

Italian desserts have a special place in my heart, especially those that highlight the creamy goodness of ricotta cheese. There’s just something about its soft texture that turns every dessert into pure bliss. From the first bite of a Sicilian cannoli to the rich indulgence of ricotta cheesecake, these treats have a way of staying with you. Ready to explore these irresistible options and find a new favorite? Let’s get started with these delightful recipes that are sure to win you over!
Classic Sicilian Cannoli With Ricotta Filling
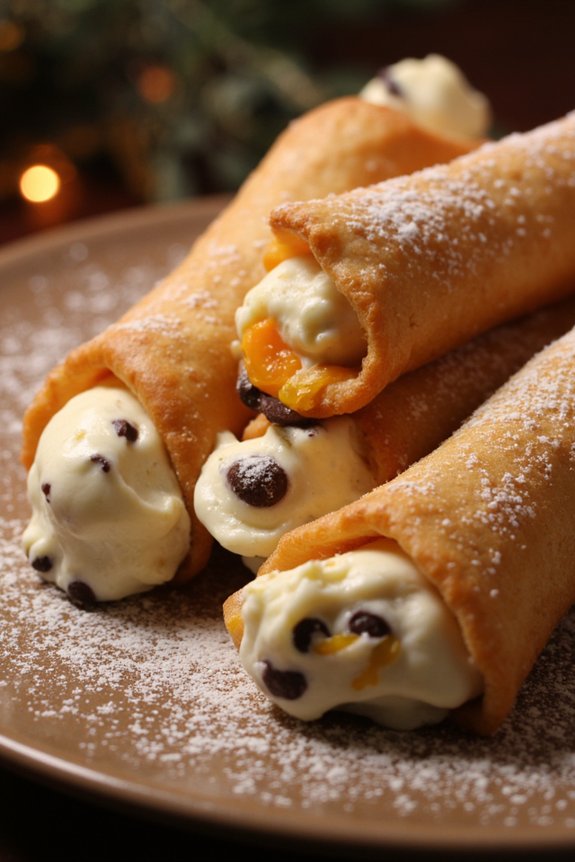
Cannoli are one of the most famous and beloved Italian desserts, originating from the beautiful island of Sicily. These delightful pastries consist of a crisp, tube-shaped shell filled with a creamy, sweet ricotta cheese mixture. Traditionally, the shells are fried to perfection and the filling is flavored with a hint of vanilla or citrus, often accompanied by chocolate chips or candied fruit.
Whether enjoyed at a festive gathering or as a special treat, cannoli bring a taste of Sicily to your table.
To prepare classic Sicilian cannoli, you’ll first need to make the pastry shells and then prepare the luscious ricotta filling. The shells are made from a simple dough that’s rolled thin, wrapped around metal tubes, and fried until golden and crispy. The ricotta filling is made by mixing fresh ricotta cheese with powdered sugar, vanilla extract, and other optional ingredients like orange zest or chocolate chips.
Once the shells are cooled, they’re filled with the sweet ricotta mixture and dusted with powdered sugar for a finishing touch.
Ingredients (serving size: 4-6 people)
*For the Cannoli Shells:*
- 2 cups all-purpose flour
- 1 tablespoon granulated sugar
- 1/4 teaspoon salt
- 3 tablespoons unsalted butter, chilled and diced
- 1 large egg yolk
- 1/2 cup Marsala wine or sweet white wine
- Vegetable oil, for frying
For the Ricotta Filling:
- 1 1/2 cups ricotta cheese, drained
- 3/4 cup powdered sugar
- 1 teaspoon vanilla extract
- 1/2 cup mini chocolate chips or candied orange peel (optional)
- Powdered sugar, for dusting
Instructions:
- Make the Dough for the Shells: In a medium bowl, combine the flour, sugar, and salt. Add the diced butter and mix with your fingers until the mixture resembles coarse crumbs. Add the egg yolk and Marsala wine, and mix until a dough forms. Knead the dough for about 5 minutes until smooth. Wrap in plastic wrap and let it rest in the refrigerator for at least 1 hour.
- Prepare the Ricotta Filling: In a large bowl, combine the drained ricotta cheese, powdered sugar, and vanilla extract. Mix until smooth. If desired, fold in the mini chocolate chips or candied orange peel. Cover and refrigerate until ready to use.
- Roll Out the Dough and Cut the Shells: Once the dough has rested, divide it into four equal pieces. Roll each piece out on a lightly floured surface until very thin (about 1/8-inch thick). Cut out circles using a 4-inch round cutter.
- Shape and Fry the Shells: Wrap each dough circle around a metal cannoli tube, sealing the edges with a little water. Heat the vegetable oil in a large pot to 350°F (175°C). Fry the shells, a few at a time, until golden brown and crisp, about 2-3 minutes. Remove and drain on paper towels. Let cool completely before removing the metal tubes.
- Fill the Cannoli: Just before serving, use a pastry bag or a small spoon to fill each shell with the ricotta mixture. Verify the filling extends slightly beyond the edges of the shell.
- Finish and Serve: Dust the filled cannoli with powdered sugar and serve immediately for the best texture.
Extra Tips:
When making cannoli, it’s important to confirm the ricotta cheese is well-drained to prevent the filling from becoming too watery. If possible, start the draining process the night before by placing the ricotta in a fine mesh strainer over a bowl and refrigerating it.
Additionally, avoid filling the shells too far in advance, as the filling can cause the shells to soften. For added flavor, consider incorporating a dash of cinnamon or a splash of almond extract into the filling. Enjoy your homemade Sicilian cannoli with a hot espresso or a sweet liqueur for an authentic Italian experience.
Heavenly Ricotta Cheesecake

Heavenly Ricotta Cheesecake is a delightful Italian dessert that combines the creamy richness of ricotta cheese with a delicate and airy texture. This cheesecake is lighter than its American counterpart, offering a melt-in-your-mouth experience that’s both satisfying and invigorating. The subtle sweetness of the ricotta cheese is beautifully complemented by a hint of citrus, making it an ideal dessert for any occasion, from casual family gatherings to elegant dinner parties.
The preparation of this cheesecake involves a crumbly crust made from crushed graham crackers or biscotti, which provides a satisfying contrast to the soft and creamy filling. The filling itself is a blend of ricotta cheese, sugar, eggs, and a touch of vanilla extract, with lemon or orange zest adding a fragrant note. Once baked to perfection, this cheesecake can be served plain or with a topping of seasonal fruits, a drizzle of honey, or a dusting of powdered sugar to enhance its visual appeal and flavor profile.
Ingredients for 4-6 People:
- 1 1/2 cups graham cracker or biscotti crumbs
- 1/4 cup unsalted butter, melted
- 1 1/2 cups ricotta cheese
- 1/2 cup granulated sugar
- 3 large eggs
- 1 teaspoon vanilla extract
- Zest of 1 lemon or orange
- Pinch of salt
- Optional toppings: fresh berries, honey, or powdered sugar
Cooking Instructions:
- Preheat the Oven: Begin by preheating your oven to 325°F (160°C). This guarantees that your cheesecake bakes evenly.
- Prepare the Crust: In a mixing bowl, combine the graham cracker or biscotti crumbs with the melted butter. Mix until the crumbs are evenly coated and resemble wet sand. Press this mixture firmly into the bottom of a 9-inch springform pan to form the crust.
- Make the Ricotta Filling: In a large bowl, whisk together the ricotta cheese, granulated sugar, eggs, vanilla extract, lemon or orange zest, and a pinch of salt. Mix until the ingredients are fully integrated and the filling is smooth.
- Assemble the Cheesecake: Pour the ricotta mixture over the prepared crust, spreading it evenly with a spatula.
- Bake the Cheesecake: Place the cheesecake in the preheated oven and bake for 50-60 minutes, or until the center is set and the top is lightly golden. The cheesecake should have a slight jiggle in the center when done.
- Cool and Serve: Allow the cheesecake to cool in the pan at room temperature for about an hour, then refrigerate for at least 2 hours before serving. This helps the cheesecake set properly and enhances the flavors.
- Add Toppings: Before serving, add your choice of toppings such as fresh berries, a drizzle of honey, or a light dusting of powdered sugar.
Extra Tips:
For the best flavor, use high-quality ricotta cheese and fresh citrus zest. It’s important to let the cheesecake cool gradually to prevent cracks on the surface. If you notice the top browning too quickly while baking, cover it lightly with aluminum foil.
For a smooth texture, confirm the ricotta filling is well-mixed, and consider using a food processor for a more uniform consistency. Remember, this cheesecake is best enjoyed chilled, so allow ample time for it to set in the fridge.
Luscious Lemon Ricotta Cake
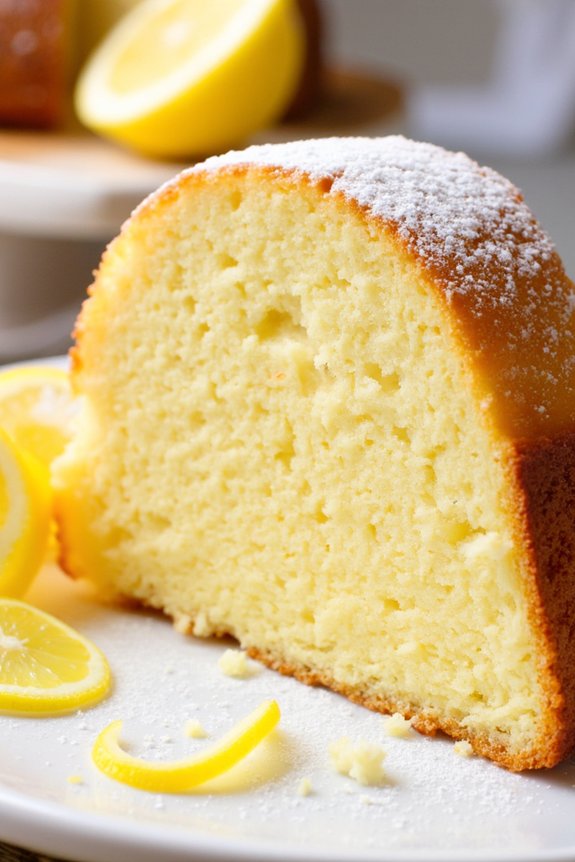
Indulge in the vibrant flavors of Italy with this delightful Luscious Lemon Ricotta Cake. A perfect blend of creamy ricotta cheese and zesty lemon, this cake is a rejuvenating treat that will transport you straight to the sun-soaked landscapes of Italy. The use of ricotta cheese not only adds a rich, moist texture to the cake but also enhances its flavor profile, making each bite a deliciously memorable experience.
This cake is perfect for any occasion, whether it be a casual afternoon tea or a sophisticated dinner party, its elegant simplicity will surely impress. This recipe yields a cake that serves 4-6 people, making it ideal for sharing with family and friends. The combination of fresh lemon zest and juice guarantees a bright and tangy flavor, while the ricotta provides a soft, tender crumb.
Serve it with a dusting of powdered sugar or a dollop of whipped cream for an added touch of sweetness. Follow the simple steps below to create this luscious dessert and enjoy a taste of Italy right in your own home.
Ingredients:
- 1 cup ricotta cheese
- 1 cup granulated sugar
- 1/2 cup unsalted butter, softened
- 3 large eggs
- 1 1/2 cups all-purpose flour
- 1 tablespoon baking powder
- 1/4 teaspoon salt
- Zest of 2 lemons
- Juice of 1 lemon
- 1 teaspoon vanilla extract
- Powdered sugar for dusting (optional)
Cooking Instructions:
- Preheat the Oven: Preheat your oven to 350°F (175°C). Grease and flour a 9-inch springform pan to prevent the cake from sticking.
- Mix Wet Ingredients: In a large mixing bowl, combine the softened butter and granulated sugar. Using an electric mixer, beat them together until the mixture is light and fluffy. This should take about 3-4 minutes.
- Add Eggs: Add the eggs to the butter-sugar mixture one at a time, beating well after each addition. This will help to incorporate air into the batter, resulting in a lighter cake.
- Incorporate Ricotta and Flavorings: Mix in the ricotta cheese, lemon zest, lemon juice, and vanilla extract. Continue to beat until the mixture is smooth and creamy.
- Combine Dry Ingredients: In a separate bowl, whisk together the flour, baking powder, and salt. Gradually add this dry mixture to the wet ingredients, folding gently with a spatula until just combined. Be careful not to overmix, as this can make the cake dense.
- Bake the Cake: Pour the batter into the prepared springform pan and smooth the top with a spatula. Bake in the preheated oven for 45-50 minutes, or until a toothpick inserted into the center comes out clean. The cake should be slightly golden on top.
- Cool and Serve: Remove the cake from the oven and allow it to cool in the pan for about 15 minutes. Carefully remove from the pan and transfer to a wire rack to cool completely. Dust with powdered sugar before serving, if desired.
Extra Tips:
For the best results, make sure all your ingredients are at room temperature before starting. This will help them blend together more smoothly and create a better texture in the finished cake.
If you want an extra lemony flavor, consider adding a bit more lemon zest. This cake can also be made a day in advance and stored in an airtight container; the flavors will meld together beautifully, making it even more delicious the next day.
Enjoy your Luscious Lemon Ricotta Cake with a cup of tea or coffee for a true Italian dessert experience.
Creamy Ricotta Panna Cotta
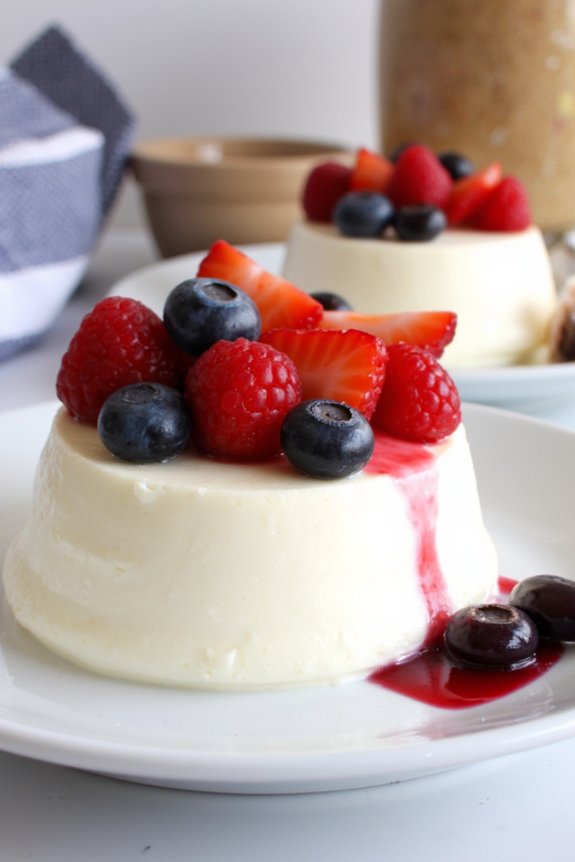
Creamy Ricotta Panna Cotta is a delightful twist on the traditional Italian dessert, offering a luscious texture and a rich, creamy flavor. This elegant dessert is perfect for entertaining, as it can be prepared in advance and requires minimal effort, yet delivers maximum satisfaction. The combination of ricotta cheese and cream results in a smooth, velvety panna cotta that pairs beautifully with fresh fruits or a simple coulis.
Whether you’re hosting a dinner party or simply indulging in a sweet treat, this Ricotta Panna Cotta is sure to impress your guests and leave them wanting more.
The key to a perfect Ricotta Panna Cotta lies in its balance of ingredients. By using high-quality ricotta cheese and fresh cream, you’ll achieve a dessert that’s both decadent and invigorating. The hint of vanilla adds a subtle sweetness, while the gelatin guarantees the panna cotta holds its shape without becoming too firm.
Served in individual portions, this dessert is as visually appealing as it’s delicious, making it an ideal choice for any occasion. Read on for the full recipe, including the ingredient list and step-by-step instructions to create this delightful dessert for 4-6 people.
Ingredients (serves 4-6):
- 1 cup ricotta cheese
- 1 cup heavy cream
- 1/2 cup whole milk
- 1/3 cup granulated sugar
- 1 teaspoon vanilla extract
- 1 packet (about 2 1/4 teaspoons) unflavored gelatin
- 3 tablespoons cold water
- Fresh fruits or fruit coulis for serving
Instructions:
- Prepare the Gelatin: Start by sprinkling the unflavored gelatin over 3 tablespoons of cold water in a small bowl. Let it sit for about 5 minutes to bloom, which will help the gelatin dissolve evenly later.
- Mix the Dairy: In a medium saucepan, combine the ricotta cheese, heavy cream, and whole milk. Stir the mixture over medium heat until it’s well combined and just begins to steam. Don’t let it come to a boil.
- Sweeten and Flavor: Add the granulated sugar and vanilla extract to the saucepan. Continue stirring until the sugar has completely dissolved. This should take about 3-4 minutes.
- Incorporate the Gelatin: Reduce the heat to low and add the bloomed gelatin to the saucepan. Stir continuously until the gelatin is fully dissolved and the mixture is smooth. This should take about 2-3 minutes.
- Strain the Mixture: For an ultra-smooth panna cotta, strain the mixture through a fine-mesh sieve into a large measuring cup or a bowl with a spout.
- Pour into Molds: Evenly pour the strained mixture into 4-6 individual ramekins or serving glasses. Cover each with plastic wrap and refrigerate for at least 4 hours, or until set.
- Serve: Once set, serve the panna cotta directly in the ramekins or gently unmold onto plates. Garnish with fresh fruits or a drizzle of fruit coulis for added flavor and presentation.
Extra Tips:
For the best texture, guarantee the ricotta cheese is smooth and free of lumps before starting. If needed, you can blend it briefly with a hand blender or food processor.
When straining the mixture, press down gently with a spatula to extract every bit of creamy goodness. This panna cotta can be made up to two days in advance, making it a convenient and impressive dessert for gatherings.
Experiment with different toppings such as crushed pistachios, honey, or chocolate shavings to add a personal touch to your creation.
Ricotta and Chocolate Chip Tiramisu
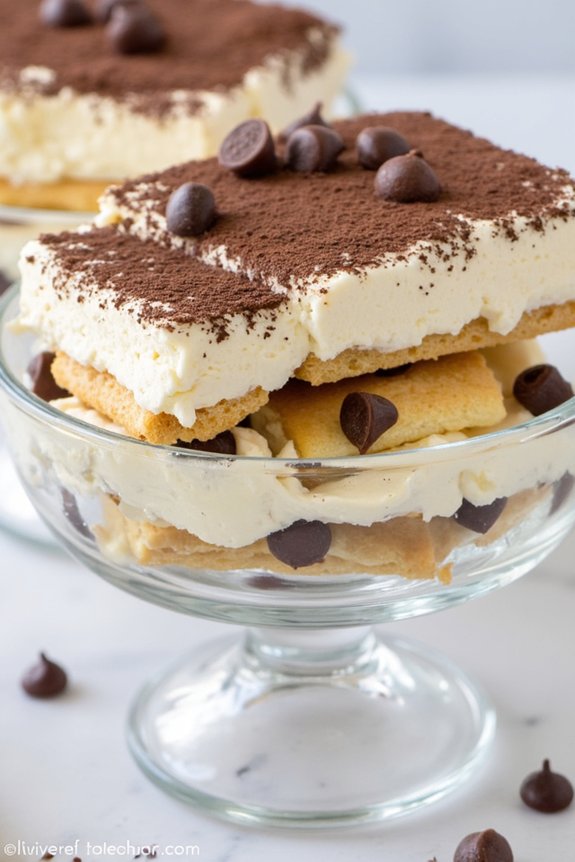
Tiramisu is a classic Italian dessert known for its rich coffee flavor and creamy texture. This Ricotta and Chocolate Chip Tiramisu is a delightful twist on the traditional recipe, incorporating the creamy goodness of ricotta cheese and the added indulgence of chocolate chips. The ricotta adds a lightness to the dessert, while the chocolate chips provide a pleasant crunch and a burst of chocolatey flavor in every bite.
This dessert is perfect for any occasion, from casual gatherings to elegant dinner parties. The combination of ricotta and mascarpone cheeses creates a smooth and luxurious filling that pairs perfectly with the coffee-soaked ladyfingers. The chocolate chips are sprinkled throughout the layers, adding a delightful surprise as you dig in.
With its harmonious blend of flavors and textures, this Ricotta and Chocolate Chip Tiramisu is bound to impress your guests and become a favorite in your dessert repertoire. Serve it in individual portions or as a show-stopping centerpiece for the whole table to enjoy.
Ingredients (serves 4-6):
- 1 cup ricotta cheese
- 1 cup mascarpone cheese
- 1/2 cup granulated sugar
- 1 teaspoon vanilla extract
- 1 cup strong brewed coffee, cooled
- 1/4 cup coffee liqueur (optional)
- 24-30 ladyfinger cookies
- 1/2 cup mini chocolate chips
- 2 tablespoons unsweetened cocoa powder
- Dark chocolate shavings, for garnish (optional)
Instructions:
- Prepare the Cheese Mixture: In a large mixing bowl, combine the ricotta cheese, mascarpone cheese, granulated sugar, and vanilla extract. Use an electric mixer or a whisk to blend until smooth and creamy. Make certain there are no lumps in the mixture for a consistent texture.
- Mix the Coffee: In a shallow dish, combine the cooled coffee and coffee liqueur (if using). Stir well to guarantee the liqueur is evenly distributed throughout the coffee.
- Assemble the Tiramisu: Quickly dip each ladyfinger into the coffee mixture, making sure they’re soaked but not soggy. Line the bottom of a 9×9-inch dish or individual serving cups with a layer of soaked ladyfingers.
- Layer the Filling: Spread half of the ricotta mixture over the layer of ladyfingers, smoothing it with a spatula. Sprinkle a layer of mini chocolate chips over the ricotta mixture.
- Repeat Layers: Add another layer of coffee-soaked ladyfingers over the ricotta mixture. Top with the remaining ricotta mixture, spreading it evenly, and sprinkle the rest of the chocolate chips on top.
- Chill and Set: Cover the dish with plastic wrap and refrigerate for at least 4 hours, or overnight if possible, to allow the flavors to meld and the dessert to set properly.
- Garnish and Serve: Before serving, dust the top with unsweetened cocoa powder and garnish with dark chocolate shavings, if desired. Cut into squares or scoop into individual dishes for serving.
Extra Tips:
For best results, verify that the coffee is completely cooled before dipping the ladyfingers to prevent them from becoming too soft. If you prefer a stronger coffee flavor, feel free to adjust the amount of coffee liqueur to your liking.
Additionally, for a more luxurious presentation, consider using a combination of dark and white chocolate chips. The tiramisu can be made a day in advance, allowing the flavors to develop even further, making it an ideal dessert for entertaining.
Delicate Ricotta and Almond Tart
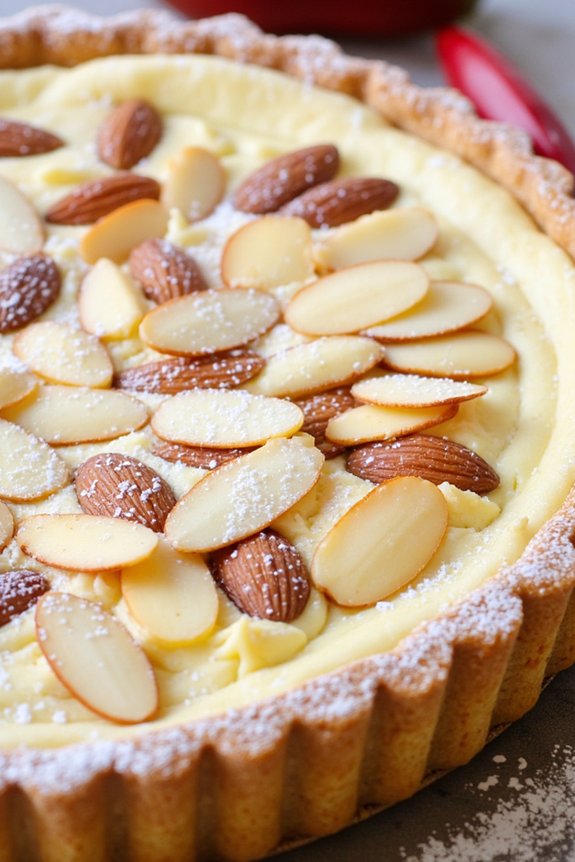
This Delicate Ricotta and Almond Tart is a classic Italian dessert that combines the creamy richness of ricotta cheese with the nutty flavor of almonds, all encased in a buttery pastry.
It’s a perfect choice for a sophisticated dinner party or a cozy family gathering. The tart is lightly sweetened, allowing the natural flavors of the ingredients to shine through, and is finished with a dusting of powdered sugar for an elegant touch.
The preparation of this tart involves creating a flaky pastry crust and a smooth, luscious filling. The ricotta provides a light, creamy texture, while the almonds add a delightful crunch.
The tart can be served warm or at room temperature, making it a versatile dessert option. This recipe yields enough to serve 4-6 people and is sure to impress your guests with its delicate balance of flavors.
Ingredients (Serves 4-6)
- 1 ½ cups all-purpose flour
- ½ cup unsalted butter, chilled and diced
- ¼ cup granulated sugar
- 1 large egg
- 1 tablespoon cold water
- 1 cup ricotta cheese
- ½ cup almond meal
- ⅓ cup powdered sugar
- 2 large eggs
- 1 teaspoon vanilla extract
- ½ teaspoon almond extract
- ¼ cup sliced almonds
- Powdered sugar for dusting
Cooking Instructions
1. Prepare the Pastry Dough: In a large bowl, combine the flour and sugar. Add the diced butter and rub it into the flour with your fingertips until the mixture resembles coarse crumbs.
Add the egg and cold water, mixing until the dough comes together. Shape into a disk, wrap in plastic wrap, and refrigerate for at least 30 minutes.
2. Preheat the Oven: Preheat your oven to 350°F (175°C). This guarantees that it reaches the right temperature by the time you’re ready to bake the tart.
3. Roll Out the Dough: On a lightly floured surface, roll out the chilled dough to fit a 9-inch tart pan. Carefully transfer the dough to the pan, pressing it into the edges.
Trim any excess dough from the edges.
4. Blind Bake the Crust: Line the pastry with parchment paper and fill with pie weights or dried beans. Blind Bake the Crust in the preheated oven for 10 minutes.
Remove the weights and parchment paper, and bake for another 5 minutes. Let it cool while preparing the filling.
5. Make the Filling: In a medium bowl, whisk together the ricotta, almond meal, powdered sugar, eggs, vanilla extract, and almond extract until smooth and well combined.
6. Assemble the Tart: Pour the ricotta filling into the cooled tart shell. Sprinkle the top with sliced almonds.
7. Bake the Tart: Bake the assembled tart in the oven for 25-30 minutes, or until the filling is set and the top is lightly golden.
Remove from the oven and allow to cool slightly.
8. Finish and Serve: Once cooled, dust the tart with powdered sugar before serving. Slice and enjoy!
Extra Tips
For best results, make sure the butter is very cold when making the pastry dough, as this helps create a flaky crust.
If the dough becomes too warm while rolling, refrigerate it again briefly to firm it up. Additionally, using fresh, high-quality ricotta will enhance the flavor and texture of the filling.
If you prefer a more pronounced almond flavor, you can increase the almond extract slightly, but be cautious, as it’s quite potent.
Finally, the tart can be stored in the refrigerator for up to 2 days, but bring it to room temperature before serving for peak taste and texture.
Fluffy Ricotta Pancakes
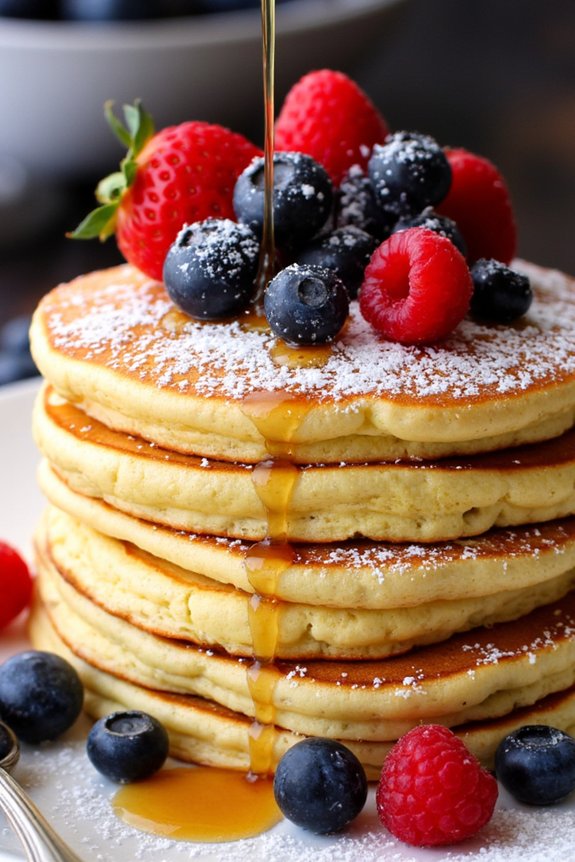
Fluffy Ricotta Pancakes offer a delightful twist on the traditional breakfast favorite. With the inclusion of creamy ricotta cheese, these pancakes become exceptionally light and tender, making them a perfect start to your day. Ideal for a weekend brunch or a special breakfast treat, the pancakes boast a delicate texture and a mild, slightly sweet flavor that pairs beautifully with maple syrup, fresh fruit, or a sprinkle of powdered sugar.
Originating from Italian culinary traditions, ricotta cheese adds a unique richness to these pancakes, setting them apart from the typical buttermilk variety. The incorporation of lemon zest enhances the flavor profile with a hint of citrus, complementing the creamy ricotta.
Whether you’re an experienced cook or a novice in the kitchen, these pancakes are simple to prepare and promise to be a crowd-pleaser, satisfying even the most discerning palates.
Ingredients (Serves 4-6):
- 1 cup ricotta cheese
- 1 cup all-purpose flour
- 2 tablespoons granulated sugar
- 1 teaspoon baking powder
- 1/4 teaspoon baking soda
- 1/4 teaspoon salt
- 3/4 cup milk
- 2 large eggs
- 1 teaspoon vanilla extract
- Zest of 1 lemon
- Butter or oil for cooking
Cooking Instructions:
- Prepare the Dry Ingredients: In a large mixing bowl, combine the flour, sugar, baking powder, baking soda, and salt. Whisk together to guarantee the ingredients are evenly distributed.
- Mix the Wet Ingredients: In a separate bowl, whisk together the ricotta cheese, milk, eggs, and vanilla extract until smooth. Stir in the lemon zest, ensuring it’s evenly mixed throughout the wet ingredients.
- Combine the Mixtures: Gradually add the wet ingredients to the dry ingredients, gently folding them together with a spatula until just combined. Be careful not to overmix, as this can result in dense pancakes.
- Preheat the Cooking Surface: Heat a non-stick skillet or griddle over medium heat. Lightly grease it with butter or oil to prevent sticking.
- Cook the Pancakes: Pour about 1/4 cup of the batter onto the skillet for each pancake. Cook until bubbles form on the surface, and the edges appear set, approximately 2-3 minutes. Flip the pancakes and cook for an additional 1-2 minutes, or until golden brown and cooked through.
- Serve: Remove the pancakes from the skillet and keep them warm until ready to serve. Top with your choice of maple syrup, fresh berries, or a dusting of powdered sugar.
Extra Tips:
For an even fluffier texture, let the batter rest for about 5-10 minutes before cooking. This allows the baking powder and baking soda to activate fully, resulting in lighter pancakes.
If you prefer a stronger lemon flavor, you can add a little lemon juice along with the zest. To prevent the pancakes from sticking, guarantee your skillet is properly preheated and greased before adding the batter.
Adjust the heat as necessary to avoid burning the pancakes – they should cook gently to achieve that perfect golden color.
Velvety Ricotta and Pear Tart
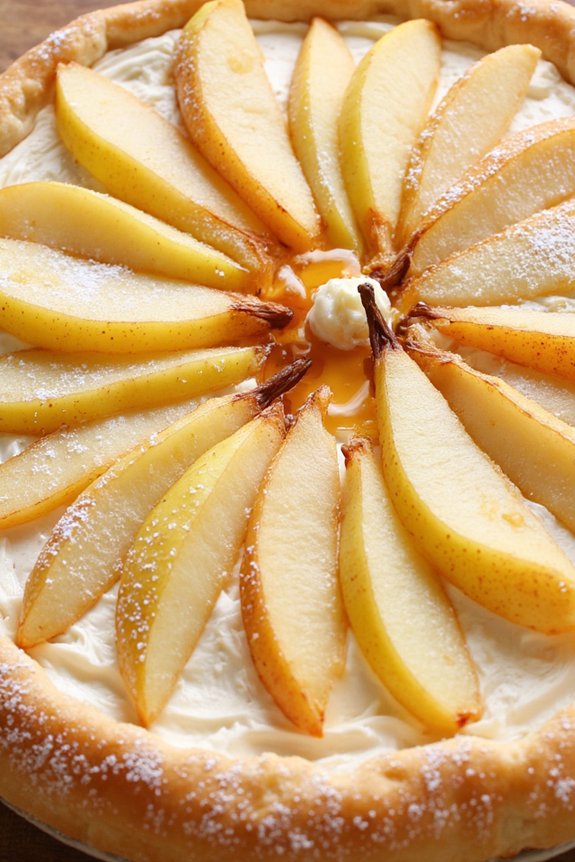
The Velvety Ricotta and Pear Tart is a delightful dessert that combines the creamy texture of ricotta cheese with the natural sweetness of ripe pears. This Italian-inspired dessert features a delicate pastry crust that cradles a luscious filling made from ricotta, sugar, and vanilla, all topped with tender slices of pear. The result is a perfectly balanced tart that’s both rich and invigorating, making it an ideal treat for any occasion.
Whether you’re hosting a dinner party or simply want to indulge in a sweet treat, this tart is sure to impress with its elegant presentation and exquisite taste.
This tart not only looks beautiful but is also incredibly easy to make. With a few simple ingredients and straightforward steps, you can create a dessert that will transport you to the charming streets of Italy. The creamy ricotta filling pairs wonderfully with the juicy pears, creating a harmonious blend of flavors.
The tart can be enjoyed warm or at room temperature, making it versatile for different serving preferences. Prepare to impress your guests with this classic Italian dessert that’s both sophisticated and comforting.
Ingredients (Serves 4-6):
- 1 sheet of puff pastry
- 1 cup ricotta cheese
- 1/4 cup granulated sugar
- 1 teaspoon vanilla extract
- 1 large egg
- 2 ripe pears, thinly sliced
- 1 tablespoon lemon juice
- 2 tablespoons honey
- 1 tablespoon confectioners’ sugar (optional, for dusting)
Cooking Instructions:
- Preheat the Oven: Begin by preheating your oven to 375°F (190°C). This will guarantee your tart bakes evenly and the pastry becomes perfectly golden.
- Prepare the Pastry: Roll out the puff pastry on a lightly floured surface to fit a 9-inch tart pan. Gently press the pastry into the pan, trimming any excess. Prick the bottom of the pastry with a fork to prevent it from puffing up during baking.
- Mix the Ricotta Filling: In a medium bowl, combine the ricotta cheese, granulated sugar, vanilla extract, and egg. Whisk until smooth and creamy. This will form the rich base of your tart.
- Prepare the Pears: Slice the pears thinly and toss them in a bowl with the lemon juice to prevent discoloration. The lemon juice will also enhance the natural sweetness of the pears.
- Assemble the Tart: Pour the ricotta mixture into the prepared pastry shell, spreading it evenly. Arrange the pear slices on top of the ricotta mixture in a circular pattern, slightly overlapping them.
- Bake the Tart: Place the tart in the preheated oven and bake for about 30-35 minutes, or until the pastry is golden and the ricotta filling is set. The pears should be tender and slightly caramelized.
- Add the Finishing Touches: Once baked, remove the tart from the oven and drizzle with honey while still warm. Allow the tart to cool slightly before dusting with confectioners’ sugar, if desired.
Extra Tips:
For the best results, make sure to use ripe but firm pears to guarantee they hold their shape during baking. If you prefer a more pronounced pear flavor, consider adding a pinch of cinnamon or nutmeg to the ricotta mixture.
To save time, you can prepare the ricotta filling in advance and refrigerate it until you’re ready to assemble the tart. Finally, serve the tart with a scoop of vanilla ice cream or a dollop of whipped cream for an extra indulgent treat.
Sweet Ricotta and Honey Fritters
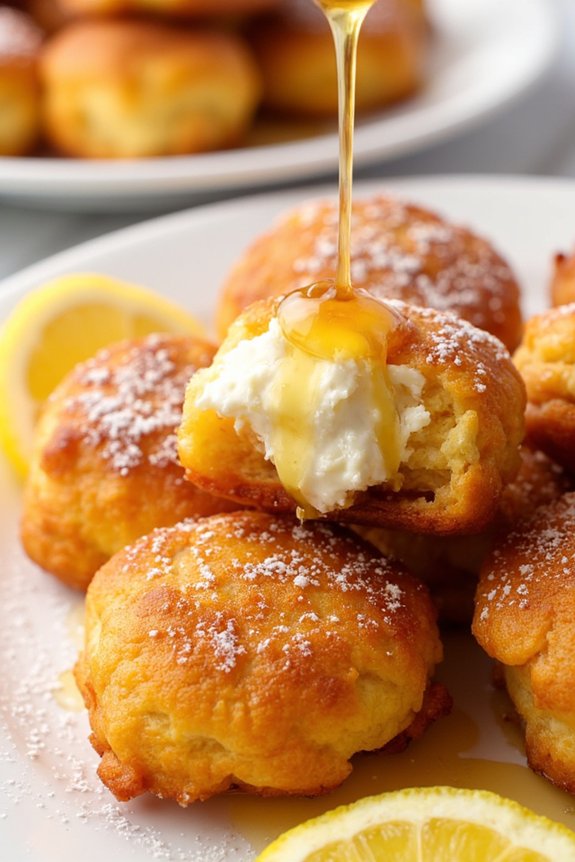
Sweet Ricotta and Honey Fritters are a delightful Italian treat that combines the creamy richness of ricotta cheese with the natural sweetness of honey. These fritters are perfect for a light dessert or a special brunch addition. The crispy exterior and soft, creamy interior make them irresistible, while the hint of citrus from lemon zest gives them a rejuvenating twist.
Whether you’re looking to impress guests or simply indulge in a sweet treat, these fritters are sure to satisfy your cravings. Originating from the traditional Italian love for simple yet flavorful desserts, Sweet Ricotta and Honey Fritters are straightforward to make and require only a handful of ingredients.
The key to their deliciousness lies in the quality of the ricotta cheese and honey used. Fresh, high-quality ricotta will guarantee the fritters are creamy and smooth, while pure honey will enhance their natural sweetness. These fritters are best served warm, sprinkled with powdered sugar or drizzled with additional honey.
Ingredients for Sweet Ricotta and Honey Fritters (Serves 4-6):
- 1 cup ricotta cheese
- 1/4 cup honey
- 2 large eggs
- 1 teaspoon vanilla extract
- 1 tablespoon lemon zest
- 1 cup all-purpose flour
- 1 teaspoon baking powder
- Pinch of salt
- Vegetable oil for frying
- Powdered sugar for dusting
- Extra honey for drizzling
Cooking Instructions:
- Prepare the Ricotta Mixture: In a large mixing bowl, combine ricotta cheese, honey, eggs, vanilla extract, and lemon zest. Mix well until the ingredients are fully integrated and the mixture is smooth.
- Combine Dry Ingredients: In a separate bowl, whisk together the flour, baking powder, and salt. This will guarantee that the dry ingredients are evenly distributed.
- Mix Wet and Dry Ingredients: Gradually add the dry ingredients to the ricotta mixture, stirring gently until just combined. Be careful not to overmix, as this can result in dense fritters.
- Heat the Oil: Pour vegetable oil into a deep frying pan or pot, enough to submerge the fritters. Heat the oil over medium heat until it reaches 350°F (175°C). You can test the oil by dropping a small piece of batter into it; if it sizzles and rises to the surface, the oil is ready.
- Fry the Fritters: Using a spoon or small ice cream scoop, drop portions of the batter into the hot oil. Fry the fritters in batches to avoid overcrowding. Cook each side for about 2-3 minutes or until they’re golden brown and cooked through.
- Drain the Fritters: Once cooked, remove the fritters from the oil using a slotted spoon and place them on a plate lined with paper towels to drain excess oil.
- Serve and Garnish: Arrange the fritters on a serving platter, dust them with powdered sugar, and drizzle with extra honey. Serve immediately while they’re warm and enjoy.
Extra Tips: For the best texture, guarantee your ricotta cheese is well-drained before mixing it with the other ingredients to prevent the batter from becoming too runny. If possible, use a kitchen thermometer to monitor the oil temperature, as maintaining the correct heat is vital for achieving perfectly crispy fritters.
If you find the batter too thick, you can add a splash of milk to reach your desired consistency. Finally, experiment with different flavorings such as orange zest or a pinch of cinnamon for a unique twist on this classic treat.
Irresistible Ricotta and Berry Parfaits
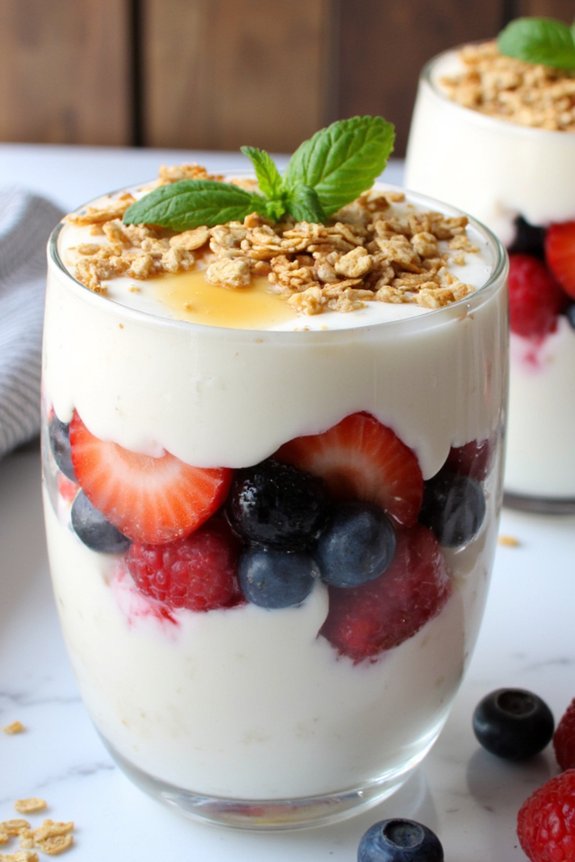
Irresistible Ricotta and Berry Parfaits are a delightful way to end any meal, offering a perfect balance of creamy, sweet, and tangy flavors. These parfaits feature layers of luscious ricotta cheese, mixed berries, and a hint of honey, all topped with a crunchy granola. The contrasting textures and flavors create a symphony in your mouth, making it an ideal dessert for any occasion.
Whether you’re planning a casual brunch or a formal dinner, these parfaits are guaranteed to impress your guests with their elegant presentation and delightful taste.
Ricotta cheese serves as the creamy base for these parfaits, providing a mild, slightly sweet flavor that pairs beautifully with fresh berries. You can use a mix of any berries you like, such as strawberries, blueberries, raspberries, or blackberries, to add both color and taste.
The addition of honey not only sweetens the ricotta but also adds a floral note that complements the natural sweetness of the berries. Finally, a sprinkle of granola on top adds a satisfying crunch, making this dessert not only delicious but also texturally exciting.
Ingredients (Serves 4-6):
- 2 cups ricotta cheese
- 1/4 cup honey
- 1 teaspoon vanilla extract
- 1 cup strawberries, hulled and quartered
- 1 cup blueberries
- 1 cup raspberries
- 1 cup granola
- Fresh mint leaves for garnish (optional)
Cooking Instructions:
- Prepare the Ricotta Mixture: In a medium-sized bowl, combine the ricotta cheese, honey, and vanilla extract. Mix well until the ingredients are thoroughly combined and the mixture is smooth and creamy.
- Prepare the Berries: Wash the berries thoroughly and pat them dry with a paper towel. Hull and quarter the strawberries if you haven’t done so already.
- Layer the Parfaits: In each serving glass or dessert bowl, begin by adding a spoonful of the ricotta mixture to form the first layer. Follow this with a layer of mixed berries. Repeat the layers until the glasses are nearly full, ending with a layer of ricotta on top.
- Add the Granola: Just before serving, sprinkle a generous amount of granola on top of each parfait. This will guarantee the granola remains crunchy and doesn’t become soggy from the moisture of the ricotta and berries.
- Garnish and Serve: If desired, garnish each parfait with a few fresh mint leaves for an added touch of color and flavor. Serve immediately and enjoy!
Extra Tips:
For a more indulgent treat, consider adding a layer of chocolate chips or a drizzle of chocolate sauce between the layers. If you like a bit of tanginess, you can mix in a tablespoon of lemon zest into the ricotta mixture.
The parfaits can be prepared a few hours in advance and stored in the refrigerator until ready to serve, but remember to add the granola just before serving to maintain its crunchiness.
Decadent Ricotta and Fig Crostata
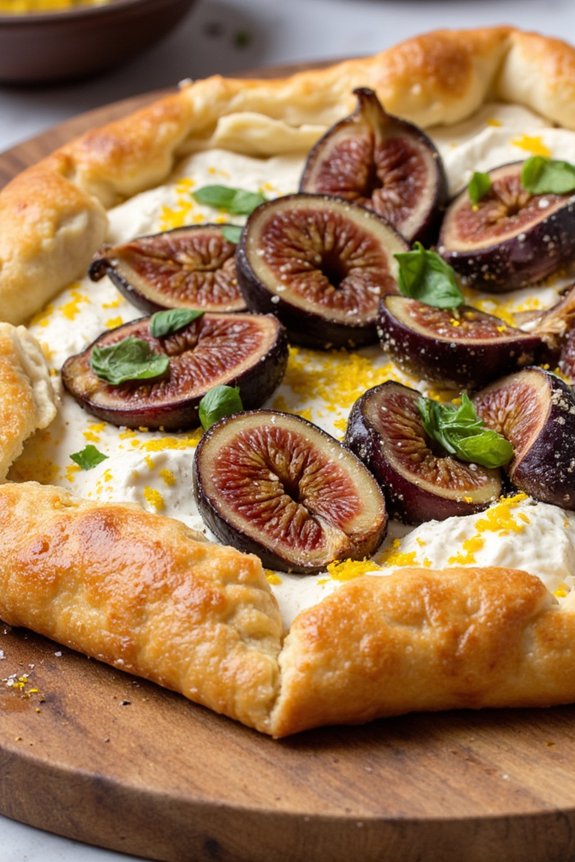
Indulge in the rich and harmonious flavors of this Decadent Ricotta and Fig Crostata—a perfect blend of creamy ricotta cheese and sweet, luscious figs cradled in a buttery, flaky crust. This Italian-inspired dessert is both simple and sophisticated, making it an ideal treat for intimate gatherings or a luxurious self-indulgence.
With its beautiful presentation and delightful taste, this crostata will certainly be the star of your dessert table. The combination of ricotta and figs provides a sumptuous contrast of textures and flavors. The ricotta is lightly sweetened and whipped to create a velvety filling, while the figs add a natural sweetness and a hint of earthiness. Together, they create a perfect balance that’s complemented by the buttery crust.
This recipe serves 4-6 people, making it a wonderful option for a family meal or a small dinner party.
Ingredients:
- 1 1/2 cups all-purpose flour
- 1/4 cup granulated sugar
- 1/2 teaspoon salt
- 1/2 cup cold unsalted butter, diced
- 1 large egg yolk
- 1/4 cup cold water
- 1 cup ricotta cheese
- 1/4 cup honey
- 1 teaspoon vanilla extract
- Zest of 1 lemon
- 8-10 fresh figs, sliced
- 1 tablespoon turbinado sugar (for sprinkling)
- 1 egg (for egg wash)
Instructions:
1. Prepare the Dough: In a large bowl, mix together the flour, granulated sugar, and salt. Add the cold butter and use a pastry cutter or your fingers to work it into the flour until the mixture resembles coarse crumbs.
In a small bowl, whisk together the egg yolk and cold water. Drizzle this over the flour mixture and stir until the dough starts to come together. Form into a disk, wrap in plastic wrap, and refrigerate for at least 30 minutes.
2. Preheat the Oven: Preheat your oven to 375°F (190°C). Line a baking sheet with parchment paper.
3. Make the Filling: In a medium bowl, combine the ricotta cheese, honey, vanilla extract, and lemon zest. Mix until smooth and creamy.
4. Roll Out the Dough: On a lightly floured surface, roll out the dough into a rough circle about 12 inches in diameter. Transfer the dough to the prepared baking sheet.
5. Assemble the Crostata: Spread the ricotta mixture evenly over the dough, leaving a 2-inch border around the edges. Arrange the fig slices decoratively over the ricotta filling.
6. Fold the Edges: Gently fold the edges of the dough over the filling, pleating as necessary to create a rustic edge. Brush the dough with the beaten egg and sprinkle the entire crostata, including the figs, with turbinado sugar.
7. Bake: Place the crostata in the oven and bake for 35-40 minutes, or until the crust is golden brown and the figs are tender. Allow to cool on the baking sheet for 10 minutes before transferring to a wire rack to cool completely.
Extra Tips: When choosing figs, look for ones that are plump and soft to the touch, as these will provide the best flavor and texture.
Feel free to experiment with different types of honey to subtly alter the sweetness of your crostata. If fresh figs aren’t available, dried figs can be used—just soak them in warm water for about 15 minutes to rehydrate them before using.
For an added touch, consider sprinkling some chopped nuts like pistachios or almonds over the top before baking.
Soft Ricotta Dumplings With Cinnamon
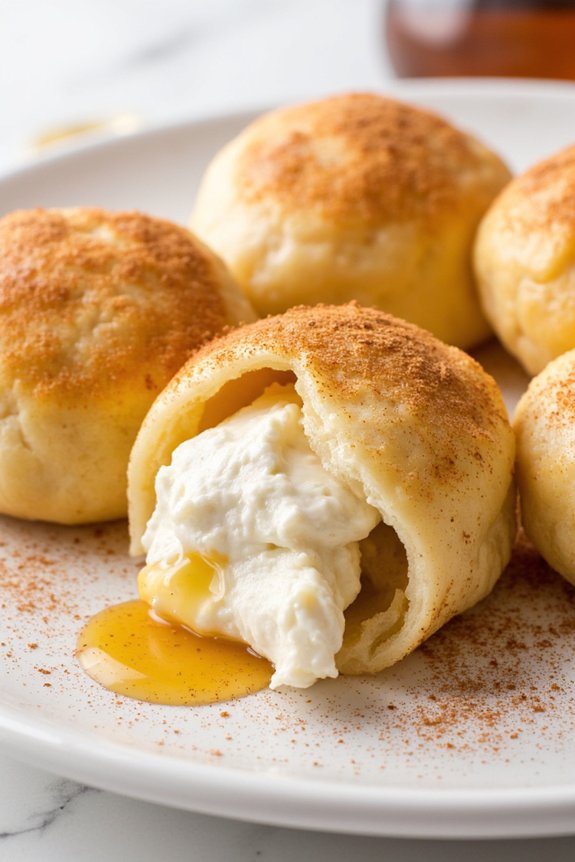
Soft Ricotta Dumplings With Cinnamon are a delightful Italian dessert that combines the rich creaminess of ricotta cheese with the warm, aromatic spice of cinnamon. This dish is perfect for those who appreciate the delicate balance of sweet and savory flavors.
The dumplings are light and fluffy, with a hint of sweetness from the ricotta and a welcoming warmth from the cinnamon. They make for a comforting dessert that’s both satisfying and elegant. Ideal for serving at a family gathering or a cozy dinner party, these dumplings are sure to impress your guests with their unique texture and taste.
The recipe is straightforward and requires minimal ingredients, allowing the natural flavors to shine through. Pair these soft ricotta dumplings with a drizzle of honey or a dusting of powdered sugar for an extra touch of sweetness, and you’ll have a dessert that’s as beautiful as it’s delicious.
Ingredients (Serves 4-6):
- 1 ½ cups ricotta cheese
- 2 large eggs
- ¾ cup all-purpose flour
- ¼ cup granulated sugar
- 1 teaspoon vanilla extract
- ½ teaspoon ground cinnamon
- 1 teaspoon baking powder
- 1 pinch of salt
- Butter for frying
- Additional ground cinnamon for dusting
- Honey or powdered sugar for serving
Cooking Instructions:
- Prepare the Ricotta Mixture: In a large mixing bowl, combine the ricotta cheese, eggs, and vanilla extract. Use a whisk or a hand mixer to blend until smooth and creamy. This guarantees that the dumplings will have a light and fluffy texture.
- Combine Dry Ingredients: In a separate bowl, sift together the all-purpose flour, granulated sugar, ground cinnamon, baking powder, and a pinch of salt. Sifting helps to evenly distribute the ingredients and adds air to the mixture, which is essential for light dumplings.
- Form the Dough: Gradually add the dry ingredients to the ricotta mixture, gently folding them in with a spatula or wooden spoon until just combined. The dough should be soft but not sticky. If it’s too sticky, add a little more flour.
- Shape the Dumplings: Using a tablespoon, scoop out portions of the dough and gently shape them into small balls or ovals with your hands. Arrange them on a lightly floured surface to prevent sticking.
- Cook the Dumplings: In a large skillet, melt a generous amount of butter over medium heat. Once the butter is hot, add the dumplings in batches, making sure not to overcrowd the pan. Cook for about 3-4 minutes on each side, or until golden brown and cooked through.
- Serve: Remove the dumplings from the skillet and drain excess butter on a paper towel. Dust with additional ground cinnamon and serve warm. For added sweetness, drizzle with honey or sprinkle with powdered sugar before serving.
Extra Tips:
For best results, confirm that the ricotta cheese is well-drained before using it in the recipe. Excess moisture can make the dough too wet, resulting in dense dumplings.
If you prefer a stronger cinnamon flavor, feel free to increase the amount of cinnamon in the dough or use it more liberally as a garnish. Additionally, these dumplings are versatile and can be paired with various toppings, such as fresh berries or a dollop of whipped cream, to suit your taste preferences. Enjoy!
Zesty Orange Ricotta Cookies

Zesty Orange Ricotta Cookies are a delightful Italian treat, perfect for those who love citrusy flavors combined with the creamy texture of ricotta cheese. These cookies are soft, cake-like, and bursting with the revitalizing taste of orange, making them an ideal dessert for any occasion.
The use of ricotta cheese not only adds moisture to the cookies but also gives them a unique texture that sets them apart from traditional cookies. Whether you’re serving them at a family gathering or enjoying them with a cup of tea, these cookies are sure to impress.
The recipe combines the tangy brightness of fresh orange zest with the subtle sweetness of ricotta cheese to create cookies that are both flavorful and satisfying. The addition of orange glaze further enhances the citrusy profile, making each bite a delightful experience.
These cookies aren’t only easy to make but also a wonderful way to incorporate the flavors of Italy into your dessert repertoire. Perfect for a serving size of 4-6 people, this recipe will quickly become a favorite in your home.
Ingredients:
- 1 cup ricotta cheese
- 1 cup granulated sugar
- 1/2 cup unsalted butter, softened
- 1 large egg
- 1 tablespoon freshly grated orange zest
- 2 tablespoons freshly squeezed orange juice
- 1 teaspoon vanilla extract
- 2 cups all-purpose flour
- 1 teaspoon baking powder
- 1/2 teaspoon baking soda
- 1/4 teaspoon salt
For the Glaze:
- 1 cup powdered sugar
- 2 tablespoons freshly squeezed orange juice
- 1 teaspoon freshly grated orange zest
Instructions:
- Preheat and Prepare Baking Sheets: Preheat your oven to 350°F (175°C). Line two baking sheets with parchment paper or silicone baking mats to prevent the cookies from sticking.
- Mix Wet Ingredients: In a large mixing bowl, combine the ricotta cheese, granulated sugar, and softened butter. Use an electric mixer to beat the mixture until it’s light and fluffy, about 2-3 minutes. Add the egg, orange zest, orange juice, and vanilla extract, and continue to mix until well combined.
- Combine Dry Ingredients: In a separate bowl, whisk together the all-purpose flour, baking powder, baking soda, and salt. Gradually add the dry ingredients to the wet mixture, mixing until just combined. Be careful not to overmix, as this can make the cookies dense.
- Shape the Cookies: Using a cookie scoop or tablespoon, drop rounded balls of dough onto the prepared baking sheets, leaving about 2 inches of space between each cookie to allow for spreading.
- Bake the Cookies: Place the baking sheets in the preheated oven and bake for 12-15 minutes, or until the edges of the cookies are lightly golden. Remove from the oven and allow the cookies to cool on the baking sheets for 5 minutes before transferring them to a wire rack to cool completely.
- Prepare the Glaze: While the cookies are cooling, prepare the glaze by whisking together the powdered sugar, orange juice, and orange zest in a small bowl until smooth and creamy.
- Glaze the Cookies: Once the cookies are completely cooled, drizzle the glaze over the top of each cookie using a spoon. Allow the glaze to set for about 15 minutes before serving.
Extra Tips:
When making Zesty Orange Ricotta Cookies, be sure to use fresh orange zest and juice for the best flavor. The freshness of the citrus is key to achieving the zesty taste that makes these cookies stand out.
Additionally, make certain that the ricotta cheese is well-drained to prevent the dough from becoming too wet. If you prefer a thicker glaze, simply add more powdered sugar until you reach the desired consistency.
These cookies can be stored in an airtight container at room temperature for up to three days, making them a convenient make-ahead dessert option.