

Italian desserts hold a special place in my heart, but finding dairy-free options that still pack a punch of flavor can be a challenge. Picture indulging in a creamy almond ricotta cannoli or refreshing coconut milk gelato, all without a trace of dairy. Each bite is light yet wonderfully rich. Join me as we explore twelve amazing recipes that turn traditional Italian delights into guilt-free treats. Curious about how these creations come to life? Let’s uncover the magic behind them.
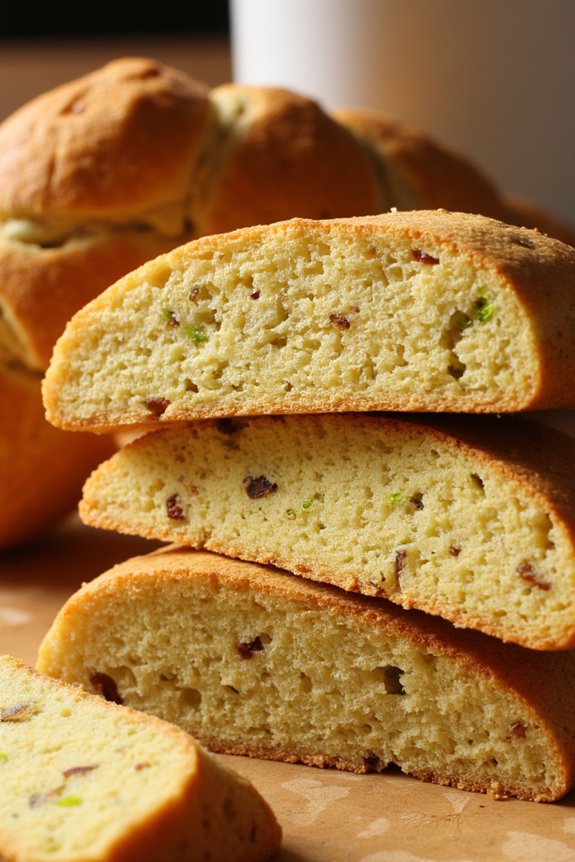
Almond Ricotta Cannoli
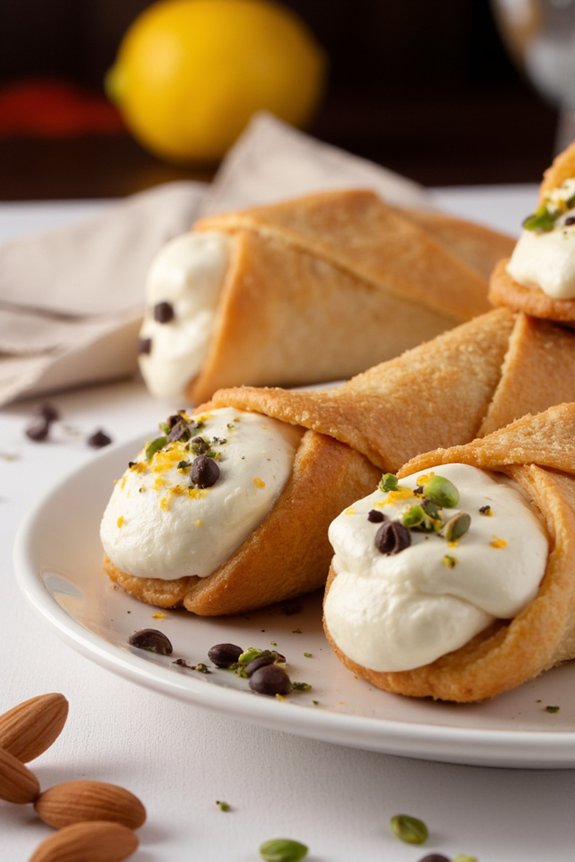
Almond Ricotta Cannoli is a delightful Italian dessert that offers a dairy-free twist on the classic cannoli. This version uses almond ricotta, a creamy and rich alternative to traditional ricotta cheese, making it suitable for those with lactose intolerance or anyone looking for a lighter option. The filling is flavored with a hint of almond and vanilla, providing a sweet and nutty taste that perfectly complements the crispy cannoli shells.
This dessert isn’t only delicious but also elegant, making it a perfect choice for entertaining guests or enjoying a special treat at home. The crispiness of the cannoli shells combined with the smooth almond ricotta filling creates a texture contrast that’s truly irresistible. The shells are traditionally deep-fried until golden brown, offering a satisfying crunch with every bite.
Meanwhile, the almond ricotta filling is light yet indulgent, accented with a touch of sweetness from powdered sugar and a hint of zest from citrus fruits. When garnished with chopped nuts or chocolate chips, these cannoli become a feast for both the eyes and the palate.
Ingredients (serving size: 4-6 people):
- 12 store-bought cannoli shells
- 2 cups almond ricotta
- 1/2 cup powdered sugar
- 1 teaspoon vanilla extract
- 1/2 teaspoon almond extract
- Zest of 1 lemon
- Zest of 1 orange
- 1/2 cup mini chocolate chips (optional)
- 1/4 cup chopped pistachios or almonds (optional)
Cooking Instructions:
- Prepare the Filling: In a medium bowl, combine the almond ricotta, powdered sugar, vanilla extract, and almond extract. Mix until the ingredients are well incorporated and the mixture is smooth and creamy.
- Add Zest: Stir in the lemon and orange zest. This adds a fresh, citrusy flavor to the filling that complements the almonds beautifully.
- Chill the Filling: Cover the bowl with plastic wrap and refrigerate the almond ricotta filling for at least 30 minutes. This chilling time allows the flavors to meld and the filling to firm up slightly, making it easier to pipe into the shells.
- Fill the Cannoli Shells: Once the filling has chilled, transfer it into a piping bag fitted with a wide tip. Carefully pipe the filling into each end of the cannoli shells, guaranteeing they’re fully filled but not overstuffed.
- Optional Garnishes: If desired, dip the ends of the filled cannoli in mini chocolate chips or chopped nuts for added texture and flavor. This step is optional but adds a delightful finishing touch to the dessert.
- Serve: Arrange the filled cannoli on a platter and serve immediately. For an added decorative touch, you can lightly dust them with extra powdered sugar before serving.
Extra Tips:
To ascertain the cannoli shells remain crisp, it’s best to fill them shortly before serving. If you fill them too far in advance, the moisture from the filling may cause the shells to soften.
Additionally, if you’re unable to find store-bought cannoli shells, you can make your own by rolling out dough, cutting it into circles, wrapping them around metal cannoli tubes, and frying until golden brown. Always confirm your almond ricotta is well-drained to achieve the desired creamy, yet firm, consistency for the filling.
Coconut Milk Gelato
Indulge in the creamy and luscious texture of Coconut Milk Gelato, a delightful dairy-free dessert that offers a tropical twist to traditional Italian gelato. This recipe harnesses the rich flavor of coconut milk, making it a perfect treat for those who are lactose intolerant or simply looking to explore new flavors.
Coconut Milk Gelato isn’t only easy to prepare but also an excellent option for a revitalizing dessert on a warm day. Its smooth consistency and subtle sweetness are sure to captivate your taste buds.
The secret to achieving the perfect gelato texture lies in the quality of the coconut milk and the technique of churning while freezing. This recipe combines coconut milk with a hint of vanilla and a touch of sugar to create a harmonious balance of flavors.
Whether you enjoy it plain or with a variety of toppings such as fresh fruits or nuts, Coconut Milk Gelato is a versatile dessert that everyone will love. This recipe yields enough for 4-6 servings, making it ideal for small gatherings or family dinners.
Ingredients for 4-6 Servings:
- 2 cans (13.5 ounces each) full-fat coconut milk
- 3/4 cup granulated sugar
- 1 tablespoon vanilla extract
- 1/4 teaspoon salt
- Optional toppings: shredded coconut, fresh berries, chopped nuts
Cooking Instructions:
- Prepare the Mixture: In a medium saucepan, combine the coconut milk, sugar, vanilla extract, and salt. Whisk the ingredients together over medium heat until the sugar has completely dissolved, and the mixture is smooth. Don’t let it boil, as you only need to warm the mixture to help dissolve the sugar.
- Cool the Base: Once the mixture is smooth, remove the saucepan from heat and allow it to cool to room temperature. For a quicker cooling process, transfer the mixture to a bowl and place it in the refrigerator for about 2 hours, or until thoroughly chilled.
- Churn the Gelato: Pour the chilled mixture into an ice cream maker and churn according to the manufacturer’s instructions. This usually takes about 20-25 minutes, depending on your machine. The goal is to achieve a soft-serve consistency.
- Freeze the Gelato: Transfer the churned gelato into an airtight container. Smooth the top with a spatula and press a piece of plastic wrap directly onto the surface to prevent ice crystals from forming. Seal the container with its lid and freeze for at least 3-4 hours, or until the gelato is firm.
- Serve and Enjoy: Before serving, let the gelato sit at room temperature for a few minutes to soften slightly. Serve in bowls and add your favorite toppings such as shredded coconut, fresh berries, or chopped nuts for added flavor and texture.
Extra Tips:
To guarantee your Coconut Milk Gelato has a smooth consistency, make sure to chill the mixture thoroughly before churning.
Using full-fat coconut milk is vital for achieving the creamy texture that resembles traditional gelato. If you prefer a less sweet gelato, you can adjust the amount of sugar to taste.
Experiment with additional flavorings such as a splash of rum or a sprinkle of cinnamon for a unique twist. Enjoy this dairy-free dessert on its own or as a base for other creative toppings.
Chocolate Hazelnut Tiramisu
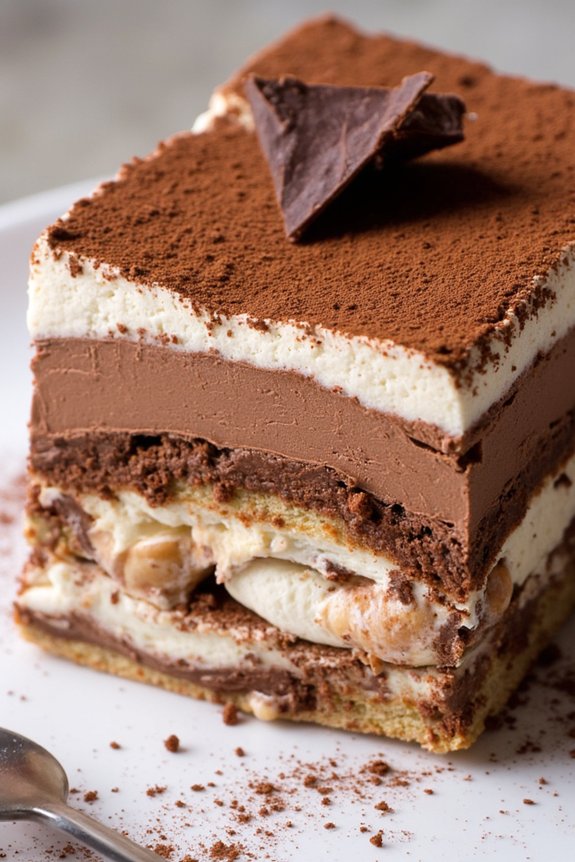
Chocolate Hazelnut Tiramisu is a delightful twist on the classic Italian dessert, offering a rich and creamy experience that remains dairy-free. This luxurious dessert maintains the essence of traditional tiramisu while incorporating the nutty flavor of hazelnuts and the deep richness of chocolate, making it a perfect treat for those who are lactose intolerant or simply looking to try something new.
By substituting traditional ingredients with dairy-free alternatives, we can enjoy the same decadent layers of flavor without compromising on taste or texture. This recipe serves 4-6 people and requires some preparation, but the results are well worth the effort.
The key to a successful Chocolate Hazelnut Tiramisu lies in the balance of flavors and the texture of the layers, which should be creamy yet firm, with a touch of sweetness from the chocolate and a hint of bitterness from the espresso. This dessert is best served chilled, making it an ideal choice for an elegant dinner party or a special family gathering.
Ingredients:
- 1 cup strong brewed espresso, cooled
- 2 tablespoons hazelnut liqueur (optional)
- 1 cup dairy-free chocolate hazelnut spread
- 1 cup full-fat coconut cream
- 1/4 cup powdered sugar
- 1 teaspoon vanilla extract
- 2 packages of dairy-free ladyfingers
- 1/4 cup cocoa powder, for dusting
- 1/4 cup chopped hazelnuts, for garnish
- Dairy-free chocolate shavings, for garnish
Instructions:
- Prepare the Coffee Mixture: In a shallow dish, combine the brewed espresso with the hazelnut liqueur (if using). Allow the mixture to cool to room temperature.
- Make the Cream Layer: In a large mixing bowl, combine the dairy-free chocolate hazelnut spread, coconut cream, powdered sugar, and vanilla extract. Use a hand mixer to blend until smooth and creamy.
- Assemble the Tiramisu: Quickly dip each ladyfinger into the espresso mixture, making sure they’re soaked but not too soggy. Arrange a layer of soaked ladyfingers at the bottom of a 9×9 inch dish.
- Layer the Cream: Spread half of the chocolate hazelnut cream mixture over the layer of ladyfingers. Use a spatula to guarantee an even layer.
- Repeat Layers: Add another layer of soaked ladyfingers on top of the cream. Follow with the remaining cream, spreading it evenly over the ladyfingers.
- Chill the Dessert: Cover the dish with plastic wrap and refrigerate for at least 4 hours or overnight. This allows the flavors to meld and the dessert to set properly.
- Garnish and Serve: Before serving, dust the top with cocoa powder. Garnish with chopped hazelnuts and dairy-free chocolate shavings for an added touch of elegance.
Extra Tips:
To guarantee your Chocolate Hazelnut Tiramisu sets properly, it’s essential to use full-fat coconut cream, as it provides the necessary richness and stability.
If you wish to enhance the hazelnut flavor, you can toast the hazelnuts before chopping them for garnish. Additionally, for a non-alcoholic version, simply omit the hazelnut liqueur without compromising the taste.
Remember to plan ahead, as allowing the tiramisu to chill overnight enhances the flavor and texture greatly.
Lemon Olive Oil Cake
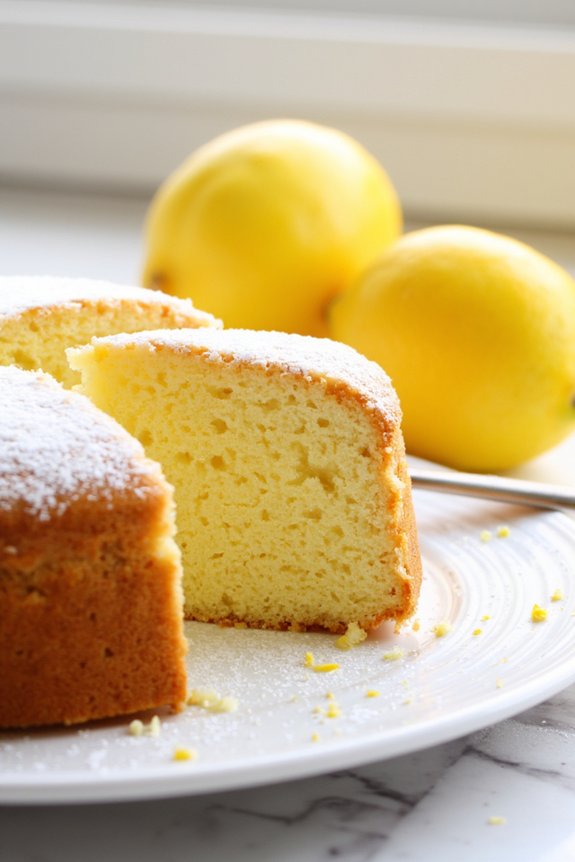
Lemon Olive Oil Cake is a wonderfully light and fragrant dessert that brings the fresh, zesty flavor of lemons together with the rich, fruity notes of olive oil. Not only is it dairy-free, but it’s also surprisingly easy to make and perfect for those who follow a dairy-free lifestyle or simply want to try something different.
The cake has a delightful crumbly texture and isn’t overly sweet, which makes it a great accompaniment to tea or coffee, or as a show-stopping end to a meal. This cake is versatile and can be served plain, dusted with powdered sugar, or with a simple glaze for added sweetness.
The use of olive oil instead of butter gives the cake a healthy twist, while the lemon adds a rejuvenating taste that’s hard to resist. It’s a perfect dessert for any occasion, be it a casual gathering or a formal dinner. The citrusy aroma will fill your kitchen, and the cake will surely impress your guests with its sophisticated yet homely appeal.
Ingredients for Lemon Olive Oil Cake (Serves 4-6):
- 1 1/2 cups all-purpose flour
- 1 cup granulated sugar
- 1/2 teaspoon baking soda
- 1/2 teaspoon baking powder
- 1/4 teaspoon salt
- 1/2 cup extra-virgin olive oil
- 1/2 cup almond milk (or any other non-dairy milk)
- 3 large eggs
- Zest of 2 lemons
- 1/4 cup fresh lemon juice
- 1 teaspoon vanilla extract
Cooking Instructions:
- Preheat the Oven: Begin by preheating your oven to 350°F (175°C). Grease a 9-inch round cake pan with olive oil or line it with parchment paper to prevent sticking.
- Mix Dry Ingredients: In a medium-sized bowl, whisk together the flour, sugar, baking soda, baking powder, and salt until well combined.
- Combine Wet Ingredients: In a separate large bowl, whisk together the olive oil, almond milk, eggs, lemon zest, lemon juice, and vanilla extract until the mixture is smooth and well incorporated.
- Combine Wet and Dry Ingredients: Gradually add the dry ingredients to the wet ingredients, stirring gently with a spatula or wooden spoon just until the batter is smooth and no lumps remain. Be careful not to overmix to maintain a light and fluffy cake.
- Pour and Bake: Pour the batter into the prepared cake pan, smoothing the top with a spatula. Place the pan in the preheated oven and bake for about 30-35 minutes, or until a toothpick inserted into the center comes out clean.
- Cool and Serve: Once baked, remove the cake from the oven and allow it to cool in the pan for about 10 minutes. Then, transfer the cake to a wire rack to cool completely. Serve plain, dust with powdered sugar, or drizzle with a simple lemon glaze if desired.
Extra Tips:
For an extra touch of flavor, you can add a pinch of rosemary to the batter for a subtle herbal note that complements the lemon.
Also, when zesting the lemons, make sure to avoid the white pith underneath the skin as it can add bitterness. If you prefer a sweeter cake, consider adding a lemon syrup glaze made by simmering equal parts lemon juice and sugar until thickened, and then drizzling it over the cooled cake.
This recipe can also be adapted to make muffins by dividing the batter into a muffin tin and adjusting the baking time to around 20-25 minutes. Enjoy experimenting with this versatile and delightful cake!
Pistachio Biscotti
Biscotti are classic Italian cookies that are well-loved for their crunchy texture and delightful flavor. Traditionally, biscotti are enjoyed with a cup of coffee or tea, making them a perfect companion for your afternoon break.
This dairy-free version of pistachio biscotti is a twist on the classic recipe, allowing those with lactose intolerance or those following a dairy-free diet to indulge in its deliciousness. The rich and nutty flavor of pistachios pairs beautifully with the subtle sweetness of the biscotti, creating a treat that’s both satisfying and irresistible.
These pistachio biscotti are easy to make and perfect for sharing with friends and family. With a golden-brown exterior and a firm, crunchy texture, they’re perfect for dipping into your favorite hot beverage. Whether you’re hosting a gathering or simply want to enjoy a homemade snack, these biscotti won’t disappoint.
Plus, they can be stored for several days, making them an excellent make-ahead option for busy schedules.
Ingredients for 4-6 Servings:
- 2 cups all-purpose flour
- 1 cup granulated sugar
- 1 teaspoon baking powder
- 1/4 teaspoon salt
- 3 large eggs
- 1 teaspoon vanilla extract
- 1 teaspoon almond extract
- 1 cup unsalted shelled pistachios, roughly chopped
Instructions:
- Preheat the Oven: Begin by preheating your oven to 350°F (175°C). Line a baking sheet with parchment paper or a silicone baking mat to prevent sticking.
- Mix Dry Ingredients: In a large bowl, whisk together the all-purpose flour, granulated sugar, baking powder, and salt until well combined.
- Prepare Wet Ingredients: In a separate bowl, beat the eggs, vanilla extract, and almond extract together until smooth.
- Combine Ingredients: Gradually add the wet ingredients to the dry ingredients, mixing until a dough forms. Stir in the chopped pistachios until evenly distributed throughout the dough.
- Shape the Dough: Divide the dough in half, and with floured hands, shape each half into a log about 12 inches long and 3 inches wide. Place the logs onto the prepared baking sheet, leaving space between them.
- First Bake: Bake the logs in the preheated oven for 25-30 minutes, or until they’re golden brown and firm to the touch. Remove from the oven and let them cool for about 10 minutes.
- Slice and Second Bake: Reduce the oven temperature to 325°F (160°C). Using a sharp serrated knife, slice each log diagonally into 1/2-inch thick slices. Lay the slices cut-side down back onto the baking sheet.
- Final Bake: Return the slices to the oven and bake for an additional 10-12 minutes, flipping them halfway through, until they’re dry and crisp. Remove from the oven and allow them to cool completely on a wire rack.
Extra Tips:
For a perfect texture, confirm that your biscotti logs are fully cooled before slicing to prevent crumbling. If you prefer a softer biscotti, reduce the second baking time slightly.
You can also experiment with adding other ingredients such as dried cranberries or chocolate chips for additional flavor variations. For an added touch, drizzle or dip the cooled biscotti in dairy-free chocolate.
Store your biscotti in an airtight container at room temperature to maintain their crunchiness for up to two weeks.
Fig and Almond Tart
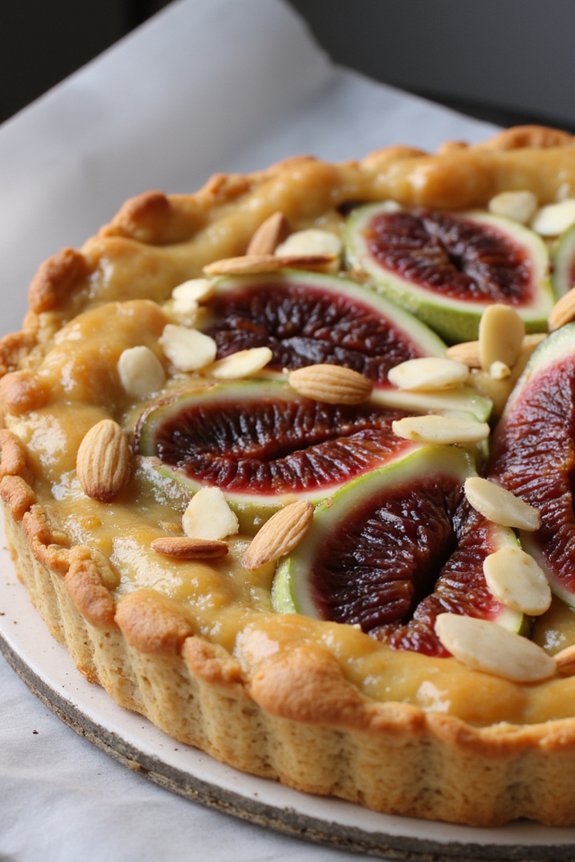
Indulge in the delightful flavors of Italy with this exquisite Fig and Almond Tart, a perfect dairy-free dessert option. This tart combines the natural sweetness of ripe figs with the nutty richness of almonds, creating a harmonious blend of flavors that will tantalize your taste buds. The buttery, crumbly crust, although dairy-free, complements the luscious fig and almond filling, making it a delightful treat for any occasion.
This Fig and Almond Tart isn’t only a feast for the eyes but also a breeze to make. The recipe calls for simple, wholesome ingredients that come together beautifully to create a dessert that’s both elegant and satisfying. Whether you’re catering to dietary restrictions or simply looking for a delicious dessert, this tart is sure to impress your family and friends.
Ingredients for 4-6 servings****:
- 1 1/2 cups all-purpose flour
- 1/2 cup almond flour
- 1/4 cup granulated sugar
- 1/2 teaspoon salt
- 1/2 cup coconut oil, solid
- 1/4 cup cold water
- 1 cup almond meal
- 1/3 cup maple syrup
- 1 teaspoon vanilla extract
- 1/2 teaspoon almond extract
- 10-12 fresh figs, sliced
- 1/4 cup sliced almonds
- 1 tablespoon powdered sugar for dusting (optional)
Instructions:
- Preheat and Prepare the Crust: Preheat your oven to 350°F (175°C). In a large mixing bowl, combine the all-purpose flour, almond flour, granulated sugar, and salt. Mix well. Add the solid coconut oil and use a fork or pastry cutter to blend it into the dry ingredients until the mixture resembles coarse crumbs. Gradually add cold water, one tablespoon at a time, mixing gently until the dough comes together.
- Roll and Bake the Crust: Roll out the dough on a lightly floured surface to fit a 9-inch tart pan. Carefully transfer the dough to the tart pan and press it into the bottom and up the sides. Trim any excess dough. Prick the bottom of the crust with a fork to prevent puffing. Bake in the preheated oven for 10-12 minutes or until lightly golden. Remove and let it cool slightly.
- Prepare the Filling: In a medium bowl, combine the almond meal, maple syrup, vanilla extract, and almond extract. Mix until smooth and evenly combined. Spread the almond filling over the cooled tart crust, smoothing it out with a spatula.
- Arrange the Figs: Arrange the sliced figs decoratively over the almond filling, slightly overlapping them. Sprinkle the sliced almonds over the figs for added texture and flavor.
- Bake the Tart: Return the tart to the oven and bake for an additional 20-25 minutes, or until the figs are tender and the filling is set. Allow the tart to cool completely in the pan.
- Serve and Enjoy: Once cooled, remove the tart from the pan, slice, and serve. Dust with powdered sugar if desired for an extra touch of sweetness and presentation.
Extra Tips:
When making this Fig and Almond Tart, make certain that the coconut oil is solid but not too hard, as this will help in achieving the perfect crumbly texture for the crust.
If your figs are particularly juicy, you may want to pat them dry slightly with a paper towel to prevent the tart from becoming soggy.
Additionally, if you find that your crust edges are browning too quickly during baking, cover them with foil to prevent over-browning.
Enjoy your tart with a cup of herbal tea for a complete Italian-inspired dessert experience.
Pear and Almond Crostata
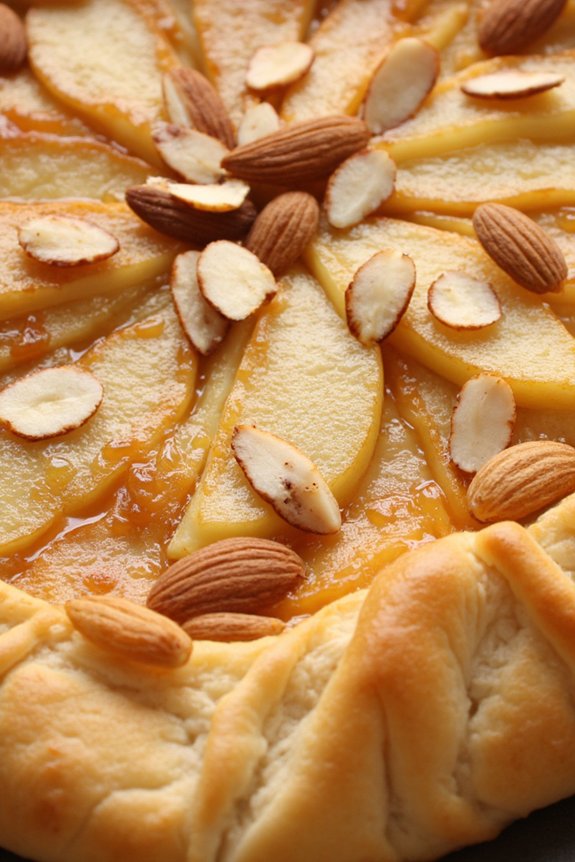
Pear and Almond Crostata is a delightful Italian dessert that offers a perfect balance between the sweetness of ripe pears and the nutty flavor of almonds. This dairy-free version maintains the classic essence of a crostata while catering to those with lactose intolerance or dietary preferences that exclude dairy. The crust is flaky and rich, made with plant-based ingredients that complement the natural sweetness of the pears.
This dessert isn’t only delicious but also a visually appealing treat that can be enjoyed as a light dessert or alongside a cup of tea or coffee.
The filling of the crostata features juicy pears that are gently spiced and nestled on a bed of almond paste, which adds a luxurious texture and depth of flavor. The almond paste is dairy-free and serves as a perfect alternative to traditional butter-based fillings. Baked to a golden brown, this dessert is a feast for the senses, with its sweet aroma, warm colors, and inviting taste.
Suitable for serving 4-6 people, this Pear and Almond Crostata is sure to impress at any gathering or family meal.
Ingredients:
- 1 1/2 cups all-purpose flour
- 1/4 cup almond flour
- 1/2 cup sugar, divided
- 1/2 teaspoon salt
- 1/2 cup coconut oil, solid
- 2-3 tablespoons ice water
- 1/2 cup almond paste
- 3 ripe pears, peeled, cored, and sliced
- 1 tablespoon lemon juice
- 1 teaspoon vanilla extract
- 1/4 teaspoon ground cinnamon
- 1/4 cup sliced almonds
Cooking Instructions:
1. Prepare the Dough: In a large mixing bowl, combine the all-purpose flour, almond flour, 1/4 cup of sugar, and salt. Add the solid coconut oil and use a pastry cutter or your fingertips to blend until the mixture resembles coarse crumbs.
Add ice water, one tablespoon at a time, mixing gently until the dough comes together. Form the dough into a disk, wrap it in plastic wrap, and refrigerate for at least 30 minutes.
2. Prepare the Filling: In a separate bowl, toss the sliced pears with lemon juice, vanilla extract, and cinnamon. Set aside to allow the flavors to meld.
3. Roll Out the Dough: Preheat your oven to 375°F (190°C). On a lightly floured surface, roll out the dough into a circle about 12 inches in diameter. Transfer the dough to a parchment-lined baking sheet.
4. Assemble the Crostata: Spread the almond paste evenly over the center of the dough, leaving a 2-inch border. Arrange the pear slices over the almond paste in a decorative pattern. Sprinkle the remaining 1/4 cup of sugar over the pears.
5. Fold the Edges: Fold the edges of the dough over the pears, pleating as necessary, to create a rustic edge. The center should remain open.
6. Add the Final Touches: Sprinkle the sliced almonds over the pears and exposed almond paste. This will add a delightful crunch and enhance the almond flavor.
7. Bake: Place the crostata in the preheated oven and bake for 35-40 minutes, or until the crust is golden brown and the pears are tender.
8. Cool and Serve: Allow the crostata to cool slightly on the baking sheet before transferring it to a wire rack. Serve warm or at room temperature.
Extra Tips:
To enhance the flavor of the pears, consider using a mix of pear varieties for added complexity. If you find the dough too sticky to work with, chill it for a bit longer or dust your rolling surface with additional flour.
For a glossy finish, brush the pears with a bit of warmed apricot jam after baking. This crostata pairs wonderfully with a scoop of dairy-free vanilla ice cream or a dollop of coconut whipped cream, making it an indulgent treat for any occasion.
Sicilian Orange Granita

Sicilian Orange Granita is a revitalizing and zesty dessert, perfect for hot summer days or as a light, palate-cleansing treat after a meal. Originating from Sicily, this classic Italian dessert is known for its simple preparation and delightful citrus flavor. The granita is a semi-frozen dessert made with fresh orange juice, sugar, and a hint of lemon, which together create a vibrant and tangy experience. This dairy-free recipe captures the essence of Sicilian cuisine, relying on the natural sweetness and fragrance of ripe oranges to deliver a burst of flavor in every spoonful.
Making Sicilian Orange Granita is an uncomplicated process that requires minimal ingredients and no special equipment. Unlike ice cream or sorbet, granita isn’t churned to a smooth consistency; instead, its texture is coarser, with ice crystals that are created through a unique freezing method. The result is a deliciously icy treat that melts in your mouth, releasing the full-bodied taste of fresh oranges. Enjoyed by people of all ages, this granita is a reflection of the timeless appeal of simple, natural ingredients.
Ingredients for 4-6 servings:
- 4 cups fresh orange juice (about 8-10 oranges)
- 1/2 cup granulated sugar
- 1/4 cup freshly squeezed lemon juice (about 1-2 lemons)
- Zest from 1 orange
Cooking Instructions:
- Juice Preparation: Start by juicing the oranges until you have four cups of fresh orange juice. Strain the juice through a fine mesh sieve to remove any pulp or seeds, ensuring a smooth liquid. Squeeze the lemon to obtain 1/4 cup of juice and set it aside.
- Combine Ingredients: In a medium saucepan, combine the orange juice, lemon juice, and orange zest. Add the granulated sugar, and stir the mixture over medium heat until the sugar has completely dissolved. This should take about 3-5 minutes. Be careful not to boil the mixture; you only need it warm enough to dissolve the sugar.
- Initial Cooling: Allow the mixture to cool to room temperature. Once cooled, pour the mixture into a shallow, freezer-safe dish. A large baking dish or a metal pan works well, as it provides more surface area for the mixture to freeze evenly.
- Freezing Process: Place the dish in the freezer. After about 30 minutes, check the granita. As it begins to freeze around the edges, use a fork to scrape the icy parts towards the center. Return the dish to the freezer.
- Scraping Method: Continue the process of scraping the mixture every 30 minutes for about 2-3 hours. This will create the classic granita texture with small, fluffy ice crystals. The granita is ready when it’s completely frozen and has a uniform crystal consistency.
- Serving: Once ready, serve the granita immediately in chilled glasses or bowls. Garnish with a slice of orange or a sprig of mint for an extra touch of elegance, if desired.
Extra Tips:
For best results, select the freshest and juiciest oranges available, as their natural sweetness and flavor are vital to the dish. If you prefer a sweeter granita, you can adjust the sugar level to your taste, but remember that the freezing process can dull flavors slightly, so it’s best to taste the mixture before freezing.
Additionally, if you find it challenging to scrape the granita into crystals, allow it to soften slightly at room temperature before attempting again. Finally, granita can be made a day in advance and stored in the freezer, but remember to scrape it again before serving to restore its fluffy texture.
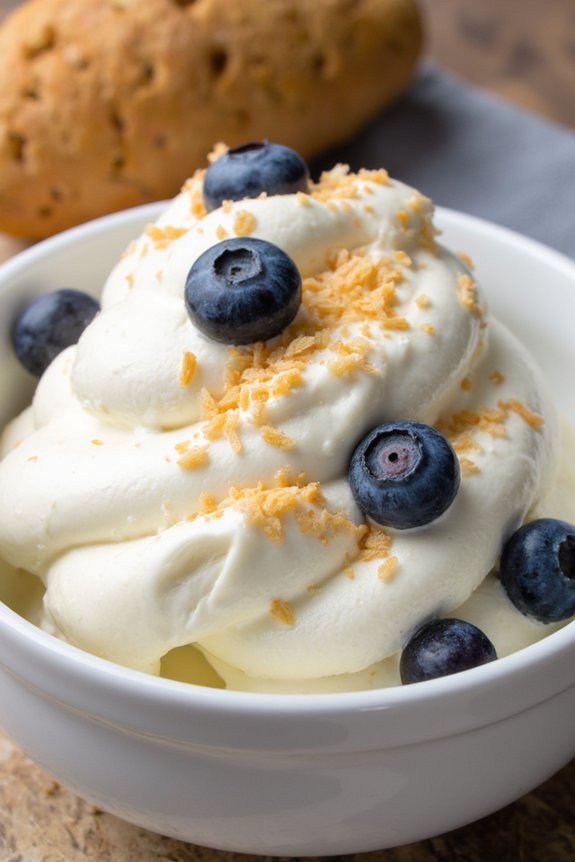
Vanilla Panna Cotta With Raspberry Coulis

Vanilla Panna Cotta with Raspberry Coulis is a delightful Italian dessert that offers a creamy, rich texture without the use of dairy. This dessert is perfect for those who are lactose intolerant or simply wish to enjoy a lighter, plant-based treat. The panna cotta is infused with the delicate flavor of vanilla and paired with a vibrant raspberry coulis, creating a perfect balance of sweetness and tanginess.
Not only is this dessert visually appealing with its contrasting colors, but it’s also easy to prepare, making it an excellent choice for both casual family dinners and more formal gatherings.
The secret to a successful panna cotta lies in achieving the right consistency – smooth and slightly wobbly, yet firm enough to hold its shape. By using a plant-based milk and cream alternative, this recipe maintains the traditional creamy texture while providing a healthier option for those avoiding dairy products. The raspberry coulis, made from fresh raspberries, adds an invigorating fruity element that complements the vanilla panna cotta beautifully.
This recipe serves 4-6 people, making it ideal for small get-togethers or a decadent family dessert.
Ingredients:
- 2 cups of almond milk
- 1 cup of coconut cream
- 1/2 cup of sugar
- 2 teaspoons of vanilla extract
- 2 teaspoons of agar-agar powder
- 2 cups of fresh raspberries
- 1/4 cup of sugar (for coulis)
- 1 tablespoon of lemon juice
Instructions:
- Prepare the Panna Cotta Mixture: In a medium saucepan, combine the almond milk, coconut cream, and sugar. Place the saucepan over medium heat, stirring occasionally, until the sugar is completely dissolved.
- Add Vanilla and Agar-Agar: Once the sugar is dissolved, add the vanilla extract and agar-agar powder. Stir well to make sure the agar-agar is evenly distributed throughout the mixture.
- Heat the Mixture: Bring the mixture to a gentle boil while stirring continuously. Allow it to boil for about 2 minutes to activate the agar-agar, making certain the mixture thickens properly.
- Pour into Molds: Remove the saucepan from the heat. Carefully pour the mixture into individual serving molds or ramekins. Let them cool at room temperature for about 20 minutes before transferring them to the refrigerator.
- Chill the Panna Cotta: Refrigerate the panna cotta for at least 4 hours or until fully set. This will guarantee they’ve the right texture and are easy to unmold.
- Prepare the Raspberry Coulis: While the panna cotta is setting, prepare the raspberry coulis. In a small saucepan, combine the raspberries, sugar, and lemon juice. Cook over medium heat until the raspberries break down and the mixture thickens slightly, about 10 minutes.
- Strain the Coulis: Remove the coulis from the heat and strain it through a fine-mesh sieve to remove the seeds, resulting in a smooth sauce. Allow it to cool completely.
- Serve: Once the panna cotta is set, gently unmold each serving onto a plate. Drizzle the raspberry coulis over the top and serve immediately.
Extra Tips:
When working with agar-agar, it’s vital to bring the mixture to a full boil to activate its gelling properties, unlike gelatin, which doesn’t require boiling. If you prefer a sweeter dessert, you can adjust the sugar levels to taste.
For an extra touch, you can garnish the panna cotta with fresh raspberries or mint leaves before serving. Additionally, make certain the panna cotta is fully set before attempting to unmold to prevent it from collapsing.
Espresso Sorbetto
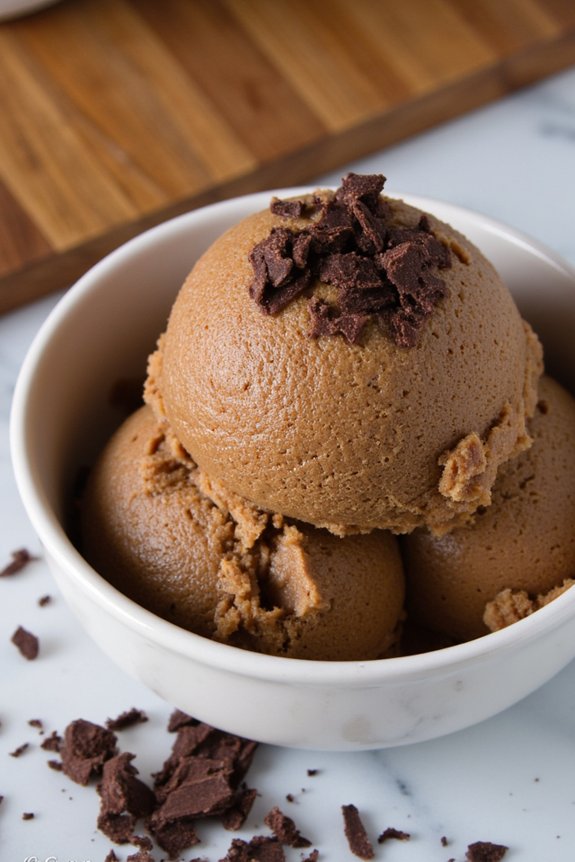
Espresso Sorbetto is a delightful dairy-free dessert that combines the bold flavors of Italian espresso with a revitalizing, icy texture. This sophisticated treat is perfect for coffee lovers looking for a cool and invigorating dessert option that doesn’t rely on cream or milk for its richness. The deep, robust taste of espresso is complemented by a subtle sweetness, making it an ideal palate cleanser or after-dinner indulgence.
The beauty of Espresso Sorbetto lies in its simplicity; it requires only a handful of ingredients and can be prepared with minimal effort. The key to achieving the perfect sorbetto texture is allowing enough time for the mixture to freeze and be churned to a smooth consistency. Whether you’re hosting a dinner party or simply seeking a unique way to enjoy your daily coffee fix, this recipe will impress with its elegance and flavor.
Ingredients (Serves 4-6):
- 2 cups strong brewed espresso, cooled
- 1 cup water
- 3/4 cup granulated sugar
- 1 tablespoon coffee liqueur (optional)
- Pinch of salt
- Grated dark chocolate or cocoa powder for garnish (optional)
Instructions:
- Prepare the Simple Syrup: In a small saucepan, combine the water and sugar. Stir over medium heat until the sugar is fully dissolved and the mixture is clear. This should take about 5 minutes. Once done, remove from the heat and let it cool to room temperature.
- Mix the Ingredients: In a medium-sized mixing bowl, combine the brewed espresso, cooled simple syrup, coffee liqueur (if using), and a pinch of salt. Stir the mixture until all the ingredients are fully incorporated.
- Chill the Mixture: Cover the bowl with plastic wrap and refrigerate for at least 2 hours, or until thoroughly chilled. Chilling is essential for achieving the best texture in the final sorbetto.
- Churn the Sorbetto: Once the mixture is chilled, pour it into an ice cream maker and churn according to the manufacturer’s instructions. This process usually takes about 20-25 minutes, depending on your machine.
- Freeze to Set: Transfer the churned sorbetto into an airtight container and freeze for an additional 2-4 hours, or until it reaches the desired firmness.
- Serve: Scoop the sorbetto into serving dishes. Optionally, garnish with grated dark chocolate or a dusting of cocoa powder for an added touch of flavor and elegance.
Extra Tips:
To achieve the best results, make sure your espresso is strong and freshly brewed; this will enhance the sorbetto’s rich coffee flavor. If you’re using an ice cream maker, be sure the bowl is pre-frozen according to the machine’s instructions.
If you don’t have an ice cream maker, you can freeze the mixture in a shallow pan and stir it every 30 minutes until it reaches a slushy consistency. Adding coffee liqueur not only boosts the flavor but also helps prevent the sorbetto from freezing too hard.
Enjoy your Espresso Sorbetto within a week for the best taste and texture.
Chocolate and Almond Biscotti

Chocolate and Almond Biscotti is a delightful Italian treat that offers a perfect blend of rich chocolate flavor and the nutty crunch of almonds. This dairy-free version of the classic biscotti is perfect for those who are lactose intolerant or simply looking to cut dairy out of their diet.
The biscotti are twice-baked, resulting in a crisp texture that’s perfect for dunking in your morning coffee, afternoon tea, or even a glass of dessert wine. This recipe makes enough biscotti for 4-6 people, making it ideal for a small gathering or to enjoy over several days.
The combination of cocoa powder and chopped almonds provides a satisfying contrast, while the inclusion of dairy-free chocolate chips guarantees that each bite is indulgent yet balanced. Easy to make and even easier to enjoy, these delectable biscotti are sure to become a staple in your dessert repertoire.
Ingredients (serves 4-6 people):
- 1 3/4 cups all-purpose flour
- 1/4 cup unsweetened cocoa powder
- 1 teaspoon baking powder
- 1/2 teaspoon salt
- 3/4 cup granulated sugar
- 2 large eggs
- 1 teaspoon vanilla extract
- 1/2 teaspoon almond extract
- 1 cup chopped almonds
- 1/2 cup dairy-free chocolate chips
Instructions:
- Preheat the Oven: Start by preheating your oven to 350°F (175°C). Line a baking sheet with parchment paper to prevent the biscotti from sticking.
- Mix Dry Ingredients: In a medium-sized bowl, combine the flour, cocoa powder, baking powder, and salt. Whisk together to make sure all dry ingredients are well incorporated.
- Prepare Wet Ingredients: In a separate large bowl, beat the sugar and eggs together until the mixture is thick and pale, about 2-3 minutes. Stir in the vanilla and almond extracts for a hint of aromatic flavor.
- Combine Ingredients: Gradually add the dry ingredients to the wet mixture, stirring until just combined. Fold in the chopped almonds and dairy-free chocolate chips, making sure they’re evenly distributed throughout the dough.
- Shape the Dough: Transfer the dough onto the prepared baking sheet. With lightly floured hands, shape the dough into a log approximately 12 inches long and 3 inches wide. Flatten the top slightly to create an even surface.
- First Bake: Bake the log in the preheated oven for 25-30 minutes, or until it feels firm to the touch. Remove from the oven and allow it to cool on a wire rack for 10 minutes.
- Slice the Biscotti: Once the log has cooled slightly, use a serrated knife to slice it diagonally into 1/2-inch thick pieces.
- Second Bake: Arrange the biscotti slices cut-side down on the baking sheet. Return them to the oven and bake for an additional 10-15 minutes, flipping them halfway through, until they’re crisp and dry.
- Cool Completely: Remove the biscotti from the oven and allow them to cool completely on a wire rack before serving.
Extra Tips:
When slicing the biscotti, use a gentle sawing motion with your serrated knife to prevent the biscotti from crumbling. For added flavor, you can toast the almonds lightly before adding them to the dough.
If you prefer a sweeter biscotti, consider drizzling melted dairy-free chocolate over the cooled slices. Remember, the second bake is essential for achieving that perfect crunchy texture, so don’t skip it! Store any leftover biscotti in an airtight container to maintain their crispness.
Strawberry Basil Semifreddo
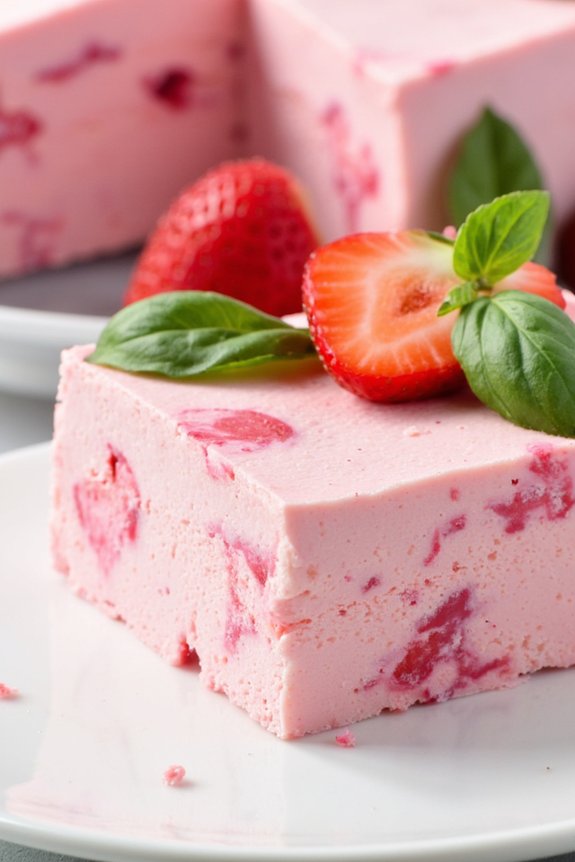
Strawberry Basil Semifreddo is a delightful Italian dessert that combines the freshness of strawberries with the aromatic essence of basil, creating a revitalizing treat that’s both dairy-free and indulgent. Semifreddo, meaning “half-frozen” in Italian, is a dessert that captures the creamy texture of ice cream without the need for an ice cream maker. This version is perfect for those looking to enjoy a creamy dessert while avoiding dairy, making it a great option for those with dietary restrictions or preferences.
The combination of strawberries and basil gives the semifreddo a unique and sophisticated flavor profile that’s sure to impress your guests.
Making Strawberry Basil Semifreddo is a straightforward process that results in a visually stunning and delicious dessert. This semifreddo is made by pureeing fresh strawberries and combining them with a mixture of coconut cream and sugar, then folding in aromatic chopped basil for a revitalizing twist.
Once frozen, the semifreddo can be sliced and served as a fancy dessert for any occasion. It’s an excellent choice for summer gatherings or a revitalizing end to a meal, offering a perfect balance of sweetness and herbal notes.
Ingredients (Serves 4-6):
- 2 cups fresh strawberries, hulled and chopped
- 1/4 cup granulated sugar
- 1 teaspoon vanilla extract
- 1 can (13.5 ounces) full-fat coconut cream, chilled
- 1/4 cup fresh basil leaves, finely chopped
- 1 tablespoon lemon juice
- Pinch of salt
Cooking Instructions:
- Prepare the Strawberry Mixture: In a blender or food processor, blend the strawberries, sugar, and lemon juice until smooth. Taste and adjust the sweetness if necessary. Pass the mixture through a fine mesh sieve to remove seeds for a smoother texture.
- Prepare the Coconut Cream: Open the chilled can of coconut cream and scoop out the solid cream into a large mixing bowl, leaving behind any liquid. Beat the cream using an electric mixer on medium speed until it becomes smooth and slightly fluffy.
- Combine Ingredients: Gently fold the strawberry puree into the whipped coconut cream until well incorporated. Add the vanilla extract, a pinch of salt, and the chopped basil, folding gently to make sure everything is evenly distributed.
- Freeze the Semifreddo: Line a loaf pan with plastic wrap, leaving some overhang on the sides for easy removal. Pour the mixture into the prepared pan, smoothing the top with a spatula. Cover with the overhanging plastic wrap and freeze for at least 4 hours, or until it’s firm enough to slice.
- Serve: To serve, remove the semifreddo from the freezer and let it sit at room temperature for about 5 minutes to soften slightly. Use the plastic wrap to lift the semifreddo out of the pan, and slice into portions. Garnish with additional fresh basil leaves or sliced strawberries if desired.
Extra Tips:
For the best results, make sure that the coconut cream is thoroughly chilled before whipping; this helps achieve the desired fluffy texture.
If desired, you can experiment with additional flavors by adding a hint of lime zest or a splash of balsamic glaze for an added depth of flavor.
This dessert can be prepared a day in advance, making it a convenient option for entertaining. Remember to store any leftovers in the freezer, tightly wrapped, to maintain the semifreddo’s texture and flavor.