

As winter’s chill envelops us, there’s nothing like the comforting warmth of Italian desserts to brighten our evenings. Picture yourself savoring a piece of tiramisu or enjoying a spoonful of creamy chocolate budino. These delightful treats don’t just satisfy sweet cravings; they wrap your home in coziness. Let’s explore these comforting flavors together, perfect for warming the coldest nights.
Classic Tiramisu
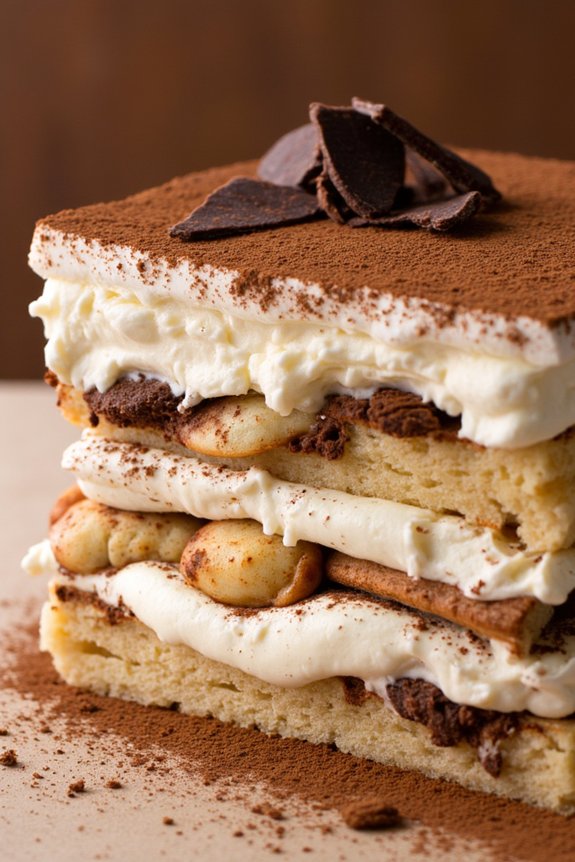
Tiramisu is a timeless Italian dessert that captures the essence of indulgence with its rich layers of coffee-soaked ladyfingers, creamy mascarpone cheese, and a dusting of cocoa powder. Originating from the Veneto region of Italy, this dessert has charmed dessert lovers across the globe.
The combination of coffee, chocolate, and cream creates a harmonious blend of flavors that’s both comforting and sophisticated. Whether you’re planning a cozy family dinner or an elegant dinner party, serving a classic tiramisu is bound to end the meal on a high note.
This recipe for classic tiramisu serves 4-6 people and guarantees that each bite is a delight. The preparation involves soaking ladyfingers in espresso, layering them with a luscious mascarpone mixture, and finishing with a dusting of cocoa powder.
It’s a simple yet elegant dessert that requires no baking, making it perfect for those who want to impress without spending hours in the kitchen. The key to a great tiramisu is using quality ingredients and allowing enough time for the flavors to meld together in the refrigerator.
Ingredients:
- 3 large eggs, separated
- 1 cup granulated sugar
- 1 cup mascarpone cheese
- 1 cup heavy cream
- 1 cup strong brewed espresso, cooled
- 1 tablespoon coffee liqueur (optional)
- 24-30 ladyfinger cookies
- Unsweetened cocoa powder, for dusting
- Dark chocolate shavings, for garnish (optional)
Instructions:
1. Prepare the Mascarpone Mixture: In a large mixing bowl, whisk the egg yolks and sugar together until the mixture is pale and creamy. Add the mascarpone cheese and mix until smooth and well combined.
2. Whip the Cream: In a separate bowl, whip the heavy cream until soft peaks form. Gently fold the whipped cream into the mascarpone mixture until fully integrated.
3. Whip Egg Whites: In another clean bowl, beat the egg whites until stiff peaks form. Carefully fold the egg whites into the mascarpone and cream mixture, taking care not to deflate the airiness.
4. Prepare the Coffee Soak: Combine the cooled espresso with coffee liqueur in a shallow dish. Quickly dip each ladyfinger into the coffee mixture, making sure they’re soaked but not soggy.
5. Assemble the Tiramisu: Layer half of the soaked ladyfingers in the bottom of a 9×9 inch baking dish or a similar-sized serving dish. Spread half of the mascarpone mixture over the ladyfingers, smoothing the top with a spatula.
Repeat with another layer of soaked ladyfingers and the remaining mascarpone mixture.
6. Chill and Serve: Cover the dish with plastic wrap and refrigerate for at least 4 hours, or overnight, to allow the flavors to meld. Before serving, dust the top with unsweetened cocoa powder and garnish with chocolate shavings if desired.
Extra Tips:
For the best results, use high-quality ingredients such as fresh espresso and authentic Italian mascarpone cheese. If you prefer a non-alcoholic version, simply omit the coffee liqueur.
Make sure ladyfingers aren’t overly soaked to prevent a soggy dessert. Tiramisu is best served chilled, so plan ahead to allow sufficient time for chilling. Additionally, you can prepare tiramisu a day in advance, as it often tastes even better the next day once the flavors have fully developed.
Rich Chocolate Budino
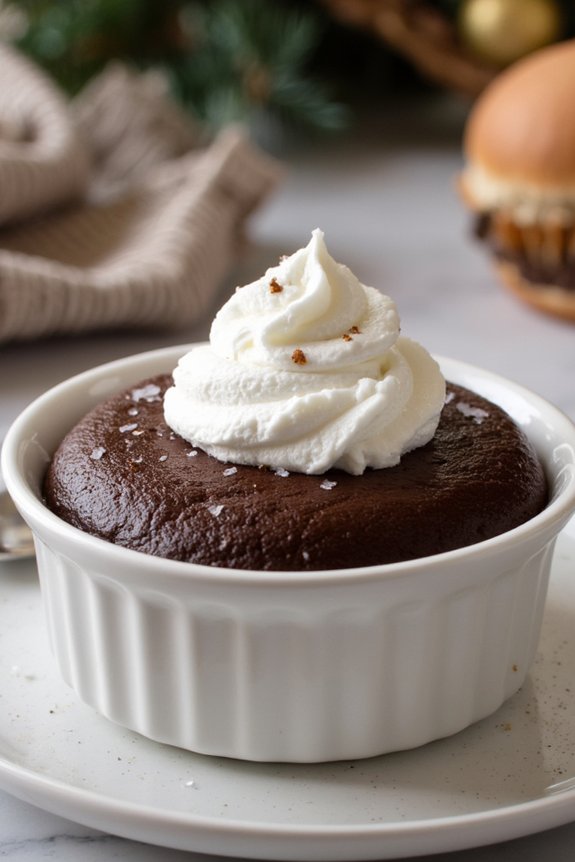
Rich Chocolate Budino is a decadent Italian dessert that perfectly captures the essence of a cozy winter night. This luscious, creamy dessert is akin to a rich chocolate pudding, but with a depth of flavor that elevates it beyond its simplicity. The word “budino” in Italian translates to “pudding,” and this dessert is a demonstration of the Italian love for exquisite, yet straightforward desserts.
It’s a perfect way to end a meal, providing warmth and comfort with every spoonful.
The Rich Chocolate Budino is made using high-quality dark chocolate, which gives it its signature rich flavor. This dessert is best served in individual ramekins, making it a charming and personal experience for each guest. The texture is smooth and velvety, and it pairs wonderfully with a dollop of whipped cream or a sprinkle of sea salt for a delightful contrast.
Whether you’re looking to impress your guests or simply treat yourself to something special, this budino is a delightful indulgence.
Ingredients (Serves 4-6):
- 1 cup (240 ml) whole milk
- 1 cup (240 ml) heavy cream
- 1/2 cup (100 g) granulated sugar
- 1/4 cup (30 g) unsweetened cocoa powder
- 1/4 teaspoon salt
- 4 ounces (115 g) dark chocolate, finely chopped
- 4 large egg yolks
- 2 teaspoons vanilla extract
- Whipped cream, for serving (optional)
- Sea salt, for garnish (optional)
Cooking Instructions:
- Prepare the Wet Ingredients: In a medium saucepan, combine the whole milk, heavy cream, granulated sugar, cocoa powder, and salt. Cook over medium heat, stirring occasionally, until the mixture is hot but not boiling, and the sugar has dissolved. This should take about 5-7 minutes.
- Melt the Chocolate: Remove the saucepan from the heat and add the finely chopped dark chocolate. Stir until the chocolate is completely melted and the mixture is smooth. This step guarantees that the chocolate is evenly distributed throughout the mixture.
- Temper the Egg Yolks: In a separate bowl, whisk the egg yolks. Gradually add a small amount of the hot chocolate mixture to the egg yolks, whisking constantly to prevent the eggs from cooking. This process is known as tempering and will help to gradually bring the temperature of the egg yolks up without scrambling them.
- Combine the Mixtures: Pour the tempered egg yolk mixture back into the saucepan with the rest of the chocolate mixture. Return the saucepan to the stove.
- Thicken the Budino: Cook over low heat, stirring constantly with a wooden spoon or heatproof spatula until the mixture thickens enough to coat the back of the spoon. This should take about 5-8 minutes. Be careful not to let the mixture boil.
- Add Vanilla Extract: Remove the saucepan from the heat and stir in the vanilla extract. This will add a lovely aroma and enhance the flavor of the budino.
- Chill the Budino: Divide the mixture evenly among individual ramekins. Cover each ramekin with plastic wrap, pressing it directly onto the surface of the budino to prevent a skin from forming. Refrigerate for at least 2 hours, or until set.
- Serve: Before serving, allow the budino to sit at room temperature for a few minutes for the best texture. Top each ramekin with a dollop of whipped cream and a sprinkle of sea salt, if desired.
Extra Tips:
When making Rich Chocolate Budino, it’s essential to use high-quality dark chocolate as it greatly impacts the dessert’s flavor. Be patient when thickening the mixture; rushing this step can result in a less smooth texture.
If you notice any lumps forming, you can strain the mixture through a fine mesh sieve before chilling. This dessert can also be made a day in advance, making it a convenient option for dinner parties. Enjoy the rich, indulgent flavors of this Italian classic in the comfort of your home.
Almond Biscotti
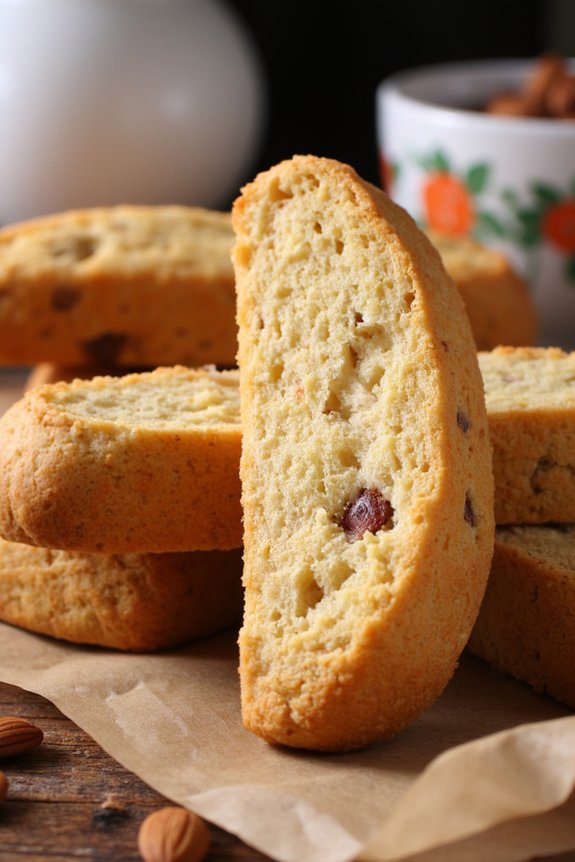
Almond Biscotti, or “Cantucci,” are classic Italian cookies that are traditionally enjoyed during the colder months, often paired with a glass of Vin Santo or a hot cup of coffee.
These twice-baked, crunchy treats are perfect for dunking and make an excellent accompaniment to holiday gatherings or a cozy evening by the fireplace. The almond flavor is pronounced, and the texture is satisfyingly crisp, making them an irresistible addition to your winter dessert repertoire.
The beauty of Almond Biscotti lies in its simplicity and the way it highlights the natural flavor of almonds. This recipe yields cookies that are slightly sweet with a hint of vanilla, and a delightful crunch that comes from both the almonds and the double baking process.
Whether you’re a seasoned baker or a novice in the kitchen, this recipe is straightforward to follow and results in professional-quality biscotti that your family and friends will love.
Ingredients for 4-6 servings:
- 2 cups all-purpose flour
- 1 cup granulated sugar
- 1 teaspoon baking powder
- 1/4 teaspoon salt
- 3 large eggs
- 1 teaspoon vanilla extract
- 1 teaspoon almond extract
- 1 cup whole almonds, toasted and coarsely chopped
- Zest of 1 orange (optional)
Cooking Instructions:
- Preheat the Oven: Begin by preheating your oven to 350°F (175°C). Line a baking sheet with parchment paper or a silicone baking mat to prevent the biscotti from sticking.
- Mix Dry Ingredients: In a large mixing bowl, whisk together the all-purpose flour, granulated sugar, baking powder, and salt until well combined.
- Blend Wet Ingredients: In another bowl, beat the eggs, vanilla extract, and almond extract together until the mixture is smooth and slightly frothy. Add the orange zest if using for an extra citrusy flavor.
- Combine Ingredients: Gradually add the wet ingredients to the dry ingredients, stirring until a dough forms. The dough should be slightly sticky but manageable. Fold in the chopped almonds, ensuring they’re evenly distributed throughout the dough.
- Shape the Dough: Divide the dough in half and shape each portion into a log about 12 inches long and 2 inches wide. Place the logs on the prepared baking sheet, leaving some space between them for expansion during baking.
- First Bake: Bake the logs in the preheated oven for 25-30 minutes, or until they’re lightly golden and firm to the touch. Remove them from the oven and allow them to cool for about 10 minutes.
- Slice the Logs: Once slightly cooled, use a serrated knife to cut the logs diagonally into 1/2-inch thick slices. For best results, cut gently to avoid crumbling.
- Second Bake: Arrange the slices, cut side down, back on the baking sheet. Bake for an additional 10-12 minutes on each side, or until the biscotti are crisp and golden brown. Allow them to cool completely on a wire rack.
Extra Tips:
When making Almond Biscotti, toasting the almonds beforehand enhances their flavor and adds an extra layer of depth to the cookies.
Be sure to watch them closely while toasting to prevent burning. If you prefer a softer biscotti, reduce the second baking time slightly.
Additionally, feel free to experiment with different nuts or add-ins, such as dried fruit or chocolate chips, to customize your biscotti to your taste. Enjoy these delightful treats with your favorite beverage for a perfect winter indulgence.
Warm Panettone Bread Pudding
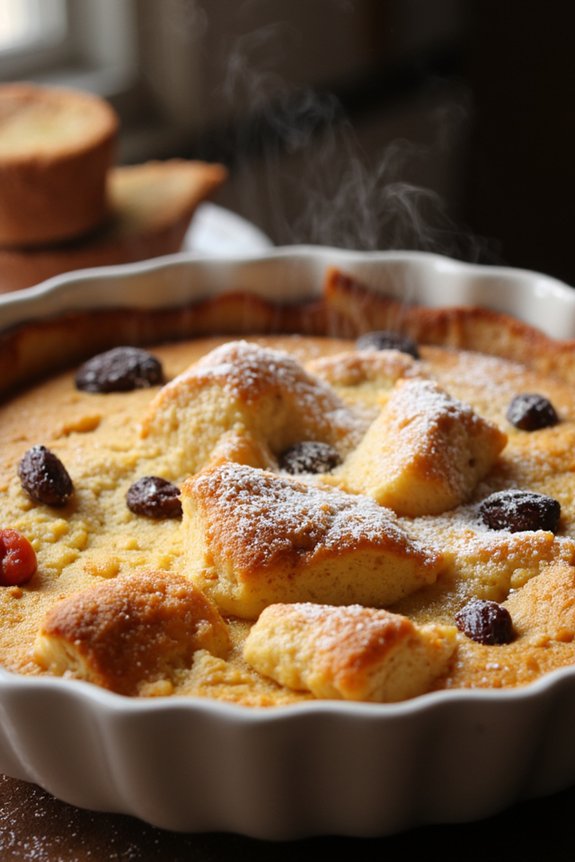
When the chilly winds of winter sweep through Italy, comforting desserts become the highlight of many family gatherings. Warm Panettone Bread Pudding is a delightful way to transform leftover panettone into a decadent dessert that warms both the heart and soul.
Panettone, a traditional Italian sweet bread dotted with raisins and candied fruits, is the perfect base for a bread pudding. This dessert marries the rich, buttery flavor of the panettone with a creamy custard, creating a luscious treat that’s perfect for the season.
This recipe is ideal for serving 4-6 people and is a wonderful way to enjoy a slice of Italian tradition during the cold months. The preparation is simple, yet the result is a sophisticated dessert that can be enjoyed at the end of a meal or as a special treat with a hot cup of coffee or tea. By using a few simple ingredients, you can create a dessert that embodies the spirit of Italian hospitality and warmth.
Ingredients (Serving Size: 4-6 people):
- 1 medium panettone (about 500g)
- 4 large eggs
- 2 cups whole milk
- 1 cup heavy cream
- 1/2 cup granulated sugar
- 1 teaspoon vanilla extract
- 1/2 teaspoon ground cinnamon
- 1/4 teaspoon salt
- 2 tablespoons unsalted butter (for greasing)
- Powdered sugar (for dusting, optional)
Cooking Instructions:
- Preheat and Prepare: Preheat your oven to 350°F (175°C). Grease a 9×13-inch baking dish with the unsalted butter to prevent sticking.
- Slice the Panettone: Cut the panettone into approximately 1-inch cubes. Arrange the cubes evenly in the prepared baking dish.
- Make the Custard: In a large mixing bowl, whisk together the eggs, whole milk, heavy cream, granulated sugar, vanilla extract, ground cinnamon, and salt until well combined.
- Combine and Soak: Pour the custard mixture over the panettone cubes in the baking dish. Gently press down on the cubes with a spatula or your hands to guarantee they soak up the liquid. Let it sit for about 15 minutes to absorb the custard.
- Bake the Pudding: Place the baking dish in the preheated oven and bake for 40-45 minutes, or until the top is golden brown and the custard is set. You should be able to insert a knife into the center and have it come out clean.
- Cool and Serve: Remove the baking dish from the oven and let it cool slightly. Dust with powdered sugar if desired. Serve warm, perhaps with a scoop of vanilla ice cream or a dollop of whipped cream for an extra touch of indulgence.
Extra Tips:
For a more flavorful twist, consider adding a splash of rum or amaretto to the custard mixture for an adult version of this dessert.
If you like your bread pudding a bit sweeter, you can increase the sugar in the custard or add a drizzle of caramel sauce on top before serving.
To guarantee the best texture, make sure to use day-old panettone, as fresh bread may become too mushy.
Finally, feel free to add in additional ingredients like chocolate chips or nuts if you want to customize your bread pudding further. Enjoy the warmth and comfort of this Italian classic!
Chestnut Cake (Castagnaccio)
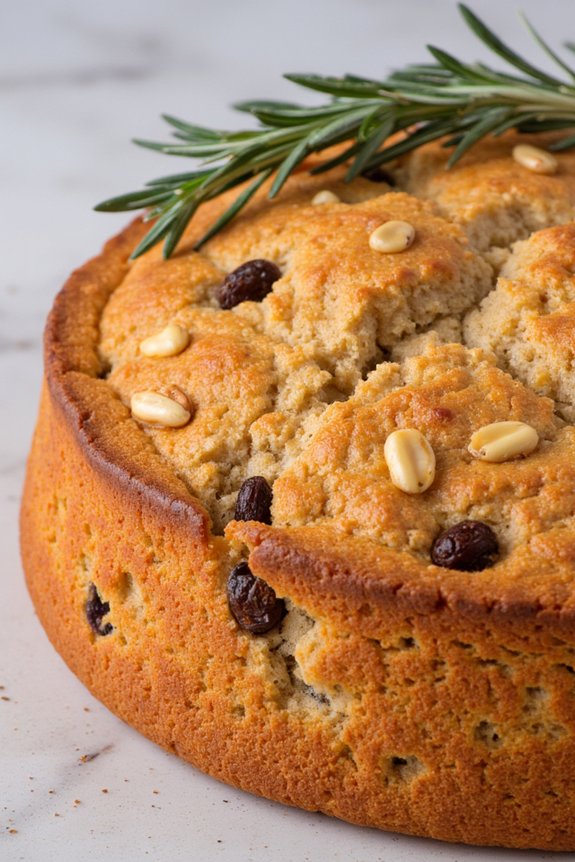
Chestnut Cake, also known as Castagnaccio, is a traditional Italian dessert originating from Tuscany. This rustic cake is made with chestnut flour, which gives it a naturally sweet and nutty flavor. Castagnaccio is often associated with the colder months, making it a perfect winter treat.
The cake is simple yet rich in taste, with a dense and moist texture. It’s typically flavored with rosemary and studded with pine nuts, raisins, and sometimes walnuts, offering a delightful combination of flavors and textures.
Castagnaccio isn’t overly sweet, making it a great option for those who prefer their desserts on the less sugary side. It’s gluten-free by nature, as it’s made entirely with chestnut flour, catering to those with dietary restrictions. This dessert pairs wonderfully with a glass of Vin Santo or a hot cup of tea, making it an ideal choice for a cozy winter afternoon.
The preparation is straightforward, requiring minimal ingredients, which makes it an accessible option even for novice bakers.
Ingredients for 4-6 servings:
- 300g chestnut flour
- 500ml water
- 50g raisins
- 50g pine nuts
- 50g walnuts (optional)
- 1 sprig of fresh rosemary
- 3 tablespoons olive oil
- Pinch of salt
- 2 tablespoons sugar
Cooking Instructions:
- Preheat the Oven: Start by preheating your oven to 180°C (350°F). This guarantees that the oven is at the right temperature when you’re ready to bake the cake.
- Soak the Raisins: Place the raisins in a small bowl and cover them with warm water. Allow them to soak for about 10 minutes to plump up. Drain and set aside.
- Prepare the Batter: In a large mixing bowl, sift the chestnut flour to remove any lumps. Gradually add water while stirring continuously to form a smooth batter. Verify there are no lumps by using a whisk.
- Add Flavorings: Stir in the olive oil, salt, and sugar into the batter. Mix well until all ingredients are fully incorporated.
- Incorporate Nuts and Raisins: Add the soaked raisins, pine nuts, and walnuts (if using) into the batter. Mix gently to distribute them evenly throughout the mixture.
- Prepare the Baking Dish: Grease a round baking dish or a cake tin with olive oil. Pour the batter into the prepared dish, spreading it evenly with a spatula.
- Top with Rosemary and Nuts: Scatter a few rosemary leaves and additional pine nuts on top of the batter for extra flavor and presentation.
- Bake the Cake: Place the dish in the preheated oven and bake for 30-35 minutes, or until the top is firm and slightly cracked. The edges should pull away from the sides of the dish.
- Cool and Serve: Remove the cake from the oven and let it cool slightly before serving. Castagnaccio is best enjoyed warm or at room temperature.
Extra Tips:
When making Castagnaccio, make sure to use good quality chestnut flour, as it greatly impacts the flavor of the cake. If you find the batter too thick, you can add a bit more water to reach the desired consistency.
This cake can be stored at room temperature for a couple of days, but it’s best consumed fresh. If you want a sweeter version, you can increase the sugar slightly or serve it with a drizzle of honey or a scoop of vanilla ice cream.
Pistachio Cannoli
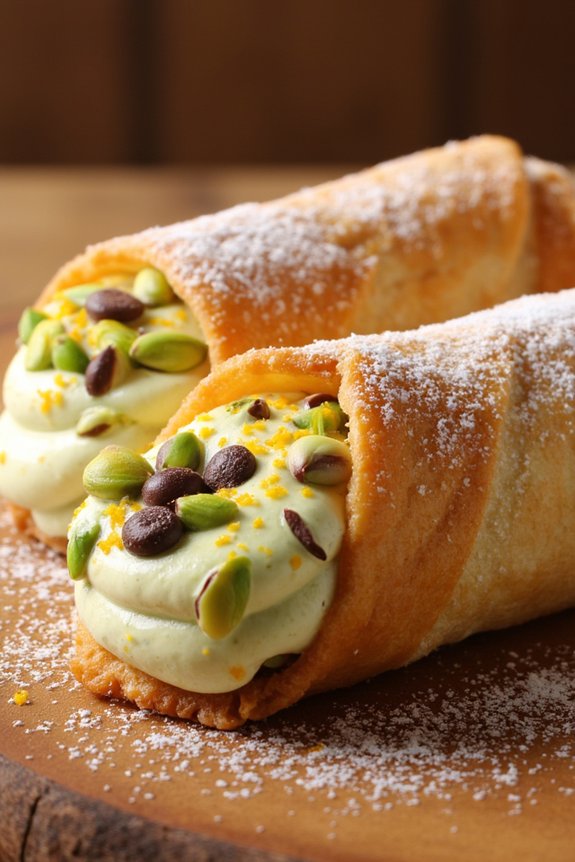
Pistachio Cannoli is a delightful Italian dessert that combines the delightful crunch of a perfectly fried pastry shell with a rich, creamy pistachio filling. This winter treat is perfect for any festive occasion or simply as a luxurious dessert to enjoy by the fireplace.
The smooth, nutty flavor of the pistachios beautifully complements the creamy ricotta cheese, creating a harmonious balance of textures and tastes. This dessert is both visually appealing and deliciously satisfying, making it a favorite among those who love Italian cuisine.
Making Pistachio Cannoli from scratch may seem intimidating, but with a bit of patience and the right ingredients, you can recreate this authentic Italian dessert in your own kitchen. The key to a perfect cannoli shell lies in the dough’s preparation and frying technique, while the filling should be smooth and packed with the flavor of fresh pistachios.
This recipe will serve 4-6 people, providing a generous serving of this decadent dessert for everyone to enjoy.
Ingredients:
- 1 ½ cups all-purpose flour
- 2 tablespoons granulated sugar
- 1 teaspoon cocoa powder
- ¼ teaspoon salt
- 3 tablespoons unsalted butter, chilled and diced
- 1 egg yolk
- ½ cup dry white wine
- Vegetable oil for frying
- 1 cup ricotta cheese, drained
- ½ cup powdered sugar
- 1 cup unsalted pistachios, finely chopped
- 1 teaspoon vanilla extract
- ¼ cup mini chocolate chips (optional)
- Zest of one orange
- Confectioners’ sugar for dusting
Instructions:
1. Prepare the Dough: In a large mixing bowl, combine the flour, sugar, cocoa powder, and salt. Add the chilled butter and rub it into the flour mixture using your fingertips until the mixture resembles coarse crumbs.
Add the egg yolk and white wine, mixing until a dough forms. Knead the dough on a lightly floured surface for about 5 minutes until smooth. Wrap in plastic wrap and refrigerate for at least 1 hour.
2. Make the Filling: In a medium bowl, combine the ricotta cheese and powdered sugar until smooth. Add the finely chopped pistachios, vanilla extract, optional chocolate chips, and orange zest. Mix well and refrigerate until ready to use.
3. Roll Out the Dough: Remove the dough from the refrigerator and divide it into two portions. Roll each portion into a thin sheet (about 1/8 inch thick) on a floured surface. Cut out circles using a 4-inch round cutter. Wrap each circle around a metal cannoli form, sealing the edges with a bit of water.
4. Fry the Shells: Heat vegetable oil in a deep saucepan or fryer to 350°F (175°C). Fry the dough-wrapped forms in batches until golden brown, about 2-3 minutes per side. Remove and drain on paper towels. Allow to cool slightly before carefully removing the cannoli forms.
5. Fill the Cannoli: Once the shells are completely cooled, use a piping bag to fill the shells with the pistachio ricotta mixture. Make certain both ends of the cannoli are filled.
6. Serve: Dust the filled cannoli with confectioners’ sugar before serving. Enjoy immediately for the freshest taste.
Extra Tips:
To guarantee your cannoli shells are perfectly crispy, make sure the dough is rolled out evenly and not too thick. If you don’t have metal cannoli forms, you can use wooden dowels or even aluminum foil shaped into tubes.
When frying, maintain a consistent oil temperature to avoid soggy shells. If the filling is too runny, drain the ricotta cheese longer or add more powdered sugar to thicken it. Finally, for a more intense pistachio flavor, consider adding a few drops of pistachio extract to the filling.
Creamy Panna Cotta With Berry Sauce
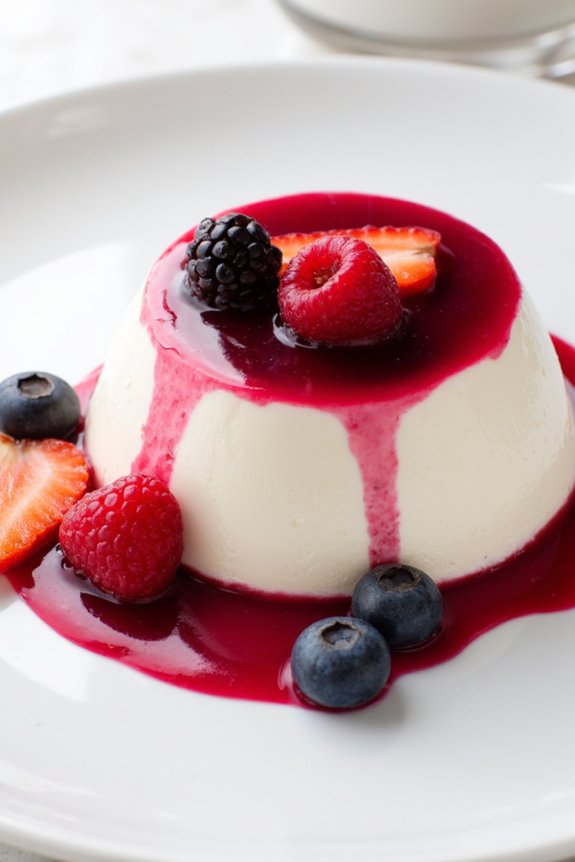
Creamy Panna Cotta With Berry Sauce is a delightful Italian dessert that’s perfect for the winter months. This luscious dessert combines the smoothness of panna cotta with the tangy freshness of a berry sauce, creating a harmonious balance of flavors and textures. It’s an elegant dish that’s surprisingly simple to prepare, making it an ideal choice for both casual gatherings and formal dinners.
The panna cotta has a rich, velvety texture that melts in your mouth, while the berry sauce adds a vibrant contrast with its sweet and slightly tart notes. This recipe serves 4-6 people and requires some basic ingredients that are likely already in your pantry or easily found at your local grocery store.
The panna cotta itself is made with cream, sugar, vanilla, and gelatin, creating a luxurious base that pairs beautifully with the berry sauce. The sauce can be made with a mix of your favorite berries, such as raspberries, strawberries, or blueberries, providing a burst of color and flavor. The combination of these elements results in a dessert that’s both visually stunning and incredibly tasty.
Ingredients:
- 2 cups heavy cream
- 1 cup whole milk
- 1/2 cup granulated sugar
- 1 teaspoon vanilla extract
- 1 packet (about 2 1/2 teaspoons) unflavored gelatin
- 3 tablespoons cold water
- 1 cup mixed berries (raspberries, strawberries, blueberries)
- 1/4 cup granulated sugar (for berry sauce)
- 1 tablespoon lemon juice
Cooking Instructions:
- Prepare the Gelatin: In a small bowl, sprinkle the gelatin over 3 tablespoons of cold water. Let it sit for about 5 minutes to bloom. This helps the gelatin dissolve easily in the cream mixture later.
- Heat the Cream Mixture: In a medium saucepan, combine the heavy cream, whole milk, and 1/2 cup of sugar. Heat over medium heat, stirring frequently, until the sugar is completely dissolved and the mixture is hot but not boiling. Remove from heat and stir in the vanilla extract.
- Incorporate the Gelatin: Add the bloomed gelatin to the hot cream mixture and stir until the gelatin is completely dissolved. This guarantees a smooth panna cotta without any lumps.
- Pour into Molds: Divide the mixture evenly among 4-6 ramekins or serving glasses. Allow them to cool to room temperature before covering with plastic wrap and refrigerating. Chill for at least 4 hours or until set.
- Prepare the Berry Sauce: In a small saucepan, combine the mixed berries, 1/4 cup of sugar, and lemon juice. Cook over medium heat, stirring occasionally, until the berries break down and the sauce thickens slightly, about 10 minutes. Remove from heat and let it cool.
- Serve: Once the panna cotta has set, remove from the refrigerator. Run a thin knife around the edge of each panna cotta to loosen if you wish to unmold them, or serve directly in the ramekins. Spoon the berry sauce over the top of each panna cotta before serving.
Extra Tips:
For the best results, allow the panna cotta to chill overnight to guarantee it’s fully set. If you’re short on time, you can speed up the cooling process by placing the ramekins in a larger pan filled with ice water before refrigerating.
When making the berry sauce, feel free to use frozen berries if fresh ones aren’t available; just make sure to adjust the cooking time as needed. If you prefer a smoother sauce, you can strain it through a fine-mesh sieve to remove the seeds. Enjoy this creamy Italian dessert with a glass of sweet dessert wine for an added touch of indulgence.
Ricotta and Lemon Zeppole
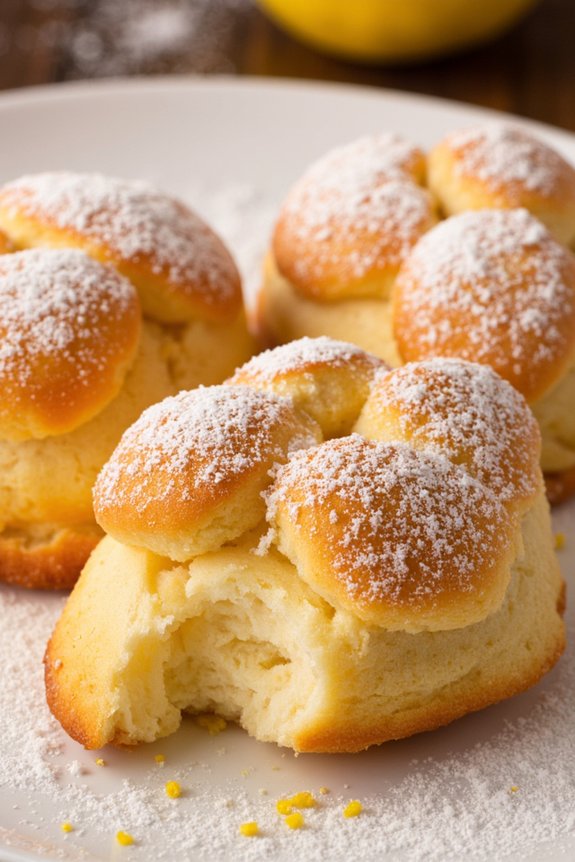
Imagine biting into a warm, doughy treat that’s lightly crisp on the outside, with a soft, fluffy interior that carries the subtle sweetness of ricotta and the zesty brightness of lemon. That’s exactly what you get with Ricotta and Lemon Zeppole, a traditional Italian dessert that’s perfect for the winter months.
These delightful doughnuts are a favorite in Italy, particularly during festive occasions, but they can be enjoyed anytime you crave a comforting sweet treat. The combination of creamy ricotta and fresh lemon zest in the batter guarantees a rich flavor that’s both satisfying and invigorating, making these zeppole a perfect way to end a hearty winter meal.
Cooking up a batch of Ricotta and Lemon Zeppole is simpler than you might think, and they’re sure to impress your family and friends. The process involves creating a rich batter, frying it into golden perfection, and then dusting the finished zeppole with powdered sugar for an irresistible finish.
This recipe is designed to serve 4-6 people, making it ideal for small gatherings or family dinners. Whether you’re a seasoned cook or a beginner in the kitchen, these zeppole are a delightful project that will reward you with the comforting aromas and flavors of Italy.
Ingredients (serving size: 4-6 people):
- 1 cup ricotta cheese
- 2 large eggs
- Zest of 1 lemon
- 1/2 cup granulated sugar
- 1 teaspoon vanilla extract
- 1 cup all-purpose flour
- 2 teaspoons baking powder
- A pinch of salt
- Vegetable oil (for frying)
- Powdered sugar (for dusting)
Cooking Instructions:
- Prepare the Batter: In a large mixing bowl, combine the ricotta cheese, eggs, lemon zest, granulated sugar, and vanilla extract. Mix thoroughly until you achieve a smooth consistency.
- Add Dry Ingredients: In another bowl, whisk together the flour, baking powder, and salt. Gradually add this dry mixture to the wet ingredients, stirring gently until everything is well combined. The batter should be thick and sticky.
- Heat the Oil: Pour vegetable oil into a deep pan or skillet to a depth of about 2 inches. Heat the oil over medium-high heat until it reaches around 350°F (175°C). Use a thermometer for accuracy, as the right temperature is key to achieving the perfect texture.
- Fry the Zeppole: Using a small ice cream scoop or two spoons, carefully drop tablespoon-sized portions of the batter into the hot oil. Fry the zeppole in batches, being careful not to overcrowd the pan. Cook each batch for about 3-4 minutes, turning occasionally, until they’re golden brown on all sides.
- Drain and Cool: Use a slotted spoon to remove the zeppole from the oil, and transfer them to a plate lined with paper towels to drain any excess oil. Allow them to cool slightly.
- Dust with Sugar: Once the zeppole are warm (not hot), dust them generously with powdered sugar before serving.
Extra Tips:
For the best results, verify the oil is at the correct temperature before frying, as too cool oil will make the zeppole greasy and too hot oil can burn them. If you don’t have a thermometer, test the oil with a small piece of batter; it should sizzle and float to the surface.
Additionally, freshly made zeppole are best enjoyed warm. If you need to reheat them, do so in a warm oven for a few minutes to maintain their crispiness. Finally, feel free to experiment by adding a splash of limoncello to the batter for an extra kick of lemony flavor.
Hazelnut Semifreddo

As the winter chill sets in, there’s nothing quite like indulging in a creamy, rich dessert that warms the heart and delights the senses. Hazelnut Semifreddo is a classic Italian treat that perfectly fits the bill. This frozen dessert is a harmonious blend of creamy textures and nutty flavors, making it an elegant option for any festive meal or cozy evening at home.
Unlike traditional ice cream, semifreddo doesn’t require churning, which makes it incredibly easy to prepare without the need for an ice cream maker.
The base of this dessert is a luscious cream mixture infused with the warm, toasty notes of roasted hazelnuts. With each spoonful, you’ll experience a delightful contrast between the creamy semifreddo and the crunchy bits of hazelnuts that add a wonderful texture. The recipe below serves 4-6 people, making it perfect for a small gathering or a family dinner. It’s a dessert that can be prepared in advance, allowing you to enjoy your time with guests without any last-minute stress.
Ingredients:
- 1 cup whole hazelnuts, toasted and peeled
- 1/2 cup granulated sugar
- 4 large eggs, separated
- 1 teaspoon vanilla extract
- 1 1/2 cups heavy cream
- Pinch of salt
Instructions:
- Prepare the Hazelnuts: Begin by preheating your oven to 350°F (175°C). Spread the hazelnuts on a baking sheet and toast them in the oven for about 8-10 minutes, or until they’re fragrant and slightly golden. Once done, let them cool, then rub them in a kitchen towel to remove the skins. Coarsely chop the hazelnuts and set aside.
- Make the Egg Mixture: In a heatproof bowl, combine the egg yolks and half of the sugar. Place the bowl over a saucepan of simmering water (making sure the bowl doesn’t touch the water) and whisk constantly until the mixture becomes thick and pale, about 5 minutes. Remove from heat and stir in the vanilla extract. Let it cool to room temperature.
- Whip the Cream: In a separate large bowl, whip the heavy cream with a hand mixer or stand mixer until soft peaks form. Carefully fold the cooled egg yolk mixture into the whipped cream using a spatula.
- Beat the Egg Whites: In another clean bowl, add the egg whites and a pinch of salt. Beat them until soft peaks form, then gradually add the remaining sugar, continuing to beat until stiff peaks form.
- Combine Mixtures: Gently fold the egg whites into the egg yolk and cream mixture, being careful not to deflate the mixture. Once combined, fold in the chopped hazelnuts.
- Freeze the Semifreddo: Line a loaf pan with plastic wrap, leaving enough overhang on the sides to cover the top later. Pour the semifreddo mixture into the pan, smoothing the top with a spatula. Cover with the overhanging plastic wrap and freeze for at least 6 hours or overnight until firm.
- Serve: To serve, unwrap the plastic wrap from the top of the semifreddo and invert it onto a serving platter. Remove the plastic wrap completely and slice the semifreddo with a sharp knife. Serve immediately.
Extra Tips:
For the best texture and flavor, verify that the hazelnuts are well-toasted, as this enhances their natural oils and flavor.
When folding the mixtures together, be gentle to maintain the airy texture of the semifreddo. If you’re preparing this dessert in advance, it can be stored in the freezer for up to two weeks.
For an added touch, consider drizzling with a bit of chocolate ganache or serving with fresh berries to complement the nutty flavors of the hazelnut semifreddo.
Caramelized Pear Crostata
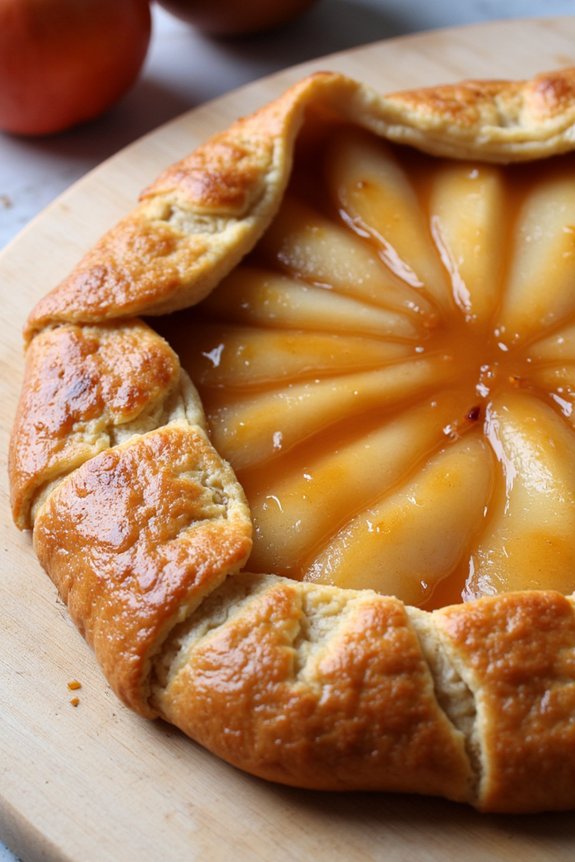
Caramelized Pear Crostata is a delightful Italian winter dessert that combines the rich flavors of caramelized pears with a buttery, flaky crust. This dessert is perfect for those chilly nights when you’re craving something sweet and comforting.
The crostata is fundamentally a rustic, free-form tart that’s easy to assemble and full of character, making it a wonderful dessert to serve for a cozy family gathering or a special occasion. The caramelized pears are the star of the dish, offering a sweet and slightly tangy flavor that complements the buttery crust.
The crostata is baked until golden brown, allowing the juices from the pears to meld with the sugar and spices, creating a luscious filling. This recipe is designed to serve 4-6 people, making it an ideal size for a small dinner party or family dessert.
Ingredients for Caramelized Pear Crostata (Serves 4-6):
- 1 1/2 cups all-purpose flour
- 1/2 cup unsalted butter, chilled and diced
- 1/4 cup granulated sugar
- 1/4 teaspoon salt
- 1/4 cup ice water
- 3 ripe pears, peeled, cored, and sliced
- 1/4 cup brown sugar
- 2 tablespoons unsalted butter
- 1 teaspoon vanilla extract
- 1 teaspoon ground cinnamon
- 1 tablespoon lemon juice
- 1 tablespoon cornstarch
- 1 egg, beaten (for egg wash)
- 1 tablespoon coarse sugar (for sprinkling)
Cooking Instructions:
1. Prepare the Dough: In a large bowl, combine the flour, granulated sugar, and salt. Add the chilled, diced butter and mix with your fingers or a pastry cutter until the mixture resembles coarse crumbs.
Gradually add the ice water, one tablespoon at a time, mixing until the dough comes together. Form the dough into a disc, wrap it in plastic wrap, and refrigerate for at least 30 minutes.
2. Caramelize the Pears: In a large saucepan over medium heat, melt the unsalted butter. Add the brown sugar and stir until it dissolves.
Add the pear slices and cook for about 5-7 minutes, or until the pears are tender and lightly caramelized. Stir in the vanilla extract, ground cinnamon, lemon juice, and cornstarch. Cook for an additional 2 minutes, then remove from heat and let cool.
3. Roll Out the Dough: Preheat your oven to 375°F (190°C). On a lightly floured surface, roll out the chilled dough into a 12-inch circle.
Transfer the dough to a baking sheet lined with parchment paper.
4. Assemble the Crostata: Spoon the caramelized pears onto the center of the dough, leaving a 2-inch border around the edges. Fold the edges of the dough over the pears, pleating as necessary to create a rustic edge.
Brush the exposed crust with beaten egg and sprinkle with coarse sugar.
5. Bake the Crostata: Place the crostata in the preheated oven and bake for 35-40 minutes, or until the crust is golden brown and the filling is bubbly.
Allow the crostata to cool on the baking sheet for at least 10 minutes before serving.
Extra Tips:
When preparing the dough, make sure the butter is very cold to guarantee a flaky crust. If the dough becomes too warm while rolling it out, pop it back in the refrigerator for a few minutes to firm up.
For a more intense flavor, consider adding a pinch of nutmeg or cardamom to the pear filling. Additionally, you can serve the crostata with a scoop of vanilla ice cream or a dollop of whipped cream for an extra indulgent treat.
Amaretto-Infused Zuccotto
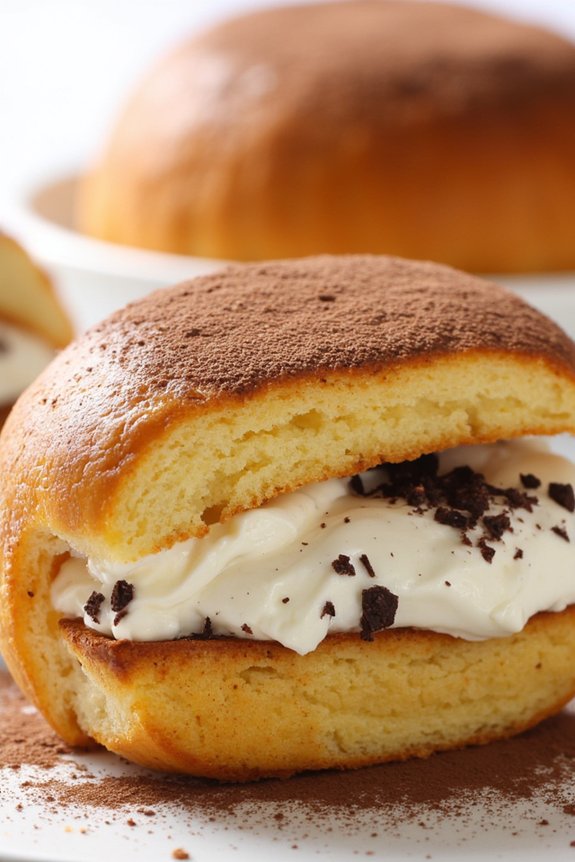
Amaretto-Infused Zuccotto is a delightful Italian dessert that combines the rich flavors of amaretto liqueur with a creamy ricotta and chocolate filling, all encased in a dome of soft sponge cake. This classic Tuscan dessert is perfect for the winter season when you’re looking to indulge in something sweet and comforting.
The unique shape of Zuccotto, resembling a half pumpkin, is said to have been inspired by the dome of Florence’s Duomo. It’s traditionally made with pan di Spagna (sponge cake) and is a no-bake dessert, making it convenient for those who want to prepare an elegant dessert without the need for an oven.
This recipe for Amaretto-Infused Zuccotto serves 4-6 people and is best made a day in advance to allow the flavors to meld together beautifully. The combination of amaretto, chocolate, and almond flavors creates a sophisticated taste that’s sure to impress your family and friends.
Whether you’re hosting a holiday dinner or simply looking to try something new, this dessert is sure to be a hit. Follow the steps below to create this delicious Italian treat.
Ingredients:
- 1 sponge cake or 1 pack of ladyfingers (about 250g)
- 1/2 cup amaretto liqueur
- 1 cup heavy cream
- 1 cup ricotta cheese
- 1/2 cup powdered sugar
- 1 teaspoon vanilla extract
- 1/2 cup dark chocolate, finely chopped
- 1/4 cup toasted almonds, chopped
- 2 tablespoons cocoa powder
- Plastic wrap
Instructions:
- Prepare the Bowl: Line a medium-sized bowl (about 1.5-2 liters in volume) with plastic wrap, allowing some overhang. This will help you remove the zuccotto easily once it’s set.
- Slice the Cake: If using sponge cake, slice it into thin, even strips. If using ladyfingers, trim each to fit within the bowl. Brush or drizzle each piece generously with amaretto liqueur.
- Line the Bowl: Start lining the bowl with the amaretto-soaked sponge cake or ladyfingers, pressing gently to cover the entire surface. Make sure there are no gaps.
- Prepare the Filling: In a large bowl, whip the heavy cream until soft peaks form. In a separate bowl, mix the ricotta cheese, powdered sugar, and vanilla extract until smooth. Gently fold the whipped cream into the ricotta mixture until fully combined.
- Add Chocolate and Nuts: Fold in the chopped dark chocolate and toasted almonds into the cream mixture. This will add texture and flavor to the zuccotto.
- Assemble the Zuccotto: Spoon the filling into the prepared, cake-lined bowl, spreading it evenly. Cover the top with more cake slices or ladyfingers, again brushing them with amaretto.
- Chill the Dessert: Fold the overhanging plastic wrap over the top of the zuccotto and press gently. Place the bowl in the refrigerator for at least 4 hours, or preferably overnight, to allow the flavors to meld.
- Unmold and Serve: When ready to serve, carefully unwrap the plastic from the top and invert the bowl onto a serving plate. Remove the bowl and plastic wrap. Dust the top with cocoa powder for a finishing touch.
Extra Tips:
For the best results, make sure the sponge cake or ladyfingers are completely saturated with amaretto; this not only enhances the flavor but also guarantees the dessert remains moist.
If you prefer a more pronounced almond flavor, add a few drops of almond extract to the filling. Additionally, you can experiment with different chocolates, such as milk or white chocolate, to vary the flavor profile.
Remember to chill the zuccotto well before serving, as this helps it hold its shape when sliced.