

Welcome to a cozy corner of Italian sweetness, where each dessert tells its own little story. Picture the classic tiramisu, layered with love, or the silky panna cotta that melts in your mouth. From crunchy cannoli stuffed with luscious ricotta to the golden, honey-drizzled struffoli, these recipes bring a taste of Italy right to your table. Whether you’re an experienced baker or just looking to try something new, there’s a delightful surprise waiting for you. Let’s explore these traditional Italian desserts together!
Tiramisu: The Classic Italian Pick-Me-Up
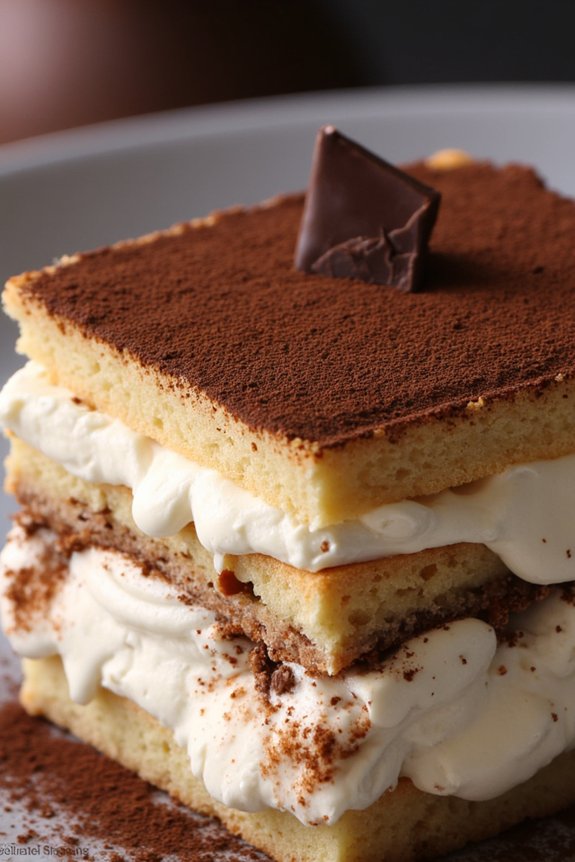
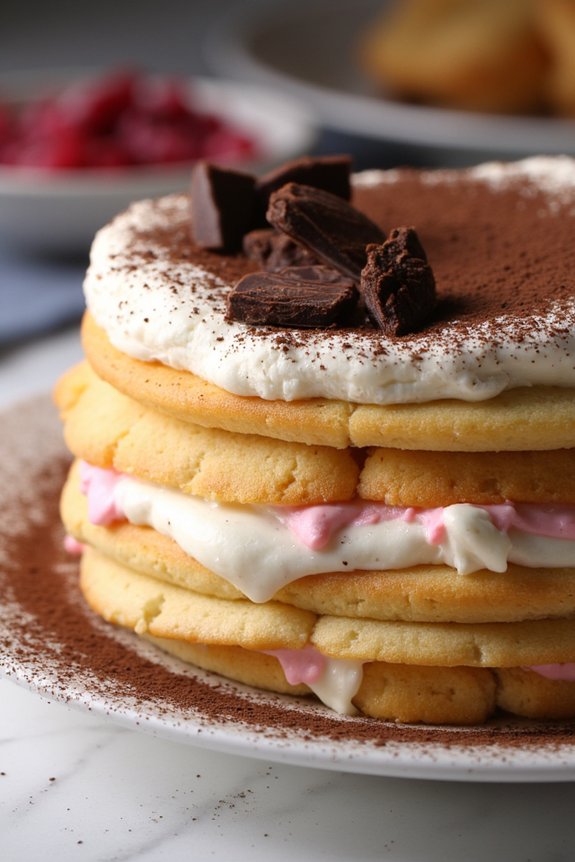
Tiramisu is a beloved Italian dessert known for its rich flavors and creamy, layered texture. This classic treat is a perfect balance of espresso-soaked ladyfingers, creamy mascarpone cheese, and a dusting of cocoa powder, making it an irresistible choice for any occasion.
Originating from the Veneto region, tiramisu translates to “pick me up,” which is fitting given its coffee-infused goodness. While the traditional recipe is straightforward, it allows for some creativity, such as adding a splash of your favorite liqueur or varying the strength of the espresso according to your taste.
Making tiramisu at home is a delightful experience that involves assembling layers of flavors and textures. The key to a successful tiramisu is using quality ingredients, such as fresh mascarpone and strong espresso, to guarantee the final dish is indulgent and authentic.
This recipe serves 4-6 people, making it an ideal dessert for a dinner party or a cozy family gathering. The recipe is best prepared in advance, allowing the flavors to meld together in the refrigerator before serving.
Ingredients (Serves 4-6):
- 3 large eggs, separated
- ½ cup granulated sugar
- 1 cup strong espresso, cooled
- 1 tablespoon coffee liqueur (optional)
- 8 ounces mascarpone cheese
- 1 teaspoon vanilla extract
- 24 ladyfingers (savoiardi)
- Unsweetened cocoa powder for dusting
- Dark chocolate shavings (optional)
Cooking Instructions:
- Prepare the Egg Mixture: In a medium bowl, whisk the egg yolks with half of the sugar until the mixture becomes thick and pale. Set aside.
- Create Mascarpone Mixture: In a separate bowl, gently fold the mascarpone cheese into the egg yolk mixture, adding the vanilla extract. Mix until smooth and well combined. Be careful not to overmix.
- Whip Egg Whites: In a clean, dry bowl, beat the egg whites until soft peaks form. Gradually add the remaining sugar and continue beating until stiff peaks form.
- Combine Mixtures: Carefully fold the whipped egg whites into the mascarpone mixture until no white streaks remain. This will create a light, fluffy mixture.
- Prepare Espresso: Mix the cooled espresso with coffee liqueur (if using) in a shallow dish.
- Assemble the Tiramisu: Quickly dip each ladyfinger into the espresso mixture, making sure they’re soaked but not soggy. Layer half of the soaked ladyfingers in the bottom of a 9×9 inch dish.
- Layer the Mixture: Spread half of the mascarpone mixture over the ladyfingers. Repeat the layers with the remaining ladyfingers and mascarpone mixture.
- Chill the Tiramisu: Cover the dish and refrigerate for at least 4 hours, or overnight for best results.
- Serve: Before serving, dust the top with unsweetened cocoa powder and add chocolate shavings if desired. Serve chilled.
Extra Tips:
For the best tiramisu, use fresh, high-quality ingredients. The espresso should be freshly brewed, and the mascarpone should be creamy and smooth.
If you prefer a stronger coffee flavor, you can increase the amount of espresso or let the ladyfingers soak a bit longer. Always use a clean bowl for beating egg whites to guarantee they reach their full volume.
Finally, chilling the tiramisu overnight allows the flavors to develop fully, making the dessert even more delicious.
Panna Cotta: A Creamy Delight
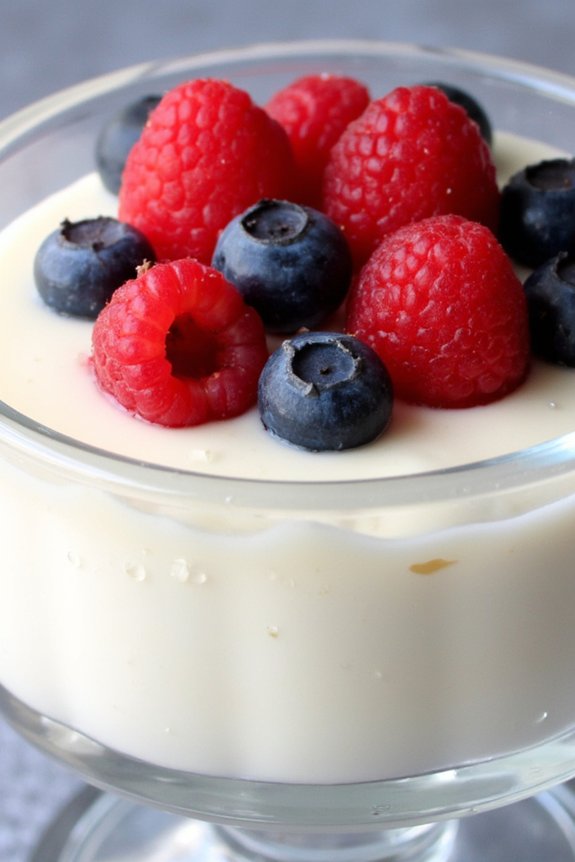
Panna Cotta, an exquisite Italian dessert, translates to “cooked cream” and is celebrated for its silky, smooth texture that melts in your mouth. Originating from the northern region of Italy, this dessert is a delightful blend of cream, sugar, and gelatin, offering a perfect balance of richness and lightness.
Its simplicity allows the flavors of vanilla or any other added essence to shine through, making it a versatile base for various toppings like fresh berries, caramel, or chocolate sauce. Whether enjoyed as a standalone treat or paired with complementary flavors, Panna Cotta is a demonstration of the elegance of Italian culinary tradition.
Creating Panna Cotta at home is a straightforward process, making it an ideal dessert for both novice and seasoned cooks. The key to achieving its characteristic silky texture lies in the careful handling of gelatin and guaranteeing the right balance of creaminess.
While the classic version typically uses vanilla, this recipe allows for creativity, enabling you to infuse the dish with flavors such as coffee, citrus, or even a hint of liqueur. This recipe serves 4-6 people, making it perfect for a small gathering or a family dinner.
Ingredients (Serves 4-6):
- 2 cups heavy cream
- 1 cup whole milk
- 1/2 cup granulated sugar
- 1 vanilla bean (or 1 teaspoon vanilla extract)
- 2 1/4 teaspoons unflavored gelatin powder
- 3 tablespoons cold water
- Pinch of salt
- Fresh berries or desired topping (optional)
Cooking Instructions:
- Prepare the Gelatin: In a small bowl, sprinkle the gelatin powder over 3 tablespoons of cold water. Let it sit for 5-10 minutes to allow the gelatin to bloom. This step guarantees that the gelatin will dissolve evenly in the cream mixture.
- Heat the Cream Mixture: In a saucepan, combine the heavy cream, whole milk, and granulated sugar. If using a vanilla bean, split it lengthwise and scrape the seeds into the mixture, then add the pod as well. For vanilla extract, you’ll add it later. Place the saucepan over medium heat and stir occasionally until the sugar dissolves and the mixture is hot but not boiling.
- Incorporate the Gelatin: Remove the saucepan from heat and take out the vanilla bean pod if used. Stir in the bloomed gelatin until completely dissolved. If using vanilla extract, add it now along with a pinch of salt, stirring well to combine.
- Strain and Pour: Strain the mixture through a fine-mesh sieve into a large measuring cup or bowl to remove any undissolved gelatin or vanilla particles. This step guarantees a perfectly smooth texture. Divide the mixture evenly among 4-6 ramekins or serving glasses.
- Chill Until Set: Allow the Panna Cotta to cool at room temperature for about 10 minutes. Then, cover each ramekin with plastic wrap and refrigerate for at least 4 hours or until set. For best results, chill overnight.
- Serve and Enjoy: To serve, you can unmold the Panna Cotta by dipping the ramekins briefly in hot water and inverting them onto plates, or simply serve them in the ramekins. Garnish with fresh berries or your choice of topping for added flavor and presentation.
Extra Tips:
When making Panna Cotta, confirm that the gelatin is fully dissolved to avoid any unpleasant texture. If you prefer a lighter dessert, you can substitute part of the heavy cream with half-and-half or additional milk, but be cautious as this might affect the setting.
For a more robust vanilla flavor, allow the vanilla bean to steep in the cream mixture for a few extra minutes before removing it. Finally, when experimenting with different flavors, start with small quantities to maintain the dessert’s delicate balance.
Cannoli: Crispy Shells With Sweet Ricotta
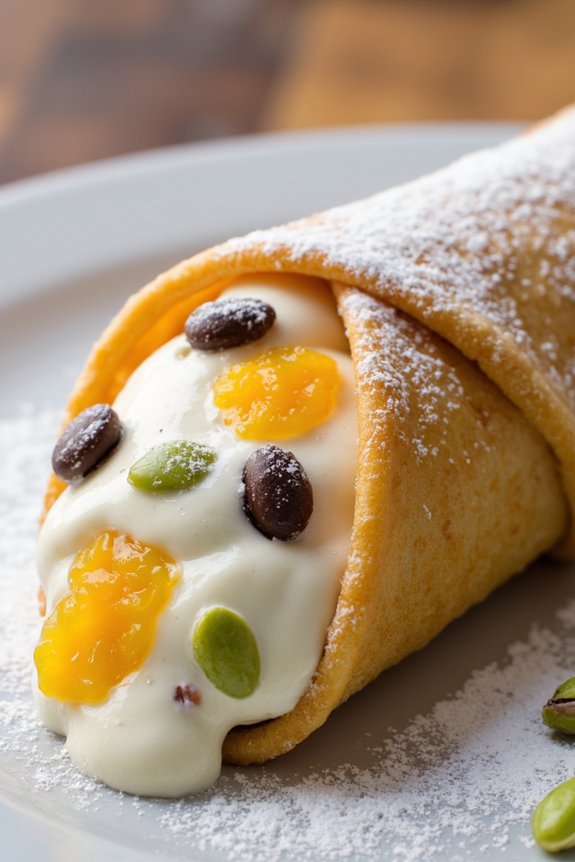
Cannoli: Crispy Shells With Sweet Ricotta is a classic Italian dessert that has captured the hearts and taste buds of many. The delightful contrast between the crispy pastry shells and the creamy, sweet ricotta filling makes it a favorite for any occasion.
Originating from Sicily, cannoli are traditionally enjoyed during the carnival season, but their popularity has made them a year-round treat. Making cannoli at home involves creating the perfect balance between the crunchy exterior and the luscious interior, guaranteeing that each bite is a symphony of flavors and textures.
To prepare this delicious dessert, you’ll first need to make the crispy shells, which are essential for holding the creamy filling. The dough is rolled thin, wrapped around cannoli tubes, and then deep-fried to achieve that characteristic crunch. The filling, made with ricotta cheese, sugar, and a hint of vanilla, is spooned or piped into the cooled shells just before serving to maintain the crispiness.
With a few simple ingredients and a bit of patience, you can create this delightful dessert that will impress your family and friends.
Ingredients (Serves 4-6):
- For the Shells:
- 2 cups all-purpose flour
- 1 tablespoon granulated sugar
- 1/4 teaspoon salt
- 3 tablespoons butter, melted
- 1 egg yolk
- 1/2 cup sweet Marsala wine
- Vegetable oil, for frying
- For the Filling:
- 2 cups ricotta cheese
- 1 cup powdered sugar
- 1 teaspoon vanilla extract
- 1/2 cup mini chocolate chips (optional)
- 1/4 cup candied orange peel, finely chopped (optional)
- To Garnish:
- Powdered sugar for dusting
- Chopped pistachios or additional chocolate chips (optional)
Cooking Instructions:
- Prepare the Dough for Shells:
- In a large bowl, mix together the flour, sugar, and salt. Add the melted butter and egg yolk, and mix until combined. Gradually add the Marsala wine while stirring until the dough comes together.
- Knead the dough on a floured surface for about 5 minutes until smooth. Wrap in plastic wrap and let it rest for at least 30 minutes.
- Roll and Shape the Shells:
- Divide the rested dough into quarters. Roll out each portion on a floured surface until very thin (about 1/8 inch). Cut into 4-inch circles.
- Wrap each circle loosely around a cannoli tube, sealing the edge with a dab of water.
- Fry the Shells:
- Heat vegetable oil in a deep fryer or a heavy pot to 350°F (175°C). Fry the dough-wrapped tubes in batches until golden brown, about 2-3 minutes.
- Carefully remove and drain on paper towels. Once cool enough to handle, gently slide shells off the tubes.
- Prepare the Filling:
- While the shells cool, combine the ricotta, powdered sugar, and vanilla extract in a bowl. Mix until smooth.
- If desired, fold in mini chocolate chips and candied orange peel.
- Fill the Shells:
- Just before serving, use a pastry bag to pipe the ricotta filling into each end of the shells. Confirm they’re filled generously but not overstuffed.
- Garnish and Serve:
- Dust filled cannoli with powdered sugar and roll the ends in chopped pistachios or additional chocolate chips for extra flavor and texture.
Extra Tips:
To guarantee the shells remain crispy, fill them only right before serving. If the ricotta seems too watery, let it drain in a cheesecloth-lined sieve in the fridge for a few hours before mixing with sugar and vanilla.
For an extra fancy touch, dip the edges of the shells in melted chocolate and let them set before filling. Cannoli are best enjoyed fresh, so try to consume them on the day they’re made to enjoy the ideal texture and flavor.
Sfogliatelle: Flaky Pastry Perfection
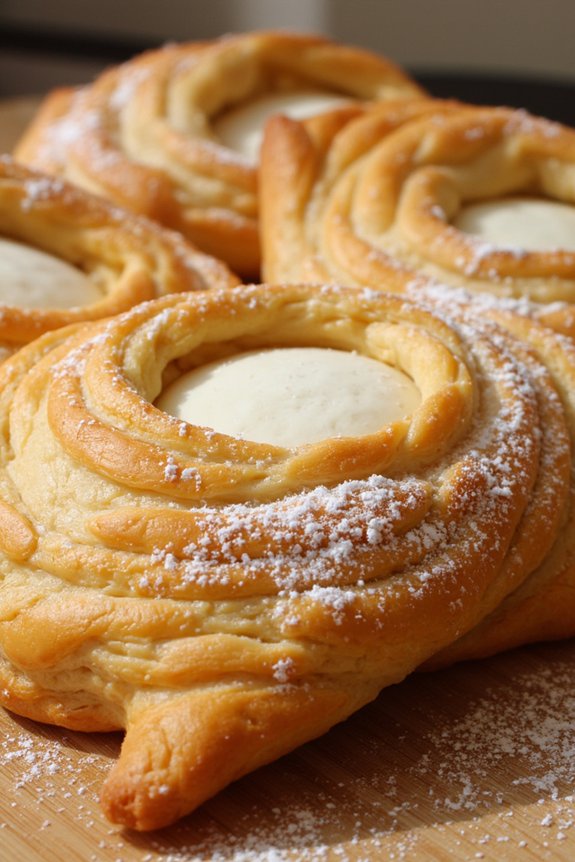
Sfogliatelle, a traditional Italian pastry originating from the Campania region, is a beloved delicacy known for its distinctively crispy and flaky shell that envelops a sweet, creamy filling. The name “sfogliatelle” translates to “many leaves” or “many layers,” a fitting description for the tender, multi-layered crust of this sumptuous dessert.
Often enjoyed with a cup of espresso, sfogliatelle is a perfect treat for those who appreciate the art of pastry making. Creating sfogliatelle at home is a labor of love, requiring patience and precision to achieve the perfect balance between the crisp pastry and the soft filling. The key to mastering this dessert is in the preparation of the dough, as well as the ricotta-based filling infused with aromatic flavors such as orange zest and vanilla.
While this dessert may appear complex, following a detailed recipe can help anyone bring a touch of Italian pastry perfection into their kitchen.
Ingredients for 4-6 servings:
- 2 cups all-purpose flour
- 1/2 teaspoon salt
- 3/4 cup cold water
- 1/4 cup unsalted butter, softened
- 1/4 cup lard or shortening, softened
- 1 cup ricotta cheese
- 1/2 cup semolina flour
- 1 cup milk
- 1/2 cup granulated sugar
- 1 teaspoon vanilla extract
- Zest of 1 orange
- 1/2 teaspoon ground cinnamon
- 1 large egg
- Powdered sugar, for dusting
Cooking Instructions:
- Prepare the Dough: In a large bowl, combine the all-purpose flour and salt. Gradually add the cold water while mixing, until a dough forms. Knead the dough on a lightly floured surface for about 10 minutes, or until smooth and elastic. Wrap the dough in plastic wrap and let it rest in the refrigerator for at least 2 hours.
- Make the Filling: In a saucepan, bring the milk to a simmer over medium heat. Gradually whisk in the semolina flour and cook, stirring constantly, until the mixture thickens, about 5 minutes. Remove from heat and let it cool slightly.
- Combine Filling Ingredients: In a mixing bowl, blend the ricotta cheese, sugar, vanilla extract, orange zest, and cinnamon. Add the semolina mixture and the egg, mixing until smooth and well-combined. Chill the filling in the refrigerator while you prepare the pastry.
- Roll Out the Dough: On a floured surface, roll the dough into a long rectangle, about 1/8 inch thick. Spread the softened butter and lard evenly over the dough. Starting from one end, roll the dough into a tight log. Wrap it in plastic wrap and refrigerate for at least 1 hour.
- Shape the Pastry: Preheat your oven to 400°F (200°C). Cut the chilled dough log into 1/2 inch slices. Using your fingers, gently press the center of each slice to form a cone shape, making sure the edges flare out to create the classic sfogliatelle shape.
- Fill and Bake: Spoon about 1-2 tablespoons of the filling into each pastry cone. Carefully seal the open edges by pinching them together. Place the filled pastries on a baking sheet lined with parchment paper. Bake for 20-25 minutes, or until the pastries are golden brown and crisp.
- Final Touch: Allow the sfogliatelle to cool slightly before dusting them with powdered sugar. Serve warm or at room temperature.
Extra Tips:
When making sfogliatelle, precision and patience are essential. Take your time when rolling out the dough to guarantee it’s thin and even, as this will affect the flakiness of the pastry.
If you’re new to making sfogliatelle, consider practicing the dough rolling and shaping technique separately to build confidence. Additionally, using high-quality ricotta and fresh orange zest will enhance the flavor of the filling, making your homemade sfogliatelle truly standout.
Enjoy these delightful pastries fresh from the oven, as their texture is best enjoyed shortly after baking.
Zuppa Inglese: Italy’s Take on Trifle
Zuppa Inglese is a classic Italian dessert that charmingly resembles the English trifle. This delightful treat is made by layering sponge cake or ladyfingers with rich pastry cream and a touch of liqueur, typically Alchermes, which gives it a distinctive pink hue. The dessert is a favorite in many Italian households and is cherished for its creamy texture combined with the slight crunch of the soaked ladyfingers.
Zuppa Inglese isn’t only visually appealing but also a perfect balance of flavors that can be enjoyed by both young and old. Preparing Zuppa Inglese requires a bit of time to allow the flavors to meld together beautifully. The key to achieving an authentic taste is using high-quality ingredients and allowing each layer to soak in the liqueur sufficiently.
This dessert can be prepared in a large serving dish or individually for an elegant presentation. Perfect for a family gathering or a special occasion, Zuppa Inglese is sure to impress your guests with its delightful taste and presentation.
Ingredients for 4-6 Servings:
- 24 ladyfingers or slices of sponge cake
- 500 ml whole milk
- 4 egg yolks
- 100 g granulated sugar
- 50 g all-purpose flour
- 1 teaspoon vanilla extract
- 100 ml Alchermes liqueur
- 100 ml espresso coffee (optional)
- Dark chocolate shavings, for garnish
- Unsweetened cocoa powder, for garnish
Cooking Instructions:
- Prepare the Pastry Cream: In a saucepan, heat the milk over medium heat until it begins to steam, but not boil. In a separate bowl, whisk together the egg yolks and sugar until pale and creamy. Gradually add the flour to the egg mixture, whisking constantly to avoid lumps.
- Combine and Heat: Slowly pour the heated milk into the egg mixture, whisking continually. Transfer the mixture back to the saucepan and place it over medium heat. Stir constantly until the mixture thickens into a smooth, creamy consistency. Remove from heat and stir in the vanilla extract. Allow it to cool slightly.
- Layer the Dessert: In a shallow dish, start with a layer of ladyfingers or sponge cake. Brush the layer with Alchermes liqueur, and if desired, a bit of espresso. Spread a portion of the pastry cream over the soaked cake layer. Repeat the process, creating multiple layers until all ingredients are used, ending with a layer of pastry cream on top.
- Chill and Set: Cover the dish with plastic wrap and refrigerate for at least 2 hours, allowing the flavors to meld and the dessert to set firmly.
- Garnish and Serve: Before serving, sprinkle a light dusting of cocoa powder over the top layer and garnish with dark chocolate shavings. Serve chilled and enjoy the delightful combination of flavors.
Extra Tips:
To guarantee the best results, make sure the pastry cream is adequately thickened before layering, as this will prevent the dessert from becoming too runny. If Alchermes liqueur is difficult to find, you can substitute it with a mix of grenadine and rum for a similar flavor profile.
When preparing the layers, don’t oversoak the ladyfingers or sponge cake; just a quick brush or dip in the liqueur is sufficient to maintain the right texture. Finally, prepare the dessert a day in advance to allow the flavors to deepen and intensify.
Ricotta Pie: A Sweet Cheese Tradition
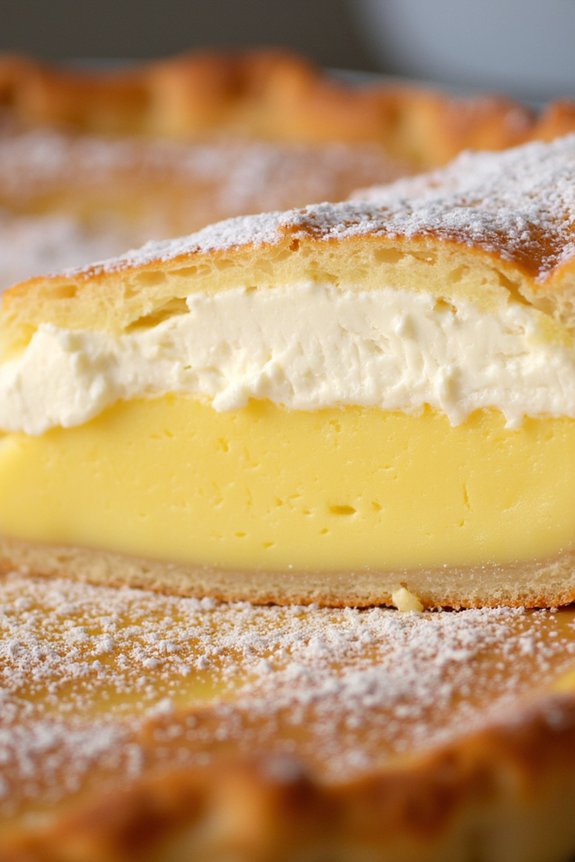
Ricotta Pie is a classic Italian dessert that beautifully marries the creamy texture of ricotta cheese with a subtly sweet and aromatic filling. Traditionally enjoyed during Easter celebrations, this pie has become a beloved treat year-round thanks to its rich flavor and delightful simplicity.
The crust is typically made from a buttery pastry, while the filling incorporates ricotta cheese, eggs, and sugar, often enhanced with citrus zest or vanilla for extra depth. This dessert is perfect for those who appreciate a balance of subtle sweetness and creamy decadence, making it a perfect ending to any Italian meal.
To create this delicious Ricotta Pie for 4-6 people, you’ll need to gather your ingredients and prepare both the crust and the filling. The crust provides a delicate base that complements the creamy, cheese-filled center. Once baked, the pie should be allowed to cool, giving the flavors time to meld together and the filling to set. Whether served warm or chilled, this pie is sure to be a hit with friends and family alike.
Ingredients:
- 1 ½ cups all-purpose flour
- ½ cup granulated sugar
- 1 stick (½ cup) unsalted butter, chilled and cut into cubes
- 1 large egg
- 1 teaspoon vanilla extract
- 1 ½ cups ricotta cheese
- 3 large eggs
- ½ cup granulated sugar
- Zest of 1 lemon
- 1 teaspoon vanilla extract
- ½ teaspoon ground cinnamon (optional)
- Powdered sugar for dusting (optional)
Cooking Instructions:
1. Prepare the Crust: In a large mixing bowl, combine the flour and granulated sugar. Add the chilled butter cubes and work them into the flour mixture using your fingertips or a pastry cutter until the mixture resembles coarse crumbs.
Add the egg and vanilla extract, mixing until the dough begins to come together. Turn the dough out onto a floured surface and knead gently until smooth. Wrap in plastic wrap and refrigerate for at least 30 minutes.
2. Preheat the Oven: Set your oven to 350°F (175°C) to guarantee it’s ready for baking the pie.
3. Roll Out the Dough: After chilling, roll out the dough on a floured surface to fit a 9-inch pie dish. Carefully transfer the dough to the dish, pressing it into the bottom and sides. Trim any excess dough hanging over the edges.
4. Make the Filling: In a medium bowl, combine the ricotta cheese, eggs, and granulated sugar. Add the lemon zest, vanilla extract, and cinnamon (if using), mixing well until smooth and creamy.
5. Assemble the Pie: Pour the ricotta mixture into the prepared pie crust, spreading it evenly. Smooth the top with a spatula to guarantee even baking.
6. Bake the Pie: Place the pie in the preheated oven and bake for 40-45 minutes, or until the filling is set and the top is lightly golden. The center should be slightly firm to the touch.
7. Cool and Serve: Once baked, remove the pie from the oven and allow it to cool on a wire rack. Dust with powdered sugar before serving, if desired. The pie can be served warm or refrigerated and served chilled.
Extra Tips:
When making Ricotta Pie, it’s important to use high-quality ricotta cheese for the best texture and flavor. To achieve a smooth filling, consider straining the ricotta to remove any excess moisture, which will help the pie set more firmly.
If you prefer a hint of extra flavor, consider adding a splash of almond extract or a handful of mini chocolate chips to the filling. For a decorative touch, you can create a lattice top with leftover pastry dough before baking.
Amaretti Cookies: Almond-Flavored Treats
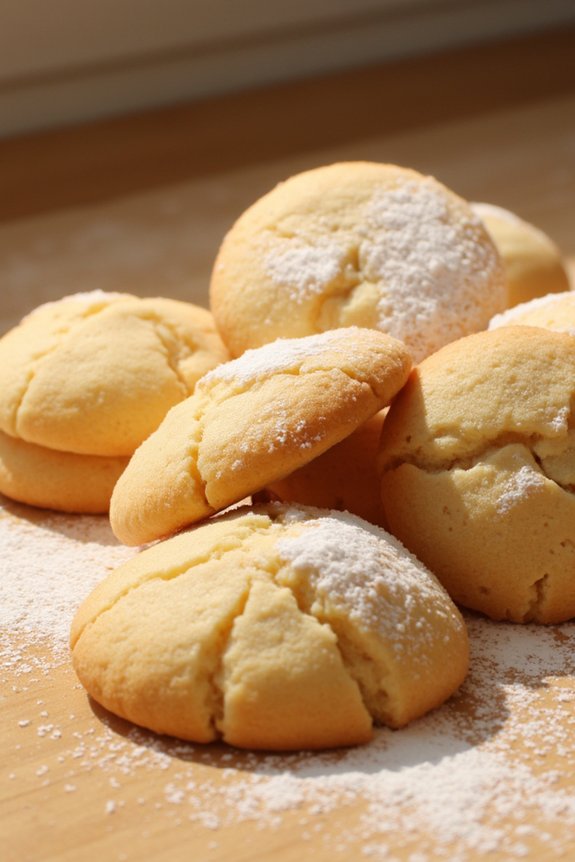
Amaretti cookies are a delightful Italian treat that perfectly balances the rich, nutty flavor of almonds with a light, crunchy texture. These cookies have a beautifully crisp exterior and a soft, chewy interior, making them a favorite for pairing with coffee or enjoying as a standalone indulgence.
Traditionally made with almond flour and egg whites, Amaretti cookies are naturally gluten-free, adding to their widespread appeal. Whether you’re looking to bring a touch of Italian elegance to your dessert table or simply craving a sweet almond-flavored delight, this recipe is bound to satisfy.
Preparing Amaretti cookies is relatively straightforward, requiring just a handful of ingredients and a little patience. The magic lies in the quality of the almonds and the precision of the baking process. For this recipe, we’ll guide you through creating a batch that serves 4-6 people, ideal for a small gathering or an afternoon treat.
These cookies also make great gifts when wrapped in decorative packaging, adding a personal touch to festive occasions.
Ingredients (Serves 4-6):
- 2 cups almond flour
- 1 cup granulated sugar
- 2 large egg whites
- 1 teaspoon almond extract
- 1/4 teaspoon vanilla extract
- A pinch of salt
- Powdered sugar (for dusting)
Cooking Instructions:
- Preheat the Oven: Begin by preheating your oven to 325°F (160°C). Line a baking sheet with parchment paper to prevent sticking and guarantee even baking.
- Mix Dry Ingredients: In a large mixing bowl, combine the almond flour, granulated sugar, and a pinch of salt. Stir the mixture until it’s evenly combined, making sure there are no lumps.
- Whisk Egg Whites: In a separate bowl, whisk the egg whites until they form soft peaks. This process helps incorporate air into the mixture, giving the cookies their characteristic lightness.
- Combine Ingredients: Gently fold the whipped egg whites into the almond flour mixture. Add the almond and vanilla extracts, folding until everything is thoroughly combined and you have a smooth dough.
- Shape the Cookies: With slightly damp hands, roll small portions of the dough into balls, about 1 inch in diameter. Place them on the prepared baking sheet, leaving enough space between each cookie to allow for spreading.
- Dust with Powdered Sugar: Lightly dust the top of each cookie ball with powdered sugar. This adds a lovely finish and enhances the cookies’ appearance.
- Bake: Place the baking sheet in the preheated oven and bake for 15-20 minutes, or until the cookies are lightly golden and firm to the touch. Keep an eye on them to prevent over-baking.
- Cool and Serve: Once baked, remove the cookies from the oven and let them cool on the baking sheet for a few minutes before transferring them to a wire rack to cool completely. Serve and enjoy!
Extra Tips:
For the best results, make sure that your egg whites are at room temperature before whisking. This helps them whip up more easily and achieve a better volume.
If you prefer a slightly softer cookie, reduce the baking time by a couple of minutes. Be careful not to over-mix the dough after adding the egg whites to maintain the airy texture.
Finally, feel free to experiment with different extracts like amaretto or lemon for a unique twist on the classic flavor.
Biscotti: The Perfect Dipping Companion
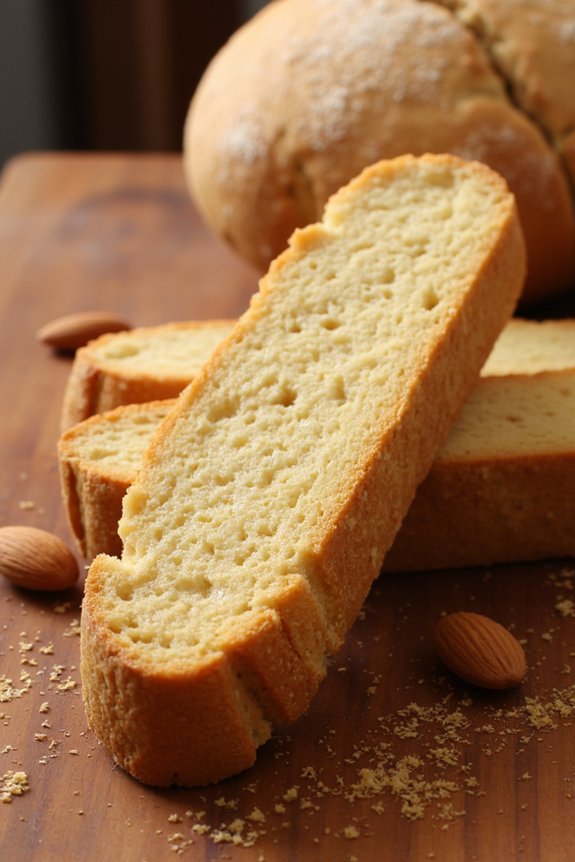
Biscotti, the twice-baked Italian cookies, are renowned for their delightful crunch and versatility. Originating from the Tuscan city of Prato, these cookies are traditionally made with almonds but have evolved to include various nuts and flavorings. Biscotti are often served with coffee or dessert wine, making them the perfect dipping companion thanks to their firm texture that softens beautifully when dipped.
Whether enjoyed as a morning treat or an after-dinner indulgence, biscotti provide a sweet, satisfying crunch that complements any occasion.
This classic almond biscotti recipe produces a delightful combination of flavors with a hint of vanilla and a subtle crunch from the toasted almonds. Ideal for a serving size of 4-6 people, these biscotti are straightforward to make and offer a great way to showcase your baking skills. Follow these simple steps to create biscotti that are perfect for enjoying with your favorite beverage or gifting to friends and family.
Ingredients (for 4-6 people):
- 2 cups all-purpose flour
- 1 cup granulated sugar
- 1 teaspoon baking powder
- 1/2 teaspoon salt
- 3 large eggs
- 1 teaspoon vanilla extract
- 1 teaspoon almond extract
- 1 cup whole almonds, toasted and coarsely chopped
- 1/2 cup unsalted butter, melted
Cooking Instructions:
- Preheat the Oven: Start by preheating your oven to 350°F (175°C). Line a baking sheet with parchment paper to prevent sticking.
- Mix Dry Ingredients: In a large mixing bowl, combine the all-purpose flour, granulated sugar, baking powder, and salt. Whisk these ingredients together until they’re evenly mixed.
- Blend Wet Ingredients: In a separate bowl, whisk together the eggs, vanilla extract, and almond extract until well combined. Slowly add the melted butter, continuing to whisk until the mixture is smooth.
- Combine Wet and Dry Ingredients: Gradually add the wet ingredients to the dry ingredients, stirring with a wooden spoon or spatula until a dough begins to form. The dough should be slightly sticky but manageable.
- Incorporate Almonds: Gently fold in the toasted and chopped almonds, making certain they’re evenly distributed throughout the dough.
- Shape the Dough: Transfer the dough to the prepared baking sheet. Divide it in half and shape each half into a log approximately 12 inches long and 2 inches wide. Flatten the tops slightly.
- First Bake: Bake the logs in the preheated oven for about 25-30 minutes, or until they’re lightly golden and firm to the touch. Remove from the oven and let the logs cool on the baking sheet for 10 minutes.
- Slice and Second Bake: Once cooled, use a serrated knife to slice the logs diagonally into 1/2-inch thick slices. Place the slices cut-side down back on the baking sheet.
- Final Bake: Return the slices to the oven and bake for an additional 10-12 minutes. Flip them over and bake for another 10-12 minutes until both sides are golden brown and crisp.
- Cool and Serve: Remove the biscotti from the oven and let them cool completely on a wire rack before serving.
Extra Tips:
To enhance the flavor of your biscotti, consider toasting the almonds before adding them to the dough. This can be done by spreading the almonds on a baking sheet and toasting them in the oven at 350°F (175°C) for about 8-10 minutes, or until they’re golden and fragrant.
Additionally, make sure that your biscotti logs are thoroughly cooled before slicing to prevent crumbling. If you prefer a softer biscotti, reduce the second bake time slightly, keeping an eye on the texture.
These biscotti can be stored in an airtight container for up to two weeks, maintaining their delicious crunch.
Panettone: Festive Sweet Bread
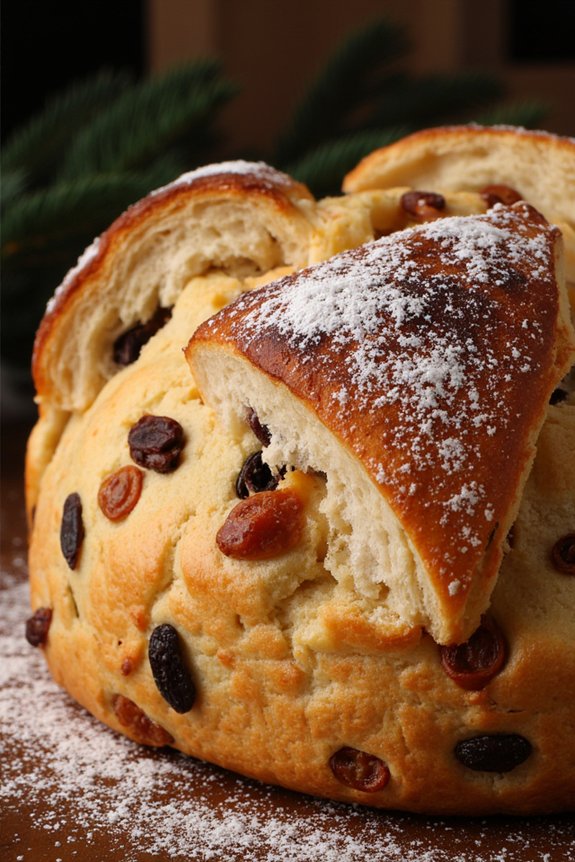
Panettone is a classic Italian dessert that’s especially popular during the Christmas season. Originating from Milan, this sweet bread is renowned for its fluffy, airy texture and rich, fruity flavor. Making Panettone at home can be a rewarding experience, as it fills the kitchen with a warm, inviting aroma and results in a delicious bread that can be shared with family and friends.
The traditional Panettone is studded with a mix of dried fruits and sometimes nuts, providing a delightful contrast to the soft bread. While the process of making Panettone can be time-consuming due to its multiple rising periods, the end result is well worth the effort.
This recipe is designed to serve 4-6 people, making it perfect for a family gathering or holiday celebration. With a little patience and attention to detail, you can create a beautifully fragrant and tasty Panettone that captures the essence of this beloved Italian treat.
Ingredients for 4-6 servings:
- 4 cups all-purpose flour
- 1/2 cup sugar
- 1/2 teaspoon salt
- 2 teaspoons active dry yeast
- 3/4 cup warm milk
- 4 large eggs
- 1 teaspoon vanilla extract
- 1 tablespoon grated lemon zest
- 1/2 cup unsalted butter, softened
- 1 cup mixed dried fruits (such as raisins, candied orange peel, cherries)
- 1/4 cup chopped nuts (optional)
- 1 tablespoon melted butter (for brushing)
- Powdered sugar for dusting
Cooking Instructions:
- Prepare the Yeast Mixture: In a small bowl, dissolve the active dry yeast in the warm milk. Stir gently and let it sit for about 5-10 minutes until it becomes frothy, indicating that the yeast is active.
- Make the Dough: In a large mixing bowl, combine the flour, sugar, and salt. Create a well in the center and add the frothy yeast mixture, eggs, vanilla extract, and lemon zest. Mix until a dough starts to form.
- Incorporate the Butter: Gradually add the softened butter to the dough, kneading it in until the dough becomes smooth and elastic. This may take about 10-15 minutes of kneading by hand or using a stand mixer with a dough hook attachment.
- First Rise: Place the dough in a lightly greased bowl, cover it with a damp cloth or plastic wrap, and let it rise in a warm place until it doubles in size. This should take about 1-2 hours.
- Add Fruits and Nuts: Once the dough has risen, gently deflate it and knead in the mixed dried fruits and nuts until they’re evenly distributed throughout the dough.
- Shape the Dough: Form the dough into a ball and place it into a greased Panettone mold or a round, deep baking dish.
- Second Rise: Cover the shaped dough and let it rise again in a warm place until it has doubled in size, which should take another 1-1.5 hours.
- Preheat the Oven: Preheat your oven to 350°F (175°C).
- Bake the Panettone: Brush the top of the risen dough with melted butter. Bake the Panettone in the preheated oven for 35-45 minutes or until golden brown on top. A skewer inserted into the center should come out clean.
- Cool and Serve: Allow the Panettone to cool in the mold for about 10 minutes before transferring it to a wire rack to cool completely. Once cooled, dust with powdered sugar before serving.
Extra Tips:
When making Panettone, the key is patience, especially during the rising periods, as this guarantees the bread will be light and airy.
It’s important to use high-quality dried fruits for the best flavor. If you find the dough is too sticky to handle, you can lightly oil your hands to make it easier to work with.
Also, for a more traditional presentation, consider using a Panettone paper mold, which helps maintain the bread’s characteristic tall shape.
Semifreddo: The Italian Ice Cream Cake
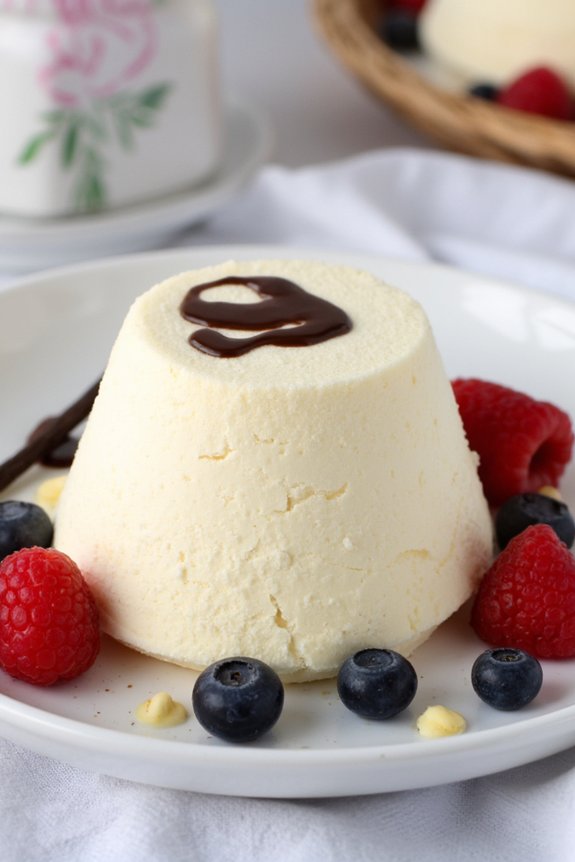
Semifreddo is a delightful Italian dessert that translates to “half-cold” in English. This classic treat is a perfect marriage between the rich creaminess of ice cream and the lightness of mousse, resulting in a dessert that’s frozen yet fluffy. Unlike traditional ice cream, semifreddo doesn’t require churning, making it an ideal choice for those without an ice cream maker.
Its versatility allows for a variety of flavors, but a classic vanilla semifreddo is a timeless favorite. This no-bake dessert is typically made with eggs, sugar, and cream, offering a luxurious texture that melts in your mouth.
Perfect for summer gatherings or festive occasions, semifreddo can be served in slices, like a cake, making it an elegant addition to any dessert table. The preparation process is straightforward, requiring only a few basic ingredients and some patience as it freezes to perfection.
By layering the semifreddo with fruits, nuts, or even chocolate, one can add a personal touch to this indulgent dessert. Below is a simple recipe to make a classic vanilla semifreddo that serves 4-6 people.
Ingredients:
- 4 large eggs
- 1 cup granulated sugar
- 2 teaspoons vanilla extract
- 2 cups heavy cream
- A pinch of salt
Instructions:
- Prepare the Egg Mixture: In a heatproof bowl, combine the eggs, sugar, and a pinch of salt. Place the bowl over a pot of simmering water, making certain the bottom of the bowl doesn’t touch the water. Whisk the mixture constantly for about 5-7 minutes until it thickens and becomes pale, and the sugar is completely dissolved. Remove from heat and let it cool slightly.
- Whip the Cream: In a separate bowl, whip the heavy cream until soft peaks form. Be careful not to over-whip the cream, as it should remain smooth and not grainy.
- Combine the Mixtures: Gently fold the whipped cream into the egg mixture using a spatula. Add the vanilla extract and continue to fold until everything is well combined and smooth.
- Prepare the Mold: Line a loaf pan with plastic wrap, leaving enough overhang on the sides to cover the top later. This will help remove the semifreddo once it’s frozen.
- Pour and Freeze: Pour the semifreddo mixture into the prepared loaf pan, smoothing out the top with a spatula. Cover the top with the overhanging plastic wrap and place the pan in the freezer. Freeze for at least 6 hours or overnight until fully set.
- Serve: Once the semifreddo is frozen, remove it from the freezer and let it sit at room temperature for about 5 minutes. Unwrap the plastic and lift the semifreddo out of the mold using the plastic wrap. Slice and serve immediately, optionally garnished with fresh berries or a drizzle of chocolate sauce.
Extra Tips:
When making semifreddo, patience is key. Confirm that the egg mixture is well whisked over the bain-marie to prevent any raw egg taste and achieve a silky texture.
Use a gentle folding motion when combining the whipped cream with the egg mixture to maintain the airiness of the dessert. For added flavor and texture, consider folding in additional ingredients such as crushed nuts or chocolate chips just before pouring the mixture into the mold.
Semifreddo can be prepared in advance, making it a convenient and impressive dessert option for entertaining.
Struffoli: Honey-Soaked Dough Balls
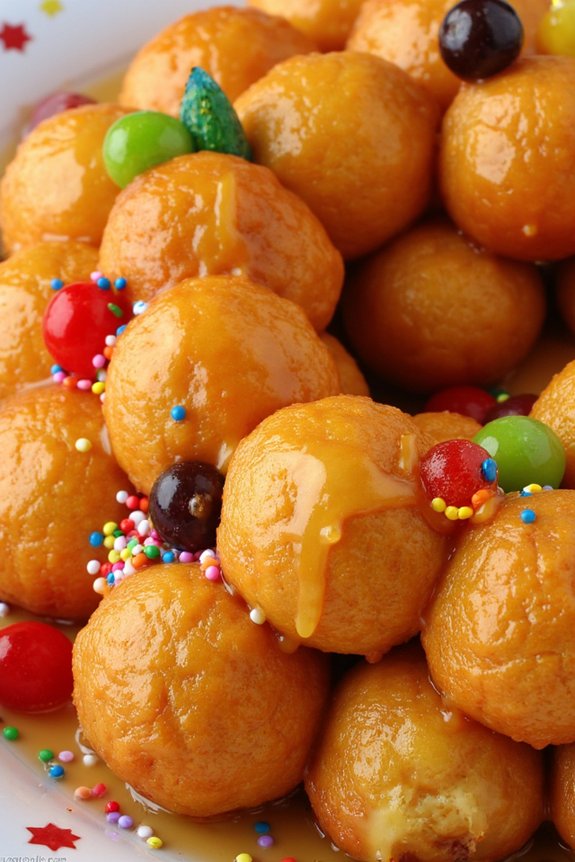
Struffoli is a traditional Italian dessert originating from Naples, often enjoyed during the Christmas season. These sweet treats are small, deep-fried dough balls that are then soaked in honey and garnished with colorful sprinkles or candied fruit. Struffoli is typically shaped into a mound or ring, resembling a festive wreath. The combination of crispy texture and sweet, sticky honey makes Struffoli a delightful and visually appealing addition to any holiday table.
Preparing Struffoli is a fun and rewarding process that involves making a simple dough, frying the dough balls until golden brown, and then tossing them in warm honey. The dish isn’t only a treat for the taste buds but also a feast for the eyes, thanks to the vibrant garnishes.
Whether you’re an experienced cook or a beginner, creating Struffoli is a great way to bring a touch of Italian tradition to your kitchen, and the finished product is sure to impress family and friends.
Ingredients (serves 4-6):
- 2 cups all-purpose flour
- 3 large eggs
- 2 tablespoons granulated sugar
- 2 tablespoons unsalted butter, softened
- 1 teaspoon vanilla extract
- Zest of 1 lemon
- 1/4 teaspoon salt
- 1 cup honey
- Vegetable oil, for frying
- Colored sprinkles or candied fruit, for garnish
Cooking Instructions:
- Prepare the Dough: In a large mixing bowl, combine the flour, sugar, and salt. Make a well in the center and add the eggs, softened butter, vanilla extract, and lemon zest. Mix until the dough comes together. Knead the dough on a floured surface for about 5-7 minutes until it’s smooth and elastic.
- Shape the Dough Balls: Divide the dough into several pieces. Roll each piece into a long, thin rope, about 1/2 inch in diameter. Cut the ropes into small, 1/2-inch pieces and roll each piece into a ball using your hands.
- Fry the Dough Balls: Heat the vegetable oil in a deep pan or fryer to 350°F (175°C). Carefully drop the dough balls into the hot oil in batches, making sure not to overcrowd the pan. Fry until golden brown, about 2-3 minutes per batch. Remove the fried dough balls with a slotted spoon and drain on paper towels.
- Coat in Honey: In a large saucepan, warm the honey over low heat until it becomes liquid. Add the fried dough balls to the honey and gently stir to guarantee each piece is thoroughly coated.
- Arrange and Garnish: Transfer the honey-coated dough balls to a serving platter. Shape them into a mound or a wreath. Sprinkle with colored sprinkles or candied fruit for decoration while the honey is still sticky.
Extra Tips:
For the best results, make certain the oil is at the correct temperature before frying; too hot and the dough balls will burn, too cool and they’ll absorb too much oil. Use a kitchen thermometer for accuracy.
Additionally, be creative with your garnishes—chopped nuts or grated chocolate can add extra flavor and texture. Finally, Struffoli is best enjoyed fresh, but if you need to prepare them in advance, they can be stored in an airtight container at room temperature for a day or two.
Budino: A Silky Italian Pudding
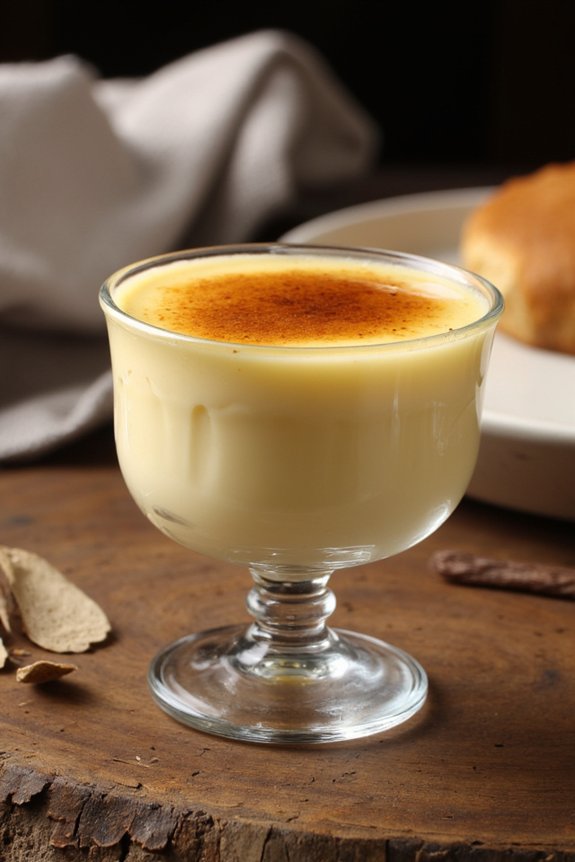
Budino is a divine Italian dessert that’s sure to delight your taste buds with its creamy texture and rich flavor. This silky pudding is a staple in Italian cuisine, often enjoyed as an elegant finish to a meal or as a comforting snack. Traditionally, Budino is flavored with vanilla, chocolate, or caramel, and can be served in individual cups or as a larger pudding to be scooped and served. Its versatility in flavors and presentation makes it a beloved choice for many dessert enthusiasts.
Making Budino is a straightforward process, requiring simple ingredients and a bit of patience to guarantee the perfect consistency. The key to achieving a velvety texture is to use high-quality ingredients and to cook the pudding slowly and carefully. Whether you’re hosting a dinner party or simply indulging in a sweet treat at home, Budino is sure to impress and satisfy. Follow this recipe to create a delectable Budino that serves 4-6 people.
Ingredients:
- 2 cups whole milk
- 1 cup heavy cream
- 3/4 cup granulated sugar
- 1/4 cup cornstarch
- 1/4 teaspoon salt
- 4 large egg yolks
- 2 teaspoons vanilla extract
- 2 tablespoons unsalted butter
Instructions:
- Prepare the Ingredients: Begin by gathering all the ingredients and measuring them out. This will make the cooking process smoother. Separate the egg yolks from the whites, as you’ll only need the yolks for this recipe.
- Mix Dry Ingredients: In a medium saucepan, whisk together the sugar, cornstarch, and salt. This helps to evenly distribute the cornstarch and avoid any lumps in the pudding.
- Combine Milk and Cream: Slowly whisk in the milk and heavy cream into the saucepan with the dry ingredients. Make sure to combine thoroughly to guarantee the cornstarch is fully dissolved.
- Cook the Mixture: Place the saucepan over medium heat and cook the mixture, stirring constantly. Continue to cook until the mixture begins to thicken and comes to a gentle boil. This should take about 5-7 minutes.
- Temper the Egg Yolks: In a separate bowl, whisk the egg yolks. Gradually add a ladle of the hot milk mixture to the yolks, whisking constantly to prevent the eggs from cooking. This process is called tempering and slowly raises the temperature of the yolks.
- Combine and Thicken: Pour the tempered egg yolk mixture back into the saucepan, continuing to cook and stir over medium heat until the pudding is thick and smooth, about 2-3 additional minutes.
- Add Flavor and Finish: Remove the saucepan from heat and stir in the vanilla extract and butter until fully incorporated. The butter adds richness and gloss to the pudding.
- Chill the Budino: Divide the pudding into serving dishes or cups, cover with plastic wrap directly on the surface to prevent a skin from forming, and refrigerate until set, at least 2 hours.
Extra Tips:
For a more indulgent Budino, consider adding a layer of caramel or chocolate sauce to the bottom of the serving dish before pouring in the pudding. Additionally, you can fold in a handful of chocolate chips or candied nuts before chilling for added texture.
To guarantee the smoothest pudding, use a fine-mesh sieve to strain the mixture before chilling, catching any small lumps that may have formed. Serve your Budino with a dollop of whipped cream or a sprinkle of cocoa powder for an elegant presentation.
Cassata Siciliana: A Colorful Confection
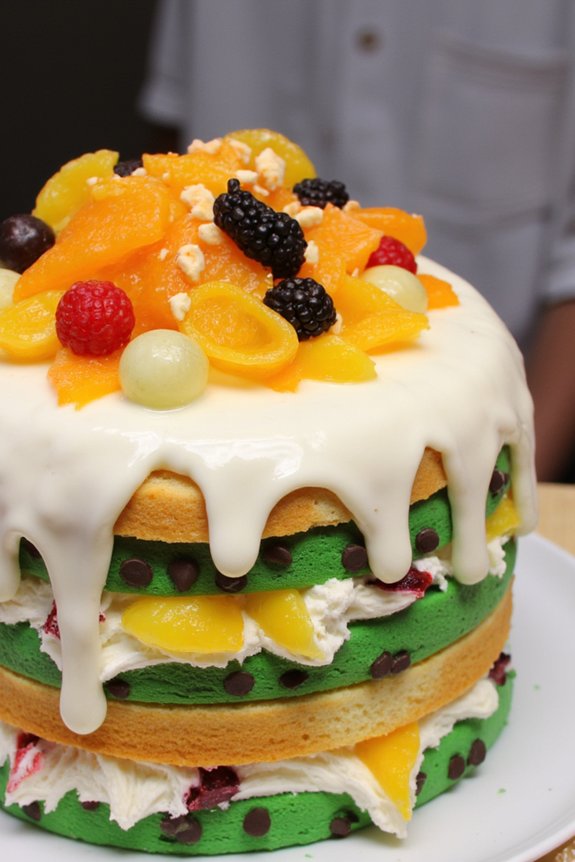
Cassata Siciliana is an opulent Italian dessert that originates from the island of Sicily. This vibrant and visually stunning cake is traditionally eaten during Easter, but its enchanting appearance and delightful flavors make it suitable for any celebration.
Cassata Siciliana is a layered cake that brings together a harmonious blend of ricotta cheese, candied fruits, chocolate chips, and marzipan, all encased in a tender sponge cake and topped with a sweet glaze. The rich history of this dessert reflects the diverse cultural influences that have shaped Sicily over centuries, combining elements from Arab, Norman, and Spanish culinary traditions.
The preparation of Cassata Siciliana requires some patience and attention to detail, but the end result is a showstopper that’s sure to impress your guests. The key to a successful cassata is to balance the flavors and textures while maintaining the vibrant aesthetics that are characteristic of this dessert.
This recipe serves 4-6 people and provides a step-by-step guide to creating this delightful Sicilian masterpiece in your own kitchen.
Ingredients:
- 1 sponge cake, 9-inch round
- 1 1/2 cups ricotta cheese
- 1/2 cup powdered sugar
- 1 teaspoon vanilla extract
- 1/2 cup dark chocolate chips
- 1/2 cup candied citrus peel
- 1/2 cup candied cherries
- 1/2 cup marzipan
- Green food coloring
- 1/2 cup apricot jam
- 1 cup icing sugar
- 3 tablespoons water
- Assorted candied fruits for decoration
Cooking Instructions:
- Prepare the Ricotta Filling: In a large mixing bowl, combine the ricotta cheese, powdered sugar, and vanilla extract. Mix until smooth and creamy. Fold in the dark chocolate chips, candied citrus peel, and half of the candied cherries. Set aside in the refrigerator to chill.
- Prepare the Marzipan: Knead the marzipan with a few drops of green food coloring until you achieve a uniform color. Roll out the marzipan into a thin sheet large enough to cover the sides of the cake.
- Assemble the Cake Layers: Slice the sponge cake horizontally into three equal layers. Place the bottom layer on a serving platter and spread half of the ricotta mixture evenly over it. Place the second layer of sponge cake on top and spread the remaining ricotta mixture. Place the final layer of sponge cake on top.
- Cover with Marzipan: Carefully drape the green marzipan around the sides of the cake, gently pressing to adhere. Trim any excess marzipan at the top.
- Glaze the Cake: In a small saucepan, heat the apricot jam over low heat until smooth. Strain and brush over the top of the cake to create a sticky surface for the icing.
- Prepare the Icing: In a small bowl, mix the icing sugar with water until it reaches a smooth, pourable consistency. Pour the icing over the top of the cake, allowing it to drip down the sides slightly.
- Decorate: Arrange the remaining candied cherries and assorted candied fruits on top of the icing for a colorful finish. Allow the cake to set in the refrigerator for at least 2 hours before serving.
Extra Tips:
When making Cassata Siciliana, it’s important to use high-quality ricotta cheese and fresh candied fruits to achieve the best flavor and texture.
Make sure that the sponge cake is completely cool before assembling to prevent the ricotta filling from becoming too soft. If you prefer a more traditional look, you can also add a touch of liqueur, such as Marsala or Cointreau, to the ricotta mixture for additional depth of flavor.
Finally, take your time while assembling and decorating the cake to guarantee a beautiful presentation.
Zeppole: Deep-Fried Dough Delights
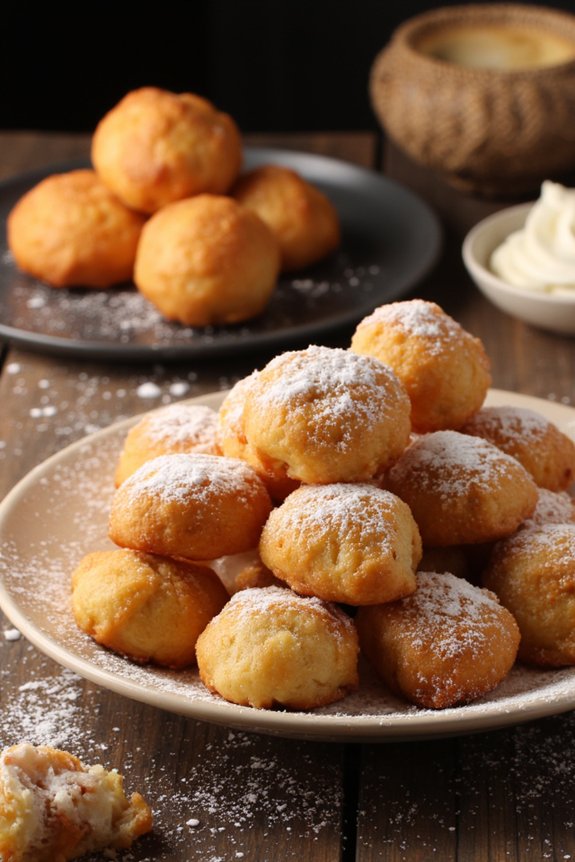
Zeppole are delightful deep-fried dough treats that are a staple in Italian cuisine, particularly enjoyed during festivals and celebrations. These fluffy and slightly sweet pastries are often dusted with powdered sugar and can be filled with a variety of luscious creams or jams. Originating from Southern Italy, zeppole are most commonly associated with the feast of Saint Joseph, celebrated on March 19th.
Whether served as a breakfast treat, dessert, or a festive indulgence, zeppole’s crispy exterior and soft, airy interior make them an irresistible delight for any occasion.
Crafting the perfect zeppole involves a simple batter made from flour, eggs, butter, and milk, which is then deep-fried to golden perfection. The key to achieving the ideal texture lies in the frying process, which guarantees the zeppole are light and fluffy on the inside while maintaining a crispy outer layer. Traditionally, these dough delights can be served plain or filled with various sweet options such as pastry cream, ricotta, or even Nutella.
For those looking to add a touch of Italian sweetness to their repertoire, this zeppole recipe is a must-try.
Ingredients for Serving Size: 4-6 People
- 1 cup all-purpose flour
- 1/4 cup granulated sugar
- 1/4 teaspoon salt
- 1 teaspoon baking powder
- 1/2 cup whole milk
- 2 tablespoons unsalted butter
- 1 teaspoon vanilla extract
- 2 large eggs
- Vegetable oil for frying
- Powdered sugar for dusting
- Optional fillings: pastry cream, ricotta, Nutella, or jam
Cooking Instructions
- Prepare the Batter: In a medium bowl, combine the flour, sugar, salt, and baking powder. In a small saucepan, heat the milk and butter over low heat until the butter is melted. Remove from heat and stir in the vanilla extract.
- Mix the Batter: Gradually add the wet ingredients to the dry ingredients, stirring until combined. Add in the eggs, one at a time, mixing well after each addition until the batter is smooth and thick.
- Heat the Oil: Pour vegetable oil into a deep pot or frying pan until it’s about 2 inches deep. Heat the oil over medium heat until it reaches 350°F (175°C).
- Fry the Zeppole: Using a tablespoon or a small cookie scoop, carefully drop small amounts of batter into the hot oil. Fry in batches, making sure not to overcrowd the pan, until golden brown on all sides, about 3-4 minutes per batch. Use a slotted spoon to transfer the zeppole to a paper towel-lined plate to drain excess oil.
- Dust and Serve: Once all the zeppole are fried, dust them generously with powdered sugar. If desired, fill them with your choice of filling by using a piping bag fitted with a narrow tip. Serve immediately while they’re warm and enjoy the delightful taste of freshly made zeppole.
Extra Tips
For the best results, verify the oil is at the correct temperature before frying; too hot, and the zeppole will burn, too cool, and they’ll absorb excess oil. If you don’t have a thermometer, test the oil by dropping a small piece of batter into it; it should sizzle and rise to the top immediately.
Additionally, keep the zeppole in a single layer while draining to avoid them becoming soggy. Finally, experiment with different fillings and toppings to customize your zeppole to your taste preferences. Enjoy these Italian treats fresh, as they’re best eaten the day they’re made.