

Mornings feel a little brighter with a touch of sweetness, don’t they? Picture yourself savoring freshly baked cornetti, bursting with citrus and vanilla flavors. From the rich layers of ricotta-filled sfogliatelle to the delicate crunch of anise biscotti, Italian pastries turn breakfast into a delightful indulgence. Let’s explore these lovely recipes and find the one that speaks to your morning heart.
Classic Cornetti

Cornetti, the Italian cousin to the French croissant, is a staple breakfast pastry in Italy. Unlike the classic croissant, cornetti are often made with a touch of sweetness and sometimes flavored with citrus zest or vanilla. They’re typically enjoyed with a morning espresso or cappuccino.
Making cornetti at home allows you to experience a taste of Italy right in your kitchen, offering a delightful start to the day with their flaky, buttery texture and golden-brown exterior.
Creating these delicious pastries involves a process similar to that of making croissants, with layers of dough and butter rolled and folded several times to achieve the perfect flakiness. While the process requires time and patience, the end result is well worth the effort.
Whether you prefer them plain, filled with jam, chocolate, or custard, these cornetti will surely become a beloved part of your breakfast routine.
Ingredients (Serves 4-6):
- 500g all-purpose flour
- 200ml whole milk
- 50g unsalted butter, softened
- 60g sugar
- 1 packet (7g) active dry yeast
- 1 teaspoon salt
- 1 teaspoon vanilla extract
- Zest of 1 lemon
- 250g unsalted butter (for laminating)
- 1 egg (for egg wash)
- 1 tablespoon water (for egg wash)
Instructions:
- Prepare the Dough: In a small saucepan, gently warm the milk until lukewarm. In a large mixing bowl, dissolve the yeast in the warm milk and let it sit for about 5 minutes until it becomes frothy. Add the sugar, softened butter, vanilla extract, lemon zest, and salt, and mix well.
- Combine Ingredients: Gradually add the flour to the wet ingredients, stirring with a wooden spoon until a dough begins to form. Transfer the dough to a lightly floured surface and knead for about 10 minutes until smooth and elastic.
- First Rise: Place the dough in a greased bowl, cover it with a damp cloth, and let it rise in a warm place for about 1-2 hours, or until it has doubled in size.
- Prepare Butter for Laminating: While the dough is rising, prepare the butter for laminating. Place the 250g of butter between two sheets of parchment paper and flatten it into a rectangle about 1/2 inch thick. Chill it in the refrigerator until firm but still pliable.
- Laminating the Dough: Once the dough has risen, roll it out on a floured surface into a rectangle large enough to enclose the butter. Place the chilled butter in the center of the dough and fold the dough over the butter, sealing the edges. Roll the dough out into a long rectangle, then fold it into thirds like a letter. Wrap it in plastic wrap and refrigerate for 30 minutes.
- Repeat Folding: Repeat the rolling and folding process two more times, chilling the dough for 30 minutes between each fold. This creates the layers needed for the flaky texture.
- Shape the Cornetti: After the final chilling, roll out the dough to about 1/4 inch thickness. Cut the dough into triangles, then roll each triangle from the base to the tip to form a crescent shape.
- Second Rise: Place the shaped cornetti on a baking sheet lined with parchment paper, cover with a cloth, and let them rise for about 1 hour until slightly puffed.
- Egg Wash and Bake: Preheat your oven to 200°C (390°F). In a small bowl, whisk together the egg and water for the egg wash. Brush the tops of the cornetti with the egg wash. Bake in the preheated oven for 15-20 minutes, or until golden brown and crisp.
- Cool and Serve: Allow the cornetti to cool slightly on a wire rack before serving. Enjoy them plain or with your favorite fillings.
Extra Tips:
To achieve the best possible texture, make sure your butter remains cold throughout the laminating process, as this helps in creating distinct layers. If your kitchen is warm, consider chilling your rolling pin and work surface before starting.
Additionally, if you prefer a sweeter pastry, you can sprinkle some sugar over the dough before rolling it into its crescent shape. For an extra touch of authenticity, serve your cornetti with a dusting of powdered sugar or a drizzle of honey just before serving.
Ricotta-Filled Sfogliatelle

Sfogliatelle, a traditional Italian pastry, is a delightful treat known for its unique shape and rich filling. Originating from the Campania region, this pastry often steals the show with its crisp, shell-like exterior and a luscious filling made of ricotta cheese, semolina, and citrus zest.
Preparing sfogliatelle is a labor of love, requiring attention to detail and patience to craft the perfect flaky layers that make this pastry truly special.
The ricotta-filled sfogliatelle is an exquisite breakfast pastry that pairs perfectly with a morning coffee or an afternoon espresso. The combination of the creamy ricotta filling with the invigorating hint of citron or orange zest offers a burst of flavor with every bite.
Although making sfogliatelle from scratch can be challenging, the end result is a rewarding experience that brings a taste of Italy to your kitchen.
Ingredients for 4-6 servings:
- 2 cups all-purpose flour
- 1/2 cup fine semolina flour
- 1/2 teaspoon salt
- 1/2 cup water
- 1/2 cup unsalted butter, softened
- 1 cup whole milk ricotta cheese
- 1/2 cup granulated sugar
- 1/2 teaspoon vanilla extract
- 1 teaspoon orange or lemon zest
- 1 large egg
- 1/4 cup candied citrus peel, finely chopped
- Powdered sugar for dusting
Cooking Instructions:
- Prepare the Dough: In a large mixing bowl, combine the all-purpose flour, semolina flour, and salt. Gradually add the water, mixing until a rough dough forms. Knead the dough on a floured surface for about 10 minutes until it’s smooth and elastic. Wrap the dough in plastic wrap and let it rest in the refrigerator for at least 1 hour.
- Prepare the Filling: In another bowl, mix the ricotta cheese, granulated sugar, vanilla extract, and citrus zest until smooth. Stir in the egg and candied citrus peel until fully incorporated. Cover and refrigerate the filling until needed.
- Roll Out Dough: After the resting period, roll out the dough into a long, thin sheet, about 1/8 inch thick. Use a pasta machine if available to achieve an even thickness. Cut the sheet into 4-inch diameter circles.
- Shape the Sfogliatelle: Take each dough circle and gently stretch the edges to form a cone shape. Fill each cone with about 1 tablespoon of the ricotta mixture, then carefully seal the edges, making sure the filling is enclosed.
- Bake the Pastries: Preheat the oven to 375°F (190°C). Place the shaped pastries on a baking sheet lined with parchment paper. Brush each pastry with melted butter. Bake for 20-25 minutes or until they’re golden brown and crisp.
- Final Touches: Once baked, remove the sfogliatelle from the oven and let them cool on a wire rack. Dust generously with powdered sugar before serving.
Extra Tips:
When making sfogliatelle, patience is key. Confirm the dough is rolled out as thinly as possible to achieve the signature flaky texture.
Using a pasta machine can help with this step. If the dough becomes too sticky while rolling, lightly dust it with flour to prevent sticking. Storing the ricotta filling in the refrigerator allows it to firm up, making it easier to fill the pastry shells.
Enjoy these pastries fresh out of the oven for the best taste and texture.
Lemon-Glazed Biscotti

Lemon-Glazed Biscotti is a delightful Italian breakfast pastry that combines the zesty flavor of fresh lemons with the satisfying crunch of classic biscotti. These twice-baked cookies are perfect for enjoying with your morning coffee or tea, offering a rejuvenating twist on traditional biscotti with their citrusy glaze. The recipe is simple yet elegant, making it an ideal treat to share with family and friends.
This recipe yields enough biscotti for 4-6 people, making it perfect for a small gathering or as a delightful homemade gift. The key to achieving the perfect biscotti lies in the right balance of ingredients and the careful baking process. The lemon glaze adds an extra layer of flavor and a touch of sweetness that complements the biscotti’s crunch beautifully.
Ingredients:
- 2 cups all-purpose flour
- 1 cup granulated sugar
- 1 teaspoon baking powder
- 1/4 teaspoon salt
- 3 large eggs
- 1 tablespoon lemon zest
- 1 teaspoon vanilla extract
- 1/2 cup unsalted butter, melted
- 1/4 cup fresh lemon juice
- 1 cup sliced almonds
For the Lemon Glaze:
- 1 cup powdered sugar
- 2 tablespoons fresh lemon juice
- 1 teaspoon lemon zest
Cooking Instructions:
- Preheat and Prepare: Preheat your oven to 350°F (175°C). Line a baking sheet with parchment paper to prevent sticking.
- Mix Dry Ingredients: In a large bowl, whisk together the flour, sugar, baking powder, and salt until well combined.
- Mix Wet Ingredients: In a separate bowl, beat the eggs, then mix in the lemon zest, vanilla extract, melted butter, and lemon juice. Stir until all the ingredients are well integrated.
- Combine Mixtures: Gradually add the wet ingredients to the dry ingredients, stirring continuously until a dough forms. Fold in the sliced almonds until evenly distributed.
- Shape the Dough: Divide the dough in half. On a lightly floured surface, shape each half into a log about 12 inches long and 3 inches wide. Place the logs on the prepared baking sheet, leaving space between them.
- First Bake: Bake the logs in the preheated oven for 25-30 minutes or until they’re golden brown and firm to the touch. Remove from the oven and let them cool for 10 minutes.
- Slice and Second Bake: Once cooled slightly, use a serrated knife to slice the logs diagonally into 1/2-inch thick slices. Arrange the slices, cut side down, back on the baking sheet. Bake for another 10-15 minutes, flipping them halfway through, until they’re crisp and golden on both sides.
- Prepare the Glaze: While the biscotti are baking, whisk together the powdered sugar, lemon juice, and lemon zest in a small bowl until smooth.
- Glaze the Biscotti: Once the biscotti are fully baked and cooled, drizzle the lemon glaze over each piece. Allow the glaze to set before serving.
Extra Tips:
To guarantee your Lemon-Glazed Biscotti have the perfect texture, make sure not to overbake them during the first bake, as they’ll continue to dry and crisp during the second bake.
If you prefer a softer biscotti, you can slightly reduce the second baking time. Also, for a more intense lemon flavor, consider adding a bit more lemon zest or a drop of lemon extract to the dough.
Store your biscotti in an airtight container to maintain their crispness for several days. Enjoy them with a warm beverage for the ultimate Italian breakfast experience.
Fresh Fruit Crostata

The Fresh Fruit Crostata is a delightful Italian breakfast pastry that combines the buttery goodness of a shortcrust pastry with the juicy sweetness of seasonal fruits. This rustic tart is perfect for showcasing the vibrant flavors and colors of fresh produce, making it a fantastic choice for a weekend brunch or a special breakfast treat.
The crostata’s simplicity allows the natural taste of the fruits to shine, while the crumbly pastry provides a satisfying contrast in texture. Ideal for serving 4-6 people, this recipe involves creating a homemade pastry base, which is then filled with a variety of fruits. You can choose your favorite combination of berries, stone fruits, or even figs, depending on what’s in season.
The Fresh Fruit Crostata isn’t only visually appealing but also incredibly versatile, as it can be adapted to suit different tastes and preferences.
Ingredients:
- 1 1/2 cups all-purpose flour
- 1/2 cup granulated sugar
- 1/2 teaspoon salt
- 1/2 cup unsalted butter, chilled and diced
- 1 large egg
- 1 teaspoon vanilla extract
- 1 tablespoon lemon zest
- 2 cups mixed fresh fruits (e.g., berries, peaches, plums)
- 2 tablespoons cornstarch
- 2 tablespoons lemon juice
- 1/4 cup apricot jam
- 1 tablespoon water
- 1 egg, beaten (for egg wash)
- 1 tablespoon turbinado sugar (optional)
Cooking Instructions:
1. Prepare the Dough: In a large bowl, combine the flour, sugar, and salt. Add the diced butter and use a pastry cutter or your fingers to blend until the mixture resembles coarse crumbs.
In a small bowl, whisk together the egg and vanilla extract. Pour this mixture into the dry ingredients, adding the lemon zest, and mix until the dough begins to come together.
2. Chill the Dough: Gather the dough into a ball, wrap it in plastic wrap, and refrigerate for at least 30 minutes. Chilling the dough helps it firm up, making it easier to roll out and preventing it from shrinking during baking.
3. Prepare the Fruits: While the dough chills, in a medium bowl, toss the fresh fruits with cornstarch and lemon juice. This mixture will help thicken the juices released by the fruits during baking, preventing a soggy crust.
4. Roll Out the Dough: Preheat your oven to 375°F (190°C). On a lightly floured surface, roll out the dough into a 12-inch circle. Transfer the dough to a parchment-lined baking sheet.
5. Assemble the Crostata: Spread the fruit mixture evenly over the dough, leaving a 2-inch border around the edges. Fold the edges of the dough over the fruit, pleating as necessary to enclose the filling partially. This freeform style gives the crostata its characteristic rustic look.
6. Apply the Egg Wash: Brush the exposed edges of the pastry with the beaten egg. Sprinkle with turbinado sugar for extra crunch and a hint of sweetness, if desired.
7. Bake the Crostata: Place the crostata in the preheated oven and bake for 35-40 minutes, or until the crust is golden brown and the fruit filling is bubbly.
8. Glaze the Crostata: In a small saucepan, heat the apricot jam and water over low heat until melted and smooth. Brush this glaze over the warm fruit to give it a glossy finish.
Extra Tips:
When selecting fruits for your crostata, opt for those that are ripe but firm to guarantee they hold their shape during baking.
Feel free to experiment with different fruit combinations, adjusting the sugar and lemon juice to balance the sweetness and acidity. Remember, the crostata is best enjoyed warm, and pairing it with a scoop of vanilla ice cream or a dollop of whipped cream can elevate the experience.
Finally, if you find the dough is too sticky to handle, sprinkle it with a little more flour to make it more manageable.
Chocolate Hazelnut Panini

Chocolate Hazelnut Panini is a delightful Italian-inspired breakfast treat that combines the rich flavors of chocolate and the nutty taste of hazelnuts, all nestled between slices of warm, toasted bread. This indulgent pastry is perfect for those mornings when you want to start your day with a touch of sweetness. The creamy hazelnut spread melts into the bread, creating a gooey, delicious filling that’s hard to resist.
Pair it with a cup of freshly brewed coffee or a frothy cappuccino for an authentic Italian breakfast experience.
Making Chocolate Hazelnut Panini at home is simple and requires just a few key ingredients. The key to a perfect panini is using quality bread that can hold up to the filling without becoming soggy. Traditionally, ciabatta or a rustic Italian loaf is used, but feel free to experiment with your favorite type of bread.
The chocolate hazelnut spread is the star of the dish, so opt for a high-quality brand or make your own if you’re feeling adventurous. This recipe serves 4-6 people, making it ideal for a small gathering or a family breakfast.
Ingredients:
- 1 loaf of ciabatta or rustic Italian bread
- 1 cup of chocolate hazelnut spread
- 1/2 cup of chopped hazelnuts
- 2 tablespoons of butter
- Powdered sugar for dusting (optional)
Cooking Instructions:
- Prepare the Bread: Slice the ciabatta loaf into approximately 1/2 inch thick slices. You should have 8-12 slices depending on the size of the loaf. Make sure that the slices are even to promote even toasting.
- Spread the Filling: Generously spread the chocolate hazelnut spread on one side of each slice of bread. Sprinkle chopped hazelnuts over half of the slices, then top with the other slices to form sandwiches.
- Butter the Bread: Lightly butter the outside of each sandwich. This will help create a crispy, golden crust when the panini is grilled.
- Heat the Panini Press: Preheat your panini press according to the manufacturer’s instructions. If you don’t have a panini press, a grill pan or skillet can be used. Just be sure to press the sandwiches with a heavy pan or lid.
- Grill the Panini: Place the sandwiches on the preheated panini press and close the lid. Grill for 3-5 minutes, or until the bread is golden brown and the chocolate hazelnut spread is melted. If using a grill pan, cook for 2-3 minutes on each side, pressing down firmly.
- Serve: Remove the panini from the press and allow them to cool slightly. Dust with powdered sugar if desired and serve warm.
Extra Tips:
For an extra crunchy texture, you can toast the hazelnuts lightly before adding them to the panini. This enhances their flavor and adds a nice bite to the sandwich.
If you prefer a sweeter panini, consider adding a few slices of ripe banana before grilling. This will create a flavorful combination of banana, chocolate, and hazelnut.
Remember not to overfill the panini, as this can cause the filling to ooze out while grilling. Enjoy your Chocolate Hazelnut Panini fresh off the press for the best taste and texture.
Almond Amaretti Cookies
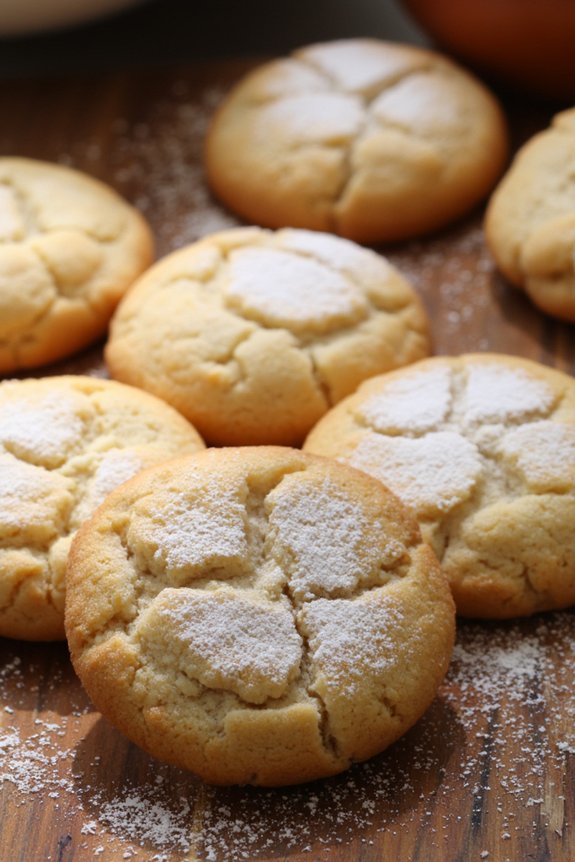
Almond Amaretti Cookies are a delightful Italian treat that make for a perfect breakfast pastry. These cookies boast a rich almond flavor and a distinctively chewy texture, making them a popular choice among fans of Italian cuisine.
Amaretti cookies are traditionally made with almond flour and almond extract, which gives them their characteristic aroma and taste. They’re often paired with a morning espresso or cappuccino, offering a sweet and satisfying start to the day.
This recipe for Almond Amaretti Cookies serves 4-6 people and is relatively simple to make, requiring only a handful of ingredients. Whether you’re an experienced baker or a novice in the kitchen, you’ll find that these cookies come together quickly and bake up beautifully.
Follow the instructions carefully, and you’ll have a batch of delicious Amaretti cookies ready to enjoy with your morning coffee or tea.
Ingredients:
- 2 cups almond flour
- 1 cup granulated sugar
- 2 large egg whites
- 1 teaspoon almond extract
- 1/4 teaspoon vanilla extract
- 1/8 teaspoon salt
- Powdered sugar for dusting
Cooking Instructions:
- Preheat the Oven: Start by preheating your oven to 325°F (165°C). Line a baking sheet with parchment paper to prevent the cookies from sticking.
- Prepare the Cookie Dough: In a large mixing bowl, combine the almond flour, granulated sugar, and salt. Mix well to guarantee even distribution. In a separate bowl, whisk the egg whites until they become frothy. Add the almond extract and vanilla extract to the egg whites and whisk again to combine.
- Mix the Ingredients: Pour the egg white mixture into the dry ingredients. Using a spatula, gently fold the ingredients together until a sticky dough forms. Be careful not to overmix, as this can affect the texture of the cookies.
- Shape the Cookies: With slightly damp hands, form the dough into small balls, about 1 inch in diameter. Arrange the balls on the prepared baking sheet, leaving some space between each cookie.
- Dust with Powdered Sugar: Lightly dust the tops of the cookies with powdered sugar. This will give them a lovely, crackled appearance once baked.
- Bake: Place the baking sheet in the preheated oven and bake for 20-25 minutes, or until the cookies are lightly golden on the edges. The centers should remain soft.
- Cool and Serve: Remove the cookies from the oven and allow them to cool on the baking sheet for a few minutes before transferring them to a wire rack to cool completely. Serve the cookies once they’ve cooled and enjoy!
Extra Tips:
For the best texture, confirm that the almond flour is finely ground. If you prefer a more pronounced almond flavor, you can increase the almond extract slightly, but be cautious as it can become overpowering.
If the dough is too sticky to handle, you can chill it in the refrigerator for about 15 minutes to make it easier to work with. Store any leftover cookies in an airtight container at room temperature for up to a week to maintain their freshness and chewiness.
Pistachio Cannoli
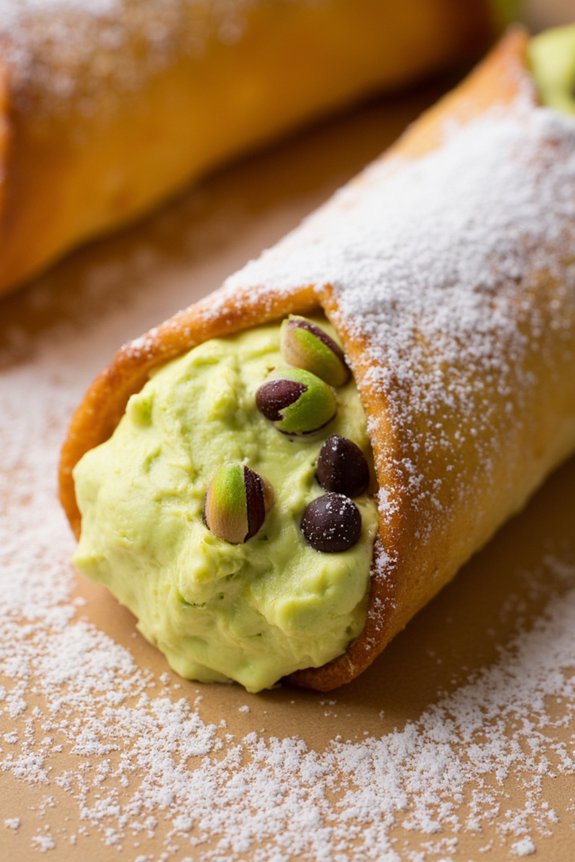
Pistachio Cannoli are a delightful Italian breakfast pastry that combines the rich flavor of pistachios with the creamy sweetness of ricotta cheese. These crisp, tube-shaped pastries are traditionally fried until golden brown and then filled with a luscious pistachio ricotta mixture, making for a perfect morning treat or an indulgent dessert.
Whether you’re serving them at a family brunch or enjoying them with a cup of coffee, Pistachio Cannoli are guaranteed to impress with their unique flavor and texture.
The key to making authentic Pistachio Cannoli lies in perfecting both the shell and the filling. The shell should be thin and crispy, providing the perfect vessel for the creamy, nutty filling. The filling itself should be smooth and rich, made with high-quality ricotta cheese and finely ground pistachios.
By balancing these two elements, you can create a pastry that’s both satisfying and sophisticated, bringing a touch of Italian tradition to your breakfast table.
Ingredients for Serving Size of 4-6 People:
- 1 1/2 cups all-purpose flour
- 2 tablespoons granulated sugar
- 1/2 teaspoon salt
- 2 tablespoons unsalted butter, chilled and cubed
- 1 egg yolk
- 1/2 cup Marsala wine or dry white wine
- Vegetable oil, for frying
- 1 1/2 cups ricotta cheese, drained
- 1/2 cup powdered sugar
- 1 teaspoon vanilla extract
- 1/2 cup finely ground pistachios
- 1/4 cup mini chocolate chips (optional)
- Additional powdered sugar, for dusting
- Whole pistachios, for garnish
Cooking Instructions:
1. Prepare the Dough: In a large mixing bowl, combine the flour, granulated sugar, and salt. Add the chilled butter and use your fingers to rub it into the flour mixture until it resembles coarse crumbs.
Mix in the egg yolk and Marsala wine, and knead the dough until smooth. Wrap the dough in plastic wrap and refrigerate for at least 1 hour.
2. Roll Out the Dough: On a lightly floured surface, roll out the dough to about 1/8-inch thickness. Cut circles using a round cookie cutter (about 3-4 inches in diameter). Wrap each circle around a metal cannoli tube, sealing the edges with a little water.
3. Fry the Shells: In a deep saucepan, heat vegetable oil to 350°F (175°C). Carefully add the dough-wrapped tubes to the oil, frying until golden brown, about 2-3 minutes.
Remove from oil and drain on paper towels. Once cool, gently slide the shells off the tubes.
4. Make the Filling: In a medium bowl, combine the drained ricotta cheese, powdered sugar, and vanilla extract. Mix until smooth.
Fold in the ground pistachios and mini chocolate chips, if using. Transfer the filling to a piping bag.
5. Fill the Cannoli: Pipe the pistachio ricotta filling into each shell, guaranteeing both ends are filled completely. Dust the filled cannoli with additional powdered sugar and garnish each end with whole pistachios.
6. Serve: Serve the Pistachio Cannoli immediately for the best texture and flavor.
Extra Tips:
To make sure your ricotta cheese is well-drained and not too watery, strain it through a cheesecloth or a fine-mesh sieve for a few hours or overnight in the refrigerator. This will help achieve a rich, thick filling.
If you don’t have cannoli tubes, you can make makeshift ones using aluminum foil wrapped around cylindrical objects, like a dowel or handle. Additionally, for extra flavor, consider adding a pinch of cinnamon or a splash of orange zest to the filling.
Apricot Jam Croissant

Apricot Jam Croissants are a delightful Italian breakfast pastry that brings a taste of Italy’s rich culinary tradition to your morning routine. These golden-brown, buttery pastries are filled with the sweet and tangy flavor of apricot jam, offering a perfect balance of textures and flavors. The flaky, tender croissant dough envelops the luscious apricot center, creating an irresistible treat that’s perfect for breakfast or brunch.
Whether you’re serving them fresh out of the oven or preparing them for a special occasion, these croissants are bound to impress.
Crafting Apricot Jam Croissants at home is a rewarding experience that allows you to indulge in a homemade version of this classic pastry. The process involves making a laminated dough, which requires a bit of patience and technique but pays off with its signature flakiness. The apricot jam filling adds a burst of fruitiness that complements the rich butteriness of the croissant, making each bite a harmonious blend of flavors.
This recipe will guide you through creating 4-6 servings of delicious Apricot Jam Croissants, perfect for sharing with family and friends.
Ingredients (Serves 4-6):
- 2 cups all-purpose flour
- 1 cup unsalted butter, cold
- 1/2 cup warm milk
- 1 packet (2 1/4 teaspoons) active dry yeast
- 2 tablespoons sugar
- 1 teaspoon salt
- 1/2 cup apricot jam
- 1 egg (for egg wash)
Instructions:
- Prepare the Dough: Begin by activating the yeast. In a small bowl, mix the warm milk, sugar, and yeast. Let it sit for about 5-10 minutes until it becomes frothy. In a large mixing bowl, combine the flour and salt. Add the yeast mixture to the flour and mix until a dough begins to form.
- Incorporate the Butter: Cut the cold butter into small cubes. Gently knead the butter into the dough, making sure some larger pieces remain for flakiness. This step is vital for the lamination process.
- Lamination Process: Roll out the dough into a rectangle on a floured surface. Fold it into thirds like a letter. Turn it 90 degrees, and roll it out again. Repeat this folding and rolling process three times, chilling the dough for 30 minutes between each turn.
- Shape the Croissants: After the final chill, roll the dough into a large rectangle, about 1/4 inch thick. Cut the dough into triangles. Place a spoonful of apricot jam at the base of each triangle. Carefully roll each triangle from the base to the tip to form a croissant shape.
- Proof the Croissants: Place the shaped croissants on a baking sheet lined with parchment paper. Cover them with a clean kitchen towel and let them rise in a warm place for about 1-2 hours, or until doubled in size.
- Bake: Preheat your oven to 375°F (190°C). Brush the croissants with a beaten egg for a shiny finish. Bake the croissants for 15-20 minutes or until they’re golden brown and flaky.
Extra Tips:
For best results, make sure that all your ingredients, particularly the butter, are very cold before starting the lamination process. This helps achieve the flakiness characteristic of good croissants.
If you notice the dough becoming too soft while working, pop it back in the refrigerator to firm up. Additionally, feel free to experiment with different fruit jams if apricot isn’t your favorite, such as raspberry or strawberry, to vary the flavor profile while maintaining the croissant’s delicious essence.
Enjoy your homemade Italian breakfast pastry fresh, as they’re at their best the day they’re baked.
Zesty Orange Ciambella

The Zesty Orange Ciambella is a delightful Italian breakfast pastry that promises to invigorate your morning with its vibrant citrus flavor. This light and fluffy cake, shaped like a ring, is traditionally enjoyed with a cup of espresso or cappuccino. Its subtle sweetness and the revitalizing zest of orange make it a perfect companion for a leisurely breakfast or a mid-morning snack. The aromatic blend of freshly grated orange zest and juice provides a delightful burst of flavor in every bite.
Creating a Zesty Orange Ciambella is a simple yet rewarding process that involves basic ingredients commonly found in your pantry. The key to achieving its signature lightness and moist texture lies in the careful blending of the wet and dry ingredients, guaranteeing that the batter is smooth and well-aerated. By following these steps, you can bring a touch of Italian charm to your breakfast table, and share a taste of the Mediterranean with family and friends.
Ingredients (Serves 4-6):
- 2 cups all-purpose flour
- 1 cup granulated sugar
- 3 large eggs
- 1/2 cup vegetable oil
- 1/2 cup freshly squeezed orange juice
- Zest of 2 oranges
- 2 teaspoons baking powder
- 1/2 teaspoon salt
- 1 teaspoon vanilla extract
- Powdered sugar for dusting
Cooking Instructions:
- Preheat the Oven: Start by preheating your oven to 350°F (175°C). Grease a ciambella or bundt pan with a little vegetable oil or butter to prevent sticking.
- Mix Dry Ingredients: In a medium-sized bowl, whisk together the flour, baking powder, and salt. This guarantees that the baking powder is evenly distributed throughout the flour.
- Combine Wet Ingredients: In a separate large bowl, beat the eggs and sugar together using an electric mixer or whisk until the mixture is light and fluffy. This should take about 3-4 minutes.
- Add Orange Elements: To the egg mixture, add the vegetable oil, orange juice, orange zest, and vanilla extract. Mix until well combined.
- Incorporate Dry Ingredients: Gradually add the dry ingredients to the wet mixture, stirring gently with a spatula or wooden spoon. Mix until just combined, being careful not to overmix, as this can make the ciambella dense.
- Pour and Bake: Pour the batter into the prepared ciambella or bundt pan, smoothing the top with a spatula. Place the pan in the preheated oven and bake for 30-35 minutes, or until a toothpick inserted into the center comes out clean.
- Cool and Serve: Allow the ciambella to cool in the pan for about 10 minutes before turning it out onto a wire rack to cool completely. Once cooled, dust with powdered sugar before slicing and serving.
Extra Tips:
For the best flavor, use fresh oranges for both the juice and zest. Confirm that the oranges are washed thoroughly before zesting.
If you prefer a sweeter pastry, consider adding a glaze made from powdered sugar and orange juice to the cooled ciambella. This adds an extra layer of citrusy sweetness.
Additionally, experimenting with other citrus fruits, such as lemons or clementines, can offer a delightful variation of this classic Italian breakfast treat.
Nutella-Stuffed Bomboloni
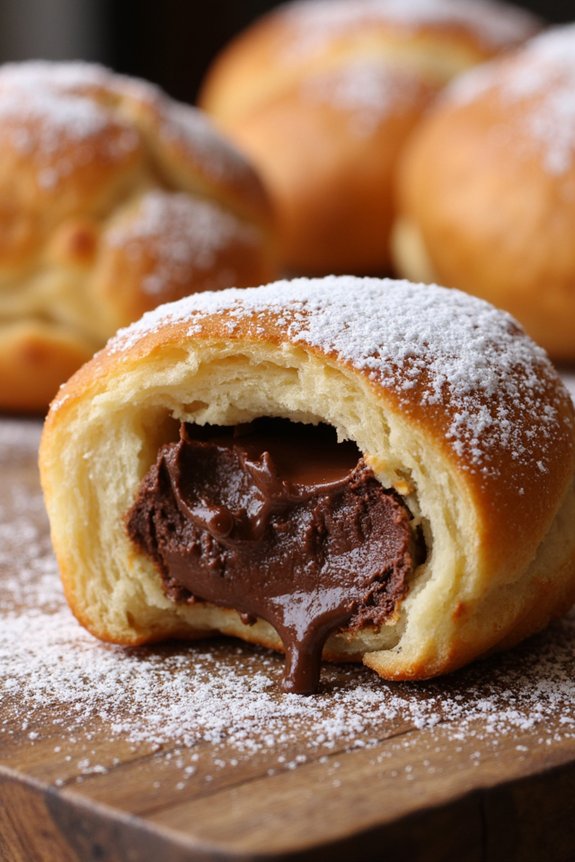
Nutella-Stuffed Bomboloni is a delightful Italian breakfast pastry that combines the soft, fluffy texture of traditional bomboloni with the rich, creamy taste of Nutella. These delicious doughnuts are perfect for a special breakfast treat or a sweet snack any time of the day.
Originating from Italy, Bomboloni are similar to doughnuts but are typically filled with a variety of fillings, with Nutella being one of the most beloved options.
To create the perfect Nutella-Stuffed Bomboloni, you’ll need to prepare a light and airy dough, allow it to rise, and then fill it generously with Nutella before frying to golden perfection. This recipe is designed to serve 4-6 people, making it ideal for a family breakfast or a small gathering.
The warm, freshly made bomboloni will have a crisp exterior and a gooey, chocolatey center that’s sure to impress your guests.
Ingredients:
- 2 1/4 teaspoons active dry yeast
- 1/4 cup warm water (about 110°F)
- 3 1/2 cups all-purpose flour
- 1/4 cup granulated sugar
- 1 teaspoon salt
- 3/4 cup whole milk, warmed
- 1/4 cup unsalted butter, melted
- 2 large eggs
- 1 teaspoon vanilla extract
- Vegetable oil, for frying
- 1 cup Nutella, for filling
- Powdered sugar, for dusting
Instructions:
- Activate the Yeast: In a small bowl, dissolve the active dry yeast in warm water. Allow it to sit for about 5 minutes, or until it becomes frothy.
- Mix the Dry Ingredients: In a large mixing bowl, combine the all-purpose flour, granulated sugar, and salt. Stir to evenly distribute the ingredients.
- Combine Wet Ingredients: In a separate bowl, mix the warmed whole milk, melted butter, eggs, and vanilla extract. Add the frothy yeast mixture to this wet mixture and stir until well combined.
- Form the Dough: Gradually add the wet ingredients to the dry ingredients, mixing with a wooden spoon or dough hook until a smooth dough forms. The dough should be slightly sticky but manageable.
- Knead the Dough: Transfer the dough onto a floured surface and knead for about 8-10 minutes until it becomes smooth and elastic. If the dough is too sticky, add a little more flour as needed.
- First Rise: Place the dough in a lightly greased bowl, cover it with a damp cloth or plastic wrap, and let it rise in a warm place for about 1-2 hours, or until it has doubled in size.
- Shape the Bomboloni: Once the dough has risen, punch it down to release the air. Roll it out on a floured surface to about 1/2 inch thickness. Use a circular cutter (about 3 inches in diameter) to cut out rounds.
- Second Rise: Place the rounds on a floured baking sheet, cover them lightly, and let them rise again for about 30 minutes.
- Fry the Bomboloni: Heat vegetable oil in a deep fryer or large pot to 350°F (175°C). Fry the dough rounds in batches, about 2-3 minutes per side, until they’re golden brown. Remove with a slotted spoon and drain on paper towels.
- Fill with Nutella: Once the bomboloni are cool enough to handle, use a pastry bag fitted with a small tip to inject Nutella into the center of each bombolone. Be generous with the filling.
- Final Touches: Dust the filled bomboloni with powdered sugar before serving.
Extra Tips:
To guarantee your Nutella-Stuffed Bomboloni have the best texture, make sure to properly knead the dough until it’s smooth and elastic. This will help the dough rise well and create that perfect fluffy interior.
When frying, keep an eye on the oil temperature, as too hot oil will brown the bomboloni too quickly without cooking them thoroughly inside. If you prefer a different filling, you can experiment with fruit preserves or custard for variety.
Enjoy these pastries fresh for the ultimate taste experience.
Custard-Filled Zeppole

Custard-Filled Zeppole are a delightful Italian breakfast pastry that will elevate any morning with their indulgent taste and texture. These traditional pastries are often associated with St. Joseph’s Day in Italy, where they’re prepared with love and shared among family and friends.
Zeppole are made from a light and airy choux pastry that’s fried to perfection, then filled with a rich, creamy custard that melts in your mouth. The combination of the crisp pastry shell with the smooth custard filling creates a perfect balance, making Custard-Filled Zeppole a beloved treat that’s hard to resist.
Preparing Custard-Filled Zeppole at home allows you to enjoy this Italian delicacy fresh and warm, just like they’re served in Italian bakeries. The process involves making a simple choux pastry dough, which is piped into circles and fried to golden perfection.
Once cooled, the zeppole are filled with a luscious vanilla custard that adds a decadent touch. Topped with a dusting of powdered sugar, these pastries are a perfect way to start your day or to enjoy as a special dessert. Below is a recipe to create this delightful dish, serving 4-6 people.
Ingredients:
- 1 cup water
- 1/2 cup unsalted butter
- 1 tablespoon granulated sugar
- 1/4 teaspoon salt
- 1 cup all-purpose flour
- 4 large eggs
- Vegetable oil for frying
- 1 cup whole milk
- 1/2 cup heavy cream
- 1/2 cup granulated sugar
- 1/4 cup cornstarch
- 4 large egg yolks
- 1 teaspoon vanilla extract
- Powdered sugar for dusting
Cooking Instructions:
- Prepare the Custard: In a medium saucepan, whisk together the milk, heavy cream, granulated sugar, and cornstarch until smooth. Place over medium heat and cook, stirring constantly until the mixture thickens and comes to a boil. Remove from heat.
- Add Egg Yolks: In a separate bowl, whisk the egg yolks. Slowly add a small amount of the hot milk mixture to the yolks to temper them, then return the yolk mixture to the saucepan. Cook over medium heat, stirring constantly, until the custard thickens. Remove from heat and stir in the vanilla extract. Transfer to a bowl, cover with plastic wrap touching the surface, and refrigerate until chilled.
- Make the Dough: In a saucepan, combine the water, butter, granulated sugar, and salt over medium heat. Bring to a boil and then add the flour all at once, stirring vigorously with a wooden spoon until the mixture forms a ball and pulls away from the sides of the pan.
- Incorporate the Eggs: Remove the pan from heat and let the dough cool slightly. Add the eggs one at a time, stirring well after each addition, until the dough is smooth and glossy.
- Fry the Zeppole: Heat oil in a deep fryer or large pot to 375°F (190°C). Transfer the dough to a piping bag fitted with a large star tip. Pipe circles of dough onto parchment paper, then carefully transfer into the hot oil. Fry in batches until golden brown, about 4-5 minutes per side. Remove and drain on paper towels.
- Fill the Zeppole: Once cooled, use a piping bag fitted with a small tip to fill each zeppola with the chilled custard through a small hole on the side or top.
- Serve: Dust the filled zeppole with powdered sugar and serve immediately.
Extra Tips:
For the best results, verify the oil is at the correct temperature before frying to achieve a perfectly crispy exterior without making the zeppole greasy.
If the dough is too thick to pipe smoothly, add a little bit of water to the mixture until it reaches the desired consistency. Additionally, when making the custard, it’s crucial to stir constantly to prevent any lumps from forming and to maintain a silky-smooth texture.
Enjoy your Custard-Filled Zeppole fresh, as they’re best enjoyed on the day they’re made.
Tiramisu Breakfast Rolls

Tiramisu Breakfast Rolls combine the rich and indulgent flavors of classic tiramisu with the comforting warmth of freshly baked rolls, making them an irresistible breakfast treat. These rolls are the perfect fusion of coffee-soaked goodness, mascarpone sweetness, and a hint of cocoa, all swirled into a soft, pillowy dough.
Whether you’re hosting a brunch or simply want to start your day with something special, these rolls are guaranteed to impress. The dough is infused with a subtle coffee flavor, while the filling is made with mascarpone cheese, giving it that authentic tiramisu taste.
As they bake, the aroma fills the kitchen with the inviting scent of a traditional Italian dessert, now transformed into a delightful breakfast option. Serving 4-6 people, these Tiramisu Breakfast Rolls are both a feast for the eyes and the taste buds.
Ingredients:
- 3 1/2 cups all-purpose flour
- 1 packet (2 1/4 tsp) active dry yeast
- 1/4 cup granulated sugar
- 1/2 tsp salt
- 1/2 cup warm milk (about 110°F/43°C)
- 1/4 cup brewed coffee, cooled
- 1/4 cup unsalted butter, melted
- 1 large egg
- 1 cup mascarpone cheese
- 1/2 cup powdered sugar
- 1 tsp vanilla extract
- 1/4 cup cocoa powder
- 1 tbsp instant coffee granules
- 1/4 cup mini chocolate chips (optional)
Cooking Instructions:
- Prepare the Dough: In a large mixing bowl, combine the flour, yeast, sugar, and salt. In a separate bowl, mix the warm milk, brewed coffee, melted butter, and egg. Gradually add the wet ingredients to the dry ingredients, stirring until a dough starts to form.
- Knead the Dough: Transfer the dough to a floured surface and knead for about 8-10 minutes until it becomes smooth and elastic. Place the dough in a greased bowl, cover it with a damp cloth, and let it rise in a warm place for about 1 hour or until doubled in size.
- Make the Filling: In a medium bowl, beat the mascarpone cheese, powdered sugar, and vanilla extract until smooth and creamy. In a small bowl, mix the cocoa powder and instant coffee granules together.
- Roll Out the Dough: Once the dough has risen, punch it down and roll it out on a floured surface into a rectangle about 18×12 inches in size.
- Assemble the Rolls: Spread the mascarpone mixture evenly over the dough, leaving a small border around the edges. Sprinkle the cocoa and coffee mixture over the mascarpone, followed by the mini chocolate chips if using.
- Roll and Cut the Dough: Starting from one long side, roll the dough tightly into a log. Using a sharp knife, cut the log into 12 equal rolls.
- Second Rise: Place the rolls cut side up in a greased 9×13 inch baking dish. Cover with a damp cloth and let them rise again for about 30 minutes.
- Bake the Rolls: Preheat the oven to 350°F (175°C). Bake the rolls for 20-25 minutes until they’re golden brown.
- Serve: Allow the rolls to cool slightly before serving. Dust with additional cocoa powder or serve with a drizzle of chocolate sauce if desired.
Extra Tips:
For the best results, make sure the milk and coffee are warm but not too hot when mixing with the yeast to facilitate proper activation. If you prefer a stronger coffee flavor, you can increase the amount of instant coffee granules in the filling.
These rolls can be prepared the night before; simply complete the second rise in the refrigerator and bake them fresh in the morning. Enjoy these rolls warm for the ultimate tiramisu experience.
Anise-Infused Biscotti

Anise-Infused Biscotti is a delightful Italian breakfast pastry that perfectly complements your morning coffee or tea. These twice-baked cookies are infused with the aromatic flavor of anise, giving them a distinct and inviting taste that’s hard to resist. Anise is known for its subtle licorice-like flavor, which adds a unique depth to these crunchy delights.
Originating from the Tuscan region, biscotti have become a staple in Italian cuisine, known for their versatility and long shelf life.
These biscotti are easy to make and can be customized with your choice of nuts or dried fruits to suit your personal preferences. The recipe below yields a serving size of 4-6 people, making it perfect for a family breakfast or a cozy gathering with friends. The key to achieving the perfect texture lies in the double-baking process, guaranteeing a crispy yet tender bite with each piece.
Ingredients (Serving Size: 4-6 people):
- 2 cups all-purpose flour
- 1 cup granulated sugar
- 1 teaspoon baking powder
- 1/2 teaspoon salt
- 3 large eggs
- 1 teaspoon pure vanilla extract
- 1 tablespoon anise seeds (lightly crushed)
- 1/2 cup whole almonds (lightly toasted and roughly chopped)
Cooking Instructions:
- Preheat and Prepare: Begin by preheating your oven to 350°F (175°C). Line a baking sheet with parchment paper to prevent the biscotti from sticking.
- Mix Dry Ingredients: In a large mixing bowl, whisk together the flour, sugar, baking powder, and salt. Confirm that the ingredients are well combined to create a consistent base for your dough.
- Combine Wet Ingredients: In a separate bowl, beat the eggs, vanilla extract, and anise seeds together. The anise seeds should be lightly crushed to release their aromatic oils, enhancing the flavor of the biscotti.
- Form the Dough: Gradually add the wet mixture to the dry ingredients, stirring until a dough begins to form. Add the chopped almonds and mix until they’re evenly distributed throughout the dough.
- Shape the Dough: Transfer the dough onto a lightly floured surface. Divide it into two equal parts and shape each portion into a log about 12 inches long and 2 inches wide. Place the logs on the prepared baking sheet, spacing them apart to allow room for spreading.
- First Bake: Bake the logs in the preheated oven for approximately 25-30 minutes, or until they’re lightly golden and firm to the touch. Remove them from the oven and let them cool for about 10 minutes.
- Slice and Second Bake: Once slightly cooled, use a sharp serrated knife to slice the logs diagonally into 1/2-inch thick slices. Arrange the slices cut side down on the baking sheet. Return to the oven and bake for an additional 10-15 minutes, flipping them halfway through, until they’re crisp and golden brown.
- Cool and Store: Allow the biscotti to cool completely on a wire rack before serving. Store them in an airtight container to maintain their crispness.
Extra Tips:
To guarantee your biscotti turn out perfectly every time, consider using fresh anise seeds for the best flavor impact. If you prefer a softer texture, reduce the second baking time slightly, but be aware that this might affect their shelf life.
For added variation, you can include additional flavors such as orange zest or chocolate chips. Remember, biscotti can be stored for several weeks in an airtight container, making them a convenient make-ahead option for busy mornings.
Honey-Drizzled Pizzelle
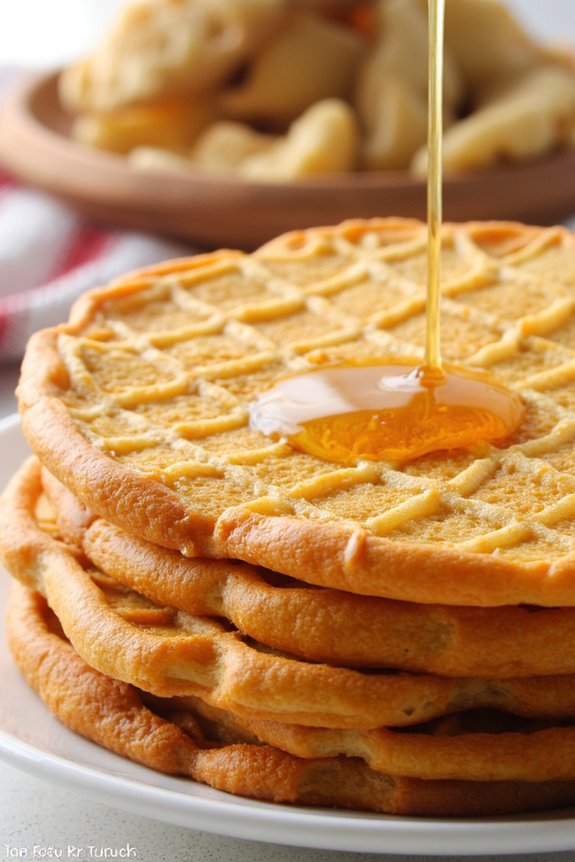
Honey-Drizzled Pizzelle is a delightful Italian breakfast pastry that combines the delicate texture of pizzelle with the sweetness of honey. Originating from the Abruzzo region, pizzelle are traditional waffle cookies made using a patterned iron. This recipe adds a unique twist by drizzling the freshly baked pizzelle with a generous helping of honey, creating a delectable treat perfect for breakfast or brunch.
With their crisp texture and intricate designs, these pizzelle are certain to impress both in taste and presentation.
Preparing Honey-Drizzled Pizzelle is a simple yet rewarding process. The key is to guarantee the batter is just the right consistency to achieve a light, crispy texture. Once the pizzelle are cooked to perfection, drizzling them with honey while they’re still warm allows the sweetness to seep into every nook and cranny.
This recipe serves 4-6 people, making it ideal for sharing with family or friends during a leisurely weekend breakfast.
Ingredients:
- 3 large eggs
- 3/4 cup granulated sugar
- 1/2 cup unsalted butter, melted and cooled
- 1 tablespoon vanilla extract
- 1 3/4 cups all-purpose flour
- 2 teaspoons baking powder
- Pinch of salt
- 1/2 cup honey, for drizzling
Cooking Instructions:
- Prepare the Batter: In a large mixing bowl, beat the eggs and sugar together until they’re light and fluffy. This should take about 2-3 minutes. Stir in the melted butter and vanilla extract until well combined.
- Combine Dry Ingredients: In a separate bowl, whisk together the all-purpose flour, baking powder, and salt. Gradually add the dry ingredients to the wet mixture, stirring until a smooth batter forms. The batter should be thick but still pourable.
- Preheat the Pizzelle Iron: Plug in the pizzelle iron and allow it to heat up according to the manufacturer’s instructions. Lightly grease the iron with a bit of melted butter or cooking spray to prevent sticking.
- Cook the Pizzelle: Once the iron is hot, drop about a tablespoon of batter onto the center of each patterned iron plate. Close the lid and cook for 30-60 seconds, or until the pizzelle are golden brown and crisp. Use a spatula to carefully remove them and place them on a wire rack to cool.
- Drizzle with Honey: While the pizzelle are still warm, drizzle them generously with honey. Allow the honey to soak in and set slightly before serving.
Extra Tips:
To guarantee your pizzelle are perfectly crisp, make sure not to overfill the iron with batter, as this can lead to uneven cooking.
If you’re looking for a flavor variation, consider adding a teaspoon of anise extract or lemon zest to the batter for an aromatic twist.
Pizzelle can be stored in an airtight container for several days, but they’re best enjoyed fresh. If you want to keep them crisp, avoid stacking them until they’re completely cooled.