

Indulging in Italian desserts feels like a sweet escape. Picture yourself enjoying a slice of classic tiramisu or a spoonful of creamy panna cotta. These rich and easy Italian sweet treats are perfect for any occasion. From zesty lemon ricotta cake to velvety mascarpone delights, there’s something here for every craving. Let’s uncover these delightful recipes together.
Classic Tiramisu
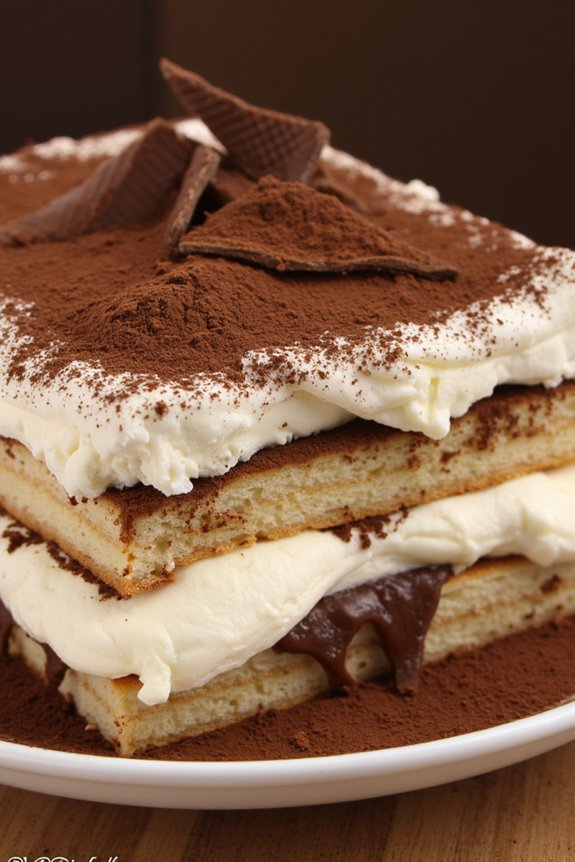
Tiramisu is a timeless Italian dessert that has won hearts all over the world with its rich flavors and creamy texture. This no-bake dessert is a harmonious blend of coffee-soaked ladyfingers, layered with a rich mascarpone cream, and finished with a dusting of cocoa powder.
Originating from the Veneto region, Tiramisu embodies the essence of Italian cuisine – simple yet sophisticated. Perfect for any occasion, this dessert is a crowd-pleaser and is best enjoyed after a delightful Italian meal.
The name “Tiramisu” translates to “pick me up,” a fitting description considering its energizing ingredients – coffee and cocoa. The classic version we’re sharing today serves 4-6 people and is the perfect ending to any dinner party or casual family gathering.
With just a few quality ingredients and a little patience, you can create this luscious dessert that will have everyone asking for seconds.
Ingredients (Serves 4-6):
- 4 large egg yolks
- 1 cup granulated sugar
- 1 1/4 cups mascarpone cheese
- 1 3/4 cups heavy cream
- 2 cups brewed espresso or strong coffee, cooled
- 2 tablespoons coffee liqueur (optional)
- 24-30 ladyfingers
- Unsweetened cocoa powder, for dusting
- Dark chocolate shavings (optional)
Cooking Instructions:
- Prepare the Mascarpone Mixture:
- In a large mixing bowl, whisk together the egg yolks and sugar until pale and creamy. This should take about 5 minutes using an electric mixer.
- Gently fold in the mascarpone cheese until smooth and well incorporated. Set aside.
- Whip the Cream:
- In another bowl, whip the heavy cream until stiff peaks form. This can also be done with an electric mixer to save time.
- Combine Mixtures:
- Carefully fold the whipped cream into the mascarpone mixture, making sure to maintain the airy texture. Mix until smooth and homogeneous.
- Prepare the Coffee Soak:
- In a shallow dish, combine the brewed espresso with the coffee liqueur, if using.
- Assemble the Tiramisu:
- Quickly dip each ladyfinger into the coffee mixture, making sure they’re soaked but not soggy.
- Arrange a layer of soaked ladyfingers at the bottom of a 9×9 inch dish.
- Spread half of the mascarpone mixture over the ladyfingers.
- Repeat with another layer of soaked ladyfingers and the remaining mascarpone mixture.
- Chill and Serve:
- Cover the dish with plastic wrap and refrigerate for at least 4 hours, preferably overnight, to allow flavors to meld and the dessert to set.
- Before serving, generously dust the top with cocoa powder and garnish with chocolate shavings, if desired.
Extra Tips:
For the best results, confirm that the coffee is strong and freshly brewed; the robust flavor is essential for the classic tiramisu taste.
When soaking the ladyfingers, a quick dip is all that’s needed – too long, and they’ll become mushy. If you’re serving this dessert to guests and want a perfect presentation, consider using a glass dish to show off the beautiful layers.
Finally, if you prefer a non-alcoholic version, simply omit the coffee liqueur without compromising the flavor. Enjoy your homemade classic tiramisu!
Creamy Panna Cotta

Panna Cotta, a classic Italian dessert, is a simple yet elegant dish that combines the smoothness of cream with the subtle sweetness of sugar and vanilla. Originating from the Piedmont region of Italy, it translates to “cooked cream” and is renowned for its silky texture and rich flavor.
Often served with a fruit compote or a drizzle of caramel, this dessert is perfect for those looking to impress with a minimal-effort sweet treat.
The beauty of panna cotta lies in its versatility and the ease with which it can be adapted to suit different tastes. Whether you choose to infuse the cream with additional flavors like coffee or chocolate, or pair it with seasonal fruits, the result is always a delightful dessert that’s bound to please.
The following recipe will guide you in creating a creamy panna cotta to serve 4-6 people.
Ingredients (for 4-6 servings):
- 2 cups heavy cream
- 1 cup whole milk
- 1/2 cup granulated sugar
- 2 teaspoons vanilla extract
- 1 packet (about 2 1/4 teaspoons) unflavored gelatin
- 3 tablespoons cold water
- Pinch of salt
Instructions:
- Prepare the Gelatin: In a small bowl, sprinkle the gelatin over the cold water. Let it sit for about 5 minutes, allowing the gelatin to soften and bloom.
- Heat the Cream Mixture: In a medium saucepan, combine the heavy cream, whole milk, granulated sugar, and a pinch of salt. Heat the mixture over medium heat, stirring occasionally until the sugar is completely dissolved. Make sure the mixture is hot but not boiling.
- Dissolve the Gelatin: Once the cream mixture is hot, remove it from the heat. Stir in the bloomed gelatin until it’s completely dissolved. Then, add the vanilla extract and mix well.
- Pour and Chill: Pour the panna cotta mixture into individual serving glasses or ramekins. Allow them to cool at room temperature for about 15 minutes before covering them with cling film. Refrigerate for at least 4 hours or until set.
- Serve: Once the panna cotta is firm, serve it directly in the glasses or unmold it onto a plate. Top with your choice of fruit compote, caramel sauce, or fresh berries for added flavor.
Extra Tips: To guarantee a smooth panna cotta, make sure the gelatin is fully dissolved in the cream mixture. Avoid boiling the mixture, as this can affect the texture of the finished dessert.
If you plan to unmold the panna cotta, lightly oil the ramekins before pouring in the mixture to help it release more easily. For a more intense flavor, consider infusing the cream with a vanilla bean or other flavorings like coffee or citrus zest during the heating process.
Zesty Lemon Ricotta Cake
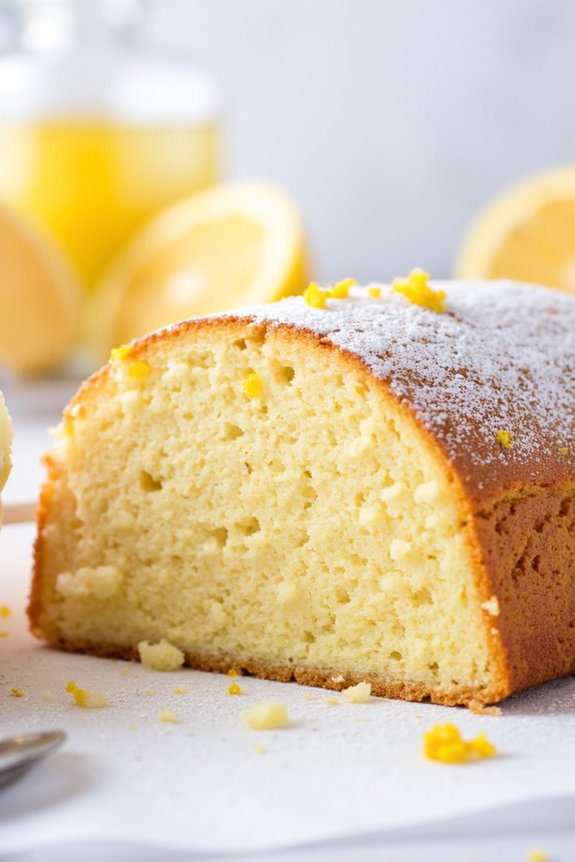
Zesty Lemon Ricotta Cake is a delightful Italian dessert that combines the creamy texture of ricotta cheese with the invigorating zing of lemon. This cake is perfect for any occasion, whether you’re looking to impress guests at a dinner party or simply enjoy a sweet treat with your family.
Its light and fluffy texture, paired with the tangy citrus flavor, makes it a standout among traditional cakes. The subtle richness of the ricotta cheese adds depth, while the vibrant lemon zest infuses the cake with a burst of vitality, creating a harmonious balance of flavors.
Not only is this cake delicious, but it’s also incredibly easy to make. With just a few simple ingredients, you can whip up this elegant dessert in no time. The key to achieving the perfect consistency is to verify that the ricotta cheese is well-integrated into the batter, creating a smooth and creamy texture.
The result is a moist and tender cake that melts in your mouth with every bite. Suitable for a serving size of 4-6 people, this Zesty Lemon Ricotta Cake is sure to be a crowd-pleaser.
Ingredients:
- 1 ½ cups all-purpose flour
- 1 cup granulated sugar
- 1 ½ teaspoons baking powder
- ½ teaspoon salt
- 3 large eggs
- 1 ½ cups ricotta cheese
- ½ cup unsalted butter, melted
- Zest of 2 lemons
- Juice of 1 lemon
- 1 teaspoon vanilla extract
- Powdered sugar for dusting (optional)
Instructions:
- Preheat and Prepare the Pan: Preheat your oven to 350°F (175°C). Grease and flour a 9-inch round cake pan to verify the cake doesn’t stick.
- Mix Dry Ingredients: In a medium bowl, whisk together the all-purpose flour, baking powder, and salt. Set aside for later use.
- Combine Wet Ingredients: In a large mixing bowl, combine the ricotta cheese, sugar, and melted butter. Beat with an electric mixer on medium speed until smooth and creamy.
- Add Eggs and Flavor: Add the eggs one at a time to the ricotta mixture, beating well after each addition. Stir in the vanilla extract, lemon zest, and lemon juice until combined.
- Incorporate Dry Ingredients: Gradually add the dry ingredients to the wet mixture, folding gently with a spatula until just combined. Be careful not to overmix, as this will verify the cake remains light.
- Bake the Cake: Pour the batter into the prepared cake pan, smoothing the top with a spatula. Bake in the preheated oven for 40-45 minutes, or until a toothpick inserted into the center comes out clean.
- Cool and Serve: Allow the cake to cool in the pan for about 10 minutes before transferring it to a wire rack to cool completely. Once cooled, dust with powdered sugar if desired.
Extra Tips:
For an extra moist and flavorful cake, make sure to use fresh lemons for both the zest and juice. If the ricotta cheese is too watery, drain it slightly to achieve a better texture in your cake.
This cake pairs beautifully with a dollop of whipped cream or a scoop of vanilla ice cream. It can be stored in an airtight container at room temperature for up to two days. For a variation, consider adding poppy seeds or a few drops of lemon extract to enhance the lemony flavor.
Traditional Cannoli
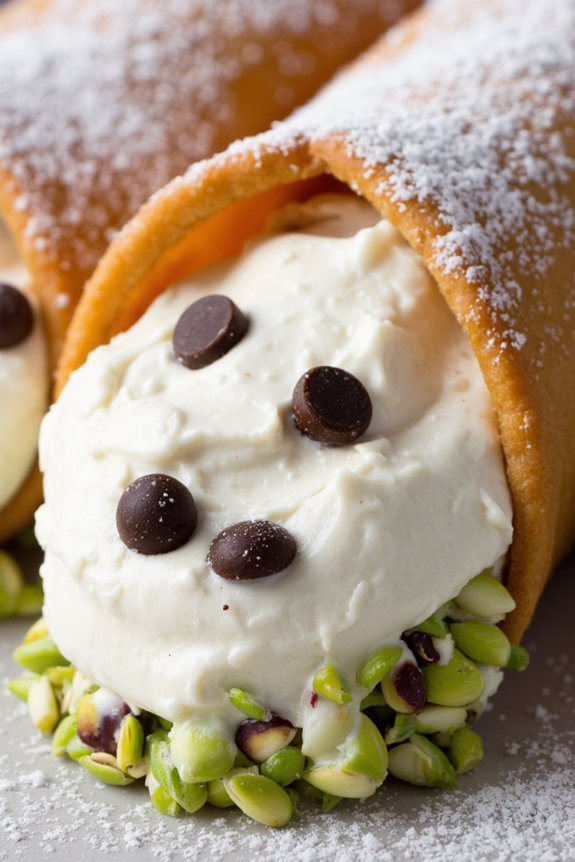
Cannoli, a classic Italian dessert, hails from Sicily and is beloved for its crispy pastry shell filled with a sweet, creamy ricotta cheese mixture. Traditionally, these delectable treats were made during Carnevale, but their popularity has made them a year-round favorite. The beauty of cannoli lies in its contrasting textures: the crunch of the fried shell paired with the smooth, sweet filling. This recipe will guide you in creating authentic cannoli from scratch, guaranteeing your dessert table is graced with this iconic Italian confection.
Before you begin, make certain you have the right equipment such as metal cannoli tubes, which are essential for shaping the shells. The dough is rolled out thinly, wrapped around the tubes, and fried until golden brown. Once cooled, they’re filled with a creamy mixture typically made of ricotta, sugar, and a hint of vanilla. For an added touch, you can adorn the ends with chopped pistachios, mini chocolate chips, or candied fruits. This recipe serves 4-6 people, perfect for a small gathering or a special family treat.
Ingredients:
For the Shells:
- 2 cups all-purpose flour
- 1 tablespoon granulated sugar
- 1/4 teaspoon ground cinnamon
- 1/4 teaspoon salt
- 3 tablespoons unsalted butter, cubed
- 1 egg yolk
- 1/2 cup sweet Marsala wine (or substitute with white wine)
- Vegetable oil, for frying
For the Filling:
- 2 cups ricotta cheese, drained
- 3/4 cup powdered sugar
- 1 teaspoon vanilla extract
- 1/2 cup mini chocolate chips (optional)
For Garnish:
- Chopped pistachios or candied fruits (optional)
- Powdered sugar, for dusting
Instructions:
- Prepare the Dough: In a large mixing bowl, combine the flour, sugar, cinnamon, and salt. Add the cubed butter and mix until the mixture resembles coarse crumbs. Stir in the egg yolk and Marsala wine, mixing until a dough forms. Knead the dough on a floured surface for about 5 minutes until smooth. Wrap in plastic wrap and refrigerate for at least 30 minutes.
- Roll and Shape the Shells: After chilling, divide the dough into four portions to make it easier to handle. Roll out each portion on a floured surface to about 1/8-inch thickness. Cut out circles using a 4-inch round cutter. Wrap each circle around a cannoli tube, sealing the edges with a dab of water.
- Fry the Shells: Heat the vegetable oil in a deep fryer or large pot to 350°F (175°C). Carefully lower the cannoli tubes into the oil, frying until they turn golden brown, about 2-3 minutes. Remove and drain on paper towels. Once cool enough to handle, gently slide the shells off the tubes.
- Prepare the Filling: In a medium bowl, combine the drained ricotta, powdered sugar, and vanilla extract. Stir until smooth. Fold in the mini chocolate chips if using. Transfer the filling into a piping bag fitted with a large round tip.
- Fill the Cannoli: Pipe the ricotta mixture into each end of the cannoli shells, filling them completely. If desired, dip the ends in chopped pistachios or candied fruits for extra flavor and color.
- Serve and Garnish: Arrange the filled cannoli on a serving platter. Dust with powdered sugar just before serving to add a touch of sweetness and elegance.
Extra Tips:
When making cannoli, it’s important to drain the ricotta cheese thoroughly to avoid a watery filling. You can do this by placing the ricotta in a fine mesh sieve over a bowl and letting it sit in the refrigerator for a few hours or overnight.
Additionally, make sure the oil is at the correct temperature before frying to achieve a perfectly crisp shell. If the oil is too cool, the shells will absorb excess oil and become greasy.
Finally, fill the cannoli shells just before serving to keep them from becoming soggy. Enjoy your homemade traditional cannoli!
Luscious Gelato

Gelato, a beloved Italian dessert, is known for its rich flavor and creamy texture. Unlike regular ice cream, gelato has less air whipped into it, resulting in a denser and more flavorful treat. The key to making authentic gelato lies in using high-quality ingredients and following a traditional method that emphasizes a slow churning process. This recipe offers a classic vanilla gelato, but you can easily adapt it to include your favorite flavors like chocolate, pistachio, or fruit purees.
Making gelato at home is a delightful experience that allows you to experiment with a variety of flavors and textures. This recipe is designed for a serving size of 4-6 people, perfect for a family gathering or a small dinner party. With just a few simple ingredients and a bit of patience, you can enjoy a homemade gelato that rivals any Italian gelateria.
Ingredients for Classic Gelato (Serves 4-6):
- 2 cups whole milk
- 1 cup heavy cream
- 2/3 cup granulated sugar
- 1 tablespoon cornstarch
- 1 vanilla bean (or 1 teaspoon vanilla extract)
- A pinch of salt
Cooking Instructions:
- Prepare the Vanilla: If using a vanilla bean, split it lengthwise and scrape out the seeds using the back of a knife. Add both the seeds and the bean to a medium saucepan. If using vanilla extract, it will be added later.
- Mix the Base: In the saucepan, combine the whole milk, heavy cream, and granulated sugar. Add a pinch of salt and whisk together until the sugar is dissolved.
- Thicken with Cornstarch: In a small bowl, mix the cornstarch with a few tablespoons of the milk mixture to form a smooth slurry. Gradually whisk this slurry into the saucepan.
- Cook the Mixture: Place the saucepan over medium heat. Heat the mixture until it begins to bubble lightly, stirring constantly to prevent sticking. Once it thickens enough to coat the back of a spoon, remove from heat. If using vanilla extract, stir it in at this point.
- Chill the Mixture: Pour the mixture through a fine-mesh sieve into a bowl to remove the vanilla bean and any lumps. Allow it to cool to room temperature, then cover and refrigerate for at least 4 hours or overnight for the best flavor.
- Churn the Gelato: Once chilled, pour the mixture into an ice cream maker and churn according to the manufacturer’s instructions. The gelato should have a thick, creamy consistency.
- Freeze and Serve: Transfer the gelato to a freezer-safe container. Cover with plastic wrap directly on the surface to prevent ice crystals from forming. Freeze for an additional 2-3 hours or until firm. Serve scoops of gelato in bowls or cones.
Extra Tips:
For the best texture, verify your mixture is thoroughly chilled before churning, as this will help achieve a creamier gelato.
Experiment with different flavorings by adding cocoa powder, fruit purees, or nut pastes during the initial mixing step.
If you don’t have an ice cream maker, you can freeze the mixture, stirring every 30 minutes to mimic the churning process, though the texture may be slightly less smooth.
Delightful Biscotti
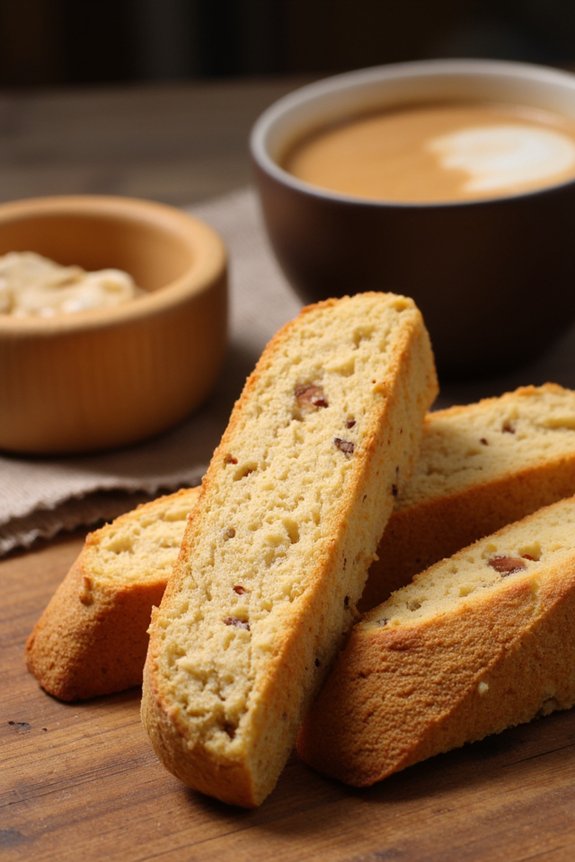
Biscotti, the classic Italian twice-baked cookies, are a delightful treat enjoyed with coffee or tea. These crunchy, almond-infused cookies have a rich history, originating in the Italian city of Prato. They’re known for their long shelf life and satisfying crunch, making them perfect for dunking.
Whether you’re looking for a sweet snack to enjoy at home or to impress guests with an authentic Italian dessert, this almond biscotti recipe is certain to please. This recipe yields enough biscotti for 4-6 people, providing a generous serving for each. The combination of almonds and a hint of vanilla creates a delectable flavor profile that pairs beautifully with a warm beverage.
Making biscotti may seem intimidating at first, but the process is straightforward when broken down into simple steps. Follow this easy recipe to bake your own batch of delightful almond biscotti.
Ingredients:
- 2 cups all-purpose flour
- 1 cup granulated sugar
- 1 teaspoon baking powder
- 1/4 teaspoon salt
- 3 large eggs
- 1 teaspoon vanilla extract
- 1 teaspoon almond extract
- 1 cup whole almonds, toasted and coarsely chopped
- Zest of 1 lemon (optional)
Instructions:
- Preheat the Oven: Preheat your oven to 350°F (175°C). Line a baking sheet with parchment paper for easy cleanup.
- Mix Dry Ingredients: In a large bowl, combine the flour, sugar, baking powder, and salt. Mix well to guarantee the baking powder is evenly distributed.
- Prepare Wet Ingredients: In a separate bowl, beat the eggs. Add the vanilla extract and almond extract to the eggs, mixing until well combined.
- Combine Mixtures: Gradually add the wet ingredients to the dry ingredients, stirring until a dough forms. The dough will be sticky, but this is normal.
- Add Almonds: Fold in the chopped almonds and lemon zest (if using), confirming they’re evenly distributed throughout the dough.
- Shape the Dough: Divide the dough in half. On a lightly floured surface, shape each half into a log about 12 inches long and 2 inches wide. Place the logs onto the prepared baking sheet.
- First Bake: Bake in the preheated oven for 25-30 minutes, or until the logs are lightly golden and firm to the touch. Remove from the oven and let them cool for about 10 minutes.
- Slice the Biscotti: Using a sharp serrated knife, cut the logs diagonally into 1/2-inch thick slices. Arrange the slices, cut side down, on the baking sheet.
- Second Bake: Return the slices to the oven and bake for an additional 10-12 minutes on each side, or until the biscotti are dry and crisp. Remove from the oven and let cool completely on a wire rack before serving.
Extra Tips:
When making biscotti, it’s essential to allow the logs to cool slightly after the first bake before slicing them. This helps in achieving clean cuts and prevents the biscotti from crumbling.
You can customize your biscotti by adding different nuts, dried fruits, or even dipping them in chocolate for an extra treat. Store biscotti in an airtight container to maintain their crispness, and they can last for several weeks. Enjoy your homemade biscotti with a cup of espresso or a cappuccino for a true Italian experience.
Rich Chocolate Budino
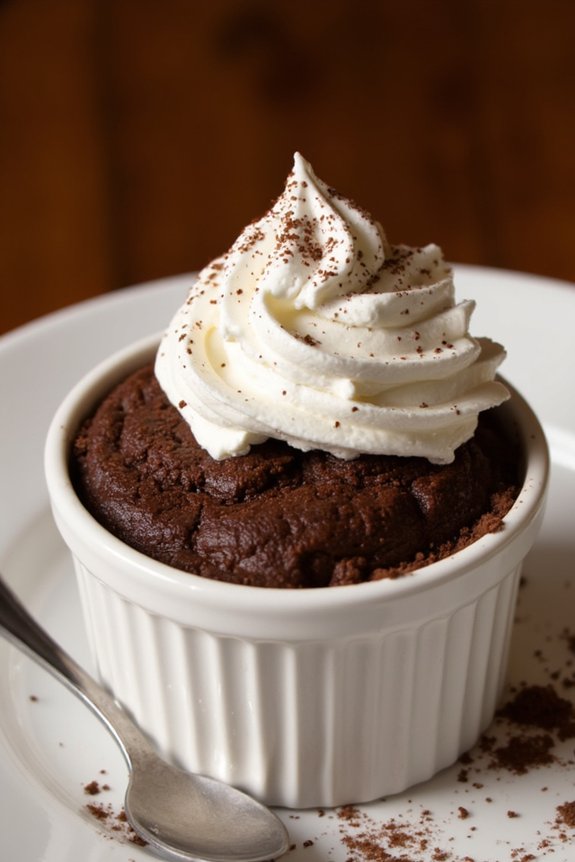
Rich Chocolate Budino is an Italian dessert that’s the epitome of indulgence, offering a smooth and luxurious chocolate experience. This traditional Italian pudding is known for its dense and creamy texture, which sets it apart from typical puddings. Perfect for chocolate lovers, the budino combines rich, dark chocolate with a few simple ingredients to create a melt-in-your-mouth delight.
This dessert is often served chilled, allowing the flavors to meld together beautifully, making it an ideal treat after a hearty Italian meal. The origins of the budino can be traced back to Italy, where it has been enjoyed for generations. While chocolate is the star ingredient, the addition of fresh cream and a hint of vanilla elevate this dessert to a sublime level.
Preparing Rich Chocolate Budino is a delightful process that fills your kitchen with the comforting aroma of chocolate, making it not only a treat for the taste buds but also for the senses. This recipe serves 4-6 people, making it perfect for sharing with family and friends.
Ingredients:
- 1 cup of whole milk
- 1 cup of heavy cream
- 2/3 cup of granulated sugar
- 1/4 cup of unsweetened cocoa powder
- 2 tablespoons of cornstarch
- 1/4 teaspoon of salt
- 4 ounces of bittersweet chocolate, finely chopped
- 1 teaspoon of vanilla extract
- Whipped cream, for serving (optional)
- Chocolate shavings, for garnish (optional)
Instructions:
- Prepare the Dry Ingredients: In a medium saucepan, whisk together the granulated sugar, cocoa powder, cornstarch, and salt until thoroughly combined. This step guarantees that the dry ingredients are evenly distributed and free of lumps.
- Mix with Milk and Cream: Gradually add the whole milk and heavy cream to the saucepan, whisking continuously to prevent any lumps from forming. Place the saucepan over medium heat.
- Heat the Mixture: Stir the mixture constantly as it heats up. This process will take about 6-8 minutes. You’ll know it’s ready when it begins to thicken and comes to a gentle boil.
- Add Chocolate: Once the mixture reaches a thick consistency, remove it from the heat. Add the finely chopped bittersweet chocolate and vanilla extract. Stir until the chocolate is fully melted and the mixture is smooth.
- Cool the Budino: Pour the budino mixture evenly into serving dishes or ramekins. Allow the desserts to cool at room temperature for about 10 minutes, then transfer them to the refrigerator to chill for at least 2 hours.
- Serve and Garnish: Before serving, top each budino with a dollop of whipped cream and a sprinkle of chocolate shavings, if desired. This adds an extra layer of flavor and a beautiful presentation.
Extra Tips:
To achieve the smoothest texture for your Rich Chocolate Budino, it’s essential to whisk continuously while heating the mixture to prevent any clumps from forming. If you prefer a sweeter dessert, you can adjust the sugar content according to your taste.
The budino can also be made a day in advance, which allows the flavors to develop even further. Just remember to cover it with plastic wrap to prevent a skin from forming on top. Enjoy your Italian dessert with a fresh espresso for a true Italian experience.
Almond Flour Amaretti
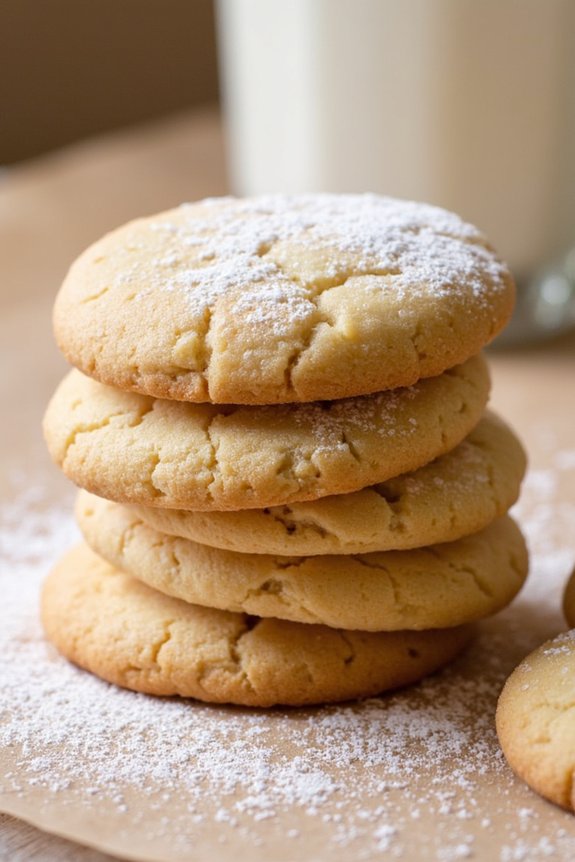
Indulge in the classic Italian sweet treat, Almond Flour Amaretti, a delectable cookie that beautifully combines the nutty flavor of almonds with the delicate sweetness of sugar. Originating from Italy, these cookies are known for their crisp exterior and soft, chewy interior. Perfect for an afternoon tea or a delightful dessert, these cookies are naturally gluten-free, making them a versatile option for various dietary preferences.
Amaretti cookies are traditionally made with almond flour, sugar, and egg whites, creating a simple yet irresistible confection. This recipe captures the essence of the original treats while being accessible for home bakers. With just a few ingredients and a straightforward preparation process, you’ll be able to bring a taste of Italy into your home. The following recipe serves 4-6 people and is sure to impress both family and friends alike.
Ingredients:
- 2 cups almond flour
- 1 cup granulated sugar
- 2 large egg whites
- 1 teaspoon almond extract
- 1/4 teaspoon salt
- Powdered sugar, for dusting
Instructions:
- Preheat the Oven: Begin by preheating your oven to 325°F (160°C). Line two baking sheets with parchment paper to prevent the cookies from sticking.
- Prepare the Dry Ingredients: In a large mixing bowl, combine the almond flour, granulated sugar, and salt. Stir the mixture until all the dry ingredients are evenly distributed.
- Beat the Egg Whites: In a separate bowl, beat the egg whites until they form soft peaks. This will help give the cookies their characteristic texture and guarantee they rise properly during baking.
- Combine Ingredients: Gently fold the beaten egg whites and almond extract into the dry ingredients. Mix until a dough forms, being careful not to deflate the egg whites too much.
- Shape the Cookies: Using your hands, shape the dough into small balls, roughly the size of a walnut. Place the balls onto the prepared baking sheets, leaving some space between each cookie.
- Dust with Powdered Sugar: Lightly dust the tops of the cookies with powdered sugar. This will give them a beautiful, crackly finish.
- Bake: Place the baking sheets in the preheated oven and bake for 15-18 minutes, or until the cookies are lightly golden on the edges. They should still be soft in the center.
- Cool and Serve: Allow the cookies to cool on the baking sheets for a few minutes before transferring them to a wire rack to cool completely. Serve them with coffee or tea for a delightful treat.
Extra Tips:
For the best results, make sure to use finely ground almond flour to achieve the desired texture. If the dough feels too sticky, you can chill it in the refrigerator for about 30 minutes before shaping the cookies.
Confirm that the egg whites are at room temperature before beating, as this will help them reach the right consistency more easily. Finally, consider adding a hint of citrus zest or a splash of your favorite liqueur to the dough for a unique twist on the classic recipe.
Italian Almond Cake

Indulge in the delightful flavors of Italy with this exquisite Italian Almond Cake. Known for its rich, nutty aroma and a perfectly moist texture, this cake is a staple in Italian dessert cuisine.
Whether it’s for a festive occasion or a simple family gathering, this cake promises to bring a touch of elegance and a burst of almond goodness to your table. The beauty of this recipe lies in its simplicity and the luxurious blend of ground almonds, which gives it a unique texture and flavor profile.
Traditionally enjoyed with a dusting of powdered sugar or alongside a cup of espresso, the Italian Almond Cake is a versatile dessert that can be dressed up or down according to the occasion. Its soft crumb and delicate almond essence make it a favorite among those who appreciate subtle, yet refined, sweet treats.
Perfect for a serving size of 4-6 people, this recipe is both easy to prepare and incredibly rewarding for the palate.
Ingredients:
- 1 cup almond flour
- 1/2 cup all-purpose flour
- 1 cup granulated sugar
- 1/2 cup unsalted butter, softened
- 3 large eggs
- 1 teaspoon vanilla extract
- 1 teaspoon almond extract
- 1 teaspoon baking powder
- 1/4 teaspoon salt
- Zest of 1 lemon
- Powdered sugar for dusting (optional)
Instructions:
- Preheat the Oven: Begin by preheating your oven to 350°F (175°C). Grease a 9-inch round cake pan with butter or line it with parchment paper to guarantee easy removal of the cake after baking.
- Cream Butter and Sugar: In a large mixing bowl, cream together the softened butter and granulated sugar until light and fluffy. This should take about 3-4 minutes using an electric mixer on medium speed.
- Add Eggs and Flavorings: Add the eggs one at a time, mixing well after each addition. Once incorporated, add the vanilla extract, almond extract, and lemon zest. Mix until the ingredients are well combined.
- Mix Dry Ingredients: In a separate bowl, whisk together the almond flour, all-purpose flour, baking powder, and salt. Make sure the dry ingredients are thoroughly mixed to guarantee even distribution throughout the cake batter.
- Combine Wet and Dry Ingredients: Gradually add the dry mixture to the wet ingredients, mixing on low speed until just combined. Be careful not to overmix, as this can lead to a dense cake.
- Bake the Cake: Pour the batter into the prepared cake pan and smooth the top with a spatula. Bake in the preheated oven for 30-35 minutes, or until a toothpick inserted into the center of the cake comes out clean.
- Cool and Serve: Allow the cake to cool in the pan for about 10 minutes, then transfer to a wire rack to cool completely. Once cooled, dust with powdered sugar before serving, if desired.
Extra Tips:
For the best results, verify that all your ingredients are at room temperature before you begin baking; this helps the batter to mix more evenly and results in a better-textured cake.
Additionally, if you prefer a more pronounced almond flavor, consider toasting the almond flour lightly before incorporating it into the batter. This simple step enhances the nutty aroma and can add an extra depth of flavor to your cake.
Finally, always use fresh lemon zest to achieve a bright and fragrant hint of citrus that perfectly complements the almonds.
Sweet Ricotta Pie
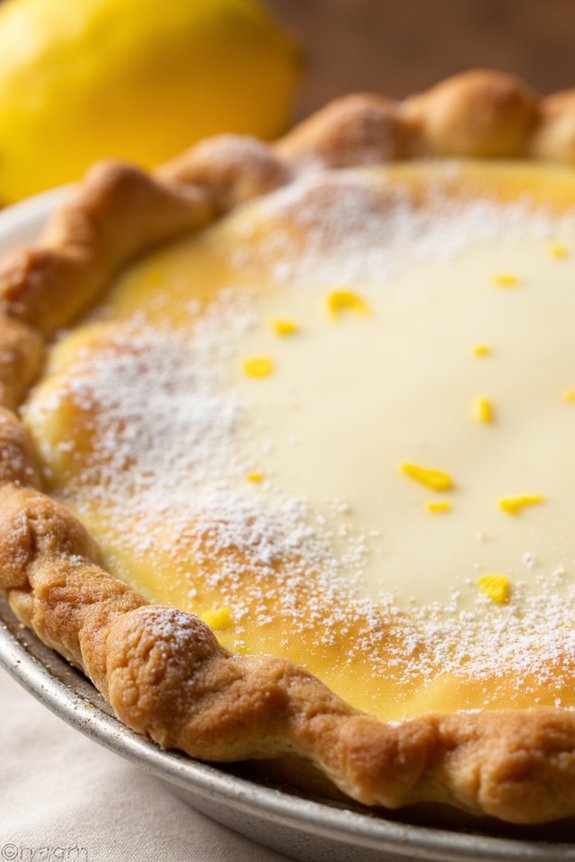
Sweet Ricotta Pie is a delightful Italian dessert that combines the creamy texture of ricotta cheese with the fragrance of lemon and a hint of vanilla. This pie is perfect for any occasion, from a cozy family dinner to a festive gathering. The combination of a buttery crust and a rich, sweet filling makes it a favorite among both adults and children.
Originating from Southern Italy, this pie has been cherished across generations and is especially popular during festive seasons such as Easter.
To make this delightful dessert, a sweet shortcrust pastry serves as the base, holding a luscious filling made from ricotta cheese, sugar, and eggs. The addition of lemon zest and vanilla extract enhances the pie’s flavor, giving it a revitalizing and aromatic touch. The pie is typically finished with a dusting of powdered sugar, adding a hint of elegance to its already inviting appearance.
Below is a detailed recipe to serve 4-6 people, guaranteeing everyone gets a taste of this Italian classic.
Ingredients:
- 2 cups all-purpose flour
- 1/2 cup granulated sugar
- 1/2 cup unsalted butter, chilled and cubed
- 1 large egg
- 1 egg yolk
- 1 teaspoon vanilla extract
- 2 cups ricotta cheese
- 1/2 cup granulated sugar (for filling)
- 2 large eggs (for filling)
- Zest of 1 lemon
- 1 teaspoon vanilla extract (for filling)
- Powdered sugar, for dusting
Instructions:
- Prepare the Pastry Dough:
- In a large mixing bowl, combine the all-purpose flour and granulated sugar. Add the cubed butter and use your fingertips to rub the butter into the flour until the mixture resembles coarse crumbs.
- Add the egg, egg yolk, and vanilla extract to the flour mixture. Mix until the dough comes together. Form into a disc, wrap in plastic wrap, and refrigerate for at least 30 minutes.
- Make the Ricotta Filling:
- In another bowl, combine the ricotta cheese and 1/2 cup of sugar. Mix well until smooth.
- Add the eggs, one at a time, mixing thoroughly after each addition. Stir in the lemon zest and vanilla extract until well incorporated.
- Assemble the Pie:
- Preheat your oven to 350°F (175°C).
- Roll out the chilled pastry dough on a lightly floured surface to fit a 9-inch pie dish. Transfer the dough to the dish and trim any excess around the edges.
- Pour the ricotta mixture into the prepared crust, spreading it evenly.
- Bake the Pie:
- Place the pie in the preheated oven and bake for about 50-60 minutes, or until the filling is set and the crust is golden brown.
- Remove from the oven and let it cool completely on a wire rack.
- Serve:
- Once cooled, dust the pie with powdered sugar before slicing and serving.
Extra Tips:
For a more pronounced lemon flavor, consider adding a bit more lemon zest or a splash of lemon juice to the filling. Confirm the ricotta is well drained before using it to prevent a watery filling.
If you prefer a more textured filling, you can lightly beat the ricotta mixture instead of making it completely smooth. This pie can be made a day in advance and stored in the refrigerator; just be sure to allow it to come to room temperature before serving for peak flavor and texture.
Decadent Sfogliatelle

Sfogliatelle, a quintessential Italian pastry, hails from the southern regions of Italy, specifically Naples. Known for its distinctive shell-like shape and layers of crisp pastry, sfogliatelle is often filled with a sweet ricotta mixture that delights with every bite. The name “sfogliatelle” itself translates to “small, thin layers,” perfectly describing the delicate, flaky texture of this beloved treat.
Whether enjoyed as a breakfast delight with a strong espresso or as an afternoon snack, sfogliatelle promises a taste of Italian tradition that’s both comforting and indulgent.
Creating sfogliatelle at home might seem intimidating due to its intricate layers, but with patience and precision, you can recreate this Italian classic in your own kitchen. This recipe is designed to serve 4-6 people, providing enough of these delectable pastries to share with family and friends.
While the process does require time and attention to detail, the reward of homemade sfogliatelle—fresh from the oven, with its crisp layers and creamy filling—is absolutely worth the effort.
Ingredients for Sfogliatelle (serves 4-6):
*For the Dough:*
- 2 cups all-purpose flour
- 1/4 teaspoon salt
- 1/2 cup water
- 1/4 cup lard or unsalted butter, melted
- 2 tablespoons sugar
For the Filling:
- 2 cups ricotta cheese
- 1/2 cup semolina flour
- 1 cup milk
- 1/2 cup sugar
- 1/2 teaspoon cinnamon
- 1 teaspoon vanilla extract
- 1 egg
- Zest of 1 orange
For Assembly:
– 1/2 cup melted lard or unsalted butter (for brushing)
Cooking Instructions:
1. Prepare the Dough: In a large bowl, combine the flour and salt. Gradually add water and mix until a dough forms. Knead the dough on a lightly floured surface for about 10 minutes until it’s smooth and elastic. Cover with a damp cloth and let it rest for at least 30 minutes.
2. Make the Filling: In a saucepan, bring the milk to a boil. Gradually whisk in the semolina flour, stirring constantly to prevent lumps, until thickened. Remove from heat and let it cool slightly.
In a separate bowl, mix the ricotta, sugar, cinnamon, vanilla extract, egg, and orange zest. Add the cooled semolina mixture to the ricotta mixture and stir until well combined. Set aside.
3. Roll Out the Dough: After resting, divide the dough into two equal parts. Roll each part into a very thin rectangle (about 1/16 inch thick) using a pasta machine or rolling pin. Brush each rectangle lightly with melted lard or butter.
4. Shape the Dough: Starting from the short end, tightly roll each dough rectangle into a log. Wrap each log in plastic wrap and refrigerate for at least 2 hours (or overnight) to firm up.
5. Cut and Fill the Dough: Preheat your oven to 375°F (190°C). Remove the logs from the fridge and slice each into 1/2-inch pieces. Gently flatten each piece into a disc, then use your thumbs to press the center and create a cone shape, forming a pocket for the filling.
6. Fill and Seal the Sfogliatelle: Spoon about a tablespoon of the filling into each dough pocket. Pinch the edges to seal and form a clam-like shape. Place the filled sfogliatelle on a baking sheet lined with parchment paper.
7. Bake the Sfogliatelle: Brush each pastry with more melted lard or butter. Bake in the preheated oven for 20-25 minutes or until golden brown and crispy. Allow them to cool slightly before serving.
Extra Tips:
When preparing sfogliatelle, verify your work surface is well-floured to prevent the delicate dough from sticking. The secret to perfect sfogliatelle lies in rolling the dough as thinly as possible; this creates the signature layers that define the pastry.
If you’re short on time, the dough can be prepared a day in advance and stored in the refrigerator. Additionally, verify the filling is well-chilled before use, as this helps maintain the pastry’s shape during baking.
Enjoy your sfogliatelle warm, dusted with a light sprinkle of powdered sugar for an authentic Italian experience.
Refreshing Limoncello Sorbet

Indulge in the revitalizing flavors of Italy with a homemade Limoncello Sorbet, a delightful treat perfect for warm days. This sorbet is a simple yet elegant dessert that captures the zesty essence of lemons combined with the smooth, sweet taste of limoncello, a traditional Italian lemon liqueur.
Ideal for a summer gathering or a light after-dinner palate cleanser, this sorbet will transport your taste buds straight to the sun-soaked Amalfi Coast.
Preparing Limoncello Sorbet is a rewarding process that involves a few basic ingredients and requires minimal effort. The key to achieving the perfect texture lies in the patience of allowing the sorbet to freeze properly. With the right balance of sweetness and tartness, this sorbet is both invigorating and satisfying.
Whether you’re a seasoned cook or a novice in the kitchen, this recipe is straightforward and sure to impress.
Ingredients for 4-6 servings:
- 1 cup water
- 1 cup granulated sugar
- 1 cup freshly squeezed lemon juice (about 4-5 large lemons)
- 1 tablespoon lemon zest
- 1/2 cup limoncello
- Mint leaves for garnish (optional)
Cooking Instructions:
- Prepare the Simple Syrup: In a medium saucepan, combine water and sugar. Heat over medium heat, stirring continuously until the sugar is completely dissolved. This should take about 3-5 minutes. Remove from heat and let it cool to room temperature.
- Juice the Lemons: While the simple syrup is cooling, juice the lemons until you have 1 cup of fresh lemon juice. Strain to remove any seeds or pulp for a smoother texture.
- Combine Ingredients: In a large mixing bowl, combine the cooled simple syrup, lemon juice, lemon zest, and limoncello. Stir well to make sure everything is evenly mixed.
- Chill the Mixture: Cover the bowl with plastic wrap or a lid and place it in the refrigerator for at least 2 hours, or until the mixture is thoroughly chilled.
- Churn the Sorbet: Once chilled, pour the mixture into an ice cream maker. Churn according to the manufacturer’s instructions, typically about 20-25 minutes, until the sorbet reaches a soft-serve consistency.
- Freeze the Sorbet: Transfer the churned sorbet into an airtight container. Freeze for at least 2-3 hours or until it’s firm enough to scoop.
- Serve: Scoop the sorbet into serving bowls or glasses. Garnish with fresh mint leaves if desired, and serve immediately.
Extra Tips:
For the best results, use freshly squeezed lemon juice as it provides a more vibrant flavor compared to bottled versions.
If you don’t have an ice cream maker, you can pour the chilled mixture into a shallow dish and freeze, stirring every 30 minutes until it reaches the desired consistency.
Confirm that all your ingredients are thoroughly chilled before churning to speed up the freezing process. Enjoy your Limoncello Sorbet with a sprig of mint or a twist of lemon for an added touch of elegance.