

Hosting an Italian-themed party and need some recipe inspiration? I’ve got you covered with a collection of irresistible Italian dishes that are always a hit. Think vibrant bruschetta and creamy risotto made with fresh, high-quality ingredients. The aroma of Margherita pizza and the indulgence of classic tiramisu are crowd favorites. These recipes promise a delightful culinary journey that your guests will absolutely love.
Classic Bruschetta With Fresh Tomatoes and Basil

Classic Bruschetta With Fresh Tomatoes and Basil is a quintessential Italian appetizer that embodies the vibrant and fresh flavors of the Mediterranean. This simple yet delicious dish is perfect for any party or gathering, offering a delightful combination of textures and tastes. The crispness of the toasted bread provides the perfect base for the juicy tomatoes and aromatic basil, while a drizzle of olive oil and a hint of garlic elevate the flavors to new heights. With just a handful of fresh ingredients, this recipe isn’t only easy to prepare but also a surefire way to impress your guests.
The beauty of bruschetta lies in its versatility and simplicity. Originating from central Italy, this dish has become a staple around the world due to its fresh ingredients and bold flavors. Whether served as an appetizer or a light snack, Classic Bruschetta With Fresh Tomatoes and Basil is a crowd-pleaser that embodies the essence of Italian cuisine. The combination of ripe tomatoes, fresh basil, and quality olive oil is a proof of the philosophy of using the best ingredients to create something truly special.
Ingredients for 4-6 servings:
- 6 ripe Roma tomatoes
- 1 French baguette or Italian bread loaf
- 2 cloves of garlic
- 1/4 cup fresh basil leaves
- 1/4 cup extra virgin olive oil
- Salt and black pepper to taste
- Optional: Balsamic glaze for drizzling
Cooking Instructions:
- Prepare the Tomatoes: Begin by dicing the Roma tomatoes into small cubes. Place them in a bowl and season with a pinch of salt and black pepper. This will help to bring out the natural juices and flavors of the tomatoes.
- Toast the Bread: Slice the baguette or Italian bread loaf into 1/2 inch thick slices. Lightly brush one side of each slice with olive oil. Place the slices on a baking sheet, oil side up, and toast them in a preheated oven at 400°F (200°C) for about 5-7 minutes or until they’re golden and crispy.
- Prepare the Garlic: While the bread is toasting, peel the garlic cloves and cut them in half. Once the bread is toasted, rub the cut side of the garlic cloves over the top of each slice. This will impart a subtle garlic flavor to the bread.
- Assemble the Bruschetta: Tear or roughly chop the fresh basil leaves and add them to the bowl of tomatoes. Drizzle with the remaining olive oil and gently mix to combine. Spoon the tomato and basil mixture generously onto each toasted bread slice.
- Serve: Arrange the bruschetta on a platter and serve immediately. Optionally, drizzle with balsamic glaze for an added touch of sweetness and depth of flavor.
Extra Tips:
When making Classic Bruschetta With Fresh Tomatoes and Basil, always use the freshest ingredients possible for the best flavor. Opt for ripe, firm tomatoes and fragrant, vibrant basil leaves.
If you have the time, prepare the tomato mixture a few hours in advance and let it sit at room temperature to allow the flavors to meld. Additionally, using day-old bread can help achieve a better crunch once toasted.
Finally, if you want to add a bit of a kick, consider sprinkling some red pepper flakes over the tomato mixture before serving. Enjoy your delicious creation!
Savory Italian Meatballs in Marinara Sauce

Savory Italian Meatballs in Marinara Sauce is a classic dish that brings the authentic flavors of Italy right to your dining table. This delightful recipe combines the rich flavors of tender meatballs infused with Italian herbs and spices, paired perfectly with a luscious homemade marinara sauce.
Whether you’re hosting a dinner party or simply craving a comforting meal, these Italian meatballs are sure to impress with their juicy texture and robust taste.
The key to achieving perfect Savory Italian Meatballs in Marinara Sauce lies in using high-quality ingredients and taking the time to blend the flavors thoroughly. The meatballs are crafted from a mixture of ground beef and pork, ensuring a succulent bite, while the marinara sauce is simmered to perfection with ripe tomatoes, garlic, and aromatic herbs.
This recipe serves 4-6 people, making it an ideal choice for a family gathering or an intimate dinner party.
Ingredients:
- 1 pound ground beef
- 1/2 pound ground pork
- 1/2 cup breadcrumbs
- 1/4 cup grated Parmesan cheese
- 2 cloves garlic, minced
- 2 tablespoons chopped fresh parsley
- 1 teaspoon dried oregano
- 1/2 teaspoon salt
- 1/4 teaspoon black pepper
- 1 large egg, beaten
- 2 tablespoons olive oil
- 1 small onion, finely chopped
- 1 can (28 ounces) crushed tomatoes
- 1 tablespoon tomato paste
- 1 teaspoon sugar
- 1 teaspoon dried basil
- 1/2 teaspoon red pepper flakes (optional)
- Salt and pepper to taste
Instructions:
- Prepare the Meatball Mixture: In a large bowl, combine the ground beef, ground pork, breadcrumbs, Parmesan cheese, minced garlic, parsley, oregano, salt, black pepper, and the beaten egg. Mix well until all ingredients are evenly incorporated. Shape the mixture into 1-inch meatballs, placing them on a plate or baking sheet.
- Brown the Meatballs: Heat olive oil in a large skillet over medium heat. Add the meatballs in batches, ensuring not to overcrowd the pan. Cook for about 5-7 minutes, turning occasionally, until nicely browned on all sides. Remove the meatballs and set aside.
- Prepare the Marinara Sauce: In the same skillet, add the chopped onion and sauté for 2-3 minutes until translucent. Stir in the crushed tomatoes, tomato paste, sugar, basil, and red pepper flakes if using. Allow the sauce to simmer for 10-15 minutes, stirring occasionally to avoid sticking.
- Combine Meatballs and Sauce: Carefully add the browned meatballs into the simmering marinara sauce. Cover the skillet and reduce the heat to low. Let the meatballs cook in the sauce for another 20-25 minutes, ensuring they’re cooked through and have absorbed the sauce’s flavors.
- Adjust Seasoning: Taste the sauce and adjust seasoning with additional salt and pepper if needed. Stir gently to avoid breaking the meatballs.
Extra Tips:
For an extra depth of flavor, consider adding a splash of red wine to the marinara sauce while it simmers. If you prefer a smoother sauce, use an immersion blender before adding the meatballs.
Serve these Italian meatballs with freshly cooked pasta or crusty bread to soak up the delicious sauce. Remember, the key to moist and tender meatballs isn’t overworking the meat mixture and allowing them to simmer gently in the sauce.
Enjoy your culinary journey to Italy with this delightful dish!
Creamy Risotto With Parmesan and Mushrooms
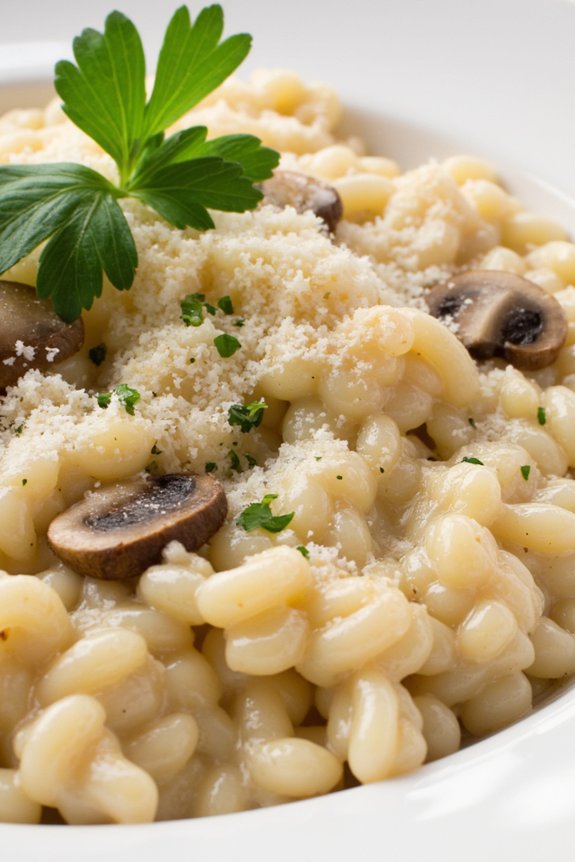
Creamy Risotto with Parmesan and Mushrooms is a delightful Italian dish that brings warmth and comfort to any gathering. This rich and savory risotto is the perfect centerpiece for an Italian-themed dinner party. The creamy texture, combined with the earthy flavor of mushrooms and the sharpness of Parmesan cheese, creates a harmonious blend that’s sure to impress your guests.
Whether you’re hosting a festive occasion or simply enjoying a cozy night in, this risotto is a sophisticated yet straightforward dish that will elevate your culinary repertoire.
Preparing this dish involves a precise and patient cooking process, as the key to a perfect risotto is in the stirring and gradual addition of broth. The risotto’s creamy consistency results from the slow release of starches from the Arborio rice, which is gently coaxed out through constant stirring.
The mushrooms add a deep, umami flavor that complements the nuttiness of the Parmesan, while a hint of white wine brings a subtle acidity that balances the dish beautifully. With a little attention and care, you’ll have a perfectly cooked risotto that’s as beautiful to taste as it’s to serve.
Ingredients for 4-6 servings:
- 1 ½ cups Arborio rice
- 4 cups chicken or vegetable broth
- 1 cup fresh mushrooms, sliced (such as cremini or button mushrooms)
- 1 small onion, finely chopped
- 2 cloves garlic, minced
- ½ cup dry white wine
- 1 cup grated Parmesan cheese
- 3 tablespoons olive oil
- 3 tablespoons unsalted butter
- Salt and pepper to taste
- Fresh parsley, chopped, for garnish
Cooking Instructions:
- Prepare the broth: In a medium saucepan, heat the chicken or vegetable broth and keep it warm on low heat. It’s essential to use warm broth as it helps the rice cook evenly.
- Sauté the mushrooms: In a large skillet, heat 2 tablespoons of olive oil over medium heat. Add the sliced mushrooms and cook until they’re golden brown and their moisture has evaporated, about 5-7 minutes. Remove the mushrooms from the skillet and set them aside.
- Cook the aromatics: In the same skillet, add the remaining olive oil and 1 tablespoon of butter. Add the chopped onion and cook until it becomes translucent, about 3-4 minutes. Stir in the minced garlic and cook for an additional minute.
- Toast the rice: Add the Arborio rice to the skillet with the onions and garlic. Stir continuously for about 2 minutes until the rice is lightly toasted and coated with the oil and butter.
- Deglaze with wine: Pour in the white wine and stir until it has mostly evaporated. This step adds depth of flavor to the risotto.
- Add broth gradually: Begin adding the warm broth, one ladle at a time, to the rice. Stir constantly and allow each addition of broth to be absorbed before adding the next. This process should take about 18-20 minutes, and the rice should be creamy and tender.
- Incorporate mushrooms and cheese: Once the rice is cooked, stir in the sautéed mushrooms and the remaining butter. Add the grated Parmesan cheese and mix until melted and well combined. Season with salt and pepper to taste.
- Serve: Garnish with freshly chopped parsley before serving. Enjoy your Creamy Risotto with Parmesan and Mushrooms warm.
Extra Tips:
When making risotto, patience is key. The gradual addition of broth and constant stirring are vital for achieving the creamy texture. Be sure not to rush this process.
Also, feel free to experiment with different types of mushrooms or add a bit of truffle oil for an extra touch of luxury. If you prefer a vegetarian version, simply use vegetable broth instead of chicken broth.
Finally, always serve risotto immediately as it tends to thicken as it cools.
Caprese Skewers With Mozzarella and Basil

Caprese Skewers With Mozzarella and Basil are a delightful and fresh appetizer perfect for any Italian-themed party. This dish captures the classic flavors of a traditional Caprese salad in a convenient, bite-sized form. The combination of ripe cherry tomatoes, creamy mozzarella balls, and fragrant basil leaves skewered together creates a harmonious blend of textures and flavors that will impress your guests.
The skewers are often drizzled with a balsamic glaze, adding a hint of sweetness to complement the savory ingredients. This recipe isn’t only visually appealing but also incredibly easy to prepare, making it a go-to choice for entertaining.
The vibrant colors of the red tomatoes, white mozzarella, and green basil bring a festive touch to your table setting. Ideal for serving 4-6 people, these Caprese Skewers are versatile enough to be enjoyed as an appetizer, a snack, or even a light side dish. Let’s explore the simple list of ingredients and the straightforward steps to create this delightful dish.
Ingredients for 4-6 servings:
- 24 cherry tomatoes
- 24 small mozzarella balls (bocconcini)
- 24 fresh basil leaves
- Salt and pepper to taste
- 2 tablespoons of olive oil
- 2 tablespoons of balsamic glaze
- 24 wooden or bamboo skewers
Cooking Instructions:
- Prepare the Ingredients: Begin by rinsing the cherry tomatoes and basil leaves under cold water. Pat them dry with a paper towel to remove excess moisture. Drain the mozzarella balls and set them aside.
- Assemble the Skewers: Take a skewer and start by threading a cherry tomato onto it. Follow with a basil leaf, then a mozzarella ball. Repeat the sequence until you have used three sets of tomato, basil, and mozzarella per skewer. Continue this process for all skewers.
- Season and Dress: Once all the skewers are assembled, lay them out on a serving platter. Drizzle olive oil over the skewers, ensuring each one is lightly coated. Sprinkle a pinch of salt and pepper over them to enhance the flavors.
- Add the Final Touch: Finish by drizzling balsamic glaze over the skewers. You can either drizzle it artistically over the entire platter or apply it more precisely to each skewer for a neat presentation.
- Serve and Enjoy: Serve the Caprese Skewers immediately for the best taste experience. They can be enjoyed at room temperature, making them a convenient choice for parties.
Extra Tips: For the best flavor, use high-quality, fresh ingredients. Opt for vine-ripened cherry tomatoes and fresh basil leaves for the most aromatic results. If you can’t find small mozzarella balls, you can cut a larger mozzarella block into bite-sized pieces.
To prevent the skewers from burning if you plan to grill them, soak wooden skewers in water for at least 30 minutes before assembly. Adjust the amount of balsamic glaze to suit your taste preference, keeping in mind that a little can go a long way in enhancing the flavors.
Authentic Margherita Pizza With Fresh Ingredients

The Margherita pizza is a classic Italian dish that represents the colors of the Italian flag with its fresh ingredients: red tomatoes, white mozzarella, and green basil. Originating from Naples, this pizza is known for its simplicity and the quality of its ingredients, which allow the flavors to shine through. To achieve an authentic taste, it’s essential to use fresh tomatoes, high-quality mozzarella, and fragrant basil leaves. A thin, crisp crust forms the perfect base, enabling the toppings to be the star of the show.
Making Margherita pizza at home can be a delightful experience, bringing a piece of Italy to your kitchen. It’s important to use a good recipe and follow precise steps to guarantee the dough is airy and the toppings are well-balanced. This recipe is perfect for a small gathering or a family meal, serving 4-6 people. By using fresh ingredients and following the steps outlined below, you’ll be able to create a Margherita pizza that tastes as if it was made by a pizzaiolo in Naples.
Ingredients for 4-6 servings:
- 500g pizza dough
- 400g fresh tomatoes (or canned San Marzano tomatoes)
- 250g fresh mozzarella cheese
- Fresh basil leaves
- 3 tablespoons extra-virgin olive oil
- 1 teaspoon salt
- 1/2 teaspoon freshly ground black pepper
- 1 teaspoon dried oregano (optional)
- Semolina flour or cornmeal for dusting
Cooking Instructions:
- Prepare the Dough: If you’re making your own pizza dough, begin by mixing 500g of flour with water, yeast, and salt as per your recipe, and let it rise for at least 1-2 hours until it doubles in size. If using store-bought dough, let it rest at room temperature for 30 minutes.
- Preheat the Oven: Preheat your oven to the highest setting (usually around 250°C/482°F) for at least 30 minutes. If you have a pizza stone, place it in the oven while it’s heating to guarantee it’s very hot.
- Prepare the Sauce: If using fresh tomatoes, blanch them in boiling water for 1 minute, then peel and crush them. If using canned tomatoes, crush them directly. Add salt, pepper, and 1 tablespoon of olive oil to the tomatoes, and stir to combine. Optionally, add oregano for extra flavor.
- Shape the Dough: Dust a clean surface with semolina flour or cornmeal. Take your dough and stretch it into a round shape, ensuring the edges are slightly thicker to form a crust. Aim for a diameter of about 12 inches for each pizza.
- Assemble the Pizza: Transfer the dough to a pizza peel or a baking sheet dusted with semolina. Spread a thin layer of tomato sauce over the base, leaving a small border around the edge. Tear the mozzarella into chunks and scatter evenly over the sauce. Drizzle with a bit of olive oil.
- Bake the Pizza: Carefully slide the pizza onto the hot pizza stone or place the baking sheet in the oven. Bake for 8-10 minutes, or until the crust is golden and the cheese is bubbling.
- Add Fresh Basil: Once the pizza is out of the oven, immediately scatter fresh basil leaves over the top. The heat from the pizza will slightly wilt the basil, releasing its aroma.
- Serve: Drizzle a bit more olive oil on top before slicing and serving the pizza hot.
Extra Tips:
For the best results, use a pizza stone or steel, as they retain heat better and help achieve a crispy crust. If you don’t have one, a heavy baking sheet will work, but guarantee it’s preheated in the oven.
When shaping the dough, try not to handle it too much to preserve the air bubbles that will form a light and airy crust. Finally, avoid overloading the pizza with cheese and toppings, as this can make the crust soggy; less is more when it comes to Margherita pizza.
Spinach and Ricotta Stuffed Shells

Spinach and Ricotta Stuffed Shells is a classic Italian dish that’s perfect for any festive gathering. With its creamy ricotta cheese filling, fresh spinach, and tangy marinara sauce, this dish is both comforting and elegant. The large pasta shells are stuffed with a savory mixture that bakes to perfection, creating a delightful experience for your taste buds.
This recipe is a wonderful addition to any Italian party menu and is certain to impress your guests. This dish isn’t only delicious but also versatile, as it can be prepared ahead of time and baked just before serving. The combination of spinach and ricotta is a timeless match that brings a burst of flavor with every bite.
Whether you’re hosting a dinner party or simply gathering with family, Spinach and Ricotta Stuffed Shells can be a centerpiece that delights everyone at the table. Let’s get started with what you’ll need to make this dish for a serving size of 4-6 people.
Ingredients:
- 20 jumbo pasta shells
- 15 ounces ricotta cheese
- 1 cup shredded mozzarella cheese
- 1/2 cup grated Parmesan cheese
- 1 large egg
- 2 cups fresh spinach, chopped
- 2 cloves garlic, minced
- Salt and pepper, to taste
- 2 cups marinara sauce
- 1 tablespoon olive oil
- Fresh basil leaves, for garnish (optional)
Instructions:
- Preheat the Oven: Start by preheating your oven to 375°F (190°C). This guarantees that the oven is at the right temperature when it’s time to bake the stuffed shells.
- Cook the Pasta Shells: Bring a large pot of salted water to a boil. Add the jumbo pasta shells and cook them until they’re al dente, according to the package instructions. Once cooked, drain the shells and lay them out on a baking sheet to cool slightly.
- Prepare the Filling: In a large mixing bowl, combine the ricotta cheese, mozzarella cheese, Parmesan cheese, chopped spinach, egg, minced garlic, salt, and pepper. Mix well until all the ingredients are thoroughly combined.
- Stuff the Shells: Using a spoon, carefully fill each cooked pasta shell with the spinach and ricotta mixture. Make sure to fill them generously but not to the point of breaking the shells.
- Assemble the Dish: Spread a thin layer of marinara sauce at the bottom of a baking dish. Arrange the stuffed shells on top of the sauce in a single layer. Pour the remaining marinara sauce evenly over the shells.
- Bake the Shells: Cover the baking dish with aluminum foil and place it in the preheated oven. Bake for 25 minutes. Remove the foil and bake for an additional 10 minutes, or until the cheese is bubbly and golden brown.
- Serve and Garnish: Once baked, remove the dish from the oven and let it cool slightly. Garnish with fresh basil leaves before serving for an added touch of flavor and color.
Extra Tips: For a more flavorful dish, consider adding a pinch of nutmeg to the ricotta filling; it complements the spinach wonderfully. You can also substitute kale for spinach if you prefer a different green.
If you’re preparing this dish ahead of time, you can stuff the shells and refrigerate them until you’re ready to bake. Just be sure to add a few extra minutes to the baking time if the shells are cold from the fridge.
Antipasto Platter With Cured Meats and Cheeses

An antipasto platter is the perfect start to any Italian-themed gathering, offering a delightful assortment of flavors and textures. This platter is a beautiful presentation of cured meats, cheeses, olives, and other complementary ingredients that excite the palate and set the tone for the meal to follow. The key to a successful antipasto platter is variety and balance, featuring a mix of savory, salty, and tangy elements that guests can mix and match according to their preferences.
Creating an antipasto platter is more of an art than a science. It involves selecting high-quality ingredients and arranging them in an aesthetically pleasing manner. Aim for a mix of textures and colors, and don’t be afraid to incorporate fresh fruits, nuts, or even marinated vegetables to add an extra dimension. This recipe is designed to serve 4-6 people, making it an excellent choice for small gatherings or intimate dinners.
Ingredients (serving size: 4-6 people):
- 4 ounces of prosciutto
- 4 ounces of salami
- 4 ounces of capicola
- 8 ounces of assorted cheeses (such as mozzarella, pecorino, and gorgonzola)
- 1 cup mixed olives (such as Kalamata, Castelvetrano, and green olives)
- 1 jar of marinated artichoke hearts
- 1 small jar of roasted red peppers
- 1 small bunch of grapes (red or green)
- 1 small bag of mixed nuts (such as almonds, walnuts, and pistachios)
- 1 loaf of crusty Italian bread or a baguette
- 1 small container of cherry tomatoes
- Fresh basil leaves for garnish
Instructions:
- Select a Platter: Begin by choosing a large, flat platter or wooden cutting board as your base. This will be the canvas for your antipasto display.
- Prepare the Meats: Arrange the prosciutto, salami, and capicola on the platter. You can fold the slices or roll them into small cones for visual appeal. Place them in separate sections on the platter.
- Slice the Cheeses: Cut the cheeses into bite-sized pieces or cubes. Arrange them next to the meats, ensuring there’s a variety of textures and flavors grouped together.
- Add Olives and Vegetables: Drain the olives and marinated artichoke hearts, and place them in small bowls or directly on the platter. Add the roasted red peppers, allowing the vibrant red to add a pop of color.
- Incorporate Fruits and Nuts: Scatter the grapes and nuts around the platter, filling in any gaps and adding visual interest. The sweetness of the grapes and the crunch of the nuts provide a nice contrast to the savory elements.
- Include Bread and Tomatoes: Slice the Italian bread or baguette into thin slices and arrange them alongside the other ingredients. Add cherry tomatoes for a burst of freshness and color.
- Garnish and Serve: Finally, garnish the platter with fresh basil leaves to add a touch of green and a hint of aromatic flavor. Serve the platter at room temperature for best taste.
Extra Tips:
When assembling your antipasto platter, remember that presentation is key. Try to create a balance between different flavors and textures, ensuring that each guest can find something they enjoy.
Feel free to customize the platter based on your preferences or dietary needs, such as including vegetarian options or gluten-free crackers. Keep in mind that antipasto platters are very forgiving, so don’t stress too much about precise measurements or arrangements—just have fun with it!
Tuscan White Bean and Kale Soup
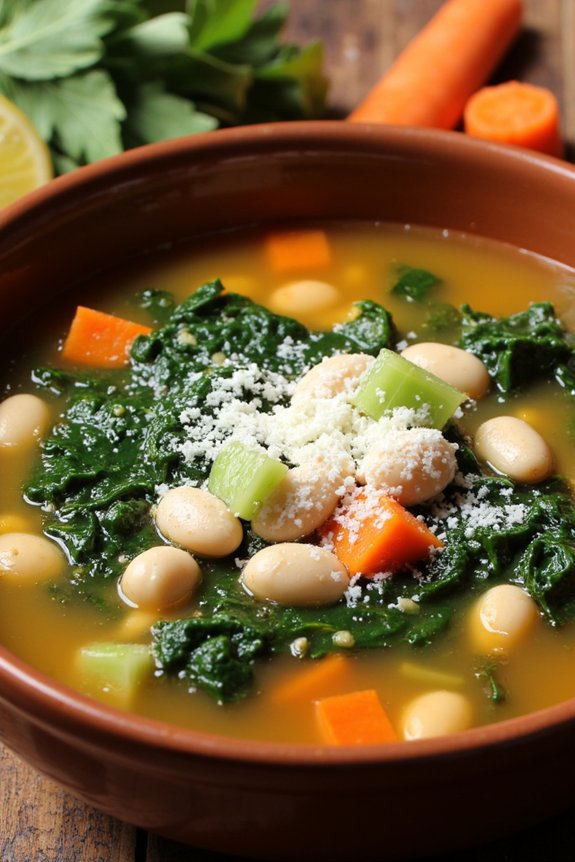
Tuscan White Bean and Kale Soup is a hearty and nutritious dish that captures the essence of Italian comfort food. This robust soup combines tender white beans with the earthy flavors of kale, creating a delightful balance that warms the soul. Perfect for a cozy night in or as a starter at a dinner party, this soup brings a taste of Tuscany to your table, enhancing any gathering with its rich aromas and wholesome ingredients.
Traditionally, Tuscan White Bean and Kale Soup is made with simple, fresh ingredients that highlight the natural flavors of the beans and greens. This dish isn’t only flavorful but also packed with nutrients, making it a healthy choice for any meal. The recipe can be easily doubled to accommodate larger gatherings, ensuring that everyone gets to savor a bowl of this delicious soup.
Ingredients (Serves 4-6 people):
- 2 tablespoons olive oil
- 1 onion, chopped
- 2 cloves garlic, minced
- 2 carrots, diced
- 2 celery stalks, diced
- 1 tablespoon tomato paste
- 1 teaspoon dried thyme
- 1 teaspoon dried rosemary
- 1/4 teaspoon red pepper flakes (optional)
- 6 cups vegetable broth
- 2 cans (15 ounces each) cannellini beans, drained and rinsed
- 1 bunch kale, stems removed and leaves chopped
- Salt and pepper to taste
- Grated Parmesan cheese, for serving (optional)
- Crusty bread, for serving (optional)
Cooking Instructions:
- Prepare the Aromatics: Heat the olive oil in a large pot over medium heat. Add the chopped onion and cook until translucent, about 5 minutes. Stir in the minced garlic and continue to cook for another 1-2 minutes until fragrant.
- Add Vegetables: Add the diced carrots and celery to the pot. Cook for about 5 minutes until the vegetables begin to soften, stirring occasionally.
- Incorporate Tomato Paste and Herbs: Stir in the tomato paste, dried thyme, dried rosemary, and red pepper flakes (if using). Cook for about 1 minute until the tomato paste is well incorporated and the spices are fragrant.
- Simmer the Soup: Pour in the vegetable broth and bring the mixture to a boil. Reduce the heat to a simmer and add the cannellini beans. Cover and let the soup simmer for 15-20 minutes to allow the flavors to meld.
- Add the Kale: Stir in the chopped kale and season the soup with salt and pepper to taste. Continue to simmer for an additional 10 minutes until the kale is tender.
- Serve: Ladle the soup into bowls and serve hot. Top with grated Parmesan cheese if desired, and accompany with crusty bread for dipping.
Extra Tips: For an even richer flavor, consider using a Parmesan rind during the simmering process, removing it before serving. If you prefer a creamier texture, you can blend a portion of the soup and return it to the pot. Additionally, feel free to adjust the amount of kale and beans according to your preference, and for a heartier meal, add cooked sausage or pancetta. This soup can be made a day ahead and tastes even better as the flavors continue to develop.
Zesty Lemon and Herb Grilled Chicken

Zesty Lemon and Herb Grilled Chicken is a delightful dish that’s perfect for any Italian-themed party. This recipe combines the bright flavors of fresh lemon with a medley of fragrant herbs to create a mouth-watering dish that’s sure to impress your guests.
The chicken is marinated in a zesty lemon and herb mixture, which not only infuses it with incredible flavor but also guarantees that it remains juicy and tender after grilling. This dish pairs perfectly with a side of roasted vegetables or a fresh green salad, making it a versatile and crowd-pleasing option for any gathering.
The key to achieving the best results with this recipe lies in the marination process, allowing the chicken to soak up all the flavors before grilling. This not only enhances the taste but also makes the chicken incredibly succulent.
Grilling gives the chicken a deliciously charred exterior while keeping the inside moist and flavorful. Whether you’re hosting a large party or a small get-together, this Zesty Lemon and Herb Grilled Chicken will be a hit with your guests, leaving them asking for more.
Ingredients (Serving Size: 4-6 people):
- 4 boneless, skinless chicken breasts
- 1/4 cup olive oil
- Juice of 2 lemons
- Zest of 1 lemon
- 3 cloves garlic, minced
- 1 tablespoon fresh rosemary, chopped
- 1 tablespoon fresh thyme, chopped
- 1 tablespoon fresh oregano, chopped
- Salt and pepper to taste
- Lemon slices for garnish
- Fresh parsley for garnish
Cooking Instructions:
- Prepare the Marinade: In a large bowl, combine the olive oil, lemon juice, lemon zest, minced garlic, rosemary, thyme, oregano, salt, and pepper. Mix well to ascertain all the ingredients are thoroughly combined.
- Marinate the Chicken: Place the chicken breasts in the bowl with the marinade, making sure they’re well-coated. Cover the bowl with plastic wrap and refrigerate for at least 1 hour, or up to 4 hours for a deeper flavor.
- Preheat the Grill: About 15 minutes before you’re ready to cook, preheat your grill to medium-high heat. If using a charcoal grill, make certain the coals are evenly distributed for consistent heat.
- Grill the Chicken: Remove the chicken from the marinade and place it on the grill. Cook each side for about 6-8 minutes, or until the internal temperature reaches 165°F (75°C). The chicken should have a nice char on the outside.
- Rest and Serve: Once cooked, remove the chicken from the grill and allow it to rest for 5 minutes before slicing. This will help the juices redistribute, keeping the chicken moist.
- Garnish and Enjoy: Garnish with lemon slices and fresh parsley before serving. This adds a burst of freshness and a pop of color to the dish.
Extra Tips:
For the best flavor, try to use fresh herbs instead of dried ones. If fresh herbs aren’t available, you can substitute with dried herbs using a third of the amount.
Also, if you have the time, marinating the chicken overnight can enhance the flavors even more. When grilling, make sure not to overcrowd the grill; leaving space between the chicken pieces ensures even cooking and allows the heat to circulate properly.
Finally, if you don’t have a grill, you can use a grill pan on the stove or a broiler in the oven as an alternative method.
Traditional Tiramisu With Espresso and Mascarpone

Traditional Tiramisu With Espresso and Mascarpone is a classic Italian dessert that perfectly encapsulates the rich and indulgent flavors Italian cuisine is known for. This dessert features layers of delicate ladyfinger biscuits, soaked in robust espresso, and enveloped in a creamy mascarpone mixture. The combination of cocoa and coffee creates a harmonious blend that delights the palate, while the smooth texture of mascarpone adds a luxurious touch.
Preparing this dish for a small gathering or a special occasion will surely impress your guests and provide them with an authentic taste of Italy.
The origins of tiramisu can be traced back to the Veneto region of Italy, and it has since become a beloved dessert worldwide. The name “tiramisu” translates to “pick me up” in Italian, a nod to the energizing effects of the espresso used in the recipe.
While there are many variations of tiramisu, this traditional version sticks to the classic ingredients that make it so beloved. By following this recipe, you can create a sumptuous dessert that will transport you and your guests to an Italian café, even if just for a moment.
Ingredients (Serves 4-6):
- 3 large eggs, separated
- 1 cup granulated sugar
- 1 cup mascarpone cheese
- 1 teaspoon vanilla extract
- 1 cup cold heavy cream
- 1 ½ cups brewed espresso, cooled
- 2 tablespoons coffee liqueur (optional)
- 24 ladyfinger biscuits
- Unsweetened cocoa powder, for dusting
- Dark chocolate shavings (optional)
Instructions:
- Prepare the Mascarpone Mixture: In a large mixing bowl, whisk the egg yolks and sugar together until the mixture becomes thick and pale. Gently fold the mascarpone cheese and vanilla extract into the egg yolk mixture until smooth and well combined.
- Whip the Cream: In a separate bowl, whip the heavy cream until it forms stiff peaks. Carefully fold the whipped cream into the mascarpone mixture, making sure not to deflate the airiness of the cream.
- Prepare the Espresso Mixture: Combine the cooled espresso and coffee liqueur (if using) in a shallow dish.
- Assemble the Tiramisu: Quickly dip each ladyfinger into the espresso mixture, making sure they’re soaked but not overly soggy. Arrange a layer of soaked ladyfingers at the bottom of a 9×9 inch dish.
- Layer the Cream: Spread half of the mascarpone mixture over the layer of ladyfingers, smoothing it out with a spatula.
- Repeat Layers: Add another layer of soaked ladyfingers over the mascarpone mixture, followed by the remaining mascarpone mixture. Smooth the top with a spatula.
- Chill and Serve: Cover the dish with plastic wrap and refrigerate for at least 4 hours, or overnight for best results. Before serving, dust the top with unsweetened cocoa powder and garnish with dark chocolate shavings if desired.
Extra Tips:
For a more intense coffee flavor, consider using a stronger espresso or adding more coffee liqueur. If you prefer a lighter version, you can replace the heavy cream with a lighter whipped topping.
Remember to serve tiramisu chilled, as it allows the flavors to meld beautifully and enhances the texture. To guarantee the ladyfingers aren’t too soggy, dip them quickly in the espresso mixture rather than letting them soak.
Finally, for a more decorative presentation, consider using individual serving glasses or dishes, which can also help in controlling portion sizes.
Prosciutto and Melon Bites

Prosciutto and Melon Bites are the epitome of simplicity and elegance, bringing together the sweet juiciness of ripe melon with the savory, salty flavor of thinly sliced prosciutto. This classic Italian antipasto is perfect for parties, as it requires minimal preparation and delivers maximum flavor.
The combination of textures and tastes makes it an ideal finger food to stimulate your guests’ appetites and add a touch of sophistication to your gathering. This dish also allows for some creative flair, as you can explore different types of melon or add additional garnishes like fresh mint or a drizzle of balsamic glaze to enhance the profile of each bite.
With a few quality ingredients and a little bit of preparation, you’ll have a stunning appetizer that showcases the best of Italian cuisine’s simple yet profound flavors.
Ingredients (Servings: 4-6 people)
- 1 ripe cantaloupe melon
- 12 thin slices of prosciutto
- Fresh basil leaves (optional)
- Freshly ground black pepper (optional)
- Toothpicks or small skewers
Instructions
- Prepare the Melon: Begin by cutting the cantaloupe in half and removing the seeds with a spoon. Once the seeds are removed, slice the melon into wedges and then carefully remove the rind. Cut the melon flesh into bite-sized cubes, making sure they’re large enough to be easily held with a toothpick but small enough to be consumed in one bite.
- Wrap with Prosciutto: Lay out the slices of prosciutto on a clean surface. Take one cube of melon and wrap it with a slice of prosciutto. If the prosciutto slice is too long, you can cut it in half to make certain the melon is adequately wrapped without overwhelming it.
- Secure and Garnish: Using a toothpick or small skewer, pierce through the prosciutto-wrapped melon to fasten the ingredients together. This will also make it easy for guests to pick up and enjoy. If desired, add a fresh basil leaf by threading it onto the toothpick before or after the melon bite.
- Season and Serve: Arrange the Prosciutto and Melon Bites on a serving platter. Optionally, you can lightly sprinkle freshly ground black pepper over the bites for an added touch of flavor. Serve immediately to enjoy the freshness of the melon and the savory notes of the prosciutto.
Extra Tips
When choosing a melon, look for one that’s fragrant and slightly soft at the stem end, indicating ripeness. The quality of the prosciutto is also essential, as it’s a dominant flavor in this dish. Opt for high-quality, thinly sliced prosciutto for the best results.
If you want to add an extra layer of flavor, consider drizzling a small amount of balsamic reduction over the bites before serving. This will complement the sweetness of the melon and the saltiness of the prosciutto beautifully.
Pesto Pasta Salad With Sun-Dried Tomatoes

Pesto Pasta Salad With Sun-Dried Tomatoes is a vibrant and flavorful dish that perfectly captures the essence of Italian cuisine. This delightful salad combines the rich, nutty flavor of pesto with the tangy sweetness of sun-dried tomatoes, creating a revitalizing and satisfying meal. Ideal for parties and gatherings, it’s a versatile dish that can be served as a side or a main course, making it a favorite among guests.
The salad isn’t only delicious but also incredibly easy to prepare. The key to this dish lies in its fresh ingredients and the harmonious balance of flavors. With a base of al dente pasta, the pesto clings to every piece, while the sun-dried tomatoes add a pop of color and a burst of flavor. To enhance the texture and taste, a sprinkle of pine nuts and a generous handful of freshly grated Parmesan cheese are added. This Pesto Pasta Salad With Sun-Dried Tomatoes is a surefire hit, whether you’re hosting a casual get-together or a more formal gathering.
Ingredients for 4-6 servings:
- 12 ounces of pasta (penne, fusilli, or farfalle)
- 1 cup of prepared pesto sauce
- 1 cup of sun-dried tomatoes, chopped
- 1/2 cup of pine nuts
- 1/2 cup of freshly grated Parmesan cheese
- 1 cup of cherry tomatoes, halved
- 1/2 cup of black olives, sliced
- 1/4 cup of fresh basil leaves, torn
- Salt and pepper to taste
- Olive oil for drizzling
Cooking Instructions:
- Cook the Pasta: Begin by bringing a large pot of salted water to a boil. Add the pasta and cook according to the package instructions until al dente. Once cooked, drain the pasta and rinse it under cold water to stop the cooking process. This helps in preserving the texture and prevents the pasta from becoming too soft in the salad.
- Prepare the Pesto Base: In a large mixing bowl, combine the cooked pasta with the pesto sauce. Stir well to verify that the pasta is evenly coated with the pesto. If the pesto feels too thick, add a splash of olive oil to loosen it up.
- Incorporate the Sun-Dried Tomatoes and Pine Nuts: Add the chopped sun-dried tomatoes and pine nuts to the pasta mixture. Stir gently to combine. The sun-dried tomatoes will add a robust flavor, while the pine nuts will contribute a nice crunch.
- Add Fresh Ingredients: Incorporate the halved cherry tomatoes, sliced black olives, and torn basil leaves into the salad. Toss everything together until well mixed. The fresh ingredients will add a burst of color and freshness to the dish.
- Season and Serve: Season the salad with salt and pepper to taste. Before serving, sprinkle the freshly grated Parmesan cheese over the top. For an extra touch, drizzle a bit of olive oil over the salad to enhance the flavor and give it a glossy finish.
Extra Tips:
For an even more flavorful pasta salad, consider preparing the dish a few hours ahead of time and letting it sit in the refrigerator. This allows the flavors to meld together beautifully.
When ready to serve, bring the salad to room temperature for the best taste. If you prefer a bit of a kick, add a pinch of red pepper flakes to the pesto mixture. Finally, feel free to experiment with additional ingredients like roasted bell peppers or artichoke hearts to customize the salad to your taste.