

As the holiday season approaches, I find myself longing for the cozy traditions of an Italian Christmas and the delicious recipes that bring loved ones around the table. Picture a vibrant antipasti platter filled with cured meats and cheeses, or the comforting aroma of tortellini in brodo filling the room. If you’re looking to create a memorable holiday feast that embodies the spirit of Italy, these cherished recipes are sure to inspire. Let’s explore these festive dishes together and make your Christmas both joyful and flavorful.
Antipasti Platter

Italian Christmas celebrations are incomplete without a delightful Antipasti Platter. This traditional starter is a feast for the senses, combining an array of textures, flavors, and colors that reflect the joy of the festive season. Typically served before the main course, an Antipasti Platter includes a variety of cured meats, cheeses, marinated vegetables, and other small bites that set the stage for a hearty Italian meal.
The beauty of this dish lies in its versatility – you can tailor it to your taste preferences or to what’s seasonally available, making it a perfect option for any gathering.
To assemble the perfect Antipasti Platter, choose high-quality ingredients that will complement each other and provide a balanced tasting experience. The platter should be a harmonious blend of savory, sweet, and tangy flavors, with a mix of crunchy, creamy, and juicy textures. It’s not only a treat for the palate but also a visually appealing centerpiece for your holiday table.
This recipe will guide you in creating an Antipasti Platter that serves 4-6 people, guaranteeing your guests start their meal with a memorable experience.
Ingredients for 4-6 servings:
- 150g Prosciutto
- 150g Salami
- 150g Mortadella
- 150g Provolone cheese
- 150g Pecorino cheese
- 150g Mozzarella balls
- 200g Marinated olives
- 200g Artichoke hearts (marinated)
- 200g Roasted red peppers
- 150g Sun-dried tomatoes
- 100g Grissini (breadsticks)
- 100g Fresh basil leaves
- 50g Mixed nuts
- 50g Dried figs
Cooking Instructions:
- Prepare the Ingredients: Begin by slicing the cured meats and cheeses into thin, bite-sized pieces. This will make it easier for guests to pick up with their fingers or small forks.
- Arrange the Meats and Cheeses: On a large platter or wooden board, start by placing the meats and cheeses. Spread them out to create a balanced look, ensuring they’re evenly distributed.
- Add the Vegetables: Drain the marinated vegetables like olives, artichoke hearts, and roasted red peppers. Arrange them in small clusters around the meats and cheeses.
- Incorporate the Extras: Add the sun-dried tomatoes, fresh basil leaves, mixed nuts, and dried figs around the platter. These will add additional flavor and texture to the dish.
- Finish with Breadsticks: Finally, place the Grissini breadsticks on the platter. You can either lay them flat or stand them up in a tall glass for visual interest.
- Check for Balance: Step back and look at the platter. Make any adjustments needed to guarantee that the colors and textures are well-distributed and visually appealing.
Extra Tips:
When preparing the Antipasti Platter, try to use a variety of colors and shapes to make it more visually appealing. You can substitute ingredients according to availability or preference, such as using different types of cured meats or cheeses.
To enhance the flavors, consider drizzling a bit of olive oil over the platter or serving with a small bowl of balsamic glaze on the side for dipping. Remember to keep the platter chilled until ready to serve, especially if preparing it in advance.
Baccalà Alla Vicentina
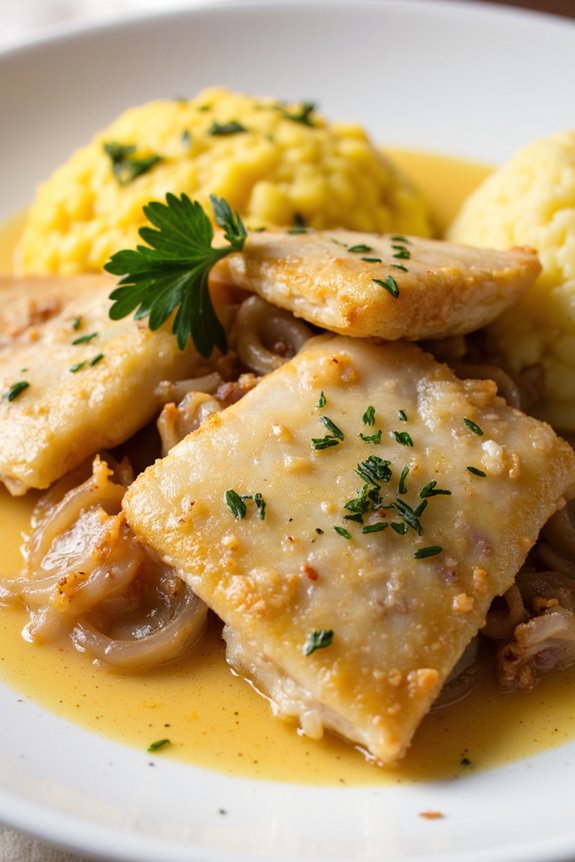
Baccalà Alla Vicentina is a traditional Italian dish hailing from the Veneto region, specifically Vicenza. This classic recipe transforms salted cod into a tender and flavorful dish, enriched with the subtle flavors of onions, milk, and anchovies. Steeped in history, Baccalà Alla Vicentina is a demonstration of the culinary ingenuity of the region, where simple ingredients are elevated into a delectable masterpiece.
This dish is usually served as part of the festive Christmas spread, bringing warmth and comfort to the holiday table.
To achieve the perfect Baccalà Alla Vicentina, it’s essential to begin with high-quality salted cod, which must be soaked and prepared properly to guarantee the best texture and flavor. The slow cooking process allows the fish to absorb the rich flavors of the accompanying ingredients, creating a harmonious blend that’s both hearty and satisfying.
Paired traditionally with polenta, this dish is a celebration of Italian culinary tradition, making it a perfect choice for a special holiday meal.
Ingredients (serves 4-6):
- 800 grams salted cod (baccalà)
- 2 large onions, thinly sliced
- 4 anchovy fillets, chopped
- 2 cloves of garlic, minced
- 200 ml whole milk
- 200 ml extra-virgin olive oil
- 1 tablespoon all-purpose flour
- Freshly ground black pepper, to taste
- Salt, to taste
- 50 grams grated Parmesan cheese
- 1 tablespoon chopped fresh parsley
- Polenta, to serve
Cooking Instructions:
- Prepare the Cod: Begin by soaking the salted cod in cold water for at least 48 hours, changing the water every 8 hours to remove excess salt. Once desalted, drain the cod and pat it dry with paper towels. Remove any skin and bones, then cut the cod into large pieces.
- Sauté the Aromatics: In a large skillet, heat a portion of the olive oil over medium heat. Add the sliced onions and garlic, sautéing gently until the onions are soft and translucent. This should take about 10 minutes. Stir in the chopped anchovies and allow them to dissolve into the mixture.
- Layer the Ingredients: In a baking dish, arrange the pieces of cod in a single layer. Sprinkle with the flour, and then pour the sautéed onion mixture over the fish. Season with freshly ground black pepper.
- Add Liquid: Pour the milk and remaining olive oil over the top, making sure the fish is evenly coated. The liquid should almost cover the fish but not entirely.
- Bake the Dish: Preheat your oven to 160°C (320°F). Cover the baking dish with aluminum foil and bake for approximately 3 hours. The slow cooking will infuse the flavors deeply into the fish, making it tender and flavorful. Check occasionally to confirm the liquid hasn’t evaporated completely; add a bit more milk if necessary.
- Finish with Cheese and Herbs: During the final 15 minutes of baking, remove the foil and sprinkle the Parmesan cheese over the top. Continue baking until the cheese is melted and slightly golden. Remove from the oven and sprinkle with fresh parsley.
- Serve: Allow the dish to rest for a few minutes before serving. Plate the Baccalà Alla Vicentina with a generous portion of polenta alongside, allowing the creamy fish to complement the soft, warm polenta.
Extra Tips:
When preparing Baccalà Alla Vicentina, patience is key. The soaking process is fundamental for removing excess salt and making sure the cod becomes tender.
To enhance the dish’s flavor, use high-quality extra-virgin olive oil and fresh ingredients. If you prefer a thicker sauce, you can slightly increase the amount of flour used.
Also, be mindful of the salt content, as the cheese and anchovies contribute to the overall seasoning. Finally, don’t rush the cooking process; the slow bake is essential for developing the deep, rich flavors that make this dish so special.
Tortellini in Brodo

Tortellini in Brodo is a classic Italian dish that perfectly captures the essence of a warm and comforting Christmas meal. This dish consists of delicate tortellini pasta filled with a rich mixture of meats and cheese, served in a savory and aromatic broth. Traditionally served as a primo piatto (first course) during the festive season, Tortellini in Brodo offers a delightful blend of flavors and textures that’s sure to impress your family and friends.
The origins of Tortellini in Brodo can be traced back to the Emilia-Romagna region of Italy, where it’s a beloved staple during the holidays. The key to a successful Tortellini in Brodo lies in both the quality of the tortellini and the depth of flavor in the broth. When made from scratch, this dish can be a labor of love, but the resulting rich and heartwarming dish is well worth the effort.
Whether you choose to make your own tortellini or opt for store-bought, this recipe will guide you through creating a delightful and authentic Italian Christmas experience.
Ingredients (serving size: 4-6 people):
- 250g fresh tortellini (meat or cheese-filled)
- 2 liters of chicken or beef broth
- 1 carrot, peeled and chopped
- 1 celery stalk, chopped
- 1 onion, halved
- 2 cloves garlic, crushed
- Salt and pepper to taste
- Freshly grated Parmesan cheese for serving
- Fresh parsley for garnish (optional)
Cooking Instructions:
- Prepare the Broth: In a large pot, combine the chicken or beef broth, chopped carrot, celery, halved onion, and crushed garlic. Bring the mixture to a gentle boil over medium-high heat.
- Simmer the Broth: Once boiling, reduce the heat to low and let the broth simmer for about 30 minutes. This will allow the vegetables to infuse their flavors into the broth, creating a rich and aromatic base for the tortellini.
- Strain the Broth: After simmering, strain the broth through a fine-mesh sieve into another pot, discarding the vegetables. Return the clear, flavorful broth to the heat and season with salt and pepper to taste.
- Cook the Tortellini: Add the tortellini to the simmering broth. Cook according to the package instructions, typically around 3-5 minutes, or until they float to the surface and are tender.
- Serve: Ladle the tortellini and broth into bowls. Top each serving with freshly grated Parmesan cheese and garnish with fresh parsley if desired. Serve immediately, ensuring each bowl has plenty of both tortellini and broth.
Extra Tips:
For a more profound flavor, consider preparing your own homemade broth a day in advance, allowing it to chill overnight to intensify the taste. If using store-bought tortellini, look for high-quality options to enhance the dish’s authenticity.
Additionally, feel free to customize your filling, incorporating personal favorites like prosciutto, mortadella, or a mix of cheeses. Finally, serving the dish with a side of crusty bread can provide a satisfying complement to the warm, comforting broth.
Lasagna Alla Bolognese

Lasagna Alla Bolognese is a classic Italian dish that’s perfect for celebrating Christmas with family and friends. Rich with layers of pasta, a hearty meat sauce, creamy béchamel, and plenty of cheese, this dish is a comfort food that’s sure to please everyone at the table.
Originating from Bologna, this version of lasagna is famed for its robust and savory flavors, making it a staple in Italian cuisine and a true festive delight.
The key to a perfect Lasagna Alla Bolognese is the balance of flavors and textures. The Bolognese sauce, made with a mix of ground meats and cooked slowly with tomatoes and a hint of red wine, combines beautifully with the creamy béchamel sauce and the tender sheets of pasta.
This recipe serves 4-6 people, making it an ideal dish for a cozy family gathering or a festive dinner party.
Ingredients for Lasagna Alla Bolognese (Serves 4-6):
- 12 sheets of lasagna pasta
- 1 pound ground beef
- 1/2 pound ground pork
- 1 onion, finely chopped
- 2 cloves garlic, minced
- 1 carrot, finely chopped
- 1 celery stalk, finely chopped
- 1/2 cup red wine
- 1 can (28 ounces) crushed tomatoes
- 2 tablespoons tomato paste
- 1 teaspoon dried oregano
- 1/2 teaspoon dried basil
- Salt and pepper to taste
- 4 tablespoons butter
- 4 tablespoons all-purpose flour
- 3 cups milk
- 1/4 teaspoon nutmeg
- 2 cups grated Parmesan cheese
- 1 cup shredded mozzarella cheese
- Olive oil
Cooking Instructions:
- Prepare the Bolognese Sauce:
- In a large skillet, heat a tablespoon of olive oil over medium heat. Add the onion, garlic, carrot, and celery. Sauté until the vegetables are soft, about 5 minutes.
- Add the ground beef and pork. Cook until browned, breaking up the meat with a spoon.
- Pour in the red wine and let it simmer until the liquid is mostly evaporated.
- Stir in the crushed tomatoes, tomato paste, oregano, basil, salt, and pepper. Reduce heat to low, cover, and let it simmer for at least 30 minutes, stirring occasionally.
- Make the Béchamel Sauce:
- In a saucepan, melt the butter over medium heat. Add the flour and whisk continuously for about 2 minutes until smooth and slightly golden.
- Gradually add the milk, whisking constantly to avoid lumps. Continue to cook until the sauce thickens.
- Season with nutmeg, salt, and pepper to taste. Remove from heat and set aside.
- Preheat the Oven:
- Preheat your oven to 375°F (190°C).
- Assemble the Lasagna:
- In a 9×13 inch baking dish, spread a thin layer of Bolognese sauce on the bottom.
- Cover with a layer of lasagna sheets. Top with more Bolognese sauce, a layer of béchamel sauce, and a sprinkle of Parmesan cheese.
- Repeat the layers until all ingredients are used, finishing with a layer of béchamel topped with mozzarella and remaining Parmesan cheese.
- Bake the Lasagna:
- Cover the baking dish with aluminum foil and bake for 25 minutes.
- Remove the foil and bake for an additional 15 minutes, or until the cheese on top is golden and bubbly.
- Rest and Serve:
- Allow the lasagna to rest for at least 10 minutes before slicing and serving.
Extra Tips:
For an even richer flavor, consider making the Bolognese sauce a day in advance. This allows the flavors to meld together beautifully.
When assembling the lasagna, verify the pasta sheets are fully covered with sauce to prevent them from drying out while baking.
If you prefer a vegetarian version, you can substitute the meat with a mixture of mushrooms and zucchini.
Finally, always let the lasagna rest before serving; this helps to set the layers and makes it easier to cut into neat slices.
Risotto Al Radicchio

This recipe serves 4-6 people and highlights the beautiful red hue of radicchio, which adds a splash of color to your holiday table. Risotto Al Radicchio is a great way to introduce more vegetables into your festive menu while still indulging in the luxurious taste and texture of a well-prepared risotto.
Follow the steps below to create a memorable dish that will delight your family and friends during the Christmas season.
Ingredients:
- 2 tablespoons olive oil
- 1 small onion, finely chopped
- 2 cloves garlic, minced
- 1 head radicchio, thinly sliced
- 1 1/2 cups Arborio rice
- 1/2 cup dry white wine
- 4 cups vegetable or chicken broth
- 1/2 cup grated Parmesan cheese
- 2 tablespoons butter
- Salt and pepper to taste
- Fresh parsley, chopped (for garnish)
Cooking Instructions:
- Prepare the Radicchio and Broth:
- Begin by heating the broth in a saucepan over low heat. Keep it warm as you’ll be adding it to the rice in increments.
- Clean and thinly slice the radicchio, then set it aside.
- Sauté the Aromatics:
- In a large skillet or saucepan, heat the olive oil over medium heat.
- Add the chopped onion and sauté until translucent, about 3-4 minutes.
- Stir in the minced garlic and cook for an additional minute until fragrant.
- Cook the Radicchio:
- Add the sliced radicchio to the pan, cooking until it wilts down slightly, approximately 2-3 minutes.
- Toast the Rice:
- Mix in the Arborio rice, stirring to coat with the oil and vegetables. Cook for 2-3 minutes until the edges of the rice become translucent.
- Add the Wine:
- Pour in the white wine and stir continuously until it’s fully absorbed by the rice.
- Incorporate the Broth:
- Begin adding the warm broth, one ladle at a time, stirring frequently. Wait for each addition to be absorbed before adding the next.
- Continue this process until the rice is al dente, which should take about 18-20 minutes.
- Finish the Risotto:
- Once the rice is cooked, remove the pan from heat.
- Stir in the butter and Parmesan cheese until the risotto is creamy and well combined.
- Season with salt and pepper to taste.
- Serve:
- Serve the risotto hot, garnished with chopped parsley for a fresh finish.
Extra Tips:
To achieve the perfect risotto consistency, make sure to stir frequently and add the broth gradually. This helps release the starches from the rice, resulting in a creamy texture.
The choice of wine can also affect the flavor, so opt for a good quality dry white wine for the best results. If you prefer a richer flavor, you can substitute some of the vegetable broth with chicken broth.
Finally, let the risotto rest for a minute before serving to allow the flavors to meld together beautifully.
Osso Buco

Osso Buco, a classic Italian dish, translates to “bone with a hole,” referring to the marrow-filled shank bone that’s the star of this savory recipe. Traditionally from Milan, Osso Buco is a rich and hearty dish often served during the festive season, making it perfect for a Christmas feast. The slow-cooked veal shanks become exceptionally tender, infused with the flavors of white wine, vegetables, and herbs. This dish pairs wonderfully with a creamy risotto or polenta, completing a meal that’s both indulgent and comforting.
The essence of Osso Buco lies in its slow cooking process, which allows the flavors to meld together beautifully. The key to a successful Osso Buco is patience, as the slow braising guarantees the meat becomes fork-tender while the marrow inside the bone adds a luscious depth to the sauce. This dish not only showcases the simplicity and elegance of Italian cuisine but also brings warmth and joy to any holiday table.
Now, let’s explore the ingredients and steps required to prepare this delightful dish for 4-6 people.
Ingredients:
- 4-6 pieces of veal shanks, about 1 1/2 inches thick
- Salt and freshly ground black pepper, to taste
- 1/2 cup all-purpose flour, for dredging
- 1/4 cup olive oil
- 1 medium onion, finely chopped
- 1 medium carrot, finely chopped
- 1 celery stalk, finely chopped
- 2 cloves garlic, minced
- 1 cup dry white wine
- 1 cup chicken or beef stock
- 1 can (14 ounces) of diced tomatoes, with juice
- 1 bay leaf
- 1 teaspoon dried thyme
- Zest of 1 lemon
- 2 tablespoons chopped fresh parsley
Cooking Instructions:
- Prepare the Veal Shanks: Season the veal shanks with salt and pepper. Dredge each piece in flour, shaking off any excess. This will help to create a nice crust when seared.
- Sear the Veal Shanks: Heat the olive oil in a large, heavy-bottomed pot or Dutch oven over medium-high heat. Add the veal shanks and sear them on all sides until browned, about 3-4 minutes per side. Remove the shanks from the pot and set aside.
- Cook the Vegetables: In the same pot, add the chopped onion, carrot, and celery. Cook over medium heat until the vegetables are softened, about 5 minutes. Stir in the minced garlic and cook for another minute.
- Deglaze the Pot: Pour in the white wine, scraping up any browned bits from the bottom of the pot. Let the wine simmer and reduce by half, intensifying the flavors.
- Add Remaining Ingredients: Return the veal shanks to the pot. Add the chicken or beef stock, diced tomatoes with juice, bay leaf, and thyme. Confirm the shanks are mostly submerged in the liquid.
- Simmer the Osso Buco: Bring the mixture to a gentle simmer, then cover the pot with a tight-fitting lid. Reduce the heat to low and let the Osso Buco braise for about 2 to 2.5 hours, or until the meat is tender and almost falling off the bone.
- Finish with Gremolata: Before serving, combine the lemon zest and chopped parsley. Sprinkle this fresh gremolata over the Osso Buco just before serving to add a burst of freshness and color.
Extra Tips:
For the best results, choose veal shanks with a good amount of marrow, as it will enhance the richness of the sauce. If you prefer, you can substitute veal with beef or pork shanks, adjusting the cooking time as needed to guarantee tenderness.
Remember to taste and adjust the seasoning at the end of cooking, as the flavors will develop and intensify over time. Osso Buco is even better when made a day in advance, allowing the flavors to meld together even more.
Serve with a side of risotto, polenta, or mashed potatoes to soak up the delicious sauce. Enjoy your festive Italian feast!
Caponata

Caponata is a classic Sicilian dish that’s often enjoyed as part of the festive Italian Christmas spread. This vibrant vegetable medley combines the rich flavors of eggplant, tomatoes, and olives, all enhanced with a sweet and tangy sauce.
Caponata can be served as a side dish, an appetizer, or a main course, and its versatile nature makes it a favorite during the holiday season. Its origins date back to the 18th century, and it has since become a staple in Italian cuisine, particularly in Southern Italy.
The key to a great Caponata lies in balancing the sweet and sour elements while allowing the vegetables to maintain their unique flavors and textures. This dish is perfect for a Christmas dinner as it can be made ahead of time and served at room temperature, allowing you to focus on other preparations.
Caponata can be enjoyed with crusty bread, as a topping for bruschetta, or as an accompaniment to grilled meats, making it a versatile addition to your holiday menu.
Ingredients (for 4-6 people):
- 2 large eggplants, diced
- 1 large onion, chopped
- 3 cloves garlic, minced
- 2 red bell peppers, chopped
- 4 ripe tomatoes, chopped
- 1/2 cup green olives, pitted and sliced
- 1/4 cup capers, rinsed
- 1/4 cup red wine vinegar
- 2 tablespoons sugar
- 1/2 cup extra virgin olive oil
- Salt and pepper to taste
- Fresh basil leaves for garnish
Cooking Instructions:
1. Prepare the Eggplant: Begin by salting the diced eggplant. Place the pieces in a colander, sprinkle them generously with salt, and let them sit for about 30 minutes. This process helps to draw out any bitterness.
After 30 minutes, rinse the eggplant under cold water and pat dry with a clean kitchen towel.
2. Cook the Vegetables: In a large skillet, heat half of the olive oil over medium heat. Add the eggplant and sauté until they’re golden brown and tender, about 8-10 minutes.
Remove the eggplant from the skillet and set aside.
3. Sauté Aromatics: In the same skillet, add the remaining olive oil. Add the chopped onions and cook until they become translucent, approximately 5 minutes.
Stir in the minced garlic and cook for another minute until fragrant.
4. Add Peppers and Tomatoes: Incorporate the chopped red bell peppers into the skillet and cook for 5 minutes, allowing them to soften.
Then add the chopped tomatoes, stirring occasionally until they break down into a sauce-like consistency, about 10 minutes.
5. Combine Ingredients: Return the cooked eggplant to the skillet, mixing it with the tomato and pepper mixture.
Add the sliced olives, rinsed capers, red wine vinegar, and sugar. Stir everything together and let it simmer for 15 minutes, allowing the flavors to meld.
6. Season and Serve: Taste and adjust the seasoning with salt and pepper as needed.
Once the Caponata is cooked, let it cool to room temperature. Garnish with fresh basil leaves before serving.
Extra Tips:
Caponata is a dish that benefits from being made in advance. Preparing it a day ahead allows the flavors to develop further, making it even more delicious.
Be sure to rinse the capers thoroughly to remove excess salt. If you prefer a sweeter Caponata, adjust the sugar to your liking.
For an added depth of flavor, consider adding a splash of balsamic vinegar at the end. Serve it with toasted bread or as a topping for grilled meats to complement its rich and tangy profile.
Polenta With Sausage

Polenta with sausage is a classic Italian dish that combines the creamy texture of polenta with the savory flavors of Italian sausage. It’s perfect for a cozy winter meal, especially around the festive Christmas season. This dish isn’t only comforting but also simple to prepare, making it an excellent choice for both family dinners and holiday gatherings.
The rich and hearty nature of the sausage enhances the mild flavor of the polenta, creating a balanced and satisfying meal. Traditionally, polenta is made from coarsely ground cornmeal and cooked slowly until it reaches a smooth and creamy consistency. Combined with a robust sausage sauce, this dish becomes a delightful blend of textures and tastes.
The recipe can be easily adjusted to accommodate different preferences, such as using spicy sausage for those who enjoy a bit of heat or adding vegetables for additional flavor and nutrition. Serve this dish as a main course to feed 4-6 people, and enjoy a taste of Italy on your festive table.
Ingredients:
- 1 cup coarse cornmeal
- 4 cups water
- 1 teaspoon salt
- 1 tablespoon butter
- 1/2 cup grated Parmesan cheese
- 1 tablespoon olive oil
- 1 pound Italian sausage (sweet or spicy, as preferred)
- 1 onion, finely chopped
- 3 cloves garlic, minced
- 1 can (14 ounces) diced tomatoes
- 1 teaspoon dried oregano
- Salt and pepper to taste
- Fresh basil leaves for garnish (optional)
Instructions:
- Prepare the Polenta: In a large saucepan, bring 4 cups of water and 1 teaspoon of salt to a boil. Gradually whisk in 1 cup of coarse cornmeal, ensuring there are no lumps. Reduce the heat to low and cook, stirring frequently, for about 30-40 minutes until the polenta is thick and creamy.
- Add Cheese and Butter: Once the polenta reaches the desired consistency, stir in 1 tablespoon of butter and 1/2 cup of grated Parmesan cheese. Mix well until the butter and cheese are fully incorporated. Cover and keep warm while you prepare the sausage.
- Cook the Sausage: In a large skillet, heat 1 tablespoon of olive oil over medium heat. Add 1 pound of Italian sausage, breaking it up with a spoon, and cook until browned, about 5-7 minutes.
- Sauté the Vegetables: Add the finely chopped onion and minced garlic to the sausage. Continue cooking until the onion is translucent and the garlic is fragrant, approximately 3 minutes.
- Make the Sauce: Stir in the can of diced tomatoes and 1 teaspoon of dried oregano. Season with salt and pepper to taste. Let the sauce simmer for 10-15 minutes, allowing the flavors to meld and the sauce to thicken.
- Assemble the Dish: Spoon the warm polenta onto serving plates and top with the sausage sauce. Garnish with fresh basil leaves if desired.
Extra Tips:
For an even creamier polenta, you can substitute half of the water with milk or cream. If you prefer a smoother texture, use a whisk instead of a wooden spoon when stirring the polenta.
To add more flavor to the dish, consider including other ingredients like mushrooms or bell peppers in the sausage sauce. This dish can be made ahead of time, and the polenta and sausage can be reheated separately before serving.
Enjoy this Italian classic with a side of crusty bread or a simple green salad for a complete meal.
Stuffed Artichokes

Stuffed Artichokes are a delightful dish that captures the essence of Italian Christmas celebrations. This hearty and flavorful dish features tender artichokes filled with a savory mixture of breadcrumbs, garlic, herbs, and cheese, then baked to perfection. The stuffing absorbs the flavors of the artichokes, resulting in a dish that’s both satisfying and full of depth. Whether served as an appetizer or a side dish, Stuffed Artichokes are bound to be a hit at your holiday table.
The process of preparing Stuffed Artichokes is straightforward, yet the result is a dish that feels both luxurious and comforting. The key to success lies in selecting fresh artichokes and preparing them properly, guaranteeing that the stuffing is well-seasoned and moist. As the artichokes bake, the stuffing becomes golden and crisp on top, while the hearts become tender and flavorful. This recipe serves 4-6 people, making it an ideal choice for a festive gathering.
Ingredients:
- 6 large fresh artichokes
- 1 lemon, halved
- 2 cups breadcrumbs
- 1/2 cup grated Parmesan cheese
- 4 cloves garlic, minced
- 1/4 cup fresh parsley, chopped
- 1/4 cup fresh basil, chopped
- Salt and pepper to taste
- 1/2 cup olive oil
- 1 cup chicken or vegetable broth
Cooking Instructions:
- Prepare the Artichokes: Begin by trimming the artichokes. Remove the tough outer leaves and cut off the top third of each artichoke. Trim the stem so that the artichokes can sit flat. Rub the cut surfaces with lemon to prevent browning.
- Make the Stuffing: In a large bowl, combine the breadcrumbs, Parmesan cheese, minced garlic, parsley, basil, salt, and pepper. Mix thoroughly to guarantee even distribution of the ingredients.
- Stuff the Artichokes: Gently open up the leaves of each artichoke and stuff the breadcrumb mixture between the leaves. Be generous but careful not to overstuff, as the filling will expand slightly when cooked.
- Prepare for Baking: Preheat your oven to 375°F (190°C). Place the stuffed artichokes in a baking dish. Drizzle olive oil over the top of each artichoke, ensuring they’re well-coated.
- Add Broth and Bake: Pour the chicken or vegetable broth into the baking dish around the artichokes. This will help steam them as they bake, keeping them moist. Cover the dish with aluminum foil.
- Bake the Artichokes: Place the covered baking dish in the preheated oven and bake for 45-60 minutes, or until the artichokes are tender and the stuffing is golden brown. Remove the foil for the last 10 minutes to allow the tops to crisp up.
- Serve: Once done, carefully remove the artichokes from the oven and allow them to cool for a few minutes before serving.
Extra Tips:
When selecting artichokes, look for those that feel heavy for their size with tightly packed leaves. If the artichokes seem particularly large, you may need to increase the cooking time slightly to guarantee they’re fully tender.
For added flavor, consider adding a pinch of red pepper flakes to the stuffing mixture. Additionally, if you prefer a more substantial stuffing, you can incorporate finely chopped cooked pancetta or sausage into the breadcrumb mixture.
Enjoy the artichokes warm, allowing the flavors to meld together beautifully.
Panettone

Panettone is a traditional Italian Christmas bread that has become a beloved holiday staple worldwide. Originating from Milan, this sweet bread is typically enjoyed during the festive season and makes a perfect centerpiece for any holiday gathering. Its rich and fluffy texture, combined with the delightful flavors of dried fruits and citrus zest, make Panettone an irresistible treat.
While it might seem intimidating to make from scratch, with a bit of patience and the right ingredients, you can create a homemade Panettone that captures the essence of an Italian Christmas. This recipe will guide you through the process of making a classic Panettone that serves 4-6 people. The key to a successful Panettone is allowing ample time for the dough to rise, resulting in a beautifully airy bread.
You’ll also learn how to infuse your Panettone with the traditional flavors of vanilla, citrus, and a variety of dried fruits. Whether you’re a seasoned baker or trying it for the first time, this homemade Panettone is sure to impress your family and friends during the holiday season.
Ingredients for 4-6 servings:
- 4 cups all-purpose flour
- 1/2 cup granulated sugar
- 1/2 teaspoon salt
- 1 packet (2 1/4 teaspoons) active dry yeast
- 1/2 cup warm milk (110°F)
- 4 large eggs
- 1 teaspoon vanilla extract
- Zest of 1 orange
- Zest of 1 lemon
- 1/2 cup unsalted butter, softened
- 1 cup mixed dried fruits (raisins, candied orange peel, etc.)
- 1/4 cup dark rum or orange juice
- 1/4 cup slivered almonds (optional)
- Butter or oil for greasing
Cooking Instructions:
- Prepare the Fruits: In a small bowl, soak the mixed dried fruits in dark rum or orange juice for at least 30 minutes to plump them up. This will enhance their flavor and texture in the Panettone.
- Activate the Yeast: In a small bowl, mix the warm milk with the yeast and a pinch of sugar. Let it sit for about 5-10 minutes until it becomes frothy. This indicates the yeast is active.
- Mix the Dough: In a large mixing bowl, combine the flour, sugar, and salt. Make a well in the center and add the eggs, vanilla extract, orange zest, lemon zest, and the yeast mixture. Mix until the dough starts to come together.
- Knead the Dough: Add the softened butter to the dough and knead either by hand or with a dough hook attachment on a mixer for about 10 minutes until the dough is smooth and elastic.
- First Rise: Place the dough in a greased bowl, cover with a damp cloth or plastic wrap, and let it rise in a warm place for 1-2 hours or until it has doubled in size.
- Incorporate Fruits and Nuts: Once the dough has risen, gently deflate it and knead in the soaked fruits and almonds, making sure they’re evenly distributed throughout the dough.
- Shape the Dough: Form the dough into a ball and place it into a greased Panettone mold or a deep, round baking pan lined with parchment paper.
- Second Rise: Cover the dough again and let it rise for another hour until it has reached the top of the mold.
- Bake the Panettone: Preheat the oven to 350°F (175°C). Bake the Panettone for about 40-45 minutes, or until a skewer inserted into the center comes out clean. If the top browns too quickly, cover it loosely with aluminum foil.
- Cool and Serve: Allow the Panettone to cool completely in the mold before removing. This will help it maintain its shape. Slice and serve as desired.
Extra Tips:
When making Panettone, patience is key. The dough requires time to rise properly, which contributes to its light and airy texture. If your kitchen is cool, try letting the dough rise in a slightly warm oven that’s turned off, or near a warm spot like a radiator.
Additionally, make sure your dried fruits aren’t too dry; soaking them adequately is vital for the best flavor and texture. If you’re not a fan of certain dried fruits or nuts, feel free to substitute with your favorites, keeping in mind the traditional flavors that make Panettone so special.
Enjoy this delightful bread with a cup of coffee or tea for a perfect holiday treat.
Struffoli

Struffoli is a traditional Italian dessert that hails from the Southern regions, particularly Naples, and is often enjoyed during the Christmas season. These delightful little dough balls are fried until crisp and then coated in honey and decorated with colorful sprinkles, making them a festive and sweet treat to share with family and friends.
The dish isn’t only a feast for the palate but also a visually appealing centerpiece that evokes warmth and celebration. Preparing Struffoli is a fun and rewarding process, perfect for creating holiday memories in the kitchen. The dough is simple to make, requiring only a few pantry staples, and the decoration allows for personal creativity.
Once fried, these golden morsels are draped in a luscious honey syrup, which adds a beautiful sheen and guarantees that each bite is perfectly sweet. Whether served as a dessert or a sweet snack, Struffoli is sure to become a cherished part of your holiday tradition.
Ingredients for 4-6 servings:
- 3 cups all-purpose flour
- 3 large eggs
- 3 tablespoons granulated sugar
- 3 tablespoons unsalted butter (softened)
- Zest of 1 lemon
- Zest of 1 orange
- 2 teaspoons vanilla extract
- Pinch of salt
- Vegetable oil (for frying)
- 1 cup honey
- 1/4 cup sugar
- Rainbow sprinkles or nonpareils
Cooking Instructions:
- Prepare the Dough: In a large mixing bowl, combine the flour, sugar, and salt. Make a well in the center and add the eggs, softened butter, lemon zest, orange zest, and vanilla extract. Mix together until a dough forms. Knead the dough on a lightly floured surface for about 5 minutes until smooth and elastic.
- Shape the Dough: Divide the dough into small portions. Roll each portion into thin ropes about 1/2 inch in diameter. Cut the ropes into small pieces about the size of a marble.
- Heat the Oil: In a large, deep saucepan, heat vegetable oil over medium heat to 350°F (175°C). It’s important to maintain this temperature to guarantee even cooking and prevent the dough from becoming greasy.
- Fry the Dough: Carefully drop the dough pieces into the hot oil in batches. Fry until they puff up and turn golden brown, about 2-3 minutes. Remove them with a slotted spoon and drain on paper towels.
- Prepare the Honey Syrup: In a small saucepan, combine the honey and sugar over low heat. Stir until the sugar dissolves and the mixture is smooth and slightly thickened.
- Coat the Struffoli: Place the fried dough balls in a large bowl. Pour the warm honey syrup over them and gently toss to guarantee each piece is evenly coated.
- Decorate and Serve: Arrange the honey-coated Struffoli on a serving plate. Sprinkle generously with rainbow sprinkles or nonpareils, and allow them to set for a few minutes before serving.
Extra Tips:
When making Struffoli, guarantee your dough isn’t too sticky or too dry; it should be just firm enough to hold its shape while being easy to work with. Maintaining the oil temperature is vital for achieving the perfect texture, so use a thermometer if necessary.
Feel free to get creative with the decorations—add nuts or candied fruit for extra flair. Struffoli is best enjoyed fresh, but they can be stored in an airtight container for a couple of days. Enjoy this delightful treat with a cup of espresso for an authentic Italian experience!
Pandoro

Pandoro is a traditional Italian Christmas cake that originates from Verona. Known for its star-shaped form and soft, buttery texture, Pandoro is a delightful treat often enjoyed during the festive season. Its name translates to “golden bread,” reflecting its rich, golden hue which is achieved by using quality ingredients.
Baking Pandoro requires patience and precision, but the end result is a deliciously fluffy and aromatic cake that embodies the spirit of an Italian Christmas. This recipe will guide you through the process of making Pandoro from scratch, suitable for serving 4-6 people. The cake is lightly dusted with powdered sugar, creating a snowy effect reminiscent of a winter wonderland.
While it may seem complex at first, following these instructions will help you master the art of baking Pandoro, allowing you to bring a touch of Italian tradition to your holiday celebrations.
Ingredients:
- 4 cups all-purpose flour
- 1 cup granulated sugar
- 1 cup unsalted butter, softened
- 1 cup whole milk
- 1 tablespoon active dry yeast
- 4 large eggs
- 1 teaspoon vanilla extract
- 1 teaspoon salt
- Zest of 1 lemon
- Powdered sugar, for dusting
Cooking Instructions:
- Activate the Yeast: Start by warming the milk until it’s lukewarm. Dissolve a tablespoon of sugar in the milk and then add the active dry yeast. Let it sit for about 10 minutes, or until it becomes frothy. This step guarantees that your yeast is active and ready to help the dough rise.
- Prepare the Dough: In a large mixing bowl, combine the flour, sugar, and salt. Make a well in the center and add the eggs, vanilla extract, and lemon zest. Gradually pour in the yeast mixture, mixing slowly until the dough starts to come together.
- Incorporate the Butter: Once the dough has formed, gradually add the softened butter, kneading it into the dough. Continue kneading for about 10-15 minutes until the dough is smooth and elastic. This step is vital for achieving the Pandoro’s signature texture.
- First Rise: Place the dough in a lightly greased bowl, cover it with a damp cloth, and let it rise in a warm place for about 2 hours, or until it has doubled in size. The warm environment allows the yeast to work its magic.
- Shape the Dough: Punch down the risen dough to remove excess air and knead it briefly. Shape it into a ball and place it into a well-greased Pandoro mold.
- Second Rise: Cover the mold with a cloth and let the dough rise again for about 1 hour, or until it reaches the top of the mold. This second rise guarantees that the Pandoro will be light and fluffy.
- Bake the Pandoro: Preheat your oven to 350°F (175°C). Once preheated, bake the Pandoro for about 35-40 minutes. The top should be golden brown, and a skewer inserted into the center should come out clean.
- Cool and Serve: Remove the Pandoro from the oven and let it cool in the mold for about 10 minutes. Then, carefully turn it out onto a wire rack to cool completely. Before serving, dust generously with powdered sugar to give it a festive, snowy appearance.
Extra Tips:
When making Pandoro, it’s important to use fresh, high-quality ingredients, particularly the butter and eggs, as they contribute to the cake’s flavor and texture. Additionally, make certain your work surface and hands are well-floured when handling the dough to prevent sticking.
Patience is key; allowing the dough to rise sufficiently during both rising phases is vital for achieving the classic Pandoro lightness and fluffiness. Finally, make sure to grease your Pandoro mold thoroughly to guarantee an easy release once baked.
Torrone

Torrone is a traditional Italian nougat that’s often enjoyed during the holiday season. This sweet confection is known for its chewy texture and delightful combination of honey, sugar, and nuts. Originating from ancient times, torrone has become a festive staple in Italy, frequently enjoyed at Christmas and other celebrations. Its origins are believed to be rooted in the Mediterranean, where similar nougat varieties were prepared as early as the Roman era.
Whether gifted or served as a dessert, torrone is a cherished part of Italian holiday traditions. The delicate balance of flavors and textures in torrone makes it a beloved treat. Its preparation, while requiring attention to detail, is a rewarding experience, resulting in a homemade sweet that can be shared with family and friends. The following recipe creates a batch suitable for 4-6 people, perfect for a gathering or as a thoughtful gift.
Whether you prefer it soft and chewy or hard and crunchy, the recipe can be adjusted to suit your personal preference.
Ingredients for 4-6 Servings:
- 2 cups whole almonds
- 1 cup whole hazelnuts
- 1 cup honey
- 1 cup granulated sugar
- 2 large egg whites
- 1 teaspoon vanilla extract
- 1/4 teaspoon salt
- Edible wafer paper (optional)
- Lemon zest (optional)
Instructions:
- Prepare the Nuts: Preheat your oven to 350°F (175°C). Spread the almonds and hazelnuts on a baking sheet and roast them for about 10-12 minutes until they become fragrant and lightly golden. Allow them to cool, then rub off the hazelnut skins using a clean kitchen towel.
- Heat the Honey and Sugar: In a heavy-bottomed saucepan, combine the honey and sugar. Cook over medium heat, stirring occasionally, until the mixture reaches a temperature of 250°F (120°C) on a candy thermometer. This should take about 10-15 minutes.
- Beat the Egg Whites: While the honey and sugar are heating, beat the egg whites in a mixing bowl with a pinch of salt until soft peaks form. Once the sugar mixture reaches the desired temperature, slowly pour it into the egg whites, continuing to beat until the mixture is thick and glossy.
- Combine Ingredients: Gently fold in the roasted nuts, vanilla extract, and lemon zest if using. Mix until the nuts are evenly distributed throughout the nougat.
- Form the Torrone: Line a square baking dish with edible wafer paper, if desired. Pour the nougat mixture into the dish and use a spatula to spread it evenly. Press down gently to make certain there are no air pockets.
- Let it Set: Allow the torrone to cool and set for at least 2 hours at room temperature. Once firm, you can cut it into small rectangular pieces using a sharp knife.
Extra Tips:
When preparing torrone, precision in temperature is key to achieving the right texture. A candy thermometer is essential to guarantee the honey and sugar reach the correct temperature; otherwise, the torrone may end up too sticky or too hard.
If you prefer a softer torrone, cook the sugar mixture to a slightly lower temperature. Additionally, using edible wafer paper helps prevent sticking and gives the torrone a professional finish. Finally, storing torrone in an airtight container will keep it fresh and chewy for several weeks, making it an ideal treat to prepare in advance for the holiday season.
Cantucci With Vin Santo

Cantucci With Vin Santo is a classic Italian treat that pairs beautifully with the sweet, aromatic Vin Santo dessert wine. These twice-baked almond biscuits, known as biscotti in the United States, are a staple during the Christmas season in Italy.
They’ve a crunchy texture that softens to a delightful consistency when dipped in the wine, making them an ideal finish to a festive meal. The combination of the nutty cantucci and the rich, fruity notes of the Vin Santo creates a harmonious balance that’s both satisfying and indulgent.
To make Cantucci With Vin Santo for 4-6 people, you’ll need to prepare the cantucci first, which involves mixing a simple dough enriched with almonds and hints of citrus. Once the dough is formed, the cantucci are shaped into logs, baked, sliced, and baked again to achieve their signature crispness.
When served with a glass of Vin Santo, these cookies provide a comforting and traditional end to an Italian Christmas feast.
Ingredients for Cantucci:
- 2 1/2 cups all-purpose flour
- 1 cup granulated sugar
- 1 teaspoon baking powder
- 1/4 teaspoon salt
- 3 large eggs
- 1 teaspoon vanilla extract
- 1 tablespoon orange zest
- 1 cup whole almonds, toasted
- Vin Santo wine for serving
Cooking Instructions:
- Preheat the Oven: Start by preheating your oven to 350°F (175°C). Line a baking sheet with parchment paper or a silicone baking mat.
- Mix Dry Ingredients: In a large bowl, whisk together the flour, sugar, baking powder, and salt until well combined.
- Combine Wet Ingredients: In a separate bowl, beat the eggs with the vanilla extract and orange zest. Gradually add the wet ingredients to the dry ingredients, mixing until a dough forms.
- Incorporate Almonds: Fold the toasted almonds into the dough until evenly distributed.
- Shape the Dough: Divide the dough in half and shape each portion into a log about 12 inches long and 2 inches wide. Place the logs on the prepared baking sheet.
- First Bake: Bake the logs in the preheated oven for 25-30 minutes, or until they’re lightly golden and firm to the touch. Remove from the oven and allow them to cool for about 10 minutes.
- Slice and Second Bake: Once cooled slightly, use a sharp knife to slice the logs diagonally into 1/2 inch thick slices. Lay the slices cut side down on the baking sheet and return them to the oven.
- Finalize Baking: Bake the slices for an additional 10-15 minutes, flipping halfway through, until they’re golden brown and crisp. Allow the cantucci to cool completely on a wire rack.
Extra Tips:
For an authentic touch, make sure to use whole almonds with their skins on, as they add extra texture and flavor to the cantucci.
If you prefer a softer crunch, you can reduce the second bake time slightly. It’s important to let the logs cool slightly before slicing to prevent them from crumbling.
When serving, pour the Vin Santo into small glasses and encourage guests to dip the cantucci into the wine for a delightful combination of flavors.
Keep the cantucci stored in an airtight container to maintain their crispness, and they’ll last for several weeks.