

The holiday season is the perfect time to savor Italian desserts that add a touch of magic to any gathering. Picture the joy of sharing a slice of Panettone or enjoying a spoonful of rich, velvety Tiramisu. These recipes aren’t just about flavors; they’re about creating lasting memories with loved ones. Join me as we explore these delicious Italian treats that will make your holiday table truly unforgettable.
Classic Panettone
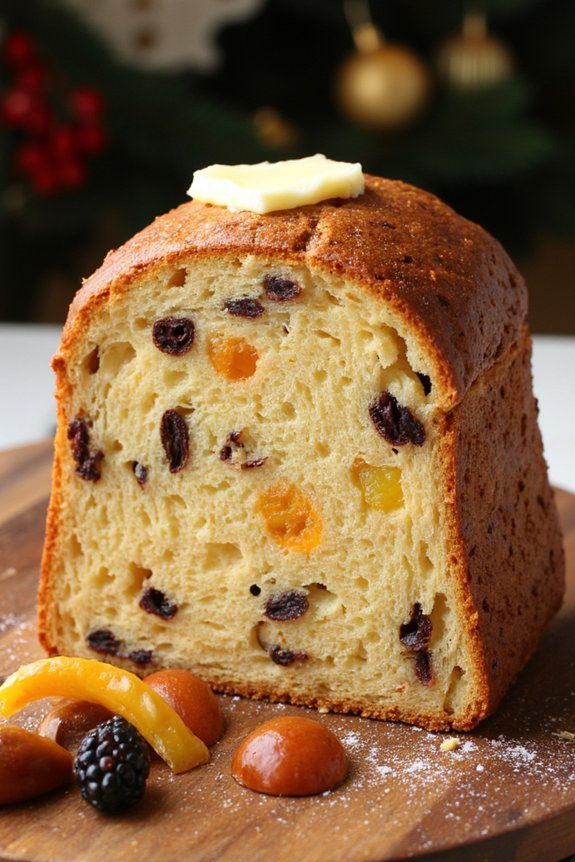
Panettone is a traditional Italian Christmas dessert that has become a beloved holiday staple worldwide. This sweet, rich bread is studded with dried fruits and often lightly scented with citrus zest and vanilla. Originating from Milan, panettone has a unique dome shape and a soft, airy texture that’s achieved through a lengthy rising process.
While it may seem complex, making panettone at home is a rewarding endeavor that fills your kitchen with the warm and inviting aroma of the holiday season. To achieve the classic panettone flavor and texture, patience is key. The dough requires a series of rises to develop its signature lightness and flavor.
This recipe yields a panettone that serves 4-6 people, perfect for sharing with family and friends during festive gatherings. Whether enjoyed plain, with a dusting of powdered sugar, or alongside a cup of coffee, homemade panettone is a delightful way to celebrate the holidays.
Ingredients (Serves 4-6):
- 3 1/2 cups all-purpose flour
- 1/2 cup granulated sugar
- 2 teaspoons active dry yeast
- 1/2 teaspoon salt
- 1/2 cup unsalted butter, softened
- 3 large eggs
- 1/2 cup warm milk
- 1 teaspoon vanilla extract
- Zest of 1 orange
- Zest of 1 lemon
- 3/4 cup mixed dried fruits (such as raisins, candied orange peel, and candied lemon peel)
- 1/4 cup almonds, chopped (optional)
- 1 tablespoon melted butter (for brushing)
Instructions:
- Prepare the Starter: In a small bowl, combine 1/4 cup of the warm milk with 1 teaspoon of sugar and the active dry yeast. Stir gently and let it sit for about 10 minutes until frothy.
- Mix the Dough: In a large mixing bowl, combine the flour and salt. Add the yeast mixture, remaining milk, sugar, softened butter, eggs, vanilla extract, and citrus zests. Mix until the dough begins to come together.
- Knead the Dough: Turn the dough out onto a floured surface and knead for about 10 minutes until it becomes smooth and elastic. Alternatively, use a stand mixer with a dough hook for about 7 minutes.
- First Rise: Place the dough in a lightly greased bowl, cover it with a clean kitchen towel, and let it rise in a warm place for about 2 hours or until doubled in size.
- Incorporate Fruits and Nuts: After the first rise, gently deflate the dough and knead in the mixed dried fruits and almonds (if using) until evenly distributed.
- Shape and Second Rise: Shape the dough into a round and place it in a panettone mold or a high-sided baking pan. Cover and let it rise again for about 1 hour, or until the dough has risen just above the edge of the mold.
- Bake the Panettone: Preheat your oven to 350°F (175°C). Brush the top of the dough with melted butter. Bake for 35-40 minutes or until the top is golden brown and a skewer inserted into the center comes out clean.
- Cool and Serve: Let the panettone cool in its mold for at least 15 minutes before removing it. Slice and serve either warm or at room temperature.
Extra Tips:
For a more authentic panettone, consider using a panettone paper mold, which helps achieve the traditional dome shape. It’s important to let the dough rise adequately, as this contributes to the bread’s light and airy texture.
Be cautious not to overbake, as this can dry out the panettone. If the top browns too quickly, cover it loosely with foil during baking. Additionally, for a flavor boost, soak the dried fruits in a little rum or brandy before incorporating them into the dough.
Enjoy your homemade panettone with coffee or a sweet wine for a delightful holiday treat.
Traditional Tiramisu

Tiramisu is a classic Italian dessert that’s both rich and invigorating, making it a perfect treat for the holiday season. This traditional recipe combines layers of coffee-soaked ladyfingers with a luscious mascarpone cream filling, topped with a dusting of cocoa powder.
Originating from the Veneto region of Italy, tiramisu translates to “pick me up,” likely due to the energizing effect of its coffee and cocoa ingredients. This dessert isn’t only a favorite during the Christmas season but is also ideal for any festive occasion.
Creating an authentic tiramisu involves selecting high-quality ingredients to bring out the best flavors. The creamy mascarpone cheese, robust espresso, and delicate ladyfingers are complemented by a hint of Marsala wine, creating a sophisticated balance of taste and texture.
Preparing this dish a day in advance allows the flavors to meld together, resulting in a truly indulgent experience. Here is how you can prepare a traditional tiramisu for 4-6 people, perfect for sharing with family and friends.
Ingredients:
- 5 large egg yolks
- 3/4 cup granulated sugar
- 2/3 cup milk
- 1 1/4 cups heavy cream
- 8 ounces mascarpone cheese
- 1 cup strong brewed espresso, cooled
- 1 tablespoon Marsala wine (optional)
- 24 ladyfinger cookies (savoiardi)
- 2 tablespoons unsweetened cocoa powder
- 1 ounce dark chocolate, grated (optional, for garnish)
Instructions:
- Prepare the Egg Mixture: In a medium saucepan, whisk together the egg yolks and sugar until well combined. Gradually whisk in the milk. Cook over medium heat, stirring constantly, until the mixture thickens and coats the back of a spoon (about 8-10 minutes). Remove from heat and allow it to cool completely.
- Whip the Cream: In a separate bowl, whip the heavy cream until stiff peaks form. Be careful not to overbeat as this could turn the cream buttery.
- Make the Mascarpone Mixture: In a large bowl, gently fold the mascarpone cheese into the cooled egg mixture until smooth. Then, carefully fold in the whipped cream, ensuring not to deflate the mixture.
- Prepare the Coffee Mixture: In a shallow dish, combine the brewed espresso and Marsala wine. Dip each ladyfinger into this mixture briefly, ensuring they’re moist but not soggy.
- Assemble the Tiramisu: In a 9×9 inch dish, arrange a layer of the soaked ladyfingers, breaking them if necessary to fit. Spread half of the mascarpone mixture over the ladyfingers. Repeat with a second layer of dipped ladyfingers and top with the remaining mascarpone mixture.
- Finish and Chill: Dust the top layer with cocoa powder and sprinkle the grated dark chocolate if using. Cover the dish with plastic wrap and refrigerate for at least 4 hours, preferably overnight, to allow the flavors to meld.
Extra Tips:
When making tiramisu, freshness is key. Use fresh eggs and high-quality mascarpone for the best results. The coffee should be strong and aromatic, so opt for a good espresso blend.
For those who prefer a non-alcoholic version, simply omit the Marsala wine. Additionally, the dessert can be assembled in individual cups for a more elegant presentation.
Ricotta Cannoli

Cannoli are a quintessential Italian dessert, particularly popular during the Christmas season. Originating from the Sicilian region, these delightful pastries feature a crispy shell filled with a creamy, sweet ricotta mixture. Making cannoli at home is a rewarding experience that allows you to enjoy a classic Italian treat fresh from your kitchen.
The process involves preparing the dough for the shells, frying them to golden perfection, and filling them with a luscious ricotta filling, often accented with chocolate chips or candied fruit.
This recipe provides a step-by-step guide to creating authentic Ricotta Cannoli for 4-6 people. The key to a successful cannoli is guaranteeing that the shells are crisp and the filling is smooth and flavorful. Whether you’re a novice or an experienced cook, this recipe will guide you through the process of making this cherished Italian dessert, perfect for adding a sweet finishing touch to your Christmas festivities.
Ingredients:
For the Shells:
- 1 cup all-purpose flour
- 1 tablespoon sugar
- 1/8 teaspoon salt
- 1 tablespoon unsalted butter, chilled and diced
- 1 egg yolk
- 1/4 cup Marsala wine or red wine
- 1 egg white, lightly beaten (for sealing)
- Oil for frying
For the Ricotta Filling:
- 1 1/2 cups ricotta cheese, drained
- 1/2 cup powdered sugar
- 1/2 teaspoon vanilla extract
- 1/4 cup mini chocolate chips
- Optional: candied orange peel or cherries for garnish
Cooking Instructions:
- Prepare the Dough: In a mixing bowl, combine flour, sugar, and salt. Add the diced butter and mix until the mixture resembles coarse crumbs. Stir in the egg yolk and Marsala wine, forming a dough. Knead the dough on a lightly floured surface until smooth. Wrap in plastic wrap and refrigerate for at least 30 minutes.
- Roll and Cut the Dough: After chilling, roll out the dough thinly on a floured surface. Use a round cutter to cut circles approximately 4 inches in diameter. Wrap each circle around a metal cannoli tube, sealing the edge with a bit of egg white.
- Fry the Shells: Heat oil in a deep fryer or large pot to 350°F (175°C). Fry the dough-wrapped tubes in batches until golden brown and crisp, about 2-3 minutes per batch. Remove from oil and let cool on paper towels. Once cooled, carefully slide the shells off the tubes.
- Prepare the Filling: In a bowl, mix together the ricotta cheese, powdered sugar, and vanilla extract until smooth. Stir in the chocolate chips. Transfer the mixture to a piping bag fitted with a large tip.
- Fill the Cannoli Shells: Just before serving, pipe the ricotta filling into each shell from both ends. Garnish the ends with additional chocolate chips or candied fruit if desired.
- Serve: Arrange the filled cannoli on a serving platter and serve immediately for the best texture and taste.
Extra Tips:
When making Ricotta Cannoli, guarantee that the ricotta cheese is well-drained to prevent a watery filling. You can strain it overnight in the refrigerator using a fine mesh sieve or cheesecloth.
It’s also best to fill the cannoli shells just before serving to maintain their crispiness. If you don’t have metal cannoli tubes, you can use aluminum foil shaped into cylinders as a substitute.
Finally, feel free to experiment with different fillings; pistachios or a touch of cinnamon can add delightful variations to the traditional recipe.
Almond Biscotti
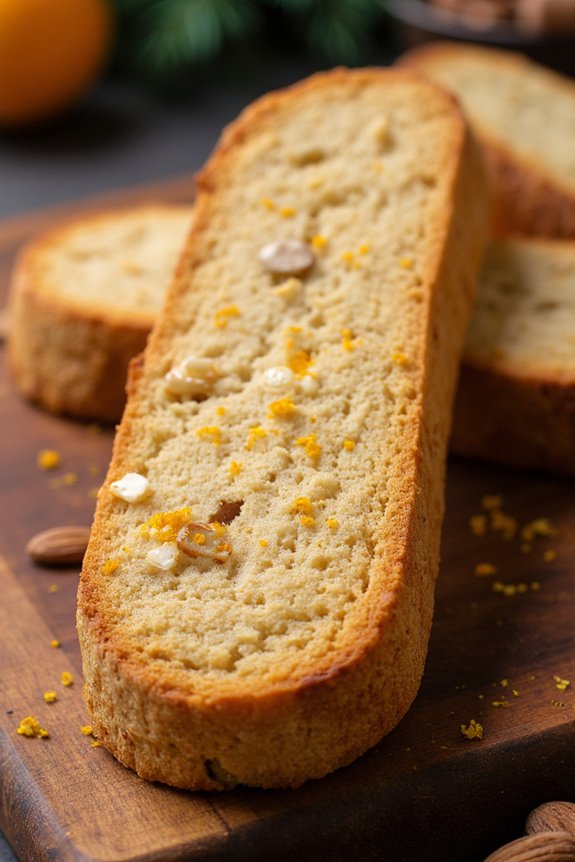
Almond Biscotti is a classic Italian dessert that’s especially popular during the Christmas season. Known for its crunchy texture and delightful almond flavor, these twice-baked cookies are perfect for enjoying with a cup of coffee or tea. Biscotti, which means ‘twice-cooked’ in Italian, are made by shaping the dough into logs, baking them until firm, then slicing and baking again until crisp. This method gives them their distinct texture and ability to be stored for longer periods, making them ideal for holiday gifting or enjoying throughout the festive season.
Creating Almond Biscotti at home is a rewarding experience that allows you to add a personal touch to this traditional treat. With a blend of almonds, flour, sugar, and a hint of vanilla, these cookies are both simple and elegant. The key to perfect biscotti is achieving the right balance of flavor and maintaining a consistent texture throughout the baking process. This recipe serves 4-6 people, giving you a generous batch to share with family and friends or to savor on your own.
Ingredients:
- 2 cups all-purpose flour
- 1 cup granulated sugar
- 1 teaspoon baking powder
- 1/2 teaspoon salt
- 3 large eggs
- 1 teaspoon vanilla extract
- 1 teaspoon almond extract
- 1 cup whole almonds, toasted and coarsely chopped
- Zest of 1 orange (optional)
Instructions:
- Preheat the Oven: Begin by preheating your oven to 350°F (175°C). Line a baking sheet with parchment paper to prevent sticking.
- Mix Dry Ingredients: In a large bowl, combine the all-purpose flour, granulated sugar, baking powder, and salt. Stir the dry ingredients together until they’re evenly mixed.
- Blend Wet Ingredients: In a separate bowl, whisk together the eggs, vanilla extract, and almond extract until well combined.
- Combine Ingredients: Gradually add the wet mixture to the dry ingredients, stirring until a dough begins to form. Once mixed, fold in the chopped almonds and orange zest if using. The dough should be slightly sticky.
- Shape the Dough: Divide the dough in half. On a lightly floured surface, shape each half into a log approximately 12 inches long and 2 inches wide. Place the logs on the prepared baking sheet, leaving some space between them.
- First Bake: Bake the logs in the preheated oven for 25-30 minutes, or until they’re firm to the touch and lightly golden brown.
- Cool and Slice: Remove the logs from the oven and allow them to cool for about 10 minutes. Reduce the oven temperature to 325°F (160°C). Using a serrated knife, carefully slice the logs diagonally into 1/2 inch thick slices.
- Second Bake: Arrange the biscotti slices cut side down on the baking sheet. Bake for an additional 10-12 minutes, then flip them over and bake for another 10-12 minutes, or until they’re dry and crisp.
- Cool Completely: Once baked, transfer the biscotti to a wire rack to cool completely before serving or storing.
Extra Tips:
When making Almond Biscotti, verify that the almonds are well toasted before incorporating them into the dough for enhanced flavor. If you prefer a softer biscotti, you can reduce the second bake time slightly, but remember that traditional biscotti are meant to be crunchy.
Feel free to experiment with additional flavorings such as cinnamon or cardamom for a unique twist. Store biscotti in an airtight container to maintain their crispness, and they can last for several weeks, making them a perfect treat to prepare in advance of the holiday rush.
Pizzelle Cookies

Pizzelle cookies are a classic Italian dessert, especially popular during the festive Christmas season. These thin, crisp, and light cookies are traditionally made using a specific pizzelle iron, which imprints beautiful patterns on each cookie. Pizzelle can be flavored with vanilla, anise, or lemon zest, giving them a delightful aroma and taste that pairs well with tea or coffee. Perfect for holiday gatherings or as a sweet gift, these cookies are a delightful way to share a piece of Italian tradition with your loved ones.
Originating from the Abruzzo region of Italy, pizzelle cookies have been enjoyed for centuries and are often associated with family celebrations. Their delicate texture and intricate designs make them a visual and gustatory treat.
Whether you’re a seasoned baker or a beginner, this recipe for homemade pizzelle cookies will guide you through creating a batch of these charming cookies that will fill your home with the warm scents of the holidays. This recipe serves 4-6 people.
Ingredients:
- 3 large eggs
- 3/4 cup granulated sugar
- 1/2 cup unsalted butter, melted and cooled
- 1 tablespoon vanilla extract (or anise extract for a traditional flavor)
- 1 3/4 cups all-purpose flour
- 2 teaspoons baking powder
- Pinch of salt
- Optional: Powdered sugar for dusting
Cooking Instructions:
- Prepare the Batter: In a large mixing bowl, beat the eggs and sugar together until they’re well combined and the mixture is pale and thick. This should take about 2-3 minutes with an electric mixer. Gradually add the melted butter and vanilla (or anise) extract to the mixture, stirring continuously until all the ingredients are incorporated.
- Mix Dry Ingredients: In another bowl, whisk together the flour, baking powder, and salt. Gradually add the dry ingredients to the wet ingredients, mixing until a smooth batter forms. The batter should be thick but spoonable.
- Heat the Pizzelle Iron: Plug in the pizzelle iron and allow it to preheat according to the manufacturer’s instructions. Most irons have a light indicator that will turn on when it reaches the appropriate temperature.
- Cook the Pizzelle: Once the iron is hot, use a tablespoon to drop a dollop of batter onto the center of each patterned section of the iron. Close the lid and cook for about 30-60 seconds, or until the pizzelle are lightly golden and easily release from the iron.
- Cool and Finish: Carefully remove the cooked pizzelle using a spatula or fork and place them on a cooling rack. The cookies will crisp up as they cool. If desired, lightly dust the cooled pizzelle with powdered sugar before serving.
Extra Tips:
To guarantee your pizzelle cookies have a uniform thickness and pattern, be consistent with the amount of batter you use for each cookie. If you prefer a crisper cookie, allow the pizzelle to cook a few seconds longer to achieve a deeper golden color.
For added flavor, try experimenting with different extracts or add some lemon or orange zest to the batter. Remember, pizzelle cookies can be stored in an airtight container for up to two weeks, making them an excellent make-ahead option for holiday celebrations.
Struffoli Honey Balls

Struffoli Honey Balls are a delightful Italian Christmas dessert that captures the essence of the holiday season with their sweet, honey-coated exterior and festive sprinkles. Originating from Naples, this dessert is traditionally enjoyed during Christmas and other celebratory occasions.
Struffoli consists of small, deep-fried balls of dough that are then coated in warm honey and decorated with colorful sprinkles or candied fruit. The result is a crunchy, sweet treat that’s as enjoyable to eat as it’s beautiful to behold.
The preparation of Struffoli is a fun and rewarding process that can be a family activity during the holiday season. Making these honey balls involves creating a simple dough, shaping it into small balls, frying them until golden brown, and finally drenching them in honey. The fragrance of honey and citrus from the zest fills the air, evoking warmth and joy.
This dish serves 4-6 people, making it perfect for sharing with loved ones around the dining table or as a festive treat for guests.
Ingredients for 4-6 Servings:
- 2 cups all-purpose flour
- 3 large eggs
- 1/4 cup granulated sugar
- 1/4 cup unsalted butter, softened
- Zest of 1 lemon
- Zest of 1 orange
- 1 teaspoon vanilla extract
- Pinch of salt
- Oil for frying (vegetable or sunflower oil)
- 1 cup honey
- 1/4 cup sugar
- Multicolored sprinkles or candied fruit for decoration
Instructions:
- Prepare the Dough: In a large mixing bowl, combine the flour, eggs, granulated sugar, softened butter, lemon zest, orange zest, vanilla extract, and a pinch of salt. Mix the ingredients together until they form a soft, smooth dough. If the dough is too sticky, add a little more flour.
- Shape the Dough: Divide the dough into small portions. Roll each portion into a long, narrow rope about 1/2 inch thick. Use a knife to cut the ropes into small, pea-sized pieces. Gently roll each piece into a ball using your hands.
- Fry the Dough Balls: Heat oil in a deep pan to about 350°F (175°C). Carefully add the dough balls in batches, frying them until they’re golden brown on all sides. Transfer the fried balls to a paper towel-lined plate to drain excess oil.
- Prepare the Honey Coating: In a large saucepan, combine the honey and sugar over medium heat. Stir the mixture until the sugar dissolves and the honey becomes slightly runny.
- Coat the Struffoli: Pour the fried dough balls into the saucepan with the honey mixture. Gently stir until each ball is thoroughly coated with honey. Use a slotted spoon to transfer the honey-coated balls to a serving platter, shaping them into a mound or wreath.
- Decorate: While the honey is still warm, generously sprinkle the Struffoli with multicolored sprinkles or candied fruit. Allow them to cool and set before serving.
Extra Tips:
For the best results, verify that the dough isn’t too sticky to handle; if necessary, dust your hands with flour to make shaping easier.
When frying, avoid overcrowding the pan as it may lower the oil temperature and lead to uneven cooking. The honey coating can be adjusted to taste; feel free to add more honey if you prefer a sweeter dessert.
Struffoli can be made a day in advance and stored at room temperature, covered, to maintain their crunchiness and flavor.
Pandoro Christmas Cake

Pandoro, a traditional Italian Christmas cake, is known for its tall, star-shaped form and its light, buttery flavor. Originating from Verona, this delightful cake is a staple on Italian tables during the holiday season. Its name, which means “golden bread,” pays tribute to its rich, golden color and exquisite texture.
The recipe for Pandoro requires patience, precision, and a bit of time, but the end result is a beautifully airy and aromatic cake that’s certain to impress your family and friends during your festive gatherings.
Creating the perfect Pandoro involves a series of rising stages to develop its signature lightness and fluffiness. The cake is baked in a special star-shaped mold, which gives it its distinctive appearance. Traditionally, Pandoro is dusted generously with powdered sugar before serving, resembling the snow-capped peaks of the Italian Alps.
This recipe will guide you through the process of making a Pandoro cake that serves 4-6 people, perfect for sharing the joy and magic of Christmas.
Ingredients (serves 4-6 people):
- 4 cups all-purpose flour
- 1 cup unsalted butter, softened
- 1 cup sugar
- 4 large eggs
- 2 teaspoons vanilla extract
- Zest of 1 lemon
- 1/2 cup warm milk
- 2 packets active dry yeast (about 4 1/2 teaspoons)
- 1/4 teaspoon salt
- Powdered sugar, for dusting
Instructions:
- Prepare the Yeast Mixture: In a small bowl, dissolve the yeast in warm milk (about 100°F/38°C). Stir gently and let it sit for about 10 minutes until it becomes frothy.
- Make the Dough: In a large mixing bowl, combine the flour, sugar, and salt. Create a well in the center and add the softened butter, eggs, vanilla extract, lemon zest, and the yeast mixture. Mix the ingredients until they form a sticky dough.
- First Rise: Cover the bowl with a clean kitchen towel and let the dough rise in a warm place for about 2 hours, or until it has doubled in size.
- Shape the Dough: After the dough has risen, punch it down and knead it gently on a floured surface. Shape the dough into a ball and place it in a greased Pandoro mold.
- Second Rise: Cover the mold with a towel and let the dough rise again in a warm place for 1-2 hours, or until it reaches the top of the mold.
- Preheat and Bake: Preheat your oven to 350°F (175°C). Bake the Pandoro for about 35-40 minutes, or until a skewer inserted into the center comes out clean. If the top starts to brown too quickly, cover it with aluminum foil.
- Cool and Dust: Allow the Pandoro to cool in the mold for about 15 minutes before transferring it to a cooling rack. Once completely cool, dust generously with powdered sugar before serving.
Extra Tips:
When making Pandoro, it’s essential to guarantee that all ingredients are at room temperature, especially the butter, to achieve the best texture.
If you don’t have a Pandoro mold, you can use a Bundt pan, but the star shape will be absent. Patience is key when allowing the dough to rise; rushing this process will affect the cake’s lightness.
Finally, for an extra festive touch, consider serving your Pandoro with a side of whipped cream or a citrusy glaze.
Zabaione Cream
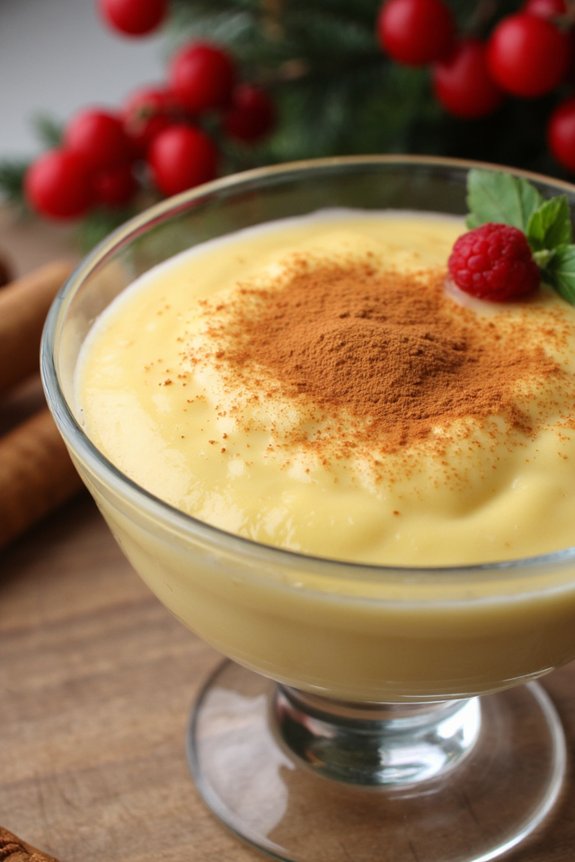
Zabaione, also known as zabaglione, is a traditional Italian dessert that’s especially popular during the holiday season. This rich and creamy dessert is made from egg yolks, sugar, and a sweet wine, typically Marsala. The mixture is gently cooked to create a luscious custard-like cream that can be served warm or cold.
Zabaione is often enjoyed on its own, but it can also be used as a decadent topping for fruits, cakes, or even ice cream. Its silky texture and sweet, wine-infused flavor make it a delightful treat for festive gatherings.
This recipe serves 4-6 people and is perfect for adding a touch of Italian elegance to your Christmas table. Making zabaione requires a bit of patience and careful attention to temperature, but the end result is well worth the effort. The key is to gently whisk the ingredients over a double boiler to prevent the eggs from scrambling.
With the right technique, you can achieve a smooth and airy cream that will impress your guests and add a special touch to your holiday festivities.
Ingredients (Serves 4-6):
- 6 large egg yolks
- 1/2 cup granulated sugar
- 1/2 cup Marsala wine
- 1 teaspoon vanilla extract
- 1/2 teaspoon grated lemon zest (optional)
Instructions:
- Prepare the Double Boiler: Fill a medium saucepan with about 2 inches of water and bring it to a simmer over medium heat. Confirm the water doesn’t touch the bottom of the bowl that will be placed on top.
- Mix the Ingredients: In a large, heatproof bowl, combine the egg yolks and sugar. Whisk the mixture until it becomes pale and slightly thickened.
- Add the Marsala Wine: Gradually whisk in the Marsala wine, confirming the mixture is smooth and well combined.
- Cook the Zabaione: Place the bowl over the simmering water, making sure the bottom of the bowl doesn’t touch the water. Continuously whisk the mixture for about 10-15 minutes, or until it thickens and becomes frothy. The mixture should reach a temperature of about 160°F (71°C).
- Add Flavorings: Once the zabaione has thickened, remove it from the heat. Stir in the vanilla extract and lemon zest, if using. Mix well to incorporate the flavors.
- Serve: Pour the zabaione into individual serving glasses or bowls. You can serve it warm, or chill it in the refrigerator for about an hour if you prefer a cold dessert. Garnish with fresh berries or a sprinkle of cinnamon, if desired.
Extra Tips:
When making zabaione, it’s essential to maintain a constant whisking motion to prevent the eggs from curdling. If you notice the mixture beginning to thicken too quickly or forming lumps, remove it from the heat and continue whisking vigorously.
If you don’t have Marsala wine, you can substitute it with another sweet wine like sherry or port, but the flavor will vary slightly. For an extra creamy texture, you can fold in softly whipped cream just before serving. Enjoy your zabaione with a glass of dessert wine or espresso for a truly Italian experience.
Amaretti Cookies
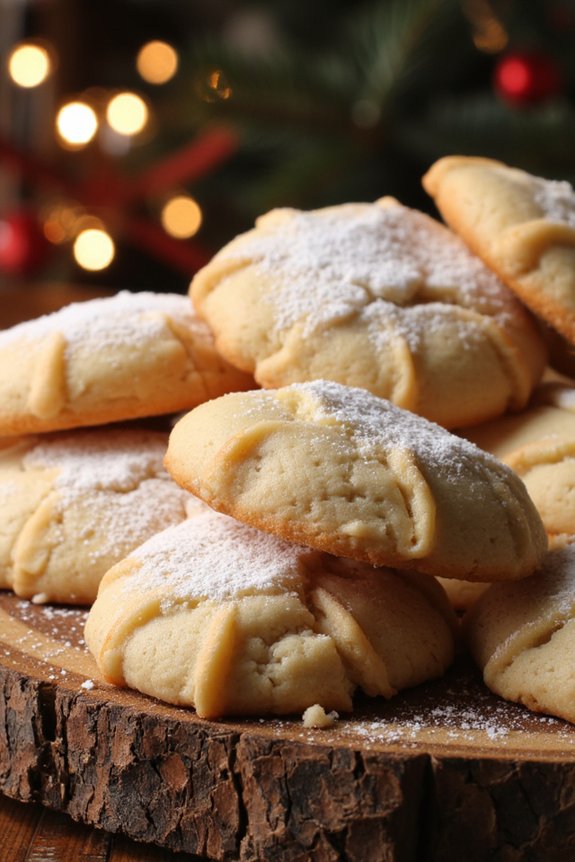
Amaretti cookies are a quintessential Italian delicacy, especially during the festive Christmas season. These delightful cookies are known for their crisp exterior and chewy interior, making them a perfect treat to share with family and friends.
Originating from the rich culinary traditions of Italy, Amaretti cookies are made with almond flour, providing a nutty flavor that pairs beautifully with the sweetness of sugar and the subtle bitterness of almonds. Whether enjoyed on their own or as an accompaniment to coffee or dessert wines, these cookies are certain to bring a taste of Italy to your holiday celebrations.
Creating Amaretti cookies is a straightforward process, requiring only a few ingredients and simple techniques. The key to achieving the perfect texture lies in the balance of ingredients and careful baking. For a serving size of 4-6 people, this recipe yields approximately 24 cookies, guaranteeing there’s enough to share or to keep a stash for yourself.
The following list of ingredients and step-by-step instructions will guide you through the process of making these delightful Italian treats.
Ingredients:
- 2 cups almond flour
- 1 cup granulated sugar
- 2 large egg whites
- 1 teaspoon almond extract
- 1/4 teaspoon vanilla extract
- 1/4 teaspoon salt
- Powdered sugar, for dusting
Cooking Instructions:
- Preheat the Oven: Begin by preheating your oven to 325°F (165°C). Line two baking sheets with parchment paper or silicone baking mats to prevent sticking.
- Mix Dry Ingredients: In a large mixing bowl, combine the almond flour, granulated sugar, and salt. Stir these ingredients together until they’re evenly distributed.
- Prepare the Egg Whites: In a separate bowl, beat the egg whites until they form soft peaks. This means the egg whites should hold their shape but still be slightly droopy when you lift the beaters out.
- Combine Ingredients: Gently fold the beaten egg whites into the almond flour mixture using a spatula. Add the almond extract and vanilla extract, and continue to fold until the mixture is well combined and forms a sticky dough.
- Shape the Cookies: Using a teaspoon or a small cookie scoop, portion out the dough and roll it into small balls, about 1 inch in diameter. Place the balls onto the prepared baking sheets, leaving about 2 inches of space between each cookie.
- Dust with Powdered Sugar: Lightly dust the tops of the cookie balls with powdered sugar. This will give the cookies a delightful finish and a slightly crisp texture on top.
- Bake: Place the baking sheets in the preheated oven and bake for 20-25 minutes, or until the cookies are lightly golden on the edges. Be careful not to overbake, as you want the centers to remain chewy.
- Cool and Serve: Remove the cookies from the oven and allow them to cool on the baking sheets for about 5 minutes. Then transfer them to a wire rack to cool completely before serving.
Extra Tips: To guarantee the best results, use high-quality almond flour for a more authentic flavor. If you find the dough too sticky to handle, you can lightly dust your hands with powdered sugar before shaping the cookies.
The cookies will keep well for up to a week if stored in an airtight container at room temperature, making them an excellent make-ahead option for busy holiday schedules. Additionally, for a different flavor profile, you can experiment by adding a hint of citrus zest to the dough, such as lemon or orange, to add a revitalizing twist to the traditional Amaretti cookies.
Torrone Nougat

Torrone Nougat is a quintessential Italian Christmas dessert that combines the delightful flavors of honey, toasted nuts, and egg whites into a chewy and sweet treat. This traditional confection is often enjoyed during the festive season, shared among family and friends as a symbol of togetherness and celebration.
With its origins tracing back to Italy’s Lombardy and Piedmont regions, Torrone has become a beloved holiday staple across the country. Making Torrone at home allows you to enjoy this classic dessert fresh, with the ability to customize the mix of nuts and flavorings to your liking.
The process of crafting Torrone Nougat involves creating a honey and sugar syrup, which is then carefully combined with whipped egg whites to form a light and airy base. Nuts are then folded into this mixture, providing a satisfying contrast in texture. The resulting nougat is poured into a mold and allowed to cool and set, transforming into a delectable and festive treat.
Whether you’re looking to recreate a piece of Italian heritage or simply indulge in a delicious dessert, this Torrone Nougat recipe is sure to bring a touch of sweetness to your holiday celebrations.
Ingredients (Serving Size: 4-6 people):
- 2 cups whole almonds, toasted
- 1 cup whole pistachios, toasted
- 1 1/2 cups granulated sugar
- 1 cup honey
- 2 large egg whites
- 1/4 teaspoon salt
- 1 teaspoon vanilla extract
- Edible rice paper sheets (for lining)
- Optional: Zest of 1 lemon or orange
Cooking Instructions:
- Prepare the Nuts: Begin by toasting the almonds and pistachios. Preheat your oven to 350°F (175°C). Spread the nuts on a baking sheet and toast for about 10 minutes, or until golden brown and fragrant. Allow them to cool completely.
- Prepare the Pan: Line a rectangular baking pan or mold with edible rice paper, trimming it to fit. This will prevent the nougat from sticking to the pan.
- Make the Syrup: In a heavy-bottomed saucepan over medium heat, combine the granulated sugar and honey. Stir until the sugar dissolves, then increase the heat to medium-high. Use a candy thermometer and cook the mixture until it reaches 250°F (121°C).
- Whip the Egg Whites: While the syrup is cooking, place the egg whites and salt in a clean, dry mixing bowl. Beat with an electric mixer on medium speed until soft peaks form.
- Combine the Mixtures: Once the syrup reaches the desired temperature, carefully pour it into the beaten egg whites, continuing to beat on medium speed. Add the vanilla extract and optional citrus zest, and beat until the mixture becomes thick and glossy.
- Incorporate the Nuts: Gently fold in the toasted almonds and pistachios until evenly distributed throughout the nougat mixture.
- Set the Nougat: Pour the nougat mixture into the prepared pan, spreading it evenly. Cover the top with more edible rice paper, pressing down gently to make sure it adheres to the nougat.
- Cool and Slice: Allow the Torrone to cool completely at room temperature, which may take several hours. Once set, use a sharp knife to cut it into small squares or rectangles.
Extra Tips:
When making Torrone Nougat, it’s crucial to monitor the temperature of the syrup closely, as precision is key for achieving the right texture. If you don’t have a candy thermometer, you can test the syrup by dropping a small amount into cold water; it should form a firm ball.
Additionally, verify your bowl and utensils are completely dry and free of grease when whipping the egg whites, as any moisture can prevent them from reaching the desired consistency. Finally, feel free to experiment with different nuts or add additional flavorings, such as cinnamon or nutmeg, to customize your Torrone to your tastes.
Enjoy this delightful treat as part of your holiday festivities!