

Hosting an Italian dinner party is such a joyful way to bring friends and family together. I recently discovered 13 elegant Italian recipes that make each dish feel special without the fuss. Picture creamy truffle risotto filling the room with its rich aroma and a Caprese salad bursting with color and flavor. These dishes create unforgettable moments around the table. Let’s explore these delightful recipes that capture the essence of Italian dining.
Classic Caprese Salad With a Twist
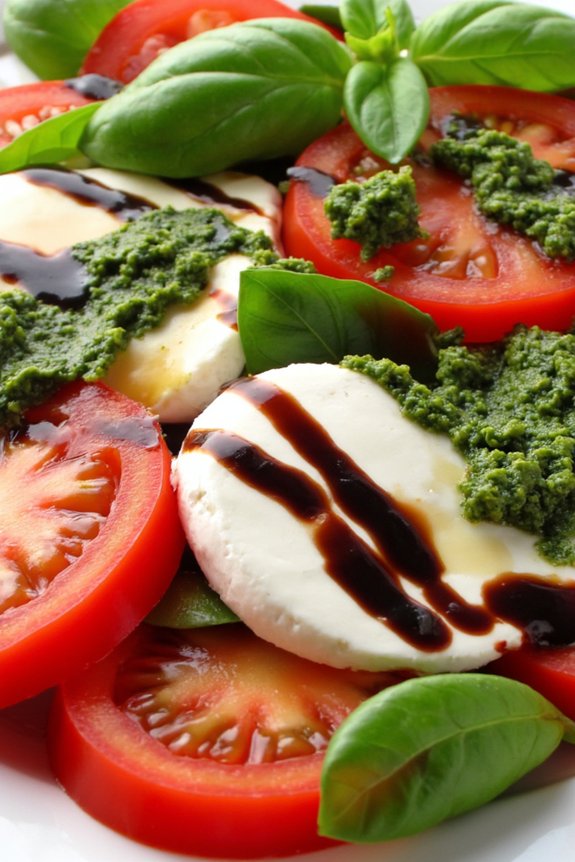
The Classic Caprese Salad is a staple in Italian cuisine, celebrated for its simplicity and the vibrancy of its ingredients. Our twist on this beloved dish adds a delightful layer of flavor and texture, making it perfect for an Italian dinner party. By incorporating a balsamic glaze reduction and a hint of fresh basil pesto, this version elevates the traditional Caprese salad, making it a standout starter or side dish that complements any Italian meal.
This recipe is designed to serve 4-6 people and combines the vibrant colors of ripe tomatoes, creamy mozzarella, and fresh basil leaves. The added balsamic glaze provides a sweet and tangy contrast, while the basil pesto infuses the salad with a rich, herbaceous aroma. Serve this salad chilled for an invigorating start to your dinner party, or as a revitalizing accompaniment to a main course.
Ingredients:
- 4 large ripe tomatoes
- 16 ounces fresh mozzarella cheese
- 1 cup fresh basil leaves
- 1/4 cup basil pesto
- 1/4 cup balsamic vinegar
- 2 tablespoons olive oil
- Salt and freshly ground black pepper to taste
Cooking Instructions:
- Prepare the Balsamic Glaze: In a small saucepan, heat the balsamic vinegar over medium heat. Allow it to simmer gently until it reduces by half, forming a syrupy consistency. This should take about 10 minutes. Set aside to cool.
- Slice the Tomatoes and Mozzarella: While the glaze is cooling, slice the tomatoes and mozzarella cheese into 1/4-inch thick rounds. Aim for equal numbers of tomato and mozzarella slices for balanced layering.
- Layer the Salad: On a large serving platter, arrange the tomato slices and mozzarella slices in an alternating pattern, slightly overlapping them. This creates a visually appealing presentation.
- Add Basil Leaves: Tuck fresh basil leaves in between the layers of tomato and mozzarella. This not only adds flavor but also enhances the salad’s aesthetic with a pop of green.
- Drizzle with Pesto and Olive Oil: Using a spoon, drizzle the basil pesto over the top of the salad. Follow this with a light drizzle of olive oil, ensuring even coverage.
- Season the Salad: Sprinkle a generous pinch of salt and freshly ground black pepper over the entire salad to enhance the flavors of the ingredients.
- Finish with Balsamic Glaze: Finally, drizzle the cooled balsamic glaze over the salad. The glaze should be added just before serving to maintain its glossy appearance and intense flavor.
Extra Tips:
For the best results, use tomatoes that are in season and fully ripe, as they provide the sweetest flavor. Fresh mozzarella, such as buffalo mozzarella, is recommended for its creamy texture that pairs perfectly with the tomatoes and basil.
If you’re preparing the salad ahead of time, assemble it without the glaze and store it in the refrigerator. Add the glaze just before serving to make sure the salad remains fresh and visually appealing.
Adjust the amount of balsamic glaze according to your taste preference; a little goes a long way in balancing the flavors.
Creamy Truffle Risotto
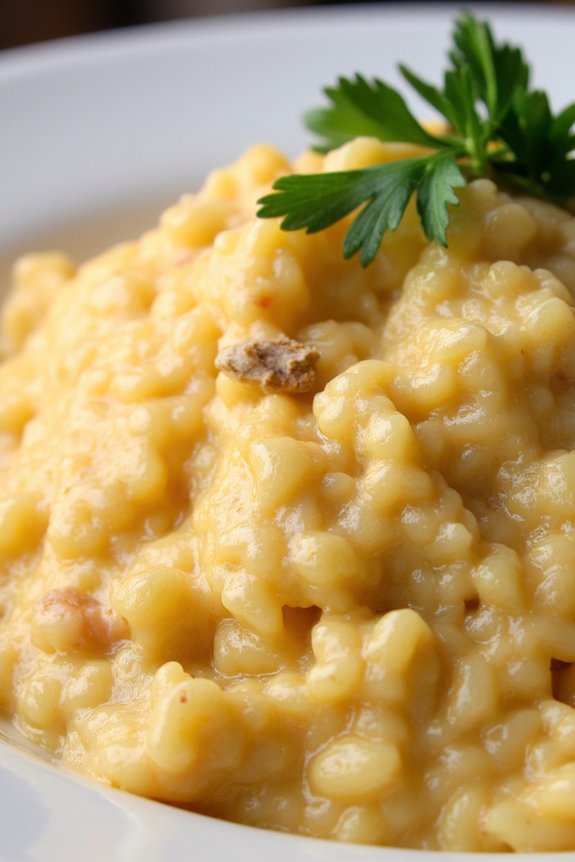
Risotto is a classic Italian dish known for its creamy texture and rich flavor, and when infused with truffle, it becomes an exquisite gourmet experience. This Creamy Truffle Risotto is perfect for an elegant dinner party, bringing a touch of sophistication to your table.
The key to this dish lies in slowly cooking the Arborio rice with broth, allowing the starches to release and create a luscious, velvety base. The truffle oil and Parmesan cheese add layers of decadent flavor that elevate the dish to new heights.
Preparing this risotto requires patience and attention, but the end result is well worth the effort. As you gently stir the rice, you’ll notice how it gradually absorbs the broth and transforms into a creamy masterpiece. This dish serves 4-6 people, making it an ideal choice for an intimate gathering.
Pair it with a crisp white wine, and you’ll have a memorable meal that delights the senses.
Ingredients:
- 2 cups Arborio rice
- 1/2 cup dry white wine
- 6 cups chicken or vegetable broth
- 2 tablespoons olive oil
- 1 small onion, finely chopped
- 2 cloves garlic, minced
- 1/2 cup grated Parmesan cheese
- 2 tablespoons truffle oil
- Salt and pepper to taste
- Fresh parsley, chopped (for garnish)
Cooking Instructions:
- Prepare the Broth: In a medium saucepan, bring the chicken or vegetable broth to a gentle simmer. Keep it warm over low heat as you cook the risotto.
- Sauté Aromatics: In a large skillet or saucepan, heat the olive oil over medium heat. Add the chopped onion and sauté until translucent, about 4-5 minutes. Stir in the minced garlic and cook for an additional 1-2 minutes until fragrant.
- Toast the Rice: Add the Arborio rice to the skillet, stirring well to coat the grains with the oil. Cook for about 2-3 minutes until the edges of the rice become translucent.
- Deglaze with Wine: Pour in the dry white wine and stir continuously until the wine is fully absorbed by the rice.
- Cook the Risotto: Begin adding the warm broth to the rice, one ladleful at a time. Stir constantly and allow each addition of broth to be absorbed before adding the next. This process should take about 18-20 minutes, or until the rice is tender and creamy.
- Finish with Flavor: Once the rice is cooked to your desired creaminess, remove the skillet from heat. Stir in the grated Parmesan cheese and truffle oil. Season with salt and pepper to taste.
- Serve and Garnish: Spoon the risotto onto plates, and garnish with freshly chopped parsley. Serve immediately while hot.
Extra Tips:
For the best results, use high-quality Arborio rice, as its high starch content is essential for achieving the creamy consistency of risotto. Truffle oil is potent, so start with a small amount and adjust to your preference.
If you can find fresh truffles, shaving some on top just before serving will add an even more luxurious touch. Remember to stir continuously during the cooking process, as this helps release the starches from the rice, creating that signature creamy texture.
Enjoy your elegant Italian dinner-party dish!
Spinach and Ricotta Stuffed Shells
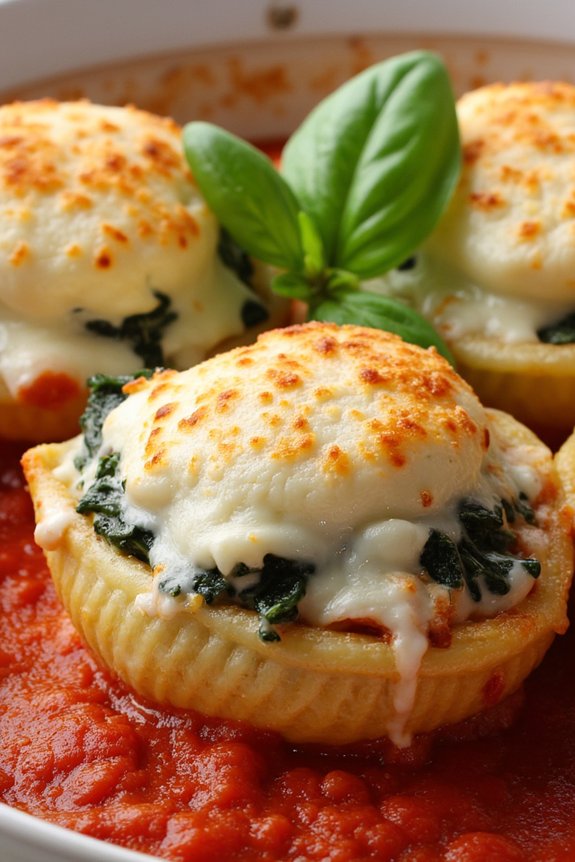
Spinach and Ricotta Stuffed Shells is a classic Italian dish that’s perfect for a dinner party. The combination of creamy ricotta cheese and fresh spinach stuffed into pasta shells, then baked with a rich tomato sauce and bubbling mozzarella cheese, creates a comforting yet elegant meal. This dish isn’t only delicious but also visually appealing, making it an ideal choice for entertaining guests.
The preparation involves cooking the pasta shells until just al dente, filling them with a delectable mixture of ricotta and spinach, and then baking them to perfection in a savory tomato sauce. It’s a dish that can be prepared ahead of time, allowing you to enjoy the company of your guests without being tied to the kitchen. This recipe serves 4-6 people, making it perfect for a small gathering.
Ingredients for Spinach and Ricotta Stuffed Shells:
- 20 jumbo pasta shells
- 2 cups ricotta cheese
- 1 cup cooked spinach, chopped (fresh or frozen)
- 1 cup grated Parmesan cheese
- 1 egg
- 1 teaspoon garlic powder
- 1 teaspoon salt
- 1/2 teaspoon black pepper
- 1 teaspoon Italian seasoning
- 2 cups marinara sauce
- 1 cup shredded mozzarella cheese
- Fresh basil leaves for garnish (optional)
Cooking Instructions:
- Preheat Oven: Preheat your oven to 375°F (190°C) to guarantee it’s ready for baking once the shells are prepared.
- Cook Pasta Shells: Bring a large pot of salted water to a boil. Add the jumbo pasta shells and cook them until they’re al dente, about 8-10 minutes. Drain the shells and set them aside to cool slightly.
- Prepare Ricotta Filling: In a large mixing bowl, combine the ricotta cheese, cooked and chopped spinach, Parmesan cheese, egg, garlic powder, salt, black pepper, and Italian seasoning. Mix well until all ingredients are evenly incorporated.
- Stuff Shells: Carefully fill each cooked pasta shell with the ricotta mixture using a spoon. You want the shells to be generously filled but not overflowing.
- Assemble Dish: Spread 1 cup of marinara sauce evenly on the bottom of a 9×13-inch baking dish. Arrange the filled shells in the dish, open side up. Pour the remaining marinara sauce over the top of the shells.
- Add Mozzarella and Bake: Sprinkle the shredded mozzarella cheese over the shells. Cover the baking dish with aluminum foil and bake in the preheated oven for 20 minutes. Remove the foil and bake for an additional 10 minutes or until the cheese is bubbly and golden brown.
- Serve: Remove from the oven and let it cool for a few minutes. Garnish with fresh basil leaves before serving, if desired.
Extra Tips:
For an even richer flavor, consider adding a pinch of nutmeg to the ricotta mixture, which complements the spinach beautifully. If time allows, make the dish a day ahead and refrigerate it; this will enhance the flavors. When ready to serve, simply bake as directed.
If you prefer a bit of heat, sprinkle some red pepper flakes over the top before serving. This dish pairs well with a crisp green salad and a glass of your favorite Italian red wine.
Lemon Basil Grilled Chicken
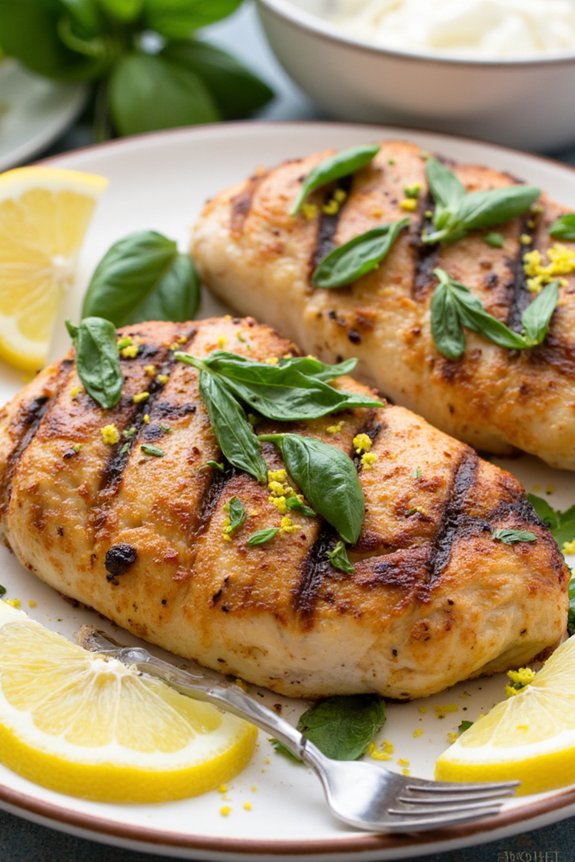
Lemon Basil Grilled Chicken is a delightful addition to any Italian dinner party, offering a fresh, vibrant flavor that’s sure to impress your guests. The combination of zesty lemon and aromatic basil creates a marinade that infuses the chicken with irresistible taste, while grilling adds a smoky depth to the dish. This recipe is perfect for those warm summer evenings when you want something light yet satisfying. Pair it with a crisp salad or roasted vegetables for a complete meal that showcases the best of Italian-inspired cuisine.
To prepare this dish for a serving of 4-6 people, you’ll start by marinating the chicken in a mixture of lemon juice, olive oil, garlic, and fresh basil, allowing the flavors to meld together beautifully. Grilling the chicken guarantees it remains juicy and tender on the inside, with a slightly charred exterior for added texture and taste. This recipe is straightforward, but it requires a little bit of planning to allow time for the chicken to soak up all the delicious flavors.
Ingredients for Lemon Basil Grilled Chicken (Serves 4-6):
- 4-6 boneless, skinless chicken breasts
- 1/2 cup fresh lemon juice (about 2-3 lemons)
- Zest of 1 lemon
- 1/4 cup extra-virgin olive oil
- 3 cloves garlic, minced
- 1/2 cup fresh basil leaves, chopped
- Salt and freshly ground black pepper, to taste
- Lemon wedges, for serving
Cooking Instructions:
- Prepare the Marinade: In a medium bowl, whisk together the lemon juice, lemon zest, olive oil, minced garlic, chopped basil, salt, and pepper. This will be the marinade for the chicken.
- Marinate the Chicken: Place the chicken breasts in a large resealable plastic bag or shallow dish. Pour the marinade over the chicken, guaranteeing each piece is well-coated. Seal the bag or cover the dish and refrigerate for at least 2 hours, or up to overnight for maximum flavor infusion.
- Preheat the Grill: About 30 minutes before you plan to grill, remove the chicken from the refrigerator to allow it to come to room temperature. Preheat your grill to medium-high heat.
- Grill the Chicken: Once the grill is hot, lightly oil the grates to prevent sticking. Remove the chicken from the marinade, allowing any excess to drip off, and place the breasts on the grill. Cook for about 6-7 minutes per side, or until the internal temperature reaches 165°F (75°C), and the chicken is no longer pink in the center.
- Rest and Serve: Remove the chicken from the grill and let it rest for a few minutes before serving. This helps retain the juices within the meat. Serve with lemon wedges on the side for an extra burst of citrus flavor.
Extra Tips:
For the best results, fresh ingredients are key in this dish, especially the basil and lemons. If possible, use a meat thermometer to guarantee the chicken is cooked perfectly without drying out. If you don’t have access to a grill, this recipe can also be cooked in a grill pan on the stovetop. Just be sure to get a good sear on each side for that authentic grilled taste.
Finally, consider making extra marinade to use as a sauce (just be sure to set it aside before adding the raw chicken to it).
Wild Mushroom Tagliatelle
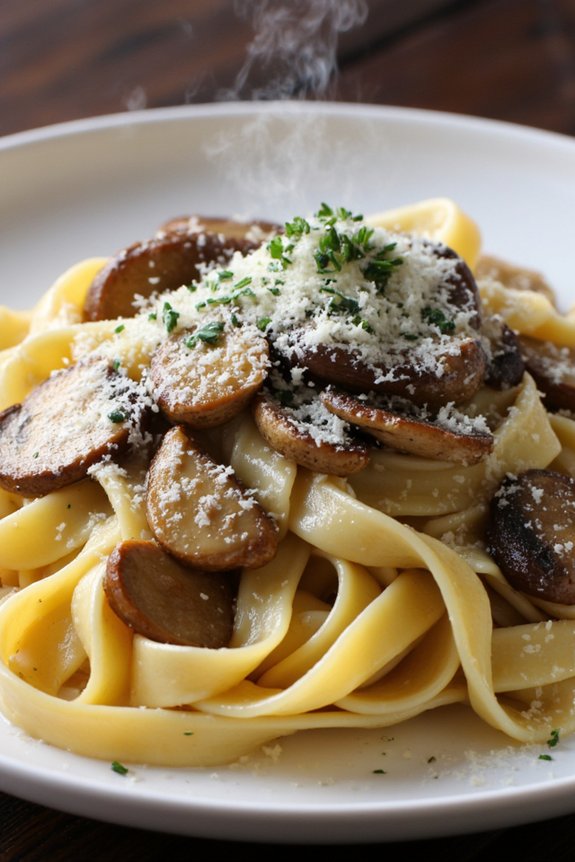
Wild Mushroom Tagliatelle is a classic Italian pasta dish that brings together the earthy flavors of wild mushrooms with the rich, creamy texture of tagliatelle pasta. This dish is perfect for a dinner party as it’s both elegant and comforting, offering a delightful balance of flavors that will impress your guests.
The key to this recipe lies in using high-quality ingredients, including a variety of wild mushrooms and freshly made tagliatelle, to create a dish that’s truly memorable. The combination of garlic, shallots, and fresh herbs enhances the natural umami flavor of the mushrooms, while a splash of white wine adds a touch of acidity to balance the creaminess of the sauce.
The final result is a luscious, savory pasta dish that’s both satisfying and sophisticated. Whether served as a main course or a side dish, Wild Mushroom Tagliatelle is sure to be a hit at any gathering.
Ingredients for 4-6 servings:
- 500g fresh tagliatelle pasta
- 500g mixed wild mushrooms (such as chanterelles, porcini, and shiitake)
- 2 tablespoons olive oil
- 2 shallots, finely chopped
- 3 cloves garlic, minced
- 100ml dry white wine
- 200ml heavy cream
- Salt and freshly ground black pepper, to taste
- 50g grated Parmesan cheese
- 2 tablespoons chopped fresh parsley
- 1 tablespoon chopped fresh thyme
- 2 tablespoons unsalted butter
Cooking Instructions:
- Prepare the Mushrooms: Clean the wild mushrooms by gently brushing off any dirt. Avoid washing them to prevent them from becoming waterlogged. Slice them into even pieces to guarantee uniform cooking.
- Cook the Pasta: Bring a large pot of salted water to a boil. Add the tagliatelle and cook according to the package instructions until al dente. Reserve 1 cup of pasta water before draining the pasta. Set the pasta aside.
- Sauté the Aromatics: In a large skillet over medium heat, add the olive oil. Once hot, add the shallots and garlic, sautéing until they become translucent and fragrant, about 2-3 minutes.
- Cook the Mushrooms: Increase the heat to medium-high and add the sliced mushrooms to the skillet. Sauté, stirring occasionally, until the mushrooms are golden brown and any released liquid has evaporated, about 5-7 minutes.
- Deglaze the Pan: Pour in the white wine, scraping up any browned bits from the bottom of the pan. Allow the wine to reduce by half, which should take about 2-3 minutes.
- Make the Sauce: Lower the heat to medium and stir in the heavy cream, thyme, salt, and pepper. Let the sauce simmer for 5 minutes until it thickens slightly.
- Combine with Pasta: Add the cooked tagliatelle to the skillet with the sauce. Toss everything together, adding reserved pasta water as needed to reach the desired consistency.
- Finish the Dish: Stir in the butter and half of the Parmesan cheese until they melt into the sauce. Garnish with fresh parsley and the remaining Parmesan cheese before serving.
Extra Tips:
For the best flavor, use a mix of your favorite wild mushrooms and verify they’re fresh. If fresh tagliatelle is unavailable, dried tagliatelle or fettuccine can be used as a substitute.
When adjusting the sauce’s consistency, add pasta water sparingly to avoid diluting the flavors. Remember, the key to a successful Wild Mushroom Tagliatelle is balancing the seasoning, so taste as you go and make any necessary adjustments.
Prosciutto-Wrapped Asparagus
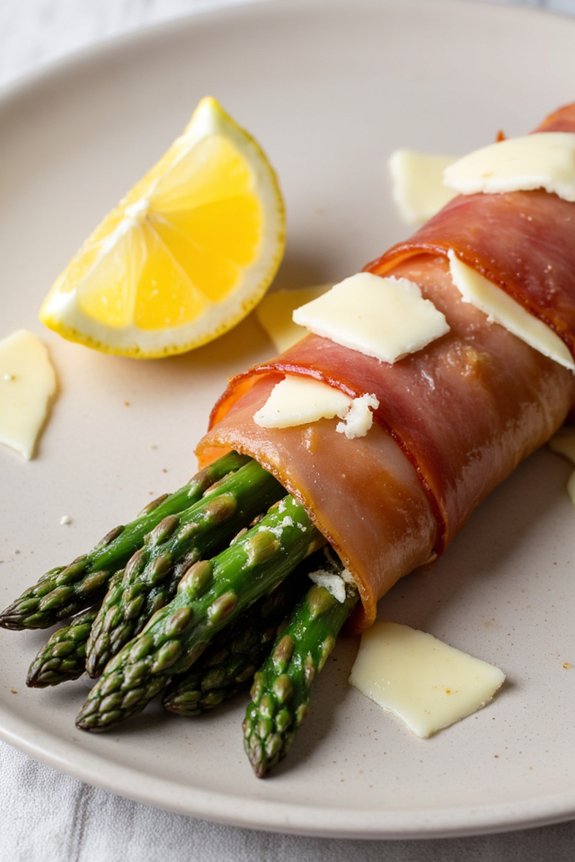
Prosciutto-wrapped asparagus is a delightful appetizer that brings together the earthy flavors of asparagus with the savory, salty taste of prosciutto. This dish is perfect for an Italian dinner party, offering a sophisticated yet simple addition to your menu. The combination of tender-crisp asparagus and crispy prosciutto makes for an irresistible bite-sized treat. Serve them warm as a starter or alongside other antipasti for a lovely spread that will impress your guests.
This recipe is designed to serve 4-6 people, making it ideal for small gatherings. With minimal ingredients and straightforward preparation, prosciutto-wrapped asparagus is both elegant and easy to make. The key to perfecting this dish lies in choosing fresh asparagus and high-quality prosciutto. Whether you’re an experienced cook or a beginner, this dish is a fantastic way to showcase classic Italian flavors in an appetizer that everyone will enjoy.
Ingredients (serves 4-6 people):
- 1 pound fresh asparagus spears
- 12 slices of prosciutto
- 2 tablespoons olive oil
- Salt and freshly ground black pepper, to taste
- Grated parmesan cheese (optional)
- Lemon wedges for serving (optional)
Cooking Instructions:
- Preheat the Oven: Begin by preheating your oven to 400°F (200°C). This will guarantee that the asparagus and prosciutto cook evenly and become crispy.
- Prepare the Asparagus: Wash the asparagus under cold water and pat them dry with a kitchen towel. Trim the tough ends of the asparagus by snapping them off or cutting them with a knife.
- Wrap the Asparagus: Lay a slice of prosciutto flat on a cutting board. Place one asparagus spear at one end of the prosciutto and roll it up tightly, making sure it’s completely wrapped. Repeat this process with the remaining asparagus and prosciutto slices.
- Arrange on a Baking Sheet: Line a baking sheet with parchment paper. Place the wrapped asparagus spears on the prepared baking sheet, ensuring they’re spaced apart to allow for even cooking.
- Season and Drizzle: Drizzle the olive oil evenly over the wrapped asparagus. Season with a pinch of salt and freshly ground black pepper. Be cautious with the salt, as prosciutto is naturally salty.
- Bake: Place the baking sheet in the preheated oven and bake for 15-20 minutes, or until the prosciutto is crispy and the asparagus is tender. Keep an eye on them to prevent overcooking.
- Serve: Once done, remove from the oven and let them cool slightly. Optionally, sprinkle grated parmesan cheese over the top for an extra touch of flavor. Serve warm with lemon wedges on the side for squeezing over the asparagus.
Extra Tips:
To guarantee the best results, choose asparagus spears that are similar in thickness to ensure even cooking. If the asparagus is particularly thick, you may want to blanch them in boiling water for 2-3 minutes before wrapping to guarantee they become tender during baking.
For an added touch of flavor, consider brushing the prosciutto with a bit of honey or balsamic glaze before wrapping the asparagus. This can provide a delightful contrast to the savory prosciutto. Be mindful of the salt content, as prosciutto itself is quite salty; adjust seasoning accordingly.
Seafood Linguine With White Wine Sauce
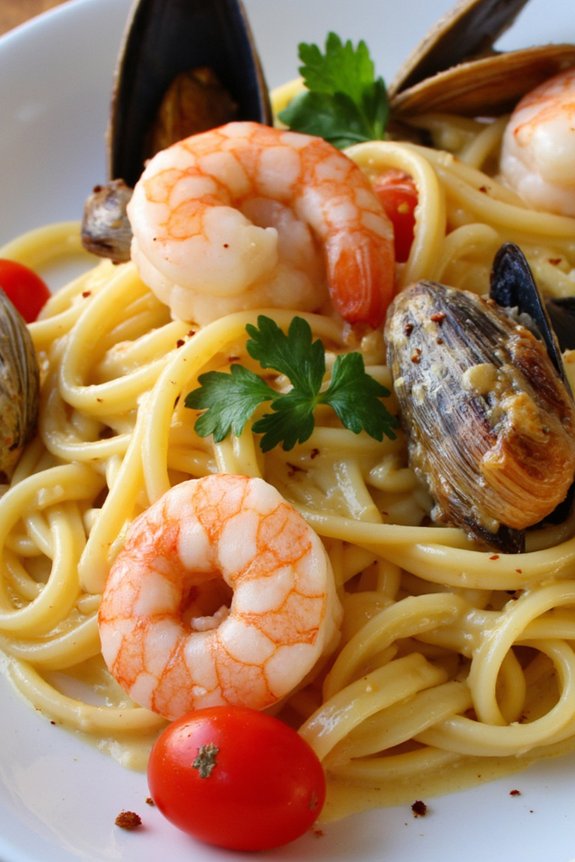
Seafood Linguine With White Wine Sauce is a delightful Italian dish that brings the flavors of the ocean to your dinner table. This recipe combines fresh seafood with the delicate flavors of white wine and garlic, creating a harmonious and elegant meal perfect for a dinner party.
The key to this dish is using the freshest seafood available, ensuring that each bite is a burst of flavor. The linguine, cooked to al dente perfection, serves as the perfect base for the luscious sauce, allowing the flavors to meld beautifully together.
Perfect for serving 4-6 people, this dish isn’t only delicious but also visually appealing, making it a standout choice for entertaining. The combination of shrimp, clams, and mussels provides a variety of textures and tastes, while the white wine sauce adds a touch of sophistication.
With simple yet high-quality ingredients, this recipe is sure to impress your guests and transport them to the Italian coast with every bite.
Ingredients (serves 4-6):
- 1 pound linguine pasta
- 2 tablespoons olive oil
- 4 cloves garlic, minced
- 1 pound shrimp, peeled and deveined
- 1 pound clams, scrubbed
- 1 pound mussels, scrubbed and debearded
- 1 cup dry white wine
- 1 cup cherry tomatoes, halved
- 1 teaspoon red pepper flakes
- Salt and pepper to taste
- 1/4 cup chopped fresh parsley
- 2 tablespoons butter
- Juice of 1 lemon
Cooking Instructions:
- Cook the Pasta: Bring a large pot of salted water to a boil. Add the linguine and cook until al dente, according to package instructions. Drain and set aside.
- Prepare the Sauce Base: In a large skillet, heat the olive oil over medium heat. Add the minced garlic and sauté for about 1 minute, until fragrant.
- Add the Seafood: Increase the heat to medium-high, add the shrimp, clams, and mussels to the skillet. Cook for 2-3 minutes until the shrimp starts to turn pink.
- Deglaze with Wine: Pour in the white wine and let it simmer for 4-5 minutes, or until the clams and mussels begin to open. Discard any that don’t open.
- Incorporate Tomatoes and Seasoning: Add the cherry tomatoes and red pepper flakes to the skillet. Season with salt and pepper. Cook for an additional 2-3 minutes, allowing the tomatoes to soften.
- Combine with Pasta: Add the drained linguine to the skillet along with the butter and lemon juice. Toss everything together until well coated in the sauce.
- Garnish and Serve: Finish by sprinkling the chopped parsley over the top. Serve immediately, ensuring each plate has a mix of shrimp, clams, and mussels.
Extra Tips:
When making Seafood Linguine With White Wine Sauce, it’s essential to use high-quality, fresh seafood for the best flavor. Make sure to clean the clams and mussels thoroughly to remove any grit.
Additionally, use a good quality dry white wine, such as Pinot Grigio or Sauvignon Blanc, as it greatly enhances the overall taste of the dish. If you’re preparing this dish in advance, cook the pasta and sauce separately and combine them just before serving to maintain the pasta’s texture and the sauce’s freshness.
Eggplant Parmesan Stacks
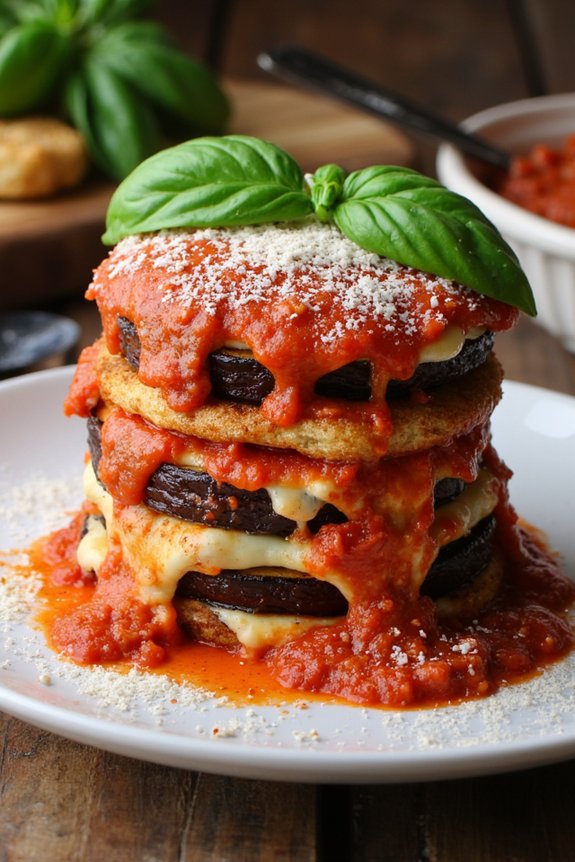
Eggplant Parmesan Stacks are a delightful twist on the classic Italian dish, perfect for a dinner party or family gathering. This version layers crispy, breaded slices of eggplant with rich marinara sauce and melty cheeses, creating a tower of flavor that’s both impressive and comforting. The dish isn’t only visually appealing but also offers a satisfying combination of textures, from the crispy exterior of the eggplant to the gooey, cheesy middle.
This recipe serves 4-6 people and is a great make-ahead option for entertaining guests. You can prepare the elements in advance and assemble them just before baking. The key to a successful Eggplant Parmesan Stack is in the preparation of the eggplant slices. Salting and draining the eggplant beforehand removes excess moisture and bitterness, guaranteeing that the stacks hold up well during cooking. As you layer the ingredients, you’ll be building a symphony of flavors that will have everyone at the table asking for seconds.
Ingredients:
- 2 large eggplants
- Salt
- 2 cups all-purpose flour
- 3 large eggs
- 2 cups breadcrumbs (preferably Italian seasoned)
- 2 cups marinara sauce
- 2 cups shredded mozzarella cheese
- 1 cup grated Parmesan cheese
- Fresh basil leaves for garnish
- Olive oil for frying
Cooking Instructions:
- Prepare the Eggplant: Slice the eggplants into 1/2-inch thick rounds. Lay them out on a baking sheet and sprinkle both sides generously with salt. Let them sit for about 30 minutes to draw out excess moisture. Afterward, rinse the slices under cold water to remove the salt, and pat them dry with paper towels.
- Set Up a Breading Station: In one shallow dish, place the flour. In a second dish, beat the eggs with a tablespoon of water. In a third dish, add the breadcrumbs. Dredge each eggplant slice first in the flour, then dip in the egg mixture, and finally coat with breadcrumbs. Confirm each slice is evenly coated.
- Fry the Eggplant: Heat olive oil in a large skillet over medium-high heat. Fry the breaded eggplant slices in batches until golden brown and crispy, about 2-3 minutes per side. Transfer to a paper towel-lined plate to drain excess oil.
- Assemble the Stacks: Preheat your oven to 375°F (190°C). In a large baking dish, spread a thin layer of marinara sauce. Place a layer of fried eggplant slices, followed by a spoonful of marinara sauce, a sprinkle of mozzarella, and a sprinkle of Parmesan. Repeat these layers until all ingredients are used, finishing with a generous topping of cheese.
- Bake: Cover the baking dish with foil and bake in the preheated oven for 20 minutes. Remove the foil and bake for an additional 10 minutes, or until the cheese is bubbly and golden brown.
- Garnish and Serve: Let the eggplant stacks cool for a few minutes before garnishing with fresh basil leaves. Serve hot and enjoy!
Extra Tips: To guarantee your Eggplant Parmesan Stacks are perfectly crispy and not soggy, make sure to fry the eggplants until they’re golden brown. This will help them maintain their texture even after baking. Additionally, consider preparing the marinara sauce from scratch for an extra layer of flavor, using fresh tomatoes, garlic, and herbs. If you prefer a lighter version, you can bake the breaded eggplant slices instead of frying them. Simply place them on a baking sheet and bake at 400°F (200°C) for about 15-20 minutes, flipping halfway through, before assembling the stacks.
Porcini Mushroom and Sage Gnocchi
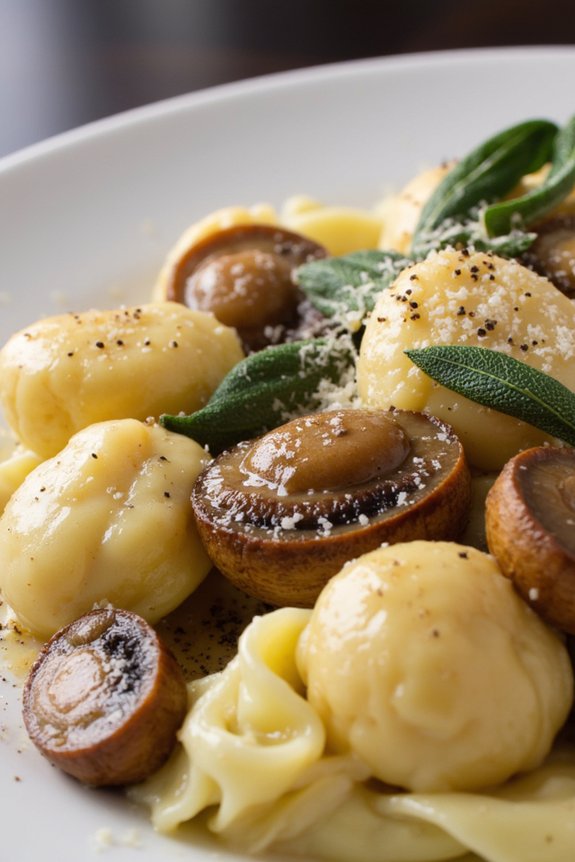
Porcini Mushroom and Sage Gnocchi is a delightful Italian dish that combines the earthy flavors of porcini mushrooms with the aromatic notes of fresh sage, all nestled in tender gnocchi. This dish is perfect for a cozy dinner party, offering a comforting yet sophisticated meal that will impress your guests. The magic of this recipe lies in its simplicity, allowing the natural flavors of the ingredients to shine through, while the gnocchi provides a satisfying, pillowy texture.
To begin, you’ll want to select the freshest ingredients possible, particularly when it comes to the mushrooms and herbs. Porcini mushrooms have a deep, umami flavor that pairs beautifully with the sage, creating a rich and savory sauce that coats the gnocchi perfectly. Whether you’re using fresh or dried porcini mushrooms, rehydrate them carefully to guarantee they retain their full flavor profile. This dish is best enjoyed with a glass of white wine and good company, making it an ideal choice for an intimate gathering.
Ingredients for 4-6 servings:
- 2 pounds of gnocchi
- 2 cups of porcini mushrooms (fresh or rehydrated if using dried)
- 3 tablespoons olive oil
- 3 cloves garlic, minced
- 1/2 cup chicken or vegetable broth
- 1/4 cup heavy cream
- Salt and pepper to taste
- 1/4 cup grated Parmesan cheese
- 2 tablespoons fresh sage leaves, chopped
- 2 tablespoons unsalted butter
Cooking Instructions:
- Prepare the Mushrooms: If using dried porcini mushrooms, soak them in warm water for about 20 minutes until they’re soft. Drain them and pat dry with a paper towel. If using fresh mushrooms, clean them gently with a damp cloth and slice them thinly.
- Cook the Gnocchi: In a large pot of salted boiling water, cook the gnocchi according to package instructions until they float to the surface. This usually takes about 2-3 minutes. Drain and set aside.
- Sauté the Garlic and Mushrooms: In a large skillet, heat the olive oil over medium heat. Add the minced garlic and sauté until fragrant, about 1 minute. Add the porcini mushrooms and cook for about 5-7 minutes, stirring occasionally, until they’re golden brown and have released their moisture.
- Make the Sauce: Pour in the chicken or vegetable broth and bring to a simmer. Allow the broth to reduce by half, then stir in the heavy cream. Season the sauce with salt and pepper to taste.
- Combine with Gnocchi: Add the cooked gnocchi to the skillet and gently toss to coat them in the sauce. Stir in the grated Parmesan cheese and fresh sage, allowing the flavors to meld together for about 2 minutes.
- Finish with Butter: Add the unsalted butter to the skillet, stirring until it melts and creates a glossy finish on the gnocchi.
Extra Tips:
When preparing the gnocchi, be cautious not to overcook them; they should be tender yet firm. For an extra touch of flavor, consider adding a splash of white wine to the sauce after adding the mushrooms and before the broth. This will add a subtle acidity that balances the richness of the dish.
Additionally, for a crispy texture, you can lightly pan-fry the gnocchi in butter before adding them to the sauce. This dish pairs well with a side of arugula salad dressed in lemon vinaigrette to cut through its richness. Enjoy your meal!
Rosemary and Garlic Lamb Chops
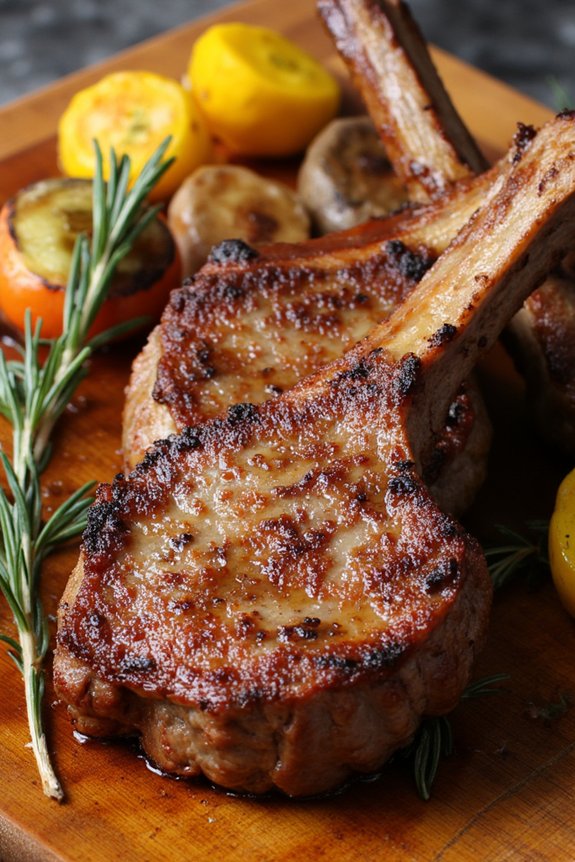
Indulge in the rich, aromatic flavors of Rosemary and Garlic Lamb Chops, a classic Italian dish perfect for a sophisticated dinner party. This recipe combines the earthy aroma of rosemary with the robust essence of garlic, creating a mouthwatering symphony that beautifully complements the succulent lamb. Each bite promises a tender, juicy experience, making it an unforgettable centerpiece for your dinner table.
Whether you’re hosting a grand gathering or an intimate dinner, these lamb chops are bound to impress your guests with their exquisite taste and elegant presentation. This recipe serves 4-6 people, providing a generous portion for each guest.
The preparation involves marinating the lamb chops with fresh herbs and spices, allowing the flavors to seep in and enhance the natural taste of the meat. Once cooked to perfection, these lamb chops are best served with a side of roasted vegetables or a fresh salad, balancing the rich flavors of the dish with light and invigorating accompaniments. Prepare to delight your guests with this flavorful and sophisticated culinary creation.
Ingredients:
- 8 lamb chops
- 4 cloves of garlic, minced
- 2 tablespoons fresh rosemary, chopped
- 1 tablespoon olive oil
- 1 tablespoon lemon juice
- Salt and pepper to taste
- Optional garnish: fresh rosemary sprigs
Cooking Instructions:
- Prepare the Marinade: In a small bowl, combine the minced garlic, chopped rosemary, olive oil, and lemon juice. Mix well until all ingredients are thoroughly combined.
- Season the Lamb Chops: Sprinkle salt and pepper on both sides of the lamb chops to taste. Place the lamb chops in a shallow dish or a resealable plastic bag.
- Apply the Marinade: Pour the marinade over the lamb chops, making sure each chop is evenly coated. Cover the dish or seal the bag and refrigerate for at least 30 minutes, or preferably overnight, to allow the flavors to meld.
- Preheat the Grill or Pan: Remove the lamb chops from the refrigerator and let them sit at room temperature for about 15 minutes. Meanwhile, preheat your grill or stovetop pan over medium-high heat.
- Cook the Lamb Chops: Place the lamb chops on the hot grill or pan. Cook for about 3-4 minutes on each side for medium-rare, or adjust the time according to your preferred level of doneness.
- Rest the Lamb Chops: Once cooked, transfer the lamb chops to a serving platter and let them rest for 5 minutes. This allows the juices to redistribute throughout the meat, ensuring a tender and juicy bite.
- Garnish and Serve: Optionally, garnish the lamb chops with fresh rosemary sprigs for an added touch of elegance. Serve immediately alongside your chosen sides.
Extra Tips:
For the best results, choose lamb chops of similar thickness to guarantee even cooking. Allowing the lamb chops to marinate overnight will greatly enhance the depth of flavor.
When cooking, be mindful not to overcook the meat; lamb chops are best enjoyed when they’re tender and slightly pink in the center. If using a grill, consider adding wood chips to infuse a smoky flavor, elevating the dish to new heights.
Burrata and Tomato Bruschetta
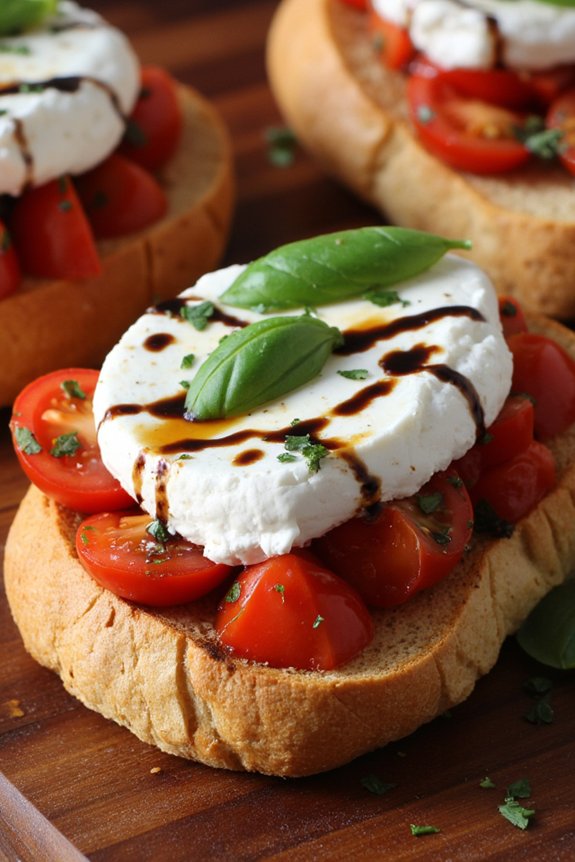
Burrata and Tomato Bruschetta is a delightful appetizer that perfectly captures the essence of Italian cuisine. This dish combines the creamy, rich texture of burrata cheese with the fresh, vibrant flavors of ripe tomatoes and aromatic basil. Ideal for a dinner party, it brings together simple yet high-quality ingredients to create a flavorful start to any meal. The key to this dish lies in the quality of the ingredients, so it’s worth sourcing the best burrata and tomatoes you can find.
Paired with a crunchy slice of toasted bread, this bruschetta is sure to impress your guests with its balance of textures and flavors. The beauty of Burrata and Tomato Bruschetta is in its simplicity and speed of preparation. It’s an elegant appetizer that doesn’t require much time in the kitchen, allowing you to focus on enjoying the company of your guests.
The contrast between the crusty bread, the creamy cheese, and the fresh tomatoes makes for a delightful mouthful. This dish is best enjoyed in the summer months when tomatoes are at their peak ripeness. However, if you can source quality tomatoes year-round, this bruschetta can be a staple at your gatherings regardless of the season.
Ingredients (Serves 4-6):
- 1 loaf of rustic Italian bread or baguette
- 2 balls of fresh burrata cheese
- 4-5 ripe tomatoes
- 2 cloves of garlic
- Fresh basil leaves
- Extra virgin olive oil
- Balsamic glaze (optional)
- Salt and freshly ground black pepper
Cooking Instructions:
- Prepare the Bread: Preheat your oven to 400°F (200°C). Slice the bread into 1-inch thick slices. Place the slices on a baking sheet and drizzle with olive oil. Toast in the oven for about 5-7 minutes, or until golden brown and crispy on the outside.
- Prepare the Tomatoes: While the bread is toasting, dice the tomatoes into small cubes and place them in a bowl. Mince the garlic cloves and add to the tomatoes. Tear a handful of basil leaves and add them to the mixture. Drizzle with olive oil, season with salt and pepper, and mix gently to combine the flavors.
- Assemble the Bruschetta: Once the bread is toasted, remove it from the oven. Spread a generous layer of burrata cheese on each slice. Top with a spoonful of the tomato mixture, ensuring each piece of bread has a good balance of cheese and tomatoes.
- Finish with Flavor: Drizzle a little extra virgin olive oil over the top of each bruschetta. For added depth of flavor, you can also drizzle a small amount of balsamic glaze over the tomatoes.
- Serve Immediately: Arrange the Bruschetta on a serving platter. Garnish with additional fresh basil leaves for presentation. Serve immediately while the bread is still warm and crispy.
Extra Tips:
To enhance the flavors of Burrata and Tomato Bruschetta, consider letting the tomato mixture sit for about 10 minutes after seasoning. This allows the flavors to meld together, creating a more cohesive taste experience.
If you want to add another dimension of flavor, consider rubbing the toasted bread with a cut garlic clove before adding the burrata. This will infuse the bread with a subtle garlic flavor. Finally, remember that the quality of your ingredients will make a significant difference, so choose the freshest tomatoes and the creamiest burrata you can find.
Tiramisu With a Modern Touch

Tiramisu is a classic Italian dessert that has delighted taste buds for generations. With its rich layers of coffee-soaked ladyfingers, creamy mascarpone cheese, and a dusting of cocoa, it’s no wonder this dessert has become a staple at dinner parties.
However, this version of Tiramisu brings a modern twist to the traditional recipe by incorporating a hint of citrus and a touch of liqueur, giving it a fresh and sophisticated flavor.
This modern Tiramisu is perfect for your next Italian dinner party, serving 4-6 people. The addition of orange zest and a splash of Grand Marnier adds a new dimension to the dessert, enhancing its complexity while retaining the beloved essence of the classic.
The following recipe will guide you through creating this exquisite dessert that will surely impress your guests.
Ingredients:
- 6 large egg yolks
- 3/4 cup granulated sugar
- 2/3 cup milk
- 1 1/4 cups heavy cream
- 1/2 teaspoon vanilla extract
- 8 ounces mascarpone cheese
- 1 tablespoon orange zest
- 1/4 cup Grand Marnier or orange liqueur
- 1 cup strong brewed coffee, cooled
- 24 ladyfingers (savoiardi)
- Unsweetened cocoa powder, for dusting
- Dark chocolate shavings, for garnish
Instructions:
1. Prepare the Custard: In a medium saucepan, whisk together the egg yolks and sugar until well combined. Gradually whisk in the milk and cook over medium heat, stirring constantly, until the mixture thickens and coats the back of a spoon. This should take about 8-10 minutes.
Remove from heat and allow to cool slightly.
2. Whip the Cream: In a large mixing bowl, beat the heavy cream and vanilla extract until soft peaks form. Gently fold in the mascarpone cheese and orange zest until smooth and well incorporated.
3. Combine Layers: Once the custard has cooled, gently fold it into the mascarpone mixture until fully combined and smooth. This will form the creamy layer of your Tiramisu.
4. Prepare the Coffee Mixture: In a shallow dish, combine the cooled coffee and Grand Marnier. Quickly dip each ladyfinger into the coffee mixture, making sure they’re soaked but not soggy.
5. Assemble the Tiramisu: In a 9×9-inch dish, arrange a layer of soaked ladyfingers at the bottom. Spread half of the mascarpone mixture over the ladyfingers, smoothing it with a spatula.
Repeat with another layer of ladyfingers followed by the remaining mascarpone mixture.
6. Chill and Serve: Cover the dish with plastic wrap and refrigerate for at least 4 hours or overnight to allow the flavors to meld. Before serving, dust the top with cocoa powder and garnish with dark chocolate shavings.
Extra Tips:
For the best results, confirm that your coffee is strong and has cooled completely before dipping the ladyfingers. If you prefer a non-alcoholic version, you can substitute the Grand Marnier with orange juice for a similar citrus flavor.
When serving, use a sharp knife to cut clean squares, and use a spatula for easy serving. Enjoy this modern twist on a traditional favorite, and watch your guests savor every bite!
Limoncello Cheesecake

Limoncello Cheesecake is a delightful dessert that combines the creamy richness of cheesecake with the vibrant, zesty flavors of limoncello, a classic Italian lemon liqueur. This dessert is perfect for an Italian-themed dinner party or any occasion where you want to impress your guests with a taste of Italy.
The smooth, tangy filling paired with a buttery graham cracker crust and topped with a hint of lemon zest makes for a revitalizing yet decadent treat. This cheesecake isn’t only delicious but also relatively simple to prepare. It requires a bit of time for baking and cooling, but the result is well worth the wait.
The limoncello adds a unique twist to the traditional cheesecake, making it stand out as a memorable dish. It’s best to prepare this cheesecake a day in advance to allow it to set properly, guaranteeing a perfect texture and flavor when served.
Ingredients for 4-6 servings:
- 1 1/2 cups graham cracker crumbs
- 1/2 cup unsalted butter, melted
- 3 (8 oz) packages cream cheese, softened
- 1 cup granulated sugar
- 4 large eggs
- 1/4 cup limoncello
- 1 tablespoon lemon zest
- 1 tablespoon lemon juice
- 1 teaspoon vanilla extract
- 1/4 cup sour cream
- Optional: whipped cream and lemon slices for garnish
Cooking Instructions:
1. Prepare the Crust: Preheat the oven to 325°F (163°C). In a medium bowl, combine the graham cracker crumbs and melted butter until well mixed. Press the mixture firmly into the bottom of a 9-inch springform pan to form an even crust. Bake for 10 minutes, then remove from oven and let it cool completely.
2. Make the Cheesecake Filling: In a large mixing bowl, beat the softened cream cheese and granulated sugar together until smooth and creamy. Add the eggs one at a time, beating well after each addition. Mix in the limoncello, lemon zest, lemon juice, and vanilla extract until fully incorporated.
Finally, gently fold in the sour cream until the mixture is smooth.
3. Assemble and Bake: Pour the cheesecake filling over the cooled crust, spreading it evenly. Place the springform pan on a baking sheet and bake in the preheated oven for 50-60 minutes, or until the edges are set and the center is slightly jiggly.
4. Cool and Chill: Remove the cheesecake from the oven and let it cool to room temperature. Once cooled, cover with plastic wrap and refrigerate for at least 4 hours, or overnight for best results.
5. Serve: Before serving, run a knife around the edge of the cheesecake to loosen it from the pan. Remove the sides of the springform pan and transfer the cheesecake to a serving platter. Garnish with whipped cream and lemon slices if desired.
Extra Tips:
When making Limoncello Cheesecake, verify all your ingredients are at room temperature before you start mixing. This helps achieve a smoother filling without lumps.
Be careful not to over-bake the cheesecake; it’s normal for the center to be slightly wobbly when you take it out of the oven, as it will firm up as it cools. If you don’t have limoncello, you can substitute it with an equal amount of lemon juice, but the limoncello adds a special flavor that makes this dessert stand out.