

Summer in Italy is pure magic, and the flavors are simply irresistible. Think vibrant heirloom tomatoes, creamy burrata, and the zesty tang of fresh lemon. I’ve gathered 11 delightful recipes that capture these sun-kissed flavors. Picture a table adorned with Caprese salad and Panzanella, and you’ll be ready for an Italian summer feast. Let’s embrace these culinary treasures together.
Caprese Salad With Burrata
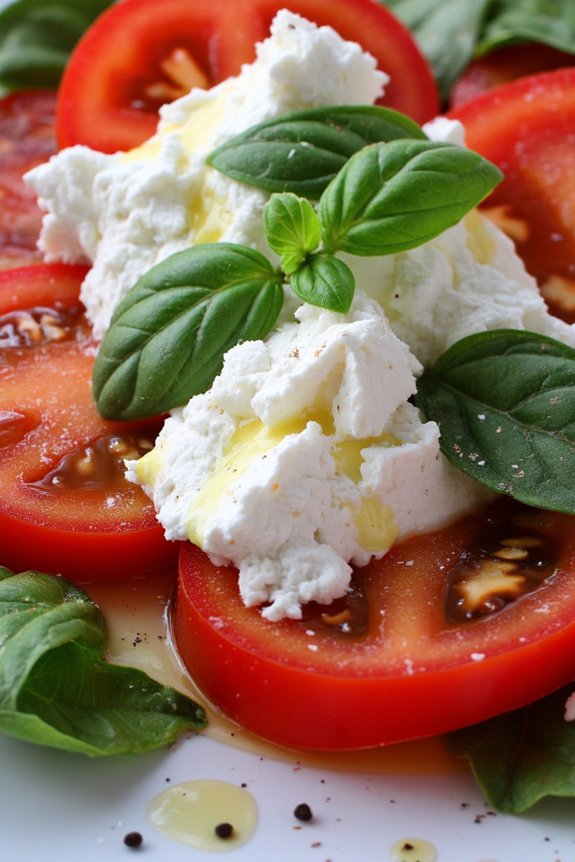
Caprese Salad With Burrata is a delightful Italian dish that epitomizes the best of summer flavors. This recipe takes the classic Caprese salad and elevates it with the creamy indulgence of burrata cheese, which provides a luscious contrast to the vibrant tomatoes and fresh basil. Perfect for a light lunch or as an appetizer, this salad isn’t only delicious but also visually stunning, showcasing the colors of the Italian flag.
The key to an exceptional Caprese Salad With Burrata lies in the quality of its ingredients. Fresh, ripe tomatoes and aromatic basil are essential, as they bring out the true essence of summer in every bite. The burrata should be soft and creamy, allowing it to meld with the other ingredients seamlessly. A drizzle of high-quality extra virgin olive oil and a sprinkle of salt and pepper enhance the flavors, making this dish a true celebration of simplicity and taste.
Ingredients (Serves 4-6):
- 4 large ripe tomatoes
- 2 balls of burrata cheese
- 1 bunch of fresh basil leaves
- Extra virgin olive oil
- Sea salt
- Freshly ground black pepper
- Optional: Balsamic glaze for drizzling
Cooking Instructions:
- Prepare the Tomatoes: Start by washing the tomatoes thoroughly. Slice them into thick rounds, about 1/4 inch thick, and arrange them evenly on a large serving platter.
- Add the Burrata: Take the burrata cheese and gently tear it into smaller pieces. Distribute the pieces evenly over the sliced tomatoes, ensuring each piece of burrata is resting partly on a tomato slice to absorb its juices.
- Layer the Basil: Pick fresh basil leaves from the bunch, rinse them under cold water, and pat dry with a paper towel. Scatter the basil leaves generously over the tomatoes and burrata.
- Season the Salad: Drizzle extra virgin olive oil over the entire salad, ensuring a light, even coating. Season with a pinch of sea salt and freshly ground black pepper to taste. If desired, add a few delicate drizzles of balsamic glaze over the top for an extra layer of flavor.
- Serve Immediately: Once assembled, serve the Caprese Salad With Burrata immediately to enjoy the freshness and texture of the ingredients at their best.
Extra Tips:
For the best results, use heirloom or vine-ripened tomatoes for their superior flavor and texture. Avoid refrigerating the tomatoes before use, as it can dull their taste.
When selecting burrata, look for fresh, locally-sourced options as they tend to be creamier and more flavorful. If you can’t find burrata, fresh mozzarella can be a substitute, although it won’t provide the same creamy texture.
Finally, remember that simplicity is the key to this dish; let the quality of your ingredients shine through without overcomplicating the flavors.
Lemon Ricotta Pasta
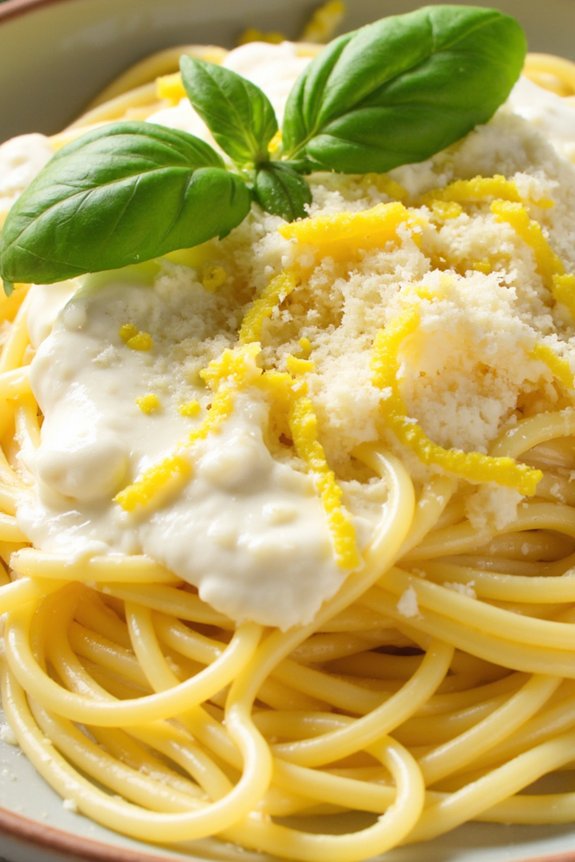
Lemon Ricotta Pasta is a revitalizing and creamy dish perfect for an Italian summer meal. This dish beautifully combines the tangy brightness of lemon with the creamy richness of ricotta cheese, all enveloped in perfectly cooked pasta. The delightful flavors offer a harmonious balance that’s both comforting and invigorating.
Ideal for a lunch or dinner, this recipe isn’t only delicious but also quick to prepare, making it a great choice for busy summer days. The simplicity of Lemon Ricotta Pasta allows the fresh ingredients to shine, making every bite a burst of flavor.
The dish is completed with a hint of garlic and a sprinkle of Parmesan cheese, bringing together all the elements into a cohesive and tasty meal. Whether you’re serving it at a family gathering or enjoying it alone as a treat, this recipe will transport you to the sunny shores of Italy with its vibrant and zesty notes.
Ingredients (Serving Size: 4-6 people):
- 1 pound (450g) pasta (such as spaghetti or fettuccine)
- 1 cup (250g) ricotta cheese
- Zest of 2 lemons
- Juice of 1 lemon
- 2 cloves garlic, minced
- 1/2 cup (50g) grated Parmesan cheese
- 1/4 cup (60ml) extra-virgin olive oil
- Salt and pepper to taste
- Fresh basil leaves, for garnish
Cooking Instructions:
1. Cook the Pasta: Bring a large pot of salted water to a boil. Add the pasta and cook according to the package instructions until al dente. Reserve 1 cup of pasta cooking water.
Grilled Eggplant Parmigiana
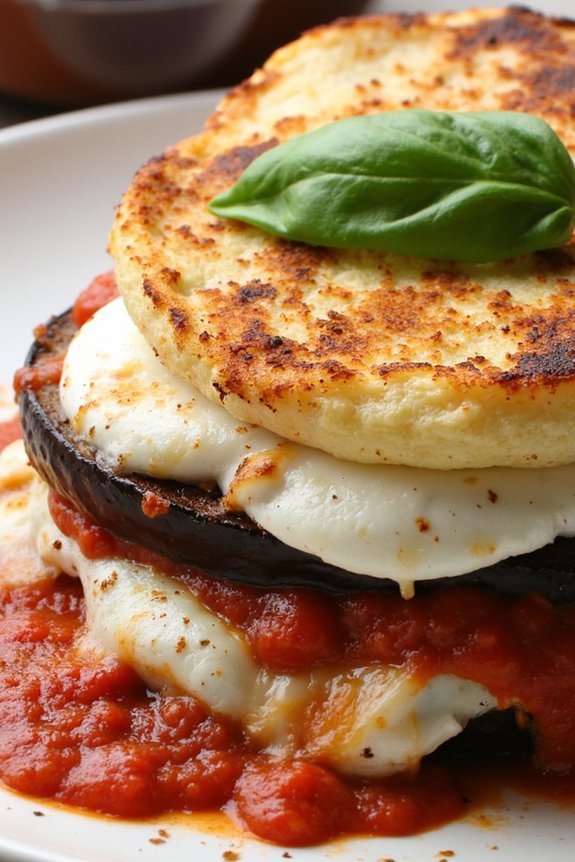
Grilled Eggplant Parmigiana is a delightful twist on the traditional Italian dish, offering a lighter version perfect for summer gatherings. This recipe utilizes the smokiness of grilled eggplant to add depth to the classic flavors of Parmigiana, all while maintaining its comforting and rich taste. The layering of fresh mozzarella, tangy tomato sauce, and fragrant basil creates a harmonious blend that’s both satisfying and invigorating for the warm months.
This dish is relatively simple to prepare, making it an excellent option for both novice and experienced cooks. Grilling the eggplant instead of frying reduces the oil content and enhances the natural sweetness of the vegetable. Served as a main or as a side, Grilled Eggplant Parmigiana is sure to be a hit at any meal. The following recipe serves 4-6 people, making it ideal for family dinners or small gatherings with friends.
Ingredients:
- 3 medium-sized eggplants
- 2 cups of marinara sauce
- 1 1/2 cups of shredded mozzarella cheese
- 1/2 cup of grated Parmesan cheese
- 1/4 cup of olive oil
- 1 teaspoon of salt
- 1/2 teaspoon of black pepper
- 1/4 cup of fresh basil leaves
- 1/4 teaspoon of red pepper flakes (optional)
Cooking Instructions:
- Prepare the Eggplant: Start by slicing the eggplants into 1/2-inch thick rounds. Lay them out on a baking sheet and sprinkle both sides with salt. Let them sit for about 20 minutes to draw out excess moisture and bitterness.
- Preheat the Grill: While the eggplant is resting, preheat your grill to medium-high heat. Lightly oil the grill grates to prevent sticking.
- Grill the Eggplant: Pat the eggplant slices dry with paper towels, then brush them with olive oil and season with black pepper. Grill the eggplant slices for about 3-4 minutes on each side, until they’re tender and have nice grill marks. Remove from the grill and set aside.
- Assemble the Parmigiana: Preheat your oven to 375°F (190°C). In a baking dish, spread a thin layer of marinara sauce on the bottom. Layer half of the grilled eggplant slices over the sauce. Top with half of the remaining marinara sauce, and sprinkle with half of the mozzarella and Parmesan cheeses. Add a few basil leaves for flavor. Repeat the layering process with the remaining ingredients.
- Bake the Dish: Cover the baking dish with aluminum foil and bake in the preheated oven for 20 minutes. Remove the foil and bake for an additional 15 minutes, or until the cheese is golden and bubbly.
- Garnish and Serve: Let the dish cool for a few minutes before serving. Garnish with additional fresh basil leaves and a sprinkle of red pepper flakes, if desired.
Extra Tips:
For the best results, choose eggplants that are firm and have smooth, shiny skin. This guarantees that they’re fresh and will have a better texture once grilled.
If you have the time, prepare the marinara sauce from scratch for a more authentic taste. You can also add layers of roasted red peppers or mushrooms for an extra burst of flavor.
When grilling the eggplant, be sure not to overcook it, as it should be tender but not mushy. Enjoy this dish with a side of crusty bread or a fresh green salad for a complete meal.
Panzanella With Heirloom Tomatoes
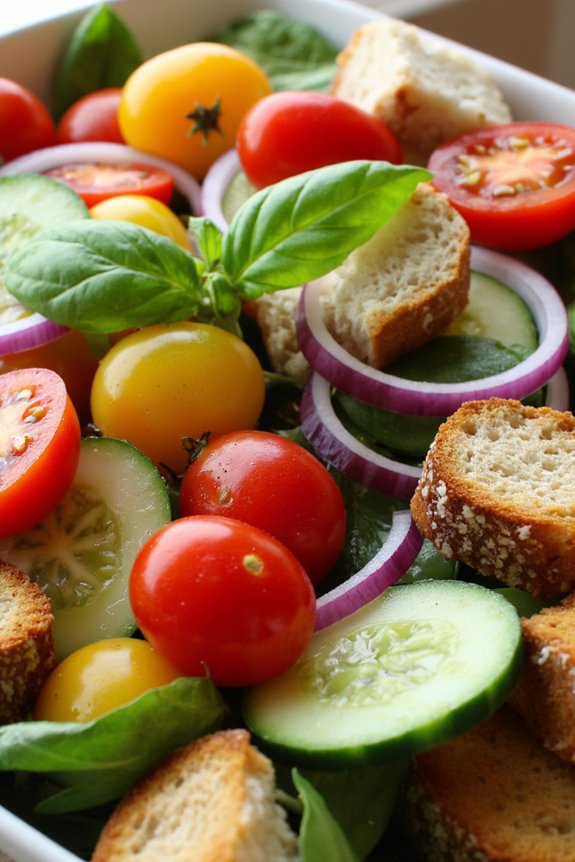
Embrace the new flavors of summer with a classic Italian dish: Panzanella with Heirloom Tomatoes. This Tuscan salad is the epitome of rustic simplicity, highlighting the vibrant and juicy heirloom tomatoes that are at their peak during the summer months.
Traditionally, panzanella was a way to use up stale bread, transforming it into a delicious, revitalizing salad that pairs beautifully with any alfresco meal. The combination of ripe tomatoes, crusty bread, and a tangy vinaigrette is a confirmation of the Italian philosophy of letting high-quality ingredients shine.
Heirloom tomatoes are the star of this dish, bringing a burst of color and flavor that standard tomatoes simply can’t match. These tomatoes, with their unique shapes and colors, add visual appeal as well as a sweet, complex taste that elevates the entire salad.
Paired with a handful of simple, fresh ingredients like basil, cucumbers, and red onions, this panzanella is a celebration of summer’s bounty. Whether served as a side dish or a light main course, this salad is sure to delight your taste buds and transport you to a sun-drenched Italian countryside.
Ingredients (Serves 4-6):
- 4 cups of cubed day-old crusty bread (such as ciabatta or sourdough)
- 3 large heirloom tomatoes, cut into wedges
- 1 English cucumber, sliced
- 1 small red onion, thinly sliced
- 1/4 cup of fresh basil leaves, torn
- 1/4 cup of extra-virgin olive oil
- 2 tablespoons of red wine vinegar
- Salt and freshly ground black pepper to taste
- Optional: 1/4 cup of pitted black olives or capers
Instructions:
- Prepare the Bread: Preheat your oven to 350°F (175°C). Spread the cubed bread on a baking sheet in a single layer. Toast the bread in the oven for about 10-15 minutes, or until it’s crisp and golden brown. Allow it to cool completely before using.
- Mix the Vegetables: In a large bowl, combine the heirloom tomatoes, cucumber slices, and red onion. If using olives or capers, add them to the mix at this stage. Toss gently to combine the ingredients.
- Prepare the Dressing: In a small bowl, whisk together the extra-virgin olive oil and red wine vinegar. Season with salt and freshly ground black pepper to taste.
- Assemble the Salad: Add the cooled toasted bread cubes to the bowl with the vegetables. Pour the dressing over the salad and toss everything together until the bread absorbs the juices from the tomatoes and dressing.
- Add the Basil: Just before serving, add the torn basil leaves to the salad. Toss gently to incorporate the basil without bruising it.
- Serve: Allow the salad to sit for about 20 minutes at room temperature to let the flavors meld together. Serve as a side dish or a light main course.
Extra Tips:
For the best results, use day-old bread, as fresh bread may become too soggy in the salad. If you don’t have day-old bread, you can dry fresh bread in the oven or leave it out overnight.
Feel free to experiment with different varieties of heirloom tomatoes to find your favorite flavor combination. Additionally, this salad can be prepared a few hours in advance, which makes it an excellent option for entertaining, as the flavors only improve with time.
Spaghetti Alle Vongole
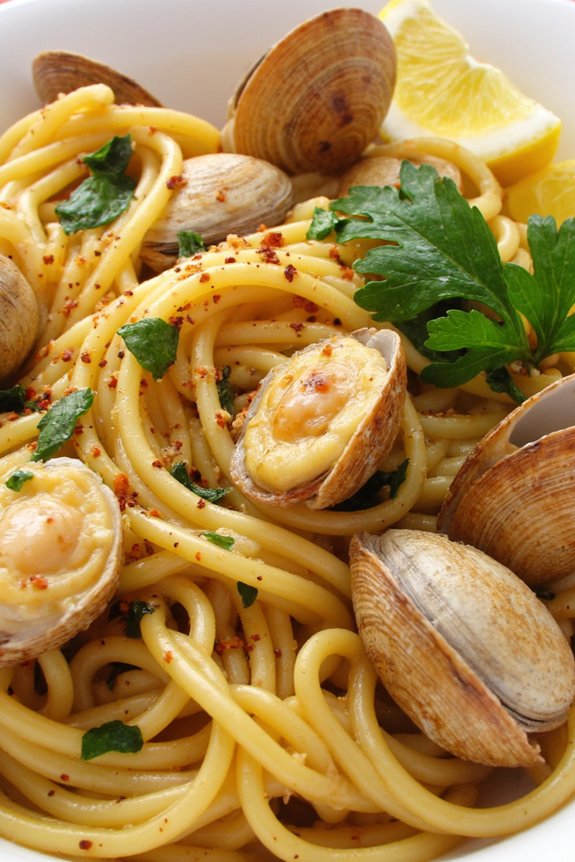
Spaghetti Alle Vongole, a classic Italian dish, is a perfect example of how simple ingredients can come together to create a meal that’s both flavorful and satisfying. This dish hails from the coastal regions of Italy, where fresh clams are in abundance, and it highlights the natural sweetness of the seafood combined with the richness of olive oil and the subtle heat of chili.
The spaghetti serves as the perfect canvas, absorbing the aromatic broth created by the clams and other ingredients, making every bite a delightful experience. The key to a successful Spaghetti Alle Vongole is using the freshest clams available and cooking them just right to keep them tender.
This dish isn’t only quick to prepare but also a crowd-pleaser, making it ideal for a summer gathering. The simplicity of the recipe allows you to enjoy the authentic flavors of Italian cuisine without spending hours in the kitchen. The combination of garlic, parsley, and white wine infuses the dish with a savory depth that pairs beautifully with the briny clams.
Ingredients (Serves 4-6)
- 500g (1 lb) spaghetti
- 1 kg (2.2 lbs) fresh clams, cleaned and scrubbed
- 4 tablespoons extra virgin olive oil
- 4 cloves garlic, thinly sliced
- 1/2 teaspoon red pepper flakes
- 1/2 cup dry white wine
- Salt, to taste
- Freshly ground black pepper, to taste
- 1/4 cup fresh parsley, chopped
- Lemon wedges, for serving
Cooking Instructions
- Prepare the Clams: Place the clams in a large bowl and cover them with cold water. Let them soak for about 20 minutes to remove any sand. Drain and rinse the clams under running water, discarding any that remain open when tapped.
- Cook the Spaghetti: In a large pot of salted boiling water, cook the spaghetti until it’s al dente, according to package instructions. Reserve a cup of pasta water, then drain the spaghetti.
- Sauté the Garlic and Red Pepper Flakes: In a large, deep skillet or saucepan, heat the olive oil over medium heat. Add the sliced garlic and red pepper flakes, sautéing until the garlic is fragrant and slightly golden, about 1-2 minutes.
- Add the Clams and Wine: Increase the heat to high and add the clams to the skillet. Pour in the white wine and cover the skillet with a lid. Cook for about 5-7 minutes, shaking the pan occasionally, until the clams have opened. Discard any clams that don’t open.
- Combine with Spaghetti: Add the cooked spaghetti to the skillet with the clams. Toss everything together, adding some reserved pasta water if needed to create a silky sauce. Season with salt and freshly ground black pepper to taste.
- Finish with Parsley: Remove from heat and stir in the chopped parsley. Toss well to combine and serve immediately with lemon wedges on the side.
Extra Tips
When making Spaghetti Alle Vongole, make sure to soak the clams properly as this step is essential for removing sand. Don’t overcook the clams, as they’ll become tough and chewy.
If you’re unable to find fresh clams, high-quality frozen clams can be used as an alternative. Also, be cautious with adding salt, as clams can be naturally salty. Finally, for a more intense flavor, you can add a splash of the clam cooking liquid to the pasta before serving.
Prosciutto and Melon Skewers
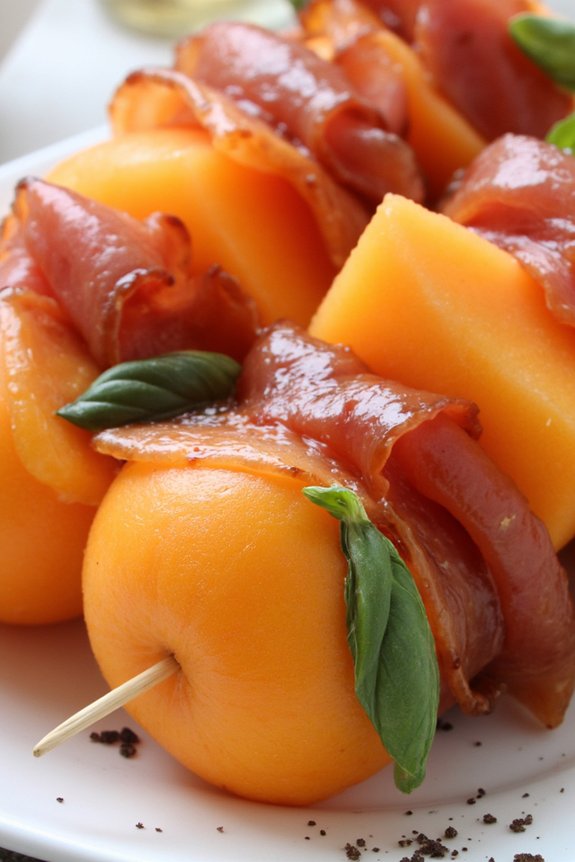
Prosciutto and Melon Skewers are a quintessential Italian summer dish that combines the savory richness of prosciutto with the revitalizing sweetness of ripe melon. This dish is perfect for a light appetizer or a delightful addition to a summer picnic or barbecue.
The simplicity of the ingredients allows the natural flavors to shine, making it a favorite for those who appreciate straightforward yet sophisticated culinary creations. The cool, juicy melon paired with the delicate, salty prosciutto creates a harmonious balance that’s both satisfying and revitalizing.
This recipe isn’t only delicious but also incredibly easy to prepare, making it ideal for those who want to enjoy a taste of Italy without spending hours in the kitchen. With just a few ingredients and minimal effort, you can create a dish that looks elegant and tastes amazing.
The skewers can be assembled in advance and are perfect for entertaining, allowing you to spend more time with your guests and less time worrying about the food. Whether you’re hosting a summer gathering or simply looking for a quick snack, Prosciutto and Melon Skewers are sure to impress.
Ingredients (Serves 4-6)
- 1 ripe cantaloupe melon
- 12 slices of prosciutto
- 1 bunch fresh basil leaves
- 2 tablespoons extra-virgin olive oil
- 1 tablespoon balsamic glaze
- Freshly ground black pepper
- 12 wooden or metal skewers
Instructions
- Prepare the Melon: Start by cutting the cantaloupe in half and removing the seeds. Use a melon baller or a sharp knife to cut the melon into bite-sized cubes or balls, making sure they’re uniform in size for even presentation on the skewers.
- Slice the Prosciutto: If the prosciutto slices are large, cut them in half lengthwise to make them more manageable. Each skewer will require one slice of prosciutto, so be certain you have enough slices for the number of skewers you’re preparing.
- Assemble the Skewers: Take a skewer and thread a piece of melon onto it, followed by a basil leaf and then a folded slice of prosciutto. Repeat this process until the skewer is filled, leaving some space at the end for handling. Continue assembling the remaining skewers in the same manner.
- Drizzle with Olive Oil and Balsamic: Once all the skewers are assembled, place them on a serving platter. Drizzle the extra-virgin olive oil and balsamic glaze over the skewers for added flavor and a beautiful finish.
- Season and Serve: Finish by sprinkling freshly ground black pepper over the skewers. Serve immediately, or refrigerate for up to an hour if preparing in advance. Enjoy the skewers chilled or at room temperature.
Extra Tips
When choosing a melon, look for one that’s fragrant and slightly soft to the touch, as this indicates ripeness. If using wooden skewers, soak them in water for about 30 minutes prior to assembling the skewers to prevent them from burning if you plan to grill them lightly for added flavor.
For a more colorful presentation, consider using a mix of cantaloupe and honeydew melons. Finally, experiment with adding other ingredients like mozzarella balls or cherry tomatoes for an extra burst of flavor and color.
Zucchini Carpaccio
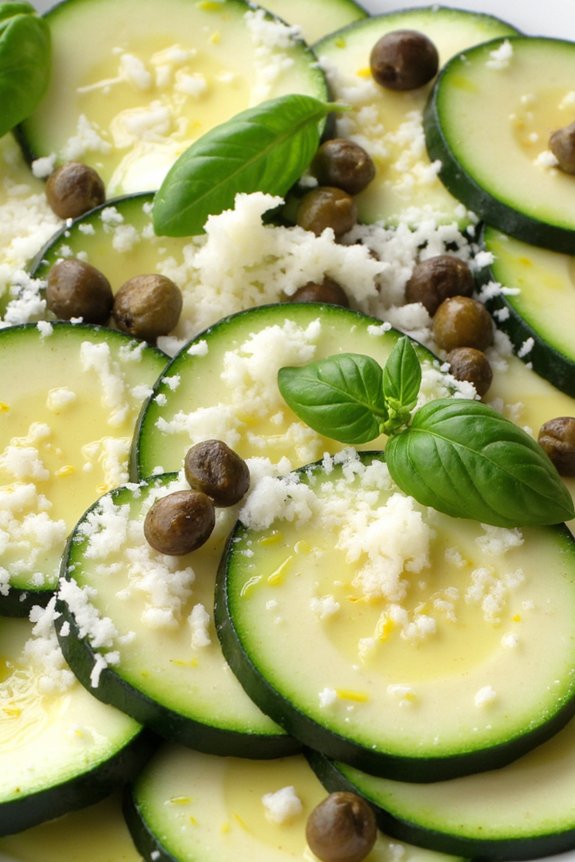
Zucchini Carpaccio is a delightful Italian summer dish that embodies freshness and simplicity. Perfect as an appetizer or a light meal, this dish celebrates the natural flavors of zucchini, enhanced by a bright and zesty dressing. The thinly sliced zucchini acts as a perfect canvas, absorbing the tangy notes of lemon and the aromatic essence of fresh herbs.
The key to a successful Zucchini Carpaccio lies in using the freshest ingredients and slicing the zucchini as thinly as possible. This recipe serves 4-6 people and can be prepared in a matter of minutes, making it an ideal choice for a quick yet elegant dish. The vibrant colors and flavors will surely impress your guests, all while keeping your kitchen time minimal.
Whether you’re hosting a summer gathering or simply looking to enjoy a revitalizing dish, Zucchini Carpaccio is sure to delight your taste buds.
Ingredients:
- 4 medium zucchinis
- 1/4 cup extra-virgin olive oil
- Juice of 1 lemon
- Zest of 1 lemon
- 1/4 cup freshly grated Parmesan cheese
- 2 tablespoons capers, drained
- Salt and freshly ground black pepper, to taste
- 2 tablespoons fresh basil leaves, chopped
- 2 tablespoons fresh mint leaves, chopped
- 1 teaspoon red pepper flakes (optional)
Instructions:
- Prepare the Zucchini: Wash and dry the zucchinis thoroughly. Using a mandoline slicer or a sharp knife, slice the zucchinis into very thin, round slices. Aim for slices that are about 1/8 inch thick for the best texture and flavor absorption.
- Arrange the Zucchini: Lay the zucchini slices in a single layer on a large serving platter or individual plates. Slightly overlap the slices to create a visually appealing pattern and guarantee even dressing distribution.
- Make the Dressing: In a small bowl, whisk together the olive oil, lemon juice, and lemon zest. Season the dressing with salt and freshly ground black pepper to taste. If you like a bit of heat, add the red pepper flakes to the dressing.
- Dress the Zucchini: Drizzle the prepared dressing evenly over the arranged zucchini slices, making sure each piece is lightly coated. This step is essential as it infuses the zucchini with flavor.
- Add Toppings: Sprinkle the grated Parmesan cheese and capers evenly over the zucchini slices. The Parmesan adds a savory depth, while the capers bring a briny contrast to the dish.
- Garnish: Finish by sprinkling the fresh basil and mint leaves over the top. These herbs provide a fragrant and invigorating aroma, complementing the dish’s overall balance.
- Chill and Serve: Allow the Zucchini Carpaccio to sit for at least 10 minutes before serving. This resting period allows the flavors to meld together. Serve chilled or at room temperature.
Extra Tips:
For the best results, choose zucchinis that are firm and free of blemishes. The thinner the slices, the more effectively they’ll absorb the dressing. If a mandoline slicer is unavailable, a vegetable peeler can be used to achieve thin strips.
Adjust the lemon juice and seasonings according to your taste preference, and feel free to experiment with additional toppings such as pine nuts or cherry tomatoes to add extra flavor and texture. Enjoy your Zucchini Carpaccio as a revitalizing start to any summer meal!
Insalata Di Farro With Fresh Herbs
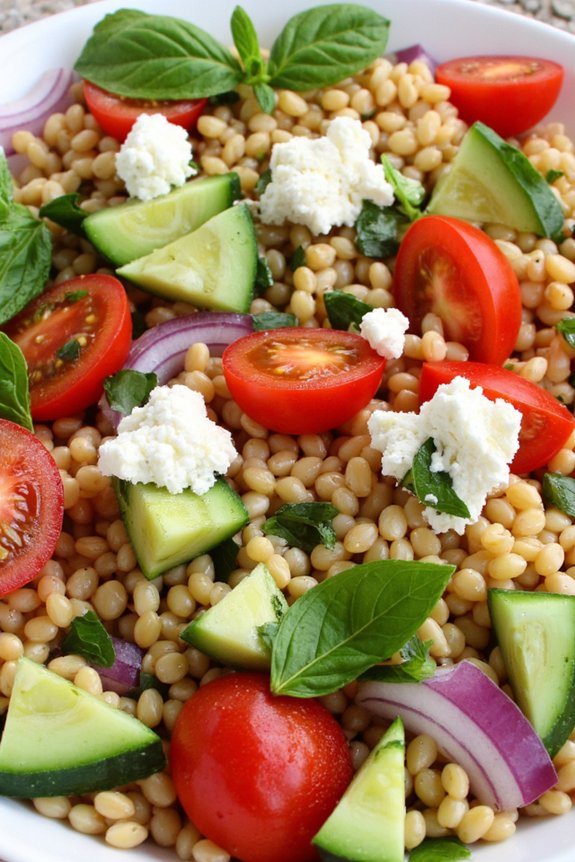
Insalata Di Farro With Fresh Herbs is a delightful Italian summer salad that brings together the nutty flavor of farro with the vibrant freshness of seasonal herbs. This dish is perfect for warm weather gatherings, offering a light yet satisfying option that’s both healthy and delicious.
Farro, an ancient grain, serves as the base of this salad, adding a chewy texture that pairs beautifully with the crispness of fresh vegetables and the aromatic qualities of herbs like basil, parsley, and mint.
This recipe isn’t only visually appealing but also packed with nutrients, making it an ideal choice for a nutritious meal. The combination of farro, fresh herbs, and a simple lemon dressing creates a harmonious blend of flavors that’s sure to impress your family and friends.
Perfect as a side dish or a light main course, Insalata Di Farro With Fresh Herbs is a versatile dish that showcases the best of Italian summer cuisine. This recipe serves 4-6 people.
Ingredients:
- 2 cups farro
- 4 cups water
- Salt to taste
- 1 cup cherry tomatoes, halved
- 1 small cucumber, diced
- 1/2 red onion, finely chopped
- 1/4 cup fresh basil leaves, chopped
- 1/4 cup fresh parsley, chopped
- 1/4 cup fresh mint leaves, chopped
- 1/4 cup extra-virgin olive oil
- 2 tablespoons lemon juice
- Freshly ground black pepper to taste
- 1/2 cup crumbled feta cheese (optional)
Cooking Instructions:
- Cook the Farro: Rinse the farro under cold water. In a medium saucepan, combine the farro with 4 cups of water and a pinch of salt. Bring to a boil over high heat, then reduce the heat to low and let it simmer for about 20-30 minutes or until the farro is tender but still chewy. Drain and let it cool completely.
- Prepare Vegetables and Herbs: While the farro is cooling, prepare the vegetables by halving the cherry tomatoes, dicing the cucumber, and finely chopping the red onion. Chop the fresh basil, parsley, and mint leaves.
- Make the Dressing: In a small bowl, whisk together the extra-virgin olive oil, lemon juice, salt, and freshly ground black pepper. Adjust the seasoning to taste.
- Assemble the Salad: In a large bowl, combine the cooked and cooled farro with the cherry tomatoes, cucumber, red onion, basil, parsley, and mint. Pour the dressing over the salad and toss until everything is evenly coated.
- Add Cheese: If using, gently fold in the crumbled feta cheese.
- Serve: Transfer the salad to a serving dish and garnish with additional herbs if desired. Serve immediately or refrigerate for 30 minutes to allow the flavors to meld.
Extra Tips:
For best results, prepare this salad a few hours before serving to allow the flavors to fully develop.
Feel free to customize the salad by adding other seasonal vegetables such as bell peppers or zucchini. If you prefer a more tangy dressing, increase the amount of lemon juice.
For a vegan option, simply omit the feta cheese. Confirm that the farro is completely cooled before adding the vegetables to prevent them from wilting.
Enjoy this dish as a revitalizing side for grilled meats or as a stand-alone vegetarian meal.
Shrimp and Lemon Risotto
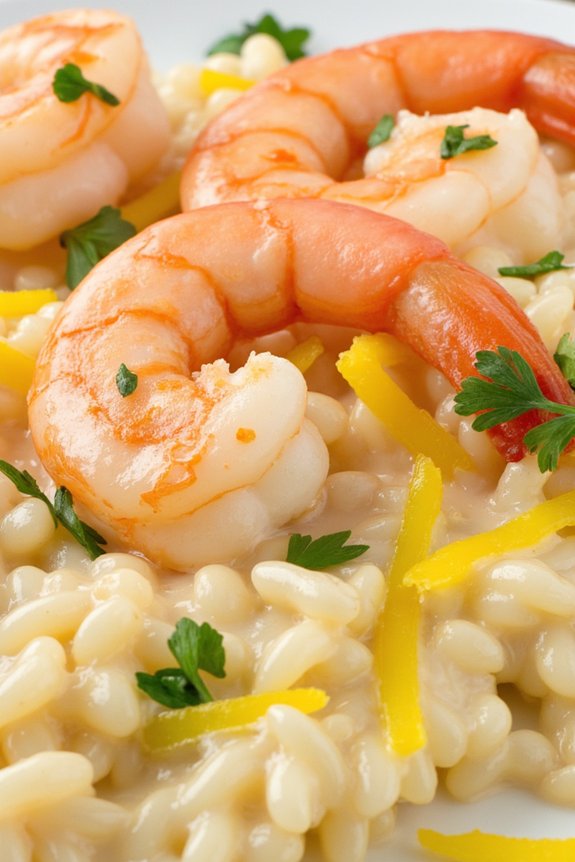
Shrimp and Lemon Risotto is a delightful Italian dish perfect for those warm summer evenings. This creamy risotto is infused with the zesty flavor of lemon and paired with succulent shrimp to create a revitalizing and satisfying meal.
Whether you’re hosting a dinner party or simply enjoying a family meal, this dish is sure to impress with its bright flavors and rich texture. The combination of citrus and seafood is a classic in Italian cuisine, bringing together the best of the coast and the garden in a single, elegant dish.
This recipe serves 4-6 people and requires you to be attentive to the risotto as it cooks, ensuring it reaches the perfect creamy consistency. The key to a great risotto is patience and constant stirring, which helps release the starches from the rice, creating a luscious, creamy texture that’s the hallmark of any good risotto.
The addition of shrimp not only adds protein but also enhances the overall flavor profile, while the lemon uplifts the dish with its invigorating notes.
Ingredients:
- 1 pound large shrimp, peeled and deveined
- 1½ cups Arborio rice
- 1 onion, finely chopped
- 2 garlic cloves, minced
- 1/4 cup dry white wine
- 6 cups chicken or vegetable broth
- 1 lemon, zested and juiced
- 1/2 cup Parmesan cheese, grated
- 3 tablespoons olive oil
- 2 tablespoons butter
- Salt and pepper to taste
- Fresh parsley, chopped, for garnish
Cooking Instructions:
- Prepare the Broth: In a saucepan, bring the chicken or vegetable broth to a simmer. Keep it hot throughout the cooking process, as adding cold broth to the risotto can disrupt the cooking.
- Cook the Shrimp: In a large skillet, heat 1 tablespoon of olive oil over medium heat. Add the shrimp and cook for about 2-3 minutes per side until they’re pink and opaque. Remove from the skillet and set aside.
- Sauté the Aromatics: In the same skillet, add the remaining olive oil and butter. Once the butter melts, add the chopped onion and garlic. Sauté until the onion is translucent and fragrant, about 3-4 minutes.
- Toast the Rice: Add the Arborio rice to the skillet with the onion and garlic. Stir frequently for about 2 minutes until the rice grains are slightly translucent around the edges.
- Deglaze with Wine: Pour in the white wine, stirring constantly until the liquid is absorbed. This step adds depth and flavor to the risotto.
- Cook the Risotto: Begin adding the hot broth one ladleful at a time, stirring frequently. Allow the rice to absorb most of the liquid before adding more. Continue this process until the rice is creamy and tender, about 18-20 minutes.
- Add Lemon and Cheese: Stir in the lemon zest, juice, and Parmesan cheese. Mix well to combine and season with salt and pepper to taste.
- Incorporate the Shrimp: Gently fold the cooked shrimp into the risotto. Allow them to warm through for about 2 minutes.
- Serve: Garnish the risotto with fresh parsley and serve immediately for the best texture and flavor.
Extra Tips:
When making Shrimp and Lemon Risotto, it’s vital to use Arborio rice, as its high starch content gives the dish its signature creamy texture.
Always keep the broth hot, as adding cold broth can shock the rice and hinder proper cooking. Stirring constantly is paramount for releasing the rice’s starches, so don’t skip this step.
Adjust the seasoning at the end, as the Parmesan cheese can add saltiness. Enjoy your risotto fresh and hot, as it tends to lose its texture if left to sit for too long.
Focaccia With Cherry Tomatoes and Olives
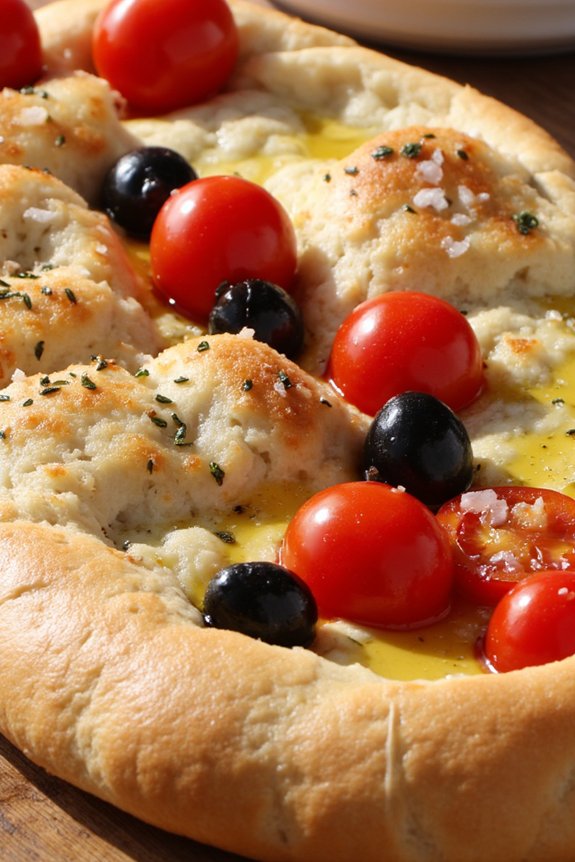
Focaccia with cherry tomatoes and olives is a quintessential Italian favorite that combines the rich flavors of ripe, juicy tomatoes with the briny bite of olives, all on a bed of soft, fluffy bread. This dish is perfect for summer gatherings, as it can be enjoyed fresh out of the oven or at room temperature, making it an ideal accompaniment to a variety of meals or as a stand-alone snack.
The focaccia‘s crispy edges and tender crumb offer a delightful contrast, while the toppings add a burst of flavor and color, reminiscent of the vibrant Italian landscape.
In this recipe, you’ll learn how to make the perfect focaccia that serves 4-6 people, starting from scratch with a simple dough that rises to perfection. The key to a good focaccia lies in the quality of its ingredients, particularly the extra virgin olive oil, which enhances the bread’s texture and flavor.
The cherry tomatoes and olives are arranged on top, creating a visually appealing presentation that’s as delightful to look at as it’s to eat. Whether you’re hosting a dinner party or enjoying a quiet family meal, this focaccia will surely be a crowd-pleaser.
Ingredients:
- 500g all-purpose flour
- 2 teaspoons salt
- 1 teaspoon sugar
- 7g (1 packet) active dry yeast
- 325ml warm water
- 60ml extra virgin olive oil, plus extra for drizzling
- 200g cherry tomatoes, halved
- 100g pitted black olives, sliced
- 1 teaspoon dried oregano
- Sea salt flakes, for sprinkling
Instructions:
- Prepare the Dough: In a large mixing bowl, combine the flour and salt. In a separate bowl, dissolve the sugar and yeast in warm water. Allow it to sit for about 5 minutes until it becomes frothy. Pour the yeast mixture and olive oil into the flour mixture, stirring until a dough begins to form.
- Knead the Dough: Turn the dough out onto a floured surface and knead for about 10 minutes until it becomes smooth and elastic. If the dough is sticky, sprinkle a little more flour as needed.
- First Rise: Place the dough in a lightly oiled bowl, cover it with a damp cloth, and let it rise in a warm place for about 1-2 hours, or until it has doubled in size.
- Prepare the Baking Tray: Preheat your oven to 220°C (428°F). Oil a baking tray generously with olive oil to prevent sticking and to add flavor to the crust.
- Shape the Focaccia: Once the dough has risen, punch it down and transfer it to the prepared baking tray. Stretch and press it out evenly with your fingertips to form a rectangle about 1-2 cm thick.
- Add Toppings: Press the halved cherry tomatoes and sliced olives gently into the dough, distributing them evenly across the surface. Drizzle a bit more olive oil over the top, then sprinkle with dried oregano and sea salt flakes.
- Final Rise: Let the dough rise again for about 20-30 minutes until it puffs up slightly.
- Bake the Focaccia: Place the focaccia in the preheated oven and bake for about 20-25 minutes, or until the edges are golden brown and the top is slightly crisp.
- Cool and Serve: Remove the focaccia from the oven and let it cool slightly on a wire rack. Cut into squares or rectangles and serve warm or at room temperature.
Extra Tips:
For the best results, use high-quality extra virgin olive oil, as it greatly enhances the focaccia’s flavor profile. If you prefer a more rustic look, feel free to add some fresh rosemary sprigs on top before baking.
Additionally, you can experiment with other toppings like caramelized onions or roasted bell peppers to customize the focaccia to your liking. Remember that the dough’s second rise is essential for a light, airy texture, so avoid skipping this step.
Limoncello Sorbet

Indulge in the rejuvenating taste of summer with this delightful Limoncello Sorbet. Perfect for those hot days when you crave something cool and light, this sorbet combines the zesty flavor of lemons with the smooth, sweet, and slightly tangy taste of limoncello.
Whether served as a palate cleanser between courses or as a revitalizing dessert, this sorbet is sure to impress guests at any summer gathering.
Crafting a Limoncello Sorbet isn’t only rewarding but also surprisingly simple. The key to achieving a perfectly smooth texture lies in the right balance of sugar and alcohol, which prevents the sorbet from freezing too hard.
Using fresh lemons is vital to capture the authentic citrus flavor, while the addition of limoncello provides a sophisticated twist. Let’s explore the ingredients and steps to create this sensational treat for 4-6 people.
Ingredients:
- 1 cup of freshly squeezed lemon juice (approximately 6-8 lemons)
- 1 cup of sugar
- 1 cup of water
- 1/2 cup of limoncello
- Zest of 2 lemons
- A pinch of salt
Instructions:
1. Prepare the Lemon Syrup:
Begin by combining the sugar and water in a medium saucepan over medium heat. Stir until the sugar has completely dissolved, creating a simple syrup. Remove from heat and allow it to cool.
2. Juice the Lemons:
While the syrup is cooling, juice the lemons to yield about 1 cup of lemon juice. Strain the juice through a fine-mesh sieve to remove any seeds and pulp for a smooth sorbet texture.
3. Mix the Ingredients:
In a large mixing bowl, combine the cooled simple syrup, lemon juice, lemon zest, limoncello, and a pinch of salt. Stir the mixture thoroughly until all ingredients are well incorporated.
4. Chill the Mixture:
Cover the bowl with plastic wrap and place it in the refrigerator for at least 2 hours, or until thoroughly chilled. This step is pivotal to affirm the sorbet churns properly.
5. Churn the Sorbet:
Once chilled, pour the mixture into an ice cream maker and churn according to the manufacturer’s instructions until it reaches a soft-serve consistency. This usually takes around 20-25 minutes.
6. Freeze the Sorbet:
Transfer the sorbet into a freezer-safe container with a tight-fitting lid. Freeze for at least 4 hours or until firm enough to scoop.
Extra Tips:
For the best flavor, use organic lemons if possible, as they typically have more vibrant zest.
If you don’t have an ice cream maker, you can still enjoy this delicious sorbet by pouring the mixture into a shallow dish and placing it in the freezer. Stir the mixture every 30 minutes with a fork to break up ice crystals, until it reaches a sorbet-like consistency.
Adjust the amount of sugar and limoncello to suit your taste, but remember that sugar and alcohol both lower the freezing point, guaranteeing a smoother texture.