

There’s nothing quite like the joy of hosting during the holiday season, especially when you have a collection of 14 festive Italian recipes ready to impress. I still remember crafting my first classic antipasto platter—it was a standout and set the perfect tone for the evening. From creamy mushroom risotto to traditional lasagna Bolognese, these dishes are all about bringing warmth and happiness. Curious about the rest of the delicious lineup? Let’s explore these delightful recipes that make hosting a breeze.
Classic Italian Antipasto Platter
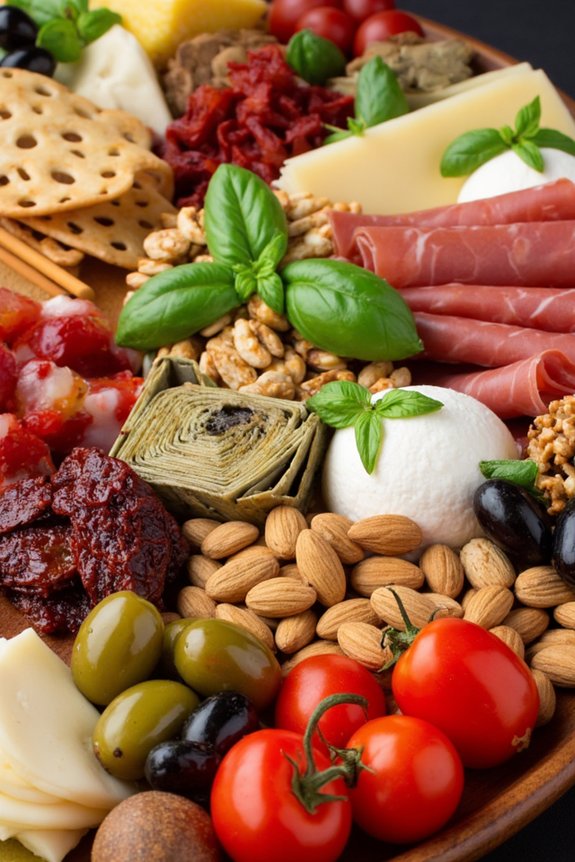
An antipasto platter is the perfect way to start any festive Italian meal, offering a tantalizing array of flavors and textures that set the tone for the courses to follow. This classic Italian antipasto platter isn’t only visually appealing but also a delightful combination of savory, tangy, and sweet elements. It’s designed to be shared among friends and family, making it an ideal centerpiece for any holiday gathering.
With a variety of cured meats, cheeses, marinated vegetables, and other traditional Italian treats, this platter is sure to please a crowd. The essence of a great antipasto platter lies in the quality and variety of its ingredients. Aim to strike a balance between different flavors and textures, incorporating both soft and hard cheeses, as well as spicy and mild meats.
The marinated vegetables add a burst of freshness, while olives and nuts introduce a satisfying crunch. The platter can be customized based on personal preferences, but the key is to offer a diverse selection that complements each other. Here’s how to create the perfect antipasto platter for 4-6 people.
Ingredients (Serving size: 4-6 people):
- 100g Prosciutto
- 100g Salami
- 100g Mortadella
- 150g Mozzarella balls
- 150g Provolone cheese, sliced
- 100g Marinated artichoke hearts
- 100g Roasted red peppers
- 100g Mixed olives (green and black)
- 50g Sun-dried tomatoes
- 50g Marcona almonds
- 50g Walnuts
- 50g Grissini (Italian breadsticks)
- Fresh basil leaves for garnish
Instructions:
- Prepare the Meats: Start by arranging the cured meats on a large platter. Fold the prosciutto slices in half or into quarters for a neat presentation. Roll the salami and mortadella into small cylinders and place them next to the prosciutto.
- Arrange the Cheeses: Slice the provolone cheese into thin pieces and place them near the meats. Add the mozzarella balls, preferably drained of any liquid, next to the other cheeses. For added visual appeal, you can skewer the mozzarella balls with toothpicks and a basil leaf.
- Add Marinated Vegetables: Distribute the marinated artichoke hearts and roasted red peppers around the cheeses and meats. These should be well-drained to avoid adding excess moisture to the platter.
- Include Olives and Nuts: Scatter the mixed olives throughout the platter, ensuring a mix of green and black varieties for color contrast. Add clusters of Marcona almonds and walnuts in the spaces between other ingredients.
- Finish with Extras: Place the sun-dried tomatoes in small piles around the platter. Tuck in some grissini breadsticks, either whole or broken in half, for a crunchy element.
- Garnish and Serve: Finally, garnish the platter with fresh basil leaves for a burst of color and a hint of herbaceous aroma. Serve immediately, allowing guests to mix and match the different components as they please.
Extra Tips:
When assembling the antipasto platter, consider the visual aesthetics as much as the flavors. Use a large wooden board or a colorful platter to enhance the presentation.
Be mindful of the spacing between different ingredients to avoid crowding, which can make it difficult for guests to serve themselves. If preparing in advance, keep the platter covered with plastic wrap in the refrigerator to maintain freshness, but allow it to sit at room temperature for about 20 minutes before serving to enhance the flavors.
Feel free to add or substitute ingredients based on availability and personal taste preferences.
Creamy Mushroom Risotto
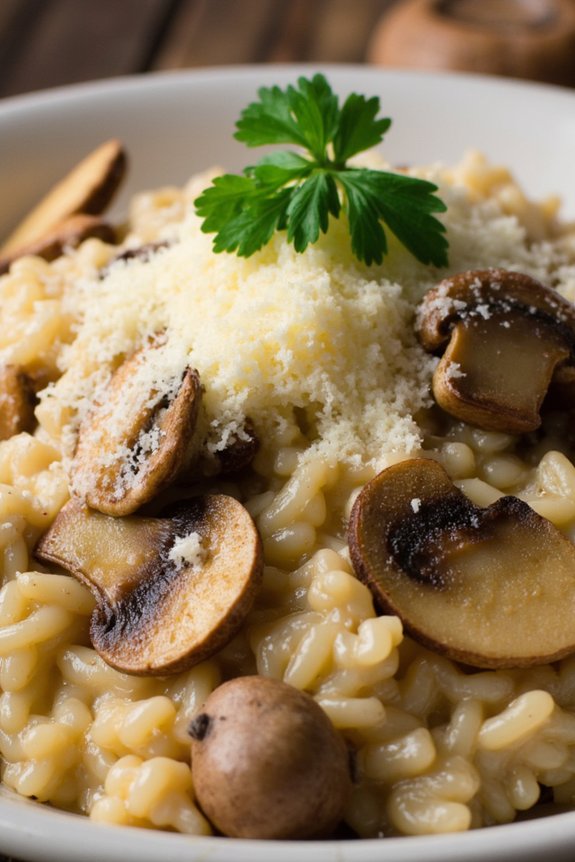
Indulge in the luxurious and comforting flavors of Creamy Mushroom Risotto, a quintessential Italian dish that’s perfect for festive holiday gatherings. This dish combines the earthy richness of mushrooms with the creamy texture of Arborio rice, creating a symphony of flavors that dance on the palate.
The key to a perfect risotto lies in the slow and steady stirring, which releases the starches from the rice, resulting in a velvety texture that’s both satisfying and elegant. Ideal for serving 4-6 people, this recipe embraces the deep umami notes of mushrooms, complemented by the aromatic presence of garlic and onions.
A splash of white wine adds a touch of acidity, balancing the richness of the dish, while a generous grating of Parmesan cheese ties everything together in a harmonious finish. Whether you’re serving it as a main course or a side, this Creamy Mushroom Risotto is sure to be a standout at your holiday table.
Ingredients:
- 2 cups Arborio rice
- 1 pound assorted mushrooms (such as cremini, shiitake, or button), sliced
- 1 medium onion, finely chopped
- 3 cloves garlic, minced
- 1/2 cup dry white wine
- 6 cups chicken or vegetable broth
- 1/2 cup grated Parmesan cheese
- 3 tablespoons olive oil
- 2 tablespoons unsalted butter
- Salt and pepper to taste
- Fresh parsley, chopped, for garnish
Cooking Instructions:
- Prepare the Broth: In a saucepan, warm the chicken or vegetable broth over low heat. Keep it at a gentle simmer throughout the cooking process to guarantee the rice absorbs warm liquid.
- Sauté the Mushrooms: In a large skillet or saucepan, heat 2 tablespoons of olive oil over medium heat. Add the sliced mushrooms and cook, stirring occasionally, until they’re browned and tender, about 8-10 minutes. Season with salt and pepper. Remove the mushrooms from the pan and set aside.
- Cook the Aromatics: In the same pan, add the remaining tablespoon of olive oil and the butter. Once melted, add the chopped onion and garlic. Cook until the onion is translucent and the garlic is fragrant, about 3-4 minutes.
- Toast the Rice: Add the Arborio rice to the pan with the onions and garlic. Stir to coat the rice with the oil, cooking for about 1-2 minutes until the edges of the rice become slightly translucent.
- Deglaze with Wine: Pour in the white wine and stir continuously until it’s fully absorbed by the rice. This step adds a depth of flavor and acidity to balance the dish.
- Add Broth Gradually: Begin adding the warm broth to the rice, one ladleful at a time, stirring frequently. Allow each addition of broth to be absorbed before adding more. Continue this process until the rice is creamy and cooked to a slightly al dente texture, about 18-20 minutes.
- Finish the Dish: Stir in the cooked mushrooms and grated Parmesan cheese. Mix until the cheese is melted and the mushrooms are evenly incorporated. Adjust seasoning with salt and pepper if necessary.
- Garnish and Serve: Remove from heat and let the risotto rest for a couple of minutes. Serve hot, garnished with fresh parsley.
Extra Tips:
To achieve the perfect risotto, patience is key. Stirring the rice constantly helps to release its starch, which contributes to the creamy texture.
If you prefer a richer flavor, you can substitute some of the broth with mushroom stock or add a splash of cream towards the end of cooking. For added depth, consider incorporating dried porcini mushrooms; simply rehydrate them in warm water, chop, and add alongside the fresh mushrooms.
Traditional Lasagna Bolognese

Lasagna Bolognese is a classic Italian dish that brings warmth and comfort to any festive gathering. This rich and hearty meal is made with layers of delicate pasta sheets, a robust Bolognese sauce, creamy béchamel, and a generous amount of cheese. Often considered the ultimate comfort food, Lasagna Bolognese is perfect for holiday celebrations, filling the home with its delicious aromas and satisfying the appetites of family and friends.
The secret to a truly authentic Lasagna Bolognese lies in taking the time to perfect each layer, from simmering the sauce to achieving the ideal consistency for the béchamel.
This recipe serves 4-6 people and requires a bit of patience and love to create a truly memorable dish. To start, it’s essential to gather all the ingredients needed to prepare this delightful meal. Once you have everything you need, you can begin crafting this Italian masterpiece, which promises to be the highlight of any festive occasion.
Ingredients (Serves 4-6):
- 12 lasagna sheets
- 1 tablespoon olive oil
- 1 onion, finely chopped
- 2 cloves garlic, minced
- 1 carrot, finely chopped
- 1 celery stalk, finely chopped
- 500g ground beef
- 1 cup red wine
- 2 cups canned crushed tomatoes
- 2 tablespoons tomato paste
- 1 teaspoon dried oregano
- 1 teaspoon dried basil
- Salt and pepper to taste
- 3 cups milk
- 3 tablespoons butter
- 3 tablespoons all-purpose flour
- Nutmeg to taste
- 2 cups grated Parmesan cheese
- 2 cups shredded mozzarella cheese
Cooking Instructions:
- Prepare the Bolognese Sauce: Heat the olive oil in a large skillet over medium heat. Add the chopped onion, garlic, carrot, and celery, and sauté until the vegetables are soft, about 5 minutes. Add the ground beef and cook until browned, breaking it apart with a spoon.
- Simmer the Sauce: Pour in the red wine and let it simmer for about 2 minutes until it reduces slightly. Stir in the crushed tomatoes, tomato paste, oregano, and basil. Season with salt and pepper. Reduce the heat to low and let the sauce simmer for at least 30 minutes, stirring occasionally to develop the flavors.
- Prepare the Béchamel Sauce: In a separate saucepan, melt the butter over medium heat. Whisk in the flour and cook for 1 minute. Gradually add the milk, whisking constantly to prevent lumps. Continue to cook and stir until the sauce thickens. Season with a pinch of nutmeg, salt, and pepper.
- Assemble the Lasagna: Preheat the oven to 180°C (350°F). In a large baking dish, spread a thin layer of Bolognese sauce. Top with a layer of lasagna sheets, then a layer of béchamel sauce. Sprinkle with Parmesan cheese. Repeat the layering process, finishing with a layer of béchamel sauce topped with mozzarella cheese.
- Bake the Lasagna: Cover the baking dish with aluminum foil and bake for 25 minutes. Remove the foil and bake for an additional 15 minutes, or until the cheese is golden and bubbly.
- Rest and Serve: Allow the lasagna to rest for about 10 minutes before slicing. This gives the layers time to set, making it easier to serve.
Extra Tips: To enhance the flavor of your Lasagna Bolognese, consider preparing the Bolognese sauce a day in advance. This allows the flavors to meld together beautifully.
If you prefer a richer béchamel, substitute some of the milk with cream. Additionally, using fresh lasagna sheets can greatly improve the texture and taste of the final dish. Remember to season each layer as you assemble the lasagna for a perfectly balanced flavor throughout.
Caprese Salad With a Twist
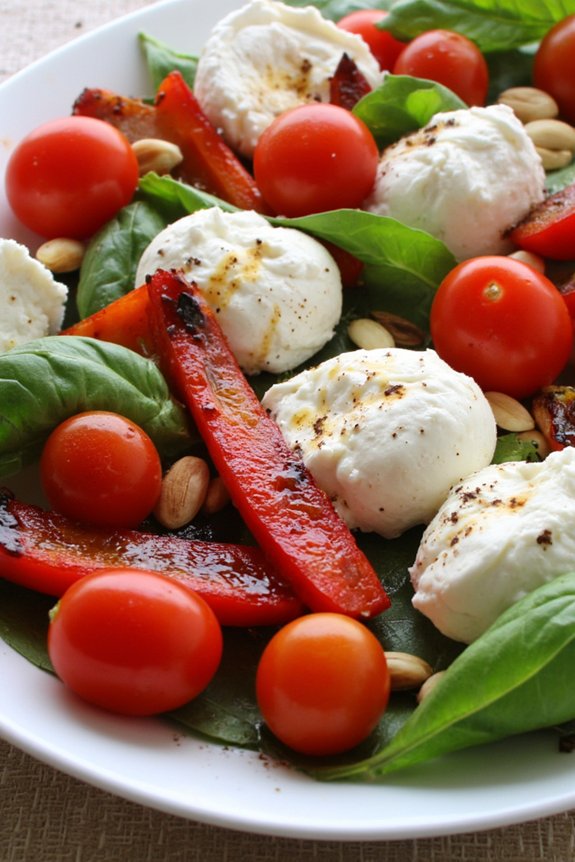
The classic Caprese salad is a staple in Italian cuisine, known for its simplicity and fresh flavors. This festive version of Caprese Salad With a Twist takes the traditional ingredients and elevates them with a few delightful additions that make it perfect for holidays or special gatherings.
While it maintains the essence of the original recipe, this variation introduces some unexpected elements that lend a richer taste and a burst of color, making it a standout dish on your holiday table.
In this recipe, we incorporate ripe, juicy cherry tomatoes, creamy mozzarella cheese, and fragrant basil, but we add a layer of roasted red peppers for a smoky depth and a drizzle of balsamic reduction to enhance the flavors with a sweet and tangy finish.
The salad is garnished with a sprinkle of toasted pine nuts for a hint of crunch and a dash of sea salt to bring all the flavors together. This Caprese Salad With a Twist isn’t only visually appealing but also a delightful explosion of taste, perfect for serving 4-6 people.
Ingredients:
- 2 cups cherry tomatoes, halved
- 12 ounces fresh mozzarella balls (bocconcini), halved
- 1 cup roasted red peppers, sliced into strips
- 1 cup fresh basil leaves
- 3 tablespoons extra-virgin olive oil
- 2 tablespoons balsamic reduction
- ¼ cup toasted pine nuts
- Sea salt, to taste
- Freshly ground black pepper, to taste
Instructions:
- Prepare the Ingredients: Start by washing and halving the cherry tomatoes and mozzarella balls. Slice the roasted red peppers into thin strips and set aside. Rinse the basil leaves under cold water and pat them dry with a paper towel.
- Assemble the Salad: In a large serving platter or bowl, arrange the halved cherry tomatoes, mozzarella balls, and roasted red pepper strips. Scatter the fresh basil leaves over the top.
- Dress the Salad: Drizzle the extra-virgin olive oil evenly over the salad ingredients. Follow with the balsamic reduction, ensuring it’s evenly distributed for a balanced flavor in each bite.
- Add the Finishing Touches: Sprinkle the toasted pine nuts over the salad for added texture and a nutty flavor. Season the salad with sea salt and freshly ground black pepper to taste.
- Serve: Toss the salad gently to combine all ingredients and serve immediately for the best taste.
Extra Tips:
To elevate the flavors of this dish, consider using high-quality extra-virgin olive oil and a well-aged balsamic reduction for the best results.
If you prefer a more intense flavor, marinate the mozzarella balls in olive oil, salt, and pepper for an hour before assembling the salad. For added color, feel free to mix in yellow cherry tomatoes.
Toast the pine nuts carefully, as they can burn quickly; a light golden color is perfect. This salad is best served fresh, but if needed, it can be prepared a few hours in advance and kept in the refrigerator until ready to serve.
Savory Stuffed Shells With Ricotta and Spinach
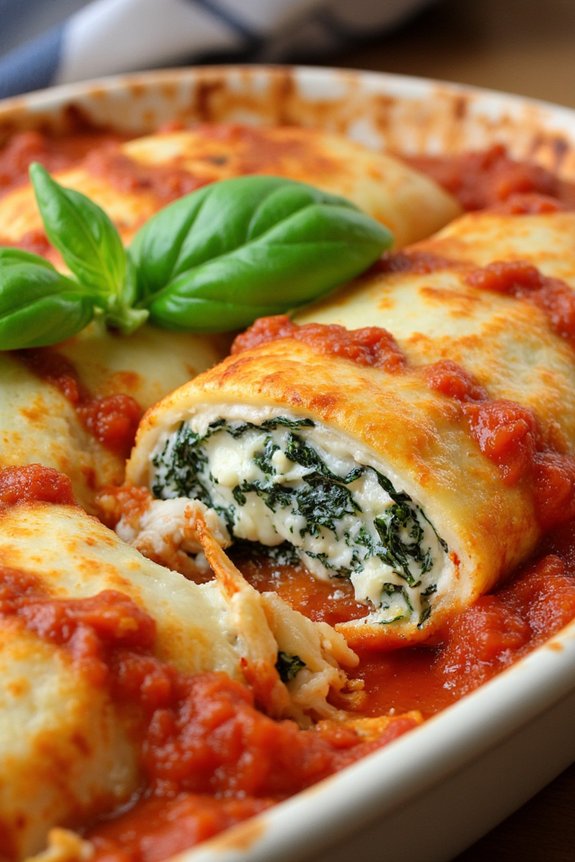
Savory Stuffed Shells with Ricotta and Spinach is a delightful Italian classic perfect for a festive holiday gathering. This dish combines the creamy richness of ricotta cheese with the earthy flavors of spinach, all encased in tender pasta shells.
It’s a comforting meal that can be enjoyed by vegetarians and meat-lovers alike, making it an excellent addition to your holiday menu. The stuffed shells are smothered in marinara sauce and topped with a generous sprinkle of mozzarella, resulting in a bubbly, golden-brown finish that’s as pleasing to the eyes as it’s to the palate.
This recipe is designed to serve 4-6 people, making it ideal for a small dinner party or a cozy family meal. It’s a relatively simple dish to prepare, yet it delivers a sophisticated taste that will leave your guests raving. By preparing and assembling the stuffed shells in advance, you can spend more time with your loved ones and less time in the kitchen on the day of your celebration.
Let’s plunge into the ingredients and steps needed to create this festive Italian treat.
Ingredients (Serves 4-6):
- 20-24 jumbo pasta shells
- 2 cups ricotta cheese
- 1 cup cooked spinach, chopped and drained
- 1/2 cup grated Parmesan cheese
- 1 large egg
- 2 cups marinara sauce
- 1 1/2 cups shredded mozzarella cheese
- 1 tablespoon olive oil
- 2 cloves garlic, minced
- 1 teaspoon dried oregano
- 1 teaspoon salt
- 1/2 teaspoon black pepper
- Fresh basil leaves for garnish (optional)
Instructions:
- Preheat the oven: Start by preheating your oven to 375°F (190°C) to guarantee it’s ready for baking once your dish is assembled.
- Cook the pasta shells: Bring a large pot of salted water to a boil. Add the jumbo pasta shells and cook until al dente, following the package instructions. Once cooked, drain the shells and rinse them under cold water to prevent them from sticking together.
- Prepare the filling: In a large mixing bowl, combine the ricotta cheese, chopped spinach, Parmesan cheese, egg, minced garlic, dried oregano, salt, and black pepper. Stir the mixture until all the ingredients are well combined.
- Stuff the shells: Carefully fill each cooked pasta shell with a generous spoonful of the ricotta and spinach mixture. Be gentle to avoid tearing the shells.
- Assemble the dish: In a large baking dish, spread a thin layer of marinara sauce on the bottom. Arrange the stuffed shells in a single layer over the sauce. Pour the remaining marinara sauce over the shells, guaranteeing they’re well covered.
- Add the cheese topping: Sprinkle the shredded mozzarella cheese evenly over the stuffed shells and sauce.
- Bake the shells: Cover the baking dish with aluminum foil and bake in the preheated oven for 25 minutes. Remove the foil and bake for an additional 10-15 minutes, or until the cheese is bubbly and golden brown.
- Serve and garnish: Once baked, remove the dish from the oven and let it cool for a few minutes. Garnish with fresh basil leaves if desired, and serve warm.
Extra Tips: For best results, guarantee that the spinach is thoroughly drained to prevent excess moisture from making the filling too watery. You can prepare the stuffed shells ahead of time and refrigerate them for up to a day before baking, which makes this dish a convenient option for holiday planning.
Feel free to add a bit of nutmeg to the ricotta mixture for an extra layer of flavor, and consider pairing the dish with a crisp green salad and crusty bread for a complete meal. Enjoy your festive Italian feast!
Homemade Gnocchi With Sage Butter
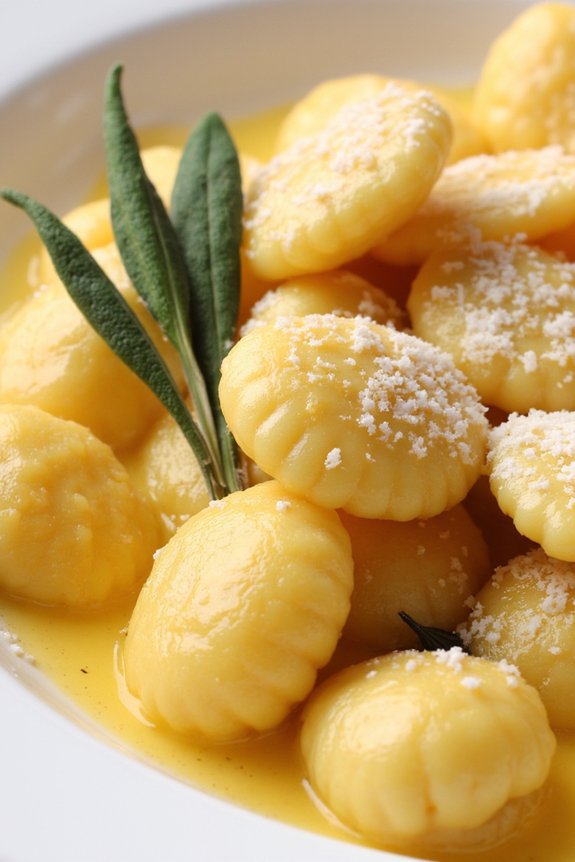
Homemade Gnocchi with Sage Butter is a classic Italian dish that brings warmth and comfort to any holiday table. This dish combines soft, pillowy gnocchi with a rich and aromatic sage butter sauce, creating a perfect balance of flavors. Making gnocchi from scratch may seem challenging, but with a little patience and practice, you’ll find that it’s a rewarding experience. The key to perfect gnocchi is using the right type of potatoes and handling the dough gently to keep it light and fluffy.
The sage butter sauce is a simple yet luxurious accompaniment that enhances the delicate flavor of the gnocchi. Fresh sage leaves are gently fried in butter until crispy, infusing the butter with their earthy aroma. A sprinkle of Parmesan cheese ties everything together, adding a savory depth to the dish. Whether you’re hosting a festive gathering or simply craving comfort food, this Homemade Gnocchi with Sage Butter will surely impress your guests and satisfy your taste buds.
Ingredients for 4-6 servings:
- 2 pounds russet potatoes
- 1 large egg
- 1 cup all-purpose flour
- 1 teaspoon salt
- 6 tablespoons unsalted butter
- 12 fresh sage leaves
- 1/2 cup grated Parmesan cheese
Cooking Instructions:
- Prepare the Potatoes: Begin by boiling the potatoes in their skins until fork-tender, approximately 20-25 minutes. Drain and allow them to cool slightly. Peel the potatoes while they’re still warm and pass them through a potato ricer or mash them until smooth.
- Make the Gnocchi Dough: Spread the mashed potatoes on a clean surface and let them cool completely. Make a well in the center, add the egg, flour, and salt. Gently mix the ingredients together, gradually incorporating the flour until a soft dough forms. Avoid overworking the dough to prevent it from becoming tough.
- Shape the Gnocchi: Divide the dough into four portions. Roll each portion into a long rope, about 3/4 inch thick. Cut the rope into 1-inch pieces. To create the classic ridged pattern, gently roll each piece over the tines of a fork or a gnocchi board.
- Cook the Gnocchi: Bring a large pot of salted water to a boil. Add the gnocchi in batches, cooking them until they float to the surface, usually about 2-3 minutes. Remove with a slotted spoon and transfer to a warm plate.
- Prepare the Sage Butter Sauce: In a large skillet, melt the butter over medium heat. Add the sage leaves and cook until the butter is golden brown and the sage is crispy, about 2-3 minutes. Be careful not to burn the butter.
- Combine and Serve: Add the cooked gnocchi to the skillet with the sage butter. Toss gently to coat the gnocchi in the sauce. Serve immediately, sprinkled with grated Parmesan cheese.
Extra Tips:
When making gnocchi, it’s important to use a starchy potato like russet, as they’ve less moisture and help create a lighter dough. Confirm that the potatoes are completely cooled before adding the egg and flour to prevent the dough from becoming sticky.
If the dough feels too sticky, lightly dust it with more flour as needed. Also, be cautious when browning the butter; it should be golden brown with a nutty aroma, but not burned.
Finally, if you’re making this dish for a large group, you can freeze the uncooked gnocchi on a baking sheet and store them in a freezer bag for up to a month. Cook them directly from frozen, allowing a few extra minutes of cooking time.
Porchetta With Herb and Garlic

Porchetta With Herb and Garlic is an iconic Italian dish that’s perfect for festive gatherings. This succulent and aromatic roast is traditionally made with pork belly, which is seasoned with a flavorful mixture of herbs, garlic, and spices. The outside is crispy and golden, while the inside remains tender and juicy, making it an irresistible centerpiece for any holiday feast. The preparation of this dish requires some time and patience, but the end result is well worth the effort.
Originating from central Italy, Porchetta is often served at celebrations and special occasions. The key to its deliciousness lies in the blend of herbs and garlic that infuse the meat with rich flavors. For this recipe, the pork is rolled and tied to guarantee even cooking and a beautiful presentation. Whether you’re serving it with roasted vegetables, crusty bread, or a fresh salad, Porchetta With Herb and Garlic will impress your guests and become a beloved holiday tradition.
Ingredients for 4-6 servings:
- 3 pounds pork belly, skin on
- 1 tablespoon fennel seeds
- 1 tablespoon black peppercorns
- 1 tablespoon kosher salt
- 6 cloves garlic, minced
- 2 tablespoons fresh rosemary, chopped
- 2 tablespoons fresh sage, chopped
- 2 tablespoons fresh thyme, chopped
- Zest of 1 lemon
- Olive oil
Cooking Instructions:
- Prepare the Pork Belly: Lay the pork belly skin-side down on a cutting board. Score the meat in a crisscross pattern, being careful not to cut through the skin, to help the flavors penetrate and the fat render during cooking.
- Make the Herb Mixture: In a mortar and pestle, crush the fennel seeds and black peppercorns. Mix them with kosher salt, minced garlic, rosemary, sage, thyme, and lemon zest. Drizzle olive oil over the mixture and combine until you have a paste-like consistency.
- Season the Pork Belly: Rub the herb and garlic mixture thoroughly over the scored side of the pork belly, pressing it into the cuts. Roll the pork belly tightly, skin-side out, and tie it securely with kitchen twine at 1-inch intervals.
- Refrigerate: Place the rolled pork belly on a tray and refrigerate, uncovered, for at least 12 hours or overnight. This helps the flavors to develop and the skin to dry out, guaranteeing a crispy finish.
- Preheat the Oven: Preheat your oven to 325°F (165°C). Allow the pork to come to room temperature while the oven heats up.
- Roast the Porchetta: Place the rolled pork belly on a roasting rack set in a baking pan. Roast in the preheated oven for about 2 to 2.5 hours, or until the internal temperature reaches 160°F (71°C).
- Crisp the Skin: Increase the oven temperature to 450°F (230°C) and continue to roast for another 20-30 minutes, or until the skin is crispy and golden brown.
- Rest and Serve: Remove the Porchetta from the oven and let it rest for at least 15 minutes before slicing. This allows the juices to redistribute, resulting in a more tender and juicy roast.
Extra Tips:
For the crispiest skin, verify the pork belly is as dry as possible before seasoning it. You can also prick the skin lightly with a fork to help the fat escape and create a crackling effect.
When tying the pork belly, make sure the roll is uniform in thickness for even cooking. Leftovers can be sliced thinly and used in sandwiches or salads for a delicious post-holiday meal.
Enjoy your Porchetta With Herb and Garlic as a centerpiece for your festive celebrations!
Zuppa Toscana: Italian Sausage and Kale Soup

Zuppa Toscana is a comforting and hearty Italian soup that brings together the rich flavors of Italian sausage and the earthy taste of kale. This dish is perfect for warming up during the festive holiday season and is sure to be a hit with family and friends. The creamy broth, infused with garlic and spices, complements the savory sausage and tender kale, creating a delicious balance of flavors.
Originating from Tuscany, Italy, this soup has gained popularity worldwide for its satisfying and soul-warming qualities.
Preparing Zuppa Toscana is straightforward, making it an ideal choice for both novice and experienced cooks. The combination of ingredients creates a well-rounded meal that can be enjoyed as a starter or a main course. Typically served with a side of crusty bread, this soup is both filling and nutritious. The following recipe is designed to serve 4-6 people, providing enough for a generous meal or leftovers to enjoy the next day.
Ingredients for 4-6 Servings:
- 1 lb Italian sausage (mild or spicy)
- 1 tbsp olive oil
- 1 onion, diced
- 3 cloves garlic, minced
- 4 cups chicken broth
- 3 cups water
- 4 large russet potatoes, sliced thinly
- 1 bunch kale, stems removed and leaves chopped
- 1 cup heavy cream
- Salt and pepper to taste
- Red pepper flakes (optional)
Cooking Instructions:
- Prepare the Sausage: In a large pot, heat the olive oil over medium heat. Add the Italian sausage, breaking it into small pieces with a spoon. Cook until the sausage is browned and cooked through. Remove the sausage from the pot and set it aside, leaving the drippings in the pot.
- Sauté the Aromatics: In the same pot, add the diced onion and minced garlic. Sauté for about 3-4 minutes until the onion becomes translucent and fragrant.
- Cook the Potatoes: Pour the chicken broth and water into the pot with the sautéed onions and garlic. Add the sliced potatoes and bring the mixture to a boil. Reduce the heat to a simmer and cook until the potatoes are tender, about 10-15 minutes.
- Add the Kale and Sausage: Once the potatoes are done, add the chopped kale and cooked sausage back into the pot. Stir well and let it simmer for another 5 minutes until the kale is wilted.
- Finish with Cream: Stir in the heavy cream and season the soup with salt, pepper, and red pepper flakes if desired. Allow the soup to heat through for a few more minutes.
- Serve: Ladle the soup into bowls and serve hot with crusty bread on the side.
Extra Tips:
For an extra layer of flavor, consider adding a splash of white wine during the sautéing of the onions and garlic. If you prefer a thicker soup, mash some of the potatoes against the side of the pot before adding the kale.
The type of kale you use can slightly alter the texture; Tuscan kale or Lacinato kale is often recommended for its tender leaves. Adjust the seasoning to your liking, and feel free to experiment with different herbs such as thyme or rosemary for additional depth of flavor.
Enjoy your festive Zuppa Toscana with a sprinkle of freshly grated Parmesan cheese for an added Italian touch.
Seafood Cioppino Stew
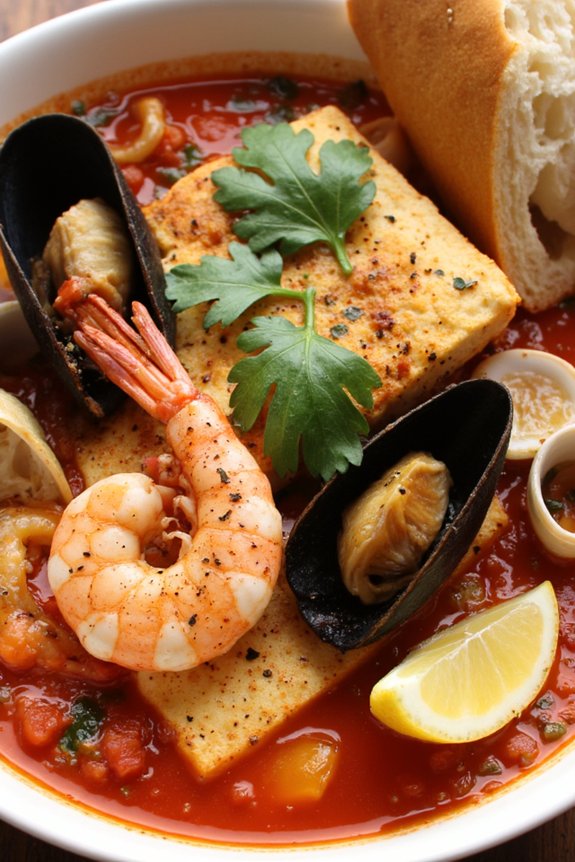
Seafood Cioppino Stew is a classic Italian-American dish that brings the flavors of the sea to your holiday table. Originating from the Italian immigrants in San Francisco, this hearty stew is a celebration of fresh seafood, simmered in a rich tomato and wine broth that warms the soul.
The beauty of Cioppino lies in its versatility, allowing you to use a variety of seafood based on availability and personal preference. It’s perfect for a festive gathering, offering an impressive and flavorful centerpiece that’s sure to delight your guests.
This stew is ideal for a cozy holiday meal, providing a delightful contrast to the heavier, more traditional holiday dishes. It’s typically served with crusty bread, which is perfect for soaking up the flavorful broth. The combination of clams, mussels, shrimp, and fish guarantees every bite is a succulent taste of the ocean.
This recipe serves 4-6 people, making it an excellent choice for an intimate dinner party or a festive family meal. Gather your freshest seafood, and let’s plunge into creating this delicious Seafood Cioppino Stew.
Ingredients for 4-6 servings:
- 1/4 cup olive oil
- 1 large onion, chopped
- 4 cloves garlic, minced
- 1 teaspoon red pepper flakes
- 1 large fennel bulb, thinly sliced
- 1/2 cup dry white wine
- 1 can (28 ounces) crushed tomatoes
- 2 cups fish stock or clam juice
- 1 cup water
- 1 bay leaf
- 1 teaspoon dried oregano
- 1 teaspoon dried thyme
- Salt and freshly ground black pepper to taste
- 1 pound firm white fish (such as halibut or cod), cut into 2-inch pieces
- 1 pound mussels, scrubbed and debearded
- 1 pound clams, scrubbed
- 1 pound large shrimp, peeled and deveined
- 1/2 pound calamari, cleaned and sliced into rings
- 1/4 cup fresh parsley, chopped
- Lemon wedges for serving
Cooking Instructions:
- Prepare the Aromatics: In a large pot, heat the olive oil over medium heat. Add the chopped onion and cook until translucent, about 5 minutes. Stir in the minced garlic, red pepper flakes, and sliced fennel, cooking for an additional 2-3 minutes until the fennel softens slightly.
- Build the Broth: Pour in the white wine, scraping the bottom of the pot to deglaze any browned bits. Allow the wine to reduce by half, about 2 minutes. Add the crushed tomatoes, fish stock, water, bay leaf, oregano, thyme, salt, and black pepper. Bring the mixture to a simmer and let it cook for 20 minutes, allowing the flavors to meld.
- Cook the Seafood: Add the fish pieces to the simmering broth and cook for 5 minutes. Then, add the mussels and clams, covering the pot. Cook until the shells begin to open, about 5-7 minutes. Finally, add the shrimp and calamari, cooking until the shrimp are pink and opaque, and the calamari is tender, approximately 3-4 minutes.
- Finish and Serve: Discard any unopened mussels or clams. Stir in the fresh parsley for a burst of color and freshness. Taste and adjust seasoning with salt and pepper, if necessary. Serve the stew hot with lemon wedges and crusty bread for dipping.
Extra Tips:
When cooking Seafood Cioppino Stew, freshness is key. Always select the freshest seafood available to guarantee the best flavor and texture. If you have access to a local fish market, that’s ideal.
It’s also important to clean the mussels and clams thoroughly, scrubbing their shells and removing beards to avoid any grit in the stew. If you can’t find specific types of seafood, feel free to substitute with what’s available, such as crab legs or scallops.
Finally, remember that the stew can be made a few hours ahead of time, but add the seafood just before serving to prevent overcooking. Enjoy this delightful dish with a glass of the same white wine used in the recipe for the perfect pairing.
Tuscan Roast Lamb With Rosemary
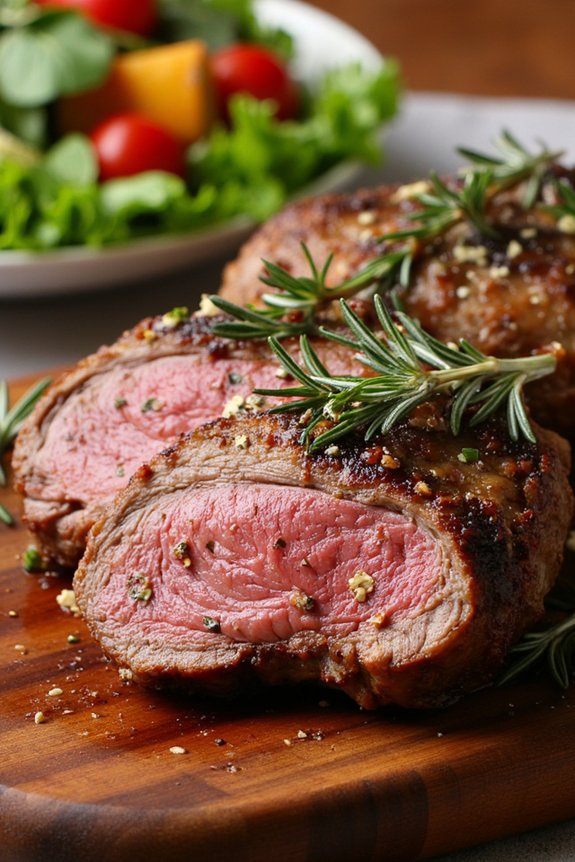
Tuscan Roast Lamb With Rosemary is a classic Italian dish that embodies the rustic flavors and aromatic herbs characteristic of the Tuscan region. This dish is perfect for a festive holiday meal, offering a succulent and tender lamb roast infused with the earthy and fragrant notes of rosemary. The lamb is slow-roasted to perfection, allowing the flavors to meld and intensify, resulting in a delightful centerpiece for any special occasion.
Preparing a Tuscan Roast Lamb With Rosemary isn’t only an opportunity to enjoy a delicious dish, but it’s also a chance to experience the culinary traditions of Tuscany. The use of fresh rosemary, garlic, and olive oil highlights the simplicity and elegance of Italian cooking. This recipe serves 4-6 people, making it ideal for family gatherings or holiday celebrations.
Ingredients (serves 4-6):
- 1 leg of lamb (about 4-5 pounds)
- 6 cloves garlic, minced
- 1/4 cup fresh rosemary leaves, chopped
- 1/4 cup olive oil
- Salt and freshly ground black pepper to taste
- 1/2 cup white wine
- 1 cup chicken or vegetable stock
- 2 lemons, zested and juiced
Cooking Instructions:
- Preparation of Marinade: In a small bowl, combine the minced garlic, chopped rosemary, olive oil, lemon zest, lemon juice, salt, and pepper. This aromatic mixture will serve as the marinade for the lamb, infusing it with flavor.
- Marinating the Lamb: Place the leg of lamb in a large roasting dish. Rub the marinade all over the lamb, ensuring it’s evenly coated. Cover the dish with plastic wrap or foil and refrigerate for at least 2 hours, preferably overnight, to enhance the flavor.
- Preheat the Oven: When ready to cook, preheat your oven to 350°F (175°C). Remove the lamb from the refrigerator and let it sit at room temperature for about 30 minutes.
- Roasting the Lamb: Uncover the lamb and pour the white wine and chicken stock into the bottom of the roasting dish. This liquid will keep the lamb moist during cooking and create a flavorful base for the sauce. Roast in the preheated oven for about 1 1/2 to 2 hours, or until the internal temperature reaches 145°F (63°C) for medium-rare.
- Resting the Lamb: Remove the lamb from the oven and let it rest for at least 15 minutes. This resting period allows the juices to redistribute throughout the meat, ensuring tenderness and flavor.
- Serving: Carve the lamb into slices and drizzle with the pan juices. The lamb can be served with roasted vegetables or a fresh salad for a complete meal.
Extra Tips:
For best results, choose a high-quality leg of lamb, preferably one with a good amount of marbling for added flavor and tenderness. If you prefer a stronger rosemary flavor, you can add additional sprigs of rosemary to the roasting pan.
Adjust the seasoning to your taste, and remember that the resting time is essential for a juicy lamb. If you like your lamb well-done, increase the roasting time accordingly, but be mindful not to overcook it, as this can result in a tougher texture.
Pesto Pasta With Sun-Dried Tomatoes
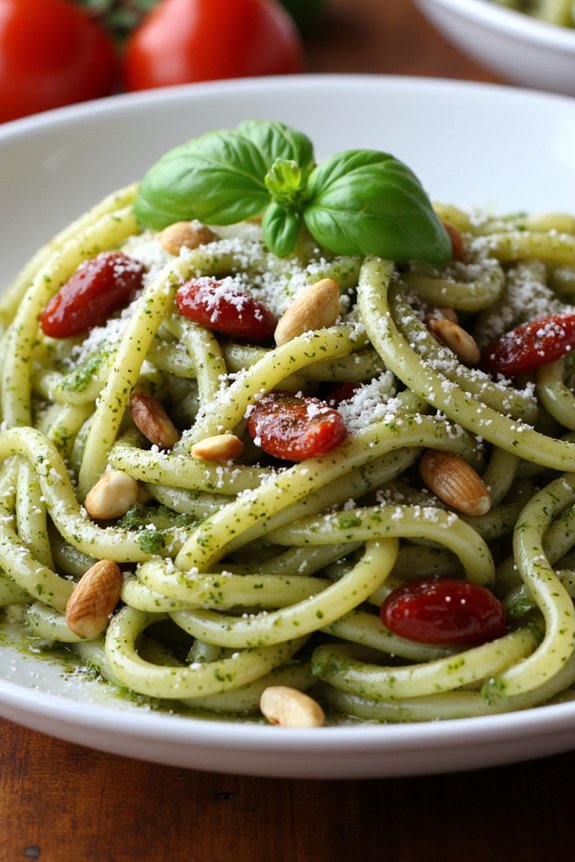
Pesto Pasta With Sun-Dried Tomatoes is a delightful Italian dish that brings the rich flavors of the Mediterranean to your holiday table. This dish is perfect for the festive season as it combines the vibrant taste of basil pesto with the sweet and tangy notes of sun-dried tomatoes. The addition of parmesan cheese and toasted pine nuts elevates the dish, making it a crowd-pleaser that’s both simple to prepare and irresistibly delicious.
Whether you’re serving it as a main course or a side dish, this Pesto Pasta With Sun-Dried Tomatoes is sure to impress your guests and leave them asking for seconds.
The beauty of this recipe lies in its simplicity and the freshness of its ingredients. By using quality pesto, sun-dried tomatoes, and a good brand of pasta, you’re guaranteed a dish full of flavor and texture. This recipe is designed to serve 4-6 people, making it an ideal choice for family gatherings or small holiday parties.
The combination of pasta, pesto, and sun-dried tomatoes creates a perfect harmony of flavors that’s both comforting and satisfying. With just a few steps, you can prepare a dish that not only looks beautiful on the table but also tastes incredible.
Ingredients (serves 4-6):
- 500 grams of your favorite pasta (such as penne or fusilli)
- 1 cup of basil pesto
- 1 cup of sun-dried tomatoes, drained and chopped
- 1/2 cup of grated parmesan cheese
- 1/4 cup of toasted pine nuts
- 2 tablespoons of olive oil
- Salt and pepper to taste
- Fresh basil leaves for garnish
Instructions:
- Cook the Pasta: Begin by bringing a large pot of salted water to a boil. Add the pasta and cook according to package instructions until al dente. Once cooked, drain the pasta and reserve about 1/2 cup of the pasta cooking water.
- Prepare the Sun-Dried Tomatoes: While the pasta is cooking, heat about 2 tablespoons of olive oil in a skillet over medium heat. Add the chopped sun-dried tomatoes and sauté for 2-3 minutes until they’re softened.
- Combine Pasta and Pesto: In a large mixing bowl, combine the cooked pasta with the basil pesto. Add the reserved pasta cooking water, a little at a time, to help the pesto coat the pasta evenly.
- Add Sun-Dried Tomatoes and Parmesan: Stir in the sautéed sun-dried tomatoes and half of the grated parmesan cheese. Mix well to ascertain all ingredients are evenly distributed.
- Garnish and Serve: Transfer the pasta to a serving dish and sprinkle with the remaining parmesan cheese and toasted pine nuts. Garnish with fresh basil leaves and a drizzle of olive oil. Serve immediately and enjoy the vibrant flavors of this festive dish.
Extra Tips:
For the best results, use high-quality ingredients, especially when it comes to the pesto and parmesan cheese. If you want to make your own pesto, blend fresh basil leaves, garlic, pine nuts, and parmesan cheese with olive oil until smooth.
For added flavor, consider including a dash of red pepper flakes for a subtle kick. If you prefer a creamier texture, you can stir in a tablespoon of mascarpone or cream cheese with the pesto. Finally, make sure to taste and adjust the seasoning before serving to guarantee that the dish is perfectly balanced.
Traditional Panettone Bread
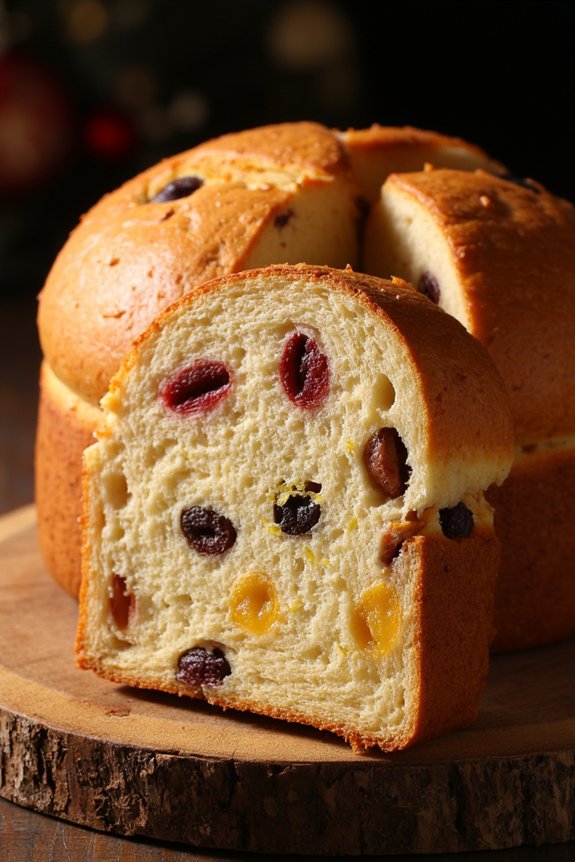
Panettone is a classic Italian Christmas bread that’s rich, sweet, and studded with candied fruits and raisins. Originating from Milan, this festive bread has become a beloved holiday treat across Italy and around the world. With its tall, dome-shaped appearance and fluffy texture, Panettone is often enjoyed during the holiday season as a dessert or with breakfast.
Making traditional Panettone from scratch can be a rewarding experience, as it involves an intricate process that requires patience and precision. The end result is a beautifully fragrant and moist bread that brings a touch of Italian tradition to your holiday celebrations.
The key to a successful Panettone is in the details—using high-quality ingredients and allowing ample time for the dough to rise and develop its flavors. This recipe will guide you through the steps to create this delightful bread, complete with a buttery, citrusy aroma and a light, airy texture. Whether you’re an experienced baker or trying your hand at Panettone for the first time, following this recipe will help you achieve a delicious and authentic Italian treat. The following ingredients will serve 4-6 people, perfect for sharing with family and friends during the festive season.
Ingredients:
- 4 cups all-purpose flour
- 1/2 cup sugar
- 1/2 cup unsalted butter, softened
- 1/2 cup warm milk
- 4 large eggs
- 2 teaspoons active dry yeast
- 1 teaspoon salt
- 1 teaspoon vanilla extract
- Zest of 1 lemon
- Zest of 1 orange
- 1 cup mixed candied fruits
- 1/2 cup raisins
- 1/4 cup slivered almonds (optional)
- 1 tablespoon honey
- 1 tablespoon rum or brandy (optional)
Cooking Instructions:
- Prepare the Yeast Mixture: In a small bowl, dissolve the active dry yeast in the warm milk. Add a teaspoon of sugar and let it sit for about 10 minutes, or until it becomes frothy.
- Make the Dough: In a large mixing bowl, combine the flour, sugar, and salt. Add the softened butter, eggs, vanilla extract, lemon zest, orange zest, and the frothy yeast mixture. Mix until a soft dough forms.
- Knead the Dough: Transfer the dough to a floured surface and knead for about 10 minutes, until it becomes smooth and elastic. If the dough is too sticky, add a little more flour as needed.
- First Rise: Place the dough in a lightly greased bowl, cover it with a damp cloth, and let it rise in a warm place for 1-2 hours, or until it doubles in size.
- Prepare the Fruits: Soak the raisins in rum or brandy (if using) for about 15 minutes. Drain and combine with the candied fruits and almonds.
- Incorporate the Fruits: Once the dough has risen, turn it out onto a lightly floured surface and gently knead in the mixed fruits and raisins until evenly distributed.
- Shape the Dough: Shape the dough into a ball and place it into a greased Panettone mold or a deep baking pan lined with parchment paper.
- Second Rise: Cover the dough again with a damp cloth and let it rise for another hour, or until it reaches the top of the mold.
- Bake the Panettone: Preheat your oven to 350°F (175°C). Brush the top of the dough with honey and bake for 40-50 minutes, or until the top is golden brown and a skewer inserted into the center comes out clean.
- Cool and Serve: Let the Panettone cool in the mold for at least 10 minutes before removing it. Allow it to cool completely on a wire rack before slicing and serving.
Extra Tips:
When making Panettone, it’s important to be patient with the rising times, as this allows the dough to develop its signature airy texture. To prevent the bread from drying out, store it in an airtight container once it’s completely cool, or wrap it tightly in plastic wrap.
For an extra flavorful twist, you can experiment with different types of dried fruits or even add a touch of chocolate chips. If you don’t have a Panettone mold, a tall, deep cake pan can be used as a substitute. Finally, for the best texture, serve the Panettone slightly warmed or toasted. Enjoy this delightful Italian tradition with a cup of coffee or a glass of sweet wine.
Classic Tiramisu
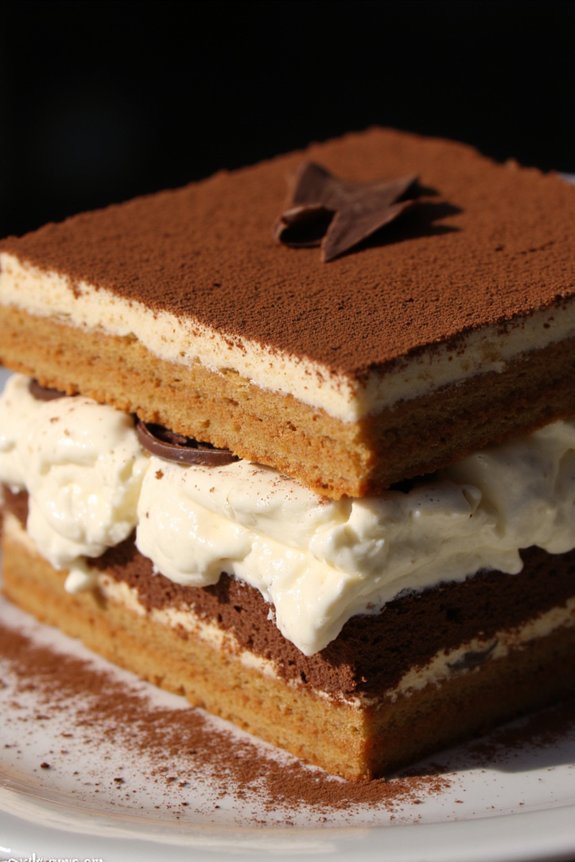
Tiramisu is a classic Italian dessert that’s known for its rich, creamy texture and bold coffee flavors. This no-bake dessert is perfect for impressing guests during the holiday season or any special occasion. The combination of espresso-soaked ladyfingers, layered with a luscious mascarpone cheese mixture and topped with a dusting of cocoa powder, creates a delightful treat that’s both elegant and comforting.
This recipe for Classic Tiramisu yields a dessert that serves 4-6 people, making it ideal for a small gathering. The preparation involves creating layers of coffee-soaked ladyfingers and a creamy mascarpone filling, which is then chilled to allow the flavors to meld together beautifully. With a little patience and careful layering, you’ll have a dessert that not only looks impressive but tastes divine as well.
Ingredients:
- 3 large eggs, separated
- 1 cup granulated sugar, divided
- 8 oz mascarpone cheese
- 1 cup heavy cream
- 1 cup strong brewed espresso, cooled
- 2 tablespoons coffee liqueur (optional)
- 24-30 ladyfinger cookies
- Cocoa powder, for dusting
- Dark chocolate shavings (optional)
Instructions:
- Prepare the Egg Yolk Mixture: In a medium bowl, whisk the egg yolks with 1/2 cup of granulated sugar over a double boiler until the mixture is pale and thickened. This should take about 5 minutes. Remove from heat and let it cool slightly.
- Mix in Mascarpone: Once the egg yolk mixture has cooled, gently fold in the mascarpone cheese until the mixture is smooth and well combined. Set aside.
- Whip the Egg Whites: In a separate bowl, beat the egg whites with the remaining 1/2 cup of sugar until soft peaks form. This will take about 3-4 minutes using an electric mixer.
- Whip the Cream: In another bowl, whip the heavy cream until stiff peaks form. Be careful not to over-whip, as it can turn into butter.
- Combine Mixtures: Gently fold the whipped cream into the mascarpone mixture, then carefully fold in the egg whites. This will create a light and airy filling.
- Prepare the Coffee Mixture: Combine the cooled espresso and coffee liqueur in a shallow dish. Quickly dip each ladyfinger into the coffee mixture, making sure they’re soaked but not soggy.
- Layer the Tiramisu: In a 9×9 inch dish or a similar-sized serving dish, arrange a layer of soaked ladyfingers at the bottom. Spread half of the mascarpone mixture over the ladyfingers. Repeat with another layer of soaked ladyfingers and top with the remaining mascarpone mixture.
- Chill the Tiramisu: Cover the dish with plastic wrap and refrigerate for at least 4 hours, preferably overnight, to allow the flavors to meld and the dessert to set.
- Serve and Garnish: Before serving, dust the top with cocoa powder and garnish with dark chocolate shavings if desired. Slice and serve the chilled tiramisu to your guests.
Extra Tips:
To guarantee the best results, it’s essential to use high-quality ingredients, especially the mascarpone cheese and espresso. If you don’t have coffee liqueur, it can be omitted or replaced with a splash of vanilla extract for added flavor.
Make sure to handle the ladyfingers gently when dipping them into the coffee mixture to prevent them from becoming too soggy. Finally, allowing the tiramisu to chill overnight will enhance the flavors and improve the texture, making it even more delicious when served.
Italian Almond Biscotti

Italian Almond Biscotti is a classic holiday treat that embodies the essence of Italian festive traditions. Known for their crisp texture and flavorful almond taste, these biscotti are perfect for dipping in coffee or enjoying on their own. Ideal for holiday gatherings or as a gift, this traditional Italian cookie recipe will warm hearts and fill your home with the delightful aroma of almonds and vanilla.
Biscotti, meaning “twice-baked,” are easy to make and can be stored for weeks, making them a convenient and delicious option during the busy holiday season.
Italian Almond Biscotti isn’t just a delightful treat but also a versatile one. You can customize it by adding different nuts or even chocolate chips to suit your taste. However, the classic almond version remains a favorite for its simplicity and timeless flavor.
This recipe yields enough biscotti to serve 4-6 people, making it perfect for a small gathering or family treat. With the following ingredients and instructions, you’ll be able to create these delectable Italian cookies in your own kitchen.
Ingredients for Serving Size 4-6:
- 2 cups all-purpose flour
- 1 cup granulated sugar
- 1 teaspoon baking powder
- 1/4 teaspoon salt
- 3 large eggs
- 1 teaspoon vanilla extract
- 1/2 teaspoon almond extract
- 1 cup whole almonds, toasted and coarsely chopped
Cooking Instructions:
- Preheat the Oven: Begin by preheating your oven to 350°F (175°C). Line a baking sheet with parchment paper to prevent sticking.
- Mix Dry Ingredients: In a large bowl, whisk together the all-purpose flour, granulated sugar, baking powder, and salt until well combined. This guarantees an even distribution of the leavening agent and sugar.
- Prepare Wet Ingredients: In a separate bowl, beat the eggs, vanilla extract, and almond extract together until blended. This mixture will serve as the base for your biscotti dough.
- Combine Ingredients: Gradually add the wet ingredients to the dry ingredients, mixing with a spatula or wooden spoon until a dough forms. It should be slightly sticky but firm enough to hold its shape.
- Add Almonds: Fold in the toasted and chopped almonds, ensuring they’re evenly distributed throughout the dough.
- Shape the Dough: On a lightly floured surface, divide the dough in half. Shape each half into a log approximately 12 inches long and 2 inches wide. Place the logs on the prepared baking sheet, spacing them at least 3 inches apart.
- First Bake: Bake in the preheated oven for 25-30 minutes, or until the logs are lightly golden and firm to the touch. Remove them from the oven and let them cool for about 10 minutes.
- Slice the Biscotti: Using a serrated knife, carefully slice the logs diagonally into 1/2-inch thick slices. This will give the biscotti their characteristic shape and texture.
- Second Bake: Arrange the slices cut side down on the baking sheet. Return them to the oven and bake for an additional 10-12 minutes, then flip the biscotti and bake for another 10-12 minutes, or until they’re golden brown and crisp.
- Cool and Serve: Allow the biscotti to cool completely on a wire rack. This cooling period will help them achieve the perfect crunchy texture. Serve with coffee or as a standalone treat.
Extra Tips:
Toasting the almonds before adding them to the dough enhances their flavor, giving your biscotti a deeper, nuttier taste. If you prefer a softer biscotti, you can reduce the second baking time slightly, but remember that the traditional biscotti texture is crunchy.
Store your biscotti in an airtight container at room temperature; they can last for several weeks. For a festive touch, consider drizzling them with melted chocolate or dusting with powdered sugar before serving.