

As the sun shines brighter, the allure of Italian summer recipes becomes irresistible. Think creamy Caprese Salad with Burrata or the refreshing zest of Lemon and Herb Grilled Shrimp. These dishes capture the season’s essence and bring a touch of Italy to your table. Ready to explore these delightful recipes? Let’s get started!
Caprese Salad With Burrata
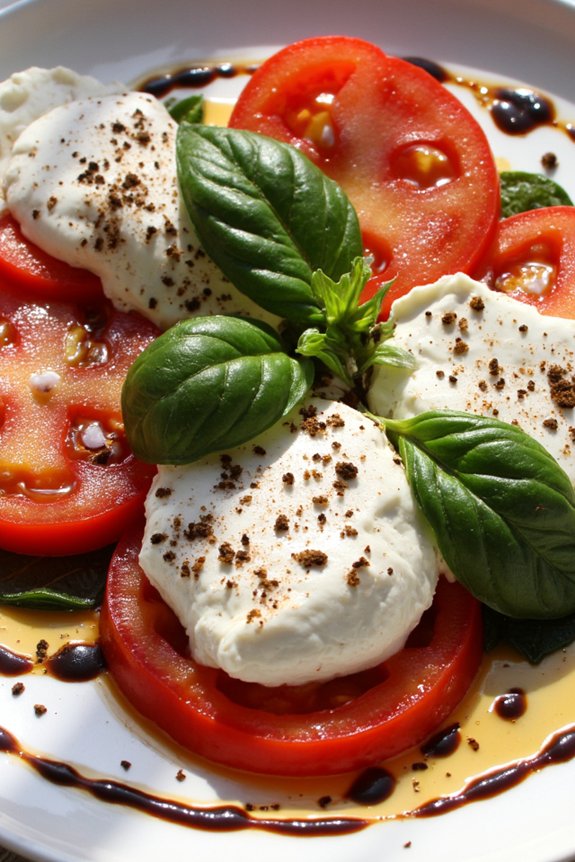
Caprese Salad With Burrata is a delightful twist on the classic Caprese salad, adding creamy burrata cheese for an extra layer of indulgence. This Italian summer dish is perfect for those warm evenings when you crave something fresh and light yet satisfying.
The combination of ripe tomatoes, fresh basil, and luscious burrata, drizzled with olive oil and balsamic glaze, creates a symphony of flavors that will transport you straight to the sunny coasts of Italy.
Ideal for serving 4-6 people, this Caprese Salad With Burrata isn’t only visually stunning but also incredibly simple to prepare. The key to mastering this dish lies in sourcing the best quality ingredients you can find.
Opt for vine-ripened tomatoes bursting with flavor, fresh basil leaves, and authentic burrata cheese that oozes creamy goodness. Pair these with a high-quality extra virgin olive oil and a rich balsamic glaze to enhance the salad’s taste and presentation.
Ingredients:
- 4 large ripe tomatoes
- 2 balls of fresh burrata cheese (about 8 oz each)
- 1 cup fresh basil leaves
- 4 tablespoons extra virgin olive oil
- 2 tablespoons balsamic glaze
- Sea salt, to taste
- Freshly ground black pepper, to taste
Instructions:
1. Prepare the Ingredients:
Start by washing the tomatoes and basil leaves under cold running water. Pat them dry with a clean kitchen towel. Slice the tomatoes into 1/4-inch thick rounds and set aside.
Gently tear the burrata cheese into large chunks.
2. Assemble the Salad:
On a large serving platter, arrange the tomato slices in a single layer, slightly overlapping each other. Scatter the torn pieces of burrata cheese evenly over the tomatoes.
3. Add the Basil:
Tuck fresh basil leaves between the tomato slices and burrata chunks. You can tear larger basil leaves into smaller pieces if desired to distribute the flavor more evenly.
4. Season the Salad:
Drizzle the extra virgin olive oil generously over the assembled salad, ensuring every component gets a touch of oil. Follow this with a drizzle of balsamic glaze for a tangy sweetness.
5. Final Touch:
Sprinkle sea salt and freshly ground black pepper over the salad to taste. Adjust the seasoning according to your preference.
6. Serve:
Serve the Caprese Salad With Burrata immediately at room temperature to enjoy the full spectrum of flavors.
Extra Tips:
When making Caprese Salad With Burrata, always use the freshest ingredients you can find. The quality of your tomatoes and burrata will greatly impact the dish’s taste.
If you have access to heirloom tomatoes, they make an excellent choice for their vibrant color and flavor. Additionally, if you prefer a bit more acidity, you can add a few drops of lemon juice to the olive oil before drizzling it on the salad.
This dish pairs beautifully with a crusty Italian bread or a chilled glass of white wine for a complete summer dining experience.
Lemon and Herb Grilled Shrimp

Lemon and Herb Grilled Shrimp is a delightful Italian-inspired dish perfect for a summer evening meal. The combination of zesty lemon, aromatic herbs, and succulent shrimp makes for a revitalizing and flavorful experience. This dish isn’t only quick to prepare but also healthy and light, making it ideal for both casual family dinners and more elaborate gatherings.
With just a few simple ingredients, you can create a meal that will transport you to the sunny coasts of Italy. The key to this recipe is in the marinade, which infuses the shrimp with vibrant flavors. Fresh lemon juice adds a tangy brightness, while a mix of herbs such as parsley and oregano bring depth and earthiness.
Grilling the shrimp allows the natural sweetness of the seafood to shine through, while imparting a smokiness that enhances the overall flavor profile. Serve this dish with a side of grilled vegetables or a crisp salad for a complete and satisfying meal.
Ingredients for 4-6 servings:
- 2 pounds large shrimp, peeled and deveined
- 3 tablespoons olive oil
- Juice of 2 lemons
- Zest of 1 lemon
- 3 cloves garlic, minced
- 1 tablespoon fresh parsley, chopped
- 1 tablespoon fresh oregano, chopped
- Salt and pepper to taste
- Lemon wedges, for serving
Cooking Instructions:
- Prepare the Marinade: In a large mixing bowl, combine the olive oil, lemon juice, lemon zest, minced garlic, chopped parsley, and chopped oregano. Stir well to confirm all ingredients are thoroughly mixed.
- Marinate the Shrimp: Add the peeled and deveined shrimp to the bowl, ensuring each shrimp is well-coated with the marinade. Cover the bowl and refrigerate for at least 30 minutes, allowing the flavors to penetrate the shrimp.
- Preheat the Grill: While the shrimp is marinating, preheat your grill to medium-high heat. If using a charcoal grill, confirm the coals are evenly distributed and have turned grey.
- Grill the Shrimp: Thread the marinated shrimp onto skewers, leaving a small space between each shrimp to confirm even cooking. Place the skewers on the preheated grill and cook for 2-3 minutes per side, or until the shrimp are opaque and have nice grill marks.
- Serve: Remove the shrimp from the grill and transfer to a serving platter. Garnish with additional chopped parsley and lemon wedges for squeezing over the top. Serve immediately while hot.
Extra Tips:
For the best results, use fresh shrimp rather than frozen, as they’ll have a firmer texture and sweeter taste. If using wooden skewers, soak them in water for at least 30 minutes before grilling to prevent them from burning.
Adjust the amount of lemon juice and herbs according to your taste preferences. Finally, keep a close eye on the shrimp while grilling to avoid overcooking, as shrimp can become rubbery if left on the heat for too long.
Zucchini and Ricotta Bruschetta

Zucchini and Ricotta Bruschetta is a delightful and invigorating appetizer perfect for a warm Italian summer evening. Combining the creamy richness of ricotta cheese with the light, fresh taste of zucchini, this dish is both simple to prepare and deliciously satisfying.
The toasted bread provides a crunchy base that contrasts beautifully with the smooth topping, making it an irresistible choice for a starter or a light snack. Whether you’re entertaining guests or enjoying a quiet dinner at home, this bruschetta is sure to impress with its vibrant flavor and elegant presentation.
This recipe brings together the best of Italian summer produce, showcasing zucchini in all its glory. The key to a great Zucchini and Ricotta Bruschetta is in its fresh ingredients and the balance of flavors. A touch of lemon zest brightens the dish, while a sprinkle of fresh basil adds an aromatic finish.
With a drizzle of olive oil and a pinch of sea salt, each bite is a harmonious blend of textures and tastes. Easy to prepare and quick to assemble, this bruschetta is a fantastic addition to any summer meal.
Ingredients (Serves 4-6):
- 1 large zucchini
- 1 cup ricotta cheese
- 1 lemon (for zest and juice)
- 1 baguette or ciabatta loaf
- 2 tablespoons olive oil
- Salt and pepper to taste
- Fresh basil leaves for garnish
Cooking Instructions:
- Prepare the zucchini: Wash the zucchini thoroughly and cut off the ends. Using a vegetable peeler or mandoline, slice the zucchini into thin ribbons. Place the ribbons in a bowl and add a pinch of salt and a squeeze of lemon juice. Toss gently and set aside to marinate for about 10 minutes.
- Toast the bread: Preheat your oven to 400°F (200°C). Slice the baguette or ciabatta into 1/2-inch thick slices. Arrange the slices on a baking sheet and brush each side with olive oil. Bake in the oven for 5-7 minutes, or until the bread is golden and crispy.
- Mix the ricotta: In a medium bowl, combine the ricotta cheese with the zest of one lemon. Add salt and pepper to taste. Mix until smooth and creamy.
- Assemble the bruschetta: Once the bread is toasted, remove it from the oven and let it cool slightly. Spread a generous amount of the lemon-ricotta mixture onto each slice. Top with a few ribbons of marinated zucchini.
- Garnish and serve: Finish each bruschetta with a drizzle of olive oil, a few fresh basil leaves, and an additional pinch of salt and pepper if desired. Serve immediately while the toast is still crisp.
Extra Tips:
When preparing Zucchini and Ricotta Bruschetta, be sure to use the freshest zucchini you can find for the best flavor. If you want to add a bit of heat, consider sprinkling some chili flakes on top before serving.
Also, for additional flavor, you might grill the zucchini ribbons briefly before placing them on the bruschetta. This will add a smoky dimension to the dish. Finally, if you find the ricotta too thick for spreading, a small amount of milk or cream can be added to achieve the desired consistency.
Enjoy your culinary creation in the warmth of a summer evening!
Prosciutto and Melon Skewers

Prosciutto and Melon Skewers, a classic Italian appetizer, are perfect for a revitalizing summer dinner. Combining the delicate saltiness of prosciutto with the sweet and juicy flavor of melon, this dish is both simple and sophisticated. The skewers aren’t only visually appealing but also highlight the essence of Italian cuisine, which often emphasizes high-quality ingredients and simplicity.
Ideal for a light start to a meal or as part of a larger antipasto spread, these skewers are sure to impress your guests.
To prepare these skewers, you’ll need to select a ripe, flavorful melon. Cantaloupe is a popular choice, but feel free to experiment with honeydew or other melons you enjoy. The slicing of the prosciutto should be thin, allowing it to wrap easily around the melon chunks. The skewers can be assembled in minutes and are best served chilled, making them an excellent choice for outdoor dining during the warm months.
With just a few ingredients, you’ll have a dish that embodies the spirit of Italian summer in every bite.
Ingredients (for 4-6 people):
- 1 ripe cantaloupe or honeydew melon
- 12 thin slices of prosciutto
- Fresh basil leaves (optional)
- Balsamic glaze (optional)
- 12 wooden skewers or toothpicks
Instructions:
- Prepare the Melon: Start by cutting the melon in half and removing the seeds with a spoon. Once cleaned, slice the melon into wedges and then into bite-sized cubes. Aim for roughly uniform pieces so they’ll be easy to skewer and eat.
- Slice the Prosciutto: If your prosciutto slices are large, cut them in half lengthwise. This will make them easier to wrap around the melon pieces and fit nicely onto the skewers.
- Assemble the Skewers: Take a piece of melon and wrap it with a slice of prosciutto. If you’re using basil, place a leaf on the melon before wrapping it with the prosciutto. Once wrapped, slide the melon piece onto a skewer. Repeat this process until all the melon pieces are skewered.
- Chill and Serve: Place the assembled skewers on a serving platter. If desired, drizzle them lightly with balsamic glaze for an extra burst of flavor. Chill the skewers in the refrigerator for at least 15 minutes before serving to ascertain they’re cool and revitalizing.
Extra Tips:
When selecting your melon, look for one that’s fragrant and slightly soft to the touch, as this indicates ripeness. If balsamic glaze is unavailable, you can make your own by reducing balsamic vinegar on the stove until it thickens.
Additionally, consider adding other complementary ingredients like mozzarella balls or cherry tomatoes to the skewers for a more varied flavor profile. Experiment with different types of prosciutto or cured meats if you wish to explore new tastes, and remember, presentation is key—arrange the skewers attractively on the platter to enhance the dining experience.
Panzanella With Heirloom Tomatoes
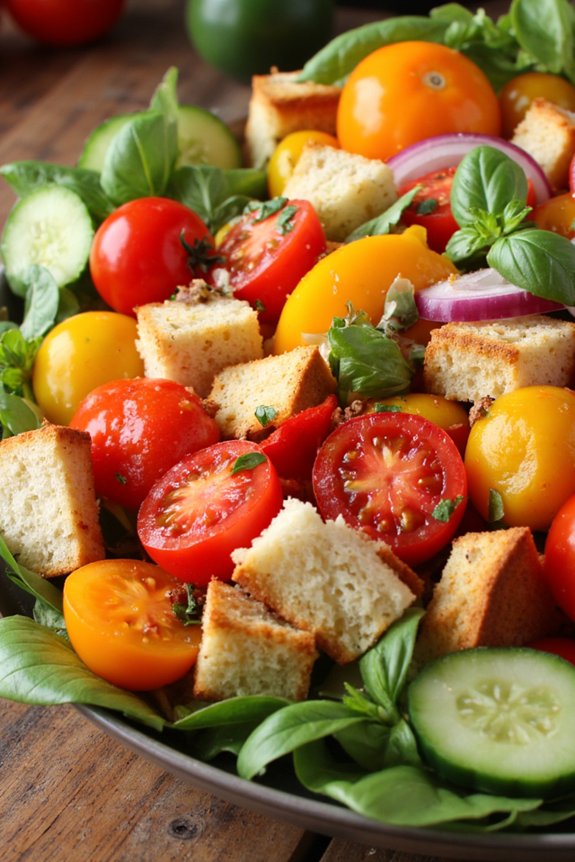
Experience the vibrant flavors of Italy with a revitalizing Panzanella salad, a classic dish that perfectly captures the essence of a sun-kissed Italian summer. This rustic bread salad, traditionally made with stale bread and fresh tomatoes, celebrates the abundance of heirloom tomatoes during the peak of summer.
The beauty of this recipe lies in its simplicity and the quality of its ingredients, allowing the natural sweetness and juiciness of the heirloom tomatoes to shine through. It’s an ideal dish for a light lunch or as a colorful starter for a summer dinner, offering a delightful medley of textures and flavors.
At the heart of Panzanella is the harmonious combination of ripe heirloom tomatoes, fragrant basil, and crusty bread that has been lovingly tossed in a light vinaigrette. As the bread absorbs the tomato juices and dressing, it transforms into a deliciously chewy and flavorful component of the salad.
This dish not only makes use of day-old bread but also celebrates the glorious produce of the season. Perfect for serving 4-6 people, this Panzanella recipe is a reflection of the Italian philosophy of simple yet exquisite food.
Ingredients:
- 4 cups cubed stale crusty bread (such as ciabatta or sourdough)
- 1 1/2 pounds heirloom tomatoes, cut into various shapes (wedges, slices, or chunks)
- 1 small red onion, thinly sliced
- 1/2 cucumber, sliced into half-moons
- 1/4 cup extra virgin olive oil
- 2 tablespoons red wine vinegar
- Salt and freshly ground black pepper, to taste
- 1/2 cup fresh basil leaves, torn
- 1 clove garlic, minced
- Optional: capers, olives, or mozzarella cheese for extra flavor
Instructions:
- Prepare the Bread: Begin by spreading the cubed bread on a baking sheet. Toast them in a 375°F (190°C) oven for about 10 minutes or until they become golden and slightly crispy. This step enhances the bread’s texture, making it more resilient to the dressing.
- Mix the Vegetables: In a large bowl, combine the heirloom tomatoes, red onion, and cucumber. Add a pinch of salt to the mixture and let it sit for about 10 minutes. This will help draw out the juices from the tomatoes, which will serve as a natural part of the salad dressing.
- Make the Dressing: In a small bowl, whisk together the olive oil, red wine vinegar, minced garlic, salt, and pepper until well combined. Adjust the seasoning according to taste.
- Assemble the Salad: Add the toasted bread cubes to the bowl with the vegetables. Drizzle the dressing over the salad and gently toss everything together until the bread is well-coated and starts to absorb the juices.
- Add Fresh Herbs: Gently fold in the torn basil leaves to the salad. Allow the Panzanella to sit for at least 20 minutes at room temperature before serving, giving the flavors time to meld together.
- Serve: Before serving, give the salad a final toss. If desired, add capers, olives, or mozzarella cheese to enhance the flavor profile of the dish.
Extra Tips:
For best results, use a variety of colorful heirloom tomatoes to add visual appeal and depth of flavor to your Panzanella. If your bread is fresh, you can dry it out by leaving it out overnight or toasting it longer in the oven.
Feel free to customize the salad with seasonal vegetables or herbs available. Panzanella is a versatile dish and can be a canvas for your creativity, making it a staple in any summer dining experience.
Grilled Eggplant With Mint and Feta
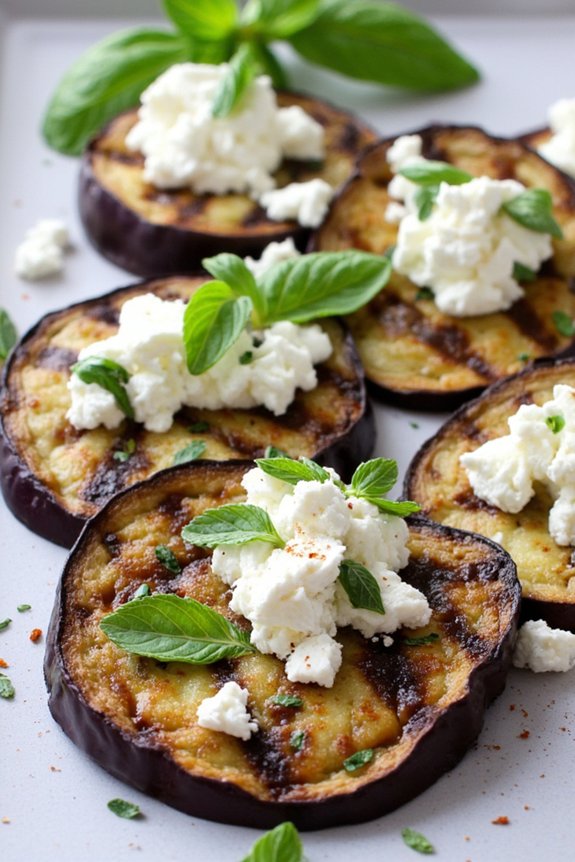
Grilled Eggplant With Mint and Feta is a delightful dish that captures the essence of a Mediterranean summer with its vibrant flavors and easy preparation. This dish highlights the creamy texture of eggplants, which are perfectly charred on the grill, and the invigorating notes of mint and tangy feta cheese. Ideal for a light summer dinner, it serves as both a stunning side dish or a meatless main course.
This recipe is designed to serve 4-6 people, making it perfect for a small gathering or family meal. The combination of fresh ingredients guarantees that each bite is packed with flavor, while the grilling process adds a subtle smokiness that pairs beautifully with the salty feta and fresh mint. It’s a dish that’s as pleasing to the eye as it’s to the palate, with its vibrant colors and contrasting textures.
Ingredients:
- 3 medium eggplants
- 1/4 cup olive oil
- Salt, to taste
- Black pepper, to taste
- 1 cup crumbled feta cheese
- 1/4 cup fresh mint leaves, chopped
- 2 tablespoons lemon juice
- 1 clove garlic, minced
- Optional: 1/4 teaspoon red pepper flakes
Cooking Instructions:
- Prepare the Eggplants: Begin by washing the eggplants thoroughly. Slice them into 1/2-inch thick rounds. Place the slices on a large tray and sprinkle both sides with salt. Let them sit for about 15-20 minutes to draw out excess moisture and bitterness.
- Preheat the Grill: While the eggplants are resting, preheat your grill to medium-high heat. If using a grill pan, place it over medium-high heat on the stove.
- Rinse and Dry the Eggplants: After the eggplants have rested, rinse them under cold water to remove the excess salt. Pat them dry with paper towels to make certain they grill properly.
- Season the Eggplants: Brush both sides of the eggplant slices with olive oil, then season with a pinch of salt and black pepper. This will help them to cook evenly and develop a nice char on the grill.
- Grill the Eggplants: Place the eggplant slices on the grill or grill pan. Cook each side for about 4-5 minutes, or until grill marks appear and the eggplants are tender.
- Prepare the Dressing: In a small bowl, whisk together the lemon juice, minced garlic, and a tablespoon of olive oil. Season with a pinch of salt and black pepper, and add the optional red pepper flakes for a bit of heat.
- Assemble the Dish: Arrange the grilled eggplant slices on a serving platter. Drizzle the lemon-garlic dressing over the eggplants. Top with crumbled feta cheese and chopped mint leaves.
- Serve: Serve immediately while the eggplants are warm, allowing the feta to slightly melt and the flavors to meld together.
Extra Tips:
For an even richer flavor, consider marinating the eggplant slices in olive oil and garlic for a few hours before grilling. If you prefer a creamier texture, you can also brush the eggplants with a bit of balsamic glaze before adding the feta and mint.
Additionally, this dish can be served cold as a salad, making it a versatile option for picnics or buffets. Always taste and adjust the seasoning, especially if your feta is particularly salty, to guarantee a balanced dish.
Lemon Basil Risotto

Lemon Basil Risotto is a creamy, delightful Italian dish perfect for a summer dinner. The essence of this dish lies in its vibrant flavors, combining the zesty brightness of lemon with the fresh, aromatic notes of basil. The creaminess of the arborio rice balances these flavors, resulting in a comforting yet invigorating meal.
This risotto pairs beautifully with a crisp white wine or a light salad, making it an ideal centerpiece for a warm evening gathering. This recipe is designed to serve 4-6 people, offering generous portions that can be enjoyed as a main course. The key to a successful risotto is patience and attention, as the rice must be gradually cooked to achieve the perfect texture.
With just a few simple ingredients, you can create a dish that’s both sophisticated and satisfying, embodying the essence of Italian summer cuisine.
Ingredients:
- 2 tablespoons olive oil
- 1 small onion, finely chopped
- 2 cloves garlic, minced
- 1 1/2 cups arborio rice
- 1/2 cup dry white wine
- 4 cups vegetable broth, kept warm
- 1 lemon, zested and juiced
- 1/2 cup grated Parmesan cheese
- 1/4 cup fresh basil leaves, chopped
- Salt and pepper to taste
- Optional: additional basil leaves for garnish
Instructions:
- Prepare the Base: In a large saucepan, heat the olive oil over medium heat. Add the finely chopped onion and sauté until it becomes translucent, about 3-4 minutes. Add the minced garlic and sauté for an additional minute, ensuring it becomes fragrant but not browned.
- Toast the Rice: Add the arborio rice to the saucepan, stirring constantly for about 2 minutes until the grains are well-coated in oil and slightly toasted. This step helps the rice absorb the flavors better and gives it a nutty undertone.
- Deglaze with Wine: Pour in the white wine and stir until it has mostly evaporated. This deglazing will add depth to the flavor profile of the risotto.
- Cook the Risotto: Begin adding the warm vegetable broth one cup at a time, stirring continuously. Allow each addition of broth to be absorbed by the rice before adding the next cup. This process should take about 18-20 minutes, resulting in creamy, tender rice.
- Add Flavor: Once the rice is cooked to your liking, stir in the lemon zest, lemon juice, and grated Parmesan cheese. Mix until the cheese has melted and incorporated into the risotto.
- Finish with Basil: Remove the saucepan from the heat and fold in the chopped basil. Season with salt and pepper to taste. Let the risotto sit for a minute to allow the flavors to meld.
- Serve: Spoon the risotto onto plates and garnish with additional basil leaves if desired. Serve immediately while warm.
Extra Tips:
When making risotto, it’s essential to keep the broth warm to maintain a consistent cooking temperature, helping the rice cook evenly.
Stirring continuously is key to releasing the starches from the rice, which gives risotto its creamy texture. Avoid rushing the process; allow each addition of broth to be fully absorbed before adding more.
For an even more intense lemon flavor, consider adding an extra teaspoon of lemon zest. If you prefer a richer taste, you can incorporate a small pat of butter at the end of cooking.
Tuscan White Bean and Arugula Salad
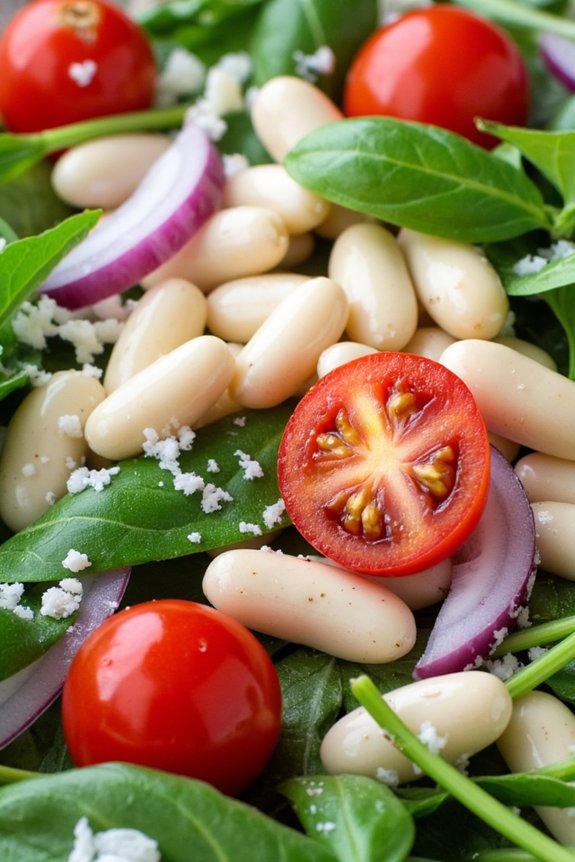
Transport yourself to the sun-kissed landscapes of Tuscany with this invigorating Tuscan White Bean and Arugula Salad. A perfect addition to any Italian summer dinner, this salad combines the creamy texture of cannellini beans with the peppery bite of fresh arugula. The addition of ripe cherry tomatoes, red onions, and a simple yet flavorful dressing makes this salad not only visually appealing but also a delightful explosion of flavors.
Ideal for a light main course or as a side dish, this salad is sure to become a staple in your summer recipe repertoire. The beauty of this salad lies in its simplicity and the quality of its ingredients. While it requires minimal preparation, the results are nothing short of extraordinary. The creamy white beans provide a hearty base, while the bright, zesty dressing enhances the natural flavors of the vegetables.
Whether you’re hosting a dinner party or enjoying a weeknight meal, this Tuscan White Bean and Arugula Salad will bring a taste of Italy to your table and delight your taste buds with its fresh, vibrant flavors.
Ingredients for 4-6 servings:
- 2 cans (15 ounces each) of cannellini beans, drained and rinsed
- 4 cups of fresh arugula, washed and dried
- 1 cup of cherry tomatoes, halved
- 1 small red onion, thinly sliced
- 1/4 cup of extra virgin olive oil
- 3 tablespoons of fresh lemon juice
- 1 teaspoon of Dijon mustard
- Salt and freshly ground black pepper, to taste
- 1/4 cup of grated Parmesan cheese
- Optional: fresh basil leaves for garnish
Cooking Instructions:
- Prepare the Dressing: In a small bowl, whisk together the extra virgin olive oil, fresh lemon juice, Dijon mustard, salt, and freshly ground black pepper until well combined. Set the dressing aside to allow the flavors to meld.
- Assemble the Salad Base: In a large salad bowl, combine the drained and rinsed cannellini beans, fresh arugula, cherry tomatoes, and thinly sliced red onion. Toss gently to guarantee all ingredients are evenly distributed.
- Dress the Salad: Pour the prepared dressing over the salad, guaranteeing all elements are lightly coated. Toss the salad gently but thoroughly to mix the dressing with the other ingredients, being careful not to crush the beans.
- Final Touches: Sprinkle the grated Parmesan cheese over the top of the salad. For a touch of added flavor and color, garnish with fresh basil leaves if desired.
- Serve and Enjoy: Serve the salad immediately as an invigorating side dish or a light main course, and enjoy the vibrant flavors of Tuscany.
Extra Tips:
When making this Tuscan White Bean and Arugula Salad, choose the freshest ingredients for the best flavor. Fresh arugula should be crisp and vibrant, and cherry tomatoes should be ripe and sweet. If possible, use freshly grated Parmesan cheese, as it will melt into the salad and add a rich, nutty flavor.
For added depth, you can also toast the beans lightly in a pan before adding them to the salad. If preparing the salad in advance, keep the dressing separate and add it just before serving to avoid wilting the arugula. Enjoy your culinary trip to Tuscany!
Grilled Swordfish With Salsa Verde

Grilled Swordfish with Salsa Verde is a delightful Italian summer dish that combines the rich, meaty texture of swordfish with the fresh, zesty flavors of a classic salsa verde. This dish is perfect for warm evenings when you want to enjoy a light yet satisfying meal.
Swordfish is a great choice for grilling because it holds together well, and its mild flavor pairs beautifully with the tangy brightness of salsa verde. Whether you’re hosting a dinner party or looking for a special family meal, this recipe will impress with its vibrant presentation and delicious taste.
The salsa verde in this recipe is a traditional Italian sauce made with fresh herbs, garlic, capers, and olive oil, creating a rejuvenating and aromatic accompaniment to the fish. Grilling the swordfish brings out its natural flavors while adding a subtle smokiness that complements the herby sauce.
This dish is quick to prepare, making it an ideal option for a weeknight dinner or a weekend barbecue. Serve it alongside a crisp salad or roasted vegetables for a complete and balanced meal that captures the essence of summer dining.
Ingredients for 4-6 servings:
- 4 swordfish steaks (about 6 ounces each)
- Salt and freshly ground black pepper
- 2 tablespoons olive oil
- 1 lemon, juiced
- 2 tablespoons capers, rinsed
- 1 cup fresh parsley leaves
- 1/2 cup fresh basil leaves
- 1/4 cup fresh mint leaves
- 2 cloves garlic
- 1/3 cup extra-virgin olive oil
- Optional: lemon wedges for serving
Cooking Instructions:
- Prepare the Swordfish: Season the swordfish steaks on both sides with salt and freshly ground black pepper. Drizzle with 2 tablespoons of olive oil and lemon juice, confirming each steak is well-coated. Let them marinate for about 15-20 minutes while you prepare the salsa verde.
- Make the Salsa Verde: In a food processor, combine the capers, parsley, basil, mint, and garlic. Pulse until the ingredients are finely chopped. With the processor running, slowly drizzle in the extra-virgin olive oil until the sauce is well-blended but still slightly chunky. Taste and adjust seasoning with salt and pepper if necessary.
- Preheat the Grill: While the swordfish is marinating, preheat your grill to medium-high heat. Clean the grill grates thoroughly to prevent sticking.
- Grill the Swordfish: Place the marinated swordfish steaks on the grill. Cook for about 4-5 minutes on each side, or until the fish is opaque and flakes easily with a fork. Avoid overcooking to maintain the tenderness of the fish.
- Serve: Transfer the grilled swordfish to a serving platter. Spoon the salsa verde generously over each steak. Serve immediately with optional lemon wedges for an extra burst of citrus flavor.
Extra Tips:
When grilling swordfish, it’s important to confirm the grill is properly preheated and the grates are clean to prevent the fish from sticking.
Swordfish is best enjoyed when it’s cooked to medium doneness; overcooking can result in a dry texture. If you don’t have access to a grill, a grill pan on the stovetop works well as an alternative.
Finally, the salsa verde can be prepared in advance and stored in the refrigerator for up to two days, allowing the flavors to meld together beautifully.
Peach and Basil Gelato

Peach and Basil Gelato is a revitalizing and delightful dessert that perfectly captures the essence of an Italian summer. This gelato combines the sweetness and juiciness of ripe peaches with the subtle peppery notes of fresh basil, creating a creamy and aromatic treat. Perfect for cooling down on those warm evenings, this gelato can be a stunning finale to an alfresco dinner or simply enjoyed as a luxurious snack on its own.
Making Peach and Basil Gelato at home is easier than you might think and allows you to control the quality and freshness of the ingredients. This recipe is designed to serve 4-6 people, making it ideal for small gatherings or family dinners. The process involves creating a rich custard base, infusing it with basil, and blending it with fresh peaches to achieve that perfect balance of flavors.
Ingredients for 4-6 servings:
- 2 cups ripe peaches, peeled, pitted, and chopped
- 1 cup whole milk
- 1 cup heavy cream
- 3/4 cup granulated sugar
- 1/4 cup honey
- 6 large egg yolks
- 1/4 cup fresh basil leaves, finely chopped
- 1 tablespoon lemon juice
- 1/4 teaspoon salt
Cooking Instructions:
- Prepare the Peaches: Begin by peeling, pitting, and chopping the ripe peaches. Place them in a blender or food processor and blend until smooth. Add lemon juice to the puree to prevent browning and set aside.
- Create the Custard Base: In a medium saucepan, combine the milk, heavy cream, and basil leaves. Heat over medium-low until the mixture is hot but not boiling. Remove from heat and let it steep for 20 minutes to infuse the basil flavor.
- Whisk Egg Yolks and Sugar: In a separate bowl, whisk together the egg yolks and sugar until the mixture is pale and slightly thickened.
- Temper the Eggs: Gradually add the warm milk mixture to the egg yolks, whisking constantly to prevent curdling. Once combined, return the mixture to the saucepan.
- Cook the Custard: Cook the custard over medium heat, stirring constantly with a wooden spoon or spatula until it thickens enough to coat the back of the spoon. This should take about 5-7 minutes. Don’t let it boil.
- Strain and Cool: Strain the custard through a fine-mesh sieve into a large bowl to remove the basil leaves and any cooked egg bits. Allow it to cool to room temperature, then stir in the peach puree and honey.
- Chill the Mixture: Cover the bowl with plastic wrap and refrigerate for at least 4 hours or overnight to allow the flavors to meld and the mixture to chill thoroughly.
- Churn the Gelato: Once chilled, pour the mixture into an ice cream maker and churn according to the manufacturer’s instructions until it reaches a soft-serve consistency.
- Freeze for Firmness: Transfer the gelato to an airtight container and freeze for at least 2 hours to firm up before serving.
Extra Tips: For the best results, use peaches that are at the peak of ripeness for maximum sweetness and flavor. If fresh basil is unavailable, you can substitute with a teaspoon of dried basil, though the flavor will be less pronounced. If you don’t have an ice cream maker, you can pour the mixture into a shallow dish and freeze, stirring every 30 minutes until it reaches the desired consistency. This method may result in a slightly less creamy texture but will still be delicious.