

I’ve stumbled upon the secret to making mealtime delightful again with some incredible Italian gluten-free recipes. Picture creamy Spinach and Ricotta Stuffed Shells, aromatic Italian Sausage Risotto, and a refreshing Caprese salad. These dishes offer vibrant flavors and comforting textures, perfect for family dinners or special gatherings. Creating delicious meals that cater to dietary needs without sacrificing taste has never been easier. Ready to transform your kitchen with these amazing recipes?
Gluten-Free Spinach and Ricotta Stuffed Shells
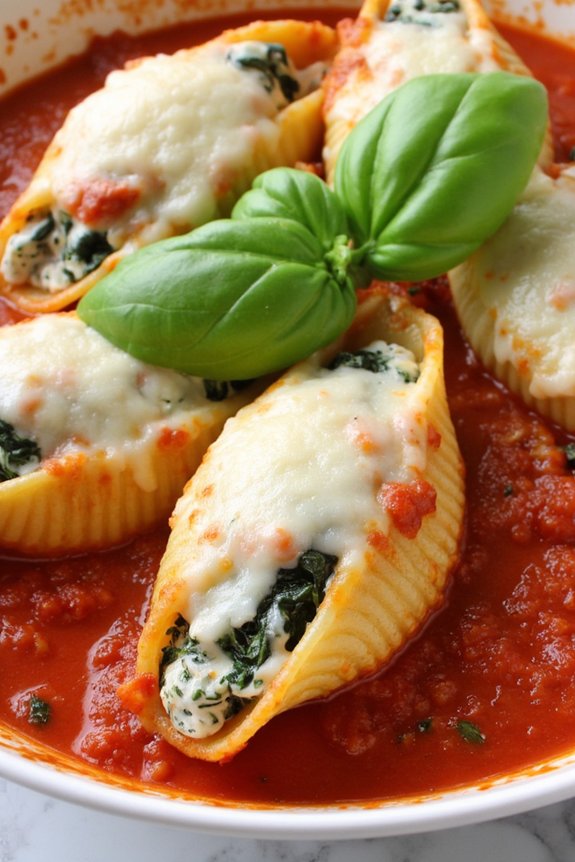
Gluten-free spinach and ricotta stuffed shells are a delightful Italian dish that’s perfect for both casual family dinners and special occasions. This recipe combines the creamy richness of ricotta cheese with the vibrant flavors of spinach and a luscious tomato sauce, all nestled inside tender gluten-free pasta shells.
It’s a comforting meal that brings warmth and satisfaction to the table without the worry of gluten. This dish isn’t only scrumptious but also accommodates those with gluten sensitivities, allowing everyone to enjoy a classic Italian favorite.
The recipe is designed to serve 4-6 people, making it ideal for serving a small gathering or for preparing ahead and enjoying leftovers. With a little bit of prep work and some baking time, you’ll have a satisfying meal that’s sure to impress your family and friends.
Ingredients:
- 20-24 gluten-free jumbo pasta shells
- 2 cups ricotta cheese
- 1 cup grated Parmesan cheese
- 1 cup shredded mozzarella cheese
- 2 cups fresh spinach, chopped
- 1 egg, beaten
- 1 teaspoon garlic powder
- 1 teaspoon Italian seasoning
- Salt and pepper to taste
- 3 cups marinara sauce
- Fresh basil leaves for garnish (optional)
Instructions:
- Prepare the Pasta Shells: Preheat your oven to 375°F (190°C). Cook the gluten-free jumbo pasta shells according to the package instructions until they’re al dente. Drain and set aside to cool slightly.
- Make the Filling: In a large mixing bowl, combine ricotta cheese, half of the Parmesan cheese, half of the mozzarella cheese, chopped spinach, beaten egg, garlic powder, Italian seasoning, salt, and pepper. Mix until all the ingredients are well incorporated.
- Stuff the Shells: Using a spoon, fill each cooked pasta shell with the spinach and ricotta mixture. Be generous with the filling to guarantee a delicious bite in every shell.
- Assemble the Dish: Spread 1 cup of marinara sauce evenly over the bottom of a 9×13 inch baking dish. Arrange the stuffed shells in a single layer over the sauce.
- Top with Sauce and Cheese: Pour the remaining marinara sauce over the stuffed shells. Sprinkle the remaining Parmesan and mozzarella cheeses evenly over the top.
- Bake: Cover the baking dish with aluminum foil and bake in the preheated oven for 25 minutes. Then, remove the foil and bake for an additional 10 minutes, or until the cheese is melted and bubbly.
- Serve: Remove the dish from the oven and let it cool for a few minutes. Garnish with fresh basil leaves if desired, and serve warm.
Extra Tips:
When preparing the filling, make sure to squeeze out any excess moisture from the spinach to prevent the filling from becoming too watery.
If you can’t find gluten-free jumbo pasta shells, consider using gluten-free lasagna sheets or large gluten-free pasta tubes as alternatives.
For an added layer of flavor, you can mix some sautéed garlic and onions into the marinara sauce before spreading it at the bottom of the baking dish.
Finally, this dish can be prepared a day in advance and stored in the refrigerator, making it convenient for busy schedules.
Italian Sausage and Bell Pepper Risotto
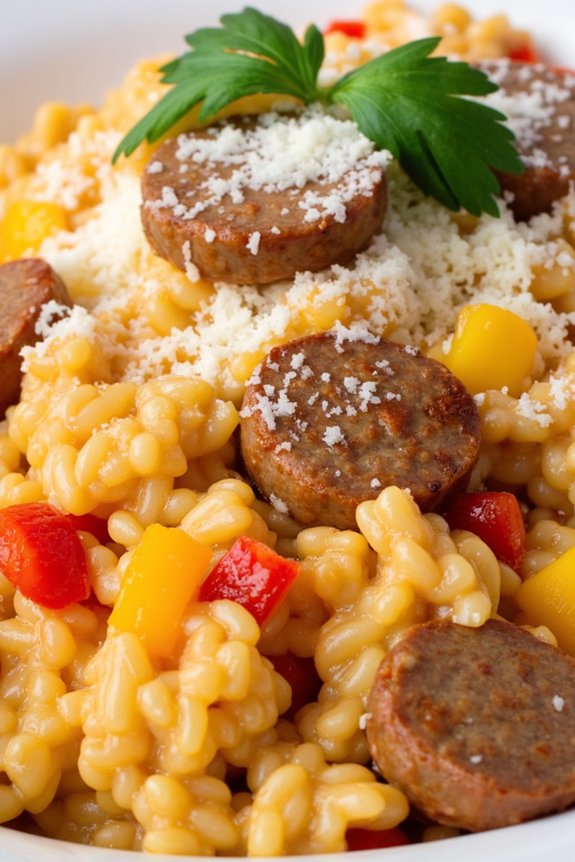
Indulge in the rich and comforting flavors of Italian cuisine with this gluten-free Italian Sausage and Bell Pepper Risotto. This dish is a harmonious blend of creamy Arborio rice, robust Italian sausage, and vibrant bell peppers, making it a perfect meal for family gatherings or a cozy night in.
The risotto’s velvety texture pairs beautifully with the savory notes of sausage and the sweetness of bell peppers, creating a delightful culinary experience that will transport your taste buds straight to Italy.
Risotto is a classic Italian dish traditionally made with Arborio rice, which absorbs flavors exceptionally well while maintaining its creamy consistency. The addition of Italian sausage infuses the risotto with a rich depth of flavor, while the bell peppers add a pop of color and a subtle sweetness that balances the dish.
Whether you’re gluten intolerant or simply looking for a new twist on a traditional favorite, this gluten-free risotto recipe is certain to impress.
Ingredients (Serves 4-6):
- 2 tablespoons olive oil
- 1 pound Italian sausage (gluten-free), casings removed
- 1 large onion, finely chopped
- 3 cloves garlic, minced
- 1 red bell pepper, diced
- 1 yellow bell pepper, diced
- 1 cup Arborio rice
- 1/2 cup dry white wine (gluten-free)
- 4 cups gluten-free chicken or vegetable broth, warmed
- 1/2 cup grated Parmesan cheese
- Salt and pepper to taste
- Fresh parsley, chopped (for garnish)
Cooking Instructions:
- Prepare the Sausage and Vegetables: In a large skillet, heat 1 tablespoon of olive oil over medium heat. Add the Italian sausage and cook until browned, breaking it up into small pieces with a spatula. Remove the sausage from the skillet and set aside.
- Sauté the Aromatics: In the same skillet, add the remaining tablespoon of olive oil. Add the chopped onion and cook until translucent, about 3-4 minutes. Stir in the minced garlic and cook for an additional 1 minute.
- Cook the Peppers: Add the diced red and yellow bell peppers to the skillet and sauté until they begin to soften, about 5 minutes.
- Toast the Rice: Stir in the Arborio rice and cook for 2-3 minutes, allowing the rice to become lightly toasted and coated with the oil and vegetable mixture.
- Deglaze with Wine: Pour in the dry white wine and stir constantly until the wine is mostly absorbed by the rice.
- Add Broth Gradually: Begin adding the warm broth to the rice mixture, one ladle at a time, stirring frequently. Allow each addition of broth to be absorbed before adding the next. Continue this process until the rice is cooked al dente and has a creamy consistency, which should take about 18-20 minutes.
- Incorporate Sausage and Cheese: Return the cooked sausage to the skillet and stir to combine. Remove the skillet from heat and stir in the grated Parmesan cheese. Season with salt and pepper to taste.
- Serve and Garnish: Spoon the risotto onto plates and garnish with chopped fresh parsley. Serve immediately.
Extra Tips:
When cooking risotto, patience is key. Stirring frequently helps release the starches from the rice, contributing to the dish’s creamy texture.
It’s important not to rush the broth-adding process; allowing each ladleful to be fully absorbed guarantees the rice cooks evenly. Additionally, using a high-quality gluten-free sausage will enhance the overall flavor of the risotto.
If you prefer a spicier dish, opt for hot Italian sausage or add a pinch of red pepper flakes during the cooking process. Enjoy your gluten-free Italian adventure!
Zucchini Noodles With Pesto Genovese
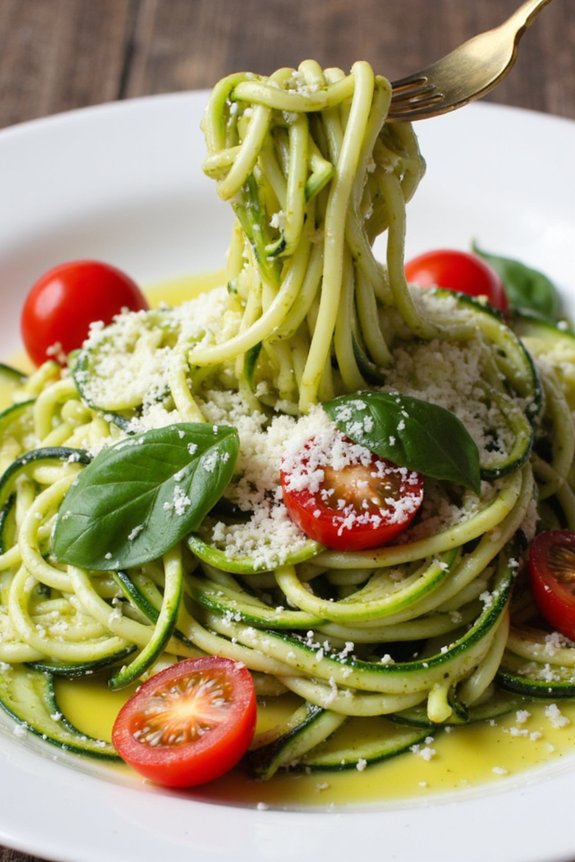
Zucchini Noodles With Pesto Genovese is a delicious gluten-free Italian recipe that combines the fresh taste of zucchini with the rich, aromatic flavors of traditional Genovese pesto. This dish is a perfect healthy alternative to traditional pasta, offering a light yet satisfying meal that’s both nutritious and flavorful.
The spiralized zucchini noodles, or “zoodles,” serve as an excellent base for the vibrant, herbaceous pesto sauce, which is made from fresh basil, garlic, pine nuts, Parmesan cheese, and olive oil. Together, they create a harmonious blend of textures and tastes that will delight your palate.
This recipe is ideal for those looking to enjoy a low-carb meal without compromising on taste. The zoodles are quick to prepare and cook, making this dish a great choice for a weeknight dinner or a special occasion.
With the addition of cherry tomatoes and a sprinkle of extra Parmesan cheese, Zucchini Noodles With Pesto Genovese can be enjoyed as a standalone dish or paired with grilled chicken or shrimp for added protein. Whether you’re a seasoned chef or a cooking novice, this recipe is simple to follow and will have you serving up a delicious gluten-free Italian meal in no time.
Ingredients (Serves 4-6):
- 4 medium zucchinis
- 2 cups fresh basil leaves
- 2 cloves garlic
- 1/2 cup pine nuts
- 1/2 cup grated Parmesan cheese
- 1/2 cup extra-virgin olive oil
- Salt and pepper to taste
- 1 cup cherry tomatoes, halved
- Additional grated Parmesan cheese for serving
Instructions:
- Prepare the Zucchini Noodles: Wash the zucchinis thoroughly and trim the ends. Using a spiralizer, cut the zucchinis into noodle-like strands. If you don’t have a spiralizer, you can use a vegetable peeler to create thin, ribbon-like strips.
- Make the Pesto Genovese: In a food processor, combine basil leaves, garlic cloves, pine nuts, and grated Parmesan cheese. Pulse until the mixture is finely chopped. Gradually add the olive oil while continuing to pulse until you achieve a smooth, creamy consistency. Season the pesto with salt and pepper to taste.
- Cook the Zucchini Noodles: In a large skillet over medium heat, add a drizzle of olive oil. Once hot, add the zucchini noodles. Sauté the noodles for 3-4 minutes, stirring frequently, until they’re just tender but still have a slight crunch. Be careful not to overcook them as they can become mushy.
- Combine and Serve: Remove the skillet from heat and add the pesto sauce to the zucchini noodles. Toss until the noodles are evenly coated with the sauce. Add the halved cherry tomatoes and gently mix. Transfer to serving plates and garnish with additional grated Parmesan cheese.
Extra Tips:
For the best flavor, use fresh basil and high-quality olive oil in your pesto. If you prefer a nuttier taste, lightly toast the pine nuts before adding them to the food processor.
To prevent the zucchini noodles from becoming too watery, sprinkle them with a little salt after spiralizing and let them sit for 10 minutes, then gently pat dry with a paper towel. This will help draw out excess moisture.
Enjoy your Zucchini Noodles With Pesto Genovese as is, or customize it with your favorite toppings such as grilled chicken, shrimp, or roasted vegetables for a heartier meal.
Gluten-Free Margherita Pizza
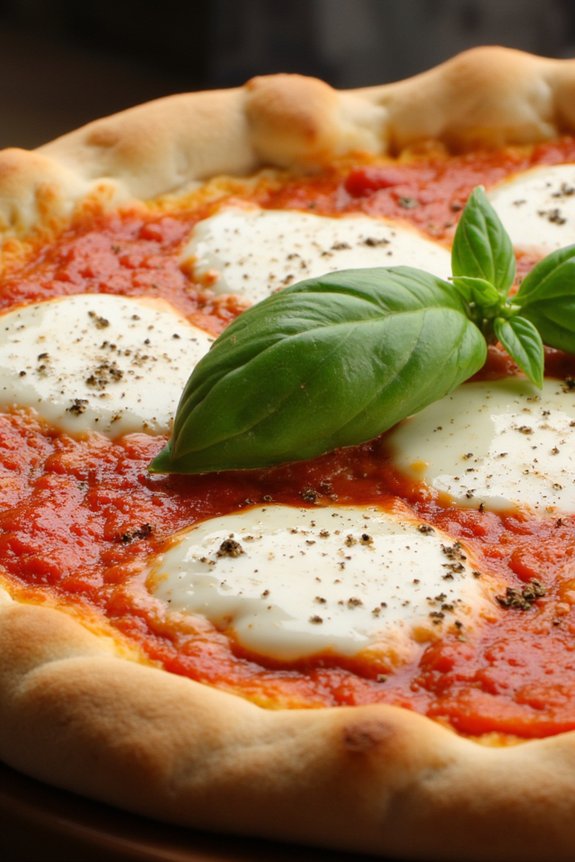
If you’ve been craving a classic Italian pizza but need to avoid gluten, this Gluten-Free Margherita Pizza recipe is your perfect solution. With a crispy gluten-free crust, fresh mozzarella, tangy tomato sauce, and fragrant basil leaves, this dish brings all the traditional flavors of a Margherita pizza to your table without the gluten.
Whether you’re hosting a dinner for family and friends or simply enjoying a quiet night in, this pizza is sure to satisfy your cravings.
Making a gluten-free pizza may seem intimidating, but with the right ingredients and techniques, it’s easier than you think. The key to a great gluten-free Margherita pizza is a well-balanced dough that holds up to toppings while maintaining a delightful texture.
In this recipe, we’ll guide you through creating a delicious pizza that serves 4-6 people, perfect for sharing or enjoying with leftovers.
Ingredients:
- 2 cups gluten-free all-purpose flour
- 1 packet (2 1/4 tsp) active dry yeast
- 1 tsp sugar
- 1 cup warm water (110°F)
- 1 tbsp olive oil
- 1 tsp salt
- 1 cup tomato sauce
- 8 oz fresh mozzarella cheese, sliced
- 1/4 cup fresh basil leaves
- 1/2 tsp dried oregano
- Salt and pepper to taste
- Extra olive oil for drizzling
Instructions:
- Prepare the Yeast Mixture: In a small bowl, combine the warm water, sugar, and yeast. Stir gently and let it sit for about 5-10 minutes until the mixture becomes frothy. This indicates that the yeast is active and ready to be used.
- Make the Dough: In a large mixing bowl, combine the gluten-free flour and salt. Create a well in the center and pour in the yeast mixture along with the olive oil. Mix until a dough forms. Knead the dough lightly on a floured surface for about 5 minutes until smooth and elastic. If the dough is too sticky, add a little more flour as needed.
- Let the Dough Rise: Place the dough in a lightly oiled bowl, cover it with a clean cloth, and let it rise in a warm, draft-free area for about 1 hour or until it doubles in size.
- Preheat the Oven: Preheat your oven to 475°F (245°C). If using a pizza stone, place it in the oven to heat up as well.
- Shape the Pizza: Once the dough has risen, punch it down and transfer it to a parchment-lined baking sheet or pizza peel. Roll out the dough to your desired thickness, keeping in mind that gluten-free dough may not stretch as much as traditional dough.
- Assemble the Pizza: Spread the tomato sauce evenly over the dough, leaving about an inch around the edges for the crust. Arrange the mozzarella slices evenly over the sauce, and sprinkle with dried oregano, salt, and pepper. Drizzle a little olive oil over the top.
- Bake the Pizza: Transfer the pizza to the oven (or onto the hot pizza stone) and bake for 12-15 minutes, or until the crust is golden and the cheese is bubbly and slightly browned.
- Add Fresh Basil and Serve: Remove the pizza from the oven and let it cool for a minute or two. Scatter the fresh basil leaves over the top before slicing and serving.
Extra Tips:
When working with gluten-free dough, it’s important to remember that it can be more delicate than traditional dough. To prevent sticking, dust your hands and the work surface with a little gluten-free flour.
Additionally, if you prefer a crispier crust, prebake the dough for 5 minutes before adding the toppings. Finally, always use fresh mozzarella and basil for the best flavor, and feel free to experiment with additional toppings like sliced tomatoes or a sprinkle of parmesan for extra depth.
Enjoy your homemade Gluten-Free Margherita Pizza!
Lemon and Herb Grilled Chicken With Caprese Salad
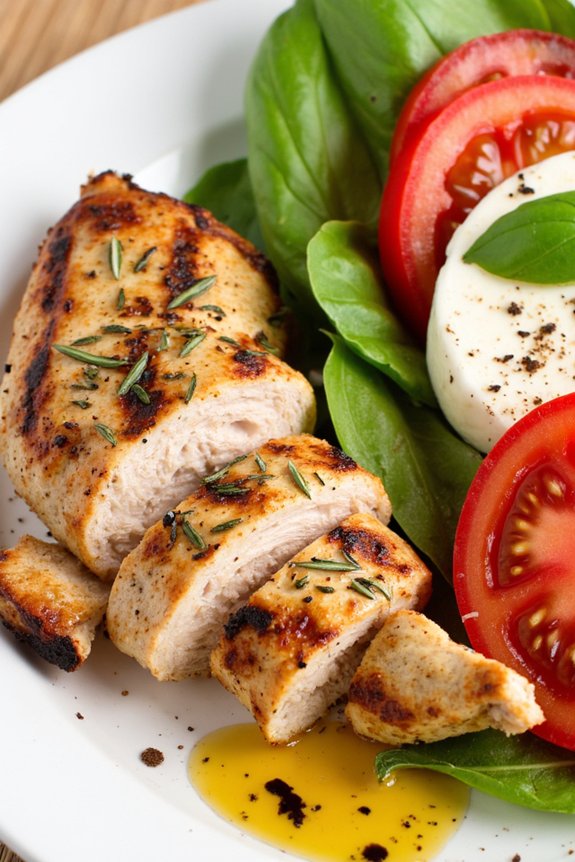
Lemon and Herb Grilled Chicken With Caprese Salad is a delightful gluten-free Italian dish that combines the zesty flavors of lemon with aromatic herbs to create a deliciously marinated grilled chicken. Paired with a classic Caprese salad, this dish offers a rejuvenating balance of savory and fresh flavors.
The Caprese salad, made with ripe tomatoes, fresh mozzarella, and fragrant basil, complements the chicken beautifully and adds a touch of elegance to any meal. Whether you’re hosting a dinner party or simply enjoying a meal with family, this dish is sure to impress.
Perfect for warm weather dining, this recipe embraces the simplicity and vibrancy of Italian cuisine. The marinade infuses the chicken with a burst of flavor, while the grilling process adds a delightful smoky char.
The Caprese salad, on the other hand, requires minimal preparation yet offers maximum taste with its combination of juicy tomatoes, creamy mozzarella, and fragrant basil leaves. Together, they create a harmonious dish that’s both satisfying and light. This recipe serves 4-6 people, making it an ideal choice for gatherings or family meals.
Ingredients for Lemon and Herb Grilled Chicken:
- 4-6 boneless, skinless chicken breasts
- 1/4 cup olive oil
- Juice of 2 lemons
- Zest of 1 lemon
- 3 cloves garlic, minced
- 1 tablespoon fresh thyme leaves
- 1 tablespoon fresh rosemary, chopped
- Salt and pepper to taste
Ingredients for Caprese Salad:
- 4 large ripe tomatoes, sliced
- 1 pound fresh mozzarella, sliced
- 1 cup fresh basil leaves
- 3 tablespoons olive oil
- 1 tablespoon balsamic vinegar
- Salt and pepper to taste
Cooking Instructions:
- Prepare the Marinade: In a bowl, combine olive oil, lemon juice, lemon zest, minced garlic, thyme, rosemary, salt, and pepper. Whisk together until well blended.
- Marinate the Chicken: Place the chicken breasts in a resealable plastic bag or a shallow dish. Pour the marinade over the chicken, affirming each piece is well coated. Seal the bag or cover the dish, and refrigerate for at least 30 minutes, or up to 4 hours for deeper flavor.
- Preheat the Grill: About 15 minutes before grilling, preheat your grill to medium-high heat. Lightly oil the grill grates to prevent sticking.
- Grill the Chicken: Remove the chicken from the marinade, letting any excess drip off. Place the chicken on the preheated grill. Grill each side for about 6-7 minutes, or until the internal temperature reaches 165°F (75°C). Transfer the grilled chicken to a platter and let it rest for a few minutes.
- Prepare the Caprese Salad: While the chicken rests, arrange tomato and mozzarella slices on a serving platter, alternating each slice. Tuck fresh basil leaves in between the slices. Drizzle with olive oil and balsamic vinegar, then season with salt and pepper.
- Serve and Enjoy: Slice the grilled chicken breasts and serve them alongside the Caprese salad. Garnish with additional fresh herbs if desired.
Extra Tips:
When grilling the chicken, it’s important to monitor the heat to avoid burning. If the grill is too hot, the outside could char before the inside is fully cooked.
Also, allowing the chicken to rest after grilling ensures the juices redistribute, resulting in tender and juicy meat. For the Caprese salad, using the freshest ingredients is key; ripe, juicy tomatoes and fresh mozzarella make all the difference in flavor.
Additionally, feel free to adjust the amount of balsamic vinegar to suit your taste preference, as some may prefer a slightly tangier salad.
Gluten-Free Eggplant Parmesan
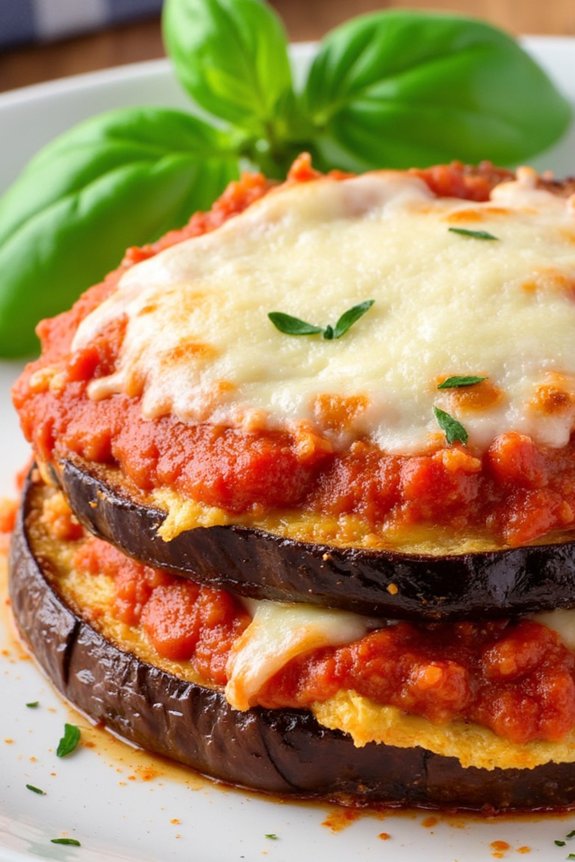
Eggplant Parmesan is a classic Italian dish, beloved for its rich flavors and comforting layers. This gluten-free version guarantees that everyone can enjoy this delicious meal without worry. In this recipe, we replace traditional breadcrumbs with a gluten-free alternative, while maintaining the harmonious blend of crispy eggplant, savory tomato sauce, and melted cheese. The result is a dish that’s both satisfying and indulgent, perfect for family dinners or special occasions.
This Gluten-Free Eggplant Parmesan serves 4-6 people and is an excellent option for those who are gluten intolerant or simply looking to reduce gluten in their diet. The eggplant slices are first coated in a gluten-free breadcrumb mixture before being baked to golden perfection. They’re then layered with a robust tomato sauce and gooey mozzarella cheese, and baked until bubbly. The finished dish isn’t only gluten-free but also packed with flavor and texture, making it a delightful addition to your culinary repertoire.
Ingredients:
- 2 large eggplants, sliced into 1/4-inch thick rounds
- Salt
- 2 cups gluten-free breadcrumbs
- 1 teaspoon dried oregano
- 1 teaspoon dried basil
- 1 teaspoon garlic powder
- 1/2 teaspoon black pepper
- 1/4 cup grated Parmesan cheese
- 2 large eggs
- 1 cup gluten-free all-purpose flour
- 3 cups marinara sauce
- 2 cups shredded mozzarella cheese
- 1/2 cup grated Parmesan cheese (for topping)
- Fresh basil leaves (for garnish)
- Olive oil for drizzling
Instructions:
- Prepare the Eggplant: Begin by slicing the eggplants into 1/4-inch thick rounds. Lay them out on a baking sheet and sprinkle both sides with salt. Let them sit for about 20-30 minutes to draw out excess moisture. This step guarantees the eggplant becomes tender during cooking. Afterward, rinse the slices under cold water and pat them dry with a paper towel.
- Preheat the Oven: Set your oven to 375°F (190°C). Line a baking sheet with parchment paper.
- Prepare the Breading Station: In a shallow bowl, combine the gluten-free breadcrumbs, dried oregano, dried basil, garlic powder, black pepper, and grated Parmesan cheese. In another bowl, beat the eggs. In a third bowl, place the gluten-free all-purpose flour.
- Bread the Eggplant: Begin by dredging each eggplant slice in the flour, shaking off any excess. Next, dip it into the beaten eggs, allowing any excess to drip off, and finally coat it with the breadcrumb mixture, pressing gently to adhere. Place each breaded slice onto the prepared baking sheet.
- Bake the Eggplant: Drizzle the breaded eggplant slices lightly with olive oil. Bake in the preheated oven for about 25 minutes, flipping halfway through, until they’re golden brown and crispy.
- Assemble the Dish: In a 9×13 inch baking dish, spread a thin layer of marinara sauce. Arrange a layer of baked eggplant slices over the sauce. Spoon more marinara sauce over the eggplant, followed by a generous sprinkle of mozzarella cheese. Repeat the layers until all ingredients are used, finishing with a layer of sauce and mozzarella cheese. Top with the additional 1/2 cup of grated Parmesan cheese.
- Bake the Dish: Cover the baking dish with aluminum foil and bake for 25 minutes. Remove the foil and bake for an additional 15 minutes, or until the cheese is bubbly and golden brown.
- Serve: Allow the Gluten-Free Eggplant Parmesan to cool for a few minutes before garnishing with fresh basil leaves. Serve warm and enjoy!
Extra Tips:
To save time, you can prepare the breaded eggplant slices a day ahead and refrigerate them until ready to bake. This dish can also be frozen after baking; simply let it cool completely, cover tightly, and freeze. When ready to eat, thaw it in the refrigerator overnight and reheat in the oven.
Additionally, using a high-quality marinara sauce will greatly enhance the overall flavor of your dish. Feel free to experiment with adding layers of other vegetables or even gluten-free pasta for added texture and variety.
Creamy Mushroom and Truffle Oil Risotto
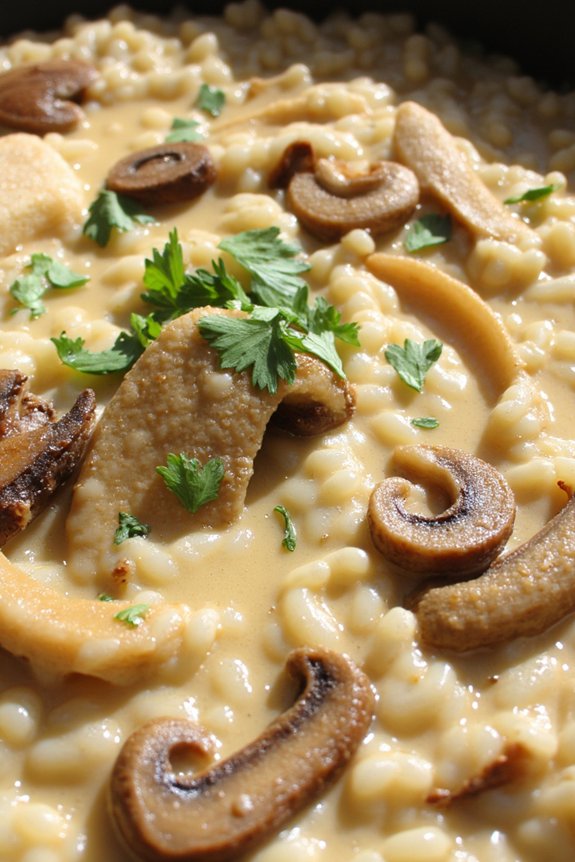
Creamy Mushroom and Truffle Oil Risotto is a delicious gluten-free Italian dish that combines the earthiness of mushrooms with the luxurious aroma of truffle oil. This risotto is perfect for a cozy dinner at home or for impressing guests with a sophisticated meal that doesn’t require gluten.
By using high-quality Arborio rice and the right balance of ingredients, you can achieve that classic creamy texture that risotto is known for. This dish isn’t only comforting but also rich in flavor, making it a memorable experience for anyone who tries it.
The dish revolves around the delicate balance of flavors, starting with sautéed mushrooms that provide a robust base. The addition of truffle oil elevates the dish, adding a fragrant and slightly nutty aroma. As the risotto cooks, the rice grains release their starches, creating a creamy consistency that pairs beautifully with the mushrooms.
This recipe serves 4-6 people, making it ideal for family gatherings or dinner parties. With careful attention to stirring and seasoning, you’ll end up with a perfectly creamy risotto that’s both gluten-free and indulgent.
Ingredients:
- 2 cups Arborio rice
- 1 pound mushrooms (such as cremini or shiitake), sliced
- 1 small onion, finely chopped
- 3 cloves garlic, minced
- 5 cups gluten-free vegetable broth
- 1 cup dry white wine
- 1/2 cup grated Parmesan cheese
- 3 tablespoons olive oil
- 2 tablespoons butter
- 2 tablespoons truffle oil
- Salt and pepper to taste
- Fresh parsley, chopped (for garnish)
Instructions:
- Prepare the Ingredients: Begin by cleaning and slicing the mushrooms. Finely chop the onion and mince the garlic. Grate the Parmesan cheese and set aside.
- Sauté the Mushrooms: In a large sauté pan, heat 2 tablespoons of olive oil over medium heat. Add the sliced mushrooms and cook until they’re golden brown and any liquid has evaporated, about 5-7 minutes. Remove the mushrooms from the pan and set them aside.
- Cook the Aromatics: In the same pan, add the remaining 1 tablespoon of olive oil and the butter. Once melted, add the chopped onion and cook until translucent, about 3-4 minutes. Add the minced garlic and cook for an additional minute until fragrant.
- Toast the Rice: Add the Arborio rice to the pan and stir well to coat the grains in the oil and butter mixture. Cook for about 2 minutes, stirring frequently, until the rice is lightly toasted.
- Deglaze with Wine: Pour in the white wine and stir constantly until the wine is mostly absorbed by the rice.
- Add the Broth Gradually: Begin adding the vegetable broth, one cup at a time, stirring constantly and allowing each addition to be absorbed before adding the next. This process should take about 18-20 minutes. The rice should be creamy but still have a slight bite to it.
- Incorporate the Mushrooms and Cheese: Once the rice is cooked to your desired consistency, stir in the sautéed mushrooms and grated Parmesan cheese. Mix until the cheese is melted and the mushrooms are evenly distributed.
- Finish with Truffle Oil: Drizzle the truffle oil over the risotto and season with salt and pepper to taste. Stir well to combine all the flavors.
- Serve: Remove from heat and let the risotto sit for a minute before serving. Garnish with freshly chopped parsley for a touch of color and freshness.
Extra Tips:
When making risotto, it’s important to stir frequently to prevent the rice from sticking to the bottom of the pan and to encourage the release of starch, which creates the creamy texture.
Use a high-quality truffle oil for the best flavor, but add it sparingly as it can easily overpower the dish. If you prefer a richer taste, you can substitute some of the vegetable broth with chicken broth, as long as it’s gluten-free.
Finally, make certain the broth is kept warm while you’re adding it to the risotto to maintain an even cooking temperature.
Gluten-Free Penne Alla Vodka
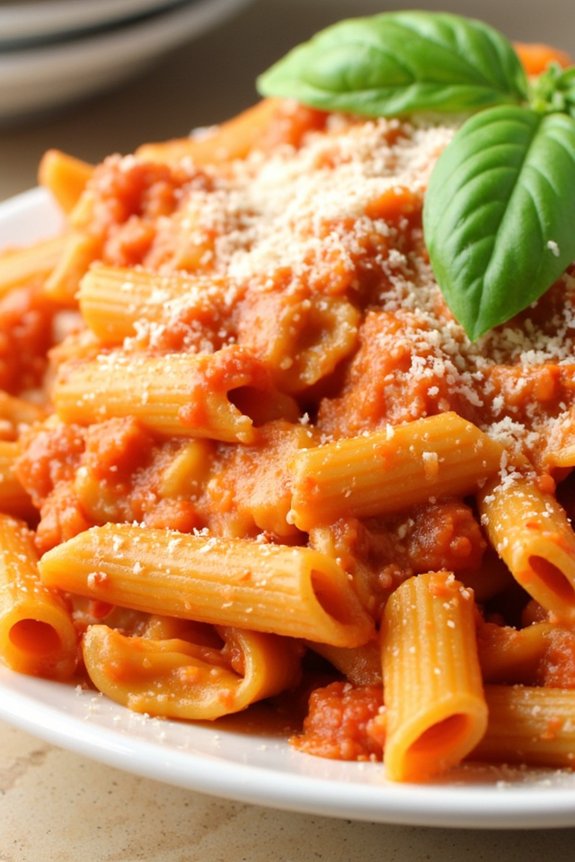
Gluten-Free Penne Alla Vodka is a delicious and comforting Italian dish that brings together the rich flavors of creamy tomato sauce with a hint of vodka to create a perfect pasta experience without the gluten. This dish is an elegant choice for a cozy dinner at home or to impress guests at a small gathering. The vodka helps to release the flavors of the tomatoes, while the cream guarantees a silky texture that coats each piece of penne beautifully.
To make this dish gluten-free, we simply use gluten-free penne pasta, which is widely available in most grocery stores. This recipe is designed to serve 4-6 people, making it ideal for a family meal or a small dinner party. The preparation is straightforward and requires minimal ingredients, allowing the quality of each component to shine through. By following this recipe, you’ll be able to create a gluten-free version of this classic Italian favorite that retains all the flavor and appeal of the traditional dish.
Ingredients:
- 1 pound gluten-free penne pasta
- 2 tablespoons olive oil
- 1 small onion, finely chopped
- 2 cloves garlic, minced
- 1/2 teaspoon red pepper flakes
- 1 cup vodka
- 1 can (28 ounces) crushed tomatoes
- 1 cup heavy cream
- Salt and pepper to taste
- 1/2 cup grated Parmesan cheese
- Fresh basil leaves for garnish
Instructions:
- Cook the Pasta: Fill a large pot with water, add a generous amount of salt, and bring it to a boil. Add the gluten-free penne and cook according to the package instructions until al dente. Drain and set aside.
- Sauté Aromatics: In a large skillet, heat olive oil over medium heat. Add the chopped onion and sauté until it becomes translucent, about 5 minutes. Add the minced garlic and red pepper flakes, and sauté for an additional minute until fragrant.
- Deglaze with Vodka: Carefully pour in the vodka, stirring constantly. Allow it to cook for about 5-7 minutes until the vodka has reduced by half, which will help mellow its sharpness and enhance the sauce’s flavor.
- Add Tomatoes: Stir in the crushed tomatoes and bring the mixture to a simmer. Let it cook for 10-15 minutes, allowing the flavors to meld together.
- Incorporate Cream: Reduce the heat to low and slowly stir in the heavy cream. Allow the sauce to simmer gently for another 5 minutes, stirring occasionally, until it thickens slightly.
- Combine Pasta and Sauce: Add the cooked gluten-free penne to the sauce and toss well to guarantee each piece is coated. Season with salt and pepper to taste.
- Serve and Garnish: Serve the pasta hot, topped with grated Parmesan cheese and fresh basil leaves for a burst of flavor and color.
Extra Tips:
When making Gluten-Free Penne Alla Vodka, it’s important to use a high-quality gluten-free pasta that holds its shape well after cooking. Be sure not to overcook the pasta, as gluten-free varieties can become mushy if left in water for too long.
Also, remember that the alcohol in the vodka will mostly cook off, leaving behind its flavor-enhancing properties, making this dish suitable for all. For those who prefer a non-alcoholic version, you can substitute the vodka with an equal amount of chicken or vegetable broth for a similar depth of flavor.
Tuscan White Bean and Kale Soup
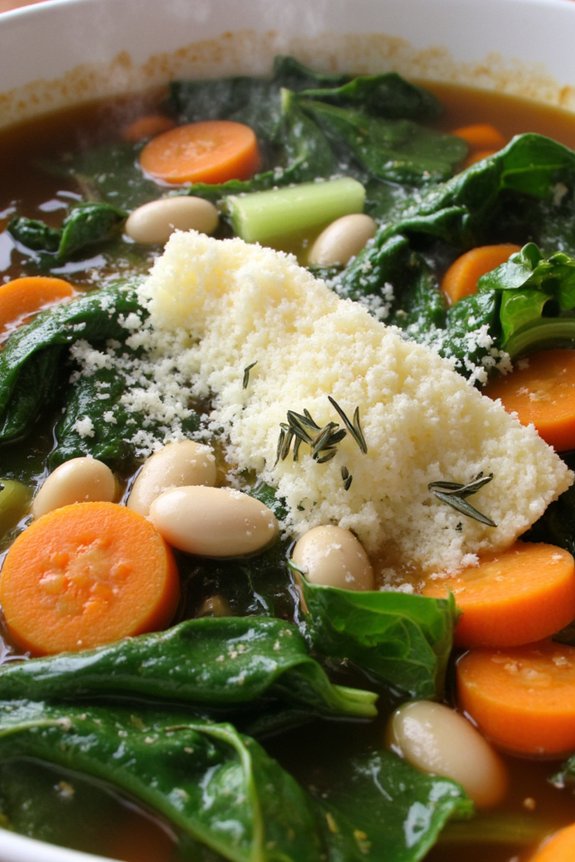
This recipe is designed to serve 4-6 people, making it suitable for a family dinner or a small gathering. The preparation involves simple ingredients that are widely available, and the cooking process is straightforward, allowing even novice cooks to achieve delicious results.
With its vibrant flavors and nourishing ingredients, Tuscan White Bean and Kale Soup is sure to become a favorite in your gluten-free recipe collection.
Ingredients:
- 2 tablespoons olive oil
- 1 medium onion, chopped
- 2 cloves garlic, minced
- 2 carrots, peeled and chopped
- 2 celery stalks, chopped
- 1 teaspoon dried thyme
- 1 teaspoon dried rosemary
- 1/4 teaspoon red pepper flakes
- 6 cups gluten-free vegetable broth
- 2 (15-ounce) cans of white beans, drained and rinsed
- 1 bunch kale, stems removed and leaves chopped
- Salt and pepper, to taste
- Juice of 1 lemon
- Grated Parmesan cheese (optional, for serving)
Cooking Instructions:
1. Prepare the Aromatics: In a large pot, heat the olive oil over medium heat. Add the chopped onion and cook until it becomes translucent, about 5 minutes.
Stir in the minced garlic, chopped carrots, and chopped celery, cooking for another 5 minutes until the vegetables begin to soften.
2. Add Herbs and Spices: Stir in the dried thyme, dried rosemary, and red pepper flakes, allowing the spices to become fragrant, about 1 minute.
3. Simmer the Soup Base: Pour in the gluten-free vegetable broth, and bring the mixture to a boil.
Once boiling, reduce the heat to a simmer. Add the drained and rinsed white beans, and cook uncovered for about 15 minutes.
4. Incorporate the Kale: Add the chopped kale to the pot, stirring to combine.
Continue to simmer for an additional 10 minutes, or until the kale is tender.
5. Season and Finish: Taste the soup, then season with salt and pepper as needed.
Add the juice of one lemon to brighten the flavors. Stir well and remove the pot from the heat.
6. Serve: Ladle the soup into bowls and sprinkle with grated Parmesan cheese if desired.
Serve hot and enjoy the comforting flavors.
Extra Tips:
For added depth of flavor, consider sautéing a small amount of pancetta or bacon with the onions at the beginning of the recipe.
This will add a savory, smoky taste to the soup. If you prefer a thicker consistency, you can mash some of the beans before adding them to the pot.
Additionally, this soup pairs wonderfully with gluten-free bread or a fresh salad for a complete meal.
Gluten-Free Tiramisu
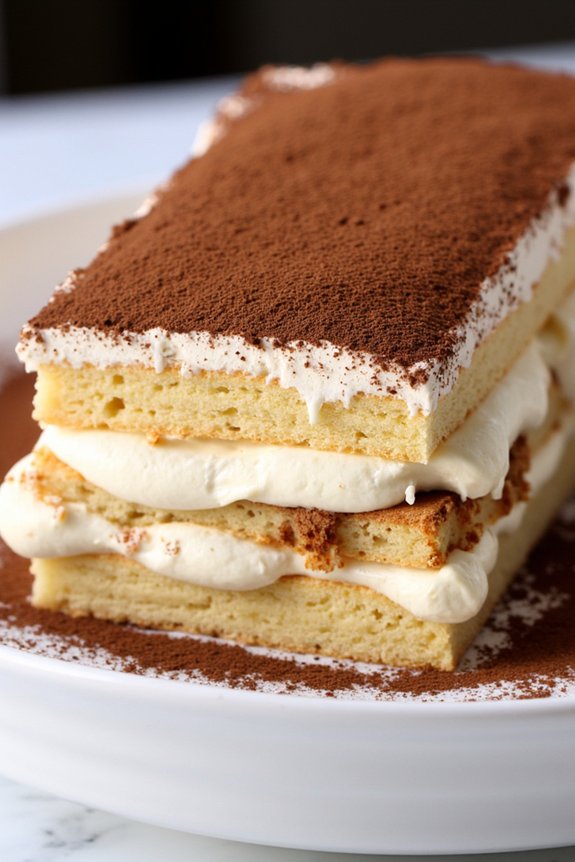
Tiramisu, a classic Italian dessert, is known for its creamy layers and rich coffee flavor. However, traditional recipes often use ladyfingers made with wheat flour, which contains gluten. This gluten-free version maintains all the delicious qualities of the original while guaranteeing that those with gluten sensitivities can enjoy it too.
By using gluten-free ladyfingers and careful ingredient selection, this recipe delivers the same indulgent experience without compromising on taste or texture.
This Gluten-Free Tiramisu recipe is perfect for gatherings and special occasions, serving 4-6 people. It combines gluten-free ladyfingers soaked in brewed espresso with layers of smooth mascarpone cream, dusted with cocoa powder to create a luxurious dessert. The key is to prepare each component with care and allow the tiramisu ample time in the refrigerator to set, so the flavors meld together beautifully.
Ingredients (Serving size: 4-6 people):
- 24 gluten-free ladyfingers
- 1 1/2 cups brewed espresso, cooled
- 4 large eggs, separated
- 1 cup granulated sugar
- 1 teaspoon vanilla extract
- 16 ounces mascarpone cheese, at room temperature
- 1 tablespoon cocoa powder, for dusting
- 1/4 cup coffee liqueur (optional)
Cooking Instructions:
- Prepare the Coffee Mixture: Brew the espresso and let it cool to room temperature. If using, add the coffee liqueur for an extra kick and set aside.
- Make the Mascarpone Cream: In a large mixing bowl, beat the egg yolks and granulated sugar together until the mixture becomes thick and pale. Mix in the vanilla extract and mascarpone cheese until smooth and creamy. Ascertain there are no lumps for a silky texture.
- Whisk Egg Whites: In a separate clean bowl, whisk the egg whites until stiff peaks form. Carefully fold the egg whites into the mascarpone mixture, keeping the mixture light and airy.
- Assemble the Tiramisu: Quickly dip each gluten-free ladyfinger into the cooled espresso mixture, ensuring they’re soaked but not soggy. Place a layer of soaked ladyfingers at the bottom of a 9×13-inch dish or a similar-sized serving dish.
- Layer the Cream: Spread half of the mascarpone cream over the ladyfingers evenly. Repeat with another layer of dipped ladyfingers, followed by the remaining mascarpone cream, smoothing the top with a spatula.
- Chill and Serve: Cover the dish with plastic wrap and refrigerate for at least 4 hours, ideally overnight. This allows the flavors to meld and the tiramisu to set properly. Before serving, dust the top with cocoa powder using a fine sieve.
Extra Tips:
When making Gluten-Free Tiramisu, ascertain all ingredients are at room temperature for easier mixing and smoother textures. Use high-quality espresso for the best flavor impact, and taste your coffee mixture before dipping the ladyfingers to adjust sweetness or liquor content to your preference.
Allowing the tiramisu to chill overnight enhances the flavors, making it even more delicious. If mascarpone is unavailable, a combination of cream cheese and heavy cream can be used as a substitute.
Almond Flour Biscotti With Dark Chocolate
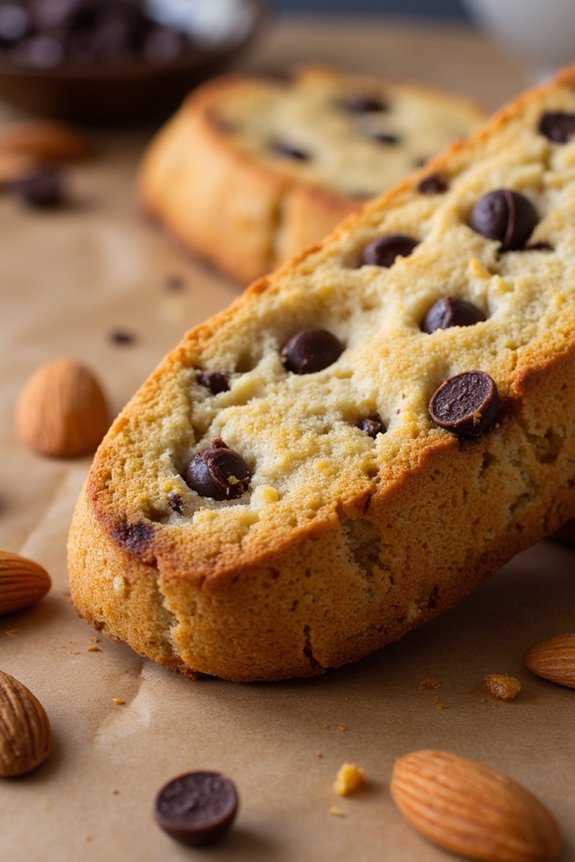
Almond Flour Biscotti With Dark Chocolate is a delightful twist on a classic Italian treat, perfect for those who are following a gluten-free diet. This biscotti recipe combines the nutty flavor of almond flour with the rich taste of dark chocolate, creating a deliciously crunchy cookie that’s perfect for dipping in coffee or enjoying on its own. The use of almond flour not only makes these biscotti gluten-free but also adds a subtle sweetness and a slightly chewy texture that complements the dark chocolate beautifully.
These biscotti are easy to make and store well, making them an ideal snack to have on hand for unexpected guests or as a satisfying treat during afternoon tea. Whether you’re looking to impress your friends with a homemade gift or simply want to satisfy your own sweet tooth, this Almond Flour Biscotti With Dark Chocolate is sure to become a staple in your gluten-free baking repertoire.
Ingredients for 4-6 servings:
- 2 cups almond flour
- 1 teaspoon baking powder
- 1/2 teaspoon salt
- 1/2 cup granulated sugar
- 2 large eggs
- 1 teaspoon vanilla extract
- 1/2 teaspoon almond extract
- 1 cup dark chocolate chips
- 1/2 cup sliced almonds
Instructions:
- Preheat the Oven: Start by preheating your oven to 350°F (175°C). Line a baking sheet with parchment paper or a silicone baking mat to guarantee the biscotti don’t stick.
- Mix the Dry Ingredients: In a large bowl, whisk together the almond flour, baking powder, salt, and granulated sugar until well combined. This helps to evenly distribute the leavening agent and guarantees a uniform texture.
- Combine Wet Ingredients: In a separate bowl, beat the eggs, vanilla extract, and almond extract together until frothy. This will help incorporate air into the mixture, giving the biscotti a light texture.
- Form the Dough: Gradually add the wet ingredients to the dry ingredients, mixing until a dough forms. Be careful not to overmix. Fold in the dark chocolate chips and sliced almonds until they’re evenly distributed throughout the dough.
- Shape the Biscotti Logs: Divide the dough in half and shape each portion into a log about 10 inches long and 2 inches wide. Place the logs on the prepared baking sheet, leaving enough space between them for expansion.
- First Bake: Bake the biscotti logs for 25-30 minutes, or until they’re golden brown and firm to the touch. Remove from the oven and let them cool on the baking sheet for about 10 minutes.
- Slice the Biscotti: Using a sharp serrated knife, carefully slice the logs diagonally into 3/4-inch thick slices. Place the slices cut side down back on the baking sheet.
- Second Bake: Return the biscotti to the oven and bake for an additional 10-12 minutes, or until they’re crisp and dry. Turn them over halfway through baking for even browning.
- Cool and Serve: Let the biscotti cool completely on a wire rack before serving. They’ll continue to harden as they cool, reaching the perfect crunchy texture.
Extra Tips:
For an extra touch of indulgence, consider drizzling melted dark chocolate over the cooled biscotti or dipping one end in chocolate for a more decadent finish. If you prefer a sweeter biscotti, you can increase the sugar slightly or add a handful of dried cranberries for a fruity twist.
Remember that almond flour can vary in texture, so for best results, use blanched almond flour, which is finer and more suited for baking. Enjoy your gluten-free Almond Flour Biscotti With Dark Chocolate with a steaming cup of espresso or your favorite tea.
Gluten-Free Polenta With Roasted Vegetables
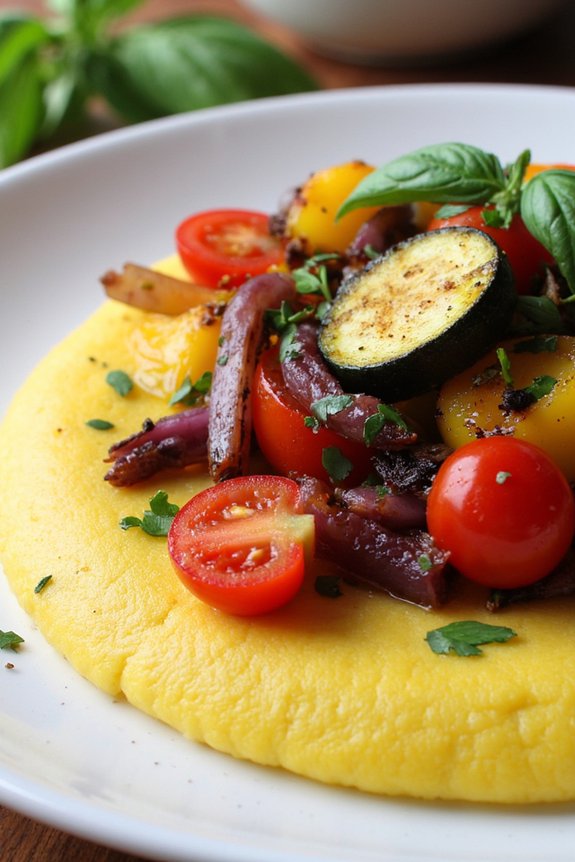
Polenta, a classic Italian dish, provides a versatile gluten-free base for a variety of flavors. In this recipe, we pair creamy polenta with a vibrant medley of roasted vegetables, creating a dish that’s both hearty and nutritious. The combination of the soft, buttery polenta and the crisp, caramelized vegetables makes for a comforting meal perfect for any occasion.
Inspired by the rustic charm of Italian cooking, this dish showcases how simple, high-quality ingredients can transform into a delicious gluten-free meal. The beauty of this recipe lies in its simplicity and flexibility. You can adapt the vegetables to what’s in season or available in your pantry, and with a few herbs and spices, uplift this dish to new heights.
Whether you’re serving it as a main course or a side dish, this Gluten-Free Polenta with Roasted Vegetables is sure to impress guests and delight family members alike. Best of all, it’s easy to prepare, making it perfect for both busy weeknights and relaxed weekend dinners.
Ingredients (Serves 4-6):
- 1 cup of polenta (cornmeal)
- 4 cups of water
- 1 tablespoon of salt
- 2 tablespoons of butter
- 1 cup of grated Parmesan cheese
- 1 red bell pepper, chopped
- 1 yellow bell pepper, chopped
- 1 zucchini, sliced
- 1 red onion, sliced
- 1 cup of cherry tomatoes, halved
- 3 tablespoons of olive oil
- 1 teaspoon of dried oregano
- 1 teaspoon of dried basil
- Salt and pepper to taste
- Fresh basil for garnish (optional)
Instructions:
- Prepare the Polenta: In a large saucepan, bring the 4 cups of water to a boil. Add 1 tablespoon of salt. Gradually whisk in the polenta to prevent any lumps from forming. Reduce the heat to low and cook the polenta, stirring frequently, for about 30-40 minutes until it thickens and pulls away from the sides of the pan.
- Finish the Polenta: Once the polenta is cooked, stir in the butter and Parmesan cheese until fully incorporated and creamy. Remove from heat and cover to keep warm.
- Preheat the Oven: Preheat your oven to 425°F (220°C).
- Prepare the Vegetables: In a large bowl, combine the chopped red and yellow bell peppers, sliced zucchini, red onion, and cherry tomatoes. Drizzle with olive oil and sprinkle with dried oregano, dried basil, salt, and pepper. Toss until the vegetables are evenly coated.
- Roast the Vegetables: Spread the vegetable mixture in a single layer on a baking sheet. Roast in the preheated oven for 20-25 minutes, or until the vegetables are tender and lightly charred, stirring halfway through the cooking time.
- Assemble the Dish: Spoon the creamy polenta onto a serving platter or individual plates. Top with the roasted vegetables, ensuring even distribution.
- Garnish and Serve: Garnish with fresh basil leaves if desired. Serve immediately while warm.
Extra Tips: To guarantee perfectly creamy polenta, make sure to whisk continuously while gradually adding the polenta to boiling water, which helps in preventing lumps. If you prefer a cheesy flavor, feel free to add more Parmesan cheese to taste.
For a vegan version, substitute the butter with olive oil and use a plant-based cheese alternative. You can also experiment with different vegetables depending on the season, such as asparagus or squash, to add variety to the dish.