

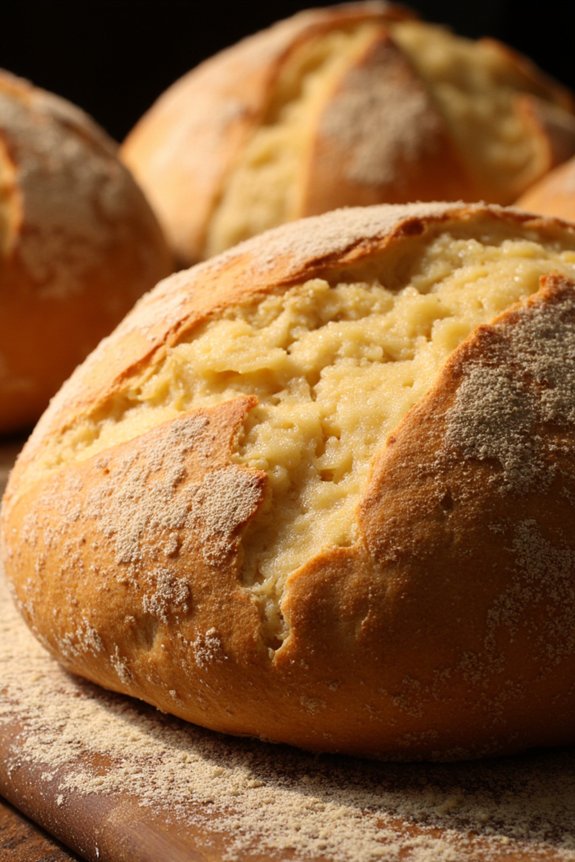
Ever found yourself yearning for the comforting aroma of freshly baked bread, only to discover there’s no yeast in the cupboard?
Worry not, because I’ve uncovered 10 crisp Italian no-yeast bread recipes that are both simple and delicious.
From the classic Italian flatbread to the rustic Pane Carasau, each recipe is a unique taste adventure waiting to be explored.
Curious about how these breads can elevate your meals?
Let’s explore these delightful creations together.
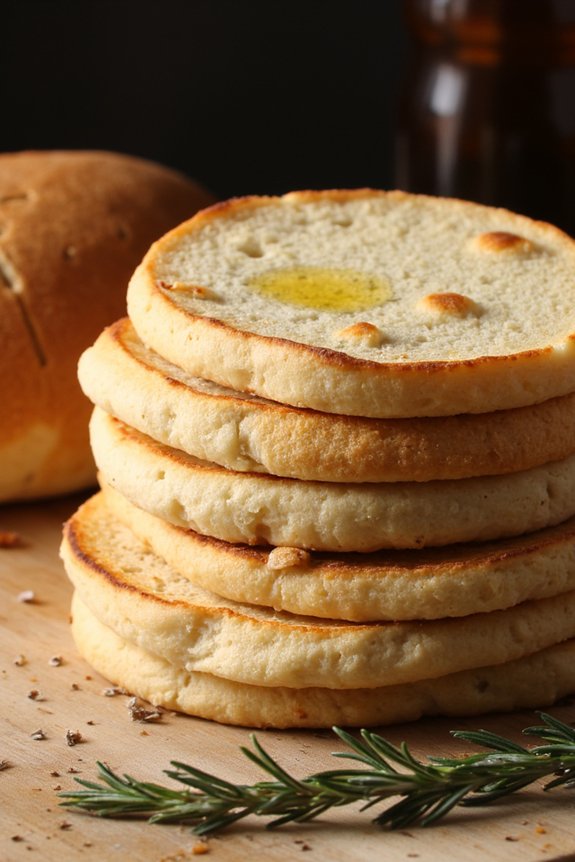
Classic Italian Flatbread
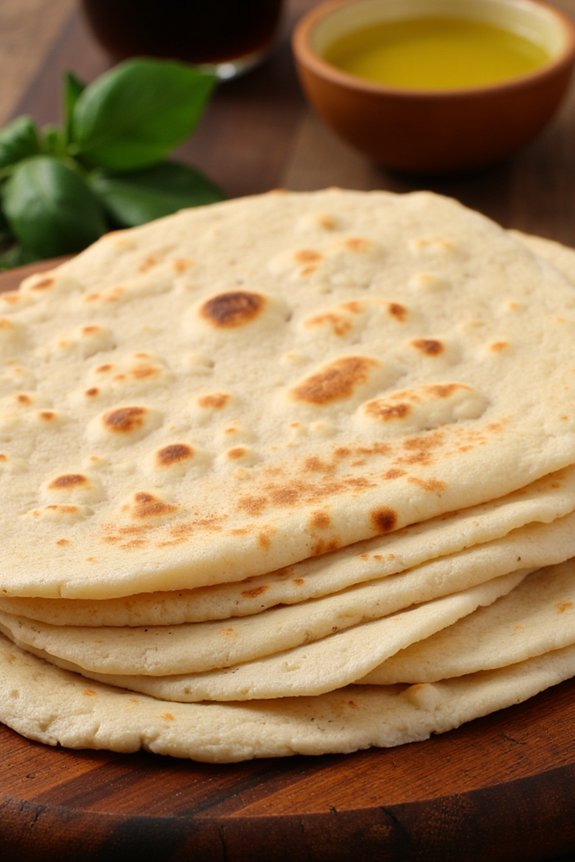
Classic Italian flatbread, known as “piadina”, is a simple yet delicious bread that can be prepared without any yeast, making it a quick option for a variety of meals. Originating from the Emilia-Romagna region, this flatbread is versatile and can be enjoyed as a wrap, stuffed with your favorite filling, or simply served as a side to accompany a hearty meal.
The beauty of this recipe lies in its simplicity, which allows the natural flavors of the ingredients to shine through. This no yeast Italian flatbread recipe is perfect for those who want to whip up a batch of bread without the need for long rising times. The dough is made with basic pantry ingredients, such as flour, olive oil, and water, which come together to create a soft, pliable dough.
Once cooked, the flatbreads are tender and slightly crispy on the outside, creating the ideal base for a range of toppings or fillings.
Ingredients for 4-6 servings:
- 500g all-purpose flour
- 1 teaspoon salt
- 1 tablespoon baking powder
- 75ml olive oil
- 225ml warm water
Cooking Instructions:
- Mix the Dry Ingredients: In a large mixing bowl, combine the all-purpose flour, salt, and baking powder. Stir the ingredients together until they’re well mixed.
- Add the Wet Ingredients: Create a well in the center of the dry ingredients. Pour in the olive oil and warm water. Stir the mixture using a wooden spoon or your hands until a rough dough begins to form.
- Knead the Dough: Transfer the dough onto a lightly floured surface. Knead for about 5-7 minutes until the dough is smooth and elastic. If the dough feels too sticky, add a little more flour as needed.
- Rest the Dough: Cover the dough with a clean kitchen towel and let it rest for about 20 minutes. This allows the gluten to relax, making the dough easier to roll out.
- Divide and Roll the Dough: After resting, divide the dough into 6 equal portions. Roll each portion into a ball and then flatten it with a rolling pin into a thin circle, approximately 3mm thick.
- Cook the Flatbread: Heat a non-stick skillet over medium-high heat. Place a rolled-out piece of dough onto the skillet. Cook for about 2-3 minutes on each side, or until the bread is golden brown and slightly puffed. Repeat with the remaining dough.
- Serve and Enjoy: Serve the flatbreads warm with your choice of fillings or as a side dish.
Extra Tips:
To guarantee your flatbreads are soft and pliable, be careful not to overcook them – they should be golden brown with light spotting. If you prefer a softer flatbread, you can cover them with a damp cloth after cooking to retain moisture.
For added flavor, consider incorporating herbs or spices like rosemary or garlic powder into the dough. Additionally, the dough can be made ahead of time and stored in the refrigerator for up to a day, allowing you to enjoy fresh flatbreads whenever you desire.
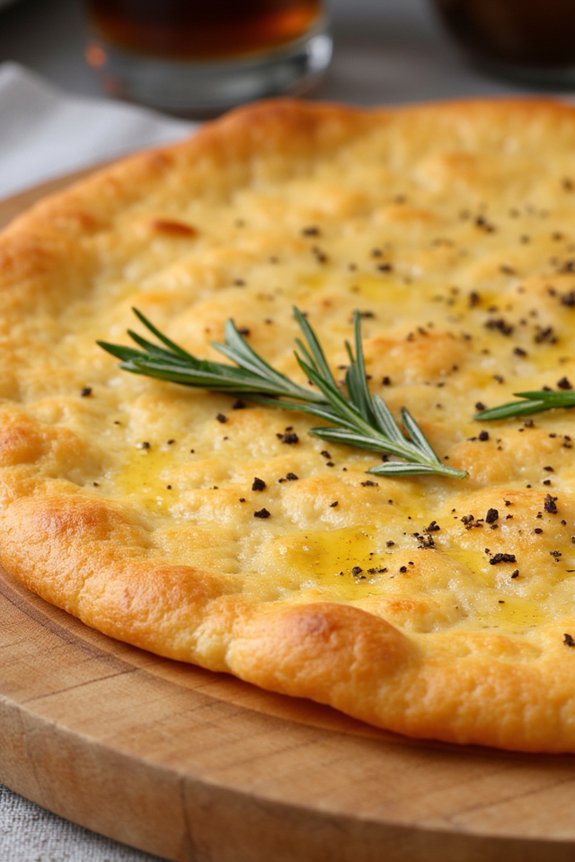
Quick Focaccia With Herbs
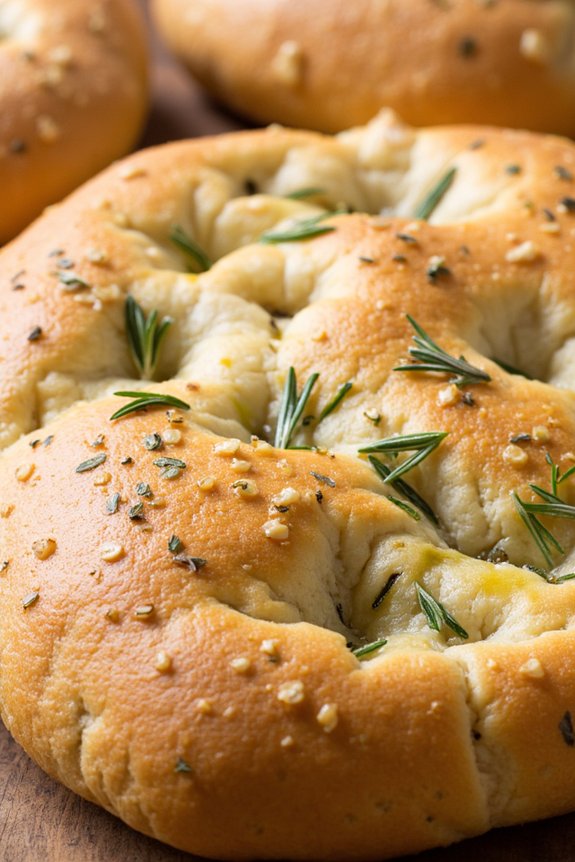
If you’re craving homemade bread but don’t have any yeast on hand, this Quick Focaccia with Herbs recipe is the perfect solution. This no-yeast bread is incredibly easy and fast to prepare, making it an ideal choice for a last-minute side dish or a delicious appetizer. The focaccia is light and fluffy with a beautiful golden crust, infused with the aromatic flavors of fresh herbs that elevate its taste to a whole new level.
Whether you’re a seasoned baker or a beginner, this recipe will guide you through creating a delightful bread that’s sure to impress. The beauty of this recipe lies in its simplicity and the use of readily available ingredients. With just a few pantry staples and some fresh herbs, you can whip up this flavorful focaccia in no time.
This recipe serves 4-6 people, making it perfect for a family meal or a small gathering. You can customize the herbs according to your preference, or even add other toppings like olives or sun-dried tomatoes to make it your own. Let’s explore the ingredients and steps to create this delicious Quick Focaccia with Herbs.
Ingredients (Serves 4-6):
- 2 cups all-purpose flour
- 1 tablespoon baking powder
- 1 teaspoon salt
- 1 cup warm water
- 2 tablespoons olive oil
- 2 cloves garlic, minced
- 1 tablespoon fresh rosemary, chopped
- 1 tablespoon fresh thyme, chopped
- Sea salt, for sprinkling
- Additional olive oil for drizzling
Instructions:
- Preheat the Oven: Start by preheating your oven to 400°F (200°C). This guarantees that your oven is at the right temperature by the time you finish preparing the dough.
- Prepare the Dough: In a large mixing bowl, combine the all-purpose flour, baking powder, and salt. Mix these dry ingredients thoroughly. Gradually add in the warm water and olive oil, stirring continuously until a soft dough forms.
- Knead the Dough: Transfer the dough onto a lightly floured surface. Knead it gently for about 3-4 minutes until it becomes smooth and elastic. If the dough feels too sticky, sprinkle a bit more flour as needed.
- Shape the Focaccia: Roll out the dough into a rectangle or circle about 1/2 inch thick. Transfer it to a baking sheet lined with parchment paper.
- Add the Toppings: Use your fingers to gently press dimples into the surface of the dough. Drizzle a little olive oil over the top, then sprinkle minced garlic, rosemary, and thyme evenly. Finish by sprinkling a pinch of sea salt for extra flavor.
- Bake the Focaccia: Place the baking sheet in the preheated oven. Bake for 20-25 minutes, or until the focaccia is golden brown and crispy on the edges.
- Cool and Serve: Once baked, remove the focaccia from the oven and allow it to cool slightly on a wire rack. Drizzle it with a touch more olive oil if desired, then cut into slices and serve warm.
Extra Tips:
When making Quick Focaccia with Herbs, it’s important to use fresh herbs for the best flavor. However, if you only have dried herbs on hand, reduce the amount by half since dried herbs have a more concentrated flavor.
Additionally, be cautious not to over-knead the dough, as this can make the focaccia dense rather than light and fluffy. Feel free to experiment with other toppings and seasonings to suit your taste preferences. Enjoy your homemade focaccia fresh out of the oven for the best texture and flavor!
Rustic Pane Carasau
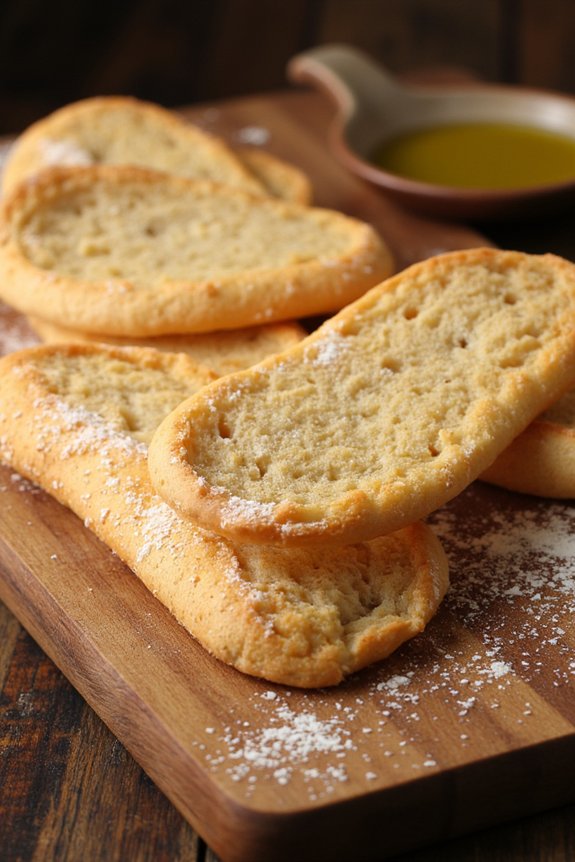
Rustic Pane Carasau, often referred to as “Sardinian music paper” due to its thin, crispy texture, is a traditional Italian flatbread originating from the island of Sardinia. This no yeast bread is perfect for those looking to savor a piece of authentic Italian cuisine in the comfort of their own home.
The simplicity of its ingredients allows the flavors to shine through while maintaining a delightful crunch, making it an ideal accompaniment to cheeses, meats, or simply enjoyed on its own with a drizzle of olive oil.
Traditionally, Pane Carasau was made by shepherds due to its long shelf life and ease of transport. Modern home cooks can replicate this rustic bread with minimal ingredients and effort. The process involves creating a dough that’s rolled out into paper-thin sheets, baked until puffed, and then crisped to perfection.
This recipe serves 4-6 people, providing enough bread to share and enjoy with family or friends.
Ingredients:
- 500g all-purpose flour
- 250ml lukewarm water
- 1 teaspoon salt
- 2 tablespoons olive oil
- Extra flour for dusting
Instructions:
- Prepare the Dough: In a large bowl, combine the flour and salt. Gradually add lukewarm water and olive oil, mixing until the dough begins to come together. Transfer the dough to a lightly floured surface and knead for about 10 minutes, until it becomes smooth and elastic.
- Rest the Dough: Divide the dough into 8 equal portions, shape them into balls, and cover with a damp cloth. Let them rest for at least 30 minutes. This resting period allows the gluten to relax, making it easier to roll out the dough.
- Roll Out the Dough: Preheat your oven to 475°F (245°C). Using a rolling pin, roll each ball of dough into a thin circle, approximately 1-2 mm thick. Use extra flour as needed to prevent sticking.
- Bake the Bread: Place one or two rolled-out dough circles directly onto a preheated baking stone or a baking tray lined with parchment paper. Bake for 2-3 minutes, or until the bread is puffed and slightly golden.
- Crisp the Bread: Carefully remove the puffed bread from the oven, and using a sharp knife, split it into two separate disks. Return these disks to the oven and bake for another 3-5 minutes, or until they’re dry and crispy.
- Cool and Serve: Allow the Pane Carasau to cool on a wire rack. Once cooled, it can be stored in an airtight container for several weeks.
Extra Tips:
For added flavor, sprinkle some sea salt or herbs like rosemary on the bread before the final crisping stage. If you prefer a softer texture, you can lightly spray or brush the bread with water before serving.
Parmesan and Olive Oil Grissini
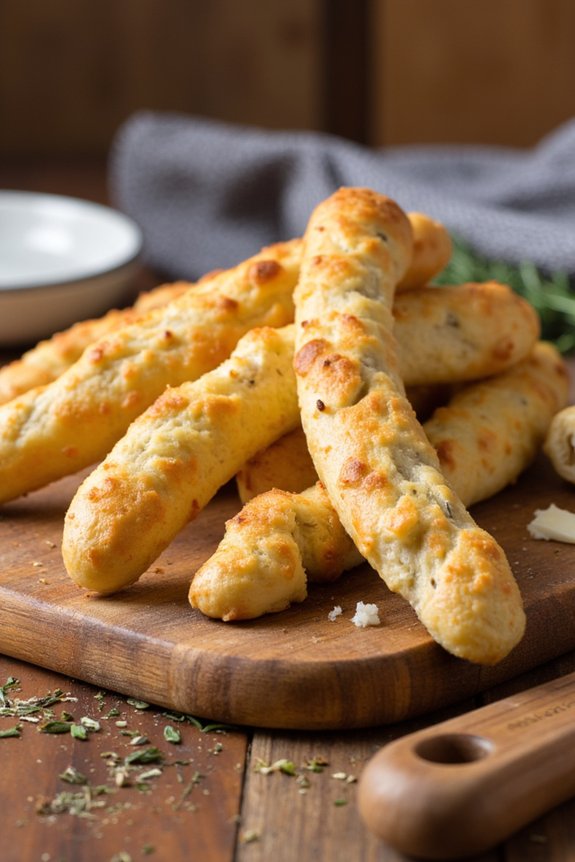
Parmesan and Olive Oil Grissini is a delightful Italian treat that brings a touch of elegance to any meal. These crispy breadsticks are perfect for serving at dinner parties or as a simple snack. Unlike traditional bread recipes, this grissini recipe doesn’t require yeast, making it a quick and easy option that still delivers on flavor and texture. The combination of Parmesan cheese and olive oil imparts a rich, savory taste, while the absence of yeast guarantees a crisp and crunchy finish.
Originating from the Piedmont region of Italy, grissini have become popular worldwide for their versatility and ease of preparation. This no-yeast version allows you to enjoy authentic Italian breadsticks without the need for rising time, making it perfect for last-minute gatherings. Serve them alongside a charcuterie board, with dips, or enjoy them on their own as a light snack. Their delicate, yet robust, flavor profile makes them a favorite among both adults and children.
Ingredients for 4-6 servings:
- 2 cups all-purpose flour
- 1/2 cup grated Parmesan cheese
- 1/4 cup extra-virgin olive oil
- 1/2 cup water
- 1 teaspoon salt
- 1 teaspoon baking powder
- 1 teaspoon garlic powder (optional)
- 1 tablespoon dried Italian herbs (such as oregano, thyme, or rosemary)
- Extra flour for dusting
Cooking Instructions:
- Preheat the Oven: Start by preheating your oven to 400°F (200°C) and line a baking sheet with parchment paper to prevent sticking.
- Combine Dry Ingredients: In a large mixing bowl, combine the flour, Parmesan cheese, salt, baking powder, garlic powder, and Italian herbs. Mix well to confirm an even distribution of the ingredients.
- Add Wet Ingredients: Create a well in the center of the dry mixture and pour in the olive oil and water. Stir the ingredients together with a wooden spoon or your hands until a dough forms.
- Knead the Dough: Transfer the dough to a lightly floured surface and knead for about 5 minutes until it becomes smooth and elastic. This helps to develop the gluten and create a better texture in the grissini.
- Shape the Grissini: Divide the dough into small portions and roll each portion into a long, thin stick, about the thickness of a pencil. Place the sticks onto the prepared baking sheet, leaving some space between each one.
- Bake the Grissini: Place the baking sheet in the preheated oven and bake for 15-20 minutes, or until the grissini are golden brown and crisp. Keep an eye on them to prevent over-browning.
- Cool and Serve: Remove the grissini from the oven and let them cool on a wire rack. Once cooled, serve them as desired.
Extra Tips:
For an extra crispy texture, make sure to roll the dough as thinly as possible. You can experiment with different herb combinations to customize the flavor to your liking. If you prefer a bit of a kick, sprinkle some chili flakes into the dough mixture.
Additionally, storing any leftover grissini in an airtight container will help maintain their crispiness for several days. Enjoy experimenting with this versatile recipe and delight your guests with homemade Italian grissini.
Savory Panigaccio
Savory Panigaccio is a traditional Italian flatbread originating from the Liguria region. This delightful bread is known for its simplicity and rustic flavor, making it a perfect accompaniment to a wide variety of dishes. Unlike many breads, Panigaccio doesn’t require yeast, which means it’s quicker to prepare and is a fantastic option for those looking for a quick and simple bread recipe.
Traditionally cooked in terracotta dishes called “testi,” this bread can also be easily made at home using a skillet or a cast-iron pan. The beauty of Panigaccio lies in its versatility and the ability to be paired with both savory and sweet accompaniments. It can be served with a variety of cheeses, cold cuts, or even spread with a little honey or jam for a sweeter option.
The bread’s crisp exterior and soft, chewy interior provide a satisfying texture that complements many flavors. Whether you’re hosting a dinner party or simply want to enjoy a taste of Italy, Savory Panigaccio is an excellent choice that will delight your taste buds and impress your guests.
Ingredients for 4-6 servings:
- 2 cups all-purpose flour
- 1 teaspoon salt
- 1 1/4 cups water
- 2 tablespoons olive oil
- Extra olive oil for cooking
Cooking Instructions:
- Prepare the Batter:
- In a large mixing bowl, combine the all-purpose flour and salt. Gradually add water while stirring continuously to form a smooth batter. The consistency should be similar to that of pancake batter.
- Rest the Batter:
- Allow the batter to rest for about 30 minutes. This resting period helps the flour to fully hydrate and results in a better texture for your Panigaccio.
- Heat the Skillet:
- Heat a non-stick skillet or cast-iron pan over medium-high heat. Once hot, lightly grease it with olive oil using a brush or a paper towel.
- Cook the Panigaccio:
- Pour a ladleful of batter into the skillet, tilting the pan to spread the batter evenly into a thin layer. Cook for about 2-3 minutes on one side, or until the edges start to lift and the bottom is golden brown. Flip and cook the other side for an additional 2 minutes.
- Repeat the Process:
- Continue the process with the remaining batter, adding a little more oil to the pan as needed. Transfer each cooked Panigaccio to a plate and cover with a clean towel to keep warm.
- Serve and Enjoy:
- Once all the bread is cooked, serve warm with your choice of accompaniments such as cheese, cured meats, or spreads.
Extra Tips:
For the best results, make certain that your skillet or pan is well-heated before pouring the batter, as this helps achieve the desired crispy texture. If you’re using a cast-iron pan, make sure it’s well-seasoned to prevent sticking.
Additionally, you can experiment with adding herbs or spices to the batter for extra flavor. Storing any leftover Panigaccio is easy; simply wrap them in foil and reheat in the oven when ready to enjoy again.
Traditional Piadina Romagnola

Traditional Piadina Romagnola is a renowned Italian flatbread originating from the Emilia-Romagna region. This delightful bread is known for its versatility, often used as a wrap or served alongside meals. What makes piadina unique is its ability to be made without yeast, resulting in a quick and easy bread that still manages to be soft and flavorful.
Traditionally cooked on a terracotta dish called “testo,” piadina can also be prepared on a skillet or griddle, making it accessible to everyone. The simple yet flavorful nature of piadina makes it a staple in Italian cuisine, often filled with ingredients like prosciutto, cheese, and arugula. Its flexibility in both preparation and serving options makes it a favorite for casual dinners and snacks alike.
Although the ingredients are few, the magic lies in the technique and balance of flavors, providing a delightful experience with every bite.
Ingredients (serves 4-6):
- 500g all-purpose flour
- 100g lard or 80ml olive oil
- 250ml lukewarm water
- 10g salt
- 1 teaspoon baking soda
Cooking Instructions:
- Mixing the Dough: In a large mixing bowl, combine the flour, baking soda, and salt. If using lard, cut it into small pieces and rub it into the flour mixture until it resembles coarse breadcrumbs. If using olive oil, pour it into the flour mixture and combine until well integrated.
- Kneading the Dough: Gradually add the lukewarm water to the mixture, stirring continuously until a dough begins to form. Transfer the dough onto a floured surface and knead it for about 8-10 minutes until it’s smooth and elastic.
- Resting the Dough: Cover the dough with a clean kitchen towel and let it rest for at least 30 minutes. This resting period allows the gluten to relax, making it easier to roll out later.
- Dividing and Rolling Out: After resting, divide the dough into 6 equal portions. Roll each portion into a ball and then flatten it with a rolling pin into a circular shape, about 3-4 mm thick and roughly 20-25 cm in diameter.
- Cooking: Heat a skillet or griddle over medium-high heat. Once hot, place one rolled-out dough onto the skillet. Cook for about 2-3 minutes on each side or until golden brown spots appear. Repeat the process with the remaining dough pieces.
- Serving: Serve the piadina warm, either as a wrap or alongside your favorite dishes. Fill with traditional toppings such as prosciutto, cheese, and arugula, or get creative with your own combinations.
Extra Tips:
For an authentic piadina experience, use a heavy-based skillet or griddle to guarantee even cooking and to achieve those characteristic brown spots. If you prefer a softer piadina, slightly reduce the cooking time.
Additionally, if you don’t have lard on hand, olive oil is a great substitute that adds its own unique flavor. Remember, the key to a perfect piadina is in the dough’s consistency and the heat of your cooking surface. Enjoy your homemade piadina fresh and warm for the best taste and texture.
Simple Farinata Di Ceci
Simple Farinata Di Ceci is an Italian no yeast bread recipe that originates from the Liguria region. This delicious dish is often enjoyed as a savory snack or appetizer. It’s made from chickpea flour, water, olive oil, and a pinch of salt, creating a thin and crispy flatbread that’s naturally gluten-free. The farinata is traditionally cooked in a wood-fired oven, but it can easily be made at home using a standard oven. With its nutty flavor and slightly crispy texture, farinata di ceci is a perfect accompaniment to a variety of dishes or enjoyed on its own.
The preparation of farinata di ceci is simple and requires minimal ingredients. The batter is made by combining chickpea flour with water, allowing it to rest for a few hours to guarantee a smooth consistency. Once rested, the batter is then baked at a high temperature until golden and crispy. This simple yet flavorful dish can be customized with various toppings such as rosemary, onions, or black pepper to suit your taste. Enjoy this traditional Italian delicacy as a part of your meal or as a delightful snack on its own.
Ingredients (Serves 4-6):
- 2 cups chickpea flour
- 3 1/2 cups water
- 1/4 cup extra virgin olive oil
- 1 teaspoon salt
- Freshly ground black pepper (optional)
- Fresh rosemary (optional)
- Olive oil for greasing the pan
Cooking Instructions:
- Prepare the Batter: In a large mixing bowl, combine the chickpea flour and salt. Gradually add the water while whisking continuously to prevent lumps. Once the batter is smooth, let it rest at room temperature for at least 2 hours. This resting period is essential for allowing the chickpea flour to absorb the water.
- Preheat the Oven: Preheat your oven to 450°F (230°C). Place a large, oven-proof skillet or baking pan inside to heat up. The pan should be large enough to spread the batter thinly.
- Skim the Foam: After the batter has rested, skim off any foam that may have formed on the surface. This guarantees a smoother texture for the finished farinata.
- Add Olive Oil: Stir 1/4 cup of olive oil into the rested batter. Mix well to incorporate the oil evenly throughout the batter.
- Prepare the Pan: Carefully remove the hot skillet or baking pan from the oven. Grease it generously with olive oil to prevent sticking and to promote a crispy crust.
- Pour the Batter: Pour the batter into the hot skillet or baking pan, spreading it evenly. The batter should be about 1/4 inch thick. Optionally, sprinkle freshly ground black pepper and rosemary over the top for added flavor.
- Bake the Farinata: Place the pan back in the oven and bake for 20-25 minutes, or until the farinata is golden brown and crispy around the edges. Keep an eye on the color and adjust the time as needed to achieve the desired crispiness.
- Serve: Once baked, carefully remove the farinata from the oven. Allow it to cool slightly before slicing into wedges. Serve warm or at room temperature.
Extra Tips:
For the best results, guarantee your batter has no lumps by thoroughly whisking and letting it rest. If you have time, let the batter rest longer, even overnight, to enhance the texture and flavor.
Using a preheated pan is essential for achieving a crispy crust, so don’t skip this step. If you prefer a slightly thicker farinata, adjust the amount of batter used or use a smaller pan.
Experiment with different herbs and spices to personalize your farinata di ceci to your liking. Enjoy this versatile dish as a standalone snack or alongside your favorite Italian meals.
Tasty Schiacciata Bread
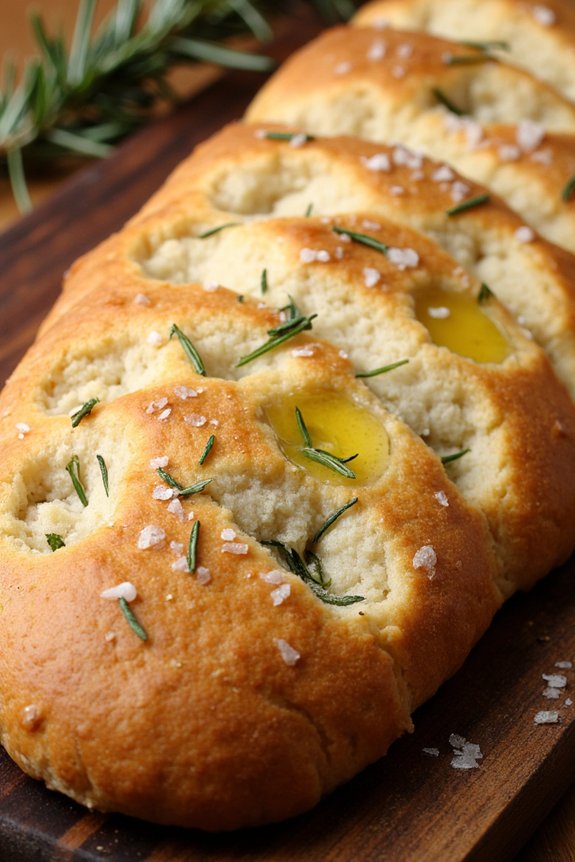
Tasty Schiacciata Bread is a delightful Italian flatbread, known for its soft, chewy texture and herb-infused flavor. Originating from the Tuscany region, this no-yeast bread is perfect for those who enjoy a quick and easy baking project without the lengthy rising times associated with yeast-leavened breads.
It’s an excellent accompaniment to soups, salads, or can be enjoyed on its own as a snack. The absence of yeast in this recipe simplifies the baking process while still delivering a deliciously satisfying bread that’s guaranteed to become a staple in your kitchen.
This recipe for Tasty Schiacciata Bread serves 4-6 people and is perfect for a family meal or a small gathering. The bread is versatile and can be customized with your favorite herbs and toppings, making it a crowd-pleaser.
It achieves its characteristic flavor from a combination of high-quality olive oil, fresh rosemary, and sea salt, which not only enhance its taste but also give it an appetizing aroma. With simple ingredients and straightforward steps, you’ll be able to whip up this Italian classic in no time.
Ingredients:
- 3 cups all-purpose flour
- 1 tablespoon baking powder
- 1 teaspoon salt
- 1 1/4 cups water
- 1/4 cup extra virgin olive oil, plus extra for drizzling
- 2 tablespoons fresh rosemary, chopped
- Coarse sea salt, for topping
Instructions:
- Preheat the Oven: Start by preheating your oven to 400°F (200°C). This guarantees that the oven is hot enough to properly bake the bread and achieve a golden crust.
- Prepare the Dough: In a large mixing bowl, combine the all-purpose flour, baking powder, and salt. Mix these dry ingredients well to guarantee even distribution of the baking powder, which will help the bread rise slightly.
- Add Wet Ingredients: Slowly add the water and olive oil to the dry mixture. Stir with a wooden spoon or your hands until a shaggy dough forms. The dough should be slightly sticky but manageable.
- Knead the Dough: Turn the dough onto a lightly floured surface and knead for about 5 minutes until it becomes smooth and elastic. This step helps develop the gluten, giving the bread its structure.
- Shape the Bread: Roll out the dough into a rectangle about 1/2 inch thick. Transfer the dough onto a baking sheet lined with parchment paper.
- Add Toppings: Drizzle the top of the dough with extra olive oil. Use your fingers to create dimples all over the surface. Sprinkle the chopped rosemary and coarse sea salt evenly over the top.
- Bake the Bread: Place the baking sheet in the preheated oven and bake for 20-25 minutes, or until the bread is golden brown and cooked through. The edges should be crispy, and the center should be soft.
- Cool and Serve: Remove the bread from the oven and let it cool slightly on a wire rack before slicing. Serve warm or at room temperature.
Extra Tips:
For a more flavorful Schiacciata, consider adding thinly sliced garlic or olives to the toppings. You can also experiment with other herbs like thyme or oregano for a different taste profile.
Confirm not to over-knead the dough, as this can make the bread tough. If you prefer a crispier crust, leave the bread in the oven for an additional 5 minutes, but keep an eye on it to prevent burning.
Enjoy your homemade Italian flatbread with a drizzle of balsamic reduction or a side of olive tapenade for an authentic Italian experience.
Easy Crescia Al Formaggio
Easy Crescia Al Formaggio is an Italian bread that’s both simple to make and deliciously cheesy. Traditionally associated with the Easter season in the Marche region of Italy, this bread is a savory delight that pairs beautifully with antipasti or can be enjoyed on its own.
Unlike typical bread recipes, Crescia Al Formaggio doesn’t require yeast, making it quicker and easier to prepare while still delivering rich flavors and a satisfying texture. The key to this bread is its blend of cheeses, which melt into the dough creating a moist and flavorful interior.
This recipe is perfect for those who want to experience authentic Italian flavors without the fuss of traditional bread-making techniques involving yeast. Ideal for a serving size of 4-6 people, Crescia Al Formaggio can be whipped up in under an hour, making it an excellent addition to any meal.
Whether you’re a seasoned baker or new to bread-making, this recipe is straightforward and approachable, guaranteeing a gratifying experience and a delicious result.
Ingredients:
- 2 cups all-purpose flour
- 1 tablespoon baking powder
- 1 teaspoon salt
- 1/2 teaspoon black pepper
- 4 large eggs
- 1/2 cup whole milk
- 1/4 cup olive oil
- 1 cup grated Parmesan cheese
- 1 cup shredded Pecorino Romano cheese
Instructions:
- Preheat the Oven: Start by preheating your oven to 375°F (190°C). This guarantees that the oven is at the right temperature when you’re ready to bake, which is vital for the bread to rise properly.
- Prepare the Baking Pan: Grease a 9-inch round cake pan or a similar-sized baking dish with olive oil or line it with parchment paper. This will prevent the bread from sticking to the pan and make it easier to remove once baked.
- Mix Dry Ingredients: In a large mixing bowl, combine the all-purpose flour, baking powder, salt, and black pepper. Stir the dry ingredients together until they’re evenly distributed.
- Whisk Wet Ingredients: In another bowl, whisk together the eggs, whole milk, and olive oil. Make sure the mixture is smooth and well combined.
- Combine Ingredients: Gradually add the wet mixture to the dry ingredients, stirring gently with a spatula or wooden spoon until just combined. Be careful not to overmix as this can result in a dense bread.
- Add the Cheeses: Fold in the grated Parmesan and shredded Pecorino Romano cheeses into the dough. Confirm they’re evenly distributed throughout the mixture for a consistent flavor in every bite.
- Transfer to Baking Pan: Pour the batter into the prepared baking pan, spreading it out evenly with a spatula.
- Bake the Bread: Place the pan in the preheated oven and bake for 30-35 minutes, or until the top is golden brown and a toothpick inserted into the center comes out clean.
- Cool and Serve: Let the bread cool in the pan for about 10 minutes, then transfer it to a wire rack to cool completely. Slice and serve warm or at room temperature.
Extra Tips:
For an extra flavorful Crescia Al Formaggio, consider adding a teaspoon of garlic powder or a tablespoon of fresh chopped rosemary to the dry ingredients. This will enhance the aromatic quality of the bread.
Additionally, if you prefer a softer crust, cover the bread with a clean kitchen towel while it cools. For those looking to experiment with more cheeses, substituting half of the Pecorino Romano with a sharp cheddar can add a unique twist to the traditional recipe.
Authentic Sardinian Pane Frattau
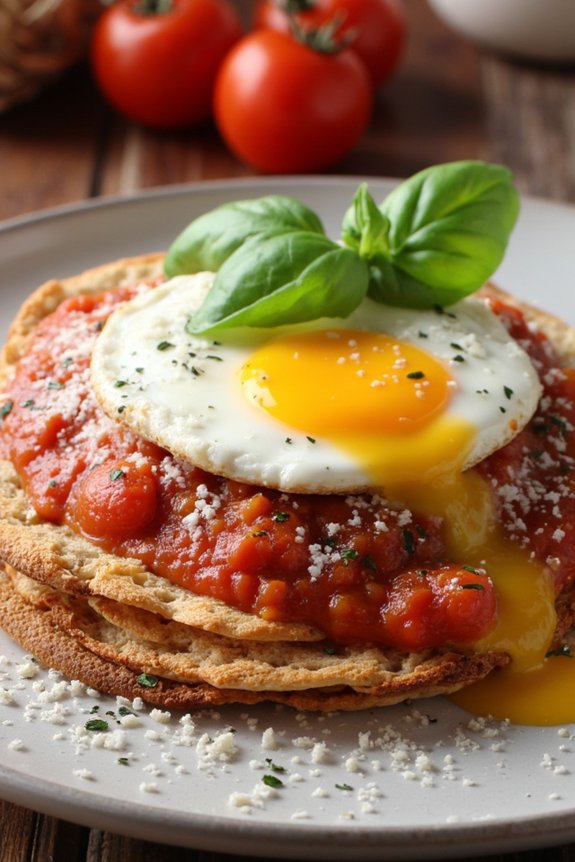
Authentic Sardinian Pane Frattau is a traditional Italian dish that originates from the beautiful island of Sardinia. This dish showcases the simplicity and flavor of Sardinian cuisine. Pane Frattau is fundamentally thin layers of Sardinian flatbread, known as pane carasau, soaked in broth and then layered with tomato sauce, pecorino cheese, and topped with a poached egg. The result is a comforting and rustic meal that highlights the island’s culinary traditions.
This no yeast bread recipe is perfect for those who appreciate the authenticity and simplicity of Italian cuisine. Pane Frattau may be humble in its ingredients, but it’s rich in flavor and history. The dish is commonly served as a hearty breakfast or a light lunch, bringing together the textures of crispy bread, rich tomato sauce, and creamy egg yolk. Preparing Pane Frattau is an experience that will transport you to the sun-drenched landscapes of Sardinia with each delicious bite.
Ingredients (Serves 4-6):
- 8 sheets of pane carasau (Sardinian flatbread)
- 4 cups vegetable broth (or chicken broth)
- 2 cups tomato sauce
- 1 cup grated pecorino cheese
- 4-6 eggs
- Salt and pepper to taste
- Fresh basil leaves for garnish
Cooking Instructions:
- Prepare the Broth: In a large pot, heat the vegetable broth until it reaches a gentle simmer. This will be used to soften the pane carasau.
- Prepare the Tomato Sauce: In a separate saucepan, heat the tomato sauce over medium heat until it’s warm. Season with salt and pepper to taste. Keep it warm while you prepare the other components.
- Soak the Pane Carasau: Dip each sheet of pane carasau, one at a time, into the simmering broth for just a few seconds until it softens slightly. Be careful not to soak them for too long, as they can become too soggy.
- Layer the Ingredients: On a serving plate, place a softened sheet of pane carasau. Spread a spoonful of tomato sauce over it, and sprinkle some grated pecorino cheese on top. Repeat this process, layering the sheets of pane carasau, tomato sauce, and cheese until you have about 3-4 layers, depending on your preference.
- Poach the Eggs: In a small pot, bring water to a gentle simmer. Carefully crack each egg into a small bowl and then gently slide it into the simmering water. Poach the eggs for about 3-4 minutes, until the whites are set but the yolks remain runny.
- Assemble the Dish: Top the layered pane carasau with a poached egg. Garnish with fresh basil leaves and a sprinkle of pecorino cheese.
- Serve Immediately: Serve the Pane Frattau immediately while the eggs are warm and the cheese is slightly melted.
Extra Tips:
Pane Frattau can be customized to suit your taste. You can add a touch of garlic or chili flakes to the tomato sauce for an extra kick. If you can’t find pane carasau, you can substitute with any thin flatbread available, though it might alter the texture slightly.
The key to a perfect Pane Frattau isn’t to oversoak the bread and to serve it immediately to enjoy the perfect blend of textures. Enjoy this dish with a side of mixed greens or a light salad for a complete meal.