

The holiday season always brings back fond memories of my childhood, especially the scents of freshly baked Panettone and the thrill of sneaking a taste of Tiramisu before dinner. Italian desserts like crispy cannoli and honey-drenched Struffoli have a special way of bringing families together. Each recipe carries a cherished story or a secret ingredient lovingly passed down through generations. Are you ready to explore these delightful treasures? Let’s uncover the sweet magic that makes our holidays truly unforgettable.
Classic Panettone
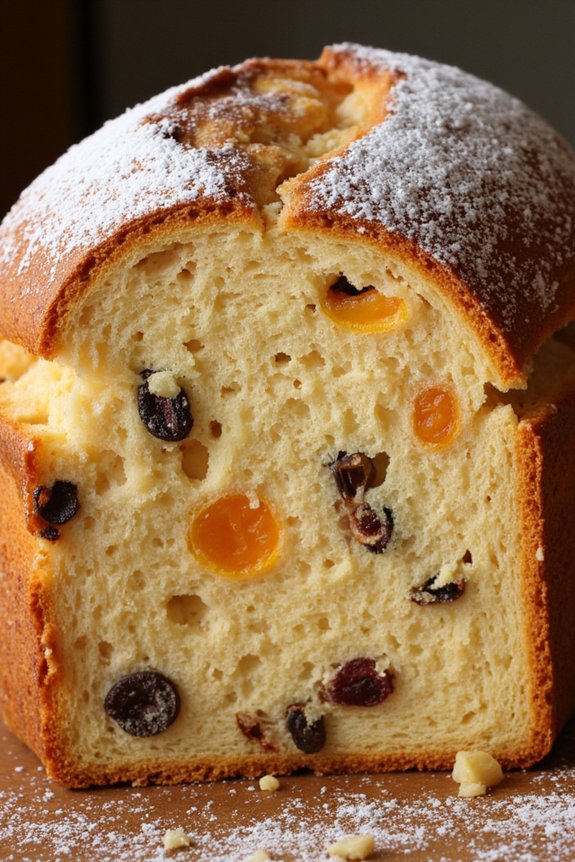
Panettone is a traditional Italian holiday dessert that’s enjoyed worldwide for its rich, buttery flavor and light, airy texture. This sweet bread is typically studded with a variety of dried fruits and often has a subtle hint of citrus, making it a festive and delightful treat.
Originating from Milan, panettone is a staple during Christmas and New Year celebrations, and its preparation is considered an art that brings families together during the holiday season.
The process of making a classic panettone requires patience and care, as the dough needs to rise slowly to develop its characteristic fluffy texture. While this recipe might seem intimidating at first, the end result is a beautifully golden, fragrant loaf that’s well worth the effort.
Serve the panettone with a cup of espresso or a glass of dessert wine for a perfectly indulgent holiday experience.
Ingredients (Serves 4-6 people):
- 4 cups all-purpose flour
- 1/2 cup granulated sugar
- 1/2 cup unsalted butter, softened
- 1/2 cup warm milk
- 1 packet (2 1/4 tsp) active dry yeast
- 4 large eggs
- 1/2 tsp salt
- 1 tsp vanilla extract
- Zest of 1 orange
- Zest of 1 lemon
- 1 cup mixed dried fruits (such as raisins, candied orange peel, and cranberries)
- 1/2 cup chopped nuts (such as almonds or walnuts)
- 1 tbsp honey
- Powdered sugar for dusting
Cooking Instructions:
- Activate the Yeast:
- In a small bowl, combine the warm milk, a tablespoon of sugar, and the active dry yeast. Stir gently and let it sit for about 10 minutes until the mixture becomes frothy.
- Prepare the Dough:
- In a large mixing bowl, whisk together the flour, remaining sugar, and salt. Add the softened butter, eggs, vanilla extract, orange zest, lemon zest, and the frothy yeast mixture. Mix well until a sticky dough forms.
- Knead the Dough:
- Transfer the dough onto a floured surface and knead it for about 10 minutes until it becomes smooth and elastic. If the dough is too sticky, add a little more flour as needed.
- First Rise:
- Place the dough in a lightly greased bowl, cover it with a damp cloth or plastic wrap, and let it rise in a warm place for about 2 hours, or until it has doubled in size.
- Incorporate Fruits and Nuts:
- Punch down the dough and gently knead in the dried fruits and nuts. Make sure they’re evenly distributed throughout the dough.
- Second Rise:
- Shape the dough into a ball and place it in a tall, round panettone mold or a deep cake tin lined with parchment paper. Cover and let it rise again in a warm place for about 1 hour, or until doubled in size.
- Bake the Panettone:
- Preheat your oven to 350°F (175°C). Brush the top of the dough with honey to create a golden crust. Bake for 35-40 minutes, or until a skewer inserted into the center comes out clean. If the top browns too quickly, cover it loosely with foil.
- Cool and Serve:
- Allow the panettone to cool in the mold before removing it. Dust with powdered sugar before serving.
Extra Tips:
When making panettone, confirm that all your ingredients are at room temperature before starting, as this helps with the yeast activation and dough consistency.
If you have a stand mixer, use it for kneading to save time and effort. Additionally, make sure to use a proper panettone mold, which supports the dough as it rises, confirming the characteristic tall shape.
If possible, plan your baking schedule to allow for the long rise times, as this will greatly enhance the flavor and texture of your panettone.
Enjoy your homemade panettone fresh, or lightly toast it for a delightful texture change.
Traditional Tiramisu
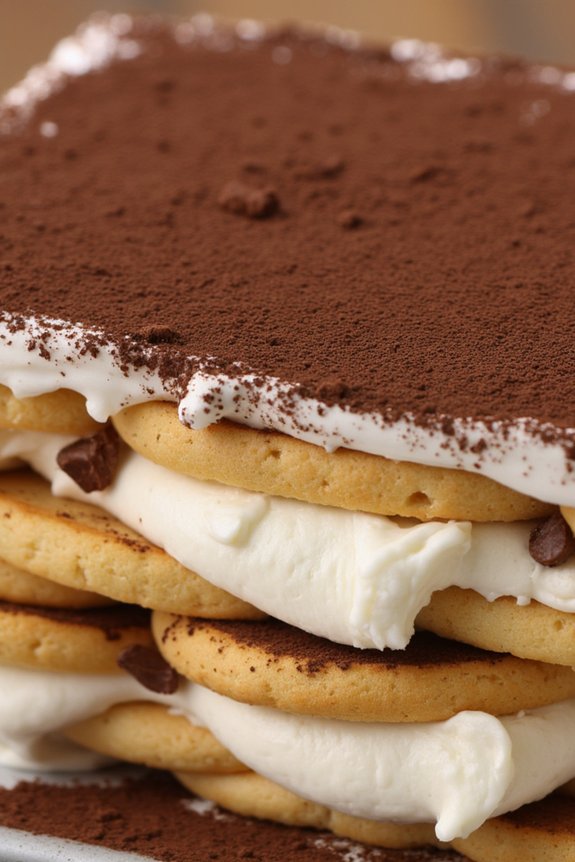
Tiramisu is a classic Italian dessert that has won the hearts of many around the world with its creamy texture and rich flavor. Originating from the Veneto region, this indulgent treat is known for its delightful layers of coffee-soaked ladyfingers and a luscious mascarpone cream, all dusted with cocoa powder. The name “tiramisu” translates to “pick me up,” a nod to the energizing combination of coffee and cocoa.
Whether you’re looking to impress guests at a dinner party or simply indulge in a sweet treat, this traditional tiramisu recipe is sure to satisfy your cravings.
The key to making an authentic tiramisu lies in using quality ingredients and allowing enough time for the flavors to meld together. This recipe serves 4-6 people, making it perfect for intimate gatherings or family dinners. While it requires some patience during the chilling process, the end result is a dessert that’s well worth the wait.
Follow the steps below to create your own delicious tiramisu that captures the essence of Italy‘s beloved dessert.
Ingredients:
- 3 large eggs, separated
- 3/4 cup granulated sugar
- 8 oz (about 1 cup) mascarpone cheese
- 1 cup strong brewed espresso or coffee, cooled
- 2 tablespoons coffee liqueur (optional)
- 24-30 ladyfingers (savoiardi)
- Unsweetened cocoa powder, for dusting
- Dark chocolate shavings, for garnish (optional)
Cooking Instructions:
- Prepare the Cream Mixture: Begin by whisking the egg yolks and sugar together in a medium bowl until the mixture becomes thick and pale. This should take about 5 minutes. Gently fold the mascarpone cheese into the egg yolk mixture until smooth and well combined.
- Whip the Egg Whites: In a separate bowl, beat the egg whites until they form stiff peaks. Carefully fold the beaten egg whites into the mascarpone mixture, guaranteeing you maintain a light and airy consistency.
- Prepare the Coffee Soak: In a shallow dish, combine the cooled espresso with the coffee liqueur, if using. Quickly dip each ladyfinger into the coffee mixture, making sure not to soak them too much, and line the bottom of a baking dish (about 8×8 inches) with a single layer of dipped ladyfingers.
- Layer the Tiramisu: Spread half of the mascarpone mixture over the layer of ladyfingers. Repeat the dipping process with the remaining ladyfingers and arrange them on top of the mascarpone layer. Spread the remaining mascarpone mixture over the second layer of ladyfingers, smoothing the top with a spatula.
- Chill and Set: Cover the dish with plastic wrap and refrigerate for at least 4 hours, or overnight if possible, to allow the flavors to meld and the dessert to set properly.
- Serve: Just before serving, dust the top of the tiramisu with a generous layer of unsweetened cocoa powder. Garnish with dark chocolate shavings if desired. Cut into slices and serve chilled.
Extra Tips:
For best results, use fresh, high-quality mascarpone cheese and espresso to enhance the flavor of your tiramisu. If you prefer a non-alcoholic version, simply omit the coffee liqueur.
It’s important to refrigerate the tiramisu for the recommended time to achieve the proper texture and flavor. Additionally, when dipping the ladyfingers, be swift to prevent them from becoming overly soggy. This guarantees that the dessert maintains its structure and doesn’t become too mushy.
Enjoy your homemade tiramisu as a delightful end to any Italian meal!
Sicilian Cannoli
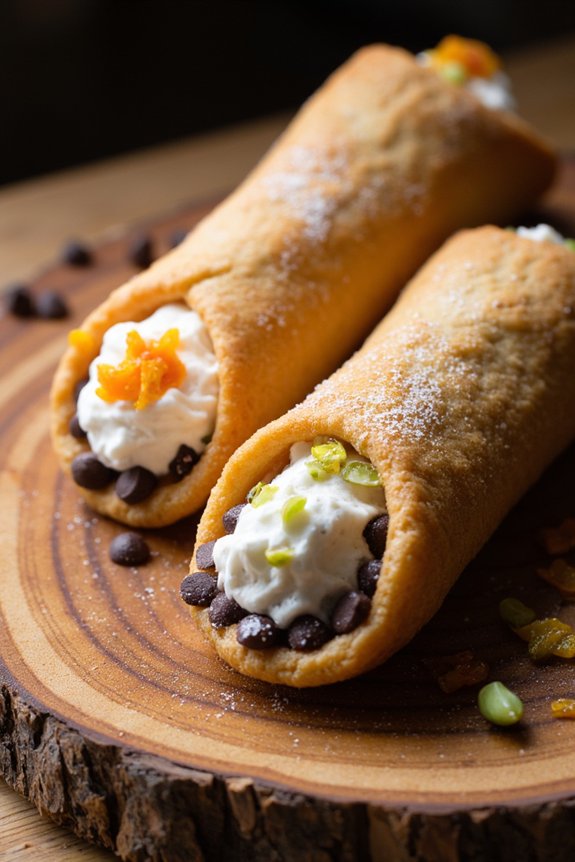
Sicilian Cannoli are a beloved Italian dessert, known for their crispy, fried pastry shells and creamy, sweet ricotta filling. Originating from Sicily, these delightful treats are a staple during holiday celebrations and special occasions. The cannoli shells are traditionally made from a dough enriched with Marsala wine, which contributes to their unique flavor and crispiness. The filling, on the other hand, is a luscious mixture of ricotta cheese, sugar, and a hint of vanilla, often enhanced with chocolate chips or candied fruit for added texture and flavor.
Making Sicilian Cannoli at home is a rewarding process that allows you to enjoy these iconic desserts fresh and tailored to your preferences. The recipe requires some preparation, as the dough needs to be rolled thin and fried until golden brown, while the ricotta filling should be smooth and not too sweet. This recipe will guide you through creating 12-16 cannoli, perfect for serving 4-6 people, guaranteeing everyone has a taste of this Italian classic.
Ingredients:
- 2 cups all-purpose flour
- 1 tablespoon granulated sugar
- 1 tablespoon unsweetened cocoa powder
- 1/4 teaspoon salt
- 3 tablespoons unsalted butter, cut into small pieces
- 1/2 cup Marsala wine
- 1 egg, beaten (for sealing)
- Vegetable oil (for frying)
- 2 cups ricotta cheese (drained)
- 1 cup powdered sugar
- 1 teaspoon vanilla extract
- 1/2 cup mini chocolate chips
- Optional: candied orange peel or pistachios for garnish
Instructions:
- Prepare the Dough: In a large mixing bowl, combine the flour, sugar, cocoa powder, and salt. Add the butter and rub it into the flour mixture using your fingertips until it resembles coarse crumbs.
- Incorporate the Liquid: Gradually add the Marsala wine to the flour mixture, stirring with a fork until the dough starts to come together. Knead the dough on a lightly floured surface until it becomes smooth and elastic, about 5-7 minutes.
- Rest the Dough: Wrap the dough in plastic wrap and let it rest at room temperature for at least 30 minutes. This allows the gluten to relax, making it easier to roll out later.
- Roll and Cut the Dough: Divide the rested dough into two portions. Roll each portion out on a floured surface to about 1/8 inch thickness. Using a round cutter (about 4 inches in diameter), cut out circles of dough.
- Shape the Shells: Wrap each dough circle around a metal cannoli tube, sealing the edges with a little beaten egg. Press the seam to guarantee it’s secure.
- Fry the Shells: Heat vegetable oil in a deep saucepan to 350°F (175°C). Fry the cannoli shells in batches until they’re golden brown and crispy, about 3-4 minutes. Carefully remove them using a slotted spoon and let them drain on paper towels.
- Prepare the Filling: In a bowl, mix the ricotta cheese, powdered sugar, and vanilla extract until smooth and creamy. Fold in the mini chocolate chips.
- Fill the Cannoli: Once the shells are completely cooled, use a pastry bag fitted with a wide tip to pipe the ricotta mixture into each shell, filling from both ends.
- Garnish and Serve: Optionally, dip the ends of the filled cannoli in chopped pistachios or candied orange peel for extra flavor and presentation. Serve immediately to maintain the crispiness of the shells.
Extra Tips:
When making Sicilian Cannoli, it’s important to make certain that the ricotta cheese is well-drained; otherwise, the filling can become too watery. You can drain it by placing the ricotta in a fine-mesh sieve over a bowl and leaving it in the refrigerator for a few hours.
Additionally, be cautious when frying the shells, as they can quickly go from golden to burnt. Keep an eye on the oil temperature and adjust the heat as necessary. If you don’t have metal cannoli tubes, you can make your own by wrapping small pieces of aluminum foil into cylinder shapes.
Finally, fill the cannoli shells just before serving to keep them crisp and enjoyable.
Zuppa Inglese

Zuppa Inglese is a classic Italian dessert that exudes elegance and rich flavors. Originating from the Emilia-Romagna region, this delectable treat is often likened to an Italian version of trifle. The name, which translates to “English Soup,” is thought to have been inspired by the English trifle desserts enjoyed by British travelers in Italy.
Composed of layers of sponge cake soaked in Alchermes liqueur, creamy custard, and occasionally chocolate, Zuppa Inglese is both visually stunning and delightfully flavorful, making it a perfect end to any festive holiday meal. This dessert isn’t only a feast for the eyes but also a sensory delight. The vibrant red Alchermes liqueur used to soak the sponge cake adds a distinctive color and a subtle hint of spice, while the custard contributes a creamy, smooth texture.
The interplay between the moist cake and the rich custard creates a harmonious balance of flavors and textures. It’s a dessert that’s sure to impress your guests and leave everyone asking for seconds. Prepare to commence on a culinary journey with this beloved Italian holiday dessert.
Ingredients (Serves 4-6)
- 1 liter whole milk
- 6 egg yolks
- 200g granulated sugar
- 100g all-purpose flour
- 1 tablespoon vanilla extract
- 1 tablespoon unsweetened cocoa powder (optional)
- 200ml Alchermes liqueur
- 300g savoiardi (ladyfinger biscuits)
- Whipped cream for garnish (optional)
Cooking Instructions
- Prepare the Custard: In a medium saucepan, heat the whole milk over medium heat until hot but not boiling. In a separate bowl, whisk together the egg yolks and sugar until pale and fluffy. Gradually add the flour to the egg mixture, whisking constantly to avoid lumps.
- Combine and Cook: Slowly pour the hot milk into the egg mixture, whisking continuously. Return the mixture to the saucepan and cook over low heat, stirring constantly, until the mixture thickens and coats the back of a spoon. Remove from heat and stir in the vanilla extract. Divide the custard into two equal parts if using cocoa powder, and mix the cocoa into one half to make chocolate custard.
- Assemble the Dessert: In a deep serving dish, spread a layer of custard on the bottom. Quickly dip each savoiardi in Alchermes liqueur and arrange them over the custard layer. Repeat the process, alternating between the plain and chocolate custard layers, and soaked biscuits, ending with a layer of custard on top.
- Chill and Set: Cover the dish with plastic wrap and refrigerate for at least 4 hours or until well chilled. This allows the flavors to meld and the dessert to set properly.
- Serve: Just before serving, garnish with whipped cream if desired. Scoop into individual serving dishes and enjoy this exquisite Italian treat.
Extra Tips
When making Zuppa Inglese, be mindful of soaking the savoiardi just enough to absorb the liqueur without becoming overly soggy, which can cause the layers to collapse. If Alchermes is unavailable, you can substitute with a mix of grenadine and a touch of rum or brandy for similar color and flavor.
The dessert can be made a day in advance, allowing the flavors to develop even further, making it an excellent choice for holiday gatherings. Enjoy your Zuppa Inglese with a cup of espresso for an authentic Italian experience.
Struffoli

Struffoli is a traditional Italian dessert that hails from Naples, typically enjoyed during the festive Christmas season. These delightful little honey balls are known for their sweet, crispy texture and are often adorned with colorful sprinkles, making them as visually appealing as they’re delicious.
The dough is rolled into small balls, fried to a golden brown, and then coated in warm, luscious honey, creating a sticky-sweet treat that’s hard to resist. Struffoli is often arranged in a mound or shaped into a wreath, making it the perfect centerpiece for holiday gatherings.
Preparing Struffoli is a fun and rewarding process that can be enjoyed with family and friends. The recipe involves making a simple dough, frying the dough balls, and then tossing them in a generous amount of honey. This dessert isn’t only delightful to eat but also offers a wonderful aroma that will fill your kitchen with the essence of the holidays.
Enjoy this traditional Italian treat with a cup of espresso or a glass of sweet dessert wine for the ultimate festive experience.
Ingredients (serves 4-6 people):
- 2 cups all-purpose flour
- 3 large eggs
- 2 tablespoons sugar
- 1 tablespoon unsalted butter, softened
- 1/2 teaspoon salt
- Zest of 1 lemon or orange
- Vegetable oil, for frying
- 1 cup honey
- 1/4 cup sugar
- Colored sprinkles for decoration
Cooking Instructions:
- Prepare the Dough: In a large mixing bowl, combine the flour, eggs, 2 tablespoons of sugar, softened butter, salt, and lemon or orange zest. Mix until a dough forms. Knead the dough on a lightly floured surface for about 5 minutes until it’s smooth and elastic. Wrap the dough in plastic wrap and let it rest for 30 minutes.
- Shape the Dough: After the dough has rested, divide it into small portions. Roll each portion into a long rope about 1/2-inch thick. Cut the rope into small pieces to form tiny balls, roughly the size of hazelnuts.
- Fry the Dough Balls: In a deep pan, heat vegetable oil to 350°F (175°C). Fry the dough balls in batches until they’re golden brown and puffed up, about 2-3 minutes. Use a slotted spoon to transfer the fried balls to a plate lined with paper towels to drain any excess oil.
- Coat in Honey: In a saucepan over medium heat, warm the honey and 1/4 cup of sugar until the sugar dissolves. Remove from heat. Place the fried dough balls in a large bowl and pour the warm honey mixture over them, stirring gently to coat each ball evenly.
- Assemble and Decorate: Arrange the honey-coated struffoli into a mound or form them into a wreath shape on a serving platter. Sprinkle generously with colored sprinkles for a festive touch. Allow to cool slightly before serving.
Extra Tips:
To guarantee your struffoli are perfectly crisp and light, make sure not to overcrowd the frying pan; fry them in small batches to maintain the oil temperature.
If you prefer a tangy note, you can add a splash of limoncello or orange liqueur to the honey mixture before coating the struffoli. This dessert can be made ahead of time and stored in an airtight container at room temperature for a few days, allowing the flavors to meld beautifully.
Enjoy the process of making struffoli as a fun holiday tradition that brings loved ones together in the kitchen.
Pizzelle
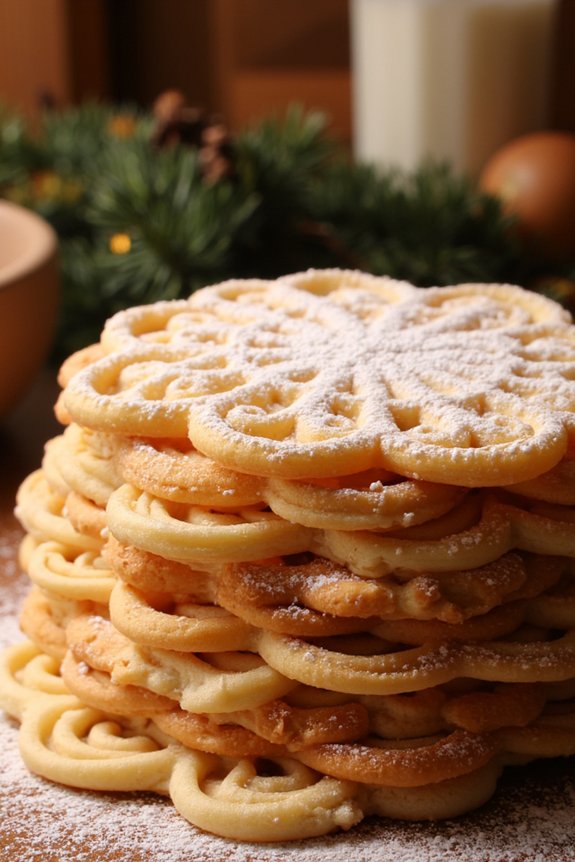
Pizzelle are a classic Italian holiday dessert, known for their delicate, thin, and crispy texture, often flavored with vanilla or anise. Originating from the Abruzzo region of Italy, these waffle-like cookies are traditionally prepared using a pizzelle iron, which imprints a beautiful pattern onto each cookie.
Pizzelle are a versatile treat that can be enjoyed plain or dusted with powdered sugar, and they’re perfect for festive gatherings or as a delightful homemade gift. The key to making perfect pizzelle lies in achieving the right balance of ingredients and carefully monitoring the cooking time to guarantee the cookies remain crisp and light.
These cookies can be stored for several weeks in an airtight container, making them an ideal make-ahead dessert for the busy holiday season. Whether you’re an experienced baker or trying your hand at pizzelle for the first time, this recipe promises to deliver delightful treats that capture the essence of Italian holiday tradition.
Ingredients for 4-6 servings:
- 3 large eggs
- 3/4 cup granulated sugar
- 1/2 cup unsalted butter, melted and cooled
- 1 tablespoon vanilla extract (or anise extract for variation)
- 1 3/4 cups all-purpose flour
- 2 teaspoons baking powder
- Pinch of salt
Cooking Instructions:
- Prepare the Batter: In a large mixing bowl, beat the eggs and sugar together until the mixture is thick and pale, about 3-4 minutes. This step guarantees the sugar fully dissolves and gives the pizzelle a light texture.
- Add the Wet Ingredients: Gradually pour in the melted butter and vanilla extract (or anise extract if preferred), mixing until well combined. The butter should be cooled to avoid cooking the eggs.
- Combine Dry Ingredients: In a separate bowl, sift together the flour, baking powder, and salt. This helps guarantee even distribution of the leavening agent and prevents clumps.
- Incorporate Dry to Wet: Gradually add the dry ingredients to the wet mixture, stirring gently until a smooth batter forms. Be careful not to overmix as it can lead to a dense cookie.
- Preheat the Pizzelle Iron: Plug in your pizzelle iron and preheat it according to the manufacturer’s instructions. Lightly grease the plates if necessary to prevent sticking.
- Cook the Pizzelle: Spoon about a tablespoon of batter onto each section of the pizzelle iron, close, and cook for about 30-60 seconds or until golden brown. The cooking time may vary depending on your iron, so keep an eye on the color.
- Cool and Store: Carefully remove the pizzelle with a spatula and place them on a wire rack to cool. They’ll crisp up as they cool. Once completely cool, store them in an airtight container to maintain their crispness.
Extra Tips:
For perfectly shaped pizzelle, use a cookie scoop to guarantee uniform size and thickness. If you prefer a softer pizzelle, reduce the cooking time slightly, but keep in mind they may not store as well.
Experiment with different flavor extracts to customize your pizzelle, such as almond or lemon. If you find the pizzelle sticking to the iron, try a quick spritz of cooking spray between batches. Enjoy your pizzelle with a dusting of powdered sugar or even drizzle with melted chocolate for an extra special touch.
Ricotta Cheesecake
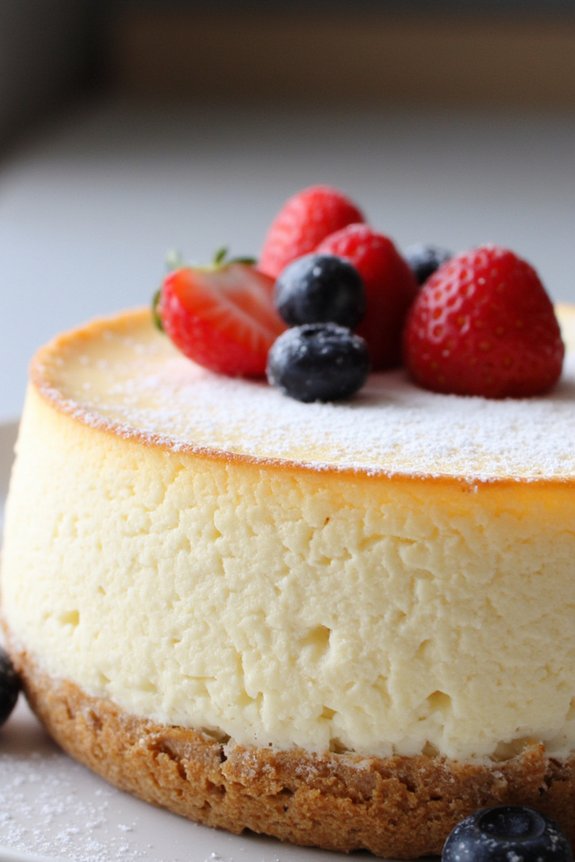
Indulge in the creamy delight of Italian Ricotta Cheesecake, a perfect dessert to grace your holiday table. Unlike its American counterpart, this cheesecake is light and airy, boasting a unique texture thanks to the ricotta cheese. Its subtle sweetness and citrusy aroma make it a revitalizing end to any festive meal.
Originating from Italy, this recipe takes a classic approach, combining traditional ingredients to create a dessert that’s both rich and satisfying, without being overly dense. This delightful Italian dessert is best enjoyed with a dusting of powdered sugar or a drizzle of honey, and pairs wonderfully with fresh berries or a scoop of gelato.
Whether served as a standalone treat or as part of a larger holiday spread, Ricotta Cheesecake is sure to impress your guests with its delicate flavor and elegant presentation. With easy-to-follow steps, this recipe will guide you through creating a delectable cheesecake that elevates any occasion.
Ingredients for 4-6 Servings:
- 1 cup ricotta cheese
- 8 ounces cream cheese, softened
- 3/4 cup granulated sugar
- 3 large eggs
- 1 teaspoon vanilla extract
- Zest of 1 lemon
- 1 tablespoon lemon juice
- 1/4 cup all-purpose flour
- 1/4 teaspoon salt
- Powdered sugar for dusting (optional)
Cooking Instructions:
- Preheat the Oven: Preheat your oven to 350°F (175°C). Grease a 9-inch springform pan with butter or non-stick cooking spray and set aside.
- Prepare the Cheese Mixture: In a large mixing bowl, combine the ricotta cheese, softened cream cheese, and granulated sugar. Use an electric mixer on medium speed to blend the ingredients until smooth and creamy.
- Add the Flavors: Add the eggs one at a time, beating well after each addition. Mix in the vanilla extract, lemon zest, and lemon juice, making sure everything is well combined.
- Incorporate Dry Ingredients: Gradually add the flour and salt to the cheese mixture. Blend on low speed just until the dry ingredients are fully integrated and the batter is smooth.
- Pour and Bake: Pour the cheesecake batter into the prepared springform pan, smoothing the top with a spatula. Bake in the preheated oven for 50 to 60 minutes, or until the center is set and the edges are lightly golden.
- Cool and Refrigerate: Remove the cheesecake from the oven and allow it to cool in the pan for about 30 minutes. Then, transfer it to the refrigerator to chill for at least 4 hours or overnight for best results.
- Serve: Before serving, dust the top of the cheesecake with powdered sugar if desired. Slice and enjoy with fresh berries or a dollop of whipped cream.
Extra Tips:
For an even lighter texture, you can substitute part of the cream cheese with mascarpone cheese. Confirm all ingredients are at room temperature before mixing to achieve a smooth batter.
If you notice cracks on the surface, don’t worry—this is common with cheesecakes and can be hidden with a topping of berries or a dusting of sugar. For a citrus twist, try adding a bit of orange zest along with the lemon.
Torta Caprese
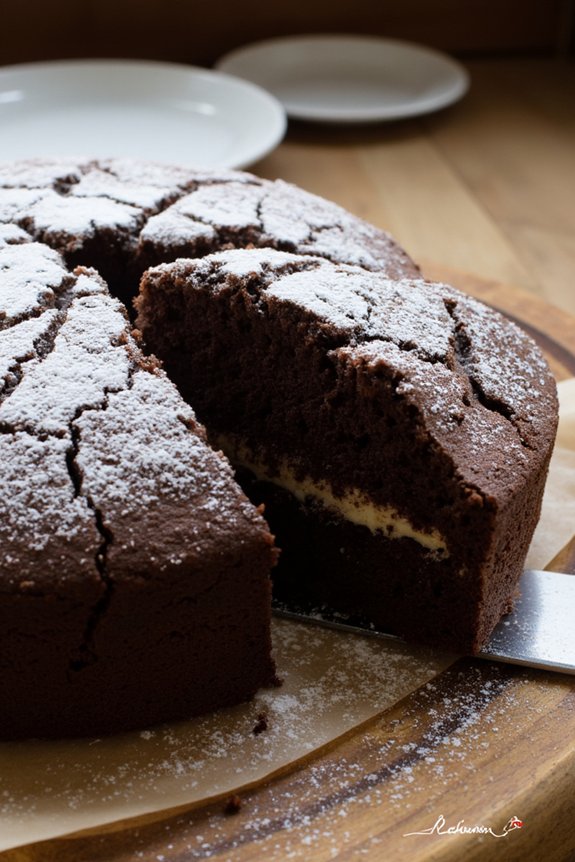
Torta Caprese is a classic Italian dessert originating from the beautiful island of Capri. This flourless chocolate almond cake is rich, dense, and incredibly moist, with a delightful combination of chocolate and almond flavors.
Torta Caprese is perfect for those who love a decadent dessert, and it’s naturally gluten-free, making it an excellent choice for those with dietary restrictions. The cake is typically served with a dusting of powdered sugar on top and can be paired with a dollop of whipped cream or a scoop of vanilla ice cream for an added touch of indulgence.
The origins of Torta Caprese are steeped in legend, with tales of its accidental creation when a baker forgot to add flour to a cake he was making for some visiting tourists. Despite this oversight, the result was a deliciously unique cake that quickly became a local favorite.
Today, Torta Caprese remains a beloved dessert in Italy and is often prepared for special occasions and holidays. Its simplicity and exquisite taste make it a must-try for any dessert lover.
Ingredients (serving size: 4-6 people):
- 200g dark chocolate
- 200g unsalted butter
- 200g granulated sugar
- 200g ground almonds
- 4 large eggs
- 1 teaspoon vanilla extract
- 1 tablespoon cocoa powder (for dusting)
- Powdered sugar (for dusting)
Cooking Instructions:
- Preheat the Oven: Preheat your oven to 170°C (340°F). Grease and line a 9-inch round cake pan with parchment paper.
- Melt Chocolate and Butter: In a heatproof bowl, combine the dark chocolate and butter. Melt them together over a pot of simmering water, stirring occasionally until smooth. Remove from heat and let it cool slightly.
- Mix Eggs and Sugar: In a separate bowl, beat the eggs and granulated sugar together using an electric mixer until the mixture is pale and foamy. This should take about 5 minutes.
- Combine Ingredients: Gradually add the melted chocolate mixture to the egg mixture, folding gently to combine. Then, fold in the ground almonds and vanilla extract until fully incorporated.
- Prepare for Baking: Pour the batter into the prepared cake pan, smoothing the top with a spatula. Dust the top lightly with cocoa powder.
- Bake the Cake: Place the cake pan in the preheated oven and bake for 40-45 minutes, or until a toothpick inserted into the center comes out with moist crumbs attached.
- Cool and Serve: Allow the cake to cool in the pan for about 10 minutes before transferring it to a wire rack to cool completely. Once cooled, dust the top with powdered sugar before serving.
Extra Tips:
To achieve the perfect texture, make certain that the melted chocolate and butter mixture isn’t too hot when combining it with the egg mixture, as this could cook the eggs.
The cake will have a slightly cracked top, which is a signature feature of Torta Caprese, so don’t worry if it doesn’t look perfectly smooth. For additional flavor, you can add a splash of almond liqueur or a pinch of espresso powder to the batter.
This cake is best served at room temperature and can be stored in an airtight container for up to three days.
Amaretti Cookies
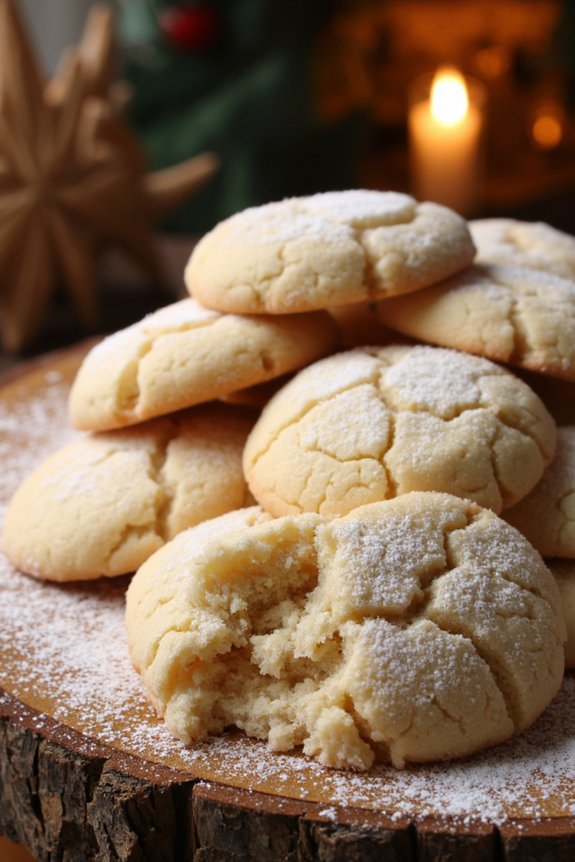
Amaretti cookies are a delightful Italian treat, perfect for the holiday season. These cookies are known for their distinct almond flavor and crisp, chewy texture. Originating in Italy, they’ve become a beloved part of festive celebrations, offering a sweet complement to a cup of coffee or a glass of dessert wine.
The name “amaretti” is derived from the Italian word “amaro,” meaning “bitter,” which refers to the traditional use of bitter almonds in the recipe. However, today’s recipes often use sweet almonds or almond extract to achieve the signature taste, making them accessible and enjoyable for everyone.
These cookies are perfect for sharing with friends and family during the holidays. The recipe is straightforward, and the ingredients are simple, yet they yield a cookie that’s full of flavor and texture.
Whether you’re an experienced baker or a beginner in the kitchen, these amaretti cookies are a wonderful addition to your holiday dessert repertoire. With a few quality ingredients and some careful preparation, you can create a batch of these delightful cookies that will surely impress your guests.
Ingredients for 4-6 servings:
- 2 cups (200g) almond flour
- 1 cup (200g) granulated sugar
- 2 large egg whites
- 1 teaspoon almond extract
- 1/4 teaspoon salt
- Powdered sugar, for dusting
Cooking Instructions:
- Preheat the Oven: Start by preheating your oven to 325°F (160°C). Line two baking sheets with parchment paper to prevent sticking and guarantee even baking.
- Mix Dry Ingredients: In a large mixing bowl, combine the almond flour, granulated sugar, and salt. Use a whisk to confirm these dry ingredients are well blended.
- Whip Egg Whites: In a separate bowl, beat the egg whites until they form soft peaks. You can use an electric mixer on medium speed for this step. The egg whites should be foamy and hold their shape but not be too stiff.
- Combine Wet and Dry Ingredients: Gently fold the beaten egg whites into the almond flour mixture. Add the almond extract and continue to fold until you have a cohesive dough. Be careful not to overmix, as this can deflate the egg whites.
- Form the Cookies: Using a teaspoon or small cookie scoop, portion the dough onto the prepared baking sheets. Leave about 2 inches between each cookie to allow space for spreading. Lightly dust the tops of the cookies with powdered sugar.
- Bake the Cookies: Place the baking sheets in the preheated oven and bake for 20-25 minutes, or until the cookies are lightly golden and set. They should have a slight crunch on the outside with a chewy center.
- Cool and Serve: Remove the cookies from the oven and let them cool on the baking sheets for about 5 minutes before transferring them to a wire rack to cool completely. Serve them once they’re at room temperature.
Extra Tips:
When making amaretti cookies, the quality of the almond flour is essential for achieving the best texture and flavor. Opt for finely ground almond flour, as coarser varieties might affect the smoothness of the cookies.
If the dough feels too sticky to work with, you can slightly dampen your hands with water to prevent sticking while shaping the cookies. Also, consider varying the flavor by adding a touch of vanilla extract or decorating the tops with slivered almonds before baking for an extra festive touch.
Enjoy these cookies fresh, as they tend to harden over time.
Sfogliatelle

Sfogliatelle is a classic Italian pastry known for its unique shell-like shape and crispy, flaky layers. Originating from the Campania region, this dessert is often enjoyed during the holiday season and is filled with a rich, creamy ricotta mixture that complements its delicate exterior.
Making Sfogliatelle from scratch is a labor of love that involves patience and precision, but the end result is a beautiful pastry that’s as much a feast for the eyes as it’s for the taste buds.
The process of creating Sfogliatelle involves making a dough similar to puff pastry, which is then rolled and shaped into its iconic form. The filling is typically made with ricotta cheese, semolina, sugar, and a hint of citrus zest, offering a balance of sweetness and tang.
This dessert is perfect for holiday gatherings, as it not only provides a delightful treat for guests but also showcases the intricate culinary traditions of Italy.
Ingredients for 4-6 servings:
- 2 cups all-purpose flour
- 1/2 teaspoon salt
- 3/4 cup water
- 1/2 cup unsalted butter, softened
- 1/3 cup lard or shortening
- 1 cup ricotta cheese
- 1/2 cup sugar
- 1/2 cup semolina flour
- 1 large egg
- 1 teaspoon vanilla extract
- Zest of 1 orange
- Powdered sugar, for dusting
Cooking Instructions:
- Prepare the Dough: In a large mixing bowl, combine the all-purpose flour and salt. Gradually add the water, stirring until a dough forms. Knead the dough on a floured surface for about 10 minutes until smooth and elastic. Wrap the dough in plastic wrap and let it rest for at least 30 minutes.
- Roll Out the Dough: After the dough has rested, divide it into 4 pieces. Roll each piece into a thin rectangle, about 1/16 inch thick. Spread a thin layer of softened butter over each sheet of dough.
- Form the Layers: Roll each sheet into a tight log. Once all sheets are rolled, connect the logs to form a single, long log. Wrap in plastic wrap and refrigerate for at least 2 hours, or overnight.
- Make the Filling: In a separate bowl, mix the ricotta cheese, sugar, semolina flour, egg, vanilla extract, and orange zest until smooth and well combined. Chill the filling in the refrigerator until ready to use.
- Shape the Sfogliatelle: Preheat your oven to 400°F (200°C). Slice the chilled dough log into 1/2-inch thick rounds. Using your fingers, gently press the center of each round to form a cone shape. Fill each cone with the ricotta mixture.
- Bake the Pastries: Place the filled Sfogliatelle on a baking sheet lined with parchment paper. Bake for 20-25 minutes, or until golden brown and crisp.
- Finish and Serve: Allow the pastries to cool slightly, then dust with powdered sugar before serving.
Extra Tips:
When making Sfogliatelle, patience is key. Confirm that the dough is rolled out as thinly as possible for the best results.
If the dough becomes too soft or sticky while working with it, refrigerate it again to firm it up. Additionally, using a pasta machine can assist in achieving even thinner layers.
Be sure not to overfill the pastries, as this can cause them to burst open during baking. Finally, enjoy these pastries fresh, as they’re best when consumed the same day they’re baked.
Pandoro
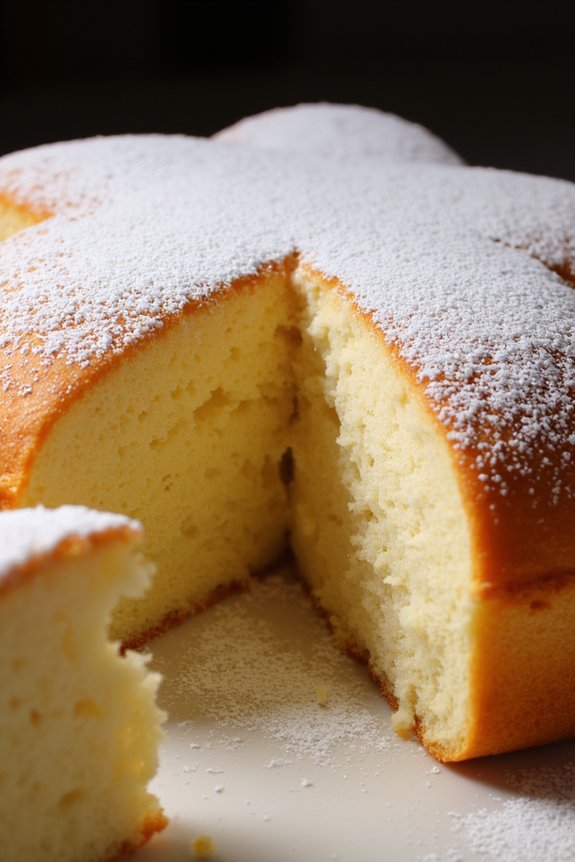
Pandoro, meaning “golden bread,” is a traditional Italian cake that makes a stunning centerpiece on any holiday table. Originally from Verona, this rich and buttery cake is known for its tall, star-shaped form and soft, delicate crumb. Its subtle sweetness and vanilla aroma make it a delightful treat, often enjoyed with a dusting of powdered sugar to resemble freshly fallen snow on its golden surface.
Whether served plain or accompanied by a side of mascarpone cream or zabaglione, Pandoro brings the warmth and festivity of an Italian Christmas to your home.
While Pandoro is commercially available, making it from scratch can be a rewarding experience that fills your kitchen with the comforting fragrance of baking bread. This homemade Pandoro recipe is perfect for serving 4-6 people, offering the opportunity to share a slice of Italian tradition with family and friends. The preparation does require some patience due to multiple rising times, but the end result is well worth the effort.
Let’s explore the ingredients and steps to create this holiday masterpiece.
Ingredients (serves 4-6):
- 500g all-purpose flour
- 200g unsalted butter, softened
- 150g granulated sugar
- 7g active dry yeast
- 5 large eggs
- 1 egg yolk
- 100ml whole milk
- 1 tsp vanilla extract
- Zest of 1 lemon
- Powdered sugar, for dusting
- A pinch of salt
Instructions:
- Prepare the Starter: In a small bowl, dissolve the yeast in lukewarm milk and let it sit for about 10 minutes until foamy. In a separate mixing bowl, combine 100g of flour with the yeast mixture, forming a soft dough. Cover with a cloth and leave it in a warm place to rise for about an hour or until doubled in size.
- First Dough: Once the starter has risen, add 100g of flour, 50g of sugar, and 2 eggs to the starter. Mix until well combined, then cover and let it rise again for another hour until doubled.
- Second Dough: Add the remaining flour, sugar, eggs, egg yolk, vanilla extract, lemon zest, and a pinch of salt to the mixture. Knead the dough until smooth and elastic. This can take about 10-15 minutes by hand or using a stand mixer with a dough hook.
- Incorporate Butter: Gradually add the softened butter, a little at a time, kneading well after each addition until fully incorporated. Once the butter is completely mixed in, form the dough into a ball, place it in a greased bowl, and cover. Let it rise in a warm place until doubled, about 2 hours.
- Final Rise and Shaping: Punch down the dough and shape it into a ball. Place the dough into a well-buttered Pandoro mold, cover, and let it rise until it fills the mold, about 1-2 hours.
- Bake the Pandoro: Preheat your oven to 180°C (350°F). Bake the Pandoro in the preheated oven for about 35-40 minutes, or until a skewer inserted into the center comes out clean. If the top browns too quickly, cover it loosely with aluminum foil.
- Cool and Serve: Let the Pandoro cool in the mold for about 10 minutes before turning it out onto a wire rack to cool completely. Dust generously with powdered sugar before serving.
Extra Tips:
When making Pandoro, patience is key, as the dough requires multiple rising periods to develop its characteristic light and airy texture. Make sure that your kitchen is warm enough to facilitate proper rising.
If your home is cool, you can create a warm proofing environment by turning on your oven to the lowest setting for a few minutes, then turning it off, and placing the covered bowl inside.
Additionally, using high-quality butter will enhance the richness of the Pandoro, while fresh lemon zest lends a bright, aromatic touch to the cake. Enjoy each step of the process as you create this classic Italian holiday treat.
Zeppole
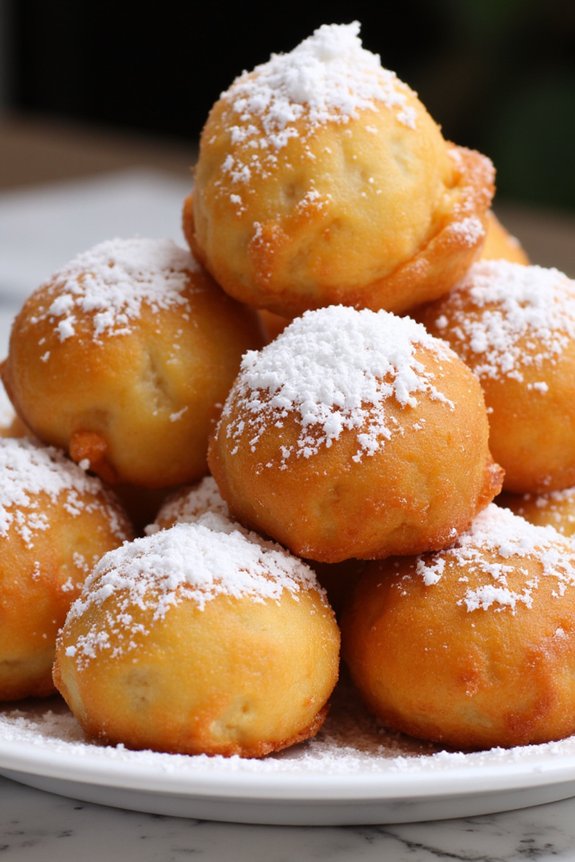
Zeppole, a classic Italian holiday dessert, are delightful deep-fried dough balls often dusted with powdered sugar. Traditionally enjoyed during the Feast of St. Joseph, these fluffy treats are beloved by many for their crispy exterior and soft, airy interior. Different regions in Italy have their own variations, some filling them with sweetened ricotta or pastry cream, while others enjoy them plain with a dust of sugar. Regardless of how they’re served, Zeppole are certain to bring a festive touch to any holiday gathering.
These delicious morsels are surprisingly simple to make at home, allowing you to bring a taste of Italy to your holiday festivities. The dough is made from pantry staples such as flour, eggs, and butter, and is flavored with a touch of vanilla for a hint of sweetness. Once fried to golden perfection, they’re coated in powdered sugar or cinnamon sugar, transforming them into an irresistible treat. This recipe serves 4-6 people, making it perfect for sharing with friends and family during the holiday season.
Ingredients:
- 1 cup all-purpose flour
- 1 tablespoon granulated sugar
- 1/4 teaspoon salt
- 1/2 cup water
- 1/4 cup unsalted butter
- 1 teaspoon vanilla extract
- 1 tablespoon lemon zest (optional)
- 4 large eggs
- Vegetable oil for frying
- Powdered sugar for dusting
Cooking Instructions:
- Prepare the Dough: In a medium saucepan, combine water, butter, sugar, and salt. Bring the mixture to a boil over medium heat until the butter is fully melted. Add the flour all at once, stirring vigorously with a wooden spoon until the dough forms a ball and pulls away from the sides of the pan.
- Cool the Dough: Remove the dough from the heat and let it cool slightly for about 5 minutes. This cooling period prevents the eggs from cooking when they’re added.
- Incorporate the Eggs: Using an electric mixer, beat the eggs into the cooled dough one at a time, assuring each egg is fully incorporated before adding the next. Add the vanilla extract and lemon zest, mixing until the dough is smooth and glossy.
- Heat the Oil: In a deep saucepan or fryer, heat the vegetable oil to 375°F (190°C). It’s important to maintain this temperature for even frying.
- Fry the Zeppole: Using a small ice cream scoop or two spoons, carefully drop spoonfuls of dough into the hot oil, frying in batches to avoid overcrowding. Fry each zeppola for about 4-5 minutes, turning occasionally, until they’re golden brown and puffed.
- Drain and Cool: Use a slotted spoon to remove the zeppole from the oil, placing them on a paper towel-lined plate to drain any excess oil. Allow them to cool slightly.
- Finish with Sugar: Once cooled, dust the zeppole generously with powdered sugar. For an extra festive touch, you can also roll them in cinnamon sugar.
Extra Tips:
For the perfect zeppole, confirm that the oil remains at a consistent temperature throughout the frying process. Too hot, and the exterior will brown too quickly while the inside remains undercooked.
If you prefer a filling, consider piping in some sweetened ricotta or pastry cream after frying. Additionally, these are best enjoyed fresh, so aim to serve them shortly after preparation for the ultimate crispness and flavor.
Cantucci

Cantucci, also known as biscotti di Prato, are traditional Italian almond biscuits that originated in the Tuscany region. These twice-baked cookies are perfect for dipping in a glass of Vin Santo or enjoying with a cup of coffee. Their crunchy texture and sweet almond flavor make them a beloved holiday treat across Italy and beyond.
While they may seem complex due to the double baking process, they’re surprisingly straightforward to make at home. Cantucci are ideal for gifting during the holiday season or for adding a touch of Italian flair to your dessert table. This recipe yields approximately 24 cantucci, perfect for serving 4-6 people. The key to achieving their distinctive crunch is in the baking technique, which involves baking the dough twice. With a few simple ingredients and steps, you can recreate this classic Italian treat in your own kitchen.
Ingredients for 4-6 Servings:
- 300g all-purpose flour
- 200g granulated sugar
- 2 large eggs
- 1 egg yolk (for brushing)
- 1 teaspoon baking powder
- 1 teaspoon vanilla extract
- 1 teaspoon almond extract
- 1/4 teaspoon salt
- 200g whole almonds, toasted
Cooking Instructions:
- Preheat the Oven: Begin by preheating your oven to 180°C (350°F). Line a baking sheet with parchment paper to prevent the dough from sticking.
- Mix Dry Ingredients: In a large bowl, combine the flour, sugar, baking powder, and salt. Stir until well mixed.
- Combine Wet Ingredients: In another bowl, whisk together the eggs, vanilla extract, and almond extract until well blended.
- Form the Dough: Gradually add the wet mixture to the dry ingredients, mixing until a dough begins to form. Add the toasted almonds and knead gently to incorporate them evenly throughout the dough.
- Shape the Dough: Divide the dough into two equal parts. Roll each portion into a log about 30 cm (12 inches) long. Place the logs on the prepared baking sheet, ensuring they’re spaced apart.
- First Bake: Brush the logs with the egg yolk for a golden finish, then bake them in the preheated oven for 25-30 minutes, or until they’re lightly golden and firm to the touch.
- Cool and Slice: Remove the logs from the oven and allow them to cool for about 10 minutes. Using a serrated knife, cut the logs diagonally into 1.5 cm (1/2 inch) thick slices.
- Second Bake: Arrange the slices cut-side down on the baking sheet. Return them to the oven and bake for an additional 10-12 minutes on each side, until they’re golden and crisp.
- Cool Completely: Once baked, remove the cantucci from the oven and let them cool completely on a wire rack. This will help them achieve the characteristic crunch.
Extra Tips:
Toasting the almonds before adding them to the dough enhances their flavor, making the cantucci even more delicious. If you prefer a softer texture, reduce the second baking time by a few minutes.
For a festive twist, you can add dried cranberries or chocolate chips to the dough. Store the cooled cantucci in an airtight container to maintain their crispness for up to two weeks. Enjoy them as a delightful accompaniment to coffee, tea, or dessert wines like Vin Santo.