

Weekends are a perfect time to enjoy something special, and sweet Italian brunch recipes bring a touch of indulgence to your mornings. From fluffy ricotta pancakes with honey to tiramisu French toast, these dishes blend tradition and creativity. Lemon ricotta muffins and Nutella-stuffed crepes will surely enchant your taste buds. Each recipe offers a delightful experience that’s both comforting and unforgettable. Ready to explore these delicious ideas?
Ricotta Pancakes With Honey Drizzle
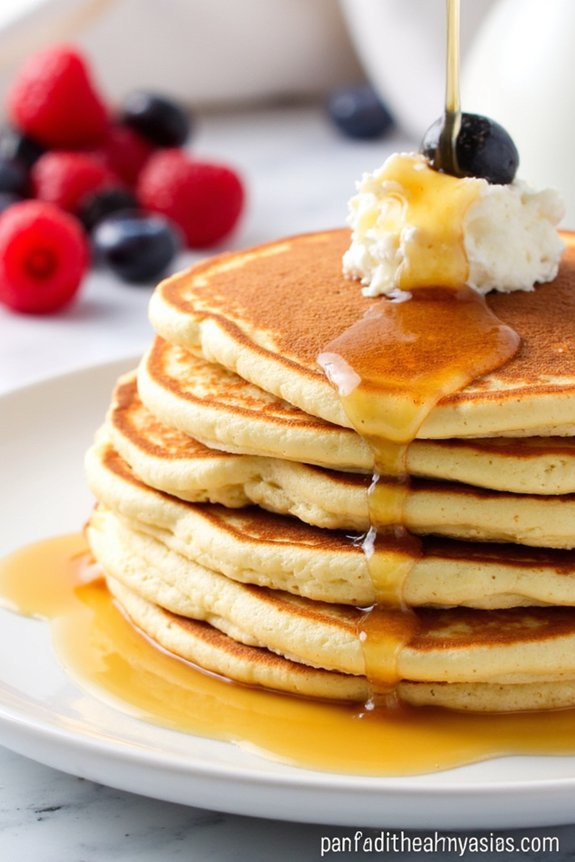
Indulge in a delightful Italian-inspired brunch with these fluffy Ricotta Pancakes with Honey Drizzle. This recipe combines the creamy richness of ricotta cheese with the lightness of classic pancakes, creating a heavenly texture that pairs perfectly with a luscious honey drizzle.
These pancakes are perfect for a leisurely weekend brunch or a special breakfast treat, bringing a taste of Italy to your table. The balance of sweet honey and the subtle tang of ricotta guarantees a memorable experience that will leave your family and friends asking for more.
This recipe yields approximately 4-6 servings, making it ideal for a small gathering or family meal. The preparation process is straightforward, and with a few simple ingredients, you can whip up these delightful pancakes in no time.
Whether you serve them with fresh fruits, nuts, or just the honey drizzle, these ricotta pancakes are sure to become a favorite brunch staple.
Ingredients (serving size: 4-6 people):
- 1 cup ricotta cheese
- 1 cup all-purpose flour
- 1 tablespoon baking powder
- 1/4 teaspoon salt
- 3 tablespoons granulated sugar
- 1 cup milk
- 3 large eggs, separated
- 1 teaspoon vanilla extract
- Butter or oil for cooking
- Honey, for drizzling
Cooking Instructions:
- Prepare the Dry Ingredients: In a large mixing bowl, combine the flour, baking powder, salt, and sugar. Whisk together to guarantee the ingredients are evenly distributed.
- Mix the Wet Ingredients: In another bowl, combine the ricotta cheese, milk, egg yolks, and vanilla extract. Stir until the mixture is smooth and well combined.
- Combine Wet and Dry Mixtures: Gradually add the wet ingredients to the dry ingredients, stirring gently until just combined. Be careful not to overmix, as this can lead to dense pancakes.
- Whip the Egg Whites: In a clean bowl, beat the egg whites until stiff peaks form. Gently fold the egg whites into the pancake batter. This step is essential for achieving light and fluffy pancakes.
- Cook the Pancakes: Heat a non-stick skillet or griddle over medium heat and add a small amount of butter or oil. Pour about 1/4 cup of batter onto the skillet for each pancake. Cook until bubbles form on the surface, then flip and cook until golden brown on both sides. Repeat with remaining batter.
- Serve and Drizzle: Stack the pancakes on a serving plate and drizzle generously with honey. Serve immediately, optionally accompanied by fresh fruits or nuts.
Extra Tips:
To make your pancakes even more flavorful, consider adding lemon zest to the batter for a citrusy twist. Guarantee your skillet or griddle is well-heated before cooking to achieve a perfect golden-brown color.
If you prefer a less sweet pancake, reduce the amount of sugar in the batter or adjust the honey drizzle to taste. For a more decadent presentation, serve with a dollop of mascarpone cheese or a dusting of powdered sugar.
Enjoy these pancakes fresh for the best texture and flavor!
Tiramisu French Toast
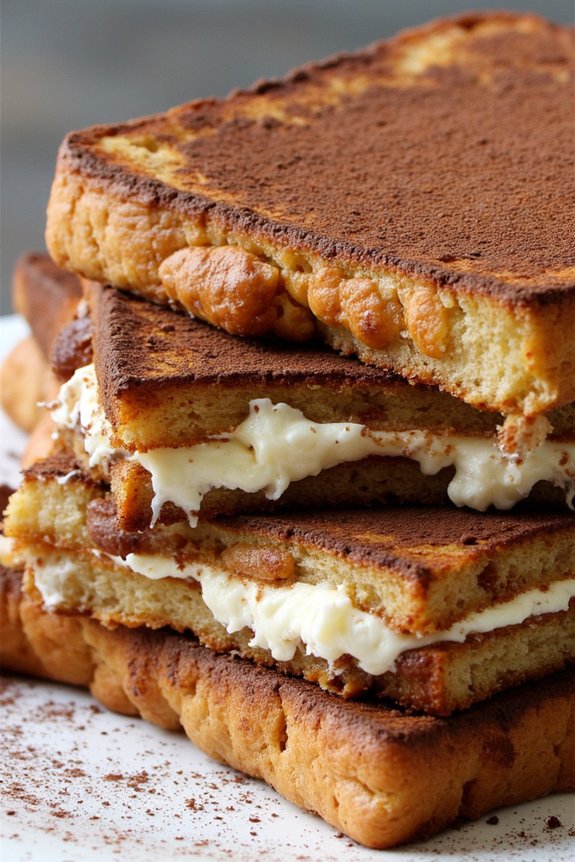
Tiramisu French Toast is a delightful fusion of two beloved dishes, blending the creamy, coffee-infused flavors of tiramisu with the classic comfort of French toast. This dish is perfect for an indulgent Italian brunch, offering a unique twist that will impress your guests.
The rich mascarpone filling, soaked in espresso, is layered between slices of fluffy bread, then dipped in an egg mixture and cooked to golden perfection. Each bite delivers a heavenly combination of textures and flavors, making it a brunch favorite.
This recipe serves 4-6 people and is ideal for those looking to elevate their brunch offerings with a touch of Italian flair. Whether you’re hosting a gathering or simply treating your family to a special breakfast, Tiramisu French Toast is easy to prepare and certain to please.
The key lies in balancing the right amount of coffee essence with the creamy mascarpone, guaranteeing each bite is a delightful explosion of taste.
Ingredients (Serves 4-6):
- 6 slices of thick-cut bread (brioche or challah works best)
- 3 large eggs
- 1 cup whole milk
- 1/2 cup heavy cream
- 1/4 cup granulated sugar
- 1 teaspoon vanilla extract
- 1/2 cup brewed espresso or strong coffee, cooled
- 8 ounces mascarpone cheese
- 1/4 cup powdered sugar
- 1 tablespoon cocoa powder
- 1 tablespoon coffee liqueur (optional)
- Butter, for cooking
Instructions:
- Prepare the Mascarpone Filling: In a medium bowl, combine mascarpone cheese, powdered sugar, and coffee liqueur. Mix until smooth and set aside.
- Prepare the Egg Mixture: In a shallow dish, whisk together eggs, milk, heavy cream, granulated sugar, and vanilla extract until well combined.
- Prepare the Espresso Mixture: In a separate shallow dish, pour the cooled espresso or strong coffee.
- Assemble the French Toast: Spread the mascarpone filling generously on one side of each slice of bread. Sandwich two slices together to form a “stuffed” piece of bread.
- Dip the Bread: Quickly dip each stuffed bread sandwich into the espresso mixture, then into the egg mixture, making sure both sides are evenly coated but not soaked.
- Cook the French Toast: Heat a large skillet over medium heat and add butter. Once melted, cook the stuffed slices until golden brown on each side, about 3-4 minutes per side.
- Serve: Remove from heat and dust with cocoa powder before serving. Optionally, drizzle with extra coffee liqueur for an enhanced flavor.
Extra Tips:
For an even richer flavor, use day-old bread, which will absorb the flavors better without becoming too soggy. If you prefer a stronger coffee taste, you can increase the amount of espresso used in the soaking process.
Additionally, if mascarpone isn’t available, cream cheese can be used as a substitute, although it will slightly alter the taste. Finally, make sure not to overcrowd the skillet to guarantee each slice cooks evenly.
Lemon Ricotta Muffins

Lemon Ricotta Muffins are a delightful addition to any Italian brunch, offering a perfect balance of zesty lemon and creamy ricotta cheese. These muffins are moist, fluffy, and bursting with citrus flavor, making them an irresistible treat for both kids and adults alike.
With their soft texture and fresh lemon aroma, they’re perfect to serve warm with a cup of coffee or tea, or as a sweet conclusion to a savory brunch spread. The use of ricotta cheese in this recipe not only adds a rich creaminess but also guarantees the muffins stay moist for days.
The lemon zest and juice give the muffins a bright and invigorating flavor that complements the sweetness of the batter. This recipe yields 12 muffins, making it ideal for serving 4-6 people, depending on appetites and additional dishes at brunch.
Ingredients (for 4-6 people):
- 2 cups all-purpose flour
- 1 cup granulated sugar
- 1 tablespoon baking powder
- 1/2 teaspoon salt
- 1 cup ricotta cheese
- 1/2 cup unsalted butter, melted and cooled
- 2 large eggs
- 1 teaspoon vanilla extract
- Zest of 2 lemons
- Juice of 1 lemon
- 1/2 cup whole milk
- 1/3 cup lemon juice
- Optional: powdered sugar for dusting
Cooking Instructions:
- Preheat the Oven: Begin by preheating your oven to 350°F (175°C). Line a 12-cup muffin tin with paper liners or lightly grease them with cooking spray.
- Mix Dry Ingredients: In a large mixing bowl, whisk together the flour, sugar, baking powder, and salt until well combined.
- Combine Wet Ingredients: In another bowl, blend the ricotta cheese, melted butter, eggs, vanilla extract, lemon zest, and lemon juice. Mix until smooth and well incorporated.
- Combine Wet and Dry Ingredients: Slowly add the wet ingredients to the dry ingredients, stirring gently. Pour in the milk gradually and mix until just combined. Be careful not to overmix, as this can lead to dense muffins.
- Distribute Batter: Using a spoon or ice cream scoop, divide the batter evenly among the prepared muffin cups, filling each about three-quarters full.
- Bake: Place the muffin tin in the preheated oven and bake for 18-22 minutes, or until a toothpick inserted into the center of a muffin comes out clean.
- Cool and Serve: Allow the muffins to cool in the tin for about 5 minutes, then transfer them to a wire rack to cool completely. Optionally, dust with powdered sugar before serving.
Extra Tips:
For the best results, use fresh lemons for both zest and juice to guarantee a vibrant lemon flavor. If you prefer a sweeter muffin, you can add a glaze made from lemon juice and powdered sugar after the muffins have cooled.
Additionally, these muffins can be stored in an airtight container at room temperature for up to three days, or they can be frozen for longer storage. Reheat frozen muffins by wrapping them in foil and placing them in a preheated oven for about 10 minutes.
Enjoy your Italian brunch with these delightful Lemon Ricotta Muffins!
Nutella-Stuffed Crepes
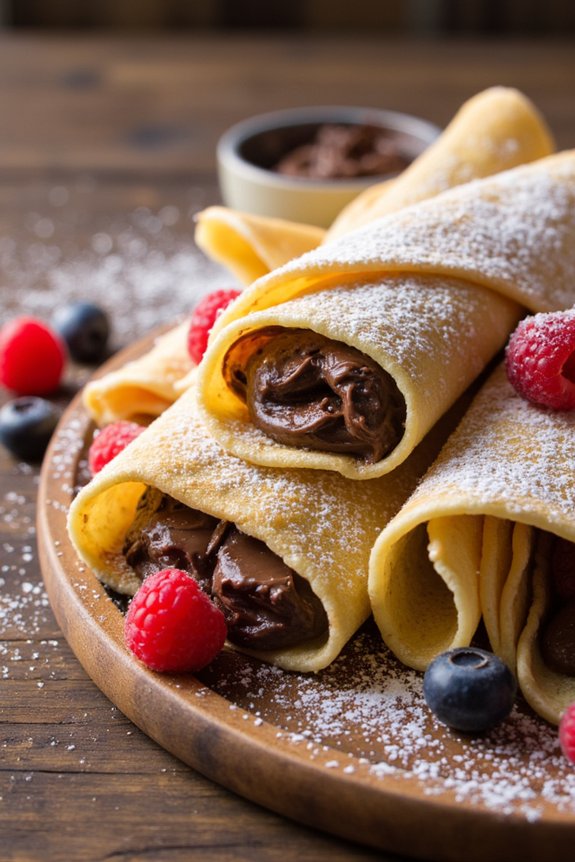
There’s something delightful about starting your day with a sweet, indulgent breakfast, and Nutella-stuffed crepes hit the mark perfectly. These delicate, thin pancakes are filled with creamy Nutella, creating a rich and satisfying treat that combines the best of Italian and French culinary traditions.
Whether you’re hosting a brunch or simply treating yourself on a lazy weekend morning, this dish promises to be a crowd-pleaser. Nutella-stuffed crepes aren’t only delicious but also surprisingly easy to make. With a simple batter and a few minutes of cooking time, you’ll have a plate full of these delectable crepes ready to be devoured.
The combination of the warm, soft crepe and the gooey, chocolate-hazelnut filling is irresistible. Perfect for a serving size of 4-6 people, this recipe guarantees everyone gets their fair share of this indulgence.
Ingredients (Serves 4-6):
- 1 cup all-purpose flour
- 2 large eggs
- 1 1/2 cups milk
- 1 tablespoon granulated sugar
- 1/4 teaspoon salt
- 2 tablespoons unsalted butter, melted
- 1 teaspoon vanilla extract
- 1 cup Nutella
- Powdered sugar, for dusting
- Fresh berries (optional, for garnish)
Instructions:
1. Prepare the Crepe Batter: In a large mixing bowl, whisk together the flour, eggs, milk, sugar, and salt until smooth. Add the melted butter and vanilla extract, and continue whisking until the batter is consistent and free of lumps.
Let the batter rest for at least 15-30 minutes to promote a smoother texture.
2. Cook the Crepes: Heat a non-stick skillet or crepe pan over medium heat and lightly grease with butter or cooking spray. Pour approximately 1/4 cup of batter into the pan, tilting it in a circular motion to evenly spread the batter into a thin layer.
Cook for about 1-2 minutes until the edges start to lift away from the pan, and the underside is lightly golden. Flip the crepe and cook for an additional 30 seconds to 1 minute. Repeat with the remaining batter.
3. Fill the Crepes: Spread a generous tablespoon of Nutella onto one half of each crepe while it’s still warm, allowing the Nutella to soften and spread easily. Fold the crepe in half, then again into quarters to form a triangle shape.
4. Serve the Crepes: Arrange the stuffed crepes on a serving platter. Dust with powdered sugar and garnish with fresh berries if desired. Serve immediately while warm for the best experience.
Extra Tips:
For the best results, make sure the crepe batter is smooth and well-rested before cooking. This allows the flour to fully absorb the liquid, resulting in tender crepes.
If you find your crepes are sticking to the pan, confirm it’s properly heated and lightly greased between each crepe. Additionally, you can experiment with different fillings such as fruit preserves or ricotta cheese for variety. Enjoy your brunch!
Italian Almond Cake
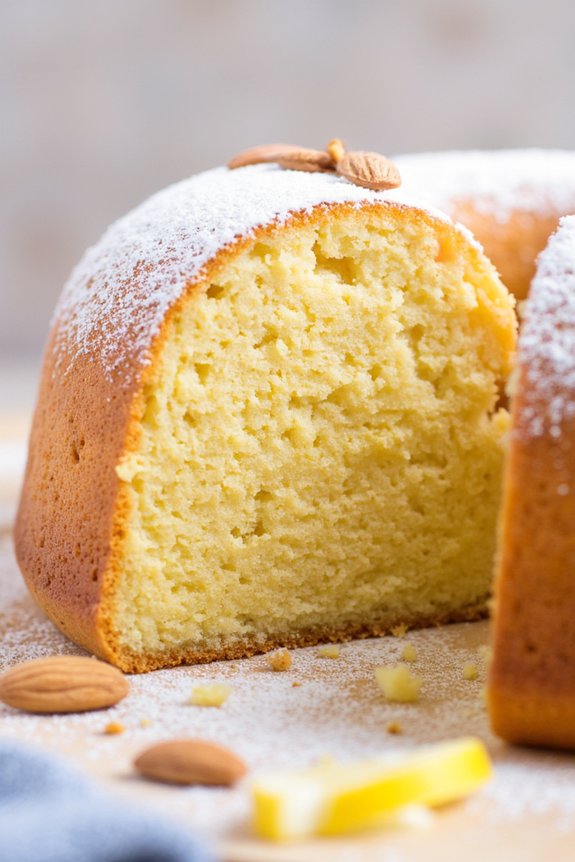
Indulge in a slice of Italy with this delightful Italian Almond Cake, a perfect addition to any brunch table. This cake, also known as “Torta di Mandorle,” is a light, moist dessert that celebrates the rich, nutty flavor of almonds. Infused with a hint of citrus, it’s a scrumptious treat that pairs beautifully with a cup of espresso or a sparkling glass of Prosecco.
Its simplicity and elegance make it an ideal choice for a leisurely brunch gathering, whether you’re enjoying it with family or entertaining guests.
This Italian Almond Cake isn’t only delicious but also surprisingly easy to make. The key ingredients—almond flour, eggs, and sugar—come together to create a tender crumb and a delightful texture. A touch of lemon zest brightens the flavor, while a dusting of powdered sugar adds a sweet, finishing touch.
Whether you’re a seasoned baker or a novice in the kitchen, this recipe is straightforward and rewarding, offering a taste of Italy right at home.
Ingredients (Serves 4-6):
- 1 cup almond flour
- 1/2 cup all-purpose flour
- 3/4 cup granulated sugar
- 3 large eggs
- 1/2 cup unsalted butter, melted
- 1 teaspoon vanilla extract
- Zest of 1 lemon
- 1 teaspoon baking powder
- 1/4 teaspoon salt
- Powdered sugar for dusting
Cooking Instructions:
- Preheat the Oven: Begin by preheating your oven to 350°F (175°C). Grease a 9-inch round cake pan with butter or line it with parchment paper to prevent sticking.
- Prepare the Dry Ingredients: In a medium bowl, combine the almond flour, all-purpose flour, baking powder, and salt. Mix well to guarantee even distribution of the baking powder.
- Mix the Wet Ingredients: In a large mixing bowl, beat the eggs and granulated sugar together using an electric mixer on medium speed until the mixture becomes pale and slightly thickened, about 3-4 minutes.
- Incorporate the Flavors: Add the melted butter, vanilla extract, and lemon zest to the egg mixture. Blend well to combine the flavors fully.
- Combine Wet and Dry Ingredients: Gradually fold the dry ingredients into the wet mixture using a spatula. Be gentle to keep the batter airy and light, ensuring no lumps remain.
- Pour the Batter: Transfer the batter into the prepared cake pan, smoothing the top with the spatula to guarantee even baking.
- Bake the Cake: Place the cake pan in the preheated oven and bake for 30-35 minutes, or until a toothpick inserted into the center comes out clean. The top should be a lovely golden brown.
- Cool and Serve: Allow the cake to cool in the pan for about 10 minutes, then transfer it to a wire rack to cool completely. Dust with powdered sugar before serving.
Extra Tips:
For an added twist, you can sprinkle sliced almonds on top of the batter before baking for an extra crunch. If you prefer a more intense citrus flavor, consider adding a teaspoon of lemon juice to the batter.
For those with a sweeter tooth, a light glaze made of lemon juice and powdered sugar can be drizzled over the top. Remember, the key to a perfect almond cake isn’t overmixing; this keeps it light and tender.
Enjoy your Italian Almond Cake with a side of fresh berries or a dollop of whipped cream for a truly luxurious treat.
Limoncello Parfait
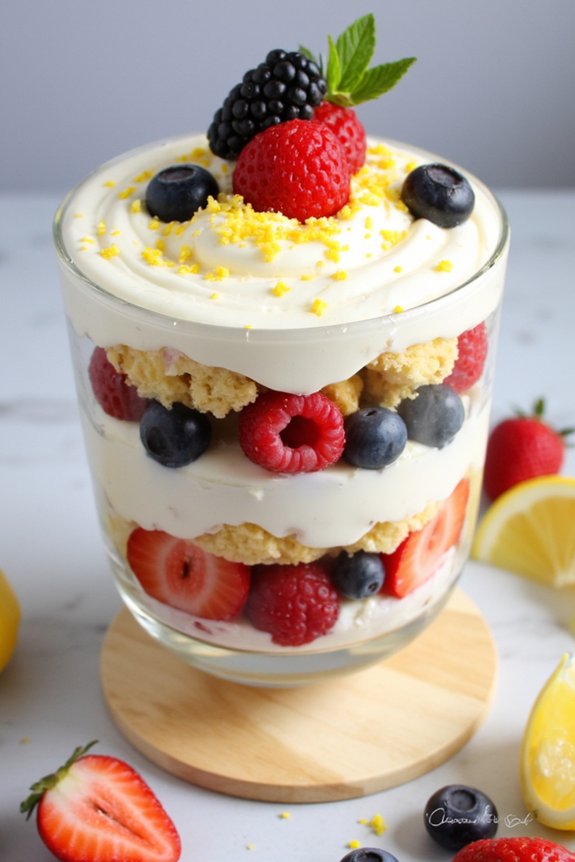
Indulge in the invigorating and zesty flavors of a Limoncello Parfait, a perfect addition to your Italian brunch menu. This delightful dessert combines the tangy essence of limoncello with layers of creamy mascarpone and a hint of sweetness from ladyfingers. Topped with fresh berries and a sprinkle of lemon zest, this parfait isn’t just a treat for the taste buds but also a feast for the eyes. Its elegant presentation makes it an ideal choice for any gathering, offering a sophisticated end to your meal.
The Limoncello Parfait is incredibly simple to put together, making it an excellent option even for novice chefs. Despite its ease of preparation, it boasts complex flavors that are sure to impress. The combination of creamy, citrus, and berry notes creates a revitalizing harmony, perfect for a warm brunch setting. Plus, the preparation can be done in advance, allowing you to enjoy your time with guests without any last-minute rush.
Ingredients (Serves 4-6):
- 1 cup mascarpone cheese
- 1 cup heavy cream
- 1/2 cup powdered sugar
- 1/4 cup limoncello
- 1 teaspoon vanilla extract
- Zest of 1 lemon
- 12-16 ladyfingers
- 1 cup fresh berries (such as raspberries, blueberries, or strawberries)
- Mint leaves for garnish (optional)
Cooking Instructions:
- Prepare the Cream Mixture: In a large mixing bowl, combine the mascarpone cheese, heavy cream, powdered sugar, limoncello, and vanilla extract. Use an electric mixer to whip the mixture until it becomes thick and forms soft peaks. Confirm it’s smooth and well-combined with no lumps.
- Layer the Parfait: Begin by placing a layer of ladyfingers at the bottom of each serving glass or bowl. You may need to break them to fit the container.
- Add Cream and Berries: Spoon a layer of the mascarpone cream mixture over the ladyfingers. Add a handful of fresh berries on top of the cream. Repeat these layers until the glasses are filled, finishing with a dollop of the mascarpone cream on top.
- Garnish and Chill: Sprinkle the top layer with lemon zest and add a few mint leaves as a garnish if desired. Place the parfaits in the refrigerator to chill for at least 1-2 hours before serving, allowing the flavors to meld together.
Extra Tips:
For the best flavor, make sure to use high-quality limoncello and fresh mascarpone. If you prefer a non-alcoholic version, you can substitute the limoncello with lemon juice mixed with a bit of sugar.
Feel free to experiment with the types of berries based on what’s in season or your personal preference. If you’re making this dish ahead of time, assemble the parfaits a few hours before serving but add the mint leaves just before presenting to maintain their freshness.
Cannoli Waffles
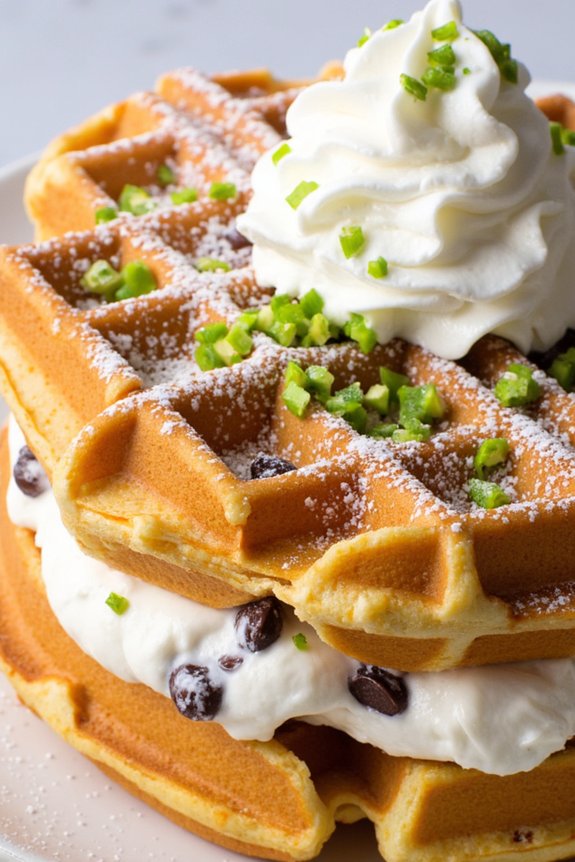
Cannoli Waffles are a delightful fusion of the beloved Italian dessert, cannoli, and the classic breakfast favorite, waffles. This brunch dish combines the crispy texture of waffles with the creamy, sweet filling typical of cannoli, making it an irresistible treat for any brunch gathering.
The unique combination of flavors and textures makes Cannoli Waffles a standout dish, perfect for those who want to start their day with something sweet and indulgent. Ideal for serving a group of 4-6 people, Cannoli Waffles bring together the rich flavors of ricotta, chocolate, and vanilla, all encapsulated in a warm, crispy waffle.
This dish not only satisfies sweet cravings but also offers a beautiful presentation, making it a perfect centerpiece for any brunch table. Whether you’re hosting a weekend brunch or simply want a special treat for your family, Cannoli Waffles are sure to impress.
Ingredients for 4-6 servings:
- 2 cups all-purpose flour
- 2 tablespoons sugar
- 1 tablespoon baking powder
- 1/2 teaspoon salt
- 1 and 3/4 cups milk
- 1/3 cup vegetable oil
- 2 large eggs
- 1 teaspoon vanilla extract
- 1 cup ricotta cheese
- 1/2 cup powdered sugar
- 1/2 teaspoon cinnamon
- 1/2 cup mini chocolate chips
- 1/4 cup chopped pistachios (optional)
- Whipped cream (for serving)
- Extra powdered sugar (for dusting)
Cooking Instructions:
1. Prepare the Waffle Batter: In a large mixing bowl, combine the all-purpose flour, sugar, baking powder, and salt. In a separate bowl, whisk together the milk, vegetable oil, eggs, and vanilla extract.
Gradually pour the wet ingredients into the dry ingredients, stirring until just combined. Be careful not to overmix to keep the waffles light and fluffy.
2. Preheat the Waffle Iron: While the batter rests for a few minutes, preheat your waffle iron according to the manufacturer’s instructions. Lightly grease it with cooking spray to prevent sticking.
3. Cook the Waffles: Pour an appropriate amount of batter onto the preheated waffle iron. Close the lid and cook until the waffles are golden brown and crispy, usually about 4-5 minutes.
Transfer cooked waffles to a warm plate and repeat the process with the remaining batter.
4. Make the Cannoli Filling: In a medium bowl, mix together the ricotta cheese, powdered sugar, and cinnamon until smooth. Gently fold in the mini chocolate chips.
5. Assemble the Cannoli Waffles: Place a waffle on a serving plate, spread a generous layer of the cannoli filling over it, and top with another waffle.
Repeat with the remaining waffles and filling.
6. Garnish and Serve: Sprinkle chopped pistachios over the waffles (if using) and dust with extra powdered sugar. Serve with a dollop of whipped cream on the side for an added touch of decadence.
Extra Tips:
For the best texture, verify your ricotta cheese is well-drained before mixing it into the filling. If it’s too watery, the filling could become runny. You can use a strainer or cheesecloth to remove excess moisture.
Additionally, if you prefer a stronger vanilla flavor, consider using vanilla bean paste instead of vanilla extract. Finally, feel free to get creative with toppings; fresh berries or a drizzle of chocolate syrup can add a delicious twist to your Cannoli Waffles.
Vanilla Panna Cotta With Berry Compote
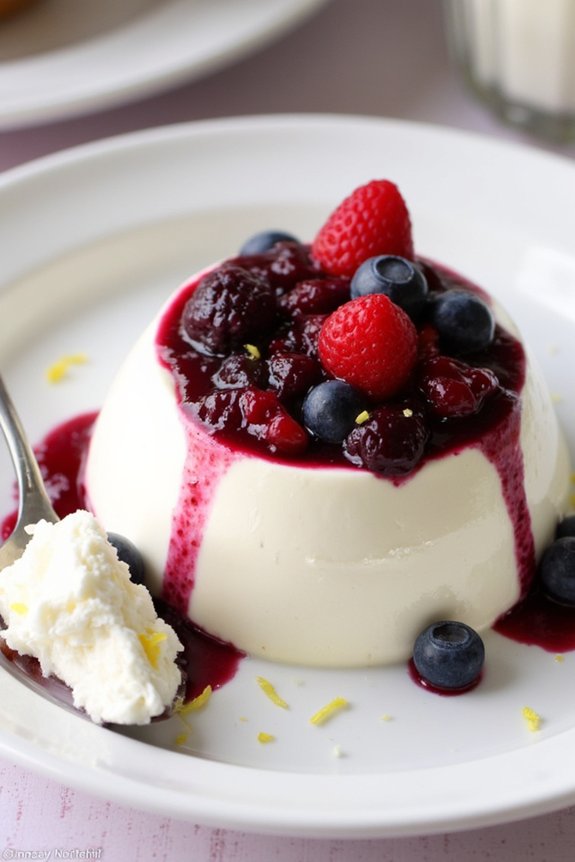
Vanilla Panna Cotta with Berry Compote is a delightful Italian dessert that makes for an elegant brunch option. This creamy, silky panna cotta pairs perfectly with the sweet and slightly tart berry compote, creating a harmonious blend of flavors and textures. It’s a simple yet sophisticated dish that’s certain to impress your brunch guests.
The panna cotta itself is a classic Italian dessert made from sweetened cream thickened with gelatin and flavored with vanilla. Topped with a vibrant berry compote, this dessert not only tastes incredible but also looks stunning on the table.
Preparing this dish is quite straightforward, and it can be made ahead of time, allowing you to focus on other brunch preparations. The panna cotta needs time to set in the refrigerator, so it’s best made the day before serving. The berry compote, on the other hand, can be prepared just before serving to retain its fresh taste and vibrant color. This recipe serves 4-6 people, making it perfect for a small gathering.
Ingredients for Vanilla Panna Cotta with Berry Compote (Serves 4-6):
*For the Panna Cotta:*
- 2 cups heavy cream
- 1 cup whole milk
- 1/2 cup granulated sugar
- 1 teaspoon vanilla extract
- 2 1/4 teaspoons unflavored gelatin powder
- 3 tablespoons cold water
For the Berry Compote:
- 2 cups mixed berries (such as strawberries, blueberries, and raspberries)
- 1/4 cup granulated sugar
- 1 tablespoon lemon juice
- 1 teaspoon lemon zest
Cooking Instructions:
- Prepare the Gelatin: In a small bowl, sprinkle the gelatin over the cold water and let it sit for about 5 minutes until it blooms. This guarantees the gelatin dissolves evenly into the panna cotta mixture.
- Heat the Cream Mixture: In a medium saucepan, combine the heavy cream, whole milk, and granulated sugar. Heat over medium heat, stirring occasionally, until the sugar dissolves and the mixture is hot but not boiling. Remove from heat.
- Incorporate Gelatin and Vanilla: Add the bloomed gelatin to the hot cream mixture, stirring until completely dissolved. Stir in the vanilla extract for that rich, aromatic flavor.
- Pour into Molds: Pour the mixture into individual serving glasses or molds. Allow them to cool to room temperature before covering with plastic wrap.
- Chill: Refrigerate the panna cotta for at least 4 hours, or until set. It’s best to leave them overnight for the perfect texture.
- Make the Berry Compote: In a small saucepan, combine the mixed berries, sugar, lemon juice, and lemon zest. Cook over medium heat until the berries release their juices and the mixture thickens slightly, about 8-10 minutes. Remove from heat and let cool.
- Serve: Once the panna cotta has set, remove from the refrigerator. Spoon the berry compote over each panna cotta just before serving.
Extra Tips:
- For a smoother panna cotta, strain the cream mixture through a fine sieve before pouring it into the molds to remove any undissolved gelatin or vanilla bean particles.
- You can prepare the berry compote with any combination of berries you prefer, or even substitute with a different fruit compote if desired.
- If using metal molds, briefly dip the bottoms in warm water to help release the panna cotta before serving.
- Adjust the sweetness of the compote to your liking by adding more or less sugar, or substitute with honey for a different flavor profile.
Amaretto Biscotti

Amaretto Biscotti is a delightful Italian treat that perfectly complements any brunch spread. These twice-baked cookies are known for their crunchy texture and rich almond flavor, thanks to the addition of amaretto liqueur and almonds.
Originating from the Italian word “biscotto,” meaning “twice cooked,” biscotti are perfect for dipping into coffee or sweet dessert wine. This recipe combines the warmth of amaretto with the sweetness of almonds to create a biscotti that’s both flavorful and satisfying.
Ideal for serving 4-6 people, this Amaretto Biscotti recipe is easy to make and will fill your kitchen with the aromatic scents of almond and vanilla. While the process of baking these cookies twice may seem intimidating at first, the result is well worth the effort.
Whether you’re hosting a brunch or simply want to enjoy a taste of Italy at home, these biscotti are sure to impress your family and friends.
Ingredients:
- 2 cups all-purpose flour
- 1 teaspoon baking powder
- 1/4 teaspoon salt
- 3/4 cup granulated sugar
- 1/2 cup unsalted butter, softened
- 2 large eggs
- 1 teaspoon vanilla extract
- 1/4 cup amaretto liqueur
- 1 cup whole almonds, toasted and coarsely chopped
- Additional flour for dusting
Instructions:
- Preheat the Oven: Preheat your oven to 350°F (175°C). Line a baking sheet with parchment paper or a silicone baking mat to prevent sticking.
- Mix Dry Ingredients: In a medium-sized bowl, whisk together the all-purpose flour, baking powder, and salt. Set aside.
- Cream Butter and Sugar: In a large mixing bowl, cream together the softened butter and granulated sugar using an electric mixer on medium speed until light and fluffy, about 2-3 minutes.
- Add Wet Ingredients: Beat in the eggs one at a time, ensuring each is fully incorporated before adding the next. Mix in the vanilla extract and amaretto liqueur.
- Combine Ingredients: Gradually add the dry ingredients to the wet ingredients, mixing on low speed until just combined. Stir in the toasted and chopped almonds until evenly distributed.
- Shape the Dough: Lightly dust a clean work surface with flour. Divide the dough in half and shape each portion into a log about 12 inches long and 2 inches wide. Place the logs on the prepared baking sheet, leaving space between them.
- First Bake: Bake in the preheated oven for 25-30 minutes or until the logs are golden brown and firm to the touch. Remove from the oven and let cool for about 10 minutes.
- Slice the Biscotti: Reduce the oven temperature to 300°F (150°C). Using a serrated knife, carefully cut the logs diagonally into 1/2-inch thick slices.
- Second Bake: Place the slices cut side down back onto the baking sheet. Bake for an additional 10-15 minutes, flipping halfway through, until the biscotti are crisp and golden. Cool completely on a wire rack before serving.
Extra Tips:
When making Amaretto Biscotti, it’s important to toast the almonds beforehand to enhance their flavor. If you prefer a softer biscotti, reduce the second baking time slightly.
Be sure to use a serrated knife when slicing the biscotti to prevent them from crumbling. Feel free to experiment by adding other ingredients such as chocolate chips or dried fruit to customize your biscotti to your liking.
Enjoy these delicious treats with your favorite coffee or tea for a delightful brunch experience.
Zabaglione With Fresh Berries
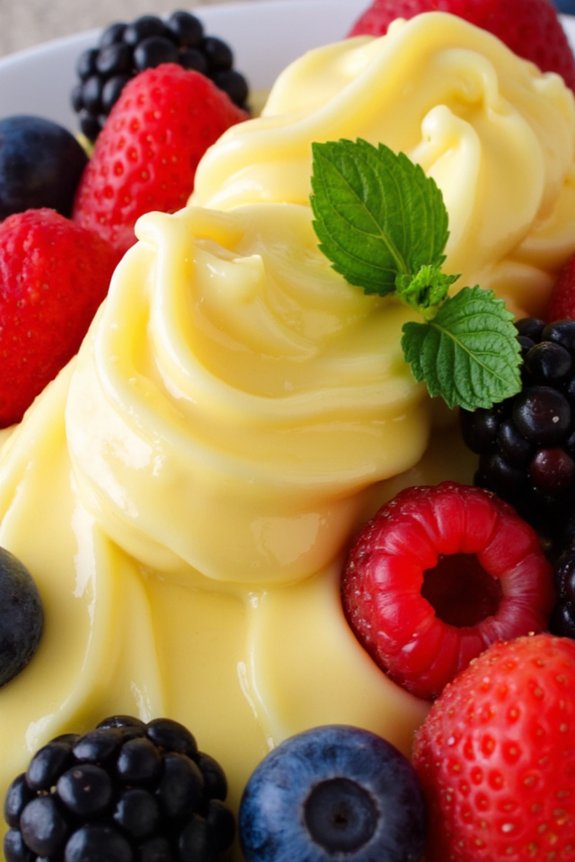
Zabaglione, an Italian classic, is a delightful dessert that’s both light and rich, making it a perfect addition to any brunch table. This dessert features a frothy, custard-like mixture made from egg yolks, sugar, and a splash of sweet wine, traditionally Marsala. Its luxurious texture is beautifully complemented by the tart and invigorating taste of fresh berries, creating a harmonious balance of flavors and textures in every spoonful.
Impress your guests with this simple yet elegant dish that showcases the best of Italian culinary tradition. Zabaglione isn’t only a feast for the taste buds but also a visual delight, as the vibrant colors of the berries contrast with the golden, silky custard. This recipe serves 4-6 people, making it ideal for brunch gatherings or intimate family meals. With a few straightforward steps, you’ll have a crowd-pleaser that leaves everyone wanting more.
Ingredients (Serves 4-6):
- 6 large egg yolks
- 1/3 cup granulated sugar
- 1/2 cup Marsala wine (or substitute with another sweet wine)
- 1 teaspoon vanilla extract
- 2 cups assorted fresh berries (such as strawberries, raspberries, blueberries, and blackberries)
- Mint leaves for garnish (optional)
Cooking Instructions:
- Prepare a Double Boiler: Fill a medium saucepan with about an inch of water and bring it to a simmer over medium heat. Make sure that the water doesn’t touch the bottom of the bowl when it’s placed on top.
- Mix Egg Yolks and Sugar: In a heatproof bowl that fits snugly over the saucepan, whisk together the egg yolks and granulated sugar until the mixture is smooth and pale. This should take about 2-3 minutes.
- Add Wine and Vanilla: Gradually whisk in the Marsala wine and vanilla extract, confirming everything is well combined.
- Cook the Mixture: Place the bowl over the simmering water, ensuring it doesn’t touch the water. Continuously whisk the mixture for about 10-15 minutes, or until it thickens to a custard-like consistency and triples in volume. The zabaglione should be light and frothy.
- Prepare the Berries: While the zabaglione is cooking, wash and dry the fresh berries. If using strawberries, hull and slice them into bite-sized pieces.
- Assemble the Dish: Divide the fresh berries among serving bowls or glasses. Spoon the warm zabaglione over the berries, allowing it to cascade and envelop them.
- Garnish and Serve: Garnish with mint leaves if desired, and serve immediately for the best texture and flavor.
Extra Tips:
When making zabaglione, it’s crucial to whisk continuously to prevent the eggs from scrambling. Maintain a gentle heat under the double boiler, as overheating can cause the custard to curdle.
If you don’t have Marsala wine, you can experiment with other sweet wines or even a bit of brandy for a different flavor profile. Always use the freshest berries you can find for the best taste and presentation, and consider chilling your serving glasses beforehand for a revitalizing contrast to the warm custard.
Italian Apple Cake
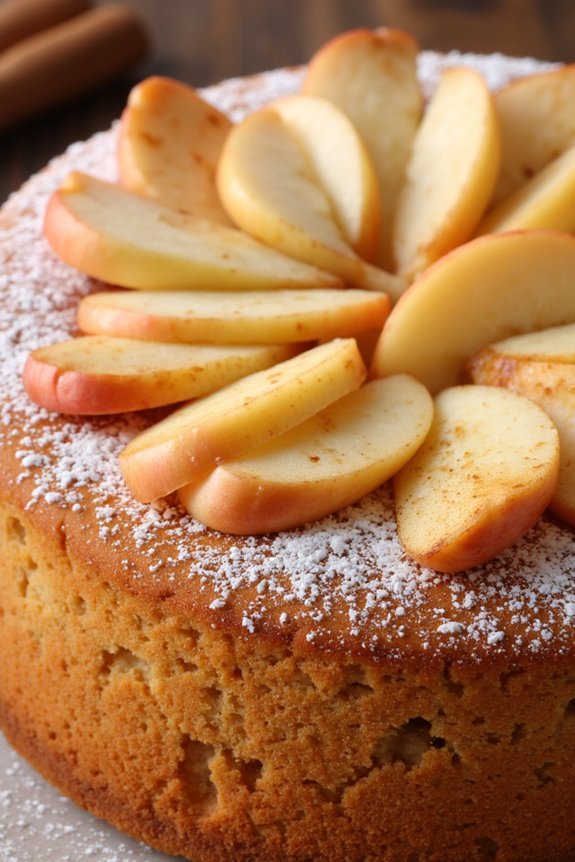
Indulge in the delightful flavors of Italy with this traditional Italian Apple Cake, a perfect choice for a leisurely brunch. This cake is known for its moist texture and the aromatic blend of apples and cinnamon, offering a warm and comforting dessert that pairs beautifully with a cup of coffee or tea.
The Italian Apple Cake isn’t just a treat for the taste buds but also a feast for the eyes with its golden-brown crust and enticing aroma. This recipe serves 4-6 people, making it ideal for a family gathering or a special occasion brunch.
The charm of the Italian Apple Cake lies in its simplicity, using fresh, wholesome ingredients that bring out the natural sweetness of the apples. The cake is lightly spiced with cinnamon and complemented by the zest of a lemon, enhancing the flavor profile without overpowering the delicate balance of the cake.
Whether you’re a seasoned baker or a novice in the kitchen, this recipe is straightforward to follow, promising a delicious outcome that will impress your guests.
Ingredients:
- 2 large apples, peeled, cored, and thinly sliced
- 1 tablespoon lemon juice
- 1 cup all-purpose flour
- 1 teaspoon baking powder
- 1/2 teaspoon ground cinnamon
- Pinch of salt
- 1/2 cup granulated sugar
- 2 large eggs
- 1/4 cup unsalted butter, melted
- 1/4 cup milk
- 1 teaspoon vanilla extract
- 1 tablespoon lemon zest
- Powdered sugar (for dusting)
Instructions:
- Prepare the Apples: Preheat your oven to 350°F (175°C). In a bowl, toss the apple slices with lemon juice to prevent browning and set aside.
- Mix Dry Ingredients: In a separate bowl, sift together the flour, baking powder, ground cinnamon, and a pinch of salt. This will guarantee even distribution of the baking powder and cinnamon.
- Combine Wet Ingredients: In a large mixing bowl, beat the sugar and eggs together until the mixture is light and fluffy. Gradually add melted butter, milk, and vanilla extract, mixing well after each addition.
- Blend Mixtures: Slowly incorporate the dry ingredients into the wet ingredients, stirring gently until fully combined. Fold in the lemon zest for a hint of citrus flavor.
- Assemble the Cake: Grease a 9-inch springform pan and pour half of the batter into the pan. Arrange half of the apple slices over the batter, then pour the remaining batter over the apples. Finish by layering the remaining apple slices on top.
- Bake the Cake: Place the cake in the preheated oven and bake for 45-50 minutes, or until a toothpick inserted into the center comes out clean. The top of the cake should be a beautiful golden brown.
- Cool and Serve: Allow the cake to cool in the pan for about 10 minutes before transferring it to a wire rack to cool completely. Dust with powdered sugar before serving for an elegant finish.
Extra Tips:
For the best results, use fresh, crisp apples like Granny Smith or Honeycrisp, which hold their shape well during baking. If you desire a richer flavor, consider adding a handful of chopped nuts, such as walnuts or almonds, to the batter.
When serving, pair the cake with a scoop of vanilla ice cream or a dollop of whipped cream for an added touch of indulgence. Remember to store any leftovers in an airtight container to maintain the cake’s moistness and freshness.
Mascarpone and Fig Crostini
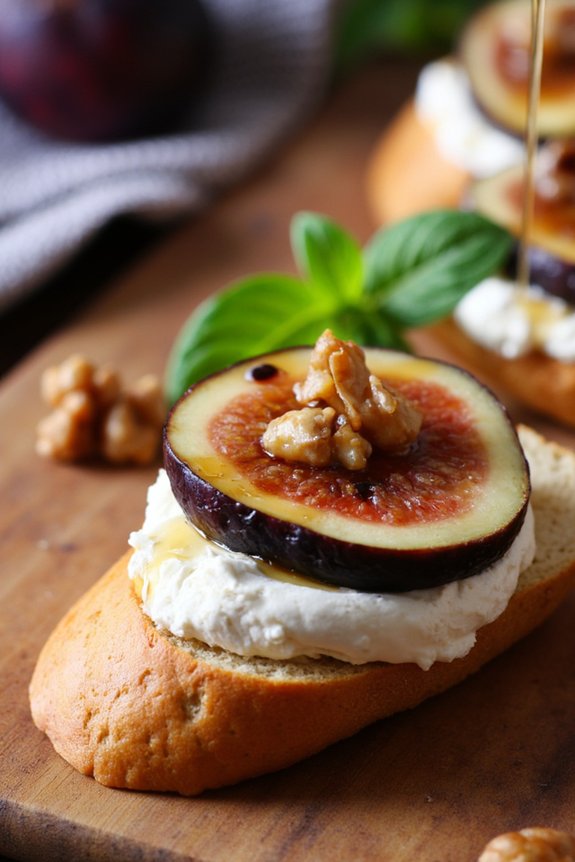
Mascarpone and Fig Crostini is an elegant and delectable Italian appetizer perfect for a brunch spread. This dish combines the creamy, rich flavor of mascarpone cheese with the sweet, luscious taste of ripe figs, all served atop crispy slices of bread. It’s a harmonious blend of textures and flavors that will delight your taste buds and impress your guests.
Whether you’re hosting a special brunch or simply want to enjoy a sophisticated snack, this crostini is bound to become a favorite. The simplicity of this recipe allows the quality of the ingredients to shine, making it essential to choose the ripest figs and freshest mascarpone.
The sweetness of the figs is complemented by a drizzle of honey and a hint of balsamic glaze, while a sprinkle of chopped walnuts adds a delightful crunch. This recipe serves 4-6 people, making it ideal for sharing with friends and family.
Ingredients (serves 4-6):
- 1 baguette, sliced into 12-16 pieces
- 8 ounces mascarpone cheese
- 8 ripe figs, sliced
- 2 tablespoons honey
- 1 tablespoon balsamic glaze
- 1/4 cup chopped walnuts
- Fresh mint leaves for garnish
- Olive oil for brushing
- Salt and pepper to taste
Instructions:
- Preheat the Oven: Begin by preheating your oven to 375°F (190°C). This will allow the bread to toast evenly and become perfectly crispy.
- Prepare the Baguette: Slice the baguette into 12-16 pieces, each about 1/2 inch thick. Arrange the slices on a baking sheet. Lightly brush each piece with olive oil and sprinkle with a pinch of salt and pepper. This will enhance the flavor of the bread and guarantee it pairs well with the toppings.
- Toast the Bread: Place the baking sheet in the preheated oven. Toast the bread slices for about 10 minutes or until they’re golden brown and crispy. Remove from the oven and let them cool slightly.
- Prepare the Mascarpone: In a small bowl, stir the mascarpone cheese until it becomes smooth and spreadable. If desired, you can season it with a pinch of salt for added flavor.
- Assemble the Crostini: Once the bread is cool enough to handle, spread a generous amount of mascarpone onto each toasted slice. Arrange the fig slices on top of the mascarpone.
- Add Finishing Touches: Drizzle honey over the figs, followed by a light drizzle of balsamic glaze. Sprinkle the chopped walnuts over each crostini for added texture. Garnish with fresh mint leaves for a burst of color and fragrance.
- Serve: Arrange the crostini on a serving platter and serve immediately. These are best enjoyed fresh to appreciate the contrast between the crisp bread and creamy toppings.
Extra Tips: When selecting figs, look for ones that are plump and slightly soft to the touch, as these will be the sweetest. If fresh figs aren’t available, dried figs can be rehydrated in warm water for a few minutes before use.
For an extra layer of flavor, you can toast the walnuts in a dry skillet for a few minutes before chopping them. Finally, don’t be afraid to experiment with additional toppings, such as prosciutto or a sprinkle of sea salt, to suit your personal taste.
Chocolate Espresso Tart
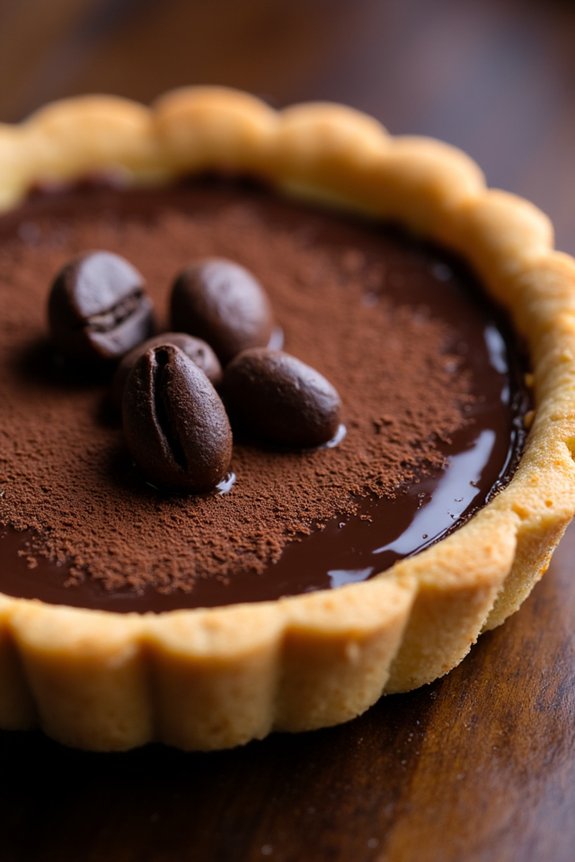
Indulge in a decadent Italian-inspired brunch treat with this Chocolate Espresso Tart. This rich and sophisticated dessert combines the bold flavors of espresso with the smoothness of dark chocolate, creating a delightful harmony that’s certain to impress your guests.
The tart is encased in a buttery, crisp pastry shell that perfectly complements the luscious filling. Whether you’re hosting a brunch or simply want to treat yourself to something special, this tart is a delicious choice that embodies the elegance of Italian cuisine.
Ideal for a serving size of 4-6 people, this Chocolate Espresso Tart isn’t only a feast for the taste buds but also a visual delight. The glossy chocolate filling, slightly dusted with cocoa powder or espresso beans, will surely be a showstopper on your brunch table.
Follow the recipe below to create this exquisite dessert, perfect for any occasion that calls for a touch of Italian flair.
Ingredients:
- 1 1/4 cups all-purpose flour
- 1/4 cup granulated sugar
- 1/2 cup unsalted butter, chilled and diced
- 1 egg yolk
- 1-2 tablespoons ice water
- 1/2 cup heavy cream
- 1/2 cup milk
- 2 tablespoons instant espresso powder
- 9 ounces dark chocolate, finely chopped
- 1/4 cup granulated sugar
- 1/4 teaspoon salt
- 2 large eggs
- 1 teaspoon vanilla extract
- Cocoa powder or espresso beans for garnish
Instructions:
1. Prepare the Tart Crust: In a mixing bowl, combine the all-purpose flour and granulated sugar. Add the diced butter and use a pastry cutter or your fingers to rub the butter into the flour until the mixture resembles coarse crumbs.
Add the egg yolk and mix in enough ice water, one tablespoon at a time, until the dough just comes together. Shape the dough into a disk, wrap it in plastic wrap, and refrigerate for at least 30 minutes.
2. Preheat the Oven: Preheat your oven to 350°F (175°C).
3. Roll and Bake the Crust: On a lightly floured surface, roll out the chilled dough to fit a 9-inch tart pan. Carefully transfer the dough to the pan, pressing it into the edges and trimming any excess.
Prick the base with a fork and chill for another 15 minutes to prevent shrinking. Line the crust with parchment paper and fill with pie weights or dried beans. Bake for 15 minutes, remove the weights and paper, and bake for an additional 10 minutes until lightly golden. Allow to cool.
4. Make the Filling: In a saucepan over medium heat, combine the heavy cream, milk, and espresso powder. Bring the mixture just to a simmer, then remove from heat.
Add the chopped dark chocolate, stirring until completely melted and smooth. Stir in the sugar and salt until dissolved.
5. Complete the Filling: In a separate bowl, whisk the eggs and vanilla extract together. Gradually pour the chocolate mixture into the eggs, whisking constantly to prevent curdling.
Confirm the mixture is smooth and well combined.
6. Fill and Bake the Tart: Pour the chocolate filling into the prepared tart crust. Bake in the preheated oven for 20-25 minutes, or until the filling is set but still slightly wobbly in the center.
Remove from the oven and allow to cool to room temperature.
7. Garnish and Serve: Once cooled, garnish the tart with a dusting of cocoa powder or a few espresso beans for an elegant finish. Slice and serve at room temperature or slightly chilled.
Extra Tips:
For the best flavor, use high-quality dark chocolate and espresso powder. If you don’t have a tart pan, a pie dish will work as a substitute, though the baking times may vary slightly.
Be sure to whisk the eggs thoroughly to prevent any lumps in the filling. If you prefer a softer crust, you can reduce the blind baking time slightly.
This tart can be made a day in advance and stored in the refrigerator, making it convenient for brunch preparations. Enjoy your Italian Chocolate Espresso Tart with a dollop of whipped cream or a scoop of vanilla gelato for an extra touch of indulgence.
Citrus Olive Oil Cake
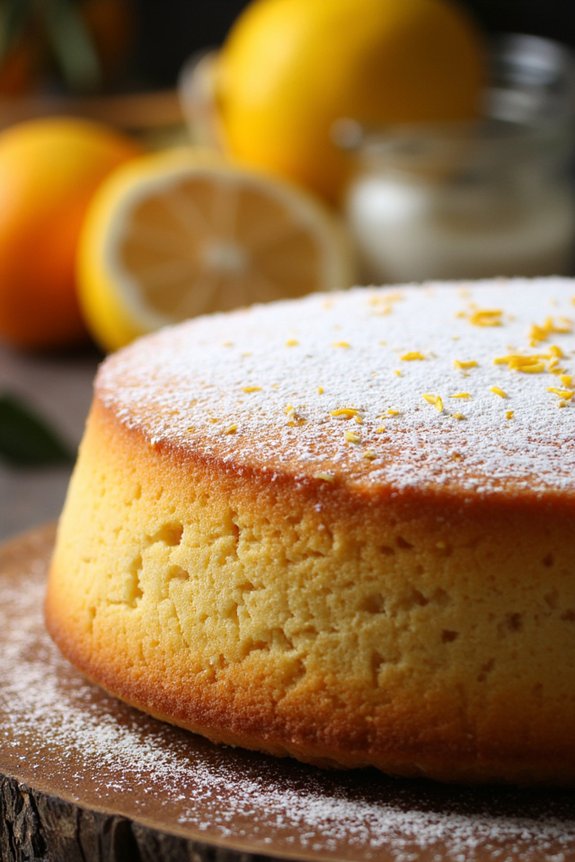
Citrus Olive Oil Cake is a delightful and moist cake that combines the fruity essence of olive oil with the invigorating zest of citrus. Perfect for a brunch gathering, this cake is light yet full of flavor, and it’s sure to impress your guests with its vibrant taste and beautiful presentation.
The olive oil keeps the cake moist, while the citrus adds a bright and tangy note that balances the sweetness perfectly. This recipe serves 4-6 people and is a fantastic addition to any Italian-themed brunch menu. The cake is simple to make and requires only a few basic ingredients, making it an ideal choice for both novice and experienced bakers.
Once baked, the cake has a tender crumb and a lovely golden hue that makes it visually appealing. Enjoy it plain, or with a dusting of powdered sugar or a dollop of whipped cream.
Ingredients:
- 1 1/2 cups all-purpose flour
- 1/2 teaspoon baking powder
- 1/4 teaspoon baking soda
- 1/4 teaspoon salt
- 1 cup granulated sugar
- 3 large eggs
- 1/2 cup olive oil
- 1/2 cup fresh orange juice
- Zest of 1 orange
- Zest of 1 lemon
- 1 teaspoon vanilla extract
- Powdered sugar for dusting (optional)
Instructions:
- Preheat the Oven: Preheat your oven to 350°F (175°C). Grease a 9-inch round cake pan with olive oil or line it with parchment paper to prevent sticking.
- Mix Dry Ingredients: In a medium bowl, whisk together the flour, baking powder, baking soda, and salt. This guarantees that the leavening agents are evenly distributed throughout the flour.
- Whisk Wet Ingredients: In a large mixing bowl, whisk together the sugar and eggs until the mixture is thick and pale. This should take about 2-3 minutes of vigorous whisking, which helps to incorporate air for a light cake.
- Combine Wet Ingredients: Slowly add the olive oil to the sugar and egg mixture, whisking continuously. Then, add the orange juice, orange zest, lemon zest, and vanilla extract. Mix well until all ingredients are thoroughly combined.
- Combine Dry and Wet Mixtures: Gradually add the dry ingredients to the wet ingredients, stirring gently until just combined. Be careful not to overmix, as this can result in a dense cake.
- Bake the Cake: Pour the batter into the prepared cake pan, spreading it evenly. Bake in the preheated oven for 30-35 minutes, or until a toothpick inserted into the center comes out clean.
- Cool and Serve: Allow the cake to cool in the pan for 10 minutes, then transfer it to a wire rack to cool completely. Dust with powdered sugar before serving, if desired.
Extra Tips:
For a more intense citrus flavor, consider adding a tablespoon of limoncello or citrus liqueur to the batter. Additionally, using a high-quality extra virgin olive oil will enhance the flavor of the cake, so choose one with fruity notes.
If you prefer a glaze, mix some powdered sugar with a bit of citrus juice and drizzle it over the cooled cake. This cake pairs beautifully with a light, invigorating tea or coffee and can be stored in an airtight container at room temperature for up to three days.