

There’s something truly magical about authentic Italian recipes that connect us to generations past.
Picture yourself savoring a creamy Risotto alla Milanese or enjoying the delicate layers of a flaky Sfogliatella.
Each dish offers a peek into time-honored techniques and unique regional flavors.
Are you ready to explore the culinary stories these recipes hold?
Let’s discover these 14 authentic recipes that keep old-world flavor alive.
Tuscan Ribollita: Hearty Bread and Vegetable Soup
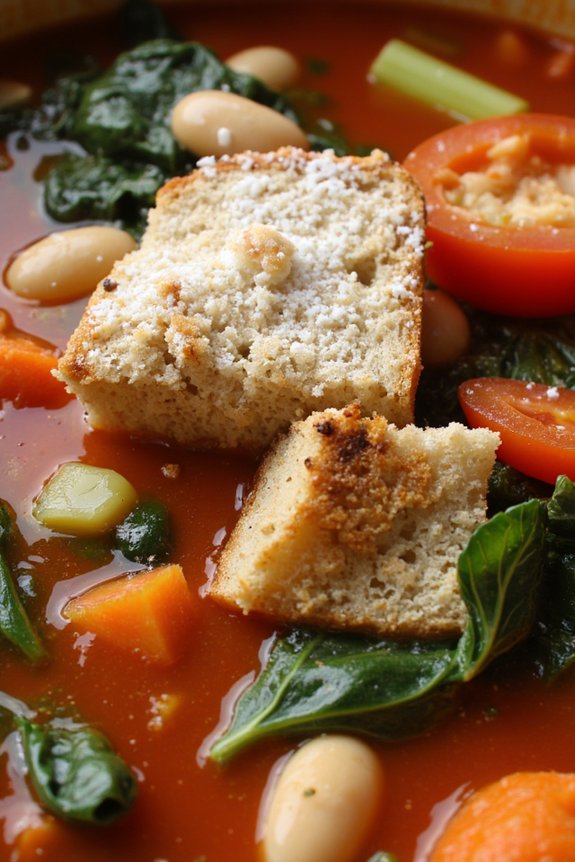
Tuscan Ribollita is a classic Italian soup known for its robust flavors and rich history. Originating from Tuscany, this dish exemplifies the concept of cucina povera, or “poor kitchen,” which emphasizes the use of simple, affordable ingredients to create flavorful meals. Ribollita, meaning “reboiled,” traditionally incorporates leftover vegetables and stale bread, making it an ideal dish for utilizing what’s available in your pantry.
This hearty soup is perfect for colder months and is deeply satisfying with its thick, stew-like consistency. The beauty of Ribollita lies in its versatility. While recipes can vary, the essential components include cannellini beans, an assortment of vegetables such as carrots, celery, and kale, and day-old bread for texture and body.
The slow simmering process allows the flavors to meld together, creating a comforting meal that’s both nourishing and delicious. Served with a drizzle of high-quality olive oil and a sprinkle of grated Parmesan cheese, this Tuscan classic is sure to warm both your body and soul.
Ingredients for Tuscan Ribollita (Serves 4-6)
- 1/4 cup extra-virgin olive oil, plus more for drizzling
- 1 large onion, chopped
- 2 carrots, diced
- 2 celery stalks, diced
- 4 garlic cloves, minced
- 1/2 teaspoon red pepper flakes
- 1/2 teaspoon dried thyme
- 1/2 teaspoon dried oregano
- 1 bay leaf
- 1 can (14 oz) diced tomatoes
- 6 cups vegetable broth
- 2 cans (15 oz each) cannellini beans, drained and rinsed
- 1 bunch of kale, stems removed and leaves chopped
- 4 cups day-old bread, cut into cubes
- Salt and freshly ground black pepper, to taste
- Grated Parmesan cheese, for serving
Cooking Instructions
- Prepare the Base: Heat the olive oil in a large pot over medium heat. Add the chopped onion, carrots, and celery, and sauté for about 8-10 minutes until the vegetables are soft and the onion is translucent.
- Add Aromatics: Stir in the minced garlic, red pepper flakes, thyme, oregano, and the bay leaf. Cook for another minute until the garlic is fragrant.
- Incorporate Tomatoes and Broth: Pour in the diced tomatoes with their juice and the vegetable broth. Stir to combine and bring the mixture to a gentle simmer.
- Simmer the Beans and Kale: Add the drained cannellini beans and chopped kale to the pot. Simmer uncovered for about 15-20 minutes, or until the kale is tender.
- Add the Bread: Stir in the cubed day-old bread, ensuring it’s fully submerged in the soup. Continue simmering for another 10 minutes, allowing the bread to absorb the liquid and thicken the soup.
- Season and Serve: Remove the bay leaf and season the soup with salt and pepper to taste. Ladle the Ribollita into bowls, drizzle with extra-virgin olive oil, and sprinkle with grated Parmesan cheese before serving.
Extra Tips
To enhance the flavor of your Ribollita, consider using homemade vegetable broth if you have it on hand. This will add a deeper, more complex taste to the soup.
If you prefer a thicker consistency, mash some of the beans against the side of the pot before adding the bread. Additionally, Ribollita is traditionally served the day after it’s made, allowing the flavors to develop further.
Feel free to reheat it gently on the stove before serving, as the name “reboiled” suggests. Enjoy this comforting dish with a side of rustic bread for a complete Tuscan experience.
Sicilian Caponata: Sweet and Sour Eggplant Stew
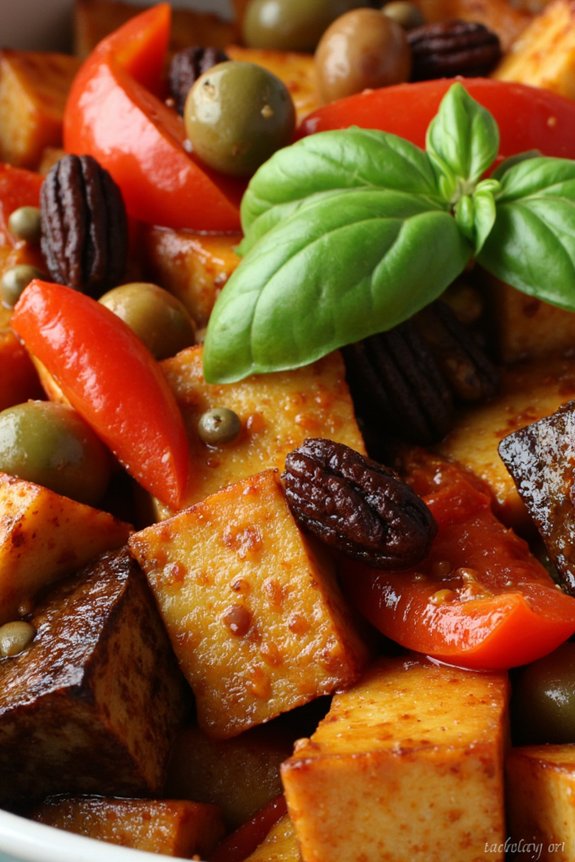
Caponata is a quintessential Sicilian dish that brilliantly balances sweet and sour flavors with a medley of vegetables, mainly eggplant. This beloved stew is a reflection of the rich culinary heritage of Sicily, capturing the vibrant tastes and aromas of the Mediterranean. Each bite offers a delightful combination of tender eggplant, tangy tomatoes, briny olives, and a hint of sweetness from raisins.
Sicilian Caponata can be enjoyed warm or at room temperature, making it a versatile dish perfect as an appetizer, side, or main course. The history of Caponata is as colorful as its ingredients, with influences from Arab, Greek, and Spanish cuisines. It’s traditionally served with crusty bread, allowing you to savor every last drop of its flavorful sauce.
Whether you’re preparing it for a family meal or a gathering with friends, this recipe designed for 4-6 people will guide you in creating an authentic Caponata that brings a piece of Sicily to your table.
Ingredients for 4-6 servings:
- 2 large eggplants, diced
- 1/4 cup olive oil
- 1 large onion, chopped
- 2 celery stalks, chopped
- 3 garlic cloves, minced
- 1 red bell pepper, diced
- 1 can (14 oz) diced tomatoes
- 1/4 cup green olives, pitted and sliced
- 1/4 cup capers, rinsed
- 1/4 cup raisins
- 3 tablespoons red wine vinegar
- 2 tablespoons sugar
- Salt and pepper to taste
- Fresh basil leaves for garnish
Cooking Instructions:
- Prepare the Eggplants: Begin by cutting the eggplants into evenly sized cubes. Sprinkle them with salt and place them in a colander to drain for about 30 minutes. This step helps to remove any bitterness. Rinse the eggplant cubes under cold water and pat them dry with a kitchen towel.
- Sauté the Vegetables: In a large pan, heat the olive oil over medium heat. Add the diced eggplants and cook until they’re golden brown and soft, about 10 minutes. Remove the eggplants from the pan and set them aside.
- Cook the Aromatics: In the same pan, add a bit more olive oil if needed. Add the chopped onion, celery, and minced garlic. Sauté until the onion is translucent and the celery is tender, approximately 5 minutes.
- Combine Ingredients: Add the diced red bell pepper to the pan and cook for another 3 minutes. Stir in the canned tomatoes, olives, capers, and raisins. Return the cooked eggplant to the pan.
- Create the Sweet and Sour Flavor: Pour in the red wine vinegar and sprinkle the sugar over the mixture. Stir well to combine all the ingredients, ensuring everything is evenly coated. Season with salt and pepper to taste.
- Simmer the Caponata: Lower the heat and let the mixture simmer gently for 20-25 minutes, stirring occasionally. The flavors will meld together, and the sauce will thicken slightly.
- Garnish and Serve: Once the Caponata is done cooking, remove it from the heat and let it cool slightly. Garnish with fresh basil leaves before serving. Enjoy it warm, at room temperature, or even cold.
Extra Tips:
For the best results, use fresh, firm eggplants to avoid any mushy texture. This dish improves in flavor as it sits, so consider making it a day in advance to allow the flavors to fully develop.
If you prefer a bit more sweetness, you can add an extra tablespoon of sugar. Additionally, feel free to customize your Caponata by adding pine nuts for extra crunch or a pinch of crushed red pepper for some heat. Remember, Caponata is a forgiving dish, so don’t be afraid to adjust it to your taste preferences.
Roman Cacio E Pepe: the Ultimate Cheese and Pepper Pasta
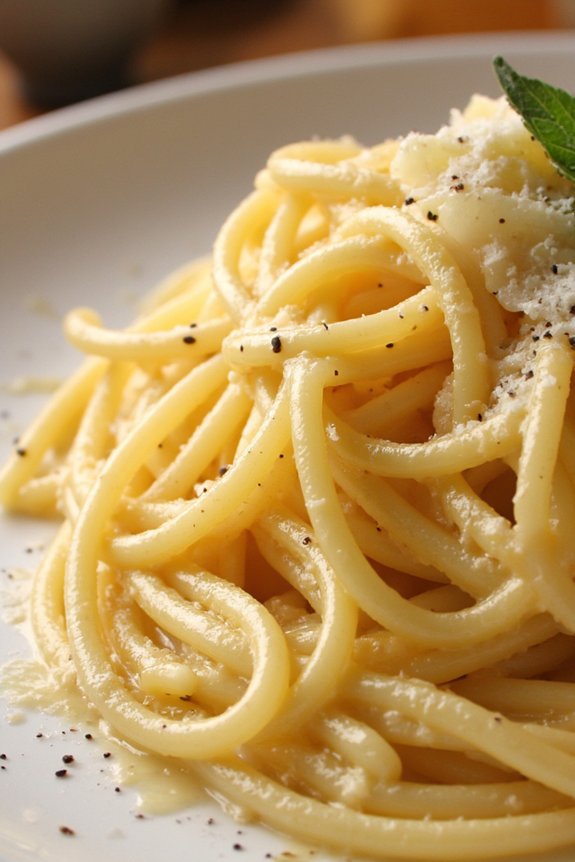
Cacio e Pepe, which translates to “cheese and pepper,” is a traditional Roman dish that showcases the beauty of simplicity in Italian cooking. This classic pasta recipe is proof that a few high-quality ingredients can create a dish that’s both flavorful and satisfying. The creamy emulsion of Pecorino Romano cheese and starchy pasta water, combined with the aromatic punch of freshly cracked black pepper, results in a dish that’s greater than the sum of its parts.
Originating from the homes of Roman shepherds, this recipe has stood the test of time and remains a beloved staple in Italian cuisine.
Preparing Cacio e Pepe is an art of balancing heat, timing, and proportions to achieve the perfect creamy texture without clumping. The key to this dish lies in the quality of the ingredients and the technique used to bring them together. With just a few steps, you can master this Roman classic and bring a taste of Italy to your own kitchen.
Whether you’re new to Italian cooking or a seasoned enthusiast, this recipe is sure to become a favorite in your culinary repertoire.
Ingredients for 4-6 people:
- 400g spaghetti or tonnarelli pasta
- 150g Pecorino Romano cheese, finely grated
- 2 teaspoons freshly cracked black pepper
- Salt (for pasta water)
Cooking Instructions:
- Boil the Pasta: Fill a large pot with water and bring it to a boil. Add a generous amount of salt to the boiling water, then add the spaghetti. Cook the pasta until it’s just shy of al dente according to the package instructions. Reserve about 1 cup of pasta water before draining the pasta.
- Prepare the Cheese and Pepper Mixture: While the pasta is cooking, finely grate the Pecorino Romano cheese and set it aside. In a large skillet, toast the freshly cracked black pepper over medium heat for about 1-2 minutes until it’s fragrant. Be careful not to burn it.
- Create the Sauce Base: Add a ladleful of the reserved hot pasta water to the skillet with the toasted pepper. Stir to combine, then remove the skillet from heat.
- Combine Pasta and Sauce: Add the drained pasta to the skillet with the pepper-infused water. Toss the pasta to coat it evenly with the peppery liquid.
- Incorporate the Cheese: Gradually sprinkle the grated Pecorino Romano over the pasta, tossing constantly to combine. Add more reserved pasta water as needed to create a creamy sauce that clings to the pasta. Continue to toss until the cheese has melted and the sauce is smooth and glossy.
- Adjust Seasoning: Taste the pasta and adjust the seasoning with more black pepper if needed. If the sauce is too thick, add a little more pasta water to reach the desired consistency.
- Serve Immediately: Transfer the pasta to serving plates and enjoy immediately for the best texture and flavor.
Extra Tips:
For the best results, make sure that the Pecorino Romano cheese is finely grated, as this will help it melt smoothly into the sauce. Use freshly cracked black pepper to maximize its flavor and aroma.
It’s also important to use hot, starchy pasta water to help emulsify the sauce and achieve that creamy consistency. If you’re new to making Cacio e Pepe, practice patience and keep the heat low when combining the cheese with the pasta to prevent clumping.
Neapolitan Pizza Margherita: Classic Wood-Fired Delight

Neapolitan Pizza Margherita is a quintessential Italian dish that exemplifies simplicity and authenticity. Originating from Naples, this pizza is celebrated for its thin, soft crust with a slightly chewy texture, which is achieved by baking it in a wood-fired oven at high temperatures. The pizza is named after Queen Margherita of Savoy and features the colors of the Italian flag: red tomatoes, white mozzarella cheese, and green basil leaves. The ingredients are minimal, allowing each one to shine and contribute to the overall harmony of flavors.
To make an authentic Neapolitan Pizza Margherita, the dough is prepared using just flour, water, salt, and yeast, and requires time to rise and develop its characteristic flavor. The sauce is made from fresh, ripe San Marzano tomatoes, known for their sweet and tangy taste. The mozzarella used should be fresh and high-quality, preferably buffalo mozzarella, which melts beautifully and adds a creamy texture. Basil leaves are added for freshness, and a drizzle of extra virgin olive oil enhances the pizza’s flavor profile. The pizza is cooked quickly in a blazing hot wood-fired oven, resulting in a perfect combination of a crisp, charred crust and gooey, bubbly cheese.
Ingredients (Serves 4-6)
- 500g Italian 00 flour
- 325ml water
- 10g sea salt
- 3g fresh yeast or 1g active dry yeast
- 400g canned San Marzano tomatoes
- Salt to taste
- Freshly ground black pepper to taste
- 300g fresh mozzarella cheese (preferably buffalo mozzarella)
- Fresh basil leaves
- Extra virgin olive oil
Cooking Instructions
- Prepare the Dough: In a large bowl, dissolve the yeast in lukewarm water. Gradually add the flour, mixing with your hand or a wooden spoon until the dough begins to come together. Add the salt and continue kneading until smooth and elastic, about 10 minutes. Cover the dough with a damp cloth and let it rise at room temperature for about 8 hours or until it doubles in size.
- Prepare the Sauce: While the dough is rising, prepare the tomato sauce. Crush the San Marzano tomatoes by hand in a bowl and season with salt and freshly ground black pepper. Set aside and let the flavors meld.
- Shape the Dough: Once the dough has risen, divide it into 4 equal pieces for 4 pizzas (or 6 for smaller ones). Shape each piece into a ball, cover with a damp cloth, and let them rest for 30 minutes.
- Preheat the Oven: If using a wood-fired oven, confirm it reaches a temperature of about 485°C (905°F). For a conventional oven, use a pizza stone and preheat to the highest setting, around 250°C (482°F) or as high as it can go.
- Stretch the Dough: Take a dough ball and flatten it into a disc. Gently use your fingers to stretch it into a 10-12 inch circle, leaving the edges thicker for a crust. Avoid using a rolling pin as it can deflate the dough.
- Assemble the Pizza: Spread a thin layer of tomato sauce over the base, leaving the edges clear. Tear the mozzarella into pieces and distribute evenly over the sauce. Add a few fresh basil leaves and drizzle with a little extra virgin olive oil.
- Bake the Pizza: Transfer the pizza to the preheated oven or stone. Bake for about 60-90 seconds in a wood-fired oven or 7-10 minutes in a conventional oven until the crust is blistered and the cheese is bubbly and golden.
- Serve: Once baked, remove the pizza from the oven, top with additional fresh basil leaves if desired, slice, and serve immediately.
Extra Tips
To achieve the best results, use high-quality ingredients, as they’re the key to an authentic Neapolitan Pizza Margherita. The dough should be soft and pliable, so handle it gently to maintain its structure.
If you don’t have access to a wood-fired oven, a pizza stone in a very hot conventional oven can help mimic the effect by providing a crispy base. Remember, the pizza cooks quickly, so keep an eye on it to prevent burning. Enjoy your pizza with a glass of Italian red wine for a truly authentic experience.
Venetian Risotto Al Nero Di Seppia: Squid Ink Risotto
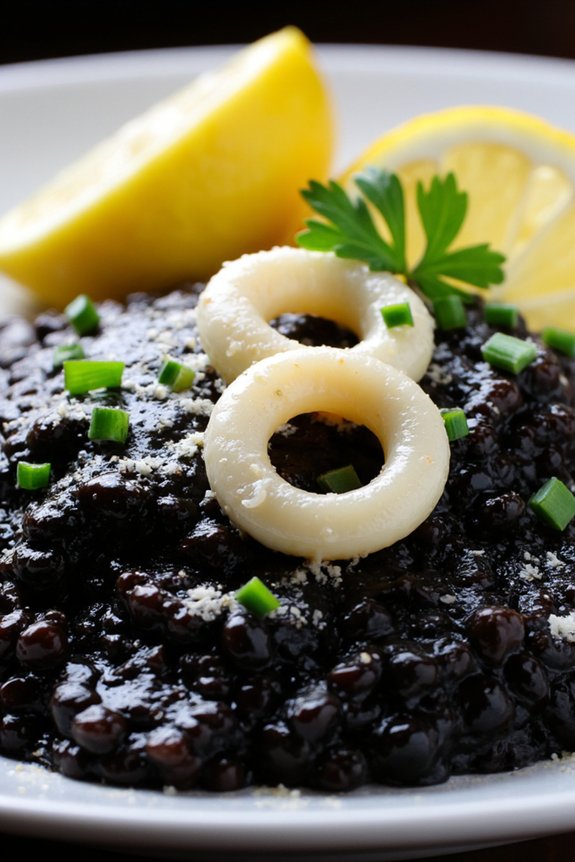
Venetian Risotto Al Nero Di Seppia, or Squid Ink Risotto, is a strikingly dark and delicious dish that hails from the enchanting canals of Venice. This unique risotto is renowned for its rich, briny flavor imparted by the squid ink, along with the creamy texture and the subtle aroma of the sea. It’s a perfect example of how traditional Italian cuisine effortlessly combines simple ingredients to create an elegant dish.
Squid ink risotto isn’t only a feast for the taste buds but also a visually stunning centerpiece, making it an ideal choice for a special occasion or dinner party.
The key to making an exceptional Risotto Al Nero Di Seppia is to use fresh, high-quality ingredients. The squid ink provides an umami depth that pairs wonderfully with the creaminess of the arborio rice. The dish typically incorporates sautéed onions and garlic, white wine, and a touch of Parmesan cheese, resulting in a flavor profile that’s both complex and comforting.
It’s vital to maintain a gentle and consistent stirring during the cooking process to achieve the perfect creamy texture that makes risotto so beloved.
Ingredients (Serves 4-6):
- 2 tablespoons olive oil
- 1 medium onion, finely chopped
- 2 cloves garlic, minced
- 1 cup arborio rice
- 1 cup dry white wine
- 4 cups fish or vegetable stock
- 2 tablespoons squid ink
- 400 grams (about 14 ounces) fresh squid, cleaned and cut into rings
- Salt and freshly ground black pepper to taste
- 2 tablespoons unsalted butter
- 1/2 cup grated Parmesan cheese
- Fresh parsley, chopped, for garnish
- Lemon wedges for serving
Cooking Instructions:
- Prepare the Base: In a large, heavy-bottomed saucepan, heat the olive oil over medium heat. Add the chopped onion and sauté until translucent, about 5 minutes. Stir in the minced garlic and cook for another minute until fragrant.
- Toast the Rice: Add the arborio rice to the pan, stirring continuously, and cook for about 2 minutes until the rice becomes slightly translucent around the edges.
- Deglaze with Wine: Pour in the white wine and stir frequently until the liquid is mostly absorbed by the rice.
- Incorporate Stock Gradually: Begin adding the fish or vegetable stock, one ladle at a time, stirring frequently and allowing each addition to absorb before adding the next. This process should take about 18-20 minutes. Maintain a gentle simmer throughout to guarantee even cooking.
- Add Squid and Ink: Once the rice is al dente and creamy, stir in the squid rings and squid ink. Cook for an additional 5 minutes, ensuring the squid is cooked through and tender.
- Finish the Risotto: Remove the pan from the heat and stir in the butter and grated Parmesan cheese. Season with salt and freshly ground black pepper to taste.
- Serve: Garnish with chopped parsley and serve immediately with lemon wedges on the side for an added burst of freshness.
Extra Tips:
To achieve the best texture, use a wooden spoon or heatproof silicone spatula to stir the risotto constantly. This helps release the rice’s starches, creating a creamy consistency without the need for cream.
It’s essential not to rush the process; patience is key to perfect risotto. If you prefer a more intense ink flavor, you can add an additional tablespoon of squid ink. Make sure to serve the dish immediately, as risotto can become gummy if allowed to sit for too long.
Enjoy your culinary journey to Venice with this exquisite dish!
Emilia-Romagna’s Tagliatelle Al Ragù: Traditional Bolognese Sauce
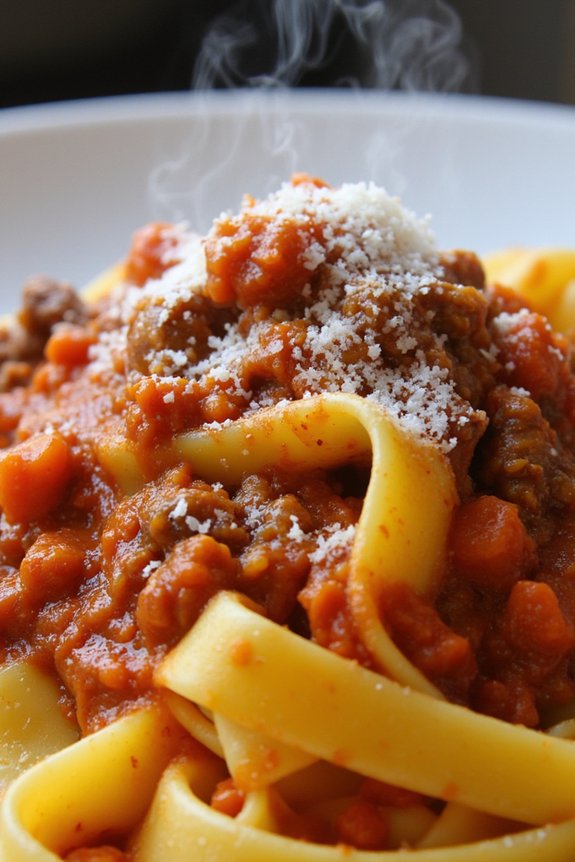
Emilia-Romagna, a region in Northern Italy, is renowned for its rich culinary traditions, and one of its most celebrated dishes is Tagliatelle Al Ragù, commonly known as Bolognese Sauce. This quintessential Italian recipe is a hearty meat sauce that pairs perfectly with the ribbon-like tagliatelle pasta. Unlike the quick-cooking versions found elsewhere, authentic Bolognese is a labor of love, involving a slow simmer to develop its deep, robust flavors. The sauce is a beautiful blend of ground meats, vegetables, wine, and a touch of tomato, creating a comforting dish that’s synonymous with the heart of Italian home cooking.
The origin of this dish can be traced back to Bologna, the capital of Emilia-Romagna, where each family might’ve its own unique twist on the recipe. However, the traditional version remains a staple at many a Sunday lunch table in Italy. The choice of ingredients and the patience in preparation make all the difference in this recipe, so it’s best to set aside a leisurely afternoon to let the ragù reach its full potential. The combination of slow-cooked meat and pasta offers a taste of Italy that’s both authentic and utterly satisfying.
Ingredients (serving size: 4-6 people)
- 400g tagliatelle pasta
- 300g ground beef
- 200g ground pork
- 1 onion, finely chopped
- 1 carrot, finely chopped
- 1 celery stalk, finely chopped
- 2 tablespoons olive oil
- 1/2 cup red wine
- 400g canned tomatoes, crushed
- 2 tablespoons tomato paste
- 1 cup beef stock
- 1/2 cup whole milk
- Salt and pepper to taste
- Freshly grated Parmesan cheese, for serving
Cooking Instructions
- Prepare the Vegetables: Begin by finely chopping the onion, carrot, and celery. This combination is known as “soffritto” and forms the flavor base for the ragù.
- Cook the Vegetables: In a large saucepan, heat the olive oil over medium heat. Add the chopped vegetables and sauté for about 5-7 minutes until they’re soft and fragrant.
- Brown the Meat: Increase the heat to medium-high and add the ground beef and pork to the pan. Cook the meat, breaking it apart with a wooden spoon, until it’s browned all over and no pink remains.
- Deglaze with Wine: Pour in the red wine and let it simmer until most of the liquid has evaporated. This helps to deglaze the pan and infuse the meat with a rich flavor.
- Add Tomatoes and Stock: Stir in the crushed tomatoes, tomato paste, and beef stock. Bring the mixture to a gentle simmer.
- Simmer the Sauce: Reduce the heat to low and let the sauce simmer uncovered for about 2-3 hours, stirring occasionally. This slow cooking allows the flavors to meld and the sauce to thicken.
- Finish with Milk: About 30 minutes before the sauce is done, stir in the milk. This mellows the acidity of the tomatoes and gives the sauce a richer texture.
- Cook the Pasta: In a large pot of boiling salted water, cook the tagliatelle according to package instructions until al dente. Drain the pasta and return it to the pot.
- Combine and Serve: Add the ragù to the pasta and toss to combine. Serve immediately, garnished with freshly grated Parmesan cheese.
Extra Tips
To enhance the flavor of your Tagliatelle Al Ragù, try using high-quality meat and fresh ingredients whenever possible. A good red wine will also impart a superior depth of flavor to the sauce.
Be patient during the simmering process; the longer the sauce cooks, the more complex and delicious it becomes. If you find the sauce too thick, you can adjust the consistency by adding a little more stock or water.
For added flavor, consider using a combination of beef and pork bones in the sauce, which can be removed before serving. Finally, always cook your pasta al dente, as it will continue to absorb the sauce once combined.
Ligurian Pesto Alla Genovese: Fresh Basil and Pine Nut Sauce
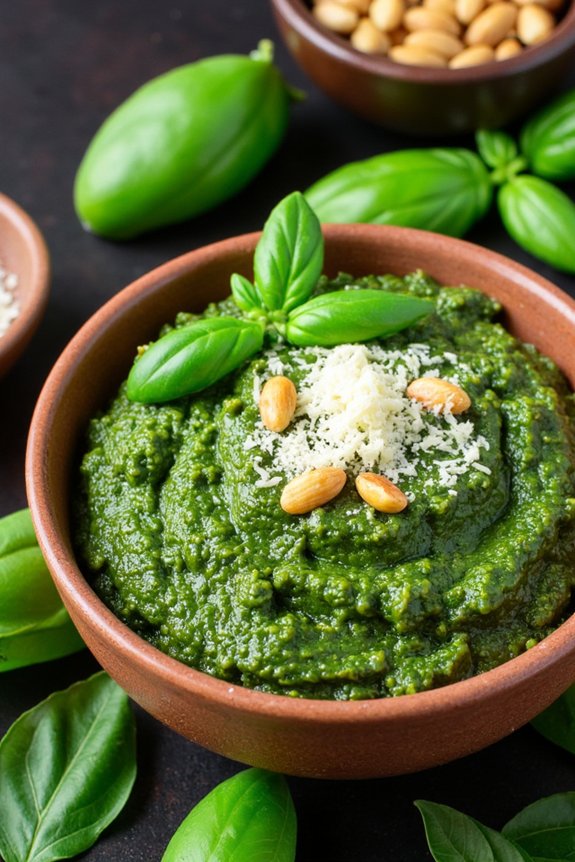
Pesto Alla Genovese is a quintessential Italian sauce originating from the Liguria region, specifically from Genoa, which is renowned for its aromatic basil. This vibrant green sauce is a harmonious blend of fresh basil leaves, creamy pine nuts, sharp Parmesan cheese, pungent garlic, and fruity extra virgin olive oil.
Traditionally, Pesto Alla Genovese is made using a mortar and pestle, which allows for a smoother, more cohesive texture and richer flavor as it gently crushes the ingredients, releasing their essential oils. This sauce is perfect for tossing with pasta, spreading on bread, or even using as a topping for grilled meats or vegetables.
The key to an authentic Pesto Alla Genovese is using the freshest ingredients available. Fresh basil is vital, as it serves as the backbone of the sauce, providing a fragrant herbaceousness. Pine nuts add a creamy, nutty undertone, while the Parmesan cheese brings a savory, umami depth. Garlic provides a robust kick, and the olive oil acts as the silky binder that melds everything together into a luscious, emerald paste.
For this recipe, we’ll guide you through creating this classic Ligurian delicacy for a serving size of 4-6 people.
Ingredients:
- 100g fresh basil leaves
- 50g pine nuts
- 2 cloves of garlic
- 100g grated Parmesan cheese
- 150ml extra virgin olive oil
- Salt to taste
- 50g Pecorino cheese (optional)
Instructions:
- Prepare the Basil: Gently wash the basil leaves in cold water to remove any dirt or impurities. Pat them dry with a clean kitchen towel or use a salad spinner to confirm they’re completely dry. This is important as excess water can dilute the flavor and texture of the pesto.
- Roast the Pine Nuts: In a small, dry skillet, toast the pine nuts over medium-low heat until they’re golden brown and release their aroma, about 3-5 minutes. Stir frequently to prevent them from burning. Remove from heat and allow them to cool.
- Crush the Garlic: Peel the garlic cloves and crush them using the side of a knife or a garlic press. This will help integrate the garlic smoothly into the sauce.
- Blend the Ingredients: In a food processor, combine the basil leaves, toasted pine nuts, crushed garlic, grated Parmesan cheese, and a pinch of salt. Pulse the mixture until it starts to blend together.
- Add Olive Oil: With the food processor running, gradually drizzle in the extra virgin olive oil. Continue blending until you achieve a smooth, creamy consistency. If you prefer, you can also incorporate 50g of Pecorino cheese for a sharper flavor.
- Adjust Seasoning: Taste the pesto and adjust the seasoning with additional salt if necessary. If the pesto is too thick, you can add a little more olive oil or a tablespoon of warm water to reach your desired consistency.
- Serve or Store: Use the pesto immediately by mixing it with freshly cooked pasta, or store it in an airtight container in the refrigerator for up to one week. To prevent discoloration, pour a thin layer of olive oil on top before sealing.
Extra Tips:
For the best pesto, always use the freshest ingredients you can find, especially the basil, as it’s the star of the dish. If you don’t have a food processor, a mortar and pestle will give you a more traditional texture, allowing for more control over the consistency of the pesto.
Remember to toast the pine nuts carefully, as their delicate flavor can quickly turn bitter if burned. If you want to add a twist, consider incorporating a squeeze of lemon juice for brightness or substituting walnuts for pine nuts for a different nutty profile.
Enjoy your homemade Pesto Alla Genovese as a versatile and delicious addition to your Italian culinary repertoire.
Umbrian Porchetta: Herb-Stuffed Roasted Pork
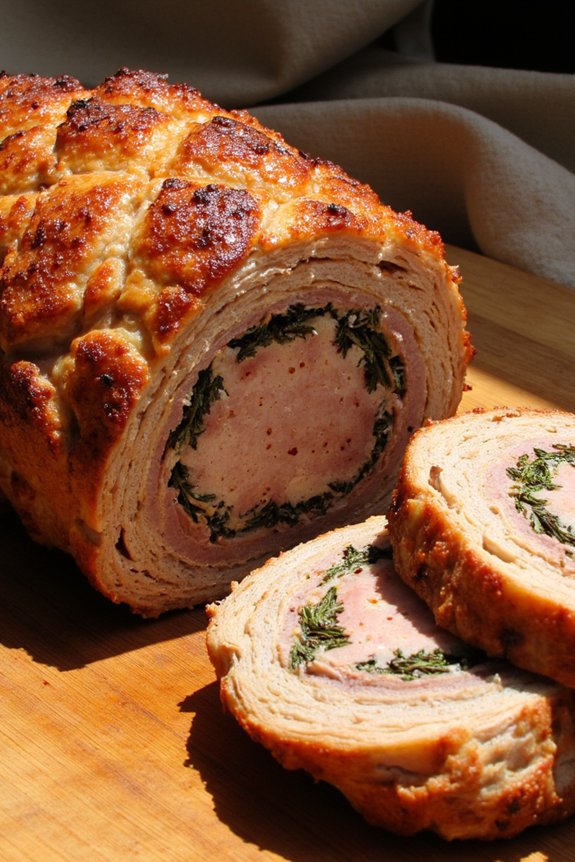
Umbrian Porchetta, an exquisite dish from the heart of Italy, is a culinary masterpiece that reflects the rich traditions of its region. This dish is characterized by its savory and aromatic flavors, achieved through a careful blend of herbs and spices stuffed into a succulent pork roast. The preparation of Porchetta requires patience and attention to detail, but the result is a deeply satisfying meal that’s perfect for family gatherings or special occasions.
The outer crust of the pork becomes golden and crispy, while the interior remains juicy and tender, infused with the flavors of rosemary, fennel, garlic, and other traditional Italian herbs.
To make Umbrian Porchetta, a boneless pork shoulder or pork belly is typically used as the main ingredient, which is then seasoned and rolled with a mixture of herbs and spices. The seasoned pork is slowly roasted to perfection, allowing the flavors to meld and the meat to become tender. This dish is often served with rustic bread or roasted vegetables, making it a hearty and fulfilling meal.
While it may seem intimidating to prepare, following a step-by-step approach will guarantee that even novice cooks can achieve a delicious and authentic result.
Ingredients (Serves 4-6)
- 4-5 pounds boneless pork shoulder or pork belly
- 2 tablespoons olive oil
- 4 cloves garlic, minced
- 1 tablespoon fennel seeds, crushed
- 1 tablespoon fresh rosemary, chopped
- 1 tablespoon fresh thyme, chopped
- 1 tablespoon fresh sage, chopped
- 1 teaspoon crushed red pepper flakes
- Salt and black pepper to taste
- Zest of 1 lemon
- Kitchen twine
Cooking Instructions
- Prepare the Pork: Begin by laying the pork shoulder or belly flat on a clean surface. Use a sharp knife to score the skin in a crosshatch pattern, being careful not to cut too deeply into the meat.
- Make the Herb Mixture: In a small bowl, combine the minced garlic, crushed fennel seeds, rosemary, thyme, sage, red pepper flakes, lemon zest, salt, and black pepper. Mix well.
- Season the Pork: Rub the olive oil over the entire surface of the pork. Spread the herb mixture evenly over the meat side (not the skin side), pressing it into the cuts and crevices.
- Roll and Tie the Pork: Carefully roll the pork into a tight cylinder, starting from one of the long sides. Secure the roll with kitchen twine at 1-inch intervals to guarantee it holds its shape during roasting.
- Preheat the Oven: Preheat your oven to 325°F (165°C).
- Roast the Pork: Place the rolled and tied pork on a roasting rack in a roasting pan. Roast in the preheated oven for about 3 to 4 hours, or until the internal temperature reaches 145°F (63°C) and the skin is crispy.
- Rest and Serve: Remove the pork from the oven and allow it to rest for at least 15 minutes before slicing. This will help the juices redistribute throughout the meat.
Extra Tips
For the perfect crispy skin, make sure the pork skin is dry before roasting; you can pat it with paper towels to remove excess moisture. Additionally, letting the seasoned pork sit in the refrigerator uncovered for a few hours or overnight will help dry out the skin, enhancing its crispiness.
If the skin isn’t as crispy as desired post-roasting, you can increase the oven temperature to 450°F (230°C) for the last 10-15 minutes of cooking, but watch closely to prevent burning. Serve the Porchetta with a side of roasted potatoes or a simple arugula salad to complement its rich flavors.
Lombardy’s Ossobuco Alla Milanese: Braised Veal Shanks
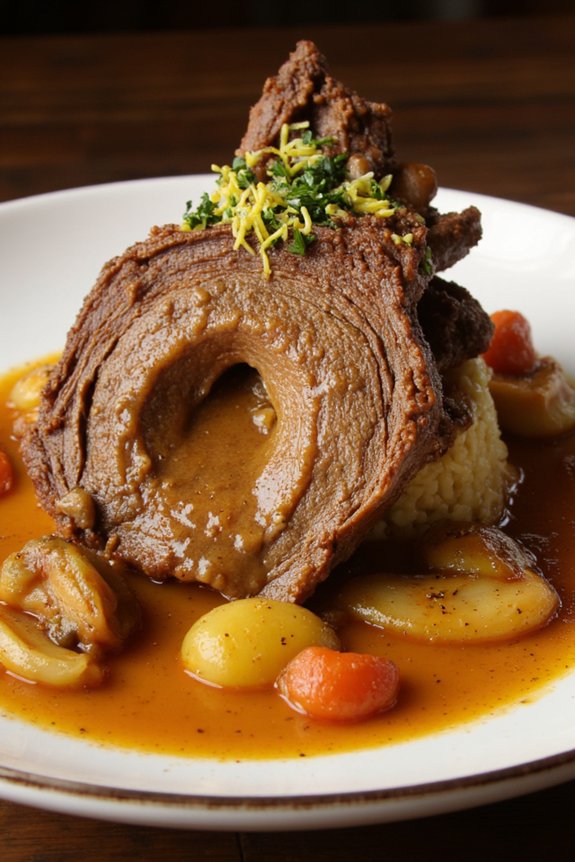
Lombardy, a region in Northern Italy, is renowned for its rich culinary traditions, and one dish that stands out is Ossobuco Alla Milanese. This hearty and flavorful dish consists of veal shanks braised to tender perfection in a sauce of white wine, broth, and aromatic vegetables. Often served on a bed of risotto or polenta, Ossobuco Alla Milanese is a classic example of Italian comfort food that has been enjoyed for generations.
The key to this dish is slow cooking, which allows the flavors to meld together beautifully, creating a meal that’s both satisfying and sophisticated.
The name “Ossobuco” literally means “bone with a hole” in Italian, referring to the marrow-filled shank bone that’s a signature feature of the dish. The marrow adds a rich, velvety texture to the sauce, making it an integral part of the overall flavor profile. Traditionally, the dish is finished with gremolata, a zesty mix of lemon zest, garlic, and parsley, which cuts through the richness and adds a fresh, bright note.
Whether you’re cooking for a special occasion or a cozy family dinner, Ossobuco Alla Milanese is sure to impress with its depth of flavor and elegant presentation.
Ingredients (Serves 4-6):
- 4 veal shanks (about 1.5 inches thick)
- Salt and freshly ground black pepper
- 1/2 cup all-purpose flour, for dredging
- 1/4 cup olive oil
- 1 onion, finely chopped
- 1 carrot, diced
- 1 celery stalk, diced
- 3 cloves garlic, minced
- 1 cup dry white wine
- 2 cups chicken or beef broth
- 1 can (14 ounces) diced tomatoes, drained
- 2 bay leaves
- 1 teaspoon dried thyme
- Zest of 1 lemon
- 3 tablespoons fresh parsley, chopped
Cooking Instructions:
- Prepare the Veal Shanks: Pat the veal shanks dry with paper towels and season them generously with salt and pepper. Dredge each shank in flour, shaking off any excess.
- Sear the Shanks: Heat the olive oil in a large, heavy-bottomed pot or Dutch oven over medium-high heat. Add the veal shanks and brown them on all sides, about 3-4 minutes per side. Remove the shanks from the pot and set aside.
- Sauté the Vegetables: In the same pot, add the chopped onion, carrot, and celery. Sauté until the vegetables are softened, about 5-7 minutes. Add the minced garlic and cook for another minute, stirring frequently.
- Deglaze the Pot: Pour in the white wine, scraping up any browned bits from the bottom of the pot with a wooden spoon. Let the wine simmer until it’s reduced by half.
- Add Remaining Ingredients: Stir in the broth, diced tomatoes, bay leaves, and thyme. Return the veal shanks to the pot, making sure they’re submerged in the liquid. Bring the mixture to a simmer.
- Braise the Shanks: Cover the pot and reduce the heat to low. Let the shanks braise slowly for 1.5 to 2 hours, or until the meat is fork-tender and falling off the bone. Turn the shanks occasionally during cooking to guarantee even cooking.
- Prepare the Gremolata: While the shanks are braising, mix together the lemon zest, chopped parsley, and remaining minced garlic in a small bowl to make the gremolata.
- Finish and Serve: Once the veal is tender, remove the pot from heat. Discard the bay leaves. Serve the ossobuco with a sprinkle of gremolata on top, alongside risotto or polenta.
Extra Tips:
For the best flavor, seek out high-quality veal shanks with plenty of marrow in the bone. If you prefer a thicker sauce, remove the shanks once they’re cooked and simmer the sauce for an additional 10-15 minutes to reduce it further.
Using a heavy-bottomed pot ensures even heat distribution, which is essential for proper braising. Finally, feel free to adjust the seasoning to taste, and don’t skip the gremolata—it adds a revitalizing contrast to the rich dish.
Puglian Orecchiette With Broccoli Rabe: Handmade Pasta Dish
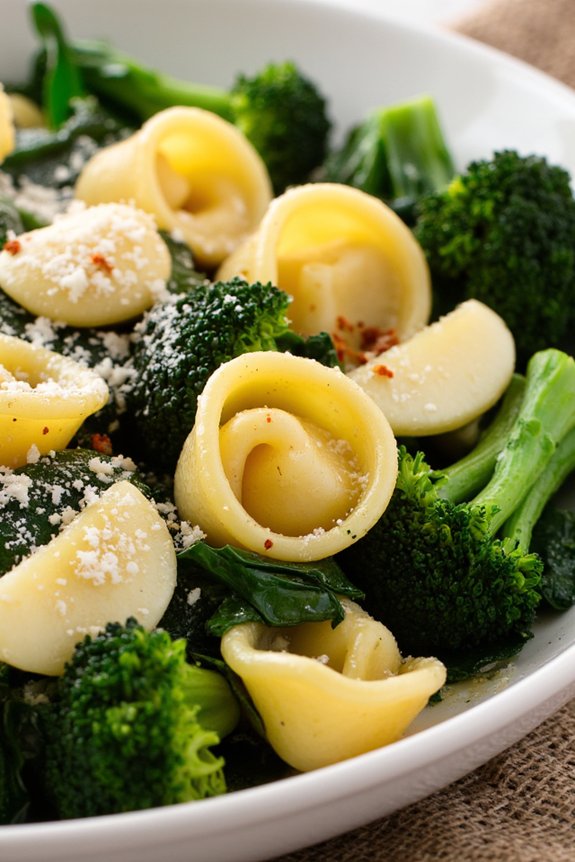
Puglia, a region in southern Italy, is renowned for its rustic and flavorful cuisine. One of its most beloved dishes is Orecchiette with Broccoli Rabe. This traditional pasta dish is a celebration of simple ingredients coming together to create a delightful and hearty meal. Orecchiette, meaning “little ears” in Italian, is the perfect pasta shape to capture the robust and slightly bitter flavors of broccoli rabe, complemented by the richness of garlic and a hint of chili.
Making Puglian Orecchiette with Broccoli Rabe from scratch is a rewarding experience that brings the authentic taste of Italy to your kitchen. The handmade orecchiette provides a satisfying texture, while the broccoli rabe adds a nutritious element, making this dish a wholesome option for lunch or dinner. It’s a versatile recipe that can be enjoyed by vegetarians and meat lovers alike, and it’s an excellent way to introduce the vibrant flavors of Puglia to your family and friends.
Ingredients (Serves 4-6):
- 2 cups semolina flour (or all-purpose flour)
- 3/4 cup warm water
- 1 teaspoon salt
- 1 bunch broccoli rabe, cleaned and trimmed
- 4 cloves garlic, thinly sliced
- 1/4 teaspoon red pepper flakes (optional)
- 1/4 cup extra virgin olive oil
- Salt, to taste
- Freshly grated Pecorino Romano cheese, for serving
Cooking Instructions:
- Prepare the Pasta Dough: In a large bowl, combine the semolina flour and salt. Gradually add the warm water, mixing with your hands until a dough forms. Knead the dough on a floured surface for about 10 minutes until it becomes smooth and elastic. Cover with a damp cloth and let it rest for 30 minutes.
- Shape the Orecchiette: Divide the rested dough into four pieces. Roll each piece into a long rope about 1/2-inch thick. Cut the rope into small 1/4-inch pieces. Using a butter knife, press and drag each piece to form a small indented disc, resembling a little ear shape. Set aside on a floured tray.
- Cook the Broccoli Rabe: Bring a large pot of salted water to a boil. Add the broccoli rabe and blanch for 2-3 minutes until tender yet still vibrant green. Remove with a slotted spoon and set aside. Keep the pot of water boiling for the pasta.
- Cook the Orecchiette: In the same boiling water, add the orecchiette and cook for 4-6 minutes until they float to the top and are al dente. Reserve 1 cup of pasta water, then drain the orecchiette.
- Sauté the Garlic and Chili: In a large skillet, heat the olive oil over medium heat. Add the sliced garlic and red pepper flakes, sautéing until the garlic is golden but not burnt, about 1-2 minutes.
- Combine and Serve: Add the blanched broccoli rabe to the skillet and toss to coat in the garlic oil. Add the cooked orecchiette, tossing everything together. If the mixture seems dry, add a bit of the reserved pasta water. Season with salt to taste. Serve hot, garnished with freshly grated Pecorino Romano cheese.
Extra Tips:
When preparing the orecchiette, make certain the dough isn’t too sticky; it should be firm yet malleable, making it easier to shape. If the dough is too dry, add a little more water.
For a spicier kick, increase the amount of red pepper flakes. If broccoli rabe is too bitter for your taste, you can substitute it with a milder green like spinach or kale.
Finally, always remember to save some pasta water, as it helps to bind the sauce to the pasta, creating a creamy and cohesive dish.
Piedmontese Bagna Cauda: Warm Anchovy and Garlic Dip
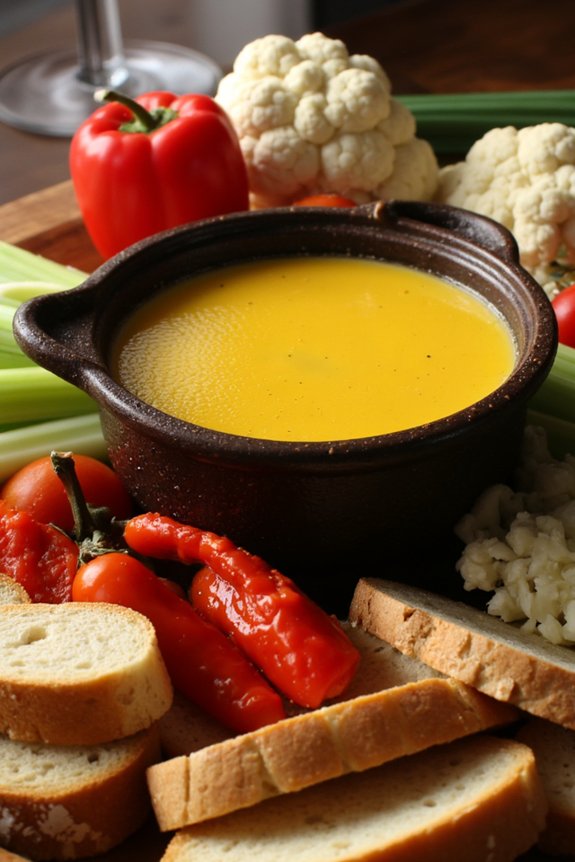
Piedmontese Bagna Cauda: Warm Anchovy and Garlic Dip is a traditional dish from the Piedmont region of Italy, known for its rich flavors and communal style of eating. This warm dip, made with anchovies, garlic, and olive oil, is typically served with an array of fresh, raw vegetables and crusty bread for dipping. The name “Bagna Cauda” translates to “warm bath” in the local dialect, referring to the bubbling pot of savory sauce that diners share, making it an ideal dish for gatherings and celebrations.
Bagna Cauda is a simple yet deeply flavorful dish that highlights the bold combination of anchovies and garlic. The key to its success is the slow cooking of these ingredients, allowing them to meld into a smooth and aromatic dip. This recipe is perfect for a cozy evening with friends or family, where everyone can gather around the table and enjoy the rustic charm of this Piedmontese classic. The following recipe serves 4-6 people, offering enough for everyone to enjoy this delightful culinary experience.
Ingredients:
- 1 cup extra virgin olive oil
- 8 cloves garlic, thinly sliced
- 12-16 anchovy fillets, rinsed and patted dry
- 2 tablespoons unsalted butter
- Freshly ground black pepper, to taste
- Assorted fresh vegetables for dipping (such as bell peppers, fennel, carrots, celery, cauliflower, and radishes)
- Sliced crusty bread for serving
Cooking Instructions:
- Prepare the Ingredients: Begin by preparing your vegetables and bread for dipping. Wash and cut the vegetables into manageable pieces for dipping, and slice the bread.
- Heat the Oil and Garlic: In a small saucepan, heat the olive oil over low heat. Add the sliced garlic and cook gently, stirring occasionally, until the garlic becomes soft and translucent. Be careful not to let the garlic brown, as this can impart a bitter taste.
- Add the Anchovies: Once the garlic is soft, add the anchovy fillets to the saucepan. Cook over low heat, stirring frequently, until the anchovies melt into the oil and form a smooth paste. This should take about 8-10 minutes.
- Incorporate the Butter: Add the unsalted butter to the mixture and stir until fully melted and incorporated. The butter will add richness and a silky texture to the dip.
- Season the Dip: Season the Bagna Cauda with freshly ground black pepper to taste. Stir well to combine all the flavors.
- Serve Warm: Transfer the Bagna Cauda to a fondue pot or a small heatproof serving dish to keep it warm. Serve immediately with the prepared vegetables and sliced bread for dipping.
Extra Tips:
When making Bagna Cauda, it’s important to use high-quality olive oil and fresh ingredients to achieve the best flavor. The slow cooking process allows the garlic and anchovies to blend without overpowering one another, resulting in a balanced dip.
If you find the flavor too strong, you can adjust the amount of garlic or anchovies to suit your taste. Additionally, keeping the dip warm throughout the meal is essential, so consider using a small burner or tea light to maintain the temperature when serving.
Enjoy this dish as part of a leisurely meal, savoring the distinct flavors of Piedmont.
Calabrian ‘Nduja: Spicy Spreadable Salami
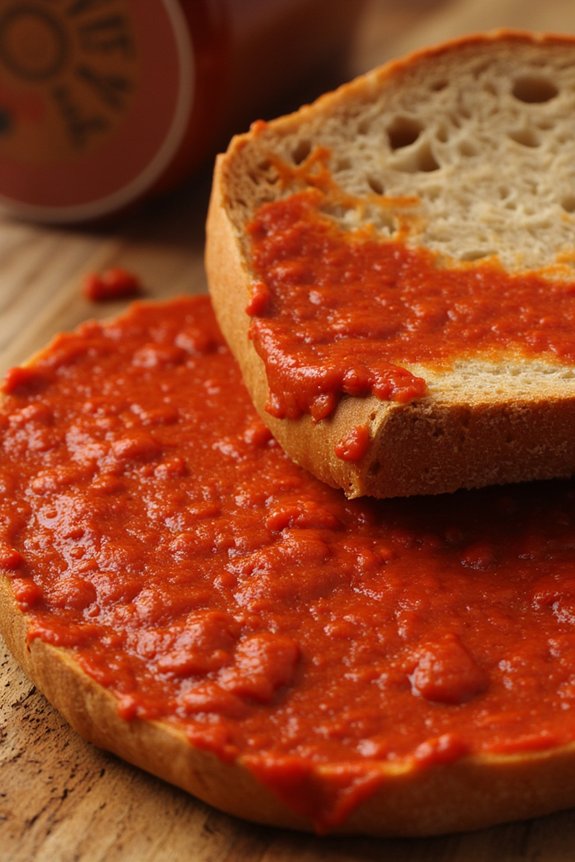
Calabrian ‘Nduja is a fiery, spreadable salami that originates from the Calabria region of Italy. Known for its rich, spicy flavor, ‘Nduja is made from a combination of pork fat, various meats, and a generous amount of Calabrian chili peppers. The unique texture and taste of ‘Nduja make it a versatile ingredient in Italian cuisine—perfect for spreading on bread, incorporating into pasta dishes, or using as a topping for pizza. Its heat and depth of flavor provide a delightful kick that enlivens any dish it accompanies.
To prepare ‘Nduja at home, the key is to balance the spices with the rich, fatty meats, guaranteeing the paste remains smooth and spreadable. Though traditionally made with cuts like pork shoulder and belly, you can customize it to suit your taste by adjusting the spice levels or incorporating additional herbs. Making ‘Nduja from scratch not only offers a taste of authentic Italian cuisine but also allows you to enjoy the satisfaction of creating a traditional dish with your own hands.
Ingredients (Serves 4-6)
- 500g pork shoulder, coarsely ground
- 200g pork fatback, coarsely ground
- 50g Calabrian chili peppers, dried and crushed
- 20g sweet paprika
- 10g smoked paprika
- 5g fennel seeds, lightly toasted
- 2g black pepper, freshly ground
- 15g salt
- 1 beef casing (optional, for traditional casing)
Cooking Instructions
- Prepare the Meat: Begin by chilling the pork shoulder and fatback in the freezer for about 30 minutes. This will make it easier to grind. Once chilled, coarsely grind both the pork shoulder and fatback using a meat grinder. If you don’t have a grinder, you can ask your butcher to grind them for you.
- Mix the Spices: In a large mixing bowl, combine the crushed Calabrian chili peppers, sweet paprika, smoked paprika, toasted fennel seeds, black pepper, and salt. Mix thoroughly until the spices are evenly distributed.
- Combine Ingredients: Add the ground pork shoulder and fatback to the spice mixture. Using your hands or a sturdy wooden spoon, mix everything together until the spices are fully incorporated into the meat. The mixture should be smooth and homogenous.
- Stuff the Casing (Optional): If you’re using a casing, soak it in warm water for about 30 minutes. Once pliable, rinse the casing thoroughly under cool running water. Fill a sausage stuffer with the ‘Nduja mixture and carefully stuff the casing, making sure there are no air pockets. Twist the casing at regular intervals to form links, if desired.
- Ferment and Cure: Hang the ‘Nduja in a cool, dark place with good air circulation. The temperature should be around 12-16°C (54-61°F) with 70-80% humidity. Allow the ‘Nduja to ferment and cure for at least 4-6 weeks, checking periodically for firmness and aroma.
- Serve: Once cured, the ‘Nduja is ready to be enjoyed. Slice or spread it onto crusty bread, incorporate it into sauces, or use it as a pizza topping.
Extra Tips
When making ‘Nduja, it’s essential to maintain a consistent temperature and humidity level during the curing process to prevent spoilage and guarantee proper fermentation. If you don’t have a suitable space for curing, consider using a curing chamber or a dedicated fridge with a humidity controller.
Additionally, while Calabrian chili peppers are traditional, you can experiment with other varieties to adjust the heat level to your preference. Remember, the quality of the pork and fatback greatly influences the final taste, so opt for the best you can find.
Sardinian Pane Carasau: Thin and Crispy Flatbread
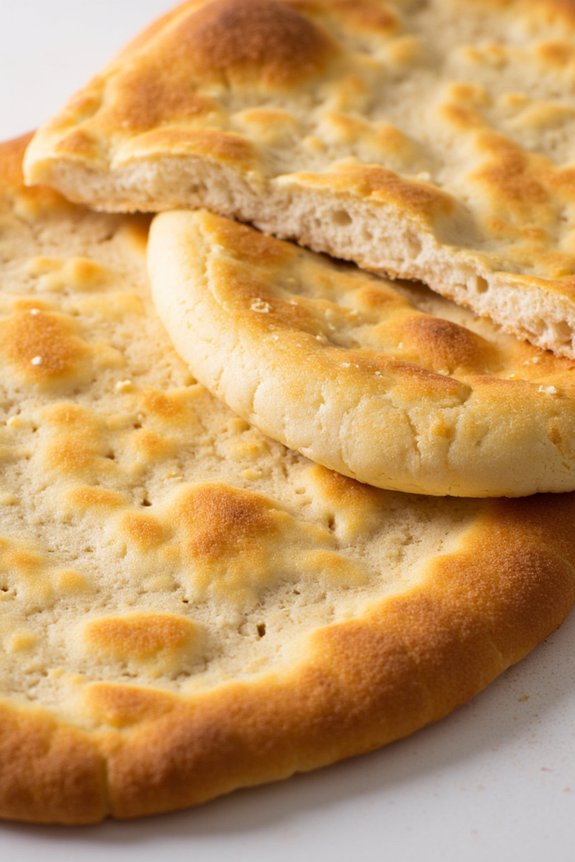
Sardinian Pane Carasau, also known as carta da musica due to its paper-thin texture, is an iconic flatbread from the island of Sardinia. This crispy bread has been a staple in Sardinian cuisine for centuries, originally crafted to last long periods, making it perfect for shepherds and travelers. Its delightful crunch and subtle flavor make it versatile, often served with olive oil, cheese, or as a side to hearty meals.
The simplicity in its ingredients highlights the significance of technique and tradition in its preparation.
Creating Pane Carasau at home is a rewarding experience that brings a touch of Sardinia to your kitchen. This traditional flatbread requires a few basic ingredients, but the magic lies in the process of rolling and baking to achieve its signature thinness. Whether enjoyed as a snack or accompanying a meal, making Pane Carasau allows you to connect with Sardinian culinary heritage and appreciate the art of bread-making.
Ingredients for 4-6 People:
- 500 grams of durum wheat semolina flour
- 325 ml of warm water
- 10 grams of salt
- 5 grams of active dry yeast
Cooking Instructions:
- Prepare the Dough: In a large mixing bowl, combine the durum wheat semolina flour and salt. Dissolve the active dry yeast in warm water and let it sit for about 5 minutes until it’s frothy. Gradually add the yeast mixture to the flour and mix until a dough begins to form.
- Knead the Dough: Transfer the dough onto a floured surface and knead it for about 10-15 minutes until it becomes smooth and elastic. The dough shouldn’t be sticky but soft to the touch. Form it into a ball.
- Let the Dough Rise: Place the dough ball back in the bowl, cover it with a damp cloth, and let it rise in a warm place for about 1 hour or until it doubles in size.
- Divide and Shape: Once the dough has risen, punch it down and divide it into 8 equal pieces. Roll each piece into a tight ball, cover them, and let them rest for another 15 minutes.
- Roll Out the Dough: Preheat your oven to the highest setting (around 250°C or 480°F). On a floured surface, roll out each ball into a very thin circle, about 1-2 millimeters thick. The thinner, the better for achieving the characteristic crispiness.
- Bake the Dough: Place the rolled-out dough on a baking sheet and bake in the preheated oven for about 2-3 minutes until it puffs up and is slightly browned. Remove from the oven and carefully split the puffed bread into two layers using a sharp knife.
- Crisp the Bread: Return the separated bread layers to the oven and bake for another 2-3 minutes until they’re completely dry and crispy. Repeat the process with the remaining dough.
- Cool and Store: Allow the Pane Carasau to cool completely on a wire rack. Once cooled, store in an airtight container to maintain its crispiness.
Extra Tips:
For the best results, make sure your oven is thoroughly preheated to its highest setting before baking the bread, as the intense heat is essential for the bread to puff up quickly.
Using a pizza stone can also help in achieving even and quick baking. If you prefer a bit more flavor, you can brush the baked bread with olive oil and sprinkle with rosemary or sea salt before serving.
Pane Carasau can be enjoyed in various forms, such as layered with tomatoes and cheese for a quick snack or used as a base for dishes like Pane Frattau.
Campanian Sfogliatella: Flaky Pastry Filled With Ricotta

Campanian Sfogliatella is a delightful and iconic pastry from the Campania region of Italy. Known for its delicate layers of flaky dough and a rich, creamy filling, this pastry is often enjoyed as a breakfast treat or a sweet indulgence at any time of the day. The name “Sfogliatella” translates to “small, thin leaf/layer,” which perfectly describes the pastry’s characteristic texture. The filling, typically made with ricotta cheese, semolina, and candied citrus peel, offers a sweet, aromatic contrast to the crispy shell.
The preparation of Sfogliatella requires patience and precision, as the dough is rolled and folded multiple times to achieve its signature layers. While it may seem challenging, the reward of biting into a freshly baked Sfogliatella is well worth the effort. The combination of textures and flavors provides an authentic taste of Italian tradition, perfect for sharing with friends and family.
Ingredients (serves 4-6 people):
For the Dough:
- 2 cups all-purpose flour
- 1/4 teaspoon salt
- 1/2 cup water
- 1/4 cup lard or unsalted butter, softened
For the Filling:
- 1 cup ricotta cheese
- 1/2 cup semolina flour
- 1/2 cup granulated sugar
- 1 large egg
- 1 teaspoon vanilla extract
- 1 teaspoon orange zest
- 1/4 cup candied citrus peel, finely chopped
- 1/2 teaspoon cinnamon
For Assembly and Baking:
- Melted lard or unsalted butter for brushing
- Powdered sugar for dusting
Instructions:
- Prepare the Dough:
- In a large mixing bowl, combine the flour and salt. Gradually add water, mixing until a rough dough forms. Knead the dough on a lightly floured surface for about 10 minutes until smooth and elastic.
- Wrap the dough in plastic wrap and refrigerate for at least 1 hour.
- Prepare the Filling:
- In a medium bowl, mix together the ricotta cheese, semolina flour, sugar, egg, vanilla extract, orange zest, candied citrus peel, and cinnamon. Stir until the mixture is smooth and well-combined. Set aside.
- Roll and Shape the Dough:
- Remove the dough from the refrigerator and divide it into 4 equal parts. Roll each piece into a thin rectangle, about 1/16 inch thick.
- Brush one side of each rectangle with melted lard or butter. Roll the dough tightly into a cylinder, starting from the shorter edge. Wrap in plastic and refrigerate for at least 1 hour.
- Form the Pastries:
- Preheat your oven to 400°F (200°C) and line a baking sheet with parchment paper. Remove the dough cylinders from the refrigerator and slice each into 1/2-inch thick rounds.
- Take each round and gently flatten it into a cone shape, ensuring the layers are visible. Fill each cone with about 1 tablespoon of the prepared filling.
- Bake the Sfogliatella:
- Place the filled pastries on the prepared baking sheet, ensuring enough space between them. Brush the tops with melted lard or butter.
- Bake in the preheated oven for 20-25 minutes, or until golden brown and crisp. Allow to cool slightly before dusting with powdered sugar.
Extra Tips:
When making Campanian Sfogliatella, the key to achieving the perfect flaky texture is in the dough’s lamination process. Be sure to roll the dough as thinly as possible and layer it with fat to create the signature layers.
If the dough becomes too soft while working, place it back in the refrigerator to firm up. Additionally, for best results, use high-quality ricotta cheese and fresh citrus zest to enhance the flavor of the filling. Enjoy your Sfogliatella warm, as it’s when the pastry is at its most flavorful and crispy.