

When it comes to hosting a party, there’s nothing quite like the vibrant energy that zesty Italian appetizers bring to the table.
Think of the crisp crunch of bruschetta with juicy tomatoes or the creamy delight of fried mozzarella balls.
Each dish has its own unique flair and excitement, perfect for mingling and sharing.
Explore these flavorful bites and elevate your next gathering with ease.
Classic Tomato and Basil Bruschetta
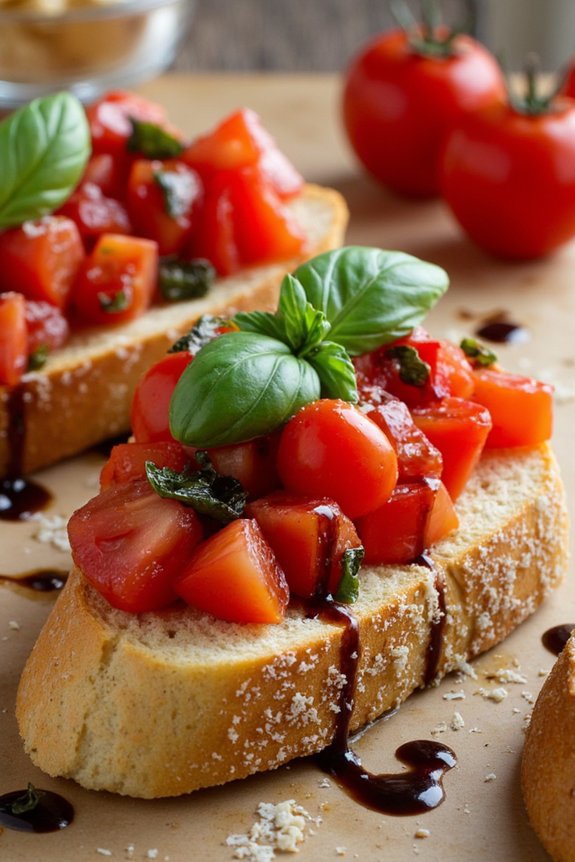
Tomato and Basil Bruschetta is an iconic Italian appetizer that beautifully combines simplicity with bold flavors. The dish features ripe tomatoes, fresh basil, and a drizzle of balsamic glaze atop slices of crusty bread, offering a delightful blend of textures and tastes. Perfect for gatherings and easy to prepare, this classic bruschetta is a crowd-pleaser that brings a touch of Italy to any meal.
Whether you’re hosting a dinner party or enjoying a quiet evening at home, this dish is sure to impress with its fresh ingredients and vibrant presentation. This recipe serves 4-6 people and can easily be adapted to suit larger gatherings or smaller, intimate occasions.
The key to a successful bruschetta lies in the quality of the ingredients. Using fresh, ripe tomatoes and fragrant basil will guarantee that each bite bursts with authentic Italian flavors. Paired with a good quality olive oil and a hint of garlic, this dish is a reflection of the beauty of uncomplicated cooking.
Ingredients:
- 6 ripe tomatoes, diced
- 1/4 cup fresh basil leaves, chopped
- 2 cloves garlic, minced
- 3 tablespoons extra-virgin olive oil
- 1 tablespoon balsamic vinegar
- Salt and pepper to taste
- 1 baguette, sliced into 1/2 inch thick slices
- 1/4 cup balsamic glaze (optional)
- 1/4 cup grated Parmesan cheese (optional)
Instructions:
- Prepare the Tomato Mixture: In a medium-sized bowl, combine the diced tomatoes, chopped basil, minced garlic, extra-virgin olive oil, balsamic vinegar, salt, and pepper. Mix well to guarantee all ingredients are evenly distributed. Allow the mixture to sit for at least 15 minutes to let the flavors meld together.
- Toast the Bread: Preheat your oven to 400°F (200°C). Arrange the baguette slices on a baking sheet in a single layer. Toast the bread in the oven for about 5-7 minutes, or until the slices are golden brown and crispy. Remove from the oven and let them cool slightly.
- Assemble the Bruschetta: Once the bread is toasted, spoon generous amounts of the tomato mixture onto each slice. If desired, drizzle with balsamic glaze for an extra touch of sweetness and complexity.
- Add Finishing Touches: Sprinkle the bruschetta with grated Parmesan cheese if using. Serve immediately while the bread is still warm and crisp.
Extra Tips:
To guarantee your Tomato and Basil Bruschetta is bursting with flavor, choose tomatoes that are ripe and firm. Heirloom or vine-ripened tomatoes work particularly well for this dish.
Additionally, consider rubbing a peeled garlic clove onto the toasted bread slices before adding the tomato mixture for an extra layer of garlic flavor. If preparing in advance, store the tomato mixture separately and assemble the bruschetta just before serving to prevent the bread from becoming soggy.
Enjoy your Italian appetizer with a glass of wine for a complete culinary experience.
Savory Caprese Skewers
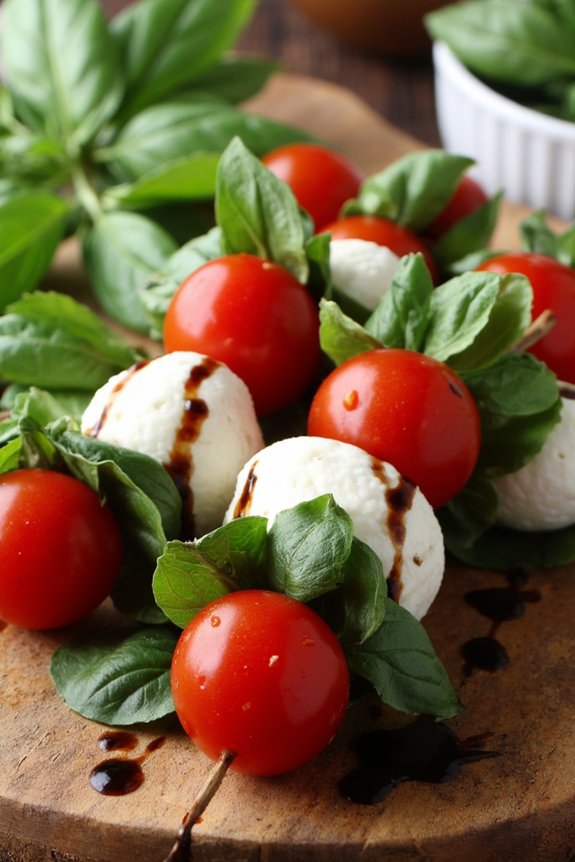
Savory Caprese Skewers are a delightful and visually appealing appetizer that brings together the classic flavors of Italy. These skewers are the perfect blend of fresh mozzarella, juicy tomatoes, aromatic basil, and a drizzle of balsamic glaze.
Whether you’re hosting a dinner party or enjoying a casual family meal, these skewers are bound to impress guests with their vibrant colors and mouthwatering taste. Easy to prepare and requiring no cooking, they’re an ideal starter for any occasion.
The beauty of Savory Caprese Skewers lies in their simplicity and the quality of the ingredients used. Fresh mozzarella balls, ripe cherry tomatoes, and fragrant basil leaves are threaded onto skewers, creating a harmonious balance of flavors in each bite.
The final touch of a balsamic glaze enhances the natural sweetness of the tomatoes and adds a slight tangy contrast to the creamy mozzarella. Perfect for serving 4-6 people, this recipe is a quick and elegant way to start any meal.
Ingredients
- 20 fresh mozzarella balls (bocconcini)
- 20 cherry tomatoes
- 20 fresh basil leaves
- Salt and freshly ground black pepper, to taste
- 2 tablespoons olive oil
- 2 tablespoons balsamic glaze
- 10-12 wooden skewers (6-inch)
Cooking Instructions
1. Prepare the Ingredients: Begin by washing the cherry tomatoes and basil leaves thoroughly. Pat them dry with a paper towel to remove excess moisture.
2. Assemble the Skewers: Take a wooden skewer and start by threading a cherry tomato onto it, followed by a fresh basil leaf. Next, add a mozzarella ball. Repeat this pattern until you have filled the skewer, leaving a bit of space at each end for easy handling.
Repeat this process with the remaining skewers and ingredients.
3. Season the Skewers: Once all the skewers are assembled, place them on a serving platter. Drizzle the olive oil evenly over the skewers. Sprinkle a pinch of salt and freshly ground black pepper over them to enhance the flavors.
4. Add the Balsamic Glaze: Finish by drizzling the balsamic glaze over each skewer. Be generous with the glaze to guarantee every bite has a burst of flavor.
5. Serve: These skewers can be served immediately or refrigerated for a short period before serving. If refrigerating, make sure to bring them to room temperature before serving for the best flavor.
Extra Tips
For an added touch of flavor, consider marinating the mozzarella balls in olive oil and a pinch of Italian seasoning for a few hours before assembling the skewers. This will infuse the cheese with aromatic herbs and elevate the taste of the entire appetizer.
Additionally, if you prefer a bit of crunch, try adding a slice of cucumber or a small piece of roasted red pepper to each skewer. Remember to soak the wooden skewers in water for about 10 minutes before assembling to prevent them from splitting.
Crispy Fried Mozzarella Balls

Crispy Fried Mozzarella Balls are a delightful Italian appetizer that will surely impress your guests. These bite-sized cheese delights are crunchy on the outside and gooey on the inside, making them an irresistible starter for any gathering.
With a quick preparation time and simple ingredients, this recipe is perfect for both novice and experienced cooks alike. Serve them with a side of marinara sauce for dipping to add an extra layer of flavor.
This recipe is designed to serve 4-6 people, making it ideal for small parties or family dinners. The key to achieving the perfect texture is to make sure the mozzarella balls are well-coated and chilled before frying. This helps them maintain their shape and prevents the cheese from oozing out during the frying process.
With a few basic ingredients and careful preparation, you’ll have a plate full of deliciously crispy mozzarella balls ready to be devoured.
Ingredients:
- 16 ounces (450g) mozzarella balls, drained
- 1 cup all-purpose flour
- 2 large eggs
- 2 tablespoons milk
- 1 cup breadcrumbs
- 1/2 cup grated Parmesan cheese
- 1 teaspoon Italian seasoning
- Salt and pepper, to taste
- Vegetable oil, for frying
- Marinara sauce, for serving
Cooking Instructions:
- Prepare the Mozzarella Balls: Drain the mozzarella balls well and pat them dry with paper towels. This step is essential to make sure the coating adheres properly.
- Set Up Breading Station: In three separate bowls, prepare the breading ingredients. Fill the first bowl with flour, the second bowl with beaten eggs and milk, and the third bowl with breadcrumbs, Parmesan cheese, Italian seasoning, salt, and pepper.
- Coat the Mozzarella Balls: Roll each mozzarella ball in the flour, making sure it’s completely covered. Next, dip it into the egg mixture, and finally roll it in the breadcrumb mixture. Make sure to create an even coating by pressing the breadcrumbs onto the mozzarella balls. Repeat for all the mozzarella balls.
- Chill the Coated Balls: Place the coated mozzarella balls on a baking sheet and refrigerate for at least 30 minutes. This step helps the coating set and prevents the cheese from leaking during frying.
- Heat the Oil: In a deep frying pan or pot, heat vegetable oil to 350°F (175°C). Make sure there’s enough oil to fully submerge the mozzarella balls.
- Fry the Mozzarella Balls: Carefully fry the mozzarella balls in batches, turning occasionally, until they’re golden brown and crispy. This should take about 2-3 minutes per batch. Use a slotted spoon to remove them from the oil and place them on a paper towel-lined plate to drain excess oil.
- Serve: Arrange the crispy fried mozzarella balls on a serving platter and serve immediately with a side of marinara sauce for dipping.
Extra Tips:
For best results, try using fresh mozzarella packed in water as it has the perfect texture for frying. If you prefer a thicker coating, you can double-coat the mozzarella balls by repeating the egg and breadcrumb steps.
Additionally, maintaining the oil at the right temperature is essential; too hot, and the coating will burn before the cheese melts, too cool, and the balls may become greasy. If you find the mozzarella balls losing their shape during frying, make sure they’re well chilled before cooking.
Zesty Lemon and Herb Arancini

Arancini, those delightful Italian rice balls, are a perfect appetizer for any occasion. Often filled with cheese and savory ingredients, this variation adds a revitalizing twist with zesty lemon and aromatic herbs. The combination of creamy risotto rice with the bright citrus notes and fresh herbs creates a harmonious balance of flavors that’s both sophisticated and comforting.
These arancini are sure to impress your guests at your next gathering or serve as a delicious snack for an evening at home. The key to making these arancini is to start with a well-made risotto, which is then cooled and shaped into balls, filled with a lemony-herb mixture, and finally coated in breadcrumbs before being fried to golden perfection.
The crispy exterior gives way to a rich, creamy center, making for a delightful textural contrast. Perfectly portioned, these rice balls can be served as a starter or a small plate, offering a taste of Italy in every bite.
Ingredients (Serves 4-6 people):
- 2 cups Arborio rice
- 6 cups chicken or vegetable stock
- 1 cup dry white wine
- 1 medium onion, finely chopped
- 4 tablespoons olive oil
- 2 tablespoons unsalted butter
- 1 cup grated Parmesan cheese
- Zest of 2 lemons
- 2 tablespoons lemon juice
- 3 tablespoons chopped fresh parsley
- 2 tablespoons chopped fresh basil
- 2 tablespoons chopped fresh thyme
- Salt and pepper to taste
- 2 cups all-purpose flour
- 3 large eggs, beaten
- 2 cups breadcrumbs
- Vegetable oil, for frying
Cooking Instructions:
1. Prepare the Risotto: In a large saucepan, heat the olive oil and butter over medium heat. Add the chopped onion and sauté until translucent. Stir in the Arborio rice and cook for 2-3 minutes until the rice is lightly toasted.
2. Cook the Risotto: Pour in the white wine and stir continuously until the wine has been absorbed. Gradually add the stock, one ladle at a time, stirring frequently and allowing each addition to be absorbed before adding the next. Continue until the rice is creamy and tender, about 20-25 minutes.
Remove from heat and stir in the Parmesan cheese, lemon zest, lemon juice, parsley, basil, thyme, and season with salt and pepper. Spread the risotto on a baking sheet and let it cool completely.
3. Shape the Arancini: Once the risotto is cooled, take a small handful and flatten it slightly in your palm. Place a little more of the lemon-herb mixture in the center and mold the rice around it to form a ball. Repeat with the remaining risotto.
4. Coat the Arancini: Set up a breading station with three bowls: one with flour, one with beaten eggs, and one with breadcrumbs. Roll each rice ball in flour, dip into the egg mixture, then coat with breadcrumbs. Confirm each ball is evenly coated.
5. Fry the Arancini: In a deep saucepan, heat vegetable oil to 350°F (180°C). Fry the arancini in batches, confirming they aren’t overcrowded in the pan. Cook until golden brown, about 3-4 minutes per batch. Remove with a slotted spoon and drain on paper towels.
6. Serve: Serve the arancini warm, garnished with extra herbs and lemon wedges if desired.
Extra Tips:
When making the risotto, be patient and allow each addition of stock to be absorbed fully before adding more, as this guarantees a creamy texture. Cooling the risotto properly before shaping is essential to prevent the balls from falling apart during frying.
If you’re preparing the arancini in advance, you can keep them in the fridge for a few hours or freeze them before frying, just confirm they’re fully defrosted before cooking. For a healthier version, consider baking the arancini in a preheated oven at 400°F (200°C) for 20-25 minutes, turning halfway through for even browning.
Creamy Spinach and Artichoke Dip

Creamy Spinach and Artichoke Dip is a popular Italian appetizer that combines the rich flavors of spinach, artichokes, and a blend of cheeses to create a deliciously creamy and savory dish. Perfect for gatherings or a cozy night in, this dip is best served warm with a side of crispy baguette slices or crunchy tortilla chips.
Its sumptuous texture and delightful taste make it a crowd-pleaser, guaranteeing your guests keep coming back for more.
This recipe for Creamy Spinach and Artichoke Dip serves 4-6 people and can be easily prepared in under 30 minutes. The use of fresh spinach and canned artichokes makes it both convenient and flavorful.
With a balance of cream cheese, Parmesan, and mozzarella, this dish is sure to satisfy any cheese lover. Whether you’re a seasoned cook or a beginner, this straightforward recipe will guide you in creating a dish that’s both impressive and easy to make.
Ingredients (serving size: 4-6 people):
- 1 (14-ounce) can of artichoke hearts, drained and chopped
- 1 (10-ounce) package of frozen chopped spinach, thawed and drained
- 1 cup of cream cheese, softened
- 1/2 cup of sour cream
- 1/4 cup of mayonnaise
- 1/2 cup of grated Parmesan cheese
- 1/2 cup of shredded mozzarella cheese
- 2 cloves of garlic, minced
- 1/4 teaspoon of salt
- 1/4 teaspoon of black pepper
- Optional: 1/4 teaspoon of red pepper flakes for a spicy kick
Cooking Instructions:
- Preheat the Oven: Start by preheating your oven to 350°F (175°C). This guarantees that your dip bakes evenly and reaches the perfect creamy consistency.
- Prepare the Spinach and Artichokes: Drain the artichoke hearts and chop them into small pieces. Make sure the spinach is properly thawed and drained to avoid excess moisture in the dip.
- Mix the Base Ingredients: In a large mixing bowl, combine the softened cream cheese, sour cream, and mayonnaise. Stir until the mixture is smooth and well-blended.
- Incorporate the Vegetables: Add the chopped artichokes and spinach into the cream cheese mixture. Stir in the minced garlic, ensuring it’s evenly distributed.
- Add the Cheeses and Seasonings: Fold in the Parmesan and mozzarella cheeses. Season with salt, black pepper, and red pepper flakes if using. Mix everything together until well combined.
- Transfer to Baking Dish: Grease a medium-sized baking dish and transfer the dip mixture into it. Spread it evenly across the dish to guarantee even baking.
- Bake the Dip: Place the baking dish in the preheated oven and bake for about 20-25 minutes, or until the top is golden brown and bubbly.
- Serve: Allow the dip to cool slightly before serving. Pair it with sliced baguette, tortilla chips, or your favorite crackers.
Extra Tips:
For the best results, use full-fat cream cheese and sour cream as they contribute to the rich, creamy texture of the dip. If you prefer a fresher taste, you can substitute fresh spinach for frozen; just make sure to sauté it lightly to remove excess moisture.
This dip can be prepared ahead of time and stored in the fridge; just bake it when you’re ready to serve. Experiment with different cheeses like Gruyère or fontina to add a unique flavor twist.
Prosciutto-Wrapped Melon Bites

Prosciutto-Wrapped Melon Bites are a classic Italian appetizer that combines the sweet, juicy flavor of ripe melon with the savory, salty taste of prosciutto. This simple yet elegant dish is perfect for entertaining, as it requires minimal preparation and offers a revitalizing burst of flavor that will delight your guests.
The natural sweetness of the melon perfectly complements the thinly sliced prosciutto, creating a harmonious balance of tastes that’s both satisfying and sophisticated. This appetizer isn’t only easy to prepare but also visually appealing, making it an ideal choice for any occasion.
Whether you’re hosting a summer barbecue, a casual dinner party, or a festive holiday gathering, Prosciutto-Wrapped Melon Bites are sure to impress. The key to achieving the finest flavor is to select a ripe, fragrant melon and high-quality prosciutto. The combination of these two ingredients creates a delightful blend of textures and tastes, making this dish a true crowd-pleaser.
Ingredients (serves 4-6):
- 1 ripe cantaloupe or honeydew melon
- 12 slices of prosciutto
- Fresh mint leaves (optional)
- Balsamic glaze (optional)
Cooking Instructions:
- Prepare the Melon: Start by cutting the melon in half and removing the seeds. Use a melon baller or a small spoon to scoop out bite-sized balls of melon from the flesh. If you prefer, you can also cut the melon into small, even cubes.
- Wrap with Prosciutto: Take a slice of prosciutto and lay it flat. Place a melon ball or cube at one end of the prosciutto slice. Carefully roll the prosciutto around the melon, making sure it’s snug but not too tight. Repeat this process for all melon pieces.
- Assemble the Bites: Once all the melon pieces are wrapped, arrange them on a serving platter. If desired, tuck a small mint leaf under each prosciutto wrap for added flavor and visual appeal.
- Drizzle with Balsamic Glaze: For an extra touch of flavor, you can drizzle a small amount of balsamic glaze over the melon bites. This step is optional but adds a delicious tangy note that complements the sweetness of the melon and the saltiness of the prosciutto.
Extra Tips:
To guarantee the best results, select a melon that’s ripe but still firm to the touch. This will make it easier to scoop or cut into neat pieces.
When choosing prosciutto, opt for thinly sliced, high-quality varieties for maximum flavor. If you prefer a slightly different taste, you can experiment with other types of cured meats such as speck or pancetta.
For a festive presentation, consider serving the melon bites on skewers or toothpicks. This not only makes them easier to pick up but also adds an elegant touch to your appetizer spread.
Roasted Red Pepper and Goat Cheese Crostini
Roasted Red Pepper and Goat Cheese Crostini is a delightful Italian appetizer that combines the rich flavors of roasted red peppers with the creamy tang of goat cheese, all atop crispy crostini. This elegant starter is perfect for any gathering, offering a burst of flavor with each bite. The vibrant red peppers are roasted to perfection, providing a smoky sweetness, while the goat cheese adds a smooth, luxurious texture that complements the crunch of the toasted bread.
This appetizer isn’t only visually appealing but also simple to prepare, making it a favorite for both novice and experienced cooks. The combination of fresh herbs and a drizzle of balsamic glaze elevates each crostini to gourmet status. Whether you’re hosting a dinner party or enjoying a quiet evening at home, Roasted Red Pepper and Goat Cheese Crostini is sure to impress your guests and leave them craving more.
Ingredients (Serves 4-6):
- 1 baguette, sliced into 1/2 inch rounds
- 2 large red bell peppers
- 6 oz goat cheese, softened
- 2 tablespoons olive oil
- 1 clove garlic, minced
- Salt and pepper to taste
- Fresh basil leaves, for garnish
- Balsamic glaze, for drizzling
Cooking Instructions:
- Preheat the Oven: Begin by preheating your oven to 400°F (200°C). This will guarantee that the baguette slices toast evenly and the peppers roast perfectly.
- Prepare the Peppers: Place the red bell peppers on a baking sheet and roast in the preheated oven for 20-25 minutes, turning occasionally, until the skins are charred and blistered. Remove from the oven and place in a bowl, covering with plastic wrap to steam for 10 minutes. This will make peeling the skin easier.
- Toast the Baguette: While the peppers are steaming, arrange the baguette slices on a baking sheet. Drizzle with olive oil and a pinch of salt, then toast in the oven for about 8-10 minutes or until golden brown and crispy.
- Peel and Slice the Peppers: Once the peppers have cooled slightly, peel off the charred skin, remove the seeds and stems, and slice into thin strips.
- Prepare the Goat Cheese Mixture: In a small bowl, combine the softened goat cheese with minced garlic, salt, and pepper. Mix until smooth and creamy.
- Assemble the Crostini: Spread a generous layer of the goat cheese mixture on each toasted baguette slice. Top with a few strips of roasted red pepper, a fresh basil leaf, and a light drizzle of balsamic glaze.
- Serve: Arrange the crostini on a serving platter and serve immediately while the baguette is still warm.
Extra Tips:
For an extra depth of flavor, consider adding a touch of honey to the goat cheese mixture. This will balance the tanginess of the cheese and enhance the sweetness of the roasted peppers.
Additionally, if you prefer a smokier taste, you can grill the peppers instead of roasting them in the oven. Remember to always taste and adjust the seasoning of the goat cheese mixture to suit your personal preference.
Finally, if you don’t have basil, fresh parsley or arugula can also be used as a garnish for a different yet delightful flavor profile.
Baked Parmesan Zucchini Fries

Baked Parmesan Zucchini Fries are a delightful and healthier alternative to traditional French fries, offering a crispy and cheesy taste that will please both kids and adults alike.
This tasty appetizer is perfect for entertaining guests or as a side dish to complement your favorite Italian meal. The zucchini fries are coated with a mixture of parmesan cheese, breadcrumbs, and flavorful Italian herbs, then baked to perfection to achieve a golden-brown crispiness without the need for frying.
Not only are these zucchini fries delicious, but they’re also quite simple to make. The zucchini is sliced into fry-like shapes, coated in a seasoned mixture, and baked until crunchy. This dish is a great way to incorporate more vegetables into your diet while still enjoying a satisfying, savory snack.
The recipe yields enough for 4-6 people, making it an ideal choice for gatherings or family dinners.
Ingredients (serves 4-6):
- 4 medium zucchinis
- 1 cup grated Parmesan cheese
- 1 cup panko breadcrumbs
- 1 teaspoon garlic powder
- 1 teaspoon Italian seasoning
- 1/2 teaspoon salt
- 1/4 teaspoon black pepper
- 2 large eggs
- Olive oil spray
Instructions:
- Preheat the Oven: Preheat your oven to 425°F (220°C). Line a baking sheet with parchment paper or lightly spray with olive oil to prevent sticking.
- Prepare the Zucchini: Wash the zucchinis thoroughly and trim the ends. Cut each zucchini in half lengthwise, and then slice each half into sticks approximately 1/2 inch thick, resembling the shape of fries.
- Make the Coating Mixture: In a shallow bowl, combine the grated Parmesan cheese, panko breadcrumbs, garlic powder, Italian seasoning, salt, and black pepper. Mix well to guarantee the seasoning is evenly distributed.
- Beat the Eggs: In another shallow bowl, beat the eggs until the yolks and whites are fully combined.
- Coat the Zucchini: Dip each zucchini stick into the beaten eggs, ensuring it’s fully coated. Then, roll the zucchini stick in the Parmesan-breadcrumb mixture, pressing gently to adhere the coating. Place the coated zucchini stick on the prepared baking sheet. Repeat the process with all zucchini sticks.
- Bake: Lightly spray the zucchini fries with olive oil to help them crisp up in the oven. Bake in the preheated oven for 20-25 minutes, or until the fries are golden brown and crispy. Flip the fries halfway through baking to guarantee even cooking.
- Serve: Remove from the oven and let cool for a few minutes before serving. Enjoy the fries on their own or with a side of marinara sauce or your preferred dipping sauce.
Extra Tips:
For the best results, make certain the zucchini fries are spaced out on the baking sheet to allow for even cooking. If they’re too close together, they may steam instead of crisp up.
Additionally, using panko breadcrumbs instead of regular breadcrumbs will give the fries an extra crunch. If you prefer a spicier kick, consider adding a pinch of cayenne pepper to the breadcrumb mixture.
Finally, these fries are best enjoyed fresh out of the oven for maximum crispiness, so plan to serve them immediately after baking.
Italian Antipasto Platter
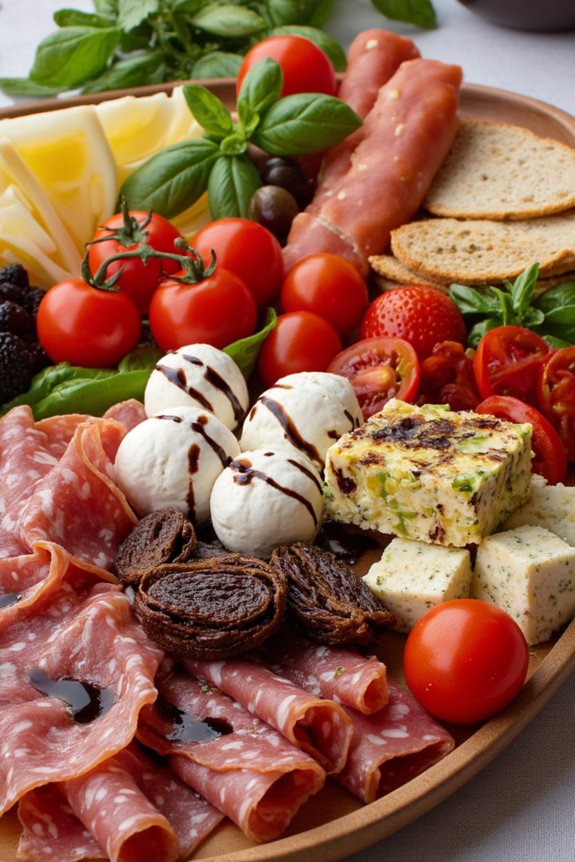
The Italian Antipasto Platter is a vibrant and flavorful way to start any meal. Traditionally served as a first course, the antipasto platter showcases a variety of textures and flavors, providing a delightful introduction to the culinary journey ahead. This dish is fundamentally a curated selection of Italian meats, cheeses, and vegetables, artfully arranged to create a colorful and inviting presentation. Perfect for entertaining, this dish not only tantalizes taste buds but also allows you to enjoy a leisurely prelude to the main course.
Creating an Italian Antipasto Platter is as much about aesthetics as it’s about taste. It’s a versatile dish that can be tailored to suit any palate, incorporating a balance of salty, sweet, and savory elements. The key to a successful antipasto platter is to choose high-quality ingredients that complement each other. While there are no strict rules, a well-thought-out combination of cured meats, cheeses, marinated vegetables, olives, and artisanal bread will guarantee an unforgettable experience for your guests.
Ingredients for 4-6 people:
- 100g Prosciutto
- 100g Salami
- 100g Mortadella
- 200g Mozzarella balls
- 200g Gorgonzola cheese
- 200g Provolone cheese
- 1 cup marinated artichoke hearts
- 1 cup roasted red peppers
- 1 cup mixed olives (green and black)
- 1 cup cherry tomatoes
- 1 jar of sun-dried tomatoes
- 1 loaf of crusty Italian bread
- 1 bunch of fresh basil
- Extra virgin olive oil
- Balsamic glaze
Instructions:
- Prepare the Ingredients: Begin by slicing the prosciutto, salami, and mortadella into thin slices. Cut the provolone and Gorgonzola cheese into bite-sized cubes. Drain the mozzarella balls and set them aside.
- Arrange the Meats: On a large serving platter, start by arranging the sliced meats in a visually appealing manner. You can create small piles or roll the slices for a more elegant presentation.
- Add the Cheeses: Place the mozzarella balls, Gorgonzola cubes, and provolone cubes around the meats. Try to distribute the cheese evenly across the platter to guarantee every guest can access them easily.
- Incorporate Vegetables and Olives: Add the marinated artichoke hearts, roasted red peppers, mixed olives, and cherry tomatoes to the platter. Make sure these elements are spread out to add color and variety throughout the dish.
- Include Sun-Dried Tomatoes and Bread: Add the sun-dried tomatoes to one side of the platter. Slice the Italian bread and arrange the slices alongside the other ingredients.
- Garnish and Finish: Garnish the platter with fresh basil leaves scattered throughout. Drizzle a small amount of extra virgin olive oil over the bread and tomatoes. Finish with a light drizzle of balsamic glaze over the top for an added touch of flavor.
Extra Tips:
When assembling an Italian Antipasto Platter, remember that presentation is key. Use a large wooden board or a colorful platter to make the ingredients stand out.
Feel free to customize the platter based on your guests’ preferences, adding items like marinated mushrooms or a variety of nuts for additional textures. Maintain the balance of flavors by pairing spicy elements with milder ones and incorporating both creamy and firm cheeses.
Finally, make sure everything is at room temperature before serving, as this enhances the flavors and aroma of the antipasto platter.
Garlic and Herb Stuffed Mushrooms

Garlic and Herb Stuffed Mushrooms are a classic Italian appetizer that will delight your taste buds with their rich, savory flavors. These bite-sized treats feature tender mushroom caps filled with a delicious mixture of garlic, fresh herbs, and creamy cheese, making them a perfect start to any meal.
Whether you’re hosting a dinner party or simply looking for a delightful snack, these stuffed mushrooms are certain to impress your guests with their elegant appearance and mouthwatering taste.
The preparation of Garlic and Herb Stuffed Mushrooms is fairly straightforward and doesn’t require any special culinary skills. The key is to use fresh, high-quality ingredients to guarantee that every bite is bursting with flavor.
The combination of garlic, herbs, and cheese creates a harmonious blend that complements the earthy taste of the mushrooms, making this dish a crowd-pleaser. With just a little bit of preparation and cooking time, you can serve a delicious appetizer that will have everyone coming back for seconds.
Ingredients (serving size: 4-6 people):
- 16 large button mushrooms
- 4 tablespoons olive oil
- 3 cloves garlic, minced
- 1/2 cup breadcrumbs
- 1/4 cup grated Parmesan cheese
- 2 tablespoons chopped fresh parsley
- 1 tablespoon chopped fresh thyme
- 1 tablespoon chopped fresh basil
- Salt and pepper to taste
- 1/4 cup cream cheese, softened
Cooking Instructions:
- Preheat the Oven: Preheat your oven to 375°F (190°C) to guarantee it’s ready for baking the stuffed mushrooms.
- Prepare the Mushrooms: Gently clean the mushrooms with a damp cloth and remove the stems. Set the mushroom caps aside and finely chop the stems.
- Sauté the Garlic: In a medium-sized skillet, heat 2 tablespoons of olive oil over medium heat. Add the minced garlic and chopped mushroom stems, and sauté for about 3-4 minutes until the garlic is fragrant and the stems are tender.
- Mix the Filling: In a mixing bowl, combine the sautéed garlic and mushroom stems with breadcrumbs, Parmesan cheese, parsley, thyme, basil, cream cheese, salt, and pepper. Mix well until the ingredients are fully incorporated.
- Stuff the Mushrooms: Arrange the mushroom caps on a baking sheet. Using a small spoon, fill each cap generously with the prepared filling. Drizzle the remaining olive oil over the stuffed mushrooms.
- Bake: Place the baking sheet in the preheated oven and bake for about 20 minutes, or until the mushrooms are tender and the tops are golden brown.
- Serve: Remove the mushrooms from the oven and let them cool slightly before serving. They can be served warm or at room temperature, depending on your preference.
Extra Tips:
For an even richer flavor, consider adding a sprinkle of shredded mozzarella cheese on top of the mushrooms before baking. You can also experiment with different herbs, such as oregano or rosemary, to suit your taste preferences.
If you prefer a spicier dish, a pinch of red pepper flakes can be added to the filling. Additionally, make sure not to overcrowd the baking sheet to guarantee even cooking.
These stuffed mushrooms can be prepared a day in advance and stored in the refrigerator, making them an excellent option for entertaining.
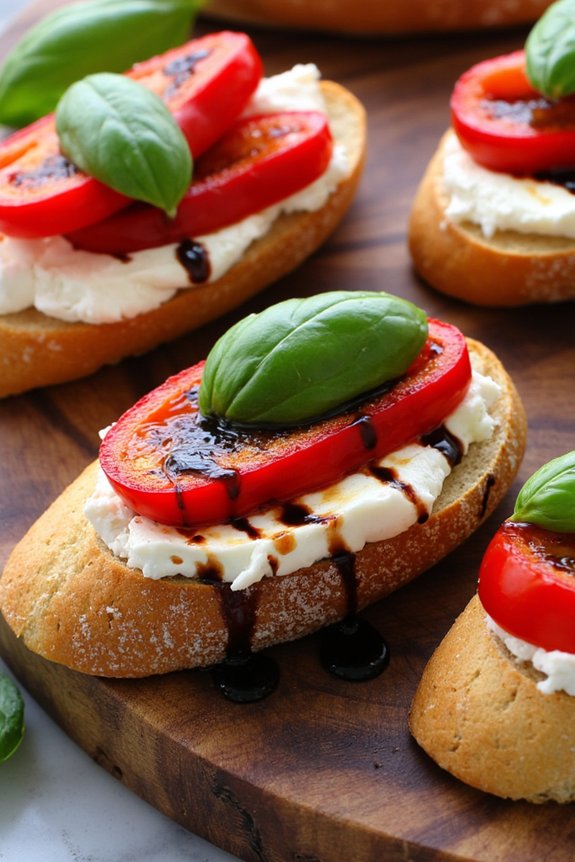
Mini Margherita Pizzas

Mini Margherita Pizzas are a delightful and classic Italian appetizer that captures the essence of traditional pizza in a smaller, bite-sized form. Perfect for parties or as a starter to a larger Italian feast, these pizzas are easy to make and packed with the fresh flavors of tomatoes, basil, and mozzarella. The simplicity of the ingredients allows each component to shine, making these mini pizzas a crowd-pleaser for any occasion.
The key to a perfect Mini Margherita Pizza lies in using fresh and high-quality ingredients. The crispiness of the dough, the juiciness of ripe tomatoes, the creaminess of fresh mozzarella, and the aromatic touch of basil create a harmonious blend of flavors. This recipe is designed to serve 4-6 people, making it ideal for sharing with friends and family. With these easy steps, you can bring the taste of Italy to your table in no time.
Ingredients (Serves 4-6):
- 1 pound pizza dough
- 1 cup tomato sauce
- 8 ounces fresh mozzarella cheese, sliced
- 2 ripe tomatoes, thinly sliced
- Fresh basil leaves
- 2 tablespoons olive oil
- Salt and pepper to taste
- Cornmeal or flour for dusting
Cooking Instructions:
- Preheat the Oven: Start by preheating your oven to 475°F (245°C). Place a pizza stone or baking sheet in the oven to heat up as well.
- Prepare the Dough: On a clean, floured surface, roll out the pizza dough to about 1/4-inch thick. Use a round cutter or a glass to cut out small circles, approximately 3-4 inches in diameter. This should yield about 12-16 mini pizzas.
- Prepare the Baking Surface: Sprinkle some cornmeal or flour onto a large baking sheet or a pizza peel to prevent sticking. Arrange the dough circles on it, leaving a bit of space between each.
- Assemble the Pizzas: Spread a small spoonful of tomato sauce on each dough circle, leaving a small border around the edges. Place a slice of mozzarella cheese on top, followed by a slice of tomato. Season with a pinch of salt and pepper.
- Bake the Pizzas: Carefully transfer the pizzas onto the preheated pizza stone or baking sheet in the oven. Bake for 8-10 minutes, or until the crust is golden brown and the cheese is bubbly and slightly browned.
- Garnish and Serve: Remove the pizzas from the oven and immediately drizzle a small amount of olive oil over them. Top each mini pizza with a fresh basil leaf. Let them cool slightly before serving.
Extra Tips:
For the best results, use fresh mozzarella rather than pre-shredded varieties, as it melts better and offers a creamier texture. If you prefer a crispier crust, roll the dough a little thinner and bake for a few extra minutes.
Feel free to experiment with additional toppings like a sprinkle of Parmesan or a dash of chili flakes for a bit of heat. These mini pizzas are best enjoyed fresh but can be reheated in the oven if needed.
Truffle Oil and Parmesan Risotto Balls

Truffle Oil and Parmesan Risotto Balls are a delectable Italian appetizer that combines the rich, creamy texture of risotto with the earthy aroma of truffle oil. These golden-brown morsels are infused with Parmesan cheese, making them a luxurious treat that’s both crispy on the outside and soft on the inside. Perfect for entertaining guests or as a sophisticated snack, these risotto balls are bound to impress with their indulgent flavors and gourmet appeal.
The key to creating the perfect Truffle Oil and Parmesan Risotto Balls lies in starting with a well-cooked risotto. Once the risotto is prepared and cooled, it’s shaped into bite-sized balls, coated in breadcrumbs, and fried until golden. This dish isn’t only a feast for the taste buds but also a delight for the senses, with its tantalizing aroma and satisfying crunch. Serve these risotto balls warm, and watch them disappear from the platter in no time.
Ingredients (Serves 4-6):
- 1 cup Arborio rice
- 4 cups chicken or vegetable stock
- 1 small onion, finely chopped
- 2 cloves garlic, minced
- 1/2 cup dry white wine
- 1 cup grated Parmesan cheese
- 2 tablespoons truffle oil
- Salt and pepper to taste
- 2 eggs, beaten
- 1 cup all-purpose flour
- 2 cups breadcrumbs
- Vegetable oil for frying
Cooking Instructions:
- Prepare the Risotto: In a large saucepan, heat a tablespoon of olive oil over medium heat. Add the chopped onion and minced garlic, sautéing until soft and translucent. Stir in the Arborio rice, allowing it to toast slightly for about 2 minutes.
- Cook the Risotto: Pour in the white wine and stir until it’s fully absorbed by the rice. Gradually add the chicken or vegetable stock, one ladle at a time, stirring frequently. Allow the liquid to be absorbed before adding more. Continue until the rice is creamy and tender, about 18-20 minutes.
- Add Flavorings: Once the risotto is cooked, remove it from the heat and stir in the Parmesan cheese, truffle oil, salt, and pepper. Spread the risotto on a baking sheet to cool completely, which will make it easier to handle when forming the balls.
- Form the Balls: Once the risotto is cool, take about two tablespoons of the mixture and shape it into a ball using your hands. Repeat until all the risotto is used up.
- Coat the Balls: Set up a breading station with three bowls: one with flour, one with beaten eggs, and one with breadcrumbs. Roll each risotto ball in flour, dip in the egg, and then coat thoroughly with breadcrumbs.
- Fry the Balls: In a large pot or deep fryer, heat the vegetable oil to 350°F (175°C). Fry the risotto balls in batches, making certain not to overcrowd the pot. Cook until they’re golden brown and crispy, about 3-4 minutes per batch. Remove with a slotted spoon and drain on paper towels.
Extra Tips:
To guarantee your risotto balls hold together well while frying, make sure the risotto is completely cooled before shaping. If you find the mixture too sticky, wet your hands slightly while forming the balls.
Additionally, for a burst of flavor, you can insert a small cube of mozzarella cheese in the center of each ball before coating them with breadcrumbs. This will create a deliciously gooey center once fried.
Finally, serve these risotto balls with a side of marinara sauce for dipping, enhancing their rich, savory taste.