

When planning a gathering, I love creating a spread that impresses my guests with ease. Italian appetizers are my favorite for their vibrant flavors and simplicity. Picture the bright colors and fresh taste of Classic Tomato and Basil Bruschetta or the creamy indulgence of Burrata with Prosciutto. These dishes are not only stunning but also capture the essence of Italy. Ready to explore more?
Classic Tomato and Basil Bruschetta
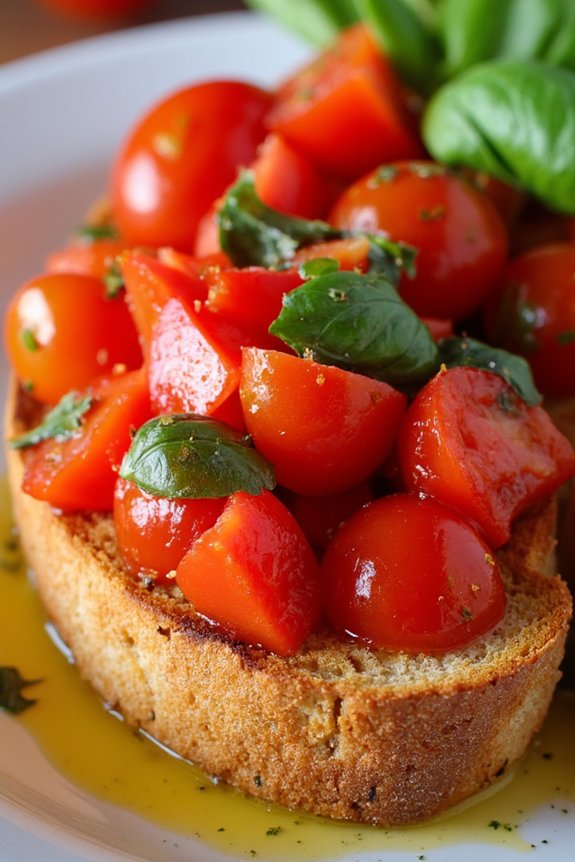
Classic Tomato and Basil Bruschetta is a quintessential Italian appetizer that’s both simple and delicious. This dish is the perfect way to start a meal, as it showcases the fresh flavors of ripe tomatoes, fragrant basil, and garlic, all nestled atop crispy slices of bread. The vibrant colors and fresh ingredients make it not only a treat for the taste buds but also a feast for the eyes.
Whether you’re hosting a dinner party or enjoying a family meal, this appetizer is sure to impress.
The beauty of Classic Tomato and Basil Bruschetta lies in its simplicity and the quality of its ingredients. Using fresh, ripe tomatoes and aromatic basil is key to achieving the best flavor. Traditionally, this dish is served on grilled or toasted slices of rustic Italian bread, which provide a satisfying crunch that complements the juicy tomato topping.
With just a handful of ingredients and a few simple steps, you can create a delightful appetizer that captures the essence of Italian cuisine.
Ingredients (Serves 4-6)
- 6 ripe tomatoes, diced
- 2 cloves garlic, minced
- 1/4 cup fresh basil leaves, chopped
- 2 tablespoons extra-virgin olive oil
- 1 tablespoon balsamic vinegar
- Salt and pepper to taste
- 1 loaf of rustic Italian bread (or baguette), sliced
- Extra olive oil for brushing the bread
Instructions
- Prepare the Tomato Mixture: In a medium-sized bowl, combine the diced tomatoes, minced garlic, and chopped basil. Drizzle with extra-virgin olive oil and balsamic vinegar. Season with salt and pepper to taste. Mix everything gently until well combined. Set aside to allow the flavors to meld.
- Prepare the Bread: Preheat your oven to 400°F (200°C). Arrange the slices of bread on a baking sheet. Brush each slice lightly with olive oil on both sides.
- Toast the Bread: Place the baking sheet in the preheated oven and bake the bread slices for about 5-7 minutes on each side, or until they’re golden brown and crispy. Keep an eye on them to prevent burning.
- Assemble the Bruschetta: Once the bread is toasted, remove it from the oven. Spoon a generous amount of the tomato mixture onto each slice of bread. Make sure each slice gets a good amount of tomatoes and basil.
- Serve Immediately: Arrange the bruschetta on a serving platter and serve immediately while the bread is still warm.
Extra Tips
For the best results, use the freshest tomatoes you can find, preferably vine-ripened or heirloom varieties, as they provide a sweeter and more flavorful topping.
If you have the option, grilling the bread rather than toasting it in the oven can add a lovely smoky flavor to the bruschetta. Additionally, if you want to add a bit of richness, consider rubbing the toasted bread with a halved garlic clove before topping it with the tomato mixture. This step infuses the bread with a subtle garlic flavor that perfectly complements the other ingredients.
Creamy Burrata With Prosciutto and Arugula
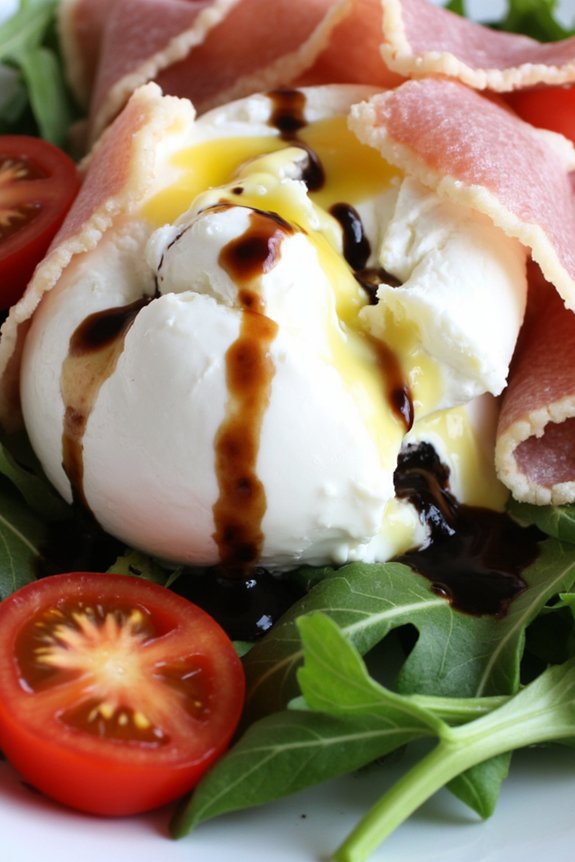
Creamy Burrata With Prosciutto and Arugula is a delightful Italian appetizer that combines the rich, silky texture of burrata cheese with the savory, salty notes of prosciutto. The peppery arugula adds a fresh and vibrant contrast, making this dish a perfect starter for any occasion, from casual gatherings to elegant dinners.
The simplicity of the ingredients allows the flavors to shine, and the presentation is as impressive as it’s delicious. This appetizer is incredibly easy to assemble, requiring no cooking, just some artful arrangement.
The creamy burrata, when paired with high-quality prosciutto and fresh arugula, creates a harmonious blend of flavors and textures that will leave your guests craving for more. By keeping the preparation minimal, you allow the high-quality ingredients to speak for themselves, making this a go-to dish for impressing your friends and family with minimal effort.
Ingredients (Serves 4-6):
- 2 large balls of burrata cheese
- 8-12 slices of prosciutto
- 2 cups fresh arugula
- 2 tablespoons extra virgin olive oil
- 1 tablespoon balsamic glaze
- Salt and freshly ground black pepper to taste
- Optional: Cherry tomatoes, halved
Cooking Instructions:
1. Prepare the Ingredients:
Begin by gently rinsing the arugula under cold water and patting it dry with a clean kitchen towel or paper towels. If you’re using cherry tomatoes, rinse them as well and cut them in half.
2. Arrange the Arugula:
On a large serving platter or individual plates, evenly distribute the arugula to create a bed for the burrata and prosciutto.
3. Place the Burrata:
Carefully place the burrata balls on top of the arugula. If desired, cut the burrata into halves or quarters to make serving easier, but be gentle to maintain the creamy inside.
4. Add the Prosciutto:
Drape the slices of prosciutto around the burrata and arugula. You can either fold them into loose ruffles or lay them flat depending on your presentation preference.
5. Drizzle with Olive Oil and Balsamic Glaze:
Drizzle the extra virgin olive oil over the burrata and prosciutto. Follow with a drizzle of balsamic glaze to add a touch of sweetness.
6. Season and Serve:
Sprinkle a pinch of salt and freshly ground black pepper over the entire dish. Add the halved cherry tomatoes for a pop of color and additional flavor, if using. Serve immediately.
Extra Tips:
For the best results, verify that you use fresh, high-quality ingredients. Burrata and prosciutto are the stars of this dish, so sourcing these from a reputable deli or specialty store can make a significant difference in taste.
If burrata isn’t available, fresh mozzarella can be a suitable substitute, although it lacks the creamy center. Adjust the amount of balsamic glaze to suit your preference for sweetness. This dish is best served fresh, so try to assemble it just before serving to keep the arugula crisp and vibrant.
Caprese Skewers With Balsamic Glaze

Caprese Skewers With Balsamic Glaze are a delightful and easy-to-make Italian appetizer that adds a touch of elegance to any gathering. This dish combines the classic flavors of fresh mozzarella, ripe cherry tomatoes, and fragrant basil leaves, all drizzled with a sweet and tangy balsamic glaze.
The skewers not only look beautiful when served, but they also offer a burst of freshness and flavor in every bite, making them a perfect starter for any meal or a standout dish at your next party.
These skewers are incredibly simple to assemble, requiring minimal preparation and cooking time. They can be made in advance, allowing you to focus on other dishes or simply enjoy the company of your guests.
Whether you’re hosting a formal dinner or a casual get-together, Caprese Skewers With Balsamic Glaze are sure to impress and satisfy. Perfect for serving 4-6 people, this recipe will quickly become a favorite go-to appetizer in your repertoire.
Ingredients for Caprese Skewers With Balsamic Glaze (serving size: 4-6 people):
- 20 cherry tomatoes
- 20 fresh mozzarella balls (bocconcini or ciliegine)
- 20 fresh basil leaves
- 1/4 cup balsamic vinegar
- 2 tablespoons honey
- 20 wooden skewers or toothpicks
- Salt and pepper to taste
Cooking Instructions:
- Prepare the Balsamic Glaze: In a small saucepan, combine the balsamic vinegar and honey. Bring the mixture to a gentle boil over medium heat, then reduce to low and let it simmer. Stir occasionally until the mixture has reduced by half and becomes thick enough to coat the back of a spoon. This should take about 10-15 minutes. Remove from heat and let it cool.
- Assemble the Skewers: While the glaze is cooling, start assembling the skewers. Thread one cherry tomato onto a wooden skewer, followed by a fresh basil leaf, and then a mozzarella ball. Repeat the sequence until all 20 skewers are assembled.
- Season the Skewers: Once assembled, lightly season the skewers with salt and pepper to enhance the flavors of the ingredients.
- Drizzle with Balsamic Glaze: Once the balsamic glaze has cooled, drizzle it evenly over the assembled skewers. Be generous with the glaze, making certain each skewer gets a good amount of the sweet and tangy sauce.
- Serve and Enjoy: Arrange the skewers on a serving platter, and they’re ready to serve. Optionally, you can garnish the platter with extra basil leaves for a touch of color and freshness.
Extra Tips: For the best flavor, use high-quality balsamic vinegar and fresh ingredients. If you have the time, allow the skewers to sit at room temperature for about 10 minutes after drizzling with the glaze so the flavors meld together.
You can also experiment with adding a slice of prosciutto or a sprinkle of pine nuts for an extra layer of flavor. If preparing in advance, store the assembled skewers in the refrigerator and add the balsamic glaze just before serving to guarantee the freshest taste.
Stuffed Mushrooms With Italian Sausage

Stuffed Mushrooms With Italian Sausage is a classic Italian appetizer that’s certain to delight your guests with its rich flavors and satisfying texture. This dish combines the earthy taste of mushrooms with the savory richness of Italian sausage, creating a perfect balance that leaves everyone reaching for more.
Whether you’re hosting a dinner party or just preparing a special meal for your family, these stuffed mushrooms are an enticing treat that’s easy to make and even easier to enjoy. Ideal for serving 4-6 people, these stuffed mushrooms aren’t only flavorful but also versatile. You can prepare them in advance and bake them just before serving, making them a convenient choice for any occasion.
The combination of creamy cheese, aromatic herbs, and spicy sausage stuffed into tender mushroom caps creates a delightful contrast that’s sure to win over even the pickiest eaters. Pair these appetizers with a crisp white wine, and you’ll have an elegant starter that sets the tone for a memorable meal.
Ingredients:
- 16 large cremini or button mushrooms
- 1 tablespoon olive oil
- 1/2 pound Italian sausage, casings removed
- 1/2 cup finely chopped onion
- 2 cloves garlic, minced
- 1/3 cup breadcrumbs
- 1/4 cup grated Parmesan cheese
- 1/4 cup cream cheese, softened
- 2 tablespoons chopped fresh parsley
- Salt and pepper to taste
- 1/4 teaspoon red pepper flakes (optional)
- 1/4 cup shredded mozzarella cheese
Instructions:
- Prepare the Mushrooms: Preheat your oven to 375°F (190°C). Clean the mushrooms with a damp paper towel and gently remove the stems. Finely chop the stems and set them aside.
- Cook the Sausage: In a skillet, heat the olive oil over medium heat. Add the Italian sausage and cook until browned, breaking it into small pieces with a spatula.
- Add Aromatics: Once the sausage is cooked, add the chopped onion, garlic, and reserved mushroom stems. Sauté for about 5 minutes until the onion becomes translucent.
- Combine Ingredients: Remove the skillet from heat and stir in the breadcrumbs, Parmesan cheese, cream cheese, parsley, salt, pepper, and red pepper flakes. Mix until well combined and the cheese is melted.
- Stuff the Mushrooms: Arrange the mushroom caps on a baking sheet. Stuff each cap generously with the sausage mixture, pressing it slightly to fill the cavity.
- Top with Cheese: Sprinkle the tops of the stuffed mushrooms with shredded mozzarella cheese.
- Bake: Place the baking sheet in the preheated oven and bake for 20-25 minutes, or until the mushrooms are tender and the cheese is bubbly and golden.
- Serve: Let the mushrooms cool slightly before serving. Garnish with additional parsley if desired.
Extra Tips:
For a vegetarian option, you can substitute the sausage with chopped spinach or another vegetable of your choice. Always taste the mixture before stuffing the mushrooms to adjust seasoning according to your preference.
If you prefer a spicier kick, increase the amount of red pepper flakes or use hot Italian sausage. To guarantee even cooking, try to choose mushrooms that are similar in size. Enjoy your stuffed mushrooms hot, as they’re best served fresh from the oven.
Marinated Artichoke Hearts and Olives
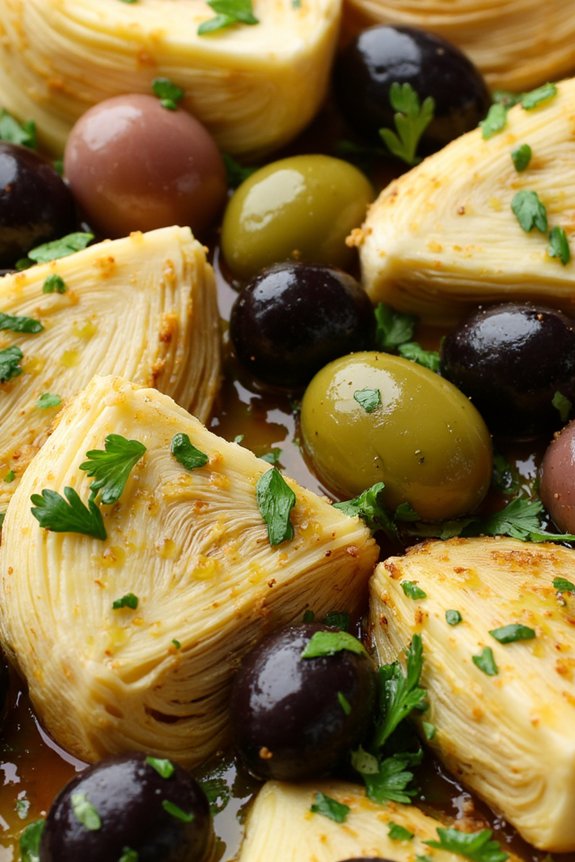
Marinated Artichoke Hearts and Olives is a delightful Italian appetizer that’s perfect for any gathering or family meal. This dish combines the unique flavors of artichoke hearts with the briny taste of olives, all soaked in a delicious marinade that enhances their natural flavors.
The dish isn’t only tasty but also visually appealing with its vibrant colors, making it a wonderful addition to any table setting. It’s easy to prepare and can be made ahead of time, allowing the flavors to meld together for an even more delicious experience.
The dish is versatile and can be served in a variety of ways. You can enjoy it on its own, as part of an antipasto platter, or alongside crusty bread for a simple yet elegant appetizer.
The marinade, made from a combination of olive oil, vinegar, herbs, and spices, provides the perfect balance of acidity and richness, complementing the textures of the artichokes and olives. This appetizer is ideal for serving 4-6 people, making it suitable for both small gatherings and larger events.
Ingredients for 4-6 people:
- 1 can (14 oz) of artichoke hearts, drained and quartered
- 1 cup of mixed olives (green and black), pitted
- 1/4 cup of extra virgin olive oil
- 2 tablespoons of red wine vinegar
- 1 tablespoon of lemon juice
- 2 cloves of garlic, minced
- 1 teaspoon of dried oregano
- 1 teaspoon of dried thyme
- Salt and black pepper to taste
- 1/4 cup of chopped fresh parsley
Cooking Instructions:
- Prepare the Marinade: In a large bowl, whisk together the olive oil, red wine vinegar, lemon juice, minced garlic, dried oregano, and dried thyme. Season with salt and black pepper to taste. This forms the flavorful base that will infuse the artichokes and olives.
- Combine Ingredients: Add the drained and quartered artichoke hearts and the mixed olives into the marinade. Toss everything gently to guarantee that the artichokes and olives are well-coated with the marinade.
- Marinate: Cover the bowl with plastic wrap or transfer the mixture to a sealable container. Refrigerate the marinated mixture for at least 2 hours, or overnight for best results. This allows the flavors to develop and intensify.
- Final Touches: Before serving, give the mixture a stir and sprinkle with fresh parsley for added freshness and color. Adjust seasoning if necessary.
- Serve: Transfer the marinated artichokes and olives to a serving dish. Serve chilled or at room temperature, accompanied by crusty bread if desired.
Extra Tips:
For the best results, use high-quality olives and artichoke hearts. You can experiment with different types of olives, such as Kalamata or Castelvetrano, to suit your taste preferences.
If you prefer a spicier kick, consider adding a pinch of red pepper flakes to the marinade. Additionally, this dish can be easily customized with additional ingredients like roasted red peppers or capers for added flavor and texture.
Crispy Eggplant Parmesan Bites
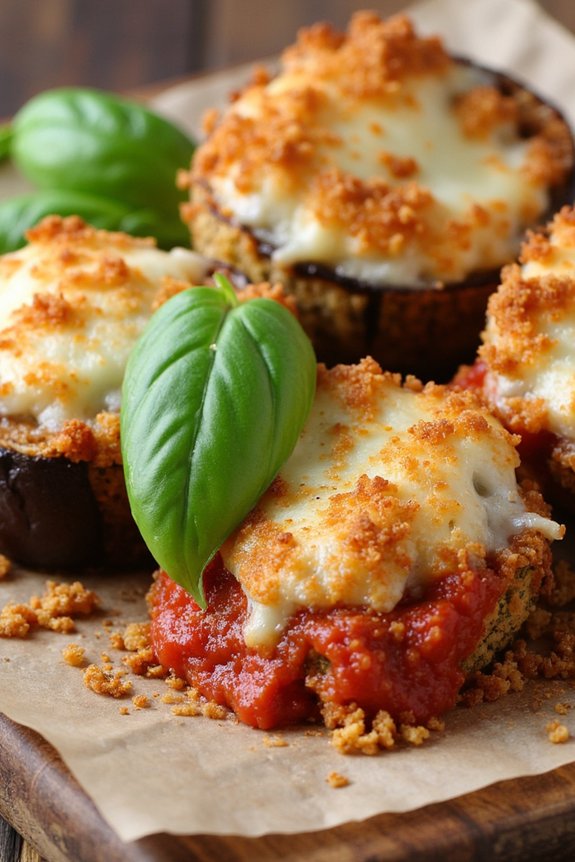
Crispy Eggplant Parmesan Bites are a delightful twist on the classic Italian dish, offering all the beloved flavors in a bite-sized appetizer that’s perfect for any gathering. These savory bites are made by coating slices of eggplant in a delicious breadcrumb mixture and baking them until golden and crispy. They’re then topped with marinara sauce and melted mozzarella cheese, creating a mouthwatering combination that’s bound to impress your guests.
This recipe isn’t only easy to prepare but also a healthier alternative to traditional fried eggplant parmesan, as it uses baking instead of frying to achieve the perfect crunch. Whether you’re hosting a dinner party or simply looking for a new appetizer to try, these Crispy Eggplant Parmesan Bites are a must-try dish that showcases the rich flavors and textures of Italian cuisine.
Ingredients for 4-6 servings:
- 2 medium eggplants
- 1 cup all-purpose flour
- 3 large eggs
- 1 ½ cups Italian breadcrumbs
- 1 cup grated Parmesan cheese
- 1 teaspoon garlic powder
- 1 teaspoon dried oregano
- Salt and pepper to taste
- 2 cups marinara sauce
- 2 cups shredded mozzarella cheese
- Fresh basil leaves for garnish
- Olive oil for drizzling
Cooking Instructions:
- Prepare the Eggplants: Begin by washing the eggplants thoroughly. Trim off the ends and slice them into rounds approximately 1/4 inch thick. Lay the slices on a paper towel and sprinkle them lightly with salt. Let them sit for about 20 minutes to draw out excess moisture, then pat them dry with another paper towel.
- Set Up the Coating Station: Preheat your oven to 400°F (200°C). Prepare three separate bowls: one with flour, the second with beaten eggs, and the third with a mixture of breadcrumbs, grated Parmesan cheese, garlic powder, dried oregano, salt, and pepper.
- Coat the Eggplant Slices: Dredge each slice of eggplant first in the flour, shaking off any excess. Then dip it into the beaten eggs, allowing any excess to drip off. Finally, coat the slice with the breadcrumb mixture, pressing gently to confirm the coating adheres well.
- Bake the Eggplant: Place the coated eggplant slices on a baking sheet lined with parchment paper. Drizzle a small amount of olive oil over the top of each slice. Bake in the preheated oven for 20-25 minutes, flipping halfway through, until the slices are golden brown and crispy.
- Add Sauce and Cheese: Remove the eggplant from the oven and spoon a small amount of marinara sauce over each slice. Top with shredded mozzarella cheese. Return to the oven and bake for an additional 5-7 minutes, or until the cheese is melted and bubbly.
- Serve and Garnish: Once done, remove the eggplant bites from the oven and let them cool slightly. Garnish with fresh basil leaves before serving.
Extra Tips:
To confirm your Crispy Eggplant Parmesan Bites are perfectly crispy, make sure to not overcrowd the baking sheet when placing the eggplant slices. This allows hot air to circulate around each slice, promoting even cooking and crispiness.
You can also experiment with different cheeses, such as provolone or fontina, to add a unique flavor profile to your bites. If you prefer a spicier kick, consider adding a pinch of red pepper flakes to the breadcrumb mixture for an extra layer of heat.
Prosciutto-Wrapped Asparagus

Prosciutto-wrapped asparagus is a delightful Italian appetizer that combines the savory flavor of prosciutto with the fresh and slightly sweet taste of asparagus. This dish isn’t only easy to prepare, but it also makes an elegant addition to any table setting, whether it’s a casual gathering or a more formal event.
The contrast between the crispy, salty prosciutto and the tender, vibrant green asparagus is sure to tantalize your taste buds. This recipe is perfect for serving 4-6 people, making it ideal for small dinner parties or family dinners. The preparation is straightforward and involves just a few ingredients, guaranteeing that the natural flavors of the asparagus and prosciutto are the stars of the dish.
By following simple steps, you can create a delicious appetizer that’s both visually appealing and deliciously satisfying.
Ingredients (Serves 4-6):
- 1 lb (16 spears) fresh asparagus
- 8 slices of prosciutto
- 2 tablespoons olive oil
- 1/2 teaspoon freshly ground black pepper
- 1/2 teaspoon garlic powder (optional)
- Zest of 1 lemon
Cooking Instructions:
- Preheat the Oven: Begin by preheating your oven to 400°F (200°C). This will guarantee that the asparagus and prosciutto cook evenly and quickly.
- Prepare the Asparagus: Wash the asparagus thoroughly under cool running water and pat them dry with a clean kitchen towel or paper towels. Trim the woody ends of the asparagus by bending each spear gently until it naturally snaps at the right point.
- Wrap the Asparagus: Take one slice of prosciutto and wrap it around each asparagus spear, starting just below the tip and spiraling down towards the base. Ensure the prosciutto is wrapped tightly, but not too tight to prevent tearing.
- Season and Oil: Place the wrapped asparagus spears on a baking sheet lined with parchment paper. Drizzle them with olive oil and sprinkle with freshly ground black pepper. If you like, add a touch of garlic powder for extra flavor.
- Bake: Place the baking sheet in the preheated oven and bake for 15-20 minutes, or until the prosciutto is crispy and the asparagus is tender. Check them halfway through to guarantee even cooking, and rotate the baking sheet if necessary.
- Add Lemon Zest: Once the asparagus is done, remove them from the oven and immediately sprinkle with lemon zest for a burst of freshness and acidity that complements the salty prosciutto.
Extra Tips:
When selecting asparagus, look for firm, bright green spears with closed tips; this indicates freshness. Thinner asparagus spears are preferable for this recipe as they cook more evenly with the prosciutto.
If you prefer a smokier flavor, consider grilling the wrapped asparagus instead of baking them. Additionally, feel free to experiment with adding herbs like thyme or rosemary for an aromatic twist. Serve this appetizer warm for the best taste and texture.
Italian Antipasto Platter
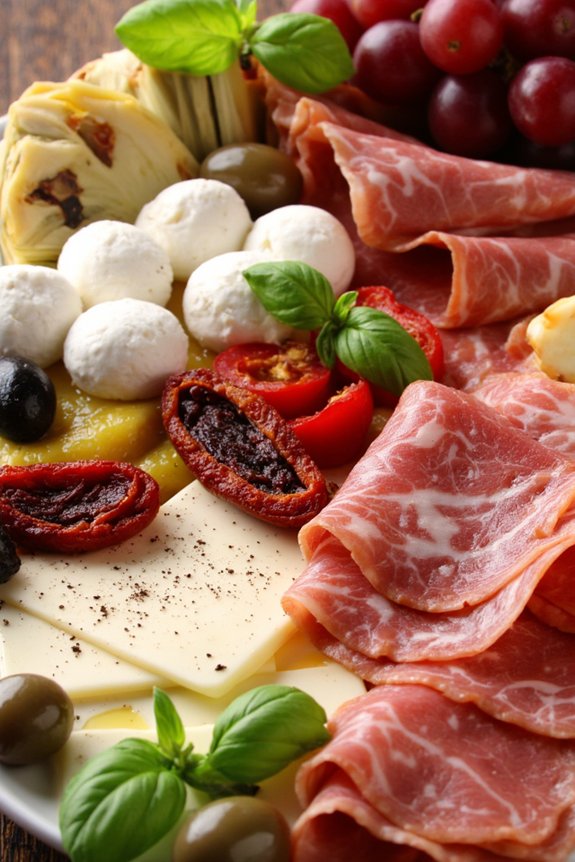
An Italian Antipasto Platter is the perfect way to start any meal, offering a delightful mix of flavors and textures that set the stage for the courses to follow. Traditionally, “antipasto” means “before the meal” in Italian, and this appetizer platter includes a variety of cured meats, cheeses, marinated vegetables, and bread.
It’s a great option for entertaining guests, as it allows everyone to sample different tastes and create their own perfect bite. The beauty of the Antipasto Platter lies in its versatility, allowing you to customize it according to your preferences and the season.
For serving 4-6 people, this platter will include an assortment of ingredients that cater to a variety of palates. You can easily adjust quantities or swap out components to suit dietary preferences or restrictions. The key is to choose high-quality ingredients that complement each other, bringing a balance of salty, sweet, tangy, and savory flavors.
Whether you’re hosting a casual get-together or a formal dinner party, this Italian Antipasto Platter will be an impressive and delicious starter.
Ingredients for 4-6 people:
- 150g Prosciutto
- 150g Salami (such as Genoa or Soppressata)
- 150g Mortadella
- 200g Fresh mozzarella balls (bocconcini)
- 200g Aged provolone cheese, sliced
- 200g Manchego cheese, sliced
- 1 jar (200g) marinated artichoke hearts
- 1 jar (200g) roasted red peppers
- 1 cup mixed olives (such as Kalamata, Castelvetrano)
- 1 cup cherry tomatoes, halved
- 1 small bunch of grapes
- 1/2 cup sun-dried tomatoes
- 1/4 cup olive oil
- 1 loaf crusty Italian bread or a baguette
- Fresh basil leaves for garnish
- Freshly cracked black pepper
Instructions:
- Prepare the Platter: Begin by selecting a large serving board or platter that can accommodate all your ingredients. This will be the foundation of your antipasto presentation.
- Arrange the Meats: Fold or roll the prosciutto, salami, and mortadella into attractive shapes and place them in separate sections on the platter. Confirm there’s enough space between each type to make it visually appealing.
- Add the Cheeses: Slice the provolone and Manchego cheese, and arrange them neatly on the board. Place the mozzarella balls in a small bowl or dish on the platter to contain any liquid.
- Incorporate the Vegetables: Drain and dry the marinated artichoke hearts and roasted red peppers. Arrange them on the platter in clusters. Add the sun-dried tomatoes next to the fresh cherry tomatoes for a contrast of flavors.
- Include the Olives and Grapes: Put the mixed olives in a small bowl and place them strategically on the platter. Tuck clusters of grapes into any available spaces to add a touch of sweetness.
- Drizzle and Garnish: Drizzle olive oil over the fresh mozzarella balls and sprinkle with freshly cracked black pepper. Garnish the platter with fresh basil leaves for a burst of color and aroma.
- Serve with Bread: Slice the crusty Italian bread or baguette and arrange it around the edges of the platter. This will allow guests to make their own bites with the various ingredients.
Extra Tips:
When crafting your Italian Antipasto Platter, focus on balance and variety. Confirm that there are enough contrasting textures and flavors to keep it interesting.
It’s also important to reflect on the visual appeal — think about color and how the ingredients complement each other. If preparing in advance, keep the platter covered in the refrigerator and add the fresh elements like basil and bread just before serving to maintain their freshness.
For an extra touch, serve with a side of balsamic reduction or pesto for dipping.
Ricotta and Spinach Stuffed Pastry

Ricotta and Spinach Stuffed Pastry is a delightful Italian appetizer that brings together the creamy texture of ricotta cheese and the earthy flavor of spinach, all wrapped in a flaky pastry. This dish is perfect for entertaining guests or as a starter to a larger meal. The filling is seasoned with a blend of herbs and spices, providing a savory taste that complements the light and crispy pastry.
These pastries aren’t only delicious but also visually appealing, making them a great addition to any table spread. The ease of preparation for Ricotta and Spinach Stuffed Pastry makes it an excellent choice for both beginners and experienced cooks. With just a few simple steps, you can create a dish that’s sure to captivate.
The combination of creamy ricotta, nutrient-rich spinach, and buttery pastry is a classic pairing in Italian cuisine. This recipe is designed for a serving size of 4-6 people, making it ideal for small gatherings or family meals. Below are the ingredients and the step-by-step instructions to create this mouthwatering appetizer.
Ingredients for 4-6 servings:
- 1 package of puff pastry sheets (2 sheets)
- 1 cup ricotta cheese
- 1 cup fresh spinach, chopped
- 1/2 cup grated Parmesan cheese
- 1 egg
- 1 clove garlic, minced
- 1/4 teaspoon nutmeg
- Salt and pepper to taste
- 1 tablespoon olive oil
- 1 tablespoon milk (for egg wash)
- Flour for dusting
Cooking Instructions:
- Preheat the Oven: Start by preheating your oven to 400°F (200°C). This guarantees that the pastry will bake evenly and become golden brown.
- Prepare the Filling: In a medium-sized bowl, combine the ricotta cheese, chopped spinach, grated Parmesan cheese, minced garlic, nutmeg, salt, and pepper. Mix well until all ingredients are fully incorporated.
- Prepare the Puff Pastry: Lightly dust your work surface with flour and unfold the puff pastry sheets. Roll out each sheet to smooth any creases. Cut each sheet into 4 equal squares, giving you a total of 8 squares.
- Fill the Pastry: Place a spoonful of the ricotta and spinach mixture in the center of each square. Be careful not to overfill to prevent the filling from spilling out during baking.
- Seal the Pastry: Beat the egg with a tablespoon of milk to create an egg wash. Brush the edges of each square with the egg wash. Fold the pastry over the filling to form a triangle or rectangle, then press the edges with a fork to seal.
- Bake the Pastry: Arrange the filled pastries on a baking sheet lined with parchment paper. Brush the tops with the remaining egg wash for a glossy finish. Bake in the preheated oven for 15-20 minutes or until the pastries are puffed and golden brown.
- Cool and Serve: Once baked, remove the pastries from the oven and allow them to cool slightly on a wire rack. Serve warm as an appetizer or as part of a larger meal.
Extra Tips:
For the best results, make certain that the puff pastry is cold when working with it. This helps maintain its structure and results in a flakier texture when baked. If the pastry becomes too warm and sticky, return it to the refrigerator for a few minutes before proceeding.
Additionally, you can customize the filling with other ingredients such as cooked mushrooms or sun-dried tomatoes for added flavor. If you’re preparing in advance, the filled pastries can be frozen and baked directly from the freezer, adding a few extra minutes to the baking time.
Sun-Dried Tomato and Olive Tapenade
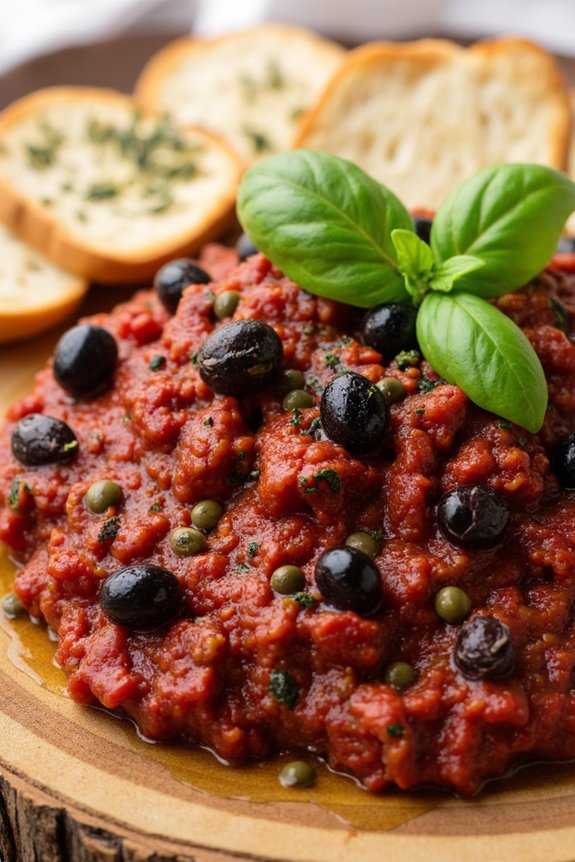
Sun-Dried Tomato and Olive Tapenade is a classic Italian appetizer that brings together the rich flavors of sun-dried tomatoes, briny olives, and a hint of garlic, all blended into a smooth, savory spread. This tapenade is perfect for serving with crusty bread or crackers, making it an ideal starter for any gathering.
The bold, robust flavors of this dish are sure to impress your guests and leave them craving more. The beauty of this recipe lies in its simplicity and the quality of the ingredients. By using sun-dried tomatoes packed in oil, you guarantee a full-bodied taste with a pleasant, chewy texture.
The olives add a salty depth, while the garlic and herbs enhance the overall flavor profile. This tapenade isn’t only easy to prepare but also versatile, as it can be used as a spread, a dip, or even a topping for grilled meats or vegetables.
Ingredients for Sun-Dried Tomato and Olive Tapenade (Serves 4-6)
- 1 cup sun-dried tomatoes packed in oil, drained
- 1 cup pitted Kalamata olives
- 2 cloves garlic
- 2 tablespoons capers, drained
- 3 tablespoons extra virgin olive oil
- 1 tablespoon fresh lemon juice
- 1 teaspoon dried oregano
- Salt and freshly ground black pepper, to taste
- Fresh basil leaves, for garnish
Cooking Instructions
- Prepare the Ingredients: Begin by draining the sun-dried tomatoes from their oil. Make sure to pat them dry with a paper towel to remove excess oil. Gather the rest of your ingredients, making certain the olives are pitted and the garlic cloves are peeled.
- Blend the Ingredients: In a food processor, combine the sun-dried tomatoes, olives, garlic, and capers. Pulse the mixture a few times until the ingredients begin to break down.
- Add Flavorings: Add the extra virgin olive oil, lemon juice, and dried oregano to the food processor. Pulse again until the mixture becomes a coarse paste. Be careful not to over-process, as you want the tapenade to have some texture.
- Season to Taste: Taste the tapenade and season with salt and freshly ground black pepper according to your preference. Pulse briefly to incorporate the seasonings.
- Serve: Transfer the tapenade to a serving bowl. Garnish with fresh basil leaves for a pop of color and additional flavor. Serve with slices of crusty bread or an assortment of crackers.
Extra Tips
To guarantee the best flavor, it’s important to use high-quality ingredients, especially the sun-dried tomatoes and olives. If you prefer a spicier kick, consider adding a pinch of red pepper flakes to the mixture.
This tapenade can be made a day in advance; just store it in an airtight container in the refrigerator, allowing the flavors to meld beautifully. Before serving, let it come to room temperature for the best taste and texture.
Parmesan and Herb Arancini

Parmesan and Herb Arancini are delightful Italian rice balls that are crispy on the outside and cheesy on the inside. Originating from Sicily, these savory bites are perfect as an appetizer or a snack for gatherings. The creamy risotto is mixed with fresh herbs and Parmesan cheese, then shaped into balls, coated in breadcrumbs, and fried to golden perfection. The result is a deliciously crunchy exterior that gives way to a soft, flavorful center.
Arancini are incredibly versatile, allowing you to customize the filling with your favorite ingredients. In this recipe, we’ll use a blend of Parmesan cheese and fresh herbs like parsley and basil to infuse the rice with aromatic flavors. This recipe serves 4-6 people, making it ideal for a small dinner party or a family meal. Serve these tasty morsels with a side of marinara sauce for dipping, and watch them disappear!
Ingredients (serves 4-6):
- 1 1/2 cups Arborio rice
- 4 cups chicken or vegetable broth
- 1/2 cup grated Parmesan cheese
- 2 tablespoons chopped fresh parsley
- 2 tablespoons chopped fresh basil
- 1 small onion, finely chopped
- 2 cloves garlic, minced
- 1/2 cup dry white wine
- 2 large eggs
- 2 cups breadcrumbs
- Salt and pepper to taste
- Vegetable oil for frying
Cooking Instructions:
- Prepare the Risotto: Heat a tablespoon of olive oil in a large saucepan over medium heat. Add the finely chopped onion and sauté until translucent, about 5 minutes. Add the minced garlic and cook for another minute until fragrant.
- Cook the Rice: Stir in the Arborio rice and cook for 2-3 minutes until the grains are lightly toasted. Pour in the white wine, and stir until the wine is absorbed. Begin adding the broth, one cup at a time, stirring frequently until each cup is absorbed before adding the next. Continue this process until the rice is creamy and al dente, about 18-20 minutes.
- Mix in Cheese and Herbs: Remove the saucepan from heat and stir in the grated Parmesan cheese, chopped parsley, and basil. Season with salt and pepper to taste. Let the mixture cool slightly, then transfer to a shallow dish and refrigerate for at least 1 hour, or until firm.
- Shape the Arancini: Once the rice mixture is firm, beat the eggs in a small bowl. Set up a breading station with the beaten eggs and breadcrumbs in separate shallow dishes. With wet hands, form the rice into balls about the size of a golf ball. Dip each ball into the beaten eggs, then roll in breadcrumbs until fully coated.
- Fry the Arancini: Heat vegetable oil in a large saucepan or deep fryer to 350°F (175°C). Carefully lower the breaded rice balls into the hot oil in batches, frying until golden brown and crisp, about 3-4 minutes per batch. Remove with a slotted spoon and drain on paper towels.
Extra Tips:
To guarantee your Arancini have the perfect texture, it’s vital to use Arborio rice, as its high starch content is essential for a creamy risotto. When shaping the Arancini, wetting your hands will help prevent the rice from sticking.
If you prefer a healthier option, try baking the Arancini at 400°F (200°C) for 20-25 minutes until golden brown, turning halfway through. Additionally, these can be made ahead of time and frozen before frying; simply fry them directly from the freezer, adding a couple of extra minutes to the cooking time.
Enjoy your Parmesan and Herb Arancini with marinara sauce or your favorite dip!
Garlic and Herb Focaccia Bread
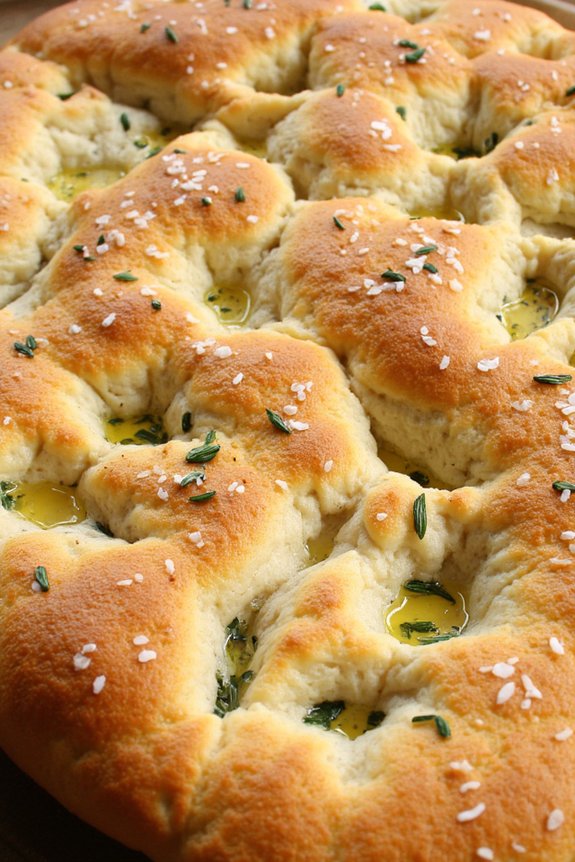
Garlic and Herb Focaccia Bread is a classic Italian appetizer that’s both flavorful and versatile. Known for its chewy texture, this bread is infused with the aromatic blend of garlic and fresh herbs, making it a perfect starter to any meal. The focaccia’s dimpled surface allows the fragrant olive oil, garlic, and herbs to seep into every bite, creating a rich and savory experience that’s both satisfying and comforting.
Whether served as an appetizer, a side to your main course, or as a base for sandwiches, this dish is sure to impress your guests.
Preparing Garlic and Herb Focaccia Bread is a delightful process that fills your kitchen with the inviting aroma of baking bread. The key to a perfect focaccia lies in the quality of ingredients and the patience to allow the dough to rise properly. By following this recipe, you’ll be guided through creating a beautifully golden, fluffy, and flavorful focaccia that showcases the best of Italian cuisine.
This recipe serves 4-6 people, making it ideal for family gatherings or small dinner parties.
Ingredients:
- 4 cups all-purpose flour
- 1 packet (2 1/4 teaspoons) active dry yeast
- 1 3/4 cups warm water (about 110°F)
- 1 teaspoon sugar
- 1 teaspoon salt
- 1/2 cup extra virgin olive oil, divided
- 4 cloves garlic, minced
- 1 tablespoon chopped fresh rosemary
- 1 tablespoon chopped fresh thyme
- 1 tablespoon chopped fresh parsley
- Coarse sea salt, for sprinkling
Instructions:
- Activate the Yeast: In a small bowl, combine the warm water, sugar, and yeast. Stir gently and let it sit for about 5-10 minutes until the mixture becomes frothy. This indicates that the yeast is active and ready to use.
- Prepare the Dough: In a large mixing bowl, combine the flour and salt. Make a well in the center and pour in the yeast mixture and 1/4 cup of olive oil. Mix together until a dough begins to form. Transfer the dough to a floured surface and knead for about 8-10 minutes until it’s smooth and elastic.
- First Rise: Place the dough in a lightly oiled bowl, turning it to coat with oil. Cover with a damp cloth or plastic wrap and let it rise in a warm, draft-free area for about 1-1.5 hours, or until it has doubled in size.
- Prepare the Baking Pan: Preheat your oven to 425°F (220°C). Grease a 9×13-inch baking pan with 2 tablespoons of olive oil. Once the dough has risen, transfer it to the prepared pan and press it out to fit the pan evenly.
- Create Indentations: Using your fingers, make deep dimples all over the surface of the dough. This will help to hold the oil and flavors as the focaccia bakes.
- Flavor the Bread: In a small bowl, mix the remaining olive oil, minced garlic, rosemary, thyme, and parsley. Spread this mixture evenly over the dough, making sure that it gets into the dimples. Sprinkle with coarse sea salt for added flavor.
- Second Rise: Let the dough rise again for about 20-30 minutes until it becomes puffy.
- Bake: Place the focaccia in the preheated oven and bake for 20-25 minutes, or until it’s golden brown on top and sounds hollow when tapped.
- Cool and Serve: Remove the focaccia from the oven and allow it to cool slightly before cutting into squares. Serve warm or at room temperature.
Extra Tips:
For the best results, use high-quality extra virgin olive oil as it greatly influences the flavor of the focaccia. Feel free to experiment with different herbs like oregano or basil to suit your taste preferences.
If you prefer a slightly crispier crust, bake the focaccia for an additional 5 minutes. Finally, verify that your yeast is fresh and not expired, as this can affect the rising process considerably.
Enjoy your homemade Garlic and Herb Focaccia Bread with a side of marinara sauce or a drizzle of balsamic glaze for an extra burst of flavor.
Roasted Red Pepper and Goat Cheese Crostini

Roasted Red Pepper and Goat Cheese Crostini is a delightful Italian appetizer that combines the earthy sweetness of roasted red peppers with the creamy tang of goat cheese, all served atop a crispy baguette slice. This dish is perfect for gatherings, offering a burst of flavor in every bite, and is both elegant and simple to prepare. The combination of textures and flavors makes it an appealing starter that will impress your guests.
The key to this appetizer is in its simplicity and the quality of the ingredients. The roasted red peppers offer a smoky sweetness that pairs beautifully with the creamy, slightly tangy goat cheese. A drizzle of balsamic glaze and a sprinkle of fresh herbs enhance the flavors further, making this crostini a stunning addition to any appetizer spread. Perfect for serving 4-6 people, this recipe can easily be prepared in advance, allowing you to spend more time enjoying your guests.
Ingredients (serving size: 4-6 people):
- 1 French baguette
- 2 large red bell peppers
- 6 oz (about 170g) goat cheese
- 2 tbsp olive oil
- Salt and pepper to taste
- 1 tbsp balsamic glaze
- A handful of fresh basil leaves
- 1 clove garlic
Instructions:
- Roast the Red Peppers: Preheat your oven to 450°F (230°C). Place the whole red bell peppers on a baking sheet and roast for 20-25 minutes, turning occasionally, until the skin is charred and blistered. Remove from the oven and transfer to a bowl. Cover with plastic wrap and let them steam for 10 minutes to loosen the skin.
- Prepare the Baguette Slices: While the peppers are steaming, slice the baguette into 1/2-inch thick rounds. Brush each slice lightly with olive oil on both sides and arrange them on a baking sheet. Toast in the oven for 5-7 minutes, or until golden and crisp.
- Peel the Peppers: Once the peppers have cooled slightly, peel off the charred skin and remove the seeds and stems. Slice the roasted peppers into thin strips.
- Assemble the Crostini: Rub each toasted baguette slice with the cut side of a garlic clove for flavor. Spread a generous amount of goat cheese on each slice, then top with a few strips of roasted red pepper.
- Finish the Dish: Drizzle the assembled crostini with balsamic glaze and season with a pinch of salt and pepper. Garnish with fresh basil leaves for a burst of color and freshness.
Extra Tips: For an extra layer of flavor, consider adding a sprinkle of crushed red pepper flakes on top for a subtle hint of heat. If you prefer a smoother texture, you can whip the goat cheese with a little bit of milk or cream before spreading it on the baguette slices. The crostini can be assembled a few hours in advance and stored in the refrigerator, but make sure to add the basil and balsamic glaze just before serving to keep the herbs fresh and vibrant.
Italian Meatball Sliders

Italian Meatball Sliders are a delightful appetizer perfect for any gathering or casual dinner party. These sliders combine savory meatballs, rich marinara sauce, and melted cheese, all nestled in soft slider buns. They offer a burst of Italian flavors in every bite and are sure to be a hit with both kids and adults alike.
With minimal prep time and simple ingredients, these sliders are both easy to make and incredibly satisfying.
Preparing Italian Meatball Sliders involves crafting juicy homemade meatballs, simmering them in a flavorful marinara sauce, and assembling them with a cheesy touch. The result is a handheld treat that’s both hearty and comforting.
Whether you’re hosting a game day party or looking for a fun family dinner, these sliders are sure to impress. Now, let’s plunge into the recipe for this delicious dish, perfect for serving 4-6 people.
Ingredients:
- 1 pound ground beef
- 1/2 cup breadcrumbs
- 1/4 cup grated Parmesan cheese
- 1/4 cup milk
- 1 large egg
- 2 cloves garlic, minced
- 1 teaspoon dried oregano
- 1 teaspoon salt
- 1/2 teaspoon black pepper
- 2 cups marinara sauce
- 1 cup shredded mozzarella cheese
- 12 slider buns
- Fresh basil leaves (optional, for garnish)
Instructions:
- Prepare the Meatballs: In a large mixing bowl, combine the ground beef, breadcrumbs, Parmesan cheese, milk, egg, minced garlic, oregano, salt, and pepper. Mix well until all ingredients are thoroughly combined.
- Shape the Meatballs: Using your hands, shape the mixture into small meatballs, approximately 1 inch in diameter. You should have around 12 meatballs.
- Cook the Meatballs: Heat a large skillet over medium heat. Add a splash of oil to the pan and add the meatballs. Cook the meatballs for about 6-8 minutes, turning occasionally, until they’re browned on all sides and cooked through.
- Simmer in Marinara Sauce: Once the meatballs are cooked, pour the marinara sauce into the skillet. Reduce the heat to low and let the meatballs simmer in the sauce for about 10 minutes, allowing the flavors to meld together.
- Assemble the Sliders: Preheat your oven to 350°F (175°C). Place the bottom halves of the slider buns on a baking sheet. Spoon a meatball along with some sauce onto each bun. Sprinkle a generous amount of mozzarella cheese over the meatballs.
- Melt the Cheese: Place the baking sheet in the oven and bake for about 5 minutes, or until the cheese is melted and bubbly. Remove from the oven and top each slider with the top half of the bun.
- Serve and Garnish: If desired, garnish the sliders with fresh basil leaves for an added touch of flavor and presentation. Serve immediately while warm.
Extra Tips:
For added flavor, consider mixing a little chopped fresh parsley into the meatball mixture.
If you’re pressed for time, you can use store-bought meatballs and marinara sauce to speed up the preparation process.
Additionally, you can experiment with different cheese options like provolone or asiago for a unique twist.
Make sure to keep an eye on the sliders in the oven to avoid over-browning the buns. Enjoy your Italian Meatball Sliders with a side of salad or roasted vegetables for a well-rounded meal.