

Transforming simple ingredients into delightful treats is always a joy, and Italian cookies are the perfect example of this magic. There’s something so satisfying about the crisp bite of Cantuccini or the delicate beauty of Florentines. With just a few pantry staples, these recipes offer a taste of Italy’s rich culinary heritage. The aroma of almond and citrus fills the air, bringing happiness with every bite. Ready to explore these delectable treats and add a sprinkle of Italian warmth to your kitchen?
Classic Almond Cantuccini

Cantuccini, also known as biscotti, are classic Italian almond cookies that originate from the Tuscan region. These delightful cookies are twice-baked, resulting in a crisp texture that’s perfect for dunking in coffee or dessert wine. The name “cantuccini” refers to the cookie’s characteristic shape, which is achieved by slicing the dough logs into individual cookies before the second baking.
Traditionally, cantuccini are flavored with almonds, but variations include ingredients like anise seeds, chocolate chips, or dried fruits. Preparing a batch of cantuccini is a rewarding experience, as the end result is a delicious and authentic Italian treat that pairs beautifully with a warm beverage.
The process involves creating a simple dough, enriching it with whole almonds, and baking it in two stages to achieve the desired crispness. The key to perfect cantuccini lies in the quality of almonds and the precision of the baking process. This recipe serves 4-6 people, making it ideal for sharing with family or friends over a leisurely afternoon coffee.
Ingredients:
- 2 cups all-purpose flour
- 1 cup granulated sugar
- 1 teaspoon baking powder
- 1/4 teaspoon salt
- 3 large eggs
- 1 teaspoon vanilla extract
- 1 teaspoon almond extract
- 1 cup whole almonds, toasted and coarsely chopped
- Zest of 1 orange (optional)
Cooking Instructions:
- Preheat the Oven: Begin by preheating your oven to 350°F (175°C). Line a baking sheet with parchment paper to prevent the cantuccini from sticking.
- Mix Dry Ingredients: In a large mixing bowl, combine the all-purpose flour, granulated sugar, baking powder, and salt. Stir together until well combined.
- Prepare Wet Ingredients: In a separate bowl, whisk together the eggs, vanilla extract, and almond extract until evenly blended. If using orange zest for added flavor, incorporate it into the wet mixture.
- Combine Ingredients: Gradually add the wet ingredients to the dry ingredients, stirring with a wooden spoon or spatula until a sticky dough forms. Fold in the toasted almonds, making sure they’re evenly distributed throughout the dough.
- Shape the Dough: Divide the dough in half. On a lightly floured surface, shape each portion into a log approximately 12 inches long and 2 inches wide. Place the logs onto the prepared baking sheet, spacing them apart.
- First Bake: Bake the logs for 25-30 minutes or until they’re firm to the touch and lightly golden. Remove from the oven and allow them to cool on the baking sheet for about 10 minutes.
- Slice into Cookies: Once cooled, transfer the logs to a cutting board. Using a serrated knife, cut the logs diagonally into 1/2-inch thick slices.
- Second Bake: Arrange the slices cut-side down on the baking sheet. Return them to the oven and bake for an additional 10-15 minutes, flipping them halfway through, until they’re golden and crisp.
- Cool Completely: Transfer the baked cantuccini to a wire rack to cool completely before serving or storing.
Extra Tips:
Toasting the almonds before adding them to the dough enhances their flavor and adds a delicious crunch to each bite. Verify the logs are cooled slightly before slicing to prevent crumbling.
If the dough is too sticky to handle, lightly dust your hands and work surface with flour. Store the cantuccini in an airtight container to maintain their crispness, and enjoy them with coffee, tea, or a glass of Vin Santo for a truly authentic Italian experience.
Traditional Italian Pizzelle

Pizzelle are classic Italian waffle cookies with a rich history, often enjoyed during festive occasions or as a delightful treat with coffee or tea. Originating from the Abruzzo region of Italy, these thin, crisp cookies are traditionally made using a pizzelle iron, which imprints a beautiful, intricate design on each cookie.
With their delicate texture and subtle flavor, pizzelle are a timeless favorite that can be customized with different extracts or spices to suit your taste. The beauty of pizzelle lies in their simplicity and versatility. While the traditional recipe calls for anise extract to impart a distinctive licorice-like flavor, you can experiment with vanilla, almond, or even lemon extracts for a different twist.
Whether you prefer them crisp or slightly chewy, pizzelle are incredibly easy to make and offer a delightful way to share a piece of Italian culinary tradition with family and friends.
Ingredients for 4-6 servings:
- 3 large eggs
- 3/4 cup granulated sugar
- 1/2 cup unsalted butter, melted and cooled
- 1 tablespoon anise extract (or vanilla/almond extract)
- 1 3/4 cups all-purpose flour
- 2 teaspoons baking powder
- Pinch of salt
Cooking Instructions:
- Prepare the Batter: In a large mixing bowl, beat the eggs and sugar together until they’re well combined and the mixture becomes thick and pale. This should take about 2-3 minutes. Gradually add the melted butter and anise extract, continuing to beat until fully incorporated.
- Mix the Dry Ingredients: In a separate bowl, whisk together the all-purpose flour, baking powder, and salt. Slowly add the dry ingredients to the wet mixture, stirring gently until you have a smooth, homogeneous batter. Be careful not to overmix.
- Preheat the Pizzelle Iron: Plug in your pizzelle iron and allow it to preheat according to the manufacturer’s instructions. This usually takes around 5 minutes. Lightly grease the plates with a bit of cooking spray or melted butter to prevent sticking.
- Cook the Pizzelle: Once the iron is hot, drop a tablespoon of batter onto each section of the pizzelle iron. Close the lid and cook for about 30-45 seconds, or until the pizzelle are a light golden brown. Remove them carefully with a fork and place on a wire rack to cool.
- Cool and Serve: Allow the pizzelle to cool completely on the wire rack. They’ll become crisp as they cool. Once cooled, serve immediately or store in an airtight container for up to a week.
Extra Tips:
For the best texture, make sure your butter is completely cooled before adding it to the batter; hot butter can cook the eggs and alter the consistency. If you prefer your pizzelle to be a bit thicker, add a little less batter to the iron, or for thinner pizzelle, spread the batter slightly before closing the iron.
If you don’t have an anise extract, try experimenting with other flavors like lemon zest or cocoa powder for a unique twist. Ultimately, make sure to adjust the cooking time depending on your preference for crispiness and the specific heat settings of your pizzelle iron.
Lemony Ricciarelli
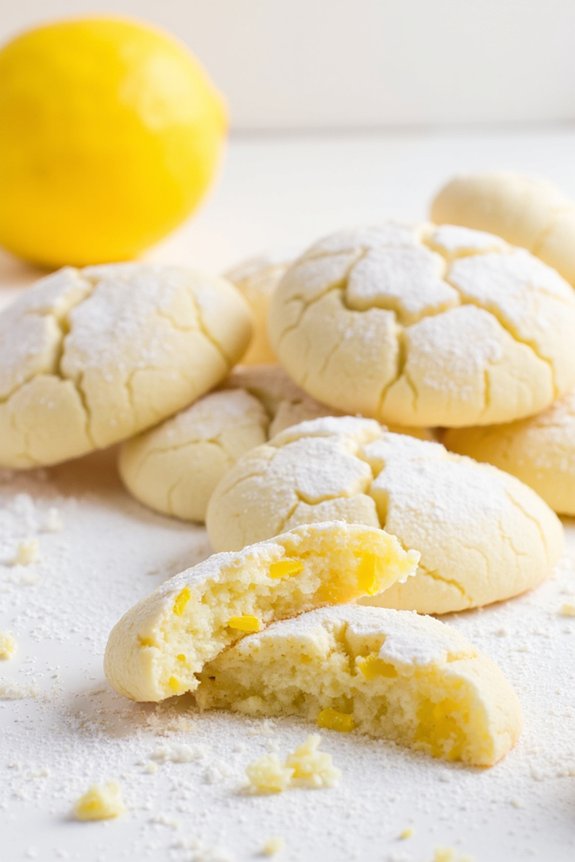
Lemony Ricciarelli are delightful Italian almond cookies originating from Siena. These cookies are known for their bright citrus flavor, chewy texture, and a delicate, crackled surface dusted with powdered sugar. Traditionally enjoyed around Christmas, they make a perfect treat for any occasion with their invigorating lemony twist.
With just a few simple ingredients, you can create this classic Italian dessert that pairs beautifully with a cup of coffee or tea. The key to perfecting Lemony Ricciarelli lies in using high-quality ingredients and following the method closely to achieve their characteristic texture.
These cookies are naturally gluten-free as they’re made using almond flour, making them a wonderful option for those with dietary restrictions. The recipe outlined below is designed for a serving size of 4-6 people, allowing you to share this delicious treat with family and friends.
Ingredients for Lemony Ricciarelli (Serves 4-6):
- 2 cups almond flour
- 1 cup granulated sugar
- Zest of 2 lemons
- 1/4 teaspoon salt
- 2 large egg whites
- 1 teaspoon almond extract
- 1 teaspoon lemon juice
- Powdered sugar for dusting
Cooking Instructions:
- Preheat the Oven: Start by preheating your oven to 325°F (160°C). Line a baking sheet with parchment paper to prevent the cookies from sticking.
- Mix Dry Ingredients: In a large bowl, combine the almond flour, granulated sugar, lemon zest, and salt. Mix well to guarantee the lemon zest is evenly distributed.
- Whip Egg Whites: In a separate bowl, whisk the egg whites until they form soft peaks. This will help give the cookies their light and airy texture.
- Combine Ingredients: Gently fold the whipped egg whites into the almond flour mixture. Add the almond extract and lemon juice, then continue folding until you achieve a smooth, sticky dough.
- Shape the Cookies: Using a tablespoon, scoop out portions of the dough and roll them into small balls. Place them onto the prepared baking sheet, spacing them about 2 inches apart to allow for spreading.
- Dust with Powdered Sugar: Generously dust the top of each cookie with powdered sugar. This will give them their signature crackled appearance once baked.
- Bake: Place the baking sheet in the preheated oven and bake for 15-18 minutes, or until the edges are lightly golden. Be careful not to overbake as they should remain soft and chewy in the center.
- Cool: Remove the cookies from the oven and allow them to cool on the baking sheet for a few minutes before transferring them to a wire rack to cool completely.
Extra Tips:
To prevent the dough from sticking to your hands while shaping the cookies, you can lightly dust your hands with powdered sugar or use a small amount of almond flour.
It’s important to monitor the baking time closely, as overbaking can lead to a loss of the desired chewy texture. Store the cookies in an airtight container at room temperature to keep them fresh for several days.
If you’re making these cookies for a special occasion, consider experimenting with different citrus zest like orange or lime for a unique twist.
Chocolate-Dipped Biscotti
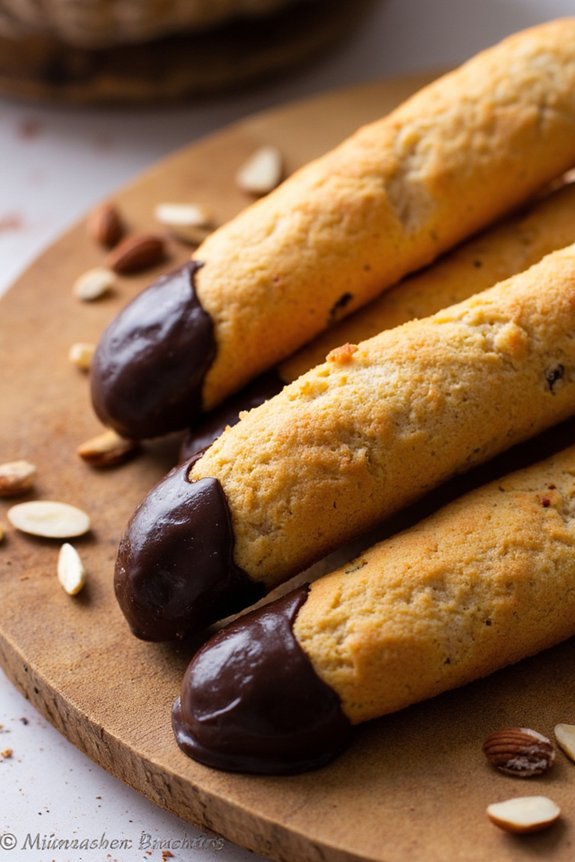
Biscotti, a traditional Italian cookie, is a delightful treat known for its crispy texture and unique shape. These cookies are twice-baked, resulting in a crunchy exterior that’s perfect for dipping in coffee, tea, or dessert wine. Adding a chocolate coating elevates the classic biscotti to a new level of indulgence, making it an irresistible treat for chocolate lovers.
This Chocolate-Dipped Biscotti recipe blends the classic flavors of almond and vanilla with a rich chocolate finish, creating a perfect balance of flavors and textures. Ideal for serving at a cozy gathering or as a sweet accompaniment to your favorite hot beverage, Chocolate-Dipped Biscotti is sure to impress any crowd.
The following recipe serves 4-6 people, making it a perfect choice for small gatherings or as a delightful homemade gift. With simple ingredients and easy-to-follow instructions, this recipe will guide you in creating a dessert that’s both sophisticated and satisfying.
Ingredients:
- 2 cups all-purpose flour
- 1 cup granulated sugar
- 1 teaspoon baking powder
- 1/2 teaspoon salt
- 3 large eggs
- 1 teaspoon vanilla extract
- 1 teaspoon almond extract
- 1 cup whole almonds, toasted and coarsely chopped
- 8 ounces dark chocolate, chopped
Instructions:
- Preheat and Prepare: Preheat your oven to 350°F (175°C). Line a large baking sheet with parchment paper or a silicone baking mat.
- Mix Dry Ingredients: In a medium-sized bowl, whisk together the flour, sugar, baking powder, and salt. This guarantees that the baking powder is evenly distributed throughout the flour.
- Combine Wet Ingredients: In a separate large bowl, beat the eggs with the vanilla and almond extracts until well combined.
- Form the Dough: Gradually add the dry ingredients to the wet mixture, stirring until a dough forms. Fold in the chopped almonds, ensuring they’re distributed evenly throughout the dough.
- Shape the Biscotti Logs: Divide the dough in half and shape each half into a log approximately 12 inches long and 2 inches wide. Place the logs on the prepared baking sheet.
- First Bake: Bake the logs in the preheated oven for about 25-30 minutes, or until they’re lightly golden brown and firm to the touch. Remove from the oven and allow them to cool for 10 minutes.
- Slice the Biscotti: Using a sharp knife, slice the logs diagonally into 1/2-inch thick slices. Arrange the slices cut-side down on the baking sheet.
- Second Bake: Return the slices to the oven and bake for an additional 10-15 minutes, flipping them halfway through, until they’re dry and crisp. Remove from the oven and let them cool completely on a wire rack.
- Melt the Chocolate: In a microwave-safe bowl, melt the dark chocolate in 30-second intervals, stirring after each interval, until smooth and fully melted.
- Dip the Biscotti: Once the biscotti are cool, dip one end of each biscotti into the melted chocolate, allowing any excess to drip off. Place the dipped biscotti on a baking sheet lined with parchment paper.
- Set the Chocolate: Allow the chocolate to set completely at room temperature or in the refrigerator before serving the biscotti.
Extra Tips:
When shaping the biscotti logs, slightly dampen your hands with water to prevent the dough from sticking. For an extra touch of flavor, consider adding a teaspoon of orange zest to the dough.
If you prefer a softer biscotti, reduce the second baking time slightly. These biscotti can be stored in an airtight container for up to two weeks, maintaining their flavor and crunch. Enjoy them as a delightful addition to your morning coffee or as an elegant dessert option for your next dinner party.
Soft Amaretti Cookies

Soft Amaretti Cookies are a delightful Italian treat that perfectly balances sweetness with a hint of almond flavor. These cookies are known for their slightly crisp exterior and soft, chewy centers, making them an irresistible dessert. Originating from Italy, soft Amaretti cookies are often enjoyed with coffee or tea, and they make a fabulous addition to any dessert spread.
The almond flavor, derived from almond flour and almond extract, is the star of this recipe, providing a rich and aromatic taste that will surely impress your friends and family. What sets these cookies apart is their simplicity and the use of just a few quality ingredients, making them an easy yet sophisticated dessert option.
The combination of egg whites, sugar, and almonds creates a wonderfully textured cookie that’s naturally gluten-free. Whether you’re a seasoned baker or a beginner, this recipe is straightforward and rewarding, resulting in cookies that are perfect for any occasion.
Ingredients (Serves 4-6 people):
- 2 cups almond flour
- 1 cup granulated sugar
- 2 large egg whites, room temperature
- 1 teaspoon almond extract
- 1/4 teaspoon salt
- Powdered sugar for dusting
Instructions:
- Preheat the Oven: Begin by preheating your oven to 325°F (160°C). Line two baking sheets with parchment paper to prevent the cookies from sticking and to guarantee even baking.
- Mix Dry Ingredients: In a medium-sized bowl, combine the almond flour, granulated sugar, and salt. Mix together until well combined, ensuring there are no lumps.
- Beat Egg Whites: In a separate bowl, use an electric mixer to beat the egg whites until they reach soft peaks. This should take about 2-3 minutes. The egg whites should be foamy and just beginning to hold their shape.
- Combine Ingredients: Gently fold the beaten egg whites and almond extract into the dry mixture. Be careful not to overmix; you want to preserve the airiness of the beaten egg whites for a light cookie texture.
- Shape the Cookies: Using a tablespoon, scoop the dough and roll it into small balls, roughly 1 inch in diameter. Place them on the prepared baking sheets, leaving about 1 inch of space between each cookie.
- Dust with Powdered Sugar: Lightly dust the tops of the cookie dough balls with powdered sugar through a fine sieve or sifter to give them a classic Amaretti look and a hint of extra sweetness.
- Bake: Place the baking sheets in the preheated oven and bake for 18-20 minutes, or until the cookies are lightly golden on the edges and slightly cracked on top. They should be soft to the touch.
- Cool: Remove the cookies from the oven and allow them to cool on the baking sheets for about 5 minutes before transferring them to a wire rack to cool completely.
Extra Tips:
When making soft Amaretti cookies, it’s important to verify that your egg whites are at room temperature, as this helps them whip up to the desired consistency more easily.
If your mixture seems too sticky when forming the cookies, lightly dust your hands with almond flour to prevent sticking. Additionally, keep an eye on the cookies towards the end of the baking time; since oven temperatures can vary, they can quickly go from perfectly baked to overdone.
Enjoy these delightful cookies fresh, or store them in an airtight container for up to a week to maintain their soft texture.
Zesty Lemon Taralli

Zesty Lemon Taralli are delightful Italian cookies that bring a burst of citrus flavor to your dessert table. Originating from Southern Italy, these ring-shaped treats are traditionally enjoyed with a glass of wine or as a sweet finish to a meal. Known for their crisp texture and rejuvenating lemony taste, Zesty Lemon Taralli are perfect for those who appreciate a blend of sweet and tangy notes in their desserts.
Whether you’re serving these at a family gathering or simply indulging in a quiet moment at home, these cookies are sure to please. The beauty of Zesty Lemon Taralli lies in their simplicity and the use of high-quality ingredients. By incorporating fresh lemon zest and juice, these cookies capture the essence of a sunny Italian day.
The cookies are first boiled and then baked to achieve their signature crunchy exterior and tender interior. Easy to make and requiring only a handful of ingredients, Zesty Lemon Taralli are a proof to the saying that sometimes less is more. Let’s plunge into this delightful recipe designed to serve 4-6 people.
Ingredients:
- 3 cups all-purpose flour
- 1/2 cup granulated sugar
- 1/2 cup olive oil
- 1/2 cup white wine
- Zest of 2 lemons
- Juice of 1 lemon
- 1 teaspoon baking powder
- 1/2 teaspoon salt
Instructions:
- Prepare the Dough: In a large mixing bowl, combine the all-purpose flour, granulated sugar, baking powder, and salt. Mix well to confirm the dry ingredients are evenly distributed. Add the olive oil, white wine, lemon zest, and lemon juice to the dry mixture. Stir until the dough begins to come together.
- Knead the Dough: Turn the dough onto a lightly floured surface and knead it for about 5 minutes until it becomes smooth and elastic. If the dough is too sticky, you can add a little more flour as needed.
- Shape the Taralli: Preheat your oven to 375°F (190°C). Divide the dough into small portions, about the size of a walnut. Roll each portion into a thin rope, approximately 6 inches long, and form it into a circle, pressing the ends together to seal.
- Boil the Taralli: Bring a large pot of water to a boil. Carefully drop the taralli into the boiling water in batches. Once they rise to the surface, remove them with a slotted spoon and place them on a baking sheet lined with parchment paper.
- Bake the Taralli: Bake the boiled taralli in the preheated oven for 25-30 minutes or until they’re golden brown and crisp. Remove them from the oven and allow them to cool on a wire rack.
Extra Tips: For a more intense lemon flavor, you can add extra lemon zest or a few drops of lemon extract to the dough. It’s important to confirm the taralli are fully boiled before baking, as this step helps them achieve their characteristic texture.
If you prefer a slightly softer cookie, reduce the baking time by a few minutes. Additionally, these cookies store well in an airtight container for up to a week, making them a great make-ahead option for entertaining.
Anise-Scented Biscotti
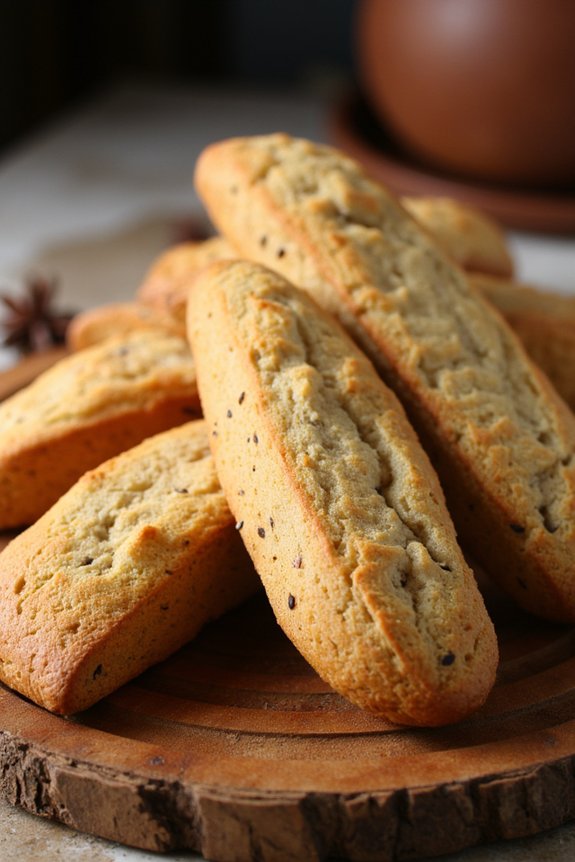
Anise-scented biscotti are a delightful Italian treat that offers a unique twist with their aromatic and slightly sweet flavor. These twice-baked cookies are perfect for dipping into coffee or enjoying on their own as a crunchy snack. The anise seeds lend a subtle licorice-like taste, which pairs beautifully with the buttery dough, making them an irresistible addition to any dessert spread.
Originating from Italy, biscotti are known for their long shelf life and are often gifted during holidays or shared during festive gatherings. Biscotti are traditionally made by first forming the dough into logs, baking them until firm, then slicing and baking the slices again until they reach the desired crispness. This recipe yields a batch suitable for 4-6 people, guaranteeing everyone can enjoy a piece or two.
Whether you’re familiar with biscotti or trying them for the first time, this anise-scented version offers a delectable way to experience a classic Italian cookie with a flavorful twist.
Ingredients for 4-6 People:
- 2 cups all-purpose flour
- 1 cup granulated sugar
- 1 teaspoon baking powder
- 1/4 teaspoon salt
- 3 large eggs
- 1 teaspoon vanilla extract
- 1 teaspoon anise extract
- 1 tablespoon anise seeds
- 1/2 cup unsalted butter, melted
- Zest of 1 lemon
Cooking Instructions:
- Preheat the Oven: Begin by preheating your oven to 350°F (175°C) and line a baking sheet with parchment paper to prevent sticking.
- Mix Dry Ingredients: In a large bowl, combine the all-purpose flour, granulated sugar, baking powder, and salt. Stir until the ingredients are well mixed.
- Blend Wet Ingredients: In a separate bowl, whisk together the eggs, vanilla extract, anise extract, and melted butter. Add the lemon zest and mix until everything is well combined.
- Combine and Add Anise Seeds: Gradually add the wet ingredients to the dry ingredients, stirring continuously until a dough forms. Fold in the anise seeds, making sure they’re evenly distributed throughout the dough.
- Shape the Dough: Divide the dough in half and shape each half into a log about 12 inches long and 2 inches wide. Place the logs on the prepared baking sheet, leaving some space between them for expansion.
- First Bake: Place the baking sheet in the preheated oven and bake for 25-30 minutes, or until the logs are golden brown and firm to the touch. Remove them from the oven and allow them to cool for about 10 minutes.
- Slice the Biscotti: Once the logs have cooled slightly, use a serrated knife to slice them diagonally into 1/2-inch thick pieces.
- Second Bake: Arrange the slices back on the baking sheet, cut side down, and return them to the oven. Bake for an additional 10-12 minutes, then flip the slices over and bake for another 10-12 minutes until they’re crisp and golden on both sides.
- Cool and Enjoy: Remove the biscotti from the oven and let them cool completely on a wire rack before serving.
Extra Tips:
When making anise-scented biscotti, verify that your dough logs are consistent in size to guarantee even baking. If you prefer a softer biscotti, you can reduce the second baking time slightly.
Additionally, feel free to experiment with complementary flavors such as adding nuts or dipping the finished biscotti in chocolate for a more decadent treat. Store biscotti in an airtight container to maintain their crisp texture for weeks.
Florentine Lace Cookies

Florentine Lace Cookies are a delightful and delicate Italian treat that boasts a unique texture and an irresistible caramel flavor. These cookies are known for their distinctive lace-like appearance, which comes from the use of finely chopped nuts and a thin batter that spreads beautifully during the baking process.
The combination of almonds, sugar, and butter results in a cookie that’s both crisp and chewy, perfect for pairing with a cup of coffee or tea.
These cookies aren’t only delicious but also visually appealing, making them an ideal dessert for festive occasions. They can be enjoyed on their own or used as a decorative element in various desserts.
Whether you’re looking to impress your guests or simply satisfy your sweet tooth, Florentine Lace Cookies offer a sophisticated twist to your typical cookie platter. Below, you’ll find a recipe that serves 4-6 people, guaranteeing everyone gets to indulge in this delightful treat.
Ingredients (Serves 4-6):
- 1/2 cup unsalted butter
- 2/3 cup granulated sugar
- 2 tablespoons corn syrup
- 2 tablespoons milk
- 1 teaspoon vanilla extract
- 2/3 cup finely chopped almonds
- 2/3 cup all-purpose flour
- A pinch of salt
- 1/4 cup dark chocolate chips (optional, for drizzling)
Cooking Instructions:
1. Preheat the Oven: Preheat your oven to 350°F (175°C). Line two baking sheets with parchment paper or silicone baking mats to prevent the cookies from sticking.
2. Prepare the Batter: In a medium saucepan, melt the butter over low heat. Once melted, stir in the sugar, corn syrup, and milk. Continue to cook over low heat until the sugar is dissolved, and the mixture is smooth.
Remove the saucepan from heat and add the vanilla extract, chopped almonds, flour, and salt. Stir until all ingredients are well combined.
3. Shape the Cookies: Drop teaspoon-sized amounts of batter onto the prepared baking sheets, leaving at least 3 inches between each cookie to allow for spreading. The batter will spread considerably, creating the lace-like appearance.
4. Bake the Cookies: Place the baking sheets in the preheated oven and bake for 6-8 minutes, or until the edges of the cookies are golden brown. Keep a close eye on them, as they can burn quickly.
5. Cool the Cookies: Once baked, remove the cookies from the oven and allow them to cool on the baking sheets for 2-3 minutes before transferring them to wire racks to cool completely.
6. (Optional) Drizzle with Chocolate****: If desired, melt the dark chocolate chips in a microwave-safe bowl or using a double boiler. Use a fork or piping bag to drizzle the melted chocolate over the cooled cookies.
Extra Tips:
When making Florentine Lace Cookies, be certain that all ingredients are finely chopped, especially the almonds, to help achieve the desired thin and lacy texture.
If the batter seems too thick, you can add an extra tablespoon of milk to loosen it up. Be mindful of the baking time, as these cookies can shift from perfectly golden to burnt in a matter of seconds.
Finally, if you prefer a sweeter cookie, consider adding a sprinkle of sea salt over the chocolate drizzle for a delightful sweet and salty contrast.
Nutty Brutti Ma Buoni
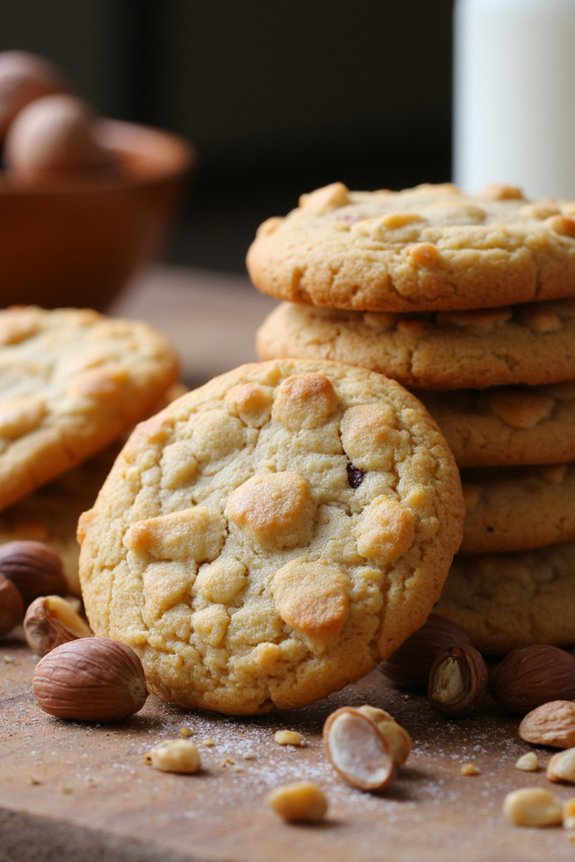
Brutti Ma Buoni, translating to “Ugly but Good,” is a classic Italian cookie that combines simplicity with an irresistible nutty flavor. Despite their unassuming appearance, these cookies pack a delightful crunch and a rich, nutty aroma that’s hard to resist. Traditionally made with hazelnuts, they offer a perfect balance of sweetness and nuttiness, making them an ideal treat for any occasion.
Whether you enjoy them with your morning coffee or as an after-dinner delight, these cookies are sure to satisfy your sweet tooth.
The origin of Brutti Ma Buoni is believed to be in the Piedmont region of Italy, where hazelnuts are abundant. The simplicity of the recipe is a demonstration of its rustic roots, requiring minimal ingredients and effort while delivering maximum flavor.
The key to achieving their signature texture lies in the careful folding of the meringue with the nuts, guaranteeing that each cookie has a light, airy interior with a crisp, golden exterior. Perfect for a serving size of 4-6 people, this recipe will quickly become a favorite in your dessert repertoire.
Ingredients for 4-6 servings:
- 2 cups whole hazelnuts
- 1 cup granulated sugar
- 3 large egg whites
- 1 teaspoon vanilla extract
- A pinch of salt
Cooking Instructions:
1. Preheat and Prepare: Start by preheating your oven to 350°F (175°C). Spread the hazelnuts on a baking sheet and toast them in the oven for about 10 minutes until they’re fragrant and lightly browned. Remove from the oven and let them cool slightly.
Once cooled, rub the hazelnuts in a clean kitchen towel to remove as much of their skins as possible, then chop them coarsely.
2. Make the Meringue: In a clean, dry bowl, beat the egg whites with a pinch of salt until soft peaks form. Gradually add the sugar, continuing to beat until the mixture becomes glossy and stiff peaks form. Add the vanilla extract and beat to combine.
3. Combine with Nuts: Gently fold in the chopped hazelnuts into the meringue mixture, being careful not to deflate the egg whites. Verify the nuts are evenly distributed throughout the mixture.
4. Shape the Cookies: Line a baking sheet with parchment paper. Using two teaspoons, drop small mounds of the nut and meringue mixture onto the prepared baking sheet, spacing them about 2 inches apart. The cookies should resemble small, uneven mounds.
5. Bake: Place the baking sheet in the preheated oven and bake for about 15-20 minutes, or until the cookies are golden brown and firm to the touch. Rotate the baking sheet halfway through the baking time to guarantee even baking.
6. Cool and Serve: Once baked, remove the cookies from the oven and allow them to cool completely on a wire rack. The cookies will become crisp as they cool. Serve them at room temperature.
Extra Tips: When making Brutti Ma Buoni, it’s vital to confirm that the egg whites are beaten to the right consistency. The meringue should be glossy and hold stiff peaks to give the cookies their airy texture.
Additionally, using fresh, high-quality hazelnuts will enhance the flavor, as their natural oils contribute greatly to the taste of the cookies. If you find hazelnuts challenging to peel, you can use a small food processor to chop them after toasting.
Finally, store any leftovers in an airtight container to maintain their crispness.
S-shaped Savoiardi
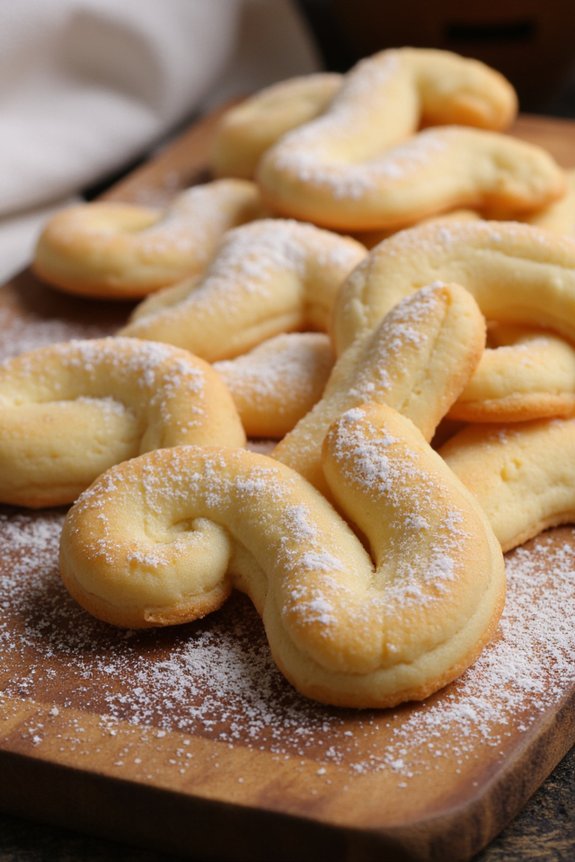
S-shaped Savoiardi, also known as ladyfingers, are a classic Italian cookie that are light, airy, and perfect for soaking up flavors in a variety of desserts. These elegant cookies are traditionally used in tiramisu, but they also make a delicious treat on their own or a perfect accompaniment to your favorite coffee or tea.
The distinct S-shape adds a touch of whimsy to this delicate biscuit, making it not only a treat for the taste buds but also a visual delight on any dessert plate.
Making S-shaped Savoiardi at home is a rewarding experience that allows you to control the flavor and texture of your cookies. This recipe will guide you through the process of creating these delightful treats from scratch. With a few simple ingredients and some careful folding, you’ll have a batch of homemade Savoiardi ready to impress your family and friends, serving 4-6 people.
Ingredients:
- 4 large eggs, separated
- 100 grams (1/2 cup) granulated sugar
- 1 teaspoon vanilla extract
- 100 grams (3/4 cup) all-purpose flour
- 1/4 teaspoon baking powder
- A pinch of salt
- Powdered sugar, for dusting
Cooking Instructions:
- Preheat and Prepare: Preheat your oven to 350°F (175°C). Line two baking sheets with parchment paper to prevent the cookies from sticking and to guarantee even cooking.
- Prepare the Egg Yolks: In a large mixing bowl, beat the egg yolks and 50 grams (1/4 cup) of the granulated sugar together using an electric mixer on medium-high speed until the mixture is thick, pale, and forms ribbons when the beaters are lifted. This should take about 3-5 minutes. Add the vanilla extract and mix until combined.
- Whisk the Egg Whites: In a separate, clean bowl, whisk the egg whites with a pinch of salt using an electric mixer until soft peaks form. Gradually add the remaining 50 grams (1/4 cup) of granulated sugar and continue to beat until stiff, glossy peaks form.
- Combine the Mixtures: Gently fold the egg yolk mixture into the egg whites, taking care not to deflate the egg whites. This folding technique helps maintain the airy texture of the batter.
- Incorporate Dry Ingredients: Sift the flour and baking powder together, then gradually fold them into the egg mixture. Mix gently until just combined, making sure there are no streaks of flour visible.
- Pipe the Cookies: Transfer the batter into a piping bag fitted with a large round tip. Pipe the batter onto the prepared baking sheets in 3-inch long “S” shapes, leaving some space between each cookie to allow for expansion.
- Dust and Bake: Lightly dust the cookies with powdered sugar before placing them in the oven. Bake for 10-12 minutes or until the cookies are lightly golden and spring back when touched.
- Cool: Remove the cookies from the oven and let them cool on the baking sheets for a few minutes before transferring them to a wire rack to cool completely.
Extra Tips:
For the best results, make sure your egg whites are at room temperature before whisking, as this will help them whip up to a greater volume.
When folding the mixtures together, use a gentle hand to avoid deflating the batter, which is vital for the light texture of these cookies. If you don’t have a piping bag, you can use a plastic sandwich bag with the corner snipped off as a makeshift piping tool.
Finally, if you prefer a crispier cookie, you can leave the baked Savoiardi in the oven with the door slightly ajar for a few additional minutes.
Enjoy your homemade S-shaped Savoiardi with a cup of espresso or as a base in a classic tiramisu!
Honey-Glazed Pignoli Cookies

Honey-Glazed Pignoli Cookies are a delightful Italian treat that combines the nutty richness of pine nuts with the sweet, aromatic touch of honey. These cookies are a classic in Italian cuisine, especially during festive occasions and holidays. The delicate crunch of the pignoli (pine nuts) paired with the smooth, sweet honey glaze creates a harmonious blend of textures and flavors that make these cookies irresistible.
Whether you’re hosting a dinner party or simply indulging in a sweet afternoon snack, these cookies are bound to impress. Originating from Sicily, pignoli cookies are a staple in Italian bakeries. Traditionally made with almond paste, these cookies are naturally gluten-free, making them a great dessert option for those with dietary restrictions.
The honey glaze not only adds a beautiful sheen to the cookies but also elevates their flavor profile, making them a perfect end to any meal. With a few simple ingredients and easy steps, you can bring a taste of Italy to your kitchen with this delicious recipe.
Ingredients (serves 4-6):
- 1 cup almond paste
- 1/2 cup granulated sugar
- 1/4 cup confectioners’ sugar
- 2 large egg whites
- 1 teaspoon vanilla extract
- 1/8 teaspoon salt
- 1 1/2 cups pine nuts
- 1/4 cup honey
Cooking Instructions:
- Preheat the Oven: Begin by preheating your oven to 350°F (175°C). Line a baking sheet with parchment paper to prevent the cookies from sticking.
- Prepare the Dough: In a large mixing bowl, combine the almond paste, granulated sugar, and confectioners’ sugar. Use your hands or a mixer to break down the almond paste into small pieces and blend until the mixture is smooth.
- Incorporate Wet Ingredients: Add the egg whites, vanilla extract, and salt to the almond mixture. Mix well until you have a smooth, sticky dough. The dough should be thick enough to hold its shape.
- Shape the Cookies: Using a tablespoon, scoop the dough and form balls about 1 inch in diameter. Roll each ball in the pine nuts, pressing gently so the nuts adhere to the dough.
- Bake: Place the pignoli-covered dough balls on the prepared baking sheet, spacing them about 2 inches apart. Bake in the preheated oven for 15-18 minutes, or until the cookies are lightly golden.
- Apply the Honey Glaze: While the cookies are still warm, drizzle the honey over them, guaranteeing a thin, even coating. The heat from the cookies will help the honey to spread and soak in, enhancing the flavor.
- Cool and Serve: Allow the cookies to cool on the baking sheet for about 10 minutes before transferring them to a wire rack to cool completely. Serve once they’re at room temperature.
Extra Tips:
For the best results, make sure that your almond paste is fresh and soft; this makes it easier to mix and results in a smoother dough. If you find the dough too sticky to handle, slightly dampen your hands with water before rolling the cookies.
Additionally, toasting the pine nuts lightly before using them can add an extra depth of flavor. When applying the honey glaze, use a light hand to avoid overpowering the natural sweetness of the cookies. These cookies can be stored in an airtight container at room temperature for up to a week, maintaining their delightful taste and texture.