

As the holiday season approaches, I find myself drawn to the comforting embrace of Italian cuisine. The rich flavors and heartwarming dishes make gatherings feel extra special. Picture a cozy kitchen filled with the aroma of classic lasagna or the golden hue of saffron risotto. These festive recipes are simple yet elegant. They’re perfect for creating cherished memories.
Classic Italian Lasagna
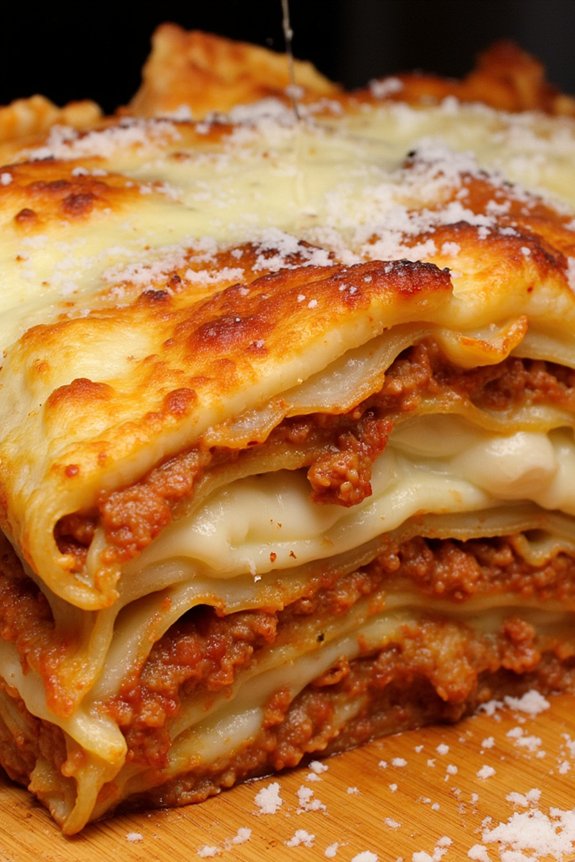
Lasagna is one of the most iconic Italian dishes, renowned for its hearty layers of pasta, rich meat sauce, creamy béchamel, and gooey cheese. Originating from the region of Emilia-Romagna, this traditional dish has been a family favorite in Italy for generations. The key to a great lasagna lies in the quality of its ingredients and the harmonious balance of flavors.
Whether served at a festive gathering or a cozy family dinner, lasagna brings comfort and joy to the table.
The recipe for Classic Italian Lasagna involves creating a robust meat sauce, a velvety béchamel, and layering them with sheets of pasta and cheese. This version serves 4-6 people and is perfect for those looking to bring a taste of Italy into their homes. The preparation requires some attention to detail but the end result is a delectable dish that will impress any crowd.
Ingredients:
- 12 lasagna sheets
- 1 pound ground beef
- 1 pound ground pork
- 1 onion, finely chopped
- 2 cloves garlic, minced
- 1 can (28 oz) crushed tomatoes
- 2 tablespoons tomato paste
- 1 teaspoon dried oregano
- 1 teaspoon dried basil
- Salt and pepper to taste
- 3 cups whole milk
- 4 tablespoons butter
- 1/4 cup all-purpose flour
- 1/4 teaspoon nutmeg
- 2 cups ricotta cheese
- 1 cup grated Parmesan cheese
- 2 cups shredded mozzarella cheese
- Olive oil
Cooking Instructions:
- Prepare the Meat Sauce: In a large skillet over medium heat, add a splash of olive oil. Sauté the chopped onion and minced garlic until translucent. Add the ground beef and pork, cooking until browned. Drain excess fat if necessary. Stir in the crushed tomatoes, tomato paste, oregano, basil, salt, and pepper. Let the sauce simmer for about 30 minutes, stirring occasionally, until thickened.
- Make the Béchamel Sauce: In a medium saucepan, melt the butter over medium heat. Sprinkle in the flour and whisk continuously for about 1 minute to form a roux. Gradually pour in the milk, whisking constantly to prevent lumps. Continue cooking until the sauce thickens and coats the back of a spoon, about 5-7 minutes. Stir in nutmeg and a pinch of salt.
- Pre-cook the Lasagna Sheets: Bring a large pot of salted water to a boil. Cook the lasagna sheets according to package instructions until al dente. Drain and lay them flat on a kitchen towel to prevent sticking.
- Assemble the Lasagna: Preheat your oven to 375°F (190°C). Grease a 9×13 inch baking dish. Spread a thin layer of meat sauce on the bottom of the dish. Layer with lasagna sheets, followed by more meat sauce, a layer of béchamel, ricotta cheese, and a sprinkle of Parmesan and mozzarella. Repeat the layers, finishing with a generous topping of mozzarella and Parmesan.
- Bake the Lasagna: Cover the dish with foil and bake for 25 minutes. Remove the foil and bake for an additional 15 minutes, or until the cheese is bubbly and golden brown. Let the lasagna rest for 10-15 minutes before slicing and serving.
Extra Tips: When making lasagna, it’s important to balance the moisture in the meat sauce and béchamel to avoid a soggy final dish. If your sauce seems too watery, let it reduce longer.
For added flavor, consider using fresh herbs like basil or parsley instead of dried. Allowing the lasagna to rest before serving helps the layers set, making it easier to slice and enhancing the overall flavor. If you have leftovers, lasagna often tastes even better the next day as the flavors continue to meld.
Festive Risotto With Saffron

Indulge in the rich and luxurious flavors of Festive Risotto With Saffron, a classic Italian dish perfect for holiday gatherings. This creamy risotto, flavored with the aromatic and golden-hued saffron, offers a delightful blend of textures and tastes, making it a show-stopping centerpiece on any festive table.
The saffron not only imparts a beautiful color but also enhances the dish with its distinct aroma, creating an experience that’s both comforting and sophisticated. Saffron, known as the world’s most expensive spice, is worth every pinch in this recipe, as it transforms the simple risotto into a decadent treat.
This dish isn’t just about the saffron though; it brings together a medley of flavors from the Parmesan cheese, white wine, and a hint of onion and garlic, all harmoniously melding together to create a creamy, flavorful risotto that will have your guests coming back for more. Prepare to commence on a culinary journey that celebrates the essence of Italian festivities.
Ingredients for 4-6 servings:
- 2 cups Arborio rice
- 1/2 teaspoon saffron threads
- 5 cups chicken or vegetable broth
- 1 cup dry white wine
- 1 medium onion, finely chopped
- 2 cloves garlic, minced
- 4 tablespoons unsalted butter
- 1 cup freshly grated Parmesan cheese
- Salt and black pepper to taste
- Fresh parsley for garnish
Cooking Instructions:
- Prepare the Saffron: Start by soaking the saffron threads in 1/4 cup of warm broth. Let it sit for about 10 minutes to allow the saffron to release its color and aroma.
- Heat the Broth: In a medium saucepan, heat the remaining broth over low heat. Keep it warm throughout the cooking process to guarantee the risotto cooks evenly when added.
- Cook the Aromatics: In a large skillet or heavy-bottomed pot, melt 2 tablespoons of butter over medium heat. Add the chopped onion and garlic, and sauté until the onion becomes translucent and fragrant, about 5 minutes.
- Toast the Rice: Add the Arborio rice to the skillet with the onion and garlic. Stir continuously for about 2-3 minutes, allowing the rice to become slightly translucent around the edges.
- Deglaze with Wine: Pour in the white wine, stirring constantly until it’s mostly absorbed by the rice. This step helps to deglaze the pan and infuse the rice with flavor.
- Add the Saffron and Broth: Stir in the saffron-infused broth, ensuring the saffron threads are evenly distributed. Begin adding the warm broth, one ladle at a time, stirring frequently. Allow each addition of broth to be absorbed before adding the next. Continue this process until the rice is creamy and tender, about 18-20 minutes.
- Finish with Butter and Cheese: Once the rice is cooked to your desired consistency, remove the skillet from the heat. Stir in the remaining 2 tablespoons of butter and the grated Parmesan cheese. Season with salt and black pepper to taste.
- Garnish and Serve: Allow the risotto to rest for a minute before serving. Garnish with freshly chopped parsley for a vibrant touch.
Extra Tips:
For the best results, use high-quality saffron and fresh Parmesan cheese to enhance the flavors of the risotto. Be patient with the process, as constant stirring is essential for achieving the creamy texture that risotto is known for.
If the risotto becomes too thick, simply add a bit more broth to reach your desired consistency. For an added layer of flavor, you can also incorporate some finely grated lemon zest into the risotto just before serving. Enjoy this dish as a standalone masterpiece or as an accompaniment to a festive main course.
Caprese Christmas Salad
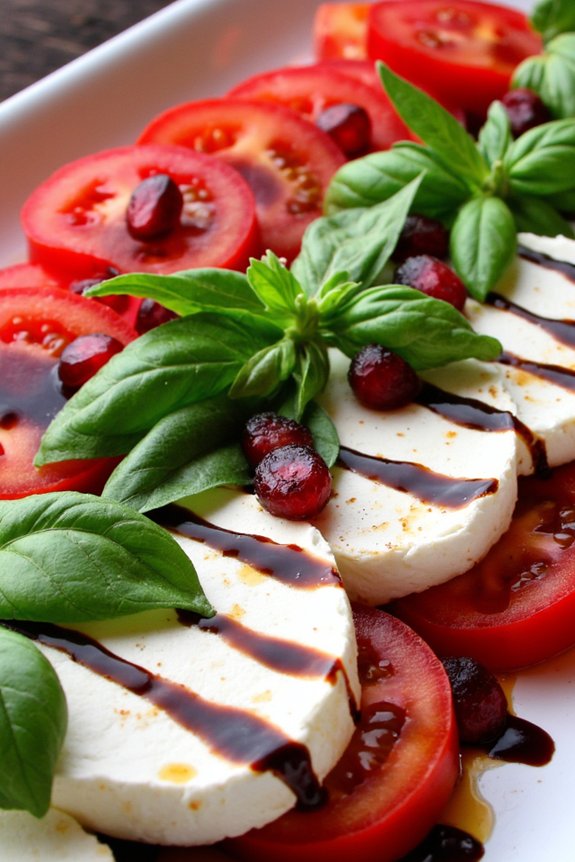
Caprese Christmas Salad is a festive twist on the classic Italian Caprese salad, perfect for adding a burst of color and flavor to your holiday table. This simple yet elegant dish combines the fresh flavors of ripe tomatoes, creamy mozzarella, and fragrant basil, with a touch of holiday spirit through the addition of pomegranate arils.
The salad isn’t only visually stunning but also incredibly easy to prepare, making it an ideal choice for a stress-free holiday appetizer or side dish. The vibrant red and green colors of this salad mimic the traditional holiday color palette, making it an eye-catching centerpiece.
The juicy tomatoes and creamy mozzarella are beautifully complemented by the tangy sweetness of the balsamic glaze and the invigorating crunch of pomegranate seeds. Whether you’re hosting a holiday gathering or looking for a new dish to add to your repertoire, this Caprese Christmas Salad is sure to delight your guests and bring a taste of Italy to your holiday celebrations.
Ingredients for 4-6 servings:
- 4 large ripe tomatoes, sliced
- 1 pound fresh mozzarella cheese, sliced
- 1 cup fresh basil leaves
- 1/2 cup pomegranate arils
- 2 tablespoons extra virgin olive oil
- 2 tablespoons balsamic glaze
- Salt and freshly ground black pepper, to taste
Cooking Instructions:
- Prepare the Ingredients: Begin by washing the tomatoes and basil leaves thoroughly. Slice the tomatoes and mozzarella cheese into even slices, approximately 1/4 inch thick. Make sure to remove any excess moisture from the mozzarella with a paper towel.
- Assemble the Salad: On a large serving platter, start arranging the sliced tomatoes and mozzarella cheese in an alternating pattern, slightly overlapping each slice to create a visually appealing layout. Tuck fresh basil leaves in between the layers of tomato and mozzarella.
- Add Pomegranate Arils: Sprinkle the pomegranate arils evenly over the arranged tomatoes and mozzarella slices. The pomegranate will add a delightful pop of color and a sweet-tart flavor to the salad.
- Season the Salad: Drizzle the extra virgin olive oil over the top of the salad, ensuring an even distribution. Follow this with the balsamic glaze, creating a decorative pattern if desired. Season with salt and freshly ground black pepper to taste.
- Serve: Allow the salad to sit for a few minutes to let the flavors meld together. Serve immediately as an invigorating appetizer or a side dish to your holiday meal.
Extra Tips:
For the best flavor, choose tomatoes that are ripe and juicy, as they’ll provide the sweetest taste. If possible, use buffalo mozzarella for its authentic creamy texture.
If you prefer a more intense flavor, you can substitute the balsamic glaze with a balsamic reduction. To make the dish more festive, consider using a star-shaped cookie cutter to shape the mozzarella slices.
Remember to adjust the seasoning according to taste and enjoy this delightful salad with a glass of your favorite wine to complete the Italian holiday experience.
Italian Sausage and Bell Pepper Skewers
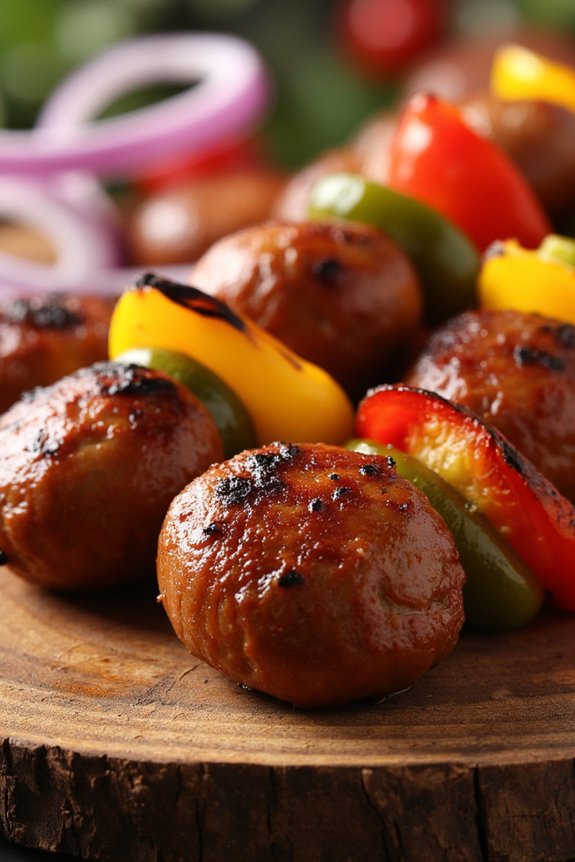
Transport yourself to the vibrant streets of Italy with these delectable Italian Sausage and Bell Pepper Skewers. Perfect for any occasion, these skewers capture the essence of Italian flavors with the aromatic combination of juicy Italian sausage and the vibrant, sweet taste of bell peppers. Grilled to perfection, these skewers are an excellent choice for a holiday feast, bursting with color and flavor that will surely impress your guests.
This dish isn’t only visually appealing but also easy to prepare, making it an ideal choice for a festive gathering. The savory sausages are complemented by the natural sweetness of the bell peppers, creating a delightful balance of flavors. Serve these skewers as an appetizer or the main course, and pair them with a fresh salad or crusty bread for a truly Italian dining experience.
Ingredients for 4-6 servings:
- 1.5 lbs Italian sausage, cut into 1-inch pieces
- 2 red bell peppers, cut into 1.5-inch pieces
- 2 yellow bell peppers, cut into 1.5-inch pieces
- 1 green bell pepper, cut into 1.5-inch pieces
- 1 large red onion, cut into wedges
- 2 tablespoons olive oil
- 1 tablespoon Italian seasoning
- Salt and pepper, to taste
- Wooden or metal skewers
Cooking Instructions:
- Prep the Ingredients: Begin by soaking wooden skewers in water for at least 30 minutes to prevent burning during grilling. If using metal skewers, this step can be skipped. Preheat your grill to medium-high heat.
- Cut the Ingredients: Cut the Italian sausages into 1-inch pieces. Chop the bell peppers and red onion into 1.5-inch pieces. This size ensures even cooking and easy skewering.
- Season the Ingredients: In a large bowl, combine the sausage, bell peppers, and onion. Drizzle with olive oil and sprinkle with Italian seasoning, salt, and pepper. Toss everything together until well coated.
- Assemble the Skewers: Thread the sausage, bell peppers, and onion alternately onto the skewers, leaving a small gap between each piece to allow for even cooking.
- Grill the Skewers: Place the skewers on the preheated grill. Cook for 12-15 minutes, turning occasionally, until the sausage is cooked through and the vegetables are charred and tender.
- Serve: Remove the skewers from the grill and let them rest for a few minutes before serving. Enjoy them hot as a delightful appetizer or a vibrant main course.
Extra Tips:
For an added depth of flavor, consider marinating the sausage and vegetables in the olive oil and seasoning mixture for a few hours before assembling the skewers. This allows the flavors to meld beautifully.
If you prefer a spicier kick, opt for hot Italian sausage instead of mild. Additionally, if the weather isn’t conducive to grilling, these skewers can also be cooked in the oven at 400°F for about 20-25 minutes, turning halfway through for even cooking.
Always confirm the sausage reaches an internal temperature of 160°F for safe consumption. Enjoy your flavorful Italian feast!
Baked Ziti With Ricotta

Baked Ziti with Ricotta is a comforting Italian-American dish that’s perfect for family gatherings or a cozy dinner at home. This hearty recipe combines tender pasta with a rich tomato sauce, gooey melted cheese, and creamy ricotta, offering a delightful blend of flavors and textures. Ideal for serving 4-6 people, this dish is a crowd-pleaser that can be prepared ahead of time and baked just before serving, making it a convenient option for busy weeknights or festive occasions.
The key to a delicious baked ziti is using quality ingredients and allowing the flavors to meld together in the oven. The ricotta adds a creamy richness, while the mozzarella guarantees a bubbly, golden top. A generous amount of parmesan cheese rounds out the dish, adding a salty, savory finish. Whether you’re a seasoned cook or a beginner, this recipe is straightforward and sure to impress at any dinner table.
Ingredients (Serves 4-6):
- 1 pound ziti pasta
- 2 tablespoons olive oil
- 1 medium onion, diced
- 3 cloves garlic, minced
- 1 pound ground beef or Italian sausage
- 1 teaspoon dried oregano
- 1 teaspoon dried basil
- Salt and pepper to taste
- 1 (28-ounce) can crushed tomatoes
- 1 cup ricotta cheese
- 2 cups shredded mozzarella cheese
- 1/2 cup grated parmesan cheese
- Fresh basil leaves for garnish (optional)
Cooking Instructions:
- Preheat the Oven: Set your oven to 375°F (190°C) to prepare for baking the ziti.
- Cook the Pasta: Bring a large pot of salted water to a boil. Add the ziti and cook until al dente, about 8-10 minutes. Drain and set aside.
- Prepare the Sauce: In a large skillet, heat the olive oil over medium heat. Add the diced onion and cook until translucent, about 5 minutes. Add the minced garlic and cook for another minute.
- Cook the Meat: Add the ground beef or sausage to the skillet and cook until browned, breaking it apart with a spoon. Drain any excess fat.
- Season the Sauce: Stir in the oregano, basil, salt, and pepper. Add the crushed tomatoes and simmer for 10 minutes, allowing the flavors to meld.
- Assemble the Dish: In a large mixing bowl, combine the cooked ziti with the sauce. Add the ricotta cheese and mix well to coat the pasta.
- Layer the Ingredients: In a large baking dish, spread half of the ziti mixture. Sprinkle with half of the mozzarella and parmesan cheese. Add the remaining ziti mixture and top with the remaining mozzarella and parmesan.
- Bake: Cover the dish with foil and bake in the preheated oven for 20 minutes. Remove the foil and bake for an additional 10 minutes, or until the cheese is bubbly and golden brown.
- Garnish and Serve: Remove from the oven and let it cool for a few minutes. Garnish with fresh basil leaves before serving if desired.
Extra Tips:
For added depth of flavor, consider adding a pinch of red pepper flakes to the sauce for a slight kick. If you prefer a vegetarian version, omit the meat and add a variety of sautéed vegetables like bell peppers, zucchini, or mushrooms.
This dish can be assembled in advance and stored in the refrigerator for up to 24 hours before baking. To enhance the cheese flavor, you can also use a blend of mozzarella and provolone. Enjoy your homemade Baked Ziti with Ricotta, a delicious and satisfying meal that’s sure to be a hit!
Prosciutto-Wrapped Mozzarella Sticks

Prosciutto-Wrapped Mozzarella Sticks are an indulgent and savory treat that combines the creamy goodness of mozzarella with the salty, rich flavor of prosciutto. This dish is perfect for holiday parties or as a delightful appetizer to impress your guests. The prosciutto crisps up beautifully in the oven, providing a delightful contrast to the gooey, melted mozzarella inside.
It’s not only delicious but also incredibly easy to prepare, making it an ideal choice for both novice and experienced cooks. The key to this recipe is using high-quality ingredients, such as fresh mozzarella and thinly sliced prosciutto, to guarantee the best flavor and texture. The prosciutto acts as a natural wrapper, keeping the cheese intact as it melts. The result is an irresistible combination that’s sure to be a hit at any gathering.
Serve these Prosciutto-Wrapped Mozzarella Sticks with a side of marinara sauce for dipping, and you’ll have a dish that’s both sophisticated and comforting.
Ingredients (Serves 4-6):
- 12 mozzarella sticks
- 12 slices of thinly sliced prosciutto
- 1 cup all-purpose flour
- 2 large eggs
- 2 tablespoons milk
- 1 cup breadcrumbs
- 1 teaspoon dried oregano
- 1 teaspoon garlic powder
- Olive oil spray
- Marinara sauce (optional, for serving)
Cooking Instructions:
- Preheat the oven: Start by preheating your oven to 400°F (200°C). This guarantees that it’s hot enough to crisp the prosciutto while melting the mozzarella inside.
- Prepare the mozzarella sticks: Pat dry the mozzarella sticks with a paper towel to remove any excess moisture. This will help the prosciutto adhere better and prevent the cheese from leaking out during cooking.
- Wrap with prosciutto: Take a slice of prosciutto and wrap it around each mozzarella stick, making sure the ends are tucked in securely. The prosciutto should cover the entire length of the cheese to keep it contained as it melts.
- Set up a dredging station: In three separate shallow dishes, place the flour in the first, beaten eggs mixed with milk in the second, and breadcrumbs mixed with oregano and garlic powder in the third.
- Coat the mozzarella sticks: Roll each prosciutto-wrapped mozzarella stick in the flour, shaking off any excess, then dip it into the egg mixture, and finally coat it thoroughly with breadcrumbs. Guarantee each stick is evenly coated for a crispy exterior.
- Bake the mozzarella sticks: Place the coated sticks on a baking sheet lined with parchment paper. Lightly spray them with olive oil to enhance crispiness. Bake in the preheated oven for about 15-20 minutes, or until the prosciutto is crispy and the cheese is melted and bubbly.
- Serve immediately: Once baked, remove the mozzarella sticks from the oven and let them cool slightly. Serve them hot with a side of marinara sauce for dipping, if desired.
Extra Tips:
To guarantee your Prosciutto-Wrapped Mozzarella Sticks turn out perfectly, make sure the cheese is cold before wrapping and baking, which helps it hold its shape longer in the oven.
If you prefer a little extra flavor, consider adding a sprinkle of Parmesan cheese to the breadcrumb mixture. Additionally, if you find that the cheese is oozing out too much during baking, try freezing the wrapped mozzarella sticks for 15 minutes before baking. This firming step can help maintain their shape as they cook.
Traditional Tiramisu

Tiramisu is a classic Italian dessert that has become a beloved treat around the world. Its creamy layers of mascarpone cheese, coffee-soaked ladyfingers, and a dusting of cocoa create a rich and indulgent experience that’s both sophisticated and comforting. Traditionally, this dessert is enjoyed after a hearty meal, providing a perfect balance of flavors and textures that delight the palate.
The origins of tiramisu can be traced back to the Veneto region of Italy, and it has since evolved into countless variations while maintaining its essential elements. This recipe stays true to the classic preparation, guaranteeing that each bite delivers the authentic taste of Italy. Perfect for gatherings and special occasions, this dessert serves 4-6 people, making it an ideal choice for sharing with loved ones.
Ingredients for 4-6 Servings:
- 6 large egg yolks
- 3/4 cup granulated sugar
- 2/3 cup milk
- 1 1/4 cups heavy cream
- 1/2 teaspoon pure vanilla extract
- 8 ounces mascarpone cheese
- 1 cup strong brewed coffee, cooled
- 1/4 cup coffee liqueur (optional)
- 24-30 ladyfinger cookies (savoiardi)
- 2 tablespoons unsweetened cocoa powder
- Dark chocolate shavings (optional, for garnish)
Cooking Instructions:
- Prepare the Custard:
- In a medium saucepan, whisk together the egg yolks and sugar until smooth. Add the milk and cook over medium heat, stirring constantly, until the mixture boils. Allow it to boil gently for one minute, then remove from heat and let cool slightly. Once cooled, cover and refrigerate for about an hour.
- Whip the Cream:
- In a large mixing bowl, whip the heavy cream with vanilla extract until stiff peaks form. Gently fold the mascarpone cheese into the whipped cream until well combined and smooth.
- Assemble the Tiramisu:
- In a shallow dish, combine the cooled coffee and coffee liqueur (if using). Quickly dip each ladyfinger into the coffee mixture, being careful not to soak them completely. Arrange a layer of soaked ladyfingers in the bottom of a 9×9 inch dish or a similarly sized serving dish.
- Layer the Ingredients:
- Spread half of the mascarpone mixture over the layer of ladyfingers. Repeat the process with another layer of coffee-soaked ladyfingers and top with the remaining mascarpone mixture.
- Add the Finishing Touches:
- Dust the top of the tiramisu with unsweetened cocoa powder. Optionally, garnish with dark chocolate shavings for added flavor and texture.
- Chill and Serve:
- Cover the dish and refrigerate for at least 4 hours, or overnight for best results, allowing the flavors to meld together. Serve chilled and enjoy the rich, creamy layers of traditional tiramisu.
Extra Tips:
When making tiramisu, the quality of the ingredients is key to achieving the best flavor. Use fresh mascarpone cheese and high-quality cocoa powder for a truly authentic taste.
If you prefer a non-alcoholic version, simply omit the coffee liqueur. Make sure to chill the dessert thoroughly before serving to ascertain the flavors are well developed and the texture is perfect.
Tiramisu can be prepared a day in advance, making it a convenient option for entertaining.
Pesto-Stuffed Mushrooms
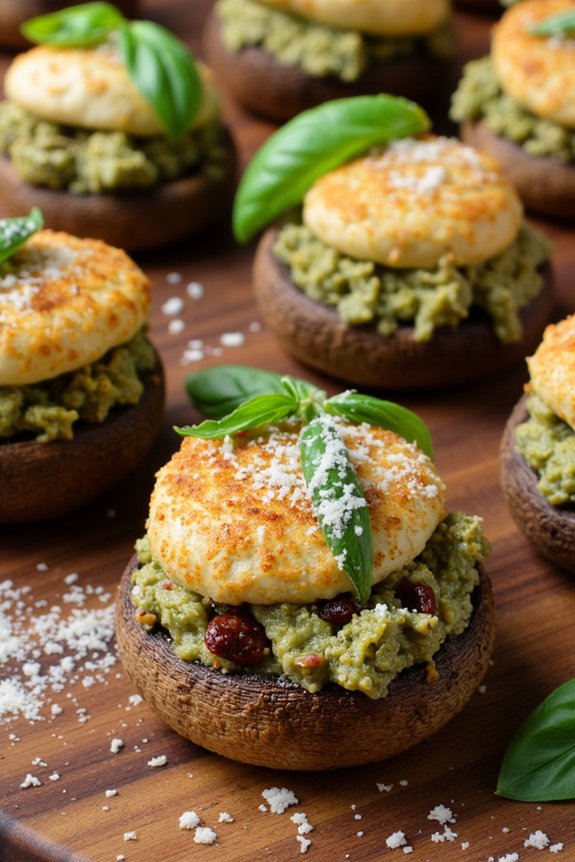
Pesto-stuffed mushrooms are a delightful appetizer that combines the earthy flavors of mushrooms with the rich and aromatic taste of pesto. Perfect for holiday gatherings or any festive occasion, these bite-sized treats are sure to impress your guests with their vibrant flavors and elegant presentation.
The pesto, made from fresh basil, garlic, pine nuts, and Parmesan cheese, is a classic Italian sauce that complements the savory taste of the mushrooms beautifully. The mushrooms are baked to perfection, creating a warm and inviting dish that’s both comforting and sophisticated.
Whether you’re hosting a dinner party or simply enjoying a quiet evening at home, pesto-stuffed mushrooms are a versatile dish that can be easily prepared. This recipe serves 4-6 people, making it ideal for small gatherings.
The combination of the soft, juicy texture of the mushrooms and the creamy, flavorful pesto filling creates a perfect harmony of taste and texture. With just a few simple ingredients and easy-to-follow instructions, you can create a dish that’s both delicious and visually appealing.
Ingredients (Serves 4-6):
- 20 large button mushrooms
- 1 cup fresh basil leaves
- 1/4 cup pine nuts
- 2 cloves garlic
- 1/2 cup grated Parmesan cheese
- 1/4 cup extra virgin olive oil
- Salt and pepper to taste
- 1/2 cup breadcrumbs
- 1 tablespoon lemon juice
- Optional: 1/4 cup sun-dried tomatoes, finely chopped
Cooking Instructions:
- Preheat the Oven: Preheat your oven to 375°F (190°C) to get it ready for baking the mushrooms.
- Prepare the Mushrooms: Gently clean the mushrooms with a damp cloth to remove any dirt. Carefully remove the stems from the mushrooms and set them aside for another use. Arrange the mushroom caps on a baking sheet, cavity-side up.
- Make the Pesto: In a food processor, combine the basil leaves, pine nuts, garlic, Parmesan cheese, and a pinch of salt and pepper. Pulse until the mixture is finely chopped. With the processor running, slowly add the olive oil until the pesto is smooth and well combined.
- Mix the Filling: In a bowl, combine the prepared pesto with breadcrumbs and lemon juice. If using sun-dried tomatoes, stir them into the pesto mixture as well.
- Stuff the Mushrooms: Using a small spoon, carefully fill each mushroom cap with the pesto mixture, pressing gently to guarantee the filling is compact and doesn’t fall out.
- Bake the Mushrooms: Place the baking sheet with the stuffed mushrooms in the preheated oven. Bake for 15-20 minutes, or until the mushrooms are tender and the tops are golden brown.
- Serve: Remove from the oven and let them cool slightly before serving. Arrange them on a platter and garnish with additional Parmesan cheese or fresh basil if desired.
Extra Tips:
To enhance the flavor of your pesto-stuffed mushrooms, consider toasting the pine nuts lightly before adding them to the pesto. This will bring out their natural oils and add depth to the dish.
Additionally, if you prefer a more robust flavor, you can substitute pecorino cheese for Parmesan. Be cautious while adding salt to the pesto, as both Parmesan and pecorino are quite salty.
Finally, these mushrooms can be prepared a day in advance and stored in the refrigerator. Simply bake them just before serving to guarantee they’re warm and fresh.
Roasted Garlic Parmesan Brussels Sprouts

For a deliciously savory and aromatic side dish that perfectly complements any Italian holiday meal, try Roasted Garlic Parmesan Brussels Sprouts. This dish transforms the often-underrated Brussels sprouts into a crispy, flavorful delight with the combination of roasted garlic and rich Parmesan cheese. The roasting process caramelizes the Brussels sprouts, enhancing their natural sweetness and creating a delightful contrast with the savory garlic and cheese.
This recipe is simple to prepare and requires minimal ingredients, making it a great choice for both novice and experienced cooks. Perfect for serving 4-6 people, these Roasted Garlic Parmesan Brussels Sprouts are a crowd-pleaser that will surely impress your guests and leave them craving more. Whether you’re hosting a festive gathering or simply looking for a new way to enjoy Brussels sprouts, this recipe is a must-try for your holiday menu.
Ingredients for 4-6 servings:
- 1½ pounds Brussels sprouts
- 3 tablespoons olive oil
- 4 cloves garlic, minced
- ½ teaspoon salt
- ¼ teaspoon black pepper
- ½ cup grated Parmesan cheese
- 1 tablespoon lemon juice (optional)
- Zest of 1 lemon (optional)
Cooking Instructions:
- Preheat the Oven: Start by preheating your oven to 400°F (200°C). This guarantees that the oven is at the right temperature to roast the Brussels sprouts evenly.
- Prepare the Brussels Sprouts: Rinse the Brussels sprouts under cold water and pat them dry with a kitchen towel. Trim the stems and remove any yellow or damaged outer leaves. Cut them in half lengthwise for a quicker and more even roast.
- Mix the Ingredients: In a large bowl, combine the halved Brussels sprouts with olive oil, minced garlic, salt, and black pepper. Toss them well to confirm each sprout is coated with the mixture.
- Arrange on Baking Sheet: Spread the Brussels sprouts out in an even layer on a baking sheet. Make sure they aren’t overcrowded to allow them to roast properly and become crispy.
- Roast the Brussels Sprouts: Place the baking sheet in the preheated oven and roast for 20-25 minutes, stirring halfway through. The Brussels sprouts should be golden brown and tender when done.
- Add Parmesan Cheese: Once the Brussels sprouts are roasted, remove them from the oven and sprinkle the grated Parmesan cheese over the top. Toss them gently to combine and allow the cheese to melt slightly with the residual heat.
- Serve: For an extra burst of flavor, add a squeeze of lemon juice and a sprinkle of lemon zest before serving. This step is optional but highly recommended for a fresh, tangy twist.
Extra Tips:
To achieve the crispiest Brussels sprouts, make sure they’re evenly coated with olive oil and not piled on top of each other on the baking sheet. If you prefer even more crunch, you can broil them for an additional 2-3 minutes after roasting.
Adjust the amount of garlic and Parmesan to your taste preference, and feel free to experiment by adding additional seasonings such as red pepper flakes or fresh herbs for a unique touch. Enjoy this easy yet impressive dish as part of your Italian holiday feast!
Italian Panettone Bread
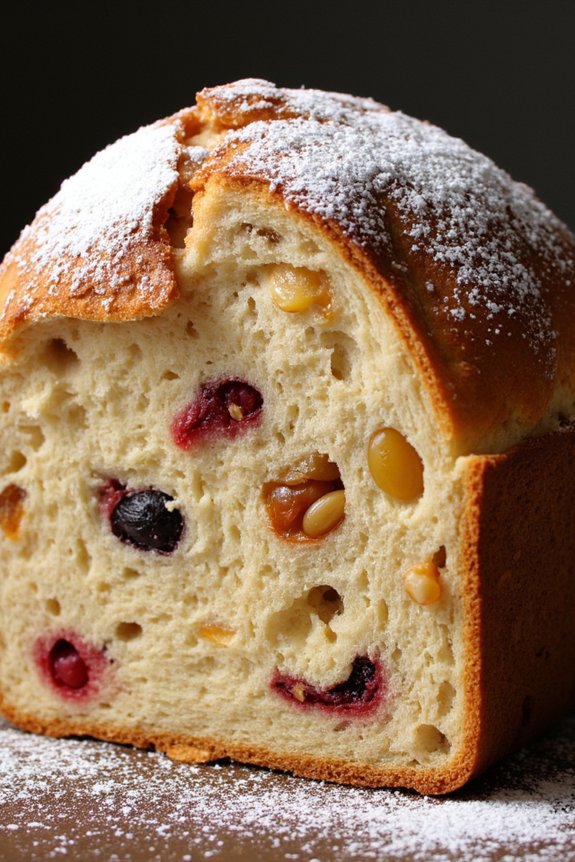
Italian Panettone is a traditional holiday bread that’s a staple in many Italian households during Christmas and New Year celebrations. Originating from Milan, this sweet, fluffy bread is rich with butter, eggs, and studded with candied fruits and raisins. Its tall, domed shape and light, airy texture make it a festive treat that can be enjoyed on its own or paired with a variety of accompaniments, like a sweet mascarpone cream or a simple hot beverage.
The process of making Panettone involves creating a dough that must rise multiple times, allowing the yeast to develop and impart that classic fluffy texture. Although it requires patience and a little bit of time, the resulting bread is well worth the effort. Whether you choose to serve it as a dessert, a breakfast treat, or a snack, Italian Panettone Bread is sure to bring warmth and joy to your holiday gatherings.
Ingredients for 4-6 servings:
- 4 cups all-purpose flour
- 1/2 cup granulated sugar
- 1/2 cup unsalted butter, softened
- 3 large eggs
- 1 teaspoon vanilla extract
- 1 teaspoon lemon zest
- 1 cup warm milk
- 1 packet (2 1/4 teaspoons) active dry yeast
- 1/2 teaspoon salt
- 1 cup golden raisins
- 1/2 cup candied orange peel
- 1/2 cup candied lemon peel
- 1/4 cup blanched almonds
- Butter for greasing
- Powdered sugar for dusting
Cooking Instructions:
- Activate the Yeast: In a small bowl, dissolve the yeast in the warm milk and let it sit for about 10 minutes, or until it becomes foamy. This indicates that the yeast is active.
- Prepare the Dough: In a large mixing bowl, combine the flour and salt. In a separate bowl, cream together the butter and sugar until light and fluffy. Beat in the eggs one at a time, then add the vanilla extract and lemon zest.
- Mix Ingredients: Gradually add the dry ingredients to the wet mixture, alternating with the milk and yeast mixture. Mix until a sticky dough forms. Knead the dough on a lightly floured surface for about 10 minutes, or until it becomes smooth and elastic.
- First Rise: Place the dough in a greased bowl, cover with a clean towel, and let it rise in a warm place for about 2 hours, or until it has doubled in size.
- Incorporate Fruits and Nuts: Punch down the risen dough and fold in the raisins, candied orange and lemon peels, and almonds. Confirm they’re evenly distributed throughout the dough.
- Shape and Second Rise: Shape the dough into a round ball and place it into a greased panettone mold or a deep, round cake pan lined with parchment paper. Cover and let it rise again for about 1 hour.
- Bake the Bread: Preheat your oven to 350°F (175°C). Once the dough has risen, bake for 40-45 minutes, or until the top is golden brown and a skewer inserted into the center comes out clean.
- Cool and Serve: Allow the panettone to cool in the mold for about 10 minutes before transferring it to a wire rack to cool completely. Dust with powdered sugar before serving.
Extra Tips:
For the best results, use high-quality ingredients, particularly for the dried fruit and nuts, as they greatly enhance the flavor of the finished bread.
Be patient with the rising process; the dough needs time to develop its characteristic light and fluffy texture.
If you don’t have a traditional panettone mold, a deep, round cake pan will suffice, just confirm it’s tall enough to accommodate the rising dough.
Finally, panettone can be stored in an airtight container for up to a week, maintaining its moistness and flavor. Enjoy experimenting with different fillings, such as chocolate chips or different nuts, to make your panettone unique.
Rustic Tuscan Bean Soup

Rustic Tuscan Bean Soup is a hearty and comforting dish that captures the essence of Italian countryside cooking. This traditional soup is a staple in Tuscan cuisine, celebrated for its simplicity and robust flavors. It beautifully combines white beans, fresh vegetables, and aromatic herbs simmered together to create a nourishing meal that’s perfect for any season.
The rustic nature of Tuscan Bean Soup allows the flavors of each ingredient to shine, making it a favorite among those who appreciate wholesome, home-cooked meals. This soup isn’t only delicious but also incredibly versatile. It can be enjoyed as a light lunch or a substantial dinner, often paired with crusty bread for dipping.
The slow cooking process allows the beans to become tender and the flavors to meld together, creating a satisfying dish that warms the soul. Ideal for serving 4-6 people, this recipe is sure to become a beloved addition to your collection of Italian culinary delights.
Ingredients:
- 1 pound dried cannellini beans (or 3 cans of cooked cannellini beans, drained and rinsed)
- 2 tablespoons olive oil
- 1 large onion, chopped
- 2 carrots, diced
- 2 celery stalks, diced
- 4 garlic cloves, minced
- 1 teaspoon dried thyme
- 1 teaspoon dried rosemary
- 1 bay leaf
- 6 cups vegetable or chicken stock
- 1 can (14.5 ounces) diced tomatoes
- Salt and pepper to taste
- 1 bunch kale, chopped
- 1 tablespoon balsamic vinegar
- Freshly grated Parmesan cheese, for serving
Cooking Instructions:
- Prepare the Beans: If using dried beans, soak them overnight in plenty of water. Drain and rinse before cooking. If using canned beans, drain and rinse them thoroughly.
- Sauté the Vegetables: In a large pot, heat the olive oil over medium heat. Add the chopped onion, carrots, and celery. Cook for about 5-7 minutes, stirring occasionally, until the vegetables are softened.
- Add Garlic and Herbs: Add the minced garlic, dried thyme, rosemary, and bay leaf to the pot. Stir well and cook for another 1-2 minutes until the garlic is fragrant.
- Simmer the Soup: Pour in the vegetable or chicken stock and the diced tomatoes. Add the soaked and drained beans (or the canned beans). Season with salt and pepper to taste. Bring the mixture to a boil, then reduce the heat to low and let it simmer for about 1 to 1.5 hours, or until the beans are tender. If using canned beans, simmer for 30 minutes.
- Add Kale: Stir in the chopped kale and continue to simmer for another 10-15 minutes until the kale is tender.
- Finish with Vinegar: Remove the bay leaf from the soup. Stir in the balsamic vinegar, taste, and adjust the seasoning if necessary.
- Serve: Ladle the soup into bowls and top with freshly grated Parmesan cheese. Serve hot with crusty bread.
Extra Tips: For a creamier texture, you can mash some of the beans against the side of the pot before adding the kale. This will thicken the soup slightly. If you prefer a spicier kick, consider adding a pinch of red pepper flakes along with the garlic and herbs.
Remember that the quality of the stock greatly affects the flavor of the soup, so use a good quality stock for the best results. Enjoy this comforting dish with a glass of Chianti to enhance the Tuscan experience.
Homemade Focaccia Bread
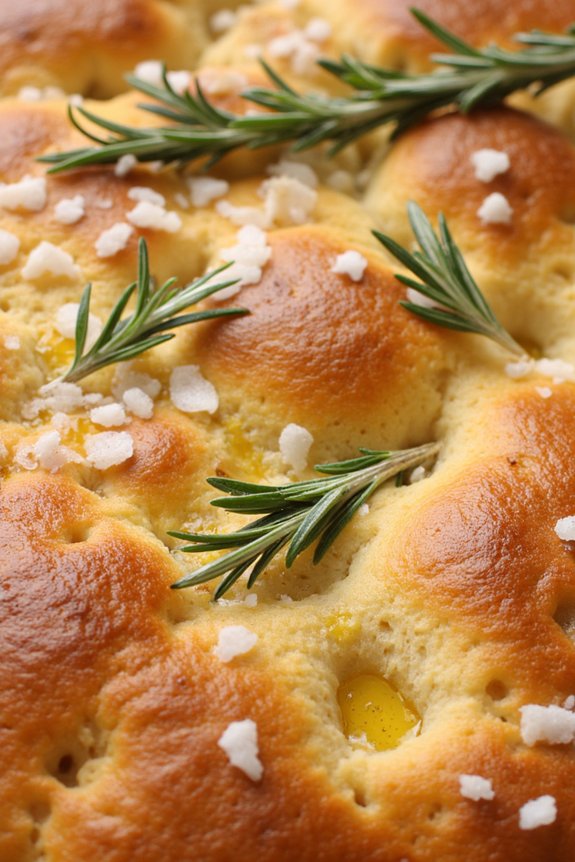
Focaccia bread is a classic Italian flatbread that’s beloved for its golden crust, airy crumb, and rich olive oil flavor. This bread is a versatile staple, often enjoyed as a side dish, a sandwich base, or even on its own as a snack. Its origins trace back to ancient Rome, and today it’s a popular choice in Italian homes and restaurants.
The beauty of focaccia lies in its simplicity, requiring only a few ingredients to create a delicious and aromatic treat. With a little patience and care, you can replicate the authentic taste of Italian focaccia right in your own kitchen.
Making homemade focaccia bread is a rewarding experience that fills your home with the delightful aroma of freshly baked bread. This recipe is designed to serve 4-6 people and is perfect for both novice and seasoned bakers.
The preparation involves mixing a simple dough, letting it rise, and then baking it to perfection. The result is a fluffy, flavorful bread with a slightly crisp exterior. Whether you choose to serve it alongside a hearty Italian meal or as a standalone delight, this focaccia is sure to impress your family and friends.
Ingredients (Serving Size: 4-6 people):
- 500 grams (4 cups) all-purpose flour
- 325 milliliters (1 1/3 cups) warm water
- 2 teaspoons sugar
- 1 teaspoon salt
- 7 grams (1 packet) active dry yeast
- 60 milliliters (1/4 cup) olive oil, plus extra for drizzling
- Coarse sea salt, for sprinkling
- Fresh rosemary sprigs, for topping
Instructions:
- Prepare the Yeast Mixture: In a small bowl, combine the warm water, sugar, and yeast. Stir gently and let it sit for about 10 minutes, or until it becomes frothy. This step activates the yeast, guaranteeing your bread will rise properly.
- Mix the Dough: In a large mixing bowl, combine the flour and salt. Make a well in the center and pour in the yeast mixture and olive oil. Stir the mixture until a dough begins to form. You may use a wooden spoon or your hands for this step.
- Knead the Dough: Transfer the dough to a floured surface and knead for about 5-10 minutes until it becomes smooth and elastic. If the dough is sticky, sprinkle a little more flour as needed.
- First Rise: Place the dough in a lightly oiled bowl, cover it with a damp cloth or plastic wrap, and let it rise in a warm place for about 1-2 hours, or until it has doubled in size.
- Prepare the Baking Pan: Grease a large baking sheet or pan with olive oil. Once the dough has risen, punch it down to release the air and transfer it to the prepared pan. Gently stretch and press the dough to fit the pan, making sure it’s evenly spread.
- Second Rise: Cover the dough with a damp cloth and let it rise again for about 30 minutes.
- Preheat and Prepare Toppings: Preheat your oven to 220°C (430°F). Once the dough has risen for the second time, use your fingers to create dimples across the surface. Drizzle with olive oil, sprinkle with coarse sea salt, and distribute rosemary sprigs over the top.
- Bake the Focaccia: Place the pan in the preheated oven and bake for 20-25 minutes, or until the focaccia is golden brown. The edges should be crisp, and the center should be soft and fluffy.
- Cool and Serve: Remove the focaccia from the oven and let it cool slightly on a wire rack. Cut into squares or strips and serve warm or at room temperature.
Extra Tips:
For the best results, confirm that your yeast is fresh and active; expired yeast can prevent your bread from rising properly. If you prefer a softer focaccia, reduce the baking time slightly.
You can customize your focaccia by adding other toppings such as sliced olives, cherry tomatoes, or caramelized onions. Also, consider using a high-quality olive oil for drizzling, as it greatly enhances the flavor of the bread.
Lemon Ricotta Cheesecake

Lemon Ricotta Cheesecake is a delightful Italian dessert that provides a fresh, creamy, and zesty twist to traditional cheesecake. This dessert combines the rich, creamy texture of ricotta cheese with the bright, revitalizing flavor of lemon, making it an ideal treat for any festive occasion or a simple indulgence at home.
The luscious filling, balanced by a crumbly crust, is a harmonious blend that offers a taste of Italy in every bite. This cheesecake isn’t only delicious but is also relatively easy to prepare. With a few simple ingredients and straightforward steps, you can create a dessert that will impress guests and satisfy any sweet tooth.
Whether you’re a seasoned baker or a novice in the kitchen, this Lemon Ricotta Cheesecake recipe is approachable and rewarding. Perfect for serving 4-6 people, it’s a wonderful addition to any holiday spread.
Ingredients (Serves 4-6):
- 1 cup graham cracker crumbs
- 1/4 cup melted butter
- 2 tablespoons sugar
- 16 ounces ricotta cheese
- 8 ounces cream cheese, softened
- 3/4 cup granulated sugar
- 3 large eggs
- 1 tablespoon lemon zest
- 1/4 cup freshly squeezed lemon juice
- 1 teaspoon vanilla extract
- 1/4 teaspoon salt
Cooking Instructions:
1. Prepare the Crust: Preheat your oven to 325°F (160°C). In a medium bowl, mix the graham cracker crumbs, melted butter, and 2 tablespoons of sugar until the mixture resembles wet sand.
Press this mixture firmly into the bottom of a 9-inch springform pan to form an even crust. Bake for 8-10 minutes until lightly golden. Remove from the oven and set aside to cool.
2. Prepare the Filling: In a large mixing bowl, combine the ricotta cheese and cream cheese. Beat with an electric mixer on medium speed until smooth and creamy. Add the granulated sugar and continue to beat until well blended.
3. Add the Eggs: Add the eggs one at a time to the cheese mixture, beating well after each addition. Ensure each egg is fully incorporated before adding the next.
4. Incorporate the Flavors: Stir in the lemon zest, lemon juice, vanilla extract, and salt. Mix until all the ingredients are combined and the mixture is smooth.
5. Assemble the Cheesecake: Pour the cheese mixture over the cooled crust in the springform pan. Smooth the top with a spatula to ensure an even surface.
6. Bake the Cheesecake: Place the springform pan in the preheated oven and bake for 50-60 minutes, or until the edges are set but the center still jiggles slightly when gently shaken. This will ensure a creamy texture as it sets.
7. Cool and Chill: Remove the cheesecake from the oven and allow it to cool to room temperature. Once cooled, refrigerate it for at least 4 hours or overnight to set completely.
Extra Tips:
For the best results, ensure all your ingredients are at room temperature before starting, as this will help the cheesecake mixture blend smoothly.
Be careful not to overmix the filling to avoid incorporating too much air, which can cause cracks during baking. If you prefer a more intense lemon flavor, you can increase the lemon zest slightly.
When slicing, dip a sharp knife in hot water and wipe it clean between cuts for neat slices. Serve the cheesecake with a dollop of whipped cream or a sprinkle of extra lemon zest for added flair.
Spaghetti Aglio E Olio With a Holiday Twist

Spaghetti Aglio E Olio is a classic Italian pasta dish that’s simple yet flavorful, relying on the perfect blend of garlic, olive oil, and chili flakes to create a comforting and delicious meal. For the holiday season, we can add a festive twist to this traditional recipe by incorporating ingredients like roasted red peppers and fresh parsley to bring a pop of color and additional depth of flavor.
This holiday-inspired version of Spaghetti Aglio E Olio is perfect for sharing with family and friends, offering a warm and aromatic dish that’s both satisfying and easy to prepare. This recipe serves 4-6 people, making it an ideal dish for a small holiday gathering.
The combination of the aromatic garlic, the spice of the chili flakes, and the vibrant addition of roasted red peppers will make this Spaghetti Aglio E Olio a standout on your holiday table. The fresh parsley adds a touch of green, reminiscent of the holiday season, and enhances the fresh, zesty flavor profile of the dish.
Prepare this dish with love and enjoy a comforting meal that brings a taste of Italy to your holiday celebrations.
Ingredients:
- 1 pound (450 grams) spaghetti
- 1/2 cup extra virgin olive oil
- 8 cloves garlic, thinly sliced
- 1 teaspoon red pepper flakes
- 1 cup roasted red peppers, sliced
- Salt, to taste
- Black pepper, to taste
- 1/2 cup fresh parsley, chopped
- 1/4 cup grated Parmesan cheese (optional)
Cooking Instructions:
- Cook the Spaghetti: Bring a large pot of salted water to a boil. Add the spaghetti and cook according to the package instructions until al dente. Reserve 1 cup of pasta water and then drain the spaghetti.
- Prepare the Garlic Oil: In a large skillet, heat the olive oil over medium heat. Add the sliced garlic and sauté until golden brown, taking care not to burn it. This should take about 2-3 minutes.
- Add Heat and Flavor: Stir in the red pepper flakes and cook for about 30 seconds to release their flavor. Add the roasted red peppers and sauté for another 1-2 minutes until they’re heated through and well combined with the garlic and oil.
- Combine Pasta and Sauce: Add the cooked spaghetti to the skillet with the garlic oil mixture. Toss to coat the pasta evenly, adding reserved pasta water a little at a time if needed to achieve the desired consistency.
- Season and Serve: Season with salt and black pepper to taste. Add the chopped parsley and toss again to incorporate. Transfer the pasta to a serving dish and sprinkle with Parmesan cheese, if desired.
Extra Tips:
When cooking the garlic, be sure to keep a close eye on it and adjust the heat as needed to prevent burning, as burnt garlic can impart a bitter taste to the dish.
Use high-quality olive oil for the best flavor, and consider adding a squeeze of fresh lemon juice for an extra hint of freshness. For a more festive presentation, garnish the dish with additional parsley and roasted red pepper strips just before serving.
Enjoy your holiday-inspired Spaghetti Aglio E Olio with a glass of your favorite Italian wine for a truly authentic experience.