

Welcome to a journey through the enchanting world of Italian baking. These 12 delicate and easy recipes will show you how simple ingredients can create pure magic. From the rich layers of tiramisu to the buttery crunch of biscotti, each treat is a delightful experience. Perfect for those who appreciate the artistry in baking, these recipes are sure to elevate your kitchen adventures. Let’s explore these lovely creations together.
Classic Biscotti
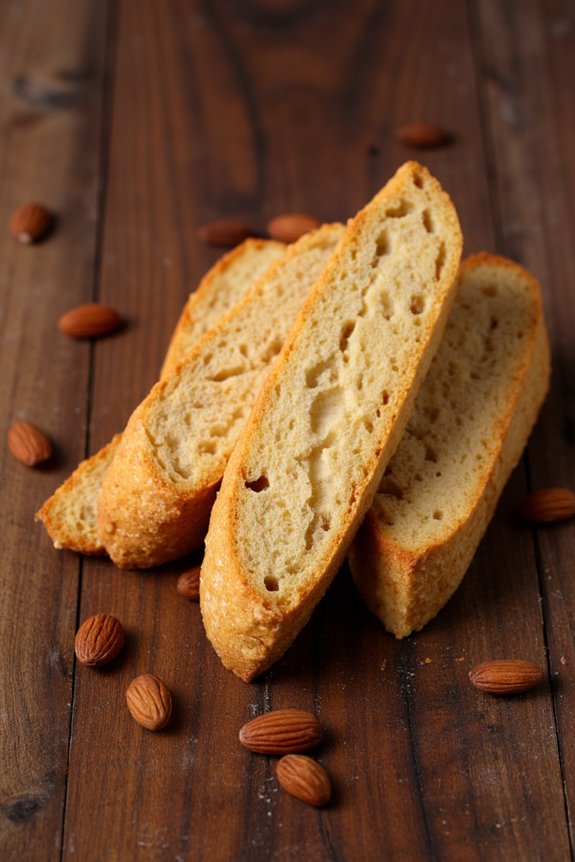
Classic Biscotti is a traditional Italian treat that offers a delightful crunch and just the right amount of sweetness. These twice-baked cookies are perfect for dunking into your morning coffee or enjoying as an afternoon snack. With its origins rooted in Italy, biscotti have become a favorite worldwide due to their versatility and long shelf life.
Whether you prefer to keep them simple or add nuts and dried fruits for extra flavor, biscotti are both easy and rewarding to bake at home. Making Classic Biscotti involves a straightforward process that yields 4-6 servings, ideal for sharing with family or friends. The key to achieving the perfect texture is the double baking method, which gives biscotti their characteristic crispiness.
Once baked, these cookies can be stored for weeks, making them a convenient treat to have on hand. Follow the steps below to create your own batch of delicious biscotti.
Ingredients:
- 2 cups all-purpose flour
- 1 cup granulated sugar
- 1 teaspoon baking powder
- 1/2 teaspoon salt
- 3 large eggs
- 1 teaspoon vanilla extract
- 1 teaspoon almond extract
- 1 cup whole almonds, toasted and coarsely chopped
Cooking Instructions:
- Preheat the Oven: Begin by preheating your oven to 350°F (175°C). Line a baking sheet with parchment paper to prevent sticking.
- Mix Dry Ingredients: In a large bowl, whisk together the flour, sugar, baking powder, and salt. This guarantees that the baking powder is evenly distributed throughout the flour.
- Prepare the Wet Ingredients: In a separate bowl, beat the eggs using a hand mixer or stand mixer until they’re light and fluffy. Add the vanilla and almond extracts, and mix until fully incorporated.
- Combine Wet and Dry Ingredients: Gradually add the dry ingredients to the wet ingredients, mixing continuously until a dough forms. The dough will be sticky but should hold together.
- Add the Almonds: Fold in the chopped almonds using a spatula or wooden spoon. Make sure the almonds are evenly distributed throughout the dough.
- Shape the Dough: Divide the dough in half and shape each half into a log approximately 12 inches long and 2 inches wide. Place the logs on the prepared baking sheet, leaving enough space between them as they’ll expand slightly during baking.
- First Bake: Bake the logs in the preheated oven for about 25-30 minutes, or until they’re firm to the touch and lightly golden brown.
- Cool and Slice: Remove the logs from the oven and let them cool on a wire rack for about 10 minutes. Once cool enough to handle, use a sharp serrated knife to slice the logs diagonally into 1/2-inch thick slices.
- Second Bake: Arrange the slices cut-side down back on the baking sheet. Return them to the oven and bake for an additional 10-15 minutes, flipping them halfway through. The biscotti should be dry and crisp.
- Cool Completely: Allow the biscotti to cool completely on a wire rack. Store them in an airtight container to maintain their crispiness.
Extra Tips:
For an extra layer of flavor, consider dipping one side of the biscotti in melted chocolate after they’ve cooled, and allow it to set before serving. You can also experiment with different nuts or add-ins like cranberries or chocolate chips for a personalized touch.
Be sure to slice the biscotti logs with a serrated knife to prevent crumbling, and don’t rush the cooling process between the first and second bake, as this guarantees the perfect texture. Enjoy your homemade Classic Biscotti with a cup of coffee or tea for a truly authentic Italian experience.
Traditional Tiramisu
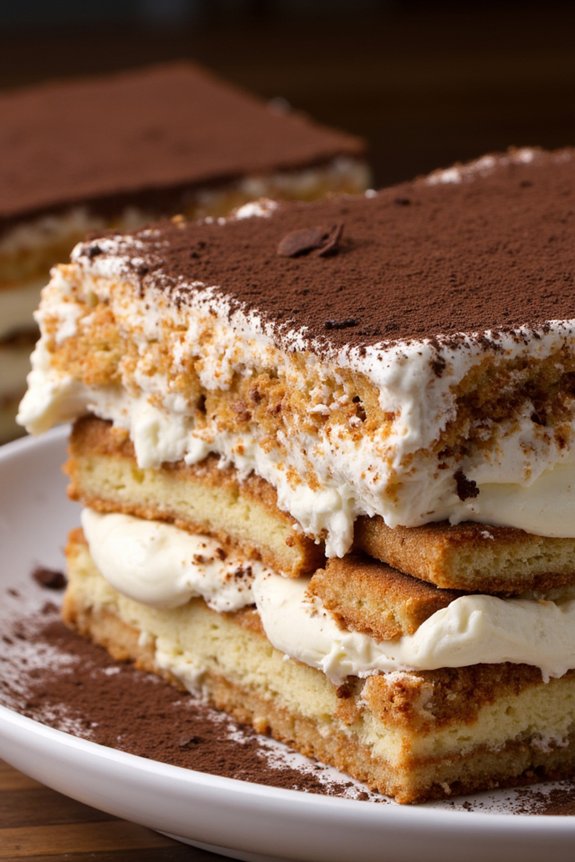
Traditional Tiramisu is a classic Italian dessert that has captured the hearts and taste buds of people around the world. Known for its rich layers of creamy mascarpone cheese, coffee-soaked ladyfingers, and a dusting of cocoa powder, this dessert is both indulgent and satisfying.
Originally from the region of Veneto, Tiramisu translates to “pick me up,” aptly named for its energizing combination of espresso and cocoa. It’s a dessert that’s perfect for any occasion, whether it’s a special dinner party or just a treat for yourself.
Creating a perfect Tiramisu requires a balance between the creaminess of the mascarpone mixture and the bold flavor of espresso. It’s a dessert that benefits from being made in advance, allowing the flavors to meld together beautifully.
Although it may seem like an elaborate dish, Tiramisu is surprisingly easy to make with the right ingredients and a little patience. This recipe serves 4-6 people, making it ideal for a small gathering or for enjoying over a couple of days.
Ingredients:
- 4 large egg yolks
- 1/2 cup granulated sugar
- 2/3 cup whole milk
- 8 ounces mascarpone cheese
- 1 cup heavy cream
- 1 cup brewed espresso, cooled
- 2 tablespoons coffee liqueur (optional)
- 24-30 ladyfingers
- Unsweetened cocoa powder, for dusting
- Dark chocolate shavings, for garnish (optional)
Instructions:
- Prepare the Cream Mixture: In a medium-sized saucepan, whisk together the egg yolks and sugar until well combined. Add the milk and place the saucepan over medium heat. Stir constantly until the mixture thickens and coats the back of a spoon, about 10 minutes. Remove from heat and let it cool slightly.
- Mix in Mascarpone: Once the egg yolk mixture has cooled to room temperature, transfer it to a large bowl. Add the mascarpone cheese and mix until smooth and creamy.
- Whip the Cream: In a separate bowl, whip the heavy cream until stiff peaks form. Gently fold the whipped cream into the mascarpone mixture until fully incorporated.
- Prepare the Espresso Mixture: Combine the brewed espresso with the coffee liqueur (if using) in a shallow dish.
- Assemble the Tiramisu: Quickly dip each ladyfinger into the espresso mixture, ensuring they’re soaked but not soggy. Arrange a layer of soaked ladyfingers at the bottom of a 9×9 inch dish. Spread half of the mascarpone mixture over the ladyfingers. Repeat with another layer of soaked ladyfingers and the remaining mascarpone mixture.
- Chill and Serve: Cover the dish with plastic wrap and refrigerate for at least 4 hours, or overnight for best results. Before serving, dust the top with cocoa powder and add chocolate shavings if desired.
Extra Tips:
When making Tiramisu, the quality of your ingredients can make a big difference. Use a good quality espresso and mascarpone cheese for the best flavor.
If you don’t have ladyfingers, you can substitute with sponge cake slices. Remember to let the Tiramisu rest in the refrigerator for several hours, as this allows the flavors to develop and the dessert to set properly.
If you prefer a stronger coffee flavor, you can adjust the amount of coffee liqueur or espresso to your liking. Enjoy your homemade Traditional Tiramisu!
Luscious Panna Cotta

Panna cotta, meaning “cooked cream” in Italian, is a classic dessert that’s both simple to make and incredibly delicious. This luscious treat is characterized by its silky-smooth texture and delicate flavor, making it an ideal choice for any occasion.
Originating from the Piedmont region of Italy, panna cotta has become a beloved dessert worldwide. The beauty of this dessert lies in its versatility; while it’s delightful on its own, it can easily be customized with various flavors or toppings such as fresh berries, chocolate sauce, or caramel.
In this recipe, we’ll guide you through creating a traditional panna cotta that serves 4-6 people. The key to a perfect panna cotta is achieving the right balance of creaminess and firmness, which is typically done using gelatin. With a few simple ingredients and some patience, you can create a restaurant-quality dessert right in your kitchen.
Get ready to impress your family and friends with this exquisite Italian delicacy.
Ingredients:
- 2 cups heavy cream
- 1 cup whole milk
- 1/2 cup granulated sugar
- 2 teaspoons vanilla extract
- 2 1/2 teaspoons powdered gelatin
- 3 tablespoons cold water
- Pinch of salt
Instructions:
- Prepare the Gelatin: Start by sprinkling the powdered gelatin evenly over the cold water in a small bowl. Let it sit and bloom for about 5-10 minutes. This step guarantees that the gelatin is fully hydrated and will dissolve smoothly into the cream mixture.
- Heat the Cream Mixture: In a medium saucepan, combine the heavy cream, whole milk, granulated sugar, and a pinch of salt. Place the saucepan over medium heat and stir occasionally until the sugar is fully dissolved and the mixture is hot but not boiling. Remove the saucepan from the heat.
- Incorporate the Gelatin: Add the bloomed gelatin to the warm cream mixture, whisking continuously until the gelatin is completely dissolved. This step is vital as any undissolved gelatin can cause lumps in the panna cotta.
- Add Vanilla: Stir in the vanilla extract to infuse the panna cotta with a rich, aromatic flavor. Make sure everything is well combined.
- Strain and Pour: For an ultra-smooth texture, strain the mixture through a fine-mesh sieve into a large bowl or pitcher. This will remove any undissolved particles or lumps. Then, carefully pour the mixture into 4-6 individual serving glasses or ramekins.
- Chill and Set: Cover each serving with plastic wrap, making sure the wrap doesn’t touch the surface of the liquid. Refrigerate for at least 4 hours, or until the panna cotta is set and firm to the touch.
- Serve: Once the panna cotta has set, serve it straight from the fridge. You can garnish it with fresh berries, a drizzle of caramel or chocolate sauce, or simply enjoy it as is.
Extra Tips:
For the best results, verify the gelatin is fully dissolved in the warm cream mixture to avoid any lumps. If you prefer a lighter panna cotta, you can substitute some of the heavy cream with additional milk.
When serving, if you wish to unmold the panna cotta onto a plate, dip the bottom of the ramekin in warm water for a few seconds to loosen it, then carefully invert it onto a plate.
Fluffy Zeppole
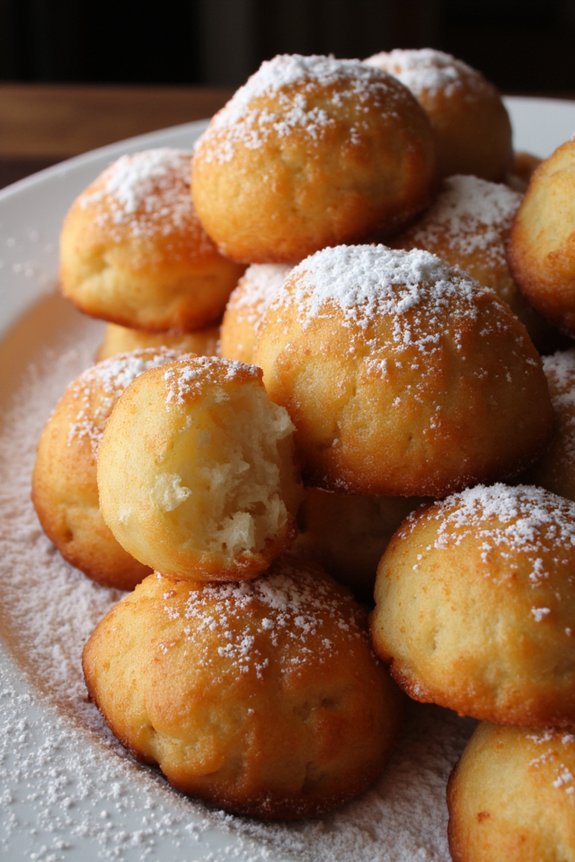
Fluffy Zeppole are a delightful Italian treat, often enjoyed during festivals and celebrations. These delicious fried dough balls are light, airy, and slightly crispy on the outside, making them a perfect indulgence for any occasion. Traditionally, zeppole are dusted with powdered sugar or filled with custard or cream, providing a sweet finish that complements their golden exterior. With just a few ingredients, you can create these irresistible desserts right in your own kitchen.
The origin of zeppole is deeply rooted in Italian culture, particularly in the southern regions of the country. They’re often associated with St. Joseph’s Day, where they’re made to commemorate the feast. Despite their festive beginnings, zeppole have become a beloved treat that can be enjoyed year-round.
Whether you’re preparing them for a special event or simply craving a sweet snack, this easy recipe will guide you through the process of making perfect zeppole that are bound to impress your family and friends.
Ingredients (Serving size: 4-6 people):
- 1 cup all-purpose flour
- 1 tablespoon granulated sugar
- 1 teaspoon baking powder
- 1/4 teaspoon salt
- 1 cup water
- 2 tablespoons unsalted butter
- 3 large eggs
- Vegetable oil, for frying
- Powdered sugar, for dusting
Cooking Instructions:
- Prepare the Dough: In a medium saucepan, combine the water and butter. Heat over medium heat until the butter melts and the mixture begins to boil.
- Mix Dry Ingredients: In a separate bowl, whisk together the flour, granulated sugar, baking powder, and salt. Reduce the heat to low and add the flour mixture to the saucepan all at once. Stir vigorously with a wooden spoon until the dough forms a ball and pulls away from the sides of the pan.
- Incorporate Eggs: Remove the saucepan from the heat and let the dough cool for about 5 minutes. Add the eggs, one at a time, beating well after each addition until the dough is smooth and glossy.
- Heat the Oil: In a deep, heavy-bottomed pot, heat about 2 inches of vegetable oil to 350°F (175°C). Use a thermometer to maintain a consistent temperature.
- Fry the Zeppole: Using a small cookie scoop or two spoons, carefully drop small balls of dough into the hot oil, frying in batches to avoid overcrowding. Fry each zeppole for about 5-6 minutes, turning occasionally, until they’re golden brown and puffed.
- Drain and Dust: Remove the zeppole from the oil using a slotted spoon and transfer them to a paper towel-lined plate to drain excess oil. Once slightly cooled, dust generously with powdered sugar.
Extra Tips:
To guarantee your zeppole are perfectly fluffy, make sure not to overcrowd the pot while frying, as this can lower the oil temperature and result in soggy dough. Maintaining a steady oil temperature is vital for achieving the right texture.
If you like your zeppole with a filling, consider piping in some pastry cream or ricotta cheese. Finally, serve them fresh and warm for the best experience, as they tend to lose their crispness once cooled.
Rustic Focaccia
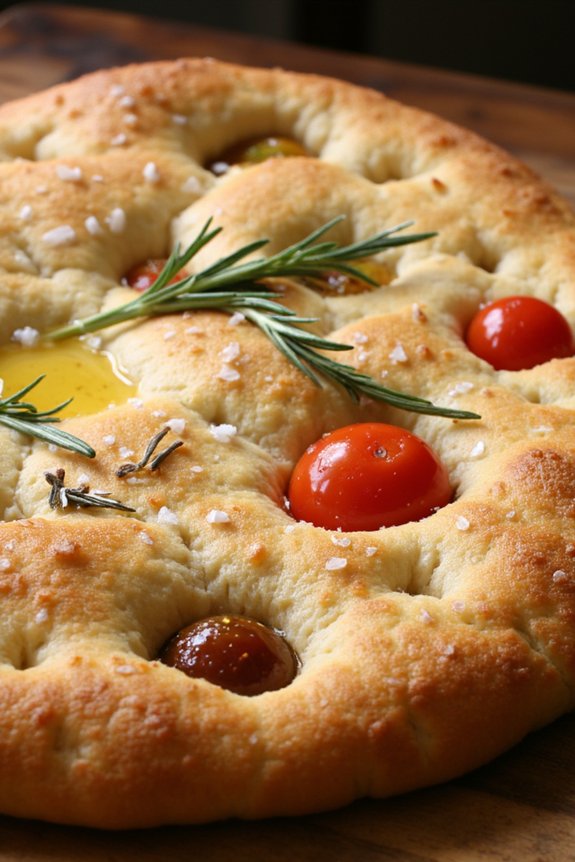
Rustic Focaccia is a classic Italian bread that’s a joy to make and even more delightful to eat. This bread is known for its fluffy interior, crispy edges, and rich olive oil flavor, making it a versatile accompaniment to many meals. It can be customized with various toppings like herbs, olives, or sun-dried tomatoes, but its simple base is delicious enough to stand on its own.
Whether you’re serving it as an appetizer, a side dish, or a sandwich base, Rustic Focaccia is sure to impress with its aromatic and comforting qualities. Making Rustic Focaccia is a rewarding experience that doesn’t require any advanced baking skills. It’s perfect for home bakers who want to try their hand at making bread without the need for a bread machine.
The process involves creating a simple dough, allowing it to rise, and then baking it to golden perfection. This recipe serves 4-6 people and can be easily adjusted to suit your taste preferences with different toppings and seasonings. Here’s how you can create this delicious Italian bread at home.
Ingredients for Rustic Focaccia (Serves 4-6):
- 4 cups all-purpose flour
- 1 packet (2 1/4 teaspoons) active dry yeast
- 1 1/2 cups warm water (about 110°F)
- 1/4 cup extra virgin olive oil, plus more for drizzling
- 2 teaspoons salt
- 1 tablespoon sugar
- Coarse sea salt, for topping
- Fresh rosemary, chopped (optional)
- Cherry tomatoes, halved (optional)
Instructions:
- Prepare the Yeast Mixture: In a small bowl, combine the warm water, sugar, and active dry yeast. Stir gently and let it sit for about 5-10 minutes, or until the mixture becomes frothy. This step activates the yeast, ensuring your focaccia will rise properly.
- Make the Dough: In a large mixing bowl, combine the flour and salt. Make a well in the center and pour in the yeast mixture and 1/4 cup of olive oil. Mix with a wooden spoon until a shaggy dough forms.
- Knead the Dough: Transfer the dough to a floured surface and knead for about 8-10 minutes, or until it’s smooth and elastic. If the dough is too sticky, add a bit more flour as needed.
- First Rise: Place the kneaded dough in a lightly oiled bowl, cover it with a damp cloth, and let it rise in a warm place for about 1-2 hours, or until it has doubled in size.
- Prepare the Baking Pan: Preheat your oven to 425°F (220°C). Generously oil a 9×13-inch baking pan with olive oil.
- Shape the Dough: Once the dough has risen, punch it down to release some of the air. Transfer it to the prepared baking pan and gently stretch it to fit the pan. Use your fingertips to dimple the surface of the dough.
- Add Toppings: Drizzle olive oil over the top of the dough, and sprinkle with coarse sea salt and fresh rosemary. If desired, press halved cherry tomatoes into the dough for added flavor and color.
- Second Rise: Let the dough rise again for about 20-30 minutes, allowing it to puff up slightly.
- Bake the Focaccia: Place the pan in the preheated oven and bake for 20-25 minutes, or until the focaccia is golden brown and crisp on the edges.
- Cool and Serve: Remove from the oven and let it cool slightly in the pan before slicing. Serve warm or at room temperature.
Extra Tips: For an extra flavorful focaccia, consider mixing finely chopped garlic with the olive oil before drizzling it over the dough. If you prefer a more herby focaccia, you can also add thyme or oregano along with rosemary.
Remember that focaccia dough is quite forgiving, so feel free to get creative with your toppings. Additionally, if you don’t have a warm place for rising, you can preheat your oven to the lowest setting, turn it off, and let the dough rise inside with the door slightly ajar. This will provide a warm and draft-free environment for your dough to rise.
Buttery Amaretti Cookies
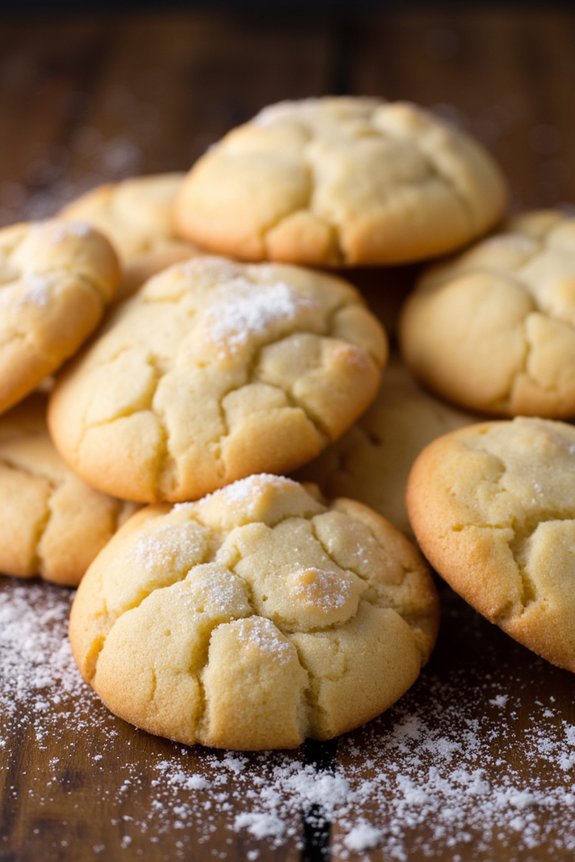
Amaretti cookies are a classic Italian treat that embodies the rich flavors of almonds and the subtlety of sweetness. These cookies, known for their chewy center and crispy exterior, are a favorite among Italian households and a delightful addition to any dessert table. The buttery version adds a luxurious richness to the traditional recipe, making it even more irresistible. Perfect for enjoying with a cup of coffee or tea, buttery amaretti cookies are bound to impress your family and friends with their perfect balance of flavors.
The beauty of making these cookies lies in their simplicity and the minimal ingredients required. With just a few pantry staples and some fresh almonds, you can create a batch of cookies that not only taste divine but also fill your home with an enchanting aroma. Whether you’re a seasoned baker or a beginner, this recipe is straightforward and rewarding, promising delicious results every time.
Ingredients for 4-6 servings:
- 2 cups blanched almonds
- 1 cup granulated sugar
- 1/4 cup unsalted butter, softened
- 2 large egg whites
- 1 teaspoon almond extract
- 1/4 teaspoon salt
- Powdered sugar, for dusting
Cooking Instructions:
- Preheat the Oven: Start by preheating your oven to 325°F (165°C). Line a baking sheet with parchment paper to prevent the cookies from sticking.
- Process the Almonds: Place the blanched almonds in a food processor and pulse until they’re finely ground. Be careful not to over-process them into almond butter.
- Mix the Dry Ingredients: In a large mixing bowl, combine the ground almonds with granulated sugar and salt. Stir until well combined.
- Combine Wet Ingredients: In a separate bowl, beat the egg whites until they form soft peaks. Add the softened butter and almond extract, and mix until smooth.
- Form the Dough: Gently fold the wet mixture into the dry ingredients until a dough forms. The dough should be slightly sticky but manageable.
- Shape the Cookies: Using your hands, roll small amounts of dough (about 1 inch in diameter) into balls. Place them on the prepared baking sheet, leaving some space between each cookie.
- Dust with Powdered Sugar: Lightly dust the tops of the cookies with powdered sugar for a sweet finish.
- Bake: Place the baking sheet in the preheated oven and bake for 15-18 minutes or until the cookies are lightly golden and the tops are firm to the touch.
- Cool: Remove the cookies from the oven and let them cool on the baking sheet for about 5 minutes before transferring them to a wire rack to cool completely.
Extra Tips:
When making buttery amaretti cookies, it’s important to ascertain that your egg whites are at room temperature as this helps them whip more effectively. Additionally, if you’re looking for a more pronounced almond flavor, you can toast the almonds lightly before grinding them.
Be mindful of the baking time; the cookies should be slightly soft when removed from the oven as they’ll firm up as they cool. Store the cookies in an airtight container to maintain their freshness and enjoy them within a week for the best taste.
Tender Cannoli Shells

Cannoli are a quintessential Italian dessert, known for their crispy shells and creamy, sweet filling. Originating from Sicily, these delightful pastry tubes are a favorite among dessert lovers. Making cannoli shells from scratch can seem intimidating, but with the right ingredients and techniques, you can achieve perfectly tender shells that will impress your family and friends.
Whether you’re hosting a dinner party or simply want to indulge in a sweet treat, homemade cannoli shells are a delicious way to showcase your baking skills.
Creating cannoli shells involves preparing a dough that’s rolled out and fried to golden perfection. The key to tender cannoli shells is to strike the right balance between crispy and slightly chewy. Once the shells are ready, they can be filled with a luscious ricotta filling, flavored with vanilla, chocolate chips, or pistachios. This recipe will guide you through the process of making cannoli shells for 4-6 people, guaranteeing you have enough to enjoy and share.
Ingredients:
- 2 cups all-purpose flour
- 2 tablespoons granulated sugar
- 1/4 teaspoon salt
- 3 tablespoons unsalted butter, chilled and cubed
- 1 egg yolk
- 1/2 cup Marsala wine (or white wine)
- Vegetable oil, for frying
- 1 egg white, lightly beaten (for sealing)
- Cannoli tubes for shaping
Cooking Instructions:
- Prepare the Dough: In a large mixing bowl, combine the flour, sugar, and salt. Add the chilled, cubed butter to the dry ingredients. Use a pastry cutter or your fingers to blend the butter into the flour until the mixture resembles coarse crumbs.
- Add Wet Ingredients: Make a well in the center of the flour mixture and add the egg yolk and Marsala wine. Mix until the dough starts to come together. Transfer the dough onto a lightly floured surface and knead until smooth and elastic, about 5-7 minutes. Wrap in plastic wrap and refrigerate for at least 1 hour.
- Roll Out the Dough: Once chilled, divide the dough into two portions. Roll each portion out to a thin sheet, about 1/8 inch thick. Use a round cutter (about 4 inches in diameter) to cut circles from the dough.
- Shape the Shells: Wrap each dough circle around a cannoli tube. Use a small brush to apply egg white to the edges of the dough, pressing gently to seal.
- Fry the Shells: In a deep saucepan or fryer, heat vegetable oil to 350°F (175°C). Carefully place the wrapped tubes into the hot oil, frying 2-3 at a time. Fry until the shells are golden brown, about 2-3 minutes. Use tongs to remove them from the oil and drain on paper towels. Allow them to cool slightly before carefully removing the cannoli tubes.
- Cool and Store: Once removed from the tubes, let the shells cool completely. Store them in an airtight container if not filling immediately.
Extra Tips:
When making cannoli shells, make sure the oil is at the right temperature. Too hot, and the shells will burn; too cold, and they’ll absorb too much oil.
If you don’t have Marsala wine, a dry white wine can be used as a substitute, but Marsala adds a unique flavor to the shells. Additionally, avoid overhandling the dough, as this can make the shells tough.
Finally, fill the shells just before serving to keep them crisp and prevent them from becoming soggy. Enjoy your homemade cannoli with your favorite filling, and savor the taste of Italy!
Sweet Ricotta Pie
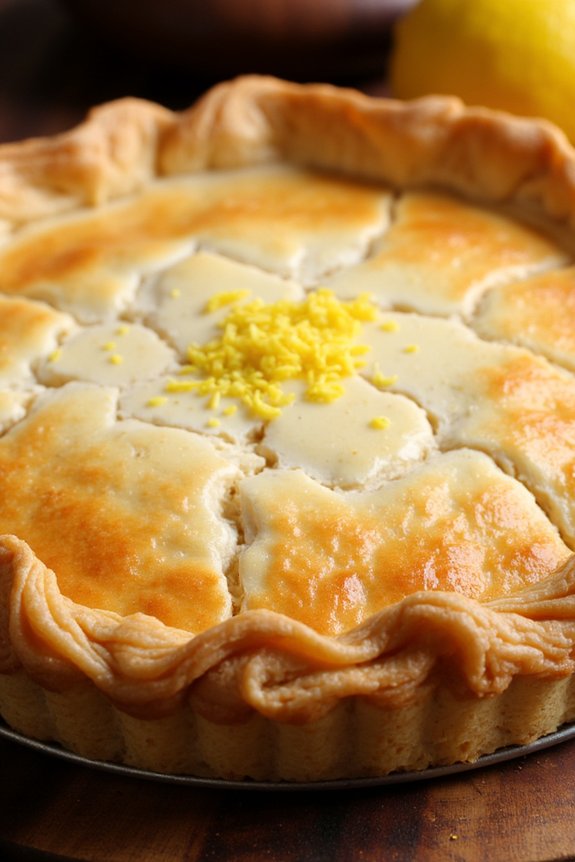
Sweet Ricotta Pie is a delightful Italian dessert that combines the rich, creamy texture of ricotta cheese with just the right amount of sweetness, all nestled in a perfectly flaky pie crust. This pie is a staple in many Italian households, especially during festive occasions like Easter. Its light yet indulgent flavor makes it a wonderful conclusion to any meal, leaving your guests impressed with its authentic taste and rustic charm.
The beauty of Sweet Ricotta Pie lies in its simplicity and versatility. While the classic version is flavored with vanilla and lemon zest, you can easily adapt the recipe by adding other ingredients such as chocolate chips, candied fruits, or a splash of your favorite liqueur. Perfect for serving 4-6 people, this pie is best served slightly chilled or at room temperature, allowing the delicate flavors to shine through.
Ingredients for 4-6 people:
- 1 pie crust (store-bought or homemade)
- 1 1/2 cups ricotta cheese
- 3/4 cup granulated sugar
- 2 large eggs
- 1 teaspoon vanilla extract
- Zest of 1 lemon
- 1/4 cup all-purpose flour
- 1/4 teaspoon salt
- Optional: 1/4 cup mini chocolate chips or candied fruit
Instructions:
- Prepare the Pie Crust: Preheat your oven to 350°F (175°C). Roll out your pie crust and fit it into a 9-inch pie dish. Trim any excess dough and crimp the edges to your liking. Place the pie crust in the refrigerator while you prepare the filling.
- Make the Ricotta Filling: In a large mixing bowl, combine the ricotta cheese and granulated sugar. Beat with an electric mixer on medium speed until smooth and well blended. This should take about 2-3 minutes.
- Add the Eggs and Flavorings: Add the eggs, one at a time, beating well after each addition. Stir in the vanilla extract, lemon zest, flour, and salt until all ingredients are well incorporated and the mixture is smooth.
- Incorporate Optional Add-ins: If using chocolate chips or candied fruit, gently fold them into the ricotta mixture with a spatula, ensuring even distribution.
- Assemble the Pie: Pour the ricotta filling into the prepared pie crust, smoothing the top with a spatula. Place the pie on the middle rack of your preheated oven.
- Bake the Pie: Bake for 45-50 minutes, or until the filling is set and lightly golden on top. The center should be firm but still have a slight jiggle. Avoid overbaking to maintain a creamy texture.
- Cool and Serve: Remove the pie from the oven and allow it to cool to room temperature. Once cooled, refrigerate for at least 2 hours before serving to enhance the flavors.
Extra Tips:
For the best results, use high-quality ricotta cheese, as it greatly affects the pie’s texture and flavor. If your ricotta appears watery, drain it in a fine mesh strainer for about 30 minutes before using.
Additionally, when adding flavorings or optional ingredients, be mindful of the balance, ensuring they complement rather than overpower the delicate taste of the ricotta.
Finally, if you prefer a sweeter pie, you can increase the sugar by an additional 1/4 cup. Enjoy your Sweet Ricotta Pie with a dollop of whipped cream or a sprinkle of powdered sugar for an extra touch of indulgence.
Light and Airy Sfogliatelle

Sfogliatelle, also known as “lobster tail,” is a classic Italian pastry with a delightful combination of crisp, flaky layers and a creamy, flavorful filling. Originating from the Campania region, this pastry is a popular treat enjoyed with a cup of espresso or as a dessert. Making sfogliatelle at home can be a rewarding experience that fills your kitchen with the aroma of freshly baked pastries and transports you to the charming streets of Italy.
To attain the characteristic light and airy texture, the dough is rolled incredibly thin and layered with butter, creating delicate, crisp layers. The filling is traditionally made with ricotta cheese and semolina, flavored with hints of cinnamon, vanilla, and candied citrus peels. This recipe will guide you through each step to create sfogliatelle that are perfect for a serving size of 4-6 people, guaranteeing that every bite delivers a burst of Italian flavors.
Ingredients:
- 2 cups all-purpose flour
- 3 tablespoons sugar
- 1/4 teaspoon salt
- 1/2 cup unsalted butter, melted
- 1/2 cup water
- 1 cup ricotta cheese
- 1/2 cup semolina flour
- 1/2 cup milk
- 1/2 cup sugar
- 1 teaspoon vanilla extract
- 1/2 teaspoon ground cinnamon
- 1/4 cup candied orange peel, finely chopped
- 1 egg, beaten (for egg wash)
- Powdered sugar (for dusting)
Instructions:
- Prepare the Dough: In a large bowl, combine the all-purpose flour, sugar, and salt. Gradually add the melted butter and water, mixing until a smooth dough forms. Knead the dough for about 10 minutes until it’s elastic. Wrap the dough in plastic wrap and let it rest in the refrigerator for 2 hours.
- Make the Filling: In a saucepan over medium heat, combine the milk and semolina flour, stirring continuously until it thickens. Remove from heat and let it cool. In another bowl, mix together the ricotta cheese, sugar, vanilla extract, ground cinnamon, and candied orange peel. Once the semolina mixture is cool, fold it into the ricotta mixture. Set aside.
- Roll the Dough: Divide the dough into four equal parts. On a floured surface, roll each piece into a thin rectangle. Brush the top of each rectangle with melted butter. Roll one rectangle tightly into a log, then wrap the next rectangle around the log, continuing until all rectangles are used, creating a layered log.
- Shape the Sfogliatelle: Cut the log into 1-inch thick slices. Using your fingers, gently press the center of each slice to form a cone shape, being careful not to tear the dough. Spoon about 1 tablespoon of filling into each cone and seal the edges by pressing them together.
- Bake the Pastries: Preheat your oven to 400°F (200°C). Place the shaped pastries on a baking sheet lined with parchment paper. Brush each with beaten egg for an even golden color. Bake for 20-25 minutes or until golden brown and crispy.
- Finish and Serve: Remove the pastries from the oven and let them cool slightly. Dust generously with powdered sugar before serving.
Extra Tips:
To attain the best flaky layers, make sure the dough is rolled out as thinly as possible. If you’re short on time, you can prepare the dough and filling a day in advance. Keep them refrigerated separately and assemble them just before baking.
Be careful with the baking time; overbaking can result in a tough texture rather than the desired flaky layers. Enjoy your sfogliatelle fresh from the oven for the best taste and texture.
Crisp and Golden Panettone
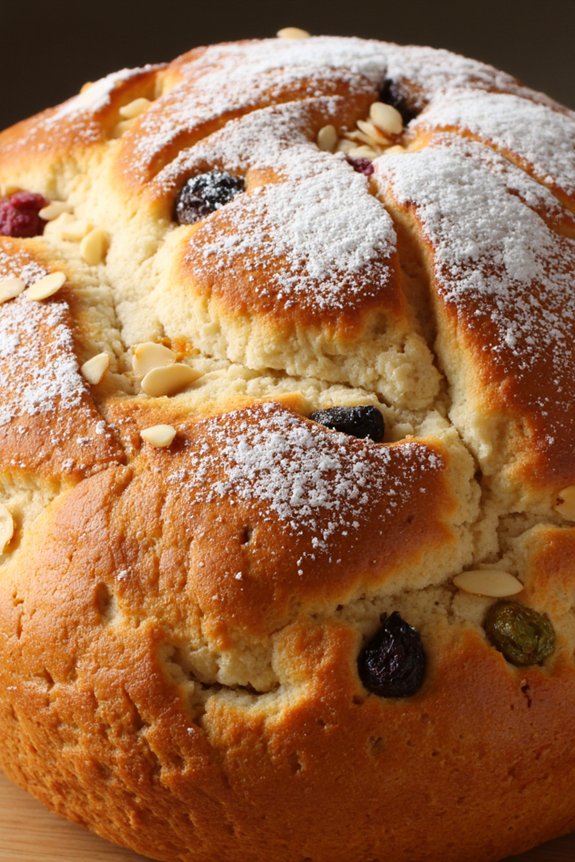
Crisp and Golden Panettone is a classic Italian delight that makes for a perfect festive treat. Its rich, buttery texture combined with a light, airy crumb is complemented by the sweet flavors of dried fruits and a hint of vanilla. While traditionally associated with Christmas, this delightful bread can be enjoyed year-round, especially when you want to impress your guests with your baking prowess.
With a few key ingredients and a little bit of patience, you can create this beautiful golden loaf right in your kitchen. The process of making Panettone involves creating a sweet, enriched dough that requires a bit of time to rise and develop its flavors. The result is a tall, dome-shaped loaf that’s as stunning to look at as it’s delicious to eat.
This recipe is designed to serve 4-6 people, making it a great choice for a family gathering or a cozy holiday celebration. By following these steps, you’ll achieve a perfect Crisp and Golden Panettone that will surely become a staple in your baking repertoire.
Ingredients for Crisp and Golden Panettone (serves 4-6):
- 4 cups all-purpose flour
- 1/2 cup granulated sugar
- 1/2 teaspoon salt
- 1 tablespoon active dry yeast
- 1/2 cup warm milk
- 4 large eggs
- 1 teaspoon vanilla extract
- 1/2 cup unsalted butter, softened
- 1 cup mixed dried fruits (raisins, candied orange peel, etc.)
- Zest of 1 lemon
- Zest of 1 orange
- 1 tablespoon honey
- 1/4 cup slivered almonds
- Powdered sugar for dusting
Cooking Instructions:
- Prepare the Yeast Mixture: In a small bowl, combine the warm milk with the active dry yeast and 1 tablespoon of sugar. Let it sit for about 10 minutes until the mixture becomes frothy.
- Make the Dough: In a large mixing bowl, combine the flour, remaining sugar, and salt. Add the eggs, vanilla extract, softened butter, and yeast mixture. Mix until a dough forms.
- Knead the Dough: Transfer the dough to a floured surface and knead for about 10 minutes until smooth and elastic. Alternatively, use a stand mixer with a dough hook attachment for about 5-7 minutes.
- First Rise: Place the dough in a lightly greased bowl, cover with a damp cloth, and let it rise in a warm place for about 2 hours or until doubled in size.
- Incorporate the Fruits and Zest: Once the dough has risen, gently deflate it and add the mixed dried fruits, lemon and orange zest. Knead the dough gently to distribute the fruits evenly.
- Second Rise: Shape the dough into a ball and place it in a paper panettone mold. Cover it loosely with plastic wrap and let it rise for another 1-2 hours until it has risen to the top of the mold.
- Preheat the Oven: Preheat the oven to 350°F (175°C).
- Bake the Panettone: Brush the top of the dough with honey and sprinkle with slivered almonds. Bake in the preheated oven for 35-40 minutes, or until the top is golden brown and a skewer inserted in the center comes out clean.
- Cool and Serve: Allow the Panettone to cool completely before dusting with powdered sugar. Slice and serve to enjoy its rich, fruity flavor.
Extra Tips:
When making Panettone, patience is key. Allowing adequate time for the dough to rise not only guarantees a light and airy texture but also helps in developing deep, complex flavors.
If you find the top browning too quickly in the oven, loosely tent it with aluminum foil to prevent over-browning. Additionally, if you don’t have a panettone mold, you can use a deep cake tin lined with parchment paper as an alternative.
Enjoy your homemade Crisp and Golden Panettone fresh, or toast slices lightly for a delightful breakfast treat.
Refreshing Lemon Polenta Cake
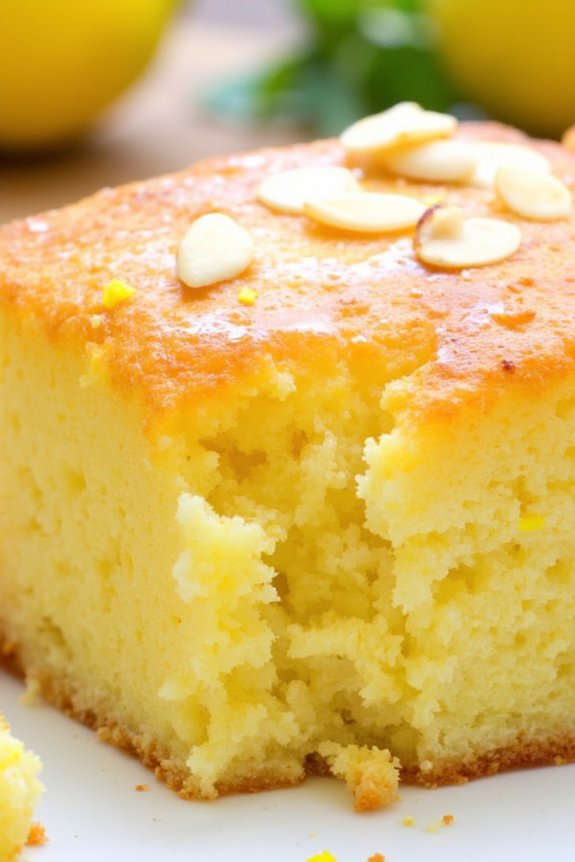
Lemon Polenta Cake is a delightful Italian dessert that combines the zesty freshness of lemons with the unique texture of polenta, making it a perfect choice for a summer afternoon treat or an elegant dinner party dessert.
This cake isn’t only gluten-free but also offers a soft, moist crumb with a slightly gritty texture from the polenta, which contrasts beautifully with the smoothness of the almond flour. The bright lemon flavor, enhanced by a simple lemon syrup glaze, adds a revitalizing tang that makes this cake truly irresistible.
This cake is easy to prepare and uses ingredients commonly found in Italian baking. The polenta provides a rustic charm, while the almonds add a nutty flavor that complements the lemon perfectly.
The cake can be served as it’s or with a dollop of whipped cream or a scoop of vanilla ice cream for extra indulgence. Whether you’re an experienced baker or a novice in the kitchen, this Lemon Polenta Cake recipe will surely delight your taste buds and impress your guests.
Ingredients (Serves 4-6)
- 1 cup (150g) fine polenta
- 1 cup (100g) almond flour
- 1 teaspoon baking powder
- 1/2 teaspoon salt
- 1/2 cup (115g) unsalted butter, softened
- 1 cup (200g) granulated sugar
- 3 large eggs
- Zest of 2 lemons
- Juice of 2 lemons
- 1 teaspoon vanilla extract
For the Lemon Syrup:
- 1/4 cup (50g) granulated sugar
- 1/4 cup (60ml) lemon juice
Instructions
- Preheat the Oven: Preheat your oven to 350°F (175°C). Grease a 9-inch (23cm) round cake pan and line the bottom with parchment paper.
- Mix the Dry Ingredients: In a medium bowl, combine the polenta, almond flour, baking powder, and salt. Whisk them together until well blended and set aside.
- Cream Butter and Sugar: In a large mixing bowl, beat the softened butter and granulated sugar together using an electric mixer on medium speed until light and fluffy, about 3-4 minutes.
- Add Eggs and Flavorings: Add the eggs one at a time to the butter mixture, beating well after each addition. Mix in the lemon zest, lemon juice, and vanilla extract until everything is well incorporated.
- Combine Wet and Dry Ingredients: Gradually add the dry ingredient mixture to the wet ingredients, mixing on low speed until just combined. Be careful not to overmix.
- Bake the Cake: Pour the batter into the prepared cake pan, smoothing the top with a spatula. Bake in the preheated oven for 35-40 minutes, or until a toothpick inserted into the center comes out clean.
- Prepare the Lemon Syrup: While the cake is baking, prepare the lemon syrup by combining the granulated sugar and lemon juice in a small saucepan. Heat over medium heat, stirring until the sugar dissolves and the mixture becomes slightly thickened. Remove from heat and set aside.
- Glaze the Cake: Once the cake is done, remove it from the oven and let it cool in the pan for about 10 minutes. Carefully transfer the cake to a wire rack. While the cake is still warm, use a skewer or toothpick to poke holes all over the top of the cake. Pour the lemon syrup evenly over the cake, allowing it to soak through.
- Serve: Allow the cake to cool completely before serving. Slice and enjoy as is, or serve with whipped cream or ice cream.
Extra Tips
For an added twist, consider adding a tablespoon of poppy seeds to the batter for a slight crunch and extra flavor. If you prefer a more intense lemon flavor, increase the amount of lemon zest in the recipe.
Make sure that the cake is completely cooled before slicing to maintain its structure and avoid crumbling. Storing the cake in an airtight container will keep it moist for up to three days. Enjoy this delightful cake with a cup of tea or coffee for a perfect afternoon treat!
Decadent Chocolate Salami
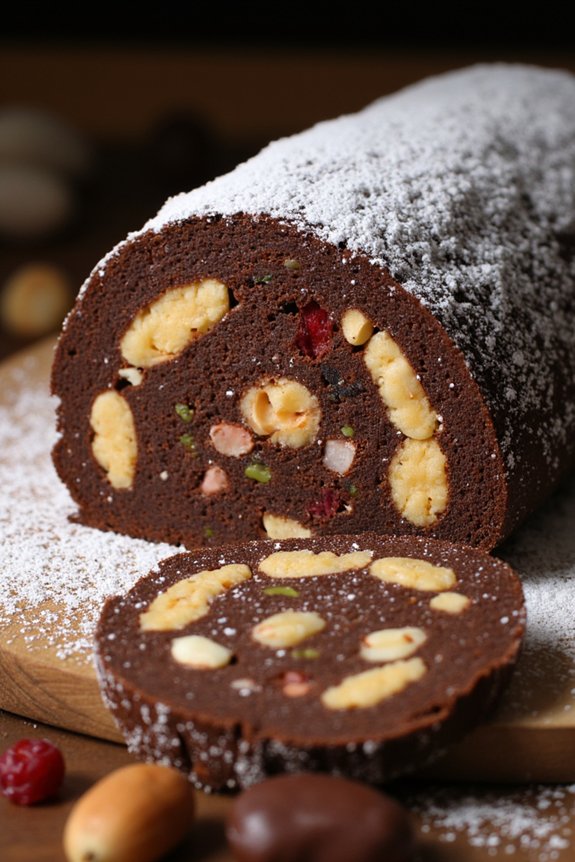
Chocolate Salami is a delightful Italian dessert that’s as visually striking as it’s delicious. Despite its name, it contains no meat and instead combines rich chocolate with crunchy biscuits, nuts, and a hint of liqueur to mimic the appearance of a traditional salami. This no-bake treat is perfect for serving at parties or keeping on hand for a sweet indulgence. Its log-like shape allows for easy slicing, making it a fun and unique addition to any dessert table.
The beauty of Chocolate Salami lies in its simplicity and versatility. You can customize it with your choice of nuts and dried fruits, or even add a sprinkle of powdered sugar for extra flair. Whether you’re an experienced baker or just starting, this recipe is a fantastic way to explore classic Italian flavors with minimal fuss. Here is how to make Chocolate Salami for a serving size of 4-6 people:
Ingredients:
- 200g dark chocolate
- 100g unsalted butter
- 1/2 cup granulated sugar
- 2 tablespoons cocoa powder
- 1 tablespoon of your favorite liqueur (optional)
- 150g digestive biscuits or tea biscuits
- 1/4 cup chopped nuts (such as almonds or hazelnuts)
- 1/4 cup dried fruits (such as raisins or cranberries)
- Powdered sugar for dusting
Instructions:
- Prepare the Chocolate Mixture:
- Start by melting the dark chocolate and butter together in a heatproof bowl over a pot of simmering water (double boiler method). Stir continuously until smooth, then remove from heat.
- Combine Dry Ingredients:
- In a separate bowl, break the digestive biscuits into small pieces. Add in the chopped nuts and dried fruits.
- Mix Ingredients Together:
- Stir the sugar, cocoa powder, and liqueur (if using) into the melted chocolate mixture. Once well combined, pour this mixture over the biscuit, nut, and fruit mixture. Use a spatula to mix thoroughly, ensuring all dry ingredients are well coated with the chocolate mixture.
- Shape the Salami:
- Lay a piece of plastic wrap or parchment paper on a flat surface. Spoon the chocolate mixture onto the wrap, shaping it into a log. Roll it up tightly in the wrap, twisting the ends to secure. Refrigerate for at least 4 hours, or until firm.
- Serve the Chocolate Salami:
- Once firm, remove the chocolate salami from the refrigerator and unwrap it. Dust generously with powdered sugar to mimic the appearance of salami casing. Slice into 1/2-inch pieces to serve.
Extra Tips:
For the best results, use high-quality dark chocolate, as it greatly impacts the flavor of the dessert. Feel free to experiment with different types of nuts and dried fruits to suit your preferences. If you prefer a sweeter treat, milk chocolate can be substituted for dark chocolate.
When shaping the salami, be sure to roll it tightly to avoid air pockets, which can affect the texture. Finally, allow the salami to sit at room temperature for a few minutes before slicing to make cutting easier and to bring out the flavors. Enjoy your decadent creation!