

Looking to add some fun to your next gathering? Italian tapas-style recipes are perfect for creating a lively spread that everyone will love. Think about the fresh taste of bruschetta with tomato and basil or the comforting, cheesy goodness of arancini. These vibrant dishes bring a joyful touch to any occasion. Let’s explore these exciting bites together.
Bruschetta With Tomato and Basil
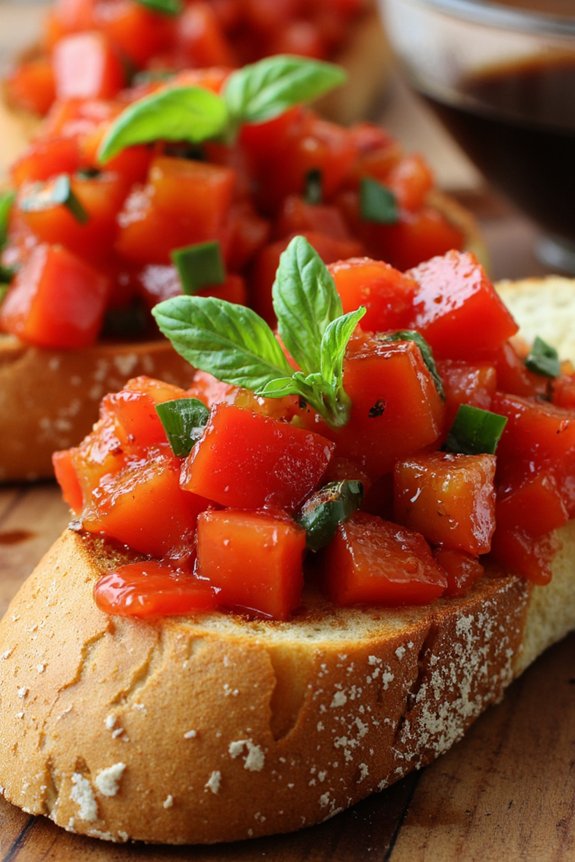
Bruschetta with tomato and basil is a classic Italian appetizer that embodies simplicity and freshness. It’s a perfect dish for those who love the vibrant flavors of ripe tomatoes combined with the aromatic scent of fresh basil. This dish isn’t only quick and easy to prepare, but it also serves as an excellent starter for any Italian tapas-style meal. The key to great bruschetta lies in using the freshest ingredients possible, ensuring the flavors shine through and complement each other beautifully.
Typically served as an antipasto, bruschetta with tomato and basil is a great way to make use of fresh produce, especially during the summer months when tomatoes are at their peak. It involves lightly toasting slices of rustic bread before topping them with a mixture of diced tomatoes, fresh basil leaves, garlic, and a drizzle of olive oil. The toasted bread provides a crunchy contrast to the juicy tomatoes, making each bite a delightful experience. For a serving size of 4-6 people, follow the recipe below.
Ingredients:
- 6 ripe tomatoes, diced
- 1 loaf of rustic Italian bread (or baguette)
- 1 clove of garlic, halved
- 1/4 cup extra-virgin olive oil
- 1 cup fresh basil leaves, chopped
- Salt, to taste
- Black pepper, to taste
- Balsamic glaze (optional)
Instructions:
- Prepare the Bread:
- Preheat your oven to 400°F (200°C). Slice the loaf of bread into 1/2-inch thick slices. Arrange them on a baking sheet.
- Toast the Bread:
- Place the baking sheet in the preheated oven and toast the bread slices for about 5-7 minutes or until they’re golden brown. Keep an eye on them to prevent burning.
- Rub with Garlic:
- Once toasted, remove the bread from the oven and immediately rub each slice with the cut side of the garlic clove. This will infuse the bread with a subtle garlic flavor.
- Prepare the Tomato Mixture:
- In a medium bowl, combine the diced tomatoes, chopped basil, olive oil, salt, and pepper. Mix well to combine all the ingredients.
- Assemble the Bruschetta:
- Spoon the tomato mixture generously over each slice of toasted bread. Make sure the tomatoes are evenly distributed.
- Finish with Balsamic (optional):
- If desired, drizzle a small amount of balsamic glaze over the top of each bruschetta for an added layer of flavor.
Extra Tips:
When making bruschetta, it’s essential to use high-quality olive oil, as it greatly impacts the overall taste of the dish. If possible, choose a good extra-virgin olive oil with a rich flavor profile.
Additionally, if you’re preparing this dish ahead of time, store the tomato mixture separately and top the bread just before serving to prevent it from becoming soggy. For a bit of variation, you can also add a sprinkle of grated Parmesan cheese or a few slices of fresh mozzarella, which will add a creamy dimension to your bruschetta.
Prosciutto-Wrapped Melon
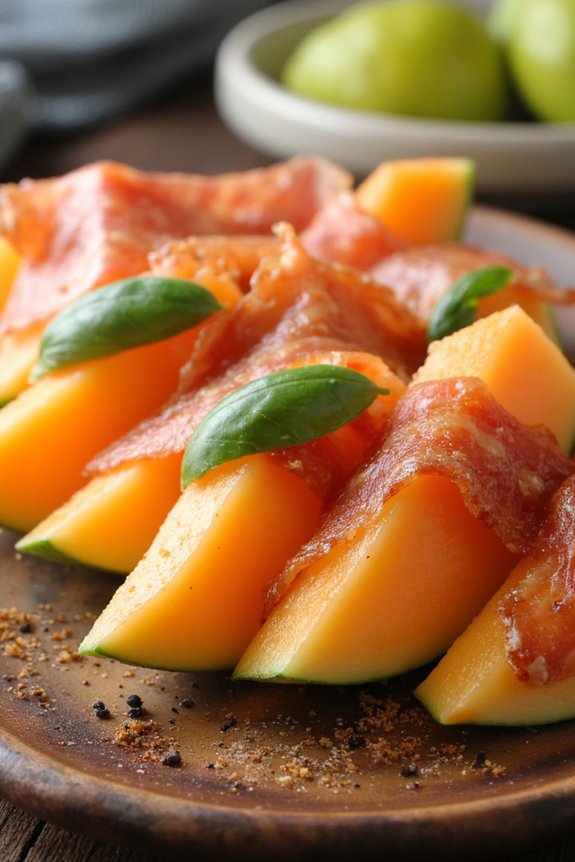
Prosciutto-Wrapped Melon is a delightful Italian tapas-style dish that combines the savory flavors of cured ham with the invigorating sweetness of ripe melon. This simple yet elegant appetizer is perfect for summer gatherings, outdoor parties, or any occasion where you want to impress your guests with minimal effort.
The key to this dish lies in selecting the freshest ingredients: ripe, juicy melon and thinly sliced, high-quality prosciutto. As the melon slices are wrapped in prosciutto, a harmonious balance of flavors is created, making every bite a perfect blend of sweet and salty.
This dish isn’t only easy to prepare, but it also offers a stunning presentation that adds a touch of sophistication to your table. Prosciutto-Wrapped Melon is typically served cold, making it a revitalizing starter that can be prepared ahead of time. This recipe serves 4-6 people, guaranteeing that everyone gets to enjoy a taste of this delicious Italian treat.
With just a few ingredients and simple steps, you can create an appetizer that will become a favorite at any gathering.
Ingredients for 4-6 people:
- 1 ripe cantaloupe or honeydew melon
- 12 thin slices of prosciutto
- Fresh basil leaves (optional)
- Freshly ground black pepper (optional)
Cooking Instructions:
- Prepare the Melon: Start by cutting the melon in half and removing the seeds with a spoon. Once the seeds are removed, slice each half into wedges. Depending on the size of your melon, you should aim for about 12 wedges. Carefully remove the rind from each wedge, leaving just the juicy flesh.
- Slice the Prosciutto: If your prosciutto slices are large, you may need to cut them in half lengthwise to guarantee they wrap neatly around the melon wedges.
- Wrap the Melon: Take a slice of prosciutto and gently wrap it around the center of each melon wedge. If desired, tuck a fresh basil leaf between the prosciutto and melon for added flavor.
- Arrange and Serve: Arrange the prosciutto-wrapped melon wedges on a serving platter. For a finishing touch, you can sprinkle a bit of freshly ground black pepper over the top. Serve immediately or refrigerate for up to an hour before serving.
Extra Tips:
To guarantee the best flavor, choose a melon that’s fragrant and slightly soft to the touch, indicating ripeness. If you prefer a bit of a kick, you can add a light drizzle of balsamic glaze over the wrapped melon wedges before serving.
Additionally, for a more colorful presentation, consider using a mix of cantaloupe and honeydew melon. Remember, the quality of the prosciutto is vital; opt for a high-quality variety with a delicate, melt-in-your-mouth texture.
Caprese Skewers
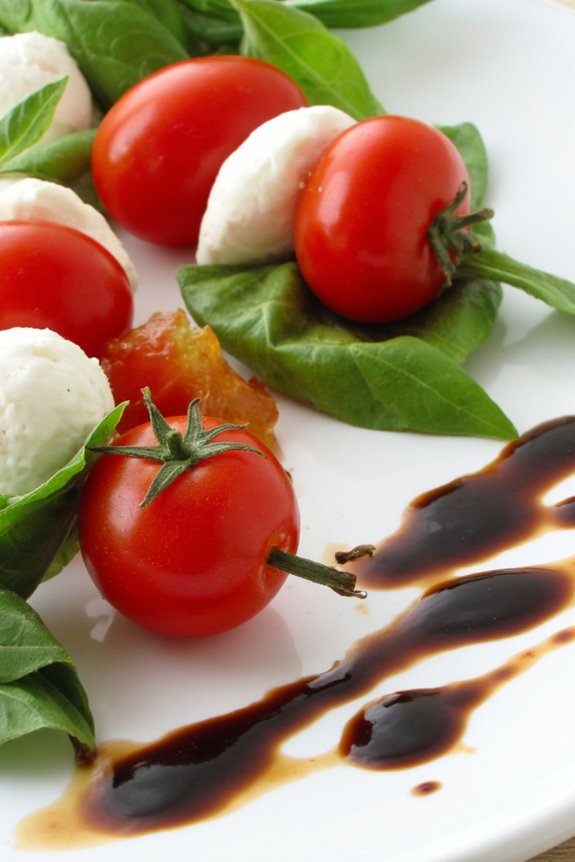
Caprese skewers are a delightful and vibrant appetizer inspired by the classic Italian Caprese salad. These skewers capture the essence of fresh Italian flavors in a bite-sized format, making them perfect for any tapas-style gathering. The combination of ripe cherry tomatoes, creamy mozzarella balls, and fragrant basil leaves drizzled with balsamic glaze offers a rejuvenating and savory experience with every bite.
The simplicity of these skewers allows the natural flavors of the ingredients to shine, making them a favorite at parties and casual get-togethers alike. These skewers aren’t only visually appealing but also incredibly easy to prepare. They’re a great option for hosts looking to create a quick yet impressive dish that requires minimal cooking skills.
The vibrant reds, whites, and greens of the ingredients echo the colors of the Italian flag, adding a festive touch to any table setting. Whether you’re serving them as an appetizer or as part of a larger tapas spread, Caprese skewers are sure to be a hit with your guests.
Ingredients (serving size: 4-6 people):
- 20 cherry tomatoes
- 20 small mozzarella balls (bocconcini)
- 20 fresh basil leaves
- 2 tablespoons extra-virgin olive oil
- Salt and pepper to taste
- Balsamic glaze
- 20 wooden skewers or toothpicks
Cooking Instructions:
- Prepare the Ingredients: Begin by washing the cherry tomatoes and fresh basil leaves under cold running water. Pat them dry with a paper towel. Drain the mozzarella balls from their packaging liquid and set them aside.
- Assemble the Skewers: Take a skewer or toothpick, and start by threading one cherry tomato, followed by one basil leaf, and then a mozzarella ball. Repeat this sequence until all ingredients are used, confirming each skewer has an even distribution of tomato, basil, and mozzarella.
- Season the Skewers: Arrange the assembled skewers on a serving platter. Drizzle them lightly with extra-virgin olive oil. Sprinkle a pinch of salt and a dash of freshly ground black pepper over the skewers to enhance their flavor.
- Add the Finishing Touch: Just before serving, drizzle the balsamic glaze over the skewers. Be generous enough to add flavor but careful not to overwhelm the other ingredients.
- Serve: Serve the Caprese skewers immediately, or refrigerate them for up to an hour if you need to prepare them in advance. They’re best enjoyed fresh.
Extra Tips:
When choosing your ingredients, opt for fresh, high-quality produce to maximize the flavors of this dish. If you can’t find bocconcini, you can use any small-size mozzarella balls, ensuring they fit well on the skewers.
For a more robust flavor, consider using heirloom cherry tomatoes or a mix of different colors. If you find the balsamic glaze too thick, you can thin it out slightly by mixing it with a bit of olive oil. Finally, confirm the skewers are well-balanced and not overfilled, as this will make them easier to handle and eat.
Arancini (Sicilian Rice Balls)

Arancini, or Sicilian Rice Balls, are a beloved Italian street food that have captured the taste buds of many with their crispy exterior and creamy, flavorful interior. Traditionally filled with a mixture of cheese, ragù, or vegetables, these delightful treats are often served as appetizers or snacks. The name “arancini” is derived from the Italian word for “little oranges,” which is a nod to their round shape and golden color. Perfect for any occasion, arancini are a great way to bring a touch of Italy to your tapas spread.
Making arancini at home might seem intimidating, but with a bit of preparation and care, these rice balls can be a show-stopping addition to your table. The key to perfect arancini is achieving the right balance of textures—crispy on the outside and soft and savory on the inside. By following this recipe, you can create a batch of arancini that will transport your guests straight to the sun-drenched streets of Sicily. This recipe serves 4-6 people.
Ingredients:
- 2 cups Arborio rice
- 4 cups chicken or vegetable broth
- 1/2 cup white wine
- 1/2 cup grated Parmesan cheese
- 2 tablespoons unsalted butter
- 1 small onion, finely chopped
- 2 cloves garlic, minced
- Salt and pepper to taste
- 1 cup mozzarella cheese, cut into small cubes
- 1 cup all-purpose flour
- 3 large eggs, beaten
- 2 cups breadcrumbs
- Vegetable oil for frying
Cooking Instructions:
- Prepare the Rice: In a large saucepan, melt the butter over medium heat and add the chopped onion. Sauté for 2-3 minutes until translucent. Add the minced garlic and cook for another minute. Stir in the Arborio rice, cooking until the grains are lightly toasted, about 2 minutes.
- Cook the Rice: Pour in the white wine and let it simmer until mostly absorbed. Gradually add the broth, one ladle at a time, allowing the rice to absorb the liquid before adding more. Stir often, and continue this process until the rice is al dente and creamy, about 18-20 minutes. Remove from heat, stir in the Parmesan cheese, and season with salt and pepper. Allow the rice mixture to cool completely.
- Form the Arancini: Once the rice is cool, take a small handful and form a ball around a cube of mozzarella cheese. Verify the cheese is completely enclosed. Repeat until all the rice and cheese have been used.
- Coat the Arancini: Prepare three separate bowls: one with flour, one with beaten eggs, and one with breadcrumbs. Roll each rice ball in flour, then dip in the egg, and finally coat with breadcrumbs. Make certain each ball is fully covered.
- Fry the Arancini: In a deep fryer or large pot, heat the vegetable oil to 350°F (175°C). Carefully drop the arancini into the hot oil, a few at a time, and fry until golden brown, about 3-4 minutes. Remove with a slotted spoon and drain on paper towels.
- Serve: Serve the arancini warm, either on their own or with a side of marinara sauce for dipping.
Tips:
For an extra flavor boost, consider adding herbs like parsley or basil to the rice mixture, or mixing in some finely chopped prosciutto. If you don’t have a deep fryer, a heavy-bottomed pot will work just as well, just make sure you maintain a consistent oil temperature.
Finally, if you prefer to bake these instead of frying, place them on a baking sheet and bake at 400°F (200°C) for 25-30 minutes or until golden, turning halfway through.
Stuffed Mushrooms With Pancetta

Stuffed mushrooms are a classic appetizer that have delighted palates for generations, but when you add pancetta into the mix, they reach a whole new level of flavor. The savory, smoky taste of the pancetta pairs perfectly with the earthiness of the mushrooms, creating a dish that’s both elegant and comforting.
This Italian tapas-style recipe is perfect for small gatherings or as a delightful starter for a dinner party. The rich, buttery filling guarantees that each bite is packed with flavor, making these stuffed mushrooms an irresistible treat.
This recipe combines the hearty texture of mushrooms with the creamy richness of cheese and the salty, crisp bite of pancetta. Whether you’re a fan of traditional Italian cuisine or just looking for a new way to enjoy an appetizer, these stuffed mushrooms with pancetta are bound to impress. Easy to prepare and even easier to enjoy, this dish is a wonderful addition to any menu.
For a serving size of 4-6 people, gather the following ingredients and follow the steps below to bring this delightful recipe to life.
Ingredients:
- 24 large button mushrooms
- 150g pancetta, diced
- 1 small onion, finely chopped
- 2 cloves garlic, minced
- 100g cream cheese, softened
- 50g Parmesan cheese, grated
- 2 tablespoons fresh parsley, chopped
- 1 tablespoon olive oil
- Salt and pepper to taste
Cooking Instructions:
- Preheat the Oven: Set your oven to 375°F (190°C) to make sure it’s hot enough for baking the mushrooms once they’re prepared.
- Prepare the Mushrooms: Clean the mushrooms with a damp paper towel to remove any dirt. Carefully remove the stems from the mushrooms and set the caps aside. Finely chop the stems.
- Cook the Pancetta: In a skillet over medium heat, add the olive oil and cook the pancetta until it’s crisp and golden brown. This should take about 5 minutes. Remove the pancetta from the skillet and set it aside, leaving the oil in the pan.
- Sauté the Vegetables: In the same skillet, add the chopped mushroom stems, onion, and garlic. Sauté until the vegetables are soft and the moisture from the mushrooms has evaporated, about 8 minutes.
- Mix the Filling: In a medium bowl, combine the pancetta, sautéed vegetables, cream cheese, Parmesan cheese, and parsley. Season with salt and pepper to taste. Mix everything well until you have a uniform filling.
- Stuff the Mushrooms: Using a spoon, fill each mushroom cap with the prepared mixture, pressing gently to make sure the filling stays in place.
- Bake the Mushrooms: Arrange the stuffed mushroom caps on a baking sheet lined with parchment paper. Bake in the preheated oven for 20-25 minutes, or until the tops are golden brown and the mushrooms are tender.
- Serve: Remove from the oven and let them cool slightly before serving warm. Enjoy them as a standalone appetizer or as part of a tapas spread.
Extra Tips:
When preparing stuffed mushrooms, it’s important to not soak them in water as they can become overly soggy; instead, clean them with a damp towel.
If you prefer a little more heat, consider adding a pinch of red pepper flakes to the filling mixture. For an extra layer of flavor, you can also add a splash of white wine to the sautéed vegetables, allowing it to reduce before mixing with the rest of the ingredients.
Finally, if you’re looking to save time, the filling can be prepared a day in advance and stored in the refrigerator until you’re ready to assemble and bake the mushrooms.
Mini Margherita Pizzas

Looking for a delightful Italian tapas-style dish that packs all the flavors of a classic pizza into bite-sized portions? Mini Margherita Pizzas are the perfect choice! These small pizzas offer a wonderful combination of crispy crust, tangy tomato sauce, creamy mozzarella, and fresh basil. They make an excellent appetizer for parties or a light snack for a casual gathering.
The simplicity of the ingredients highlights the traditional flavors of Italy, making these mini pizzas a favorite for both adults and children alike.
The key to a delicious Mini Margherita Pizza lies in using high-quality ingredients. Fresh mozzarella cheese, ripe tomatoes, and fragrant basil leaves are essential to capture the authentic taste of a Margherita pizza. The pizzas are baked until perfectly golden, guaranteeing a crispy base that complements the soft, melted cheese.
This easy-to-make recipe can be prepared in under 30 minutes, making it an ideal option for impromptu get-togethers or when you’re craving a quick taste of Italy.
Ingredients (Serves 4-6):
- 12 mini pizza bases or 12 slices of French baguette
- 1 cup of tomato sauce
- 2 cups of fresh mozzarella cheese, sliced
- 1/4 cup of extra virgin olive oil
- 1/2 teaspoon of salt
- 1/2 teaspoon of black pepper
- Fresh basil leaves for garnish
- 1 teaspoon of dried oregano
- 1 clove of garlic, minced
Cooking Instructions:
- Preheat the Oven: Begin by preheating your oven to 400°F (200°C). This temperature guarantees the mini pizzas cook evenly and achieve a crispy crust.
- Prepare the Bases: Arrange the mini pizza bases or baguette slices on a baking sheet lined with parchment paper. Brush each piece lightly with olive oil to promote a crispy texture once baked.
- Add the Sauce: In a small bowl, mix the tomato sauce with the minced garlic, salt, and black pepper. Spread a thin layer of this seasoned sauce over each pizza base or baguette slice.
- Top with Cheese: Place slices of fresh mozzarella cheese on top of the tomato sauce. Guarantee each mini pizza has an even distribution of cheese for a consistent flavor.
- Season and Bake: Sprinkle a pinch of dried oregano over each pizza. Place the baking sheet in the preheated oven and bake for about 10-12 minutes, or until the cheese is melted and bubbly, and the edges are golden brown.
- Garnish and Serve: Remove the pizzas from the oven and let them cool for a minute. Garnish each mini pizza with fresh basil leaves. Serve immediately for the best taste experience.
Extra Tips:
To enhance the flavor of your Mini Margherita Pizzas, consider using a pizza stone if you have one, as it helps achieve a perfectly crisp base.
If you’re using a baguette, lightly toasting the slices before adding toppings can prevent them from becoming soggy. For a touch of spice, sprinkle a bit of red pepper flakes over the top before baking.
Grilled Eggplant Rollatini
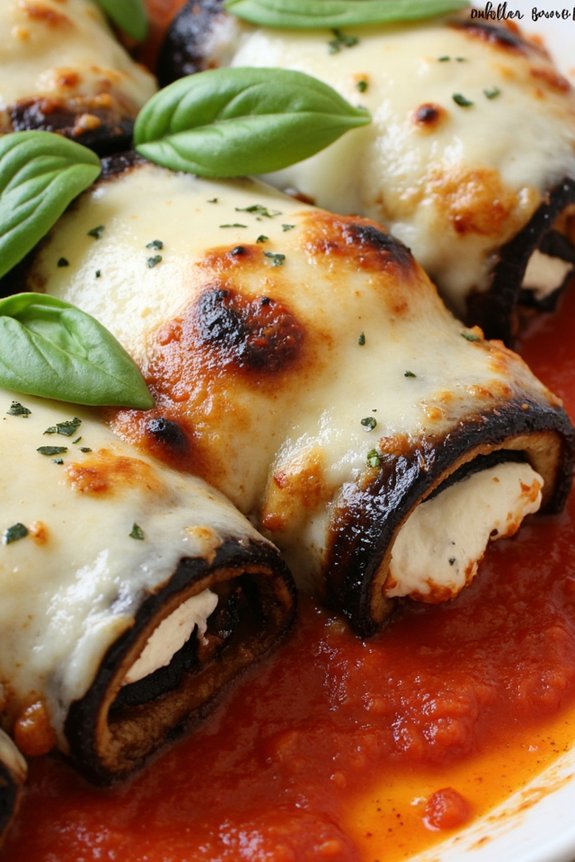
Grilled Eggplant Rollatini is a delightful Italian tapas-style dish that beautifully combines the smoky flavor of grilled eggplant with a rich, creamy cheese filling. This dish makes for an excellent appetizer or a light main course, perfect for gatherings or a cozy dinner at home.
The eggplant slices are grilled to perfection, providing a slightly charred yet tender base, which is then filled with a blend of ricotta, Parmesan, and fresh herbs, before being rolled up and baked with a tangy tomato sauce. Not only does this dish offer a burst of flavors, but it also brings a touch of elegance to your table.
The combination of textures, from the soft, creamy filling to the firm eggplant exterior, guarantees each bite is a delightful experience. Whether you’re entertaining guests or simply treating yourself, Grilled Eggplant Rollatini is sure to impress. This recipe serves 4-6 people, making it a versatile option for various occasions.
Ingredients:
- 2 large eggplants
- 1 cup ricotta cheese
- 1/2 cup grated Parmesan cheese
- 1 cup shredded mozzarella cheese
- 1 cup tomato sauce
- 1 egg
- 2 tablespoons chopped fresh basil
- 2 tablespoons chopped fresh parsley
- 2 cloves garlic, minced
- Salt and pepper to taste
- Olive oil for grilling
Cooking Instructions:
- Prepare the Eggplant: Slice the eggplants lengthwise into 1/4-inch thick slices. Sprinkle both sides with salt and let them sit for 15-20 minutes to draw out excess moisture. Rinse and pat dry with paper towels.
- Grill the Eggplant: Preheat your grill or grill pan over medium-high heat. Brush the eggplant slices lightly with olive oil and grill for about 3-4 minutes on each side until they’re tender and have grill marks. Set them aside to cool slightly.
- Make the Filling: In a medium bowl, combine the ricotta cheese, Parmesan cheese, egg, minced garlic, chopped basil, chopped parsley, salt, and pepper. Mix well until all ingredients are evenly incorporated.
- Assemble the Rollatini: Preheat your oven to 375°F (190°C). Spread a thin layer of tomato sauce on the bottom of a baking dish. Spoon about 1-2 tablespoons of the ricotta mixture onto one end of each eggplant slice, then roll up the slice around the filling. Place each roll seam-side down in the baking dish.
- Add the Sauce and Cheese: Pour the remaining tomato sauce over the top of the eggplant rolls. Sprinkle the shredded mozzarella cheese over the top.
- Bake the Rollatini: Cover the dish with aluminum foil and bake in the preheated oven for 20 minutes. Remove the foil and bake for an additional 10 minutes, or until the cheese is bubbly and golden brown.
Extra Tips:
When selecting eggplants, look for ones that are firm and have a smooth, shiny skin without blemishes. If you prefer a spicier version, you can add a pinch of red pepper flakes to the ricotta filling.
Ascertain the eggplants are grilled until tender but not too soft, as they need to hold their shape when rolled. This dish can also be prepared ahead of time and baked just before serving, making it a convenient option for entertaining.
Enjoy your Grilled Eggplant Rollatini with a side of crusty bread to soak up the delicious tomato sauce!
Italian-Style Meatballs

These Italian-style meatballs are the perfect addition to any tapas spread, offering a delightful blend of classic Italian flavors in bite-sized form.
These small yet flavorful meatballs are crafted with a combination of ground beef and pork, infused with the aromatic notes of garlic, parsley, and Parmesan cheese. The meatballs are then simmered gently in a rich tomato sauce, allowing them to absorb all the delicious flavors and ensuring that each bite is juicy and tender.
Ideal for sharing, these meatballs can be served as an appetizer or as part of a larger tapas meal, bringing a taste of Italy to your table.
The key to making these meatballs truly irresistible is in the balance of ingredients, which creates a moist and flavorful meatball that pairs perfectly with the tangy tomato sauce.
Whether you’re hosting a small gathering or simply looking to enjoy a variety of small dishes, these Italian-style meatballs are sure to be a hit. Gather your ingredients, and let’s get cooking!
Ingredients (Serves 4-6):
- 1/2 pound ground beef
- 1/2 pound ground pork
- 1/2 cup breadcrumbs
- 1/4 cup grated Parmesan cheese
- 2 cloves garlic, minced
- 2 tablespoons chopped fresh parsley
- 1 egg
- Salt and pepper to taste
- 1 tablespoon olive oil
- 2 cups tomato sauce
- Fresh basil leaves for garnish
Instructions:
- Prepare the Meatball Mixture: In a large mixing bowl, combine the ground beef and ground pork. Add the breadcrumbs, Parmesan cheese, minced garlic, chopped parsley, and the egg. Season the mixture with salt and pepper to taste. Use your hands to mix everything together until well combined, being careful not to overmix as this can make the meatballs tough.
- Shape the Meatballs: Use a tablespoon to scoop out portions of the meat mixture and roll them into small, even-sized balls. Aim for the meatballs to be about 1 inch in diameter, so they cook evenly and are easy to eat as part of a tapas spread.
- Cook the Meatballs: In a large skillet, heat the olive oil over medium heat. Once the oil is hot, add the meatballs in a single layer, ensuring they’ve enough room to brown evenly. Cook the meatballs for about 4-5 minutes on each side, turning them carefully until they’re browned all over.
- Simmer in Tomato Sauce: Once the meatballs are browned, pour the tomato sauce over them in the skillet. Reduce the heat to low and cover the skillet. Let the meatballs simmer in the sauce for about 15-20 minutes, allowing them to cook through and absorb the rich flavors of the sauce.
- Serve: Once cooked, remove the meatballs from the heat. Transfer them to a serving dish and garnish with fresh basil leaves. Serve warm as part of your tapas selection.
Extra Tips:
For a gluten-free version, you can substitute the breadcrumbs with gluten-free breadcrumbs or even a small amount of almond flour.
If you prefer a spicier dish, consider adding a pinch of red pepper flakes to the meatball mixture or the tomato sauce.
These meatballs can be made in advance and stored in the refrigerator for up to two days, making them a convenient option for entertaining. Simply reheat them gently in the sauce before serving.
Focaccia With Rosemary and Sea Salt
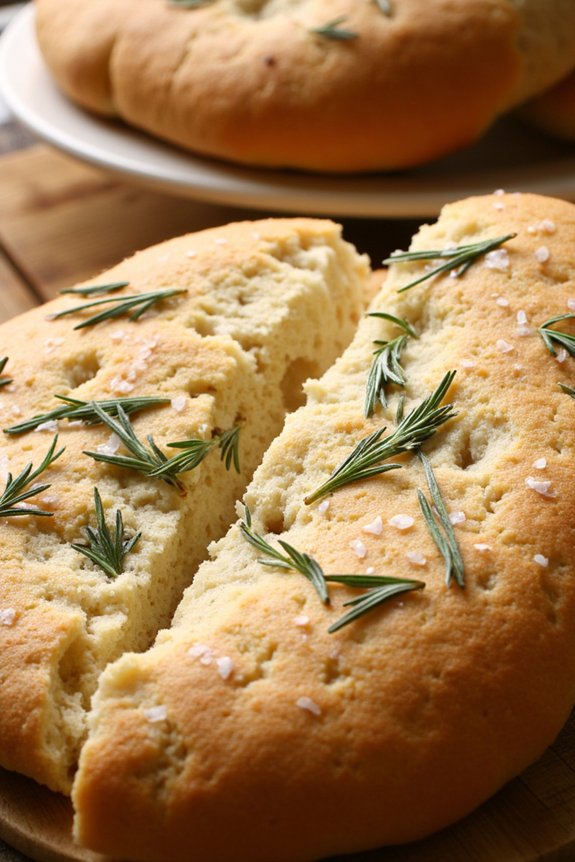
Focaccia With Rosemary and Sea Salt is a delightful Italian bread that’s perfect for tapas-style entertaining. This bread is light, airy, and full of flavor, making it an ideal accompaniment to a variety of dishes or as a standalone treat. Its crisp crust, soft interior, and the fragrant aroma of rosemary make it a crowd-pleaser in any gathering. The addition of sea salt enhances its flavor, providing a savory contrast to the bread’s subtle sweetness.
Preparing this focaccia is an excellent way to practice your bread-making skills, and the result is a rustic, yet sophisticated dish that can be served warm or at room temperature. Whether you’re hosting a dinner party or looking for a comforting snack, this recipe offers a taste of Italy that’s sure to impress your guests. The following recipe serves 4-6 people, making it perfect for small gatherings or family meals.
Ingredients:
- 500g all-purpose flour
- 325ml warm water
- 2 teaspoons active dry yeast
- 1 teaspoon sugar
- 1 teaspoon salt
- 60ml olive oil, plus extra for drizzling
- 2 tablespoons fresh rosemary leaves
- 1 tablespoon coarse sea salt
Cooking Instructions:
- Activate the Yeast: In a small bowl, combine the warm water, sugar, and yeast. Stir gently and let it sit for about 5-10 minutes until frothy. This indicates that the yeast is active.
- Mix the Dough: In a large mixing bowl, combine the flour and salt. Make a well in the center and pour in the yeast mixture and 2 tablespoons of olive oil. Mix until a dough begins to form.
- Knead the Dough: Transfer the dough to a lightly floured surface and knead for about 10 minutes until smooth and elastic. Alternatively, you can use a stand mixer with a dough hook attachment for about 5-6 minutes.
- First Rise: Place the dough in a lightly oiled bowl, cover with a damp cloth, and let it rise in a warm place for about 1-1.5 hours, or until it has doubled in size.
- Prepare the Baking Sheet: Preheat your oven to 220°C (428°F). Grease a baking sheet with olive oil.
- Shape the Dough: Punch down the risen dough and place it on the prepared baking sheet. Stretch and press it out to fit the sheet, approximately 1.5 cm thick.
- Add Toppings: Drizzle the top with olive oil, then use your fingers to create dimples all over the surface of the dough. Sprinkle the rosemary leaves and sea salt evenly over the top.
- Second Rise: Cover the dough loosely with plastic wrap and let it rise again for about 20-30 minutes.
- Bake the Focaccia: Place in the preheated oven and bake for 20-25 minutes, or until the top is golden brown and the bread sounds hollow when tapped.
- Cool and Serve: Allow the focaccia to cool on a wire rack before cutting it into pieces. Serve warm or at room temperature.
Extra Tips:
When making focaccia, the quality of the olive oil can greatly impact the flavor, so opt for a good-quality extra virgin olive oil. Fresh rosemary is preferred over dried, as it provides a more vibrant aroma and flavor.
If you desire a softer crust, you can cover the focaccia with a clean kitchen towel as it cools. Additionally, feel free to experiment with other toppings such as olives, sun-dried tomatoes, or caramelized onions to customize your focaccia to your liking.
Zucchini Fritters

Zucchini Fritters are a delightful Italian-inspired tapas dish that brings together the fresh, light flavors of zucchini with a crispy, savory exterior. These fritters are perfect for a casual gathering or as part of a tapas spread, offering a satisfying bite that’s both healthy and delicious.
The key to making these fritters exceptional lies in balancing the moisture content of the zucchini with the right blend of spices and ingredients to guarantee that each fritter is perfectly golden and crisp.
Creating these fritters involves a simple process of mixing grated zucchini with a few pantry staples to form a batter that’s then lightly pan-fried until golden brown. This recipe yields a serving size perfect for 4-6 people, making it ideal for sharing as part of a larger meal or enjoying as a stand-alone snack.
The combination of fresh zucchini, aromatic herbs, and a hint of cheese makes these fritters a tempting treat for any occasion.
Ingredients for 4-6 Servings:
- 4 medium zucchinis
- 1 teaspoon salt
- 2 large eggs
- 1/3 cup all-purpose flour
- 1/3 cup grated Parmesan cheese
- 1/4 cup chopped fresh parsley
- 2 cloves garlic, minced
- 1/2 teaspoon black pepper
- 1/2 teaspoon baking powder
- Olive oil for frying
Cooking Instructions:
- Prepare the Zucchini: Start by grating the zucchinis using a box grater or food processor. Place the grated zucchini in a large bowl and sprinkle with the teaspoon of salt. Allow it to sit for about 10 minutes to draw out excess moisture.
- Drain the Zucchini: After the zucchini has sat for 10 minutes, use a clean kitchen towel or cheesecloth to squeeze out as much moisture as possible. This step is vital to verify the fritters hold together and become crispy.
- Mix the Ingredients: In a separate large bowl, beat the eggs and then add the flour, Parmesan cheese, parsley, garlic, black pepper, and baking powder. Stir until well combined. Add the drained zucchini to the mixture and mix until the batter is evenly combined.
- Fry the Fritters: Heat a generous amount of olive oil in a large skillet over medium heat. Using a spoon or small scoop, drop spoonfuls of the zucchini batter into the hot oil, flattening them slightly with the back of the spoon. Fry for about 3-4 minutes on each side, or until they’re golden brown and crispy.
- Drain and Serve: Once cooked, transfer the fritters to a plate lined with paper towels to drain any excess oil. Serve warm as a tapas appetizer or side dish, perhaps with a dollop of Greek yogurt or a squeeze of lemon juice for added zest.
Extra Tips:
To guarantee the crispiest fritters, make sure to thoroughly squeeze out the moisture from the zucchini. Too much moisture can make the fritters soggy and prevent them from becoming crispy.
Additionally, it’s important not to overcrowd the pan while frying, as this can lower the oil temperature and result in less crispy fritters. If you prefer a little heat, consider adding a pinch of red pepper flakes to the batter for a subtle kick.
Enjoy experimenting with different herbs like dill or mint for a unique flavor twist!
Baked Ricotta and Spinach Bites
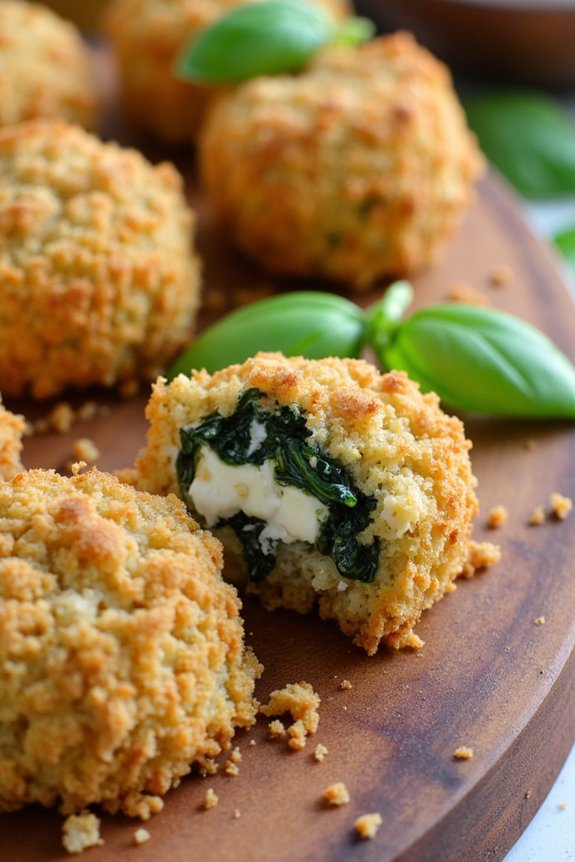
Baked Ricotta and Spinach Bites are a delightful Italian tapas-style dish that brings together the creamy texture of ricotta cheese and the earthy flavor of spinach into a deliciously satisfying bite-sized treat. Perfect for a light appetizer or a party snack, these bites are easy to prepare and incredibly versatile.
The combination of cheese and spinach is enhanced by a hint of garlic and nutmeg, creating a savory experience that will leave your guests craving more. This recipe is designed to serve 4-6 people, making it ideal for small gatherings or intimate dinners.
The key to achieving the perfect texture lies in balancing the moisture from the ricotta with the freshness of the spinach, guaranteeing that each bite is both creamy and substantial. By baking these bites, you achieve a slightly crisp exterior that complements the soft interior, making each mouthful a delightful contrast of textures.
Ingredients (serving size: 4-6 people):
- 2 cups fresh spinach leaves, chopped
- 1 cup ricotta cheese
- 1/2 cup grated Parmesan cheese
- 1 large egg
- 1 garlic clove, minced
- 1/4 teaspoon nutmeg
- Salt and pepper to taste
- Olive oil for drizzling
- 1/4 cup breadcrumbs
- Fresh basil leaves for garnish (optional)
Cooking Instructions:
- Preheat the Oven: Begin by preheating your oven to 375°F (190°C). This guarantees it’s ready and at the right temperature by the time you prepare the bites.
- Prepare the Spinach: Heat a skillet over medium heat and add a drizzle of olive oil. Add the chopped spinach and sauté until wilted, which should take about 2-3 minutes. Remove from heat and let it cool slightly.
- Mix the Ingredients: In a large mixing bowl, combine the ricotta cheese, grated Parmesan, minced garlic, nutmeg, and the sautéed spinach. Crack in the egg and mix thoroughly until all ingredients are well incorporated. Season with salt and pepper to taste.
- Shape the Bites: Lightly grease a baking sheet or line it with parchment paper. Using a spoon or your hands, form the mixture into small balls or patties, roughly the size of a golf ball. Roll each one in breadcrumbs to coat evenly.
- Bake the Bites: Place the coated ricotta and spinach bites on the prepared baking sheet. Drizzle a little more olive oil over the top of each bite to help them crisp up while baking. Bake in the preheated oven for 15-18 minutes, or until the bites are golden brown and firm to the touch.
- Serve: Once baked, remove from the oven and let them cool slightly before transferring to a serving platter. Garnish with fresh basil leaves if desired. Serve warm and enjoy!
Extra Tips:
For an even richer flavor, consider adding a pinch of red pepper flakes for a subtle kick of heat. If you prefer a more consistent texture, you can use a food processor to blend the ricotta mixture before shaping the bites.
These bites can also be prepared ahead of time and stored in the refrigerator for up to 24 hours before baking. Just make sure to bring them to room temperature before placing in the oven to guarantee even cooking. Enjoy the flexibility of this recipe by experimenting with different herbs or cheeses to suit your taste preferences.
Calamari Fritti

In this recipe, calamari rings are lightly coated in seasoned flour, then deep-fried until golden brown. The key to perfect calamari fritti is guaranteeing the calamari is fresh and not overcooked, which preserves its tenderness.
This dish is often served with a wedge of lemon and a side of marinara sauce or aioli for dipping. Whether you’re hosting a tapas night or just want to enjoy a taste of Italy, calamari fritti is sure to impress.
Ingredients (Serves 4-6)
- 1 pound fresh calamari, cleaned and cut into rings
- 1 cup all-purpose flour
- 1/2 cup cornmeal
- 1 teaspoon salt
- 1 teaspoon black pepper
- 1 teaspoon paprika
- 1 teaspoon garlic powder
- Vegetable oil for frying
- Lemon wedges, for garnish
- Marinara sauce or aioli, for dipping
Cooking Instructions
- Prepare the Calamari:
- Start by rinsing the calamari rings under cold water. Pat them dry thoroughly using paper towels. Guaranteeing the calamari is dry will help the coating adhere better and result in a crispier texture.
- Mix the Coating:
- In a large mixing bowl, combine the all-purpose flour, cornmeal, salt, black pepper, paprika, and garlic powder. Mix well to guarantee the seasonings are evenly distributed.
- Coat the Calamari:
- Add the calamari rings to the flour mixture, tossing them until they’re fully coated. Shake off any excess coating to avoid clumping when frying.
- Heat the Oil:
- Pour vegetable oil into a deep pan or fryer, filling it about 2-3 inches deep. Heat the oil to 350°F (175°C), using a kitchen thermometer to monitor the temperature.
- Fry the Calamari:
- Carefully add the coated calamari rings into the hot oil in small batches. Fry them for about 2-3 minutes or until they’re golden brown and crispy. Avoid overcrowding the pan to maintain the oil temperature and guarantee even cooking.
- Drain and Serve:
- Use a slotted spoon to remove the fried calamari from the oil, placing them onto a plate lined with paper towels to drain any excess oil. Serve immediately with lemon wedges and your choice of dipping sauce.
Extra Tips
To guarantee your calamari fritti is perfectly crispy, make sure the oil is at the right temperature before frying; too low, and the calamari will absorb more oil, becoming soggy.
If you don’t have a thermometer, test the oil by dropping a small piece of bread into it; if it sizzles and browns within a minute, the oil is ready. Additionally, if you’re using frozen calamari, thaw it completely and pat it dry to remove any moisture.
Finally, consider experimenting with different spices in the flour mixture to customize the flavor to your liking.
Antipasto Platter With Italian Cured Meats and Cheeses

The Antipasto Platter is a delightful tapas-style dish that brings together a vibrant assortment of Italian cured meats, cheeses, and complementary accompaniments. This platter is perfect for entertaining, allowing guests to savor a variety of flavors and textures.
It’s not just a starter; it’s a culinary journey through the rich traditions of Italian cuisine. The combination of salty, savory, and creamy elements makes this dish an appealing choice for any gathering.
Serving 4-6 people, this antipasto platter is both easy to assemble and visually stunning. The key to a successful platter is the selection of high-quality ingredients, which will guarantee a memorable dining experience.
The cured meats provide a robust flavor, while the cheeses offer a creamy counterbalance. When paired with fresh fruits, olives, and artichokes, this platter truly captures the essence of Italian gastronomy. It’s a versatile dish that can be customized according to personal taste, making it a favorite among hosts and guests alike.
Ingredients:
- 100g Prosciutto
- 100g Salami
- 100g Mortadella
- 150g Parmigiano-Reggiano cheese
- 150g Mozzarella cheese
- 150g Gorgonzola cheese
- 1 cup mixed olives
- 1 cup marinated artichoke hearts
- 1 cup cherry tomatoes
- 1 cup sliced roasted red peppers
- 1 cup fresh figs or grapes
- 1 loaf crusty Italian bread or a selection of breadsticks
- Olive oil and balsamic vinegar (for drizzling)
- Fresh basil leaves for garnish
Instructions:
1. Prepare the Meats and Cheeses: Start by slicing the prosciutto, salami, and mortadella into thin slices. Cut the Parmigiano-Reggiano into small chunks, slice the mozzarella, and crumble the Gorgonzola into small pieces.
Arrange these on a large platter, ensuring each type of meat and cheese is separate to allow guests to choose their favorites.
2. Assemble the Accompaniments: Place the mixed olives, marinated artichoke hearts, cherry tomatoes, and roasted red peppers in small bowls or directly on the platter around the meats and cheeses.
This will add color and variety to the platter.
3. Add Fresh Fruits: Arrange the fresh figs or grapes in clusters around the platter. This not only adds a sweet element to balance the salty meats but also enhances the visual appeal.
4. Add Bread and Drizzles: Slice the Italian bread or arrange breadsticks alongside the platter. Provide small bowls of olive oil and balsamic vinegar for dipping.
This provides a delightful option for guests to enjoy the meats and cheeses with a touch of Italian flavor.
5. Garnish and Serve: Finally, garnish the platter with fresh basil leaves. This adds a vibrant green color and a hint of freshness.
Serve the platter at room temperature, allowing the flavors of the meats and cheeses to be fully appreciated.
Extra Tips:
When preparing the Antipasto Platter, aim for a balance of textures and colors to make it visually appealing. Feel free to experiment with additional ingredients like marinated mushrooms, sun-dried tomatoes, or a variety of nuts.
Guarantee that all items are bite-sized, making it easy for guests to pick and enjoy. Consider pairing the platter with a good Italian wine, such as Chianti or Pinot Grigio, to enhance the dining experience.
Tiramisu Bites

Indulge in the delightful flavors of Italy with Tiramisu Bites, a tapas-style twist on the classic dessert. These bite-sized treats capture the essence of traditional tiramisu, combining creamy mascarpone cheese, rich espresso-soaked ladyfingers, and a hint of cocoa. Perfect for a gathering or as an elegant after-dinner treat, Tiramisu Bites offer the decadence of tiramisu in a convenient, easy-to-serve format.
Whether you’re hosting a party or simply craving a taste of Italy, these delectable morsels are bound to impress.
Each Tiramisu Bite is lovingly crafted to deliver the perfect balance of flavors and textures. The creamy mascarpone filling is lightly sweetened and layered with espresso-drenched ladyfingers, creating a harmonious blend that’s both rich and invigorating.
Topped with a dusting of cocoa, these bites are as visually appealing as they’re delicious. Designed to serve 4-6 people, this recipe guarantees that everyone can enjoy a taste of Italy’s most beloved dessert in a fun and unique way.
Ingredients for 4-6 servings:
- 1 cup of strong espresso or coffee, cooled
- 2 tablespoons coffee liqueur (optional)
- 16-20 ladyfinger cookies
- 1 cup mascarpone cheese
- 1 cup heavy cream
- 1/3 cup granulated sugar
- 1 teaspoon vanilla extract
- Unsweetened cocoa powder, for dusting
- Chocolate shavings or curls, for garnish (optional)
Cooking Instructions:
- Prepare the espresso mixture: In a shallow bowl, combine the cooled espresso or coffee with the coffee liqueur, if using. Stir well to mix the flavors.
- Whip the cream: In a large mixing bowl, combine the heavy cream, granulated sugar, and vanilla extract. Using an electric mixer, whip the mixture on medium-high speed until stiff peaks form.
- Prepare the mascarpone filling: Gently fold the mascarpone cheese into the whipped cream mixture using a spatula. Be careful not to deflate the cream, guaranteeing a light and fluffy texture.
- Soak the ladyfingers: Quickly dip each ladyfinger into the espresso mixture, ensuring they’re well-coated but not overly soaked. Place the soaked ladyfingers on a tray lined with parchment paper.
- Assemble the bites: Using a small spoon or piping bag, dollop or pipe the mascarpone mixture onto each soaked ladyfinger, creating a generous topping. Repeat until all ladyfingers are topped.
- Chill the bites: Place the assembled tiramisu bites in the refrigerator for at least 1 hour to allow the flavors to meld and the filling to set.
- Finish and serve: Just before serving, dust the tiramisu bites with unsweetened cocoa powder. For an extra touch, garnish with chocolate shavings or curls.
Extra Tips:
For the best results, make sure the espresso is strongly brewed to enhance the coffee flavor in the bites. If you prefer a non-alcoholic version, simply omit the coffee liqueur.
When whipping the cream, guarantee that both the bowl and beaters are chilled, as this helps achieve the desired stiff peaks more efficiently. These bites can be prepared a day in advance, allowing the flavors to develop further, making them an excellent option for entertaining.
Enjoy your Tiramisu Bites with a strong cup of coffee or a glass of dessert wine for a truly Italian experience.