

Eating healthy and enjoying flavorful meals can absolutely go hand in hand, especially with Italian recipes. Picture savoring zucchini noodles with pesto or a hearty lentil Bolognese that are both satisfying and nourishing. These recipes shine with fresh ingredients and traditional techniques, making them perfect for family dinners or gatherings. They promise to transform your dinner table while keeping your taste buds delighted. Ready to explore these wholesome Italian dishes?
Zucchini Noodles With Pesto and Cherry Tomatoes
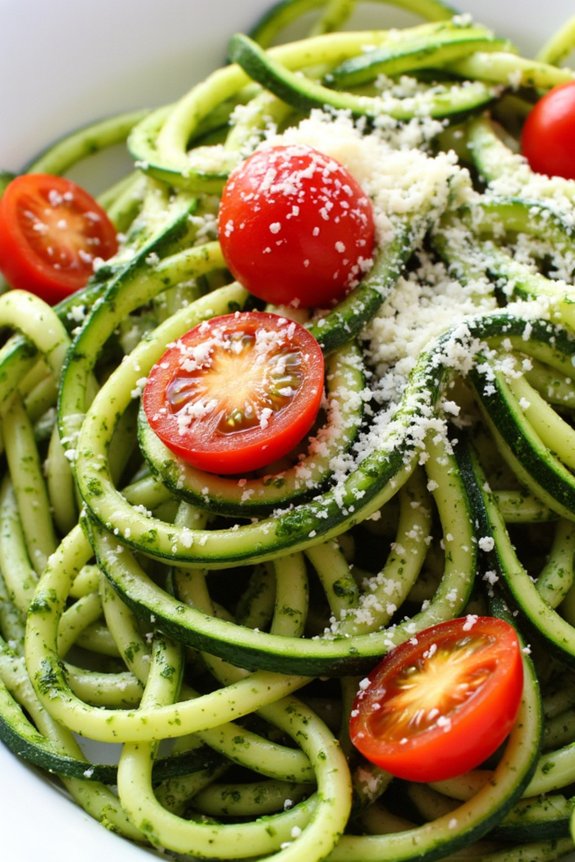
Zucchini Noodles with Pesto and Cherry Tomatoes is a delightful and healthy Italian-inspired dish that perfectly balances freshness and flavor. This low-carb meal isn’t only quick to prepare but also packed with nutrients, making it an ideal option for a light dinner. The zucchini noodles, often referred to as “zoodles,” serve as an excellent substitute for traditional pasta, absorbing the rich pesto and juicy cherry tomatoes’ flavors. This recipe is perfect for those looking to enjoy a guilt-free yet satisfying meal.
This dish brings together the vibrant green of homemade pesto with the sweet burst of cherry tomatoes, creating a harmonious blend of colors and tastes. The pesto, made from fresh basil, parmesan cheese, pine nuts, garlic, and olive oil, infuses the zucchini noodles with its aromatic flavor. The addition of cherry tomatoes not only adds a pop of color but also a revitalizing acidity that complements the creamy pesto. This recipe serves 4-6 people, making it a great choice for family dinners or small gatherings.
Ingredients:
- 4 medium zucchinis
- 2 cups fresh basil leaves
- 1/2 cup grated parmesan cheese
- 1/3 cup pine nuts
- 2 cloves garlic
- 1/2 cup extra virgin olive oil
- Salt and pepper to taste
- 1 pint cherry tomatoes
- Optional: grated parmesan for garnish
Instructions:
- Prepare the Zucchini Noodles: Start by washing the zucchinis thoroughly. Using a spiralizer, create zucchini noodles. If you don’t have a spiralizer, you can use a vegetable peeler to create thin strips. Set the zoodles aside.
- Make the Pesto: In a food processor, combine the basil leaves, parmesan cheese, pine nuts, and garlic cloves. Pulse until the ingredients are finely chopped. Gradually add the olive oil while the processor is running until a smooth paste forms. Season the pesto with salt and pepper to taste.
- Cook the Zucchini Noodles: In a large skillet, add a drizzle of olive oil and heat over medium-high heat. Add the zucchini noodles, and sauté for about 3-4 minutes until they’re tender but still crisp. Be careful not to overcook them, as they can become mushy.
- Combine with Pesto and Tomatoes: Lower the heat to medium and add the prepared pesto to the skillet. Toss the noodles gently to coat them evenly with the pesto. Add the cherry tomatoes to the skillet and cook for an additional 2 minutes, just until the tomatoes are warmed through.
- Serve: Transfer the zucchini noodles with pesto and cherry tomatoes to a serving dish. Optionally, sprinkle with additional grated parmesan cheese for garnish.
Extra Tips:
To enhance the flavor of your pesto, lightly toast the pine nuts in a dry skillet over medium heat until they’re golden brown. This will add a nutty depth to the pesto.
If you prefer a spicier kick, consider adding a pinch of red pepper flakes to the pesto. Remember to not overcook the zucchini noodles; they should maintain a bit of crunch to create a pleasant texture contrast with the creamy pesto and juicy tomatoes.
Finally, for a more protein-rich meal, consider adding grilled chicken or shrimp on top.
Eggplant Parmesan With a Whole Grain Twist
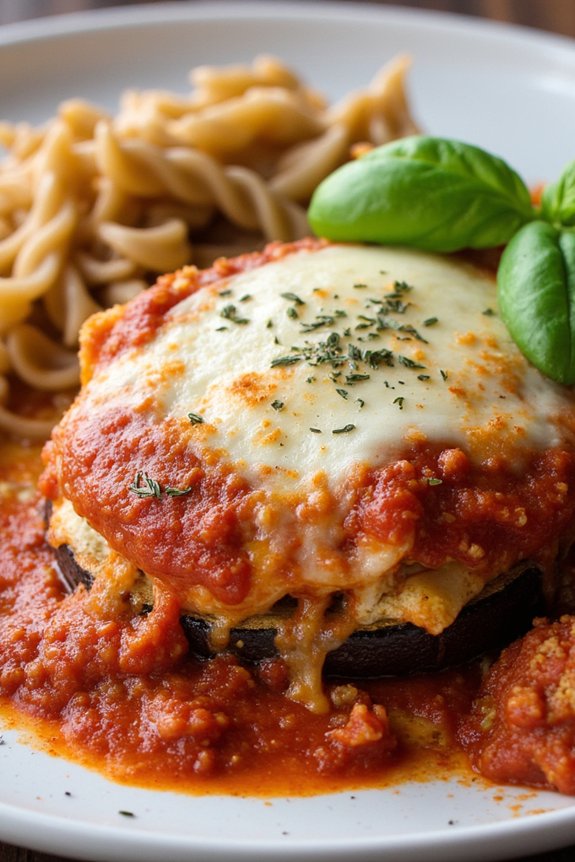
Eggplant Parmesan With a Whole Grain Twist is a delightful variation of the classic Italian favorite. By using whole grain breadcrumbs and whole wheat pasta, this recipe offers a healthier version of the beloved dish without compromising on taste. The eggplant slices are oven-baked instead of fried, reducing the amount of oil while still delivering a crispy texture. Layered with rich marinara sauce, melted mozzarella, and freshly grated Parmesan cheese, this dish is both hearty and nutritious.
Perfect for a family dinner, this recipe serves 4-6 people and is sure to be a hit with both kids and adults alike. The combination of flavors and textures will leave everyone satisfied, and the use of whole grains adds an extra boost of fiber and nutrients. Whether you’re a seasoned cook or a beginner, this dish is straightforward to prepare and will bring a delicious taste of Italy to your table.
Ingredients:
- 2 large eggplants, sliced into 1/4-inch rounds
- 1 tablespoon salt
- 2 cups whole grain breadcrumbs
- 1 teaspoon dried oregano
- 1 teaspoon dried basil
- 1/2 teaspoon garlic powder
- 1/2 teaspoon black pepper
- 2 large eggs
- 1/4 cup milk
- 2 cups marinara sauce
- 2 cups shredded mozzarella cheese
- 1/2 cup freshly grated Parmesan cheese
- 1/4 cup chopped fresh basil
- 12 ounces whole wheat pasta
Instructions:
- Prepare the Eggplant: Lay the eggplant slices on a large baking sheet and sprinkle both sides with salt. Let them sit for 30 minutes to draw out excess moisture and bitterness. Rinse the slices under cold water and pat them dry with paper towels.
- Set Up the Breading Station: Preheat your oven to 400°F (200°C). In a shallow dish, combine the whole grain breadcrumbs, oregano, basil, garlic powder, and black pepper. In another bowl, whisk together the eggs and milk.
- Bread the Eggplant: Dip each eggplant slice into the egg mixture, allowing any excess to drip off, then coat it in the breadcrumb mix. Press the breadcrumbs onto the slices to confirm they adhere well.
- Bake the Eggplant: Arrange the breaded eggplant slices on a baking sheet lined with parchment paper. Bake for 25-30 minutes, flipping halfway through, until they’re golden brown and crispy.
- Cook the Pasta: While the eggplant is baking, cook the whole wheat pasta according to the package instructions. Drain and set aside.
- Assemble the Dish: In a large baking dish, spread a thin layer of marinara sauce. Layer half of the baked eggplant slices over the sauce, sprinkle half of the mozzarella and Parmesan cheese, then add another layer of sauce. Repeat with the remaining eggplant, sauce, and cheese.
- Bake the Dish: Cover the dish with aluminum foil and bake in the preheated oven for 20 minutes. Remove the foil and bake for an additional 10-15 minutes, or until the cheese is bubbly and golden.
- Garnish and Serve: Let the dish cool for a few minutes before topping with fresh basil. Serve hot with the cooked whole wheat pasta on the side.
Extra Tips:
When selecting eggplants, look for those that are firm to the touch with glossy skin and no blemishes. This confirms a fresher taste and better texture. If you prefer a spicier kick, add a pinch of red pepper flakes to the breadcrumb mixture. For an even healthier option, consider using low-fat cheese.
Remember to taste the dish before serving and adjust the seasoning if necessary. Also, this dish can be prepared in advance and stored in the refrigerator, making it perfect for a hassle-free dinner on busy nights.
Grilled Chicken and Vegetable Caprese Salad
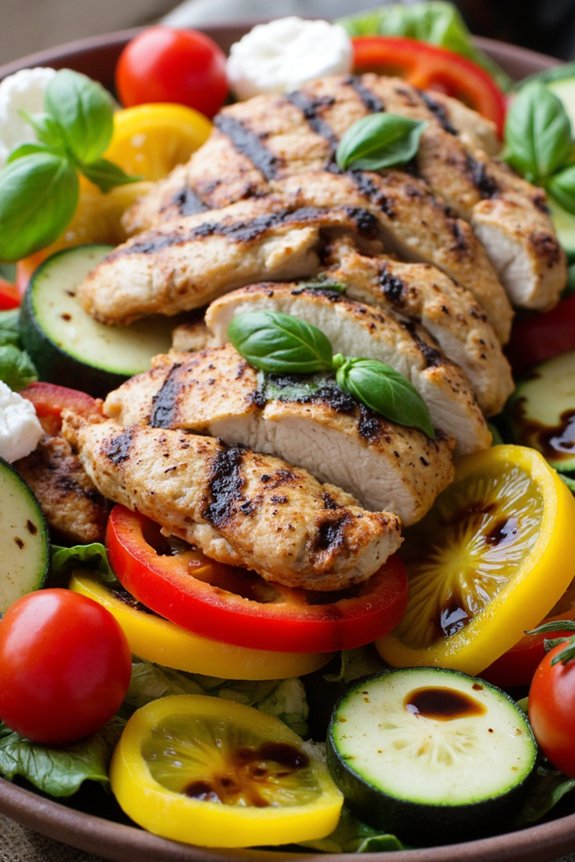
Grilled Chicken and Vegetable Caprese Salad is a delightful and healthy Italian-inspired dish that combines the savory flavors of grilled chicken with the fresh, vibrant taste of a classic Caprese salad. This dish is perfect for a light dinner or a satisfying lunch, offering a balance of protein, fresh vegetables, and the creamy goodness of mozzarella.
The addition of grilled vegetables adds a smoky depth to the salad, making it a delicious and nutritious option for anyone looking to enjoy a healthy Italian meal. This recipe is designed to serve 4-6 people, making it ideal for a family dinner or a small gathering with friends.
The dish is simple to prepare yet elegant enough to impress your guests with its beautiful presentation and rich flavors. By using fresh, high-quality ingredients, you can elevate this simple salad into a gourmet experience that captures the essence of Italian cuisine.
Now, let’s explore the ingredients and step-by-step instructions to create this delicious Grilled Chicken and Vegetable Caprese Salad.
Ingredients (for 4-6 servings):
- 4 boneless, skinless chicken breasts
- 2 tablespoons olive oil
- 1 teaspoon dried oregano
- 1 teaspoon garlic powder
- Salt and pepper to taste
- 2 zucchinis, sliced
- 1 red bell pepper, sliced
- 1 yellow bell pepper, sliced
- 1 pint cherry tomatoes, halved
- 8 ounces fresh mozzarella balls, halved
- 1 cup fresh basil leaves
- 3 tablespoons balsamic glaze
Cooking Instructions:
- Prepare the Chicken: Start by preheating your grill to medium-high heat. In a small bowl, mix together the olive oil, oregano, garlic powder, salt, and pepper. Rub this mixture evenly over both sides of the chicken breasts.
- Grill the Chicken: Place the chicken breasts onto the grill and cook for about 6-7 minutes on each side, or until the internal temperature reaches 165°F (75°C). Once cooked, remove from the grill and let them rest for a few minutes before slicing them into strips.
- Grill the Vegetables: While the chicken is resting, place the sliced zucchinis and bell peppers onto the grill. Grill them for about 3-4 minutes on each side until they’re tender and have nice grill marks. Remove from the grill and set aside.
- Assemble the Salad: In a large serving platter, arrange the grilled chicken slices, grilled vegetables, halved cherry tomatoes, and mozzarella balls. Scatter fresh basil leaves over the top.
- Finish with Balsamic Glaze: Drizzle the balsamic glaze over the entire salad to add a touch of sweetness and tang.
Extra Tips:
When grilling the chicken and vegetables, confirm your grill is well-oiled to prevent sticking. If you don’t have a grill, you can use a grill pan on the stove.
For added flavor, you can marinate the chicken for a few hours in the olive oil mixture before grilling. To make the salad even more filling, consider adding a bed of mixed greens or arugula as a base.
Finally, for a more rustic presentation, serve the salad on a wooden board or a large platter to showcase the beautiful colors and textures of the dish.
Lentil Bolognese With Whole Wheat Spaghetti
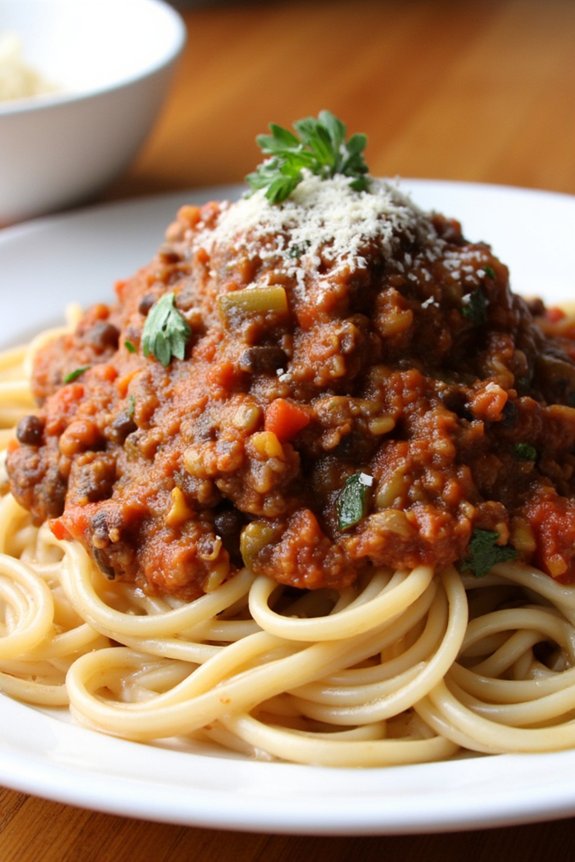
Lentil Bolognese With Whole Wheat Spaghetti is a wholesome Italian-inspired dish that combines the hearty flavors of a classic Bolognese sauce with the nutritional benefits of lentils and whole wheat pasta. This recipe is perfect for those looking to enjoy a healthy yet satisfying meal that’s rich in fiber and plant-based protein. The lentils provide a meaty texture, making it an excellent vegetarian alternative that doesn’t compromise on taste.
This dish isn’t only delicious but also simple to prepare, making it a great option for a weeknight dinner or a meal to impress guests. The combination of fresh vegetables, savory herbs, and a touch of red wine creates a depth of flavor that complements the nuttiness of whole wheat spaghetti. By using everyday ingredients, this recipe allows you to enjoy a taste of Italy right at home, with the added benefit of being both nutritious and filling.
Ingredients (Serves 4-6):
- 1 tablespoon olive oil
- 1 medium onion, finely chopped
- 2 cloves garlic, minced
- 1 carrot, diced
- 1 celery stalk, diced
- 1 red bell pepper, diced
- 1 cup dried green or brown lentils, rinsed
- 1 can (14 ounces) crushed tomatoes
- 2 tablespoons tomato paste
- 1 teaspoon dried oregano
- 1 teaspoon dried basil
- 1/2 teaspoon dried thyme
- 1/4 teaspoon red pepper flakes (optional)
- Salt and pepper to taste
- 1/2 cup red wine (optional)
- 3 cups vegetable broth or water
- 1 pound whole wheat spaghetti
- Fresh parsley, chopped, for garnish
- Grated Parmesan cheese (optional for serving)
Cooking Instructions:
- Prepare the Ingredients:
- Start by finely chopping the onion, mincing the garlic, and dicing the carrot, celery, and red bell pepper. Rinse the lentils thoroughly under cold water.
- Cook the Vegetables:
- In a large pot or Dutch oven, heat the olive oil over medium heat. Add the onion and garlic, sautéing for about 2-3 minutes until the onion becomes translucent. Add the carrot, celery, and red bell pepper, stirring occasionally, and cook for an additional 5 minutes until the vegetables are softened.
- Add the Lentils and Liquids:
- Stir in the lentils, crushed tomatoes, tomato paste, oregano, basil, thyme, and red pepper flakes. Season with salt and pepper to taste. Pour in the red wine if using, and allow it to simmer for about 2 minutes to let the alcohol evaporate. Then add the vegetable broth or water, bringing the mixture to a boil.
- Simmer the Bolognese:
- Once boiling, reduce the heat to low, cover, and let the sauce simmer gently for 30-35 minutes, or until the lentils are tender and the sauce has thickened. Stir occasionally to prevent sticking.
- Cook the Spaghetti:
- While the sauce is simmering, bring a large pot of salted water to a boil. Add the whole wheat spaghetti and cook according to package instructions until al dente. Drain the pasta, reserving about 1/2 cup of the pasta water.
- Combine and Serve:
- If the Bolognese sauce is too thick, add a little of the reserved pasta water to reach the desired consistency. Serve the lentil Bolognese over the cooked whole wheat spaghetti. Garnish with chopped fresh parsley and grated Parmesan cheese, if desired.
Extra Tips:
For a richer flavor, consider cooking the sauce a day ahead and letting it sit in the fridge overnight; the flavors will meld and intensify. You can also use different types of lentils, such as red or yellow, but keep in mind they may alter the cooking time and texture slightly.
If you prefer a spicier kick, feel free to increase the amount of red pepper flakes or add a dash of smoked paprika. Ultimately, for a vegan version, simply omit the Parmesan cheese or replace it with a vegan alternative.
Spinach and Ricotta Stuffed Bell Peppers
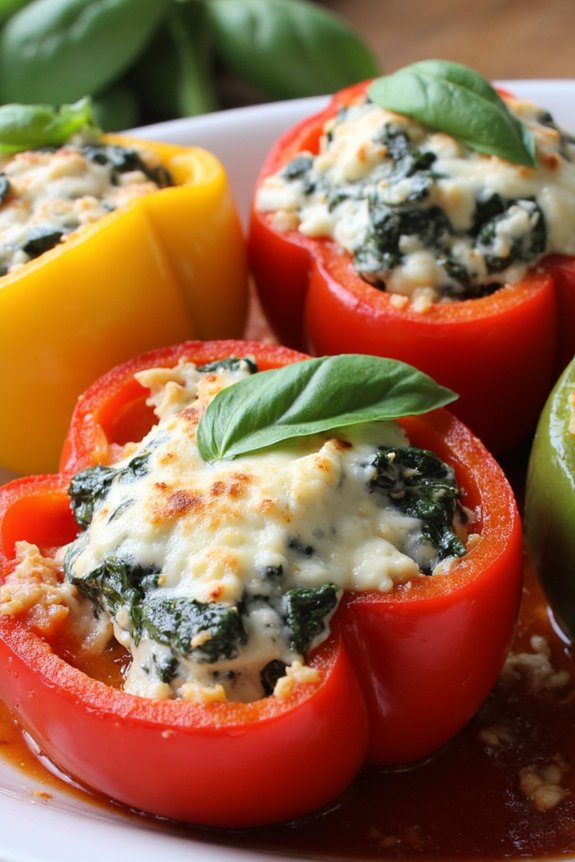
Spinach and Ricotta Stuffed Bell Peppers are a delicious and healthy Italian-inspired dish that makes for a perfect dinner. The combination of vibrant bell peppers filled with a creamy mixture of spinach and ricotta creates a satisfying meal that’s both nutritious and flavorful.
This dish isn’t only easy to prepare but also makes for an impressive presentation, ideal for family dinners or casual gatherings. The flavors are enhanced by the addition of Parmesan cheese and a hint of nutmeg, creating a savory filling that pairs perfectly with the sweetness of roasted bell peppers.
This recipe serves 4-6 people, making it suitable for a small dinner party or a family meal. The stuffed bell peppers are baked until tender, allowing the flavors to meld beautifully. Whether you’re a seasoned cook or a beginner, this dish is straightforward to make and can be prepared in advance, making it a convenient option for busy weeknights. Serve the stuffed peppers with a side salad or some crusty bread to complete the meal.
Ingredients:
- 6 large bell peppers (any color)
- 2 cups fresh spinach, chopped
- 1 1/2 cups ricotta cheese
- 1/2 cup grated Parmesan cheese
- 1 egg
- 1 teaspoon garlic powder
- 1/2 teaspoon nutmeg
- Salt and pepper to taste
- 2 tablespoons olive oil
- 1 cup marinara sauce
- Fresh basil leaves for garnish (optional)
Instructions:
- Prepare the Oven and Peppers: Preheat your oven to 375°F (190°C). Cut the tops off the bell peppers and remove the seeds and membranes. Lightly brush the outside of the peppers with olive oil and place them in a baking dish.
- Prepare the Spinach: Heat a tablespoon of olive oil in a skillet over medium heat. Add the chopped spinach and sauté until wilted, about 2-3 minutes. Remove from heat and let it cool slightly.
- Mix the Filling: In a large bowl, combine the ricotta cheese, sautéed spinach, Parmesan cheese, egg, garlic powder, nutmeg, salt, and pepper. Mix until all ingredients are well incorporated.
- Stuff the Peppers: Spoon the spinach and ricotta mixture evenly into each bell pepper, pressing gently to fill them completely. Place the stuffed peppers upright in the baking dish.
- Bake the Peppers: Pour marinara sauce over and around the stuffed peppers in the baking dish. Cover the dish with aluminum foil and bake in the preheated oven for 30 minutes.
- Finish Baking: Remove the foil and continue baking for an additional 10-15 minutes, or until the peppers are tender and the tops are lightly browned.
- Serve: Remove from the oven and let cool slightly before serving. Garnish with fresh basil leaves if desired.
Extra Tips:
For an added layer of flavor, consider mixing some chopped sun-dried tomatoes or roasted red peppers into the ricotta filling. If you prefer a bit of heat, sprinkle some crushed red pepper flakes into the filling mixture.
To ascertain even cooking, try to select bell peppers of similar size. This dish can be made ahead of time; simply prepare the stuffed peppers and refrigerate them until ready to bake. Enjoy your Spinach and Ricotta Stuffed Bell Peppers with a light drizzle of balsamic glaze for a touch of sweetness.
Mushroom Risotto With Brown Rice
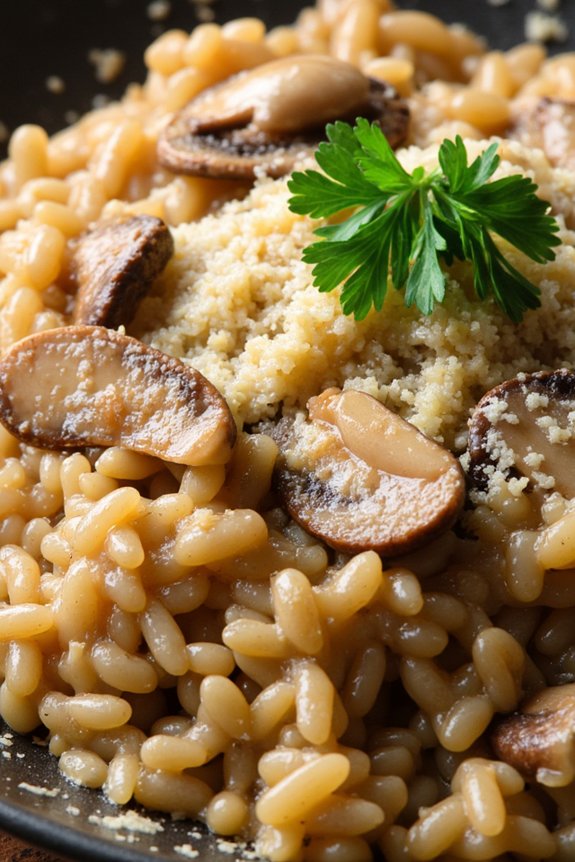
Mushroom Risotto With Brown Rice is a delightful twist on the classic Italian risotto, offering a healthier alternative while maintaining its rich flavors and creamy texture. This dish utilizes brown rice instead of the traditional arborio rice, adding a wholesome element with more fiber and nutrients. The earthy flavors of mushrooms complement the nutty taste of brown rice beautifully, making it a satisfying meal that can be enjoyed on any occasion.
Whether you’re serving it as a main course or a side dish, this risotto is sure to impress your family and friends with its delicious taste and hearty ingredients.
The preparation of this Mushroom Risotto With Brown Rice involves simple steps, yet it requires a bit of patience to achieve that perfect creamy consistency. The key to a great risotto is slowly cooking the rice while gradually adding broth, allowing the flavors to meld together. This recipe is perfect for a cozy family dinner, serving 4-6 people, and it can easily be adapted to include additional vegetables or proteins if desired.
Let’s explore the ingredients and cooking instructions to create this wonderful Italian dish.
Ingredients (Serves 4-6):
- 1 1/2 cups brown rice
- 6 cups vegetable or chicken broth
- 2 tablespoons olive oil
- 1 medium onion, finely chopped
- 2 cloves garlic, minced
- 1 pound mushrooms, sliced (button, cremini, or a mix)
- 1/2 cup dry white wine
- 1/2 cup grated Parmesan cheese
- 2 tablespoons unsalted butter
- Salt and pepper to taste
- 2 tablespoons fresh parsley, chopped (for garnish)
Cooking Instructions:
- Prepare the Broth: In a medium saucepan, heat the vegetable or chicken broth over low heat. Keep it warm but not boiling, as you’ll be adding it gradually to the rice.
- Sauté the Aromatics: In a large skillet or saucepan, heat the olive oil over medium heat. Add the chopped onion and minced garlic, sautéing until the onion becomes translucent and fragrant, about 3-4 minutes.
- Cook the Mushrooms: Add the sliced mushrooms to the onion and garlic mixture. Cook them until they’re tender and have released their moisture, about 5-7 minutes.
- Toast the Rice: Stir in the brown rice, making certain it’s well-coated with the oil and combined with the mushrooms. Toast the rice for about 2-3 minutes, stirring frequently.
- Deglaze with Wine: Pour in the dry white wine, stirring constantly until the wine has mostly evaporated. This step adds depth to the flavor profile of the risotto.
- Add the Broth Gradually: Begin adding the warm broth, one ladleful at a time, allowing the rice to absorb the liquid before adding more. Stir frequently to prevent sticking. This process will take about 45-50 minutes, as brown rice takes longer to cook than arborio rice.
- Finish the Risotto: Once the rice is tender and creamy, remove the pan from the heat. Stir in the grated Parmesan cheese and unsalted butter until well incorporated. Season with salt and pepper to taste.
- Garnish and Serve: Transfer the risotto to serving plates and garnish with fresh parsley. Serve immediately while hot.
Extra Tips:
To enhance the flavors of this Mushroom Risotto With Brown Rice, consider using a combination of different mushroom varieties such as shiitake or porcini for a more complex taste.
If you prefer a richer risotto, substitute some of the broth with a bit of cream. Remember to taste the risotto as you cook and adjust the seasoning accordingly.
Patience is key, as slowly cooking and stirring the rice will guarantee a creamy and perfectly cooked risotto. Enjoy your culinary creation with a side of roasted vegetables or a fresh salad for a complete meal.
Roasted Cauliflower and Quinoa Salad
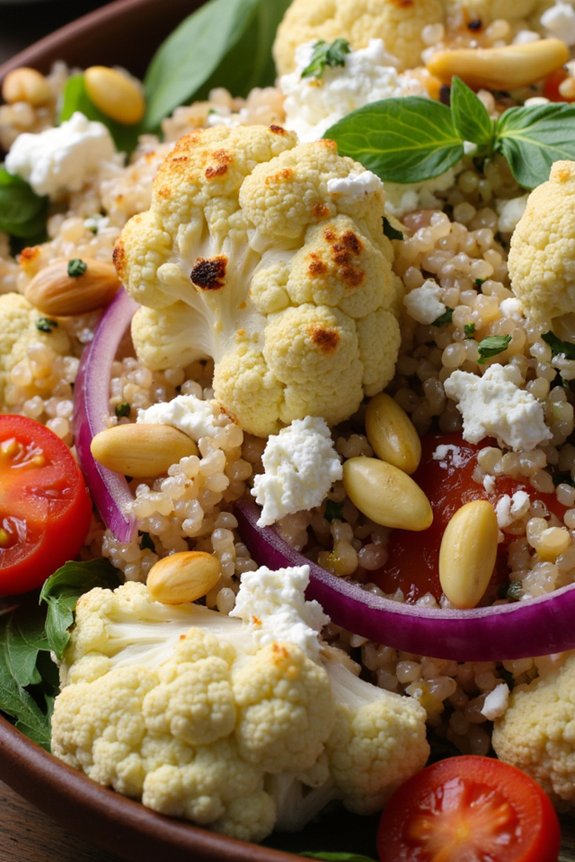
Roasted Cauliflower and Quinoa Salad is a delightful and nutritious Italian-inspired dish that’s perfect for a healthy dinner. The combination of roasted cauliflower and quinoa creates a hearty base, while the addition of fresh vegetables, herbs, and a zesty dressing brings vibrant flavors and textures to the plate.
This salad isn’t only satisfying but also packed with essential nutrients, making it an excellent choice for those who want to enjoy a wholesome meal without compromising on taste.
This salad is a versatile dish that can be served as a main course or a side. It’s ideal for serving 4-6 people and is perfect for those looking to incorporate more plant-based meals into their diet. The nutty flavor of quinoa complements the slightly sweet and caramelized roasted cauliflower, while the fresh herbs and tangy dressing elevate the overall taste profile.
This dish is sure to become a family favorite, whether you’re serving it for a weeknight dinner or a special gathering.
Ingredients (Serving size: 4-6 people):
- 1 large head of cauliflower, cut into florets
- 1 cup quinoa, rinsed
- 2 cups water
- 1/4 cup olive oil
- 2 tablespoons lemon juice
- 1 teaspoon Dijon mustard
- 1 clove garlic, minced
- Salt and pepper to taste
- 1/2 cup cherry tomatoes, halved
- 1/4 cup red onion, finely chopped
- 1/4 cup fresh parsley, chopped
- 1/4 cup fresh basil, chopped
- 1/4 cup feta cheese, crumbled (optional)
- 1/4 cup pine nuts, toasted
Cooking Instructions:
1. Preheat and Prepare Cauliflower: Preheat your oven to 400°F (200°C). Place the cauliflower florets on a baking sheet and drizzle with 2 tablespoons of olive oil. Season with salt and pepper, and toss to coat the florets evenly.
Roast in the preheated oven for 25-30 minutes, or until the cauliflower is golden brown and tender, stirring halfway through the cooking time.
2. Cook Quinoa: While the cauliflower is roasting, combine the rinsed quinoa and water in a medium saucepan. Bring to a boil, then reduce the heat to low, cover, and let it simmer for about 15-20 minutes, or until the quinoa is cooked and the water is absorbed.
Fluff the quinoa with a fork and set aside to cool slightly.
3. Prepare the Dressing: In a small bowl, whisk together the remaining olive oil, lemon juice, Dijon mustard, and minced garlic. Season with salt and pepper to taste.
4. Assemble the Salad: In a large mixing bowl, combine the roasted cauliflower, cooked quinoa, cherry tomatoes, red onion, parsley, and basil. Pour the dressing over the salad and toss gently to combine.
5. Add Finishing Touches: Just before serving, sprinkle the salad with crumbled feta cheese and toasted pine nuts, if using.
Extra Tips:
For an extra layer of flavor, consider adding a teaspoon of honey to the dressing for a touch of sweetness. Make sure to roast the cauliflower until it’s caramelized on the edges for maximum flavor.
This salad can be made ahead of time and stored in the refrigerator for up to two days, though it’s best enjoyed fresh. If you prefer a vegan version, simply omit the feta cheese.
Feel free to customize the salad by adding other vegetables or proteins such as grilled chicken or shrimp for a more substantial meal.
Baked Salmon With Italian Herbs and Asparagus
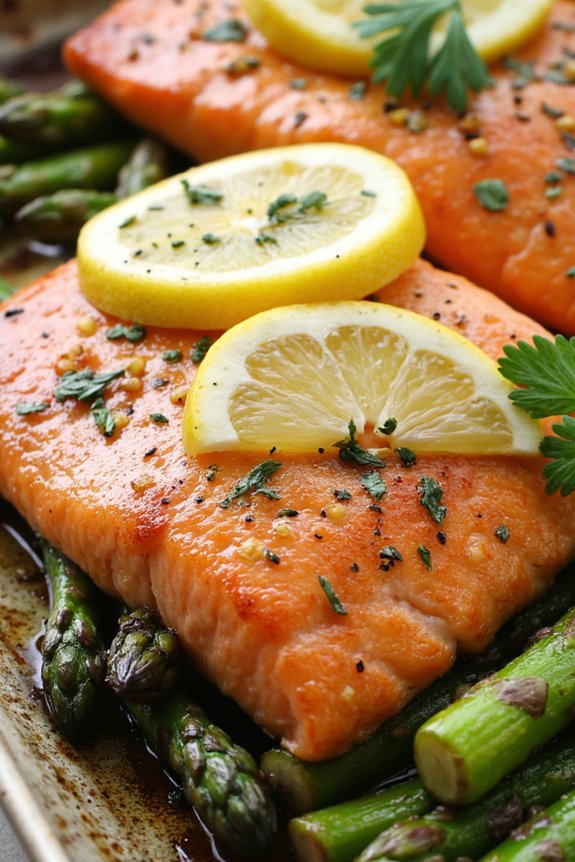
Indulge in a delightful and healthy Italian-inspired dinner with this simple yet flavorful Baked Salmon with Italian Herbs and Asparagus. This dish brings together the tender flakiness of salmon fillets with the aromatic blend of Italian herbs, complemented by the crispness of fresh asparagus. It’s not only a feast for the senses but also packed with nutrients, making it a perfect choice for a wholesome family dinner.
The combination of herbs like basil, rosemary, and oregano with a touch of lemon zest elevates the natural flavors of the salmon, while the roasted asparagus adds a satisfying crunch to each bite. This recipe is ideal for serving 4-6 people, making it great for a small dinner gathering or a cozy family meal.
The preparation is straightforward and requires minimal ingredients, guaranteeing that you can enjoy a nutritious meal without spending hours in the kitchen. Whether you’re a seasoned cook or a beginner, this recipe will guide you through creating a restaurant-quality dish right at home.
Ingredients:
- 4-6 salmon fillets (about 6 oz each)
- 1 pound fresh asparagus, trimmed
- 3 tablespoons olive oil
- 1 tablespoon fresh lemon juice
- 2 teaspoons lemon zest
- 1 tablespoon Italian seasoning (a mix of dried basil, oregano, and rosemary)
- 3 cloves garlic, minced
- Salt and pepper to taste
- Lemon slices, for garnish
- Fresh parsley, chopped, for garnish
Cooking Instructions:
- Preheat the Oven: Start by preheating your oven to 400°F (200°C). This temperature guarantees a perfect bake, giving the salmon a tender texture and allowing the asparagus to roast evenly.
- Prepare the Baking Sheet: Line a large baking sheet with parchment paper or lightly grease it with olive oil. This will prevent the salmon and asparagus from sticking and make for an easy cleanup.
- Season the Salmon: Place the salmon fillets on the prepared baking sheet. Drizzle each fillet with olive oil and lemon juice, then sprinkle them with Italian seasoning, minced garlic, lemon zest, salt, and pepper. Use your hands to gently rub the seasoning into the salmon, guaranteeing each fillet is well coated.
- Arrange the Asparagus: Lay the trimmed asparagus spears around the salmon fillets on the baking sheet. Drizzle them with olive oil and season with salt and pepper. Toss gently to coat the asparagus evenly.
- Bake the Dish: Place the baking sheet in the preheated oven and bake for about 12-15 minutes, or until the salmon is cooked through and flakes easily with a fork. The asparagus should be tender and slightly crispy at the tips.
- Garnish and Serve: Once done, remove from the oven and let it rest for a minute. Garnish the salmon with lemon slices and fresh parsley before serving. This adds a revitalizing touch and enhances the presentation of the dish.
Extra Tips:
For the best results, choose fresh, wild-caught salmon if possible, as it tends to have a better flavor and texture. Make sure the asparagus spears are of similar thickness to ensure even cooking. If they’re too thick, you might want to peel the outer layer slightly or slice them in half lengthwise.
Feel free to adjust the amount of Italian herbs to suit your taste, or add a pinch of red pepper flakes for a bit of heat. Finally, pair this dish with a side of brown rice or a simple mixed green salad to complete the meal.
Tuscan White Bean and Kale Soup
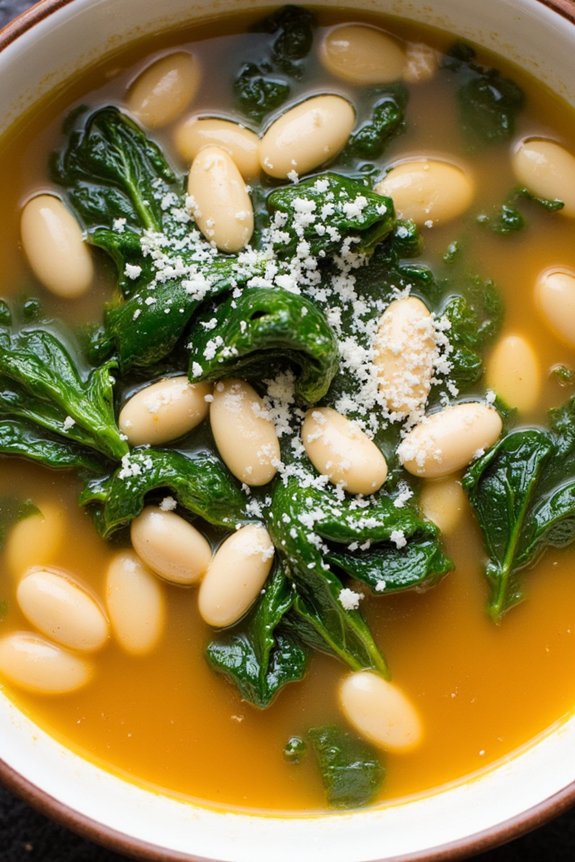
Tuscan White Bean and Kale Soup is a classic Italian dish that brings together the robust flavors of Tuscany in a comforting and nutritious bowl. This soup isn’t only perfect for chilly evenings, but it’s also packed with protein and fiber, making it a healthy addition to any meal plan.
The combination of creamy white beans, fresh kale, and aromatic herbs creates a hearty and satisfying dish that can serve as a complete meal or a delightful starter. This recipe is designed to serve 4-6 people, ensuring that there’s plenty to go around for family and friends.
The preparation involves simmering vegetables and beans together, allowing the flavors to meld and develop over time. The addition of kale not only adds a vibrant color to the soup but also provides a boost of vitamins and minerals. Whether you’re an experienced cook or a beginner in the kitchen, this Tuscan White Bean and Kale Soup is simple to prepare and a delightful way to enjoy the essence of Italian cuisine.
Ingredients:
- 2 tablespoons olive oil
- 1 large onion, chopped
- 2 carrots, diced
- 2 celery stalks, diced
- 3 garlic cloves, minced
- 1 teaspoon dried thyme
- 1 teaspoon dried rosemary
- 1/2 teaspoon red pepper flakes (optional)
- 6 cups vegetable broth
- 2 (15-ounce) cans of cannellini beans, drained and rinsed
- 1 bunch of kale, stems removed and leaves chopped
- Salt and pepper to taste
- Juice of 1 lemon
- Grated Parmesan cheese for serving (optional)
Cooking Instructions:
- Prepare the Aromatics: In a large pot, heat the olive oil over medium heat. Add the chopped onion, diced carrots, and diced celery. Cook for about 5 minutes, stirring occasionally, until the vegetables begin to soften and the onion becomes translucent.
- Add Garlic and Herbs: Add the minced garlic, dried thyme, dried rosemary, and red pepper flakes to the pot. Stir well and cook for another 1-2 minutes until the garlic becomes fragrant, being careful not to let it burn.
- Simmer the Soup: Pour in the vegetable broth and bring the mixture to a boil. Once boiling, reduce the heat to low and add the drained cannellini beans. Let the soup simmer for about 20 minutes, allowing the flavors to meld together.
- Incorporate the Kale: Add the chopped kale to the pot, stirring to combine. Simmer for an additional 10 minutes, or until the kale is tender and cooked through.
- Season and Finish: Season the soup with salt and pepper to taste. Just before serving, stir in the juice of one lemon to brighten the flavors. Ladle the soup into bowls and, if desired, top with grated Parmesan cheese.
Extra Tips:
For a richer flavor, consider adding a rind of Parmesan cheese to the pot while the soup simmers; it will infuse the broth with depth and umami.
If you prefer a creamier texture, you can partially blend the soup using an immersion blender, leaving some whole beans for texture. This soup also stores well in the refrigerator for a few days or can be frozen for up to a month, making it a perfect make-ahead meal.
Don’t forget to taste and adjust the seasoning before serving, as the flavors develop over time. Enjoy your Tuscan culinary experience!
Grilled Shrimp and Arugula Salad
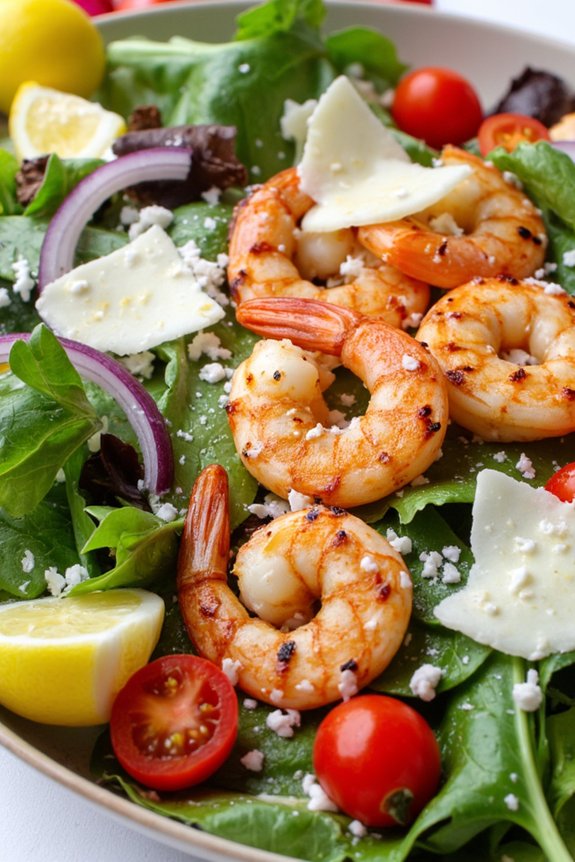
Grilled Shrimp and Arugula Salad is a delightful Italian-inspired dish that combines the succulent flavors of grilled shrimp with the peppery freshness of arugula. This salad is perfect for a healthy dinner, featuring a balance of protein and greens, and is complemented by a zesty lemon vinaigrette.
Whether you’re hosting a dinner party or simply looking for a wholesome meal, this salad offers a burst of flavor with every bite. Ideal for serving 4 to 6 people, this dish is both nutritious and satisfying, making it a great choice for those who want to enjoy a light yet flavorful meal.
The grilled shrimp are marinated with herbs and spices, enhancing their natural sweetness, while the arugula provides a rejuvenating contrast. The addition of cherry tomatoes, red onion, and Parmesan cheese completes the dish, making it a colorful and appetizing option for any dinner table.
Ingredients for 4-6 servings:
- 1 ½ pounds large shrimp, peeled and deveined
- 6 cups arugula, washed and dried
- 1 pint cherry tomatoes, halved
- 1 small red onion, thinly sliced
- ½ cup shaved Parmesan cheese
- 3 tablespoons olive oil
- 2 tablespoons lemon juice
- 2 cloves garlic, minced
- 1 teaspoon dried oregano
- Salt and pepper, to taste
- Lemon wedges, for serving
Cooking Instructions:
- Prepare the Marinade: In a large bowl, combine 2 tablespoons of olive oil, lemon juice, minced garlic, dried oregano, salt, and pepper. Mix well to create a marinade for the shrimp.
- Marinate the Shrimp: Add the shrimp to the bowl with the marinade, making sure they’re well coated. Cover the bowl and refrigerate for at least 30 minutes to allow the flavors to infuse.
- Preheat the Grill: While the shrimp is marinating, preheat your grill to medium-high heat. If using a grill pan, heat it over medium-high heat until hot.
- Grill the Shrimp: Remove the shrimp from the marinade and place them on the grill. Cook for about 2-3 minutes on each side, or until they’re pink and opaque. Remove from the grill and set aside.
- Assemble the Salad: In a large salad bowl, combine the arugula, cherry tomatoes, and red onion. Drizzle with the remaining tablespoon of olive oil and toss gently to combine.
- Add the Shrimp and Cheese: Top the salad with the grilled shrimp and sprinkle with shaved Parmesan cheese. Toss gently to guarantee the ingredients are evenly distributed.
- Serve: Transfer the salad to a serving platter or individual plates. Garnish with lemon wedges and serve immediately.
Extra Tips:
For best flavor, let the shrimp marinate for at least an hour if time permits. This will enhance the taste and tenderness of the shrimp.
If you prefer a bit of spice, add a pinch of red pepper flakes to the marinade. When grilling, make sure not to overcook the shrimp to avoid a rubbery texture.
Finally, feel free to add avocado slices or toasted pine nuts for extra richness and crunch.
Whole Wheat Margherita Pizza With Fresh Basil

Whole Wheat Margherita Pizza With Fresh Basil is a delightful Italian dish that combines the classic flavors of a Margherita pizza with the health benefits of whole wheat. This pizza isn’t only delicious but also a healthier alternative to traditional pizzas, making it a perfect choice for those who want to enjoy a nutritious meal without sacrificing taste.
With its crispy whole wheat crust, tangy tomato sauce, creamy mozzarella cheese, and fresh basil leaves, this pizza is sure to become a family favorite.
Making Whole Wheat Margherita Pizza at home is both fun and rewarding. The whole wheat dough provides a nutty flavor and a satisfying crunch, while fresh basil adds a burst of aromatic freshness.
Whether you’re preparing it for a weeknight dinner or a special occasion, this pizza is versatile and quick to make. Gather your family or friends and enjoy the process of crafting a homemade pizza that everyone will love.
Ingredients for 4-6 servings:
- 2 cups whole wheat flour
- 1 teaspoon salt
- 1 teaspoon sugar
- 1 packet (2 1/4 teaspoons) active dry yeast
- 3/4 cup warm water (about 110°F)
- 1 tablespoon olive oil
- 1 cup tomato sauce
- 2 cups fresh mozzarella cheese, sliced
- 1/2 cup freshly grated Parmesan cheese
- 1/4 cup fresh basil leaves
- 1 teaspoon dried oregano
- 1/2 teaspoon crushed red pepper flakes (optional)
- Cornmeal (for dusting)
Instructions:
- Prepare the Dough: In a mixing bowl, combine the warm water, sugar, and active dry yeast. Stir gently and let it sit for about 5 minutes until it becomes frothy. This indicates that the yeast is active.
- Mix the Dough Ingredients: Add the whole wheat flour, salt, and olive oil to the yeast mixture. Mix until a dough begins to form. Transfer the dough onto a floured surface and knead for about 8-10 minutes until it becomes smooth and elastic.
- Let the Dough Rise: Place the dough in a lightly oiled bowl, cover it with a damp cloth, and let it rise in a warm area for about 1-2 hours or until it doubles in size.
- Preheat the Oven: Preheat your oven to 475°F (245°C). If you have a pizza stone, place it in the oven to heat up as well.
- Shape the Dough: Punch down the risen dough and transfer it to a surface dusted with cornmeal. Roll it out into a circle or rectangle, about 1/4-inch thick, depending on your preference.
- Assemble the Pizza: Transfer the rolled-out dough onto a pizza peel or baking sheet. Spread the tomato sauce evenly over the surface, leaving a small border around the edges. Arrange the fresh mozzarella slices on top, followed by the grated Parmesan cheese. Sprinkle the dried oregano and crushed red pepper flakes if using.
- Bake the Pizza: Carefully slide the pizza onto the preheated pizza stone or place the baking sheet in the oven. Bake for 10-12 minutes, or until the crust is golden brown and the cheese is bubbling.
- Add Fresh Basil and Serve: Once baked, remove the pizza from the oven and scatter fresh basil leaves on top. Let it cool for a couple of minutes before slicing and serving.
Extra Tips:
For a crispier crust, consider pre-baking the crust for about 5 minutes before adding the toppings. If you prefer a thicker crust, allow the dough to rise for a longer period or increase the amount of dough used.
Feel free to experiment with additional toppings such as sliced tomatoes or a drizzle of balsamic glaze for added flavor. Always use fresh basil for the best taste and aroma, and add it after baking to preserve its vibrant color and flavor.