

Hosting a gathering is always a joy, especially when you can share dishes that leave a lasting impression. Italian cuisine is perfect for this with its rich flavors and simple elegance. Picture serving a fresh bruschetta with tomatoes and basil or a creamy burrata paired with prosciutto. These recipes bring a taste of Italy’s vibrant culinary heritage to your table. Let’s explore these delightful creations together.
Classic Bruschetta With Fresh Tomatoes
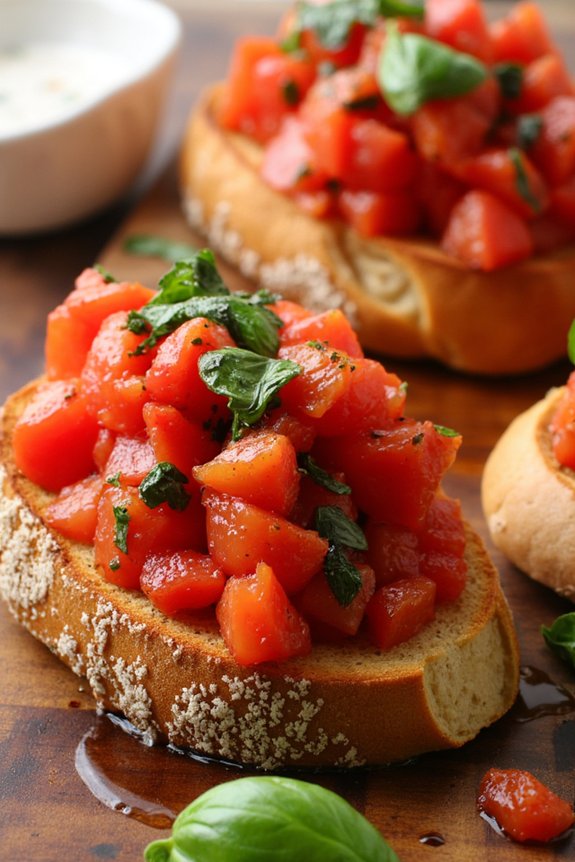
Classic Bruschetta With Fresh Tomatoes is a simple yet delicious Italian appetizer that perfectly captures the essence of fresh ingredients. This recipe is ideal for gatherings and parties, offering a burst of flavor and vibrant colors that will impress your guests. The combination of ripe tomatoes, fragrant basil, and crispy bread makes for a delightful bite that’s both invigorating and satisfying.
Whether you’re hosting a casual get-together or a formal dinner party, this bruschetta is sure to be a crowd-pleaser. Originating from Italy, bruschetta has become a staple in Italian cuisine and is loved worldwide for its simplicity and taste. This recipe focuses on using fresh, high-quality ingredients to create a dish that highlights the natural flavors of each component.
By toasting slices of bread and topping them with a mixture of tomatoes, garlic, basil, and olive oil, you can enjoy a classic Italian treat that’s easy to prepare and delightful to eat. Perfect for serving 4-6 people, this recipe allows for a quick and easy dish that can be whipped up in no time.
Ingredients:
- 1 French baguette or Italian bread loaf
- 4 ripe tomatoes
- 2 cloves of garlic
- 1/4 cup fresh basil leaves
- 1/4 cup extra virgin olive oil
- Salt and freshly ground black pepper to taste
- Balsamic glaze (optional)
Instructions:
- Prepare the Bread: Preheat your oven to 400°F (200°C). Slice the baguette or Italian bread into 1/2 inch thick slices. Arrange the slices on a baking sheet and brush them lightly with olive oil on both sides. Toast in the preheated oven for about 5-7 minutes, or until they turn golden brown. Remove and let them cool slightly.
- Prepare the Tomatoes: While the bread is toasting, dice the ripe tomatoes into small cubes. Place them in a mixing bowl. Mince the garlic cloves and add them to the bowl with the tomatoes.
- Season the Tomato Mixture: Tear the fresh basil leaves into small pieces and add them to the tomato mixture. Drizzle with the extra virgin olive oil, and season with salt and freshly ground black pepper to taste. Stir gently to combine all the ingredients.
- Assemble the Bruschetta: Once the bread slices are cool enough to handle, take each slice and spoon a generous amount of the tomato mixture onto it. Verify each piece is well-covered for maximum flavor.
- Serve and Enjoy: Arrange the bruschetta on a serving platter. For extra presentation and flavor, drizzle a balsamic glaze over the top of each bruschetta piece if desired. Serve immediately and enjoy the fresh, vibrant flavors.
Extra Tips:
For the best results, always use the freshest possible ingredients. The quality of the tomatoes and basil will greatly impact the flavor of your bruschetta. If you have the time, allow the tomato mixture to sit for about 10-15 minutes before assembling the bruschetta. This resting time allows the flavors to meld together, enhancing the overall taste.
When selecting bread, choose one with a firm texture that will hold up well to the toppings. For a little extra flavor, you can rub a cut clove of garlic over the toasted bread slices before adding the tomato mixture. Enjoy your Classic Bruschetta With Fresh Tomatoes as a delightful appetizer or a light snack.
Creamy Burrata With Prosciutto and Arugula
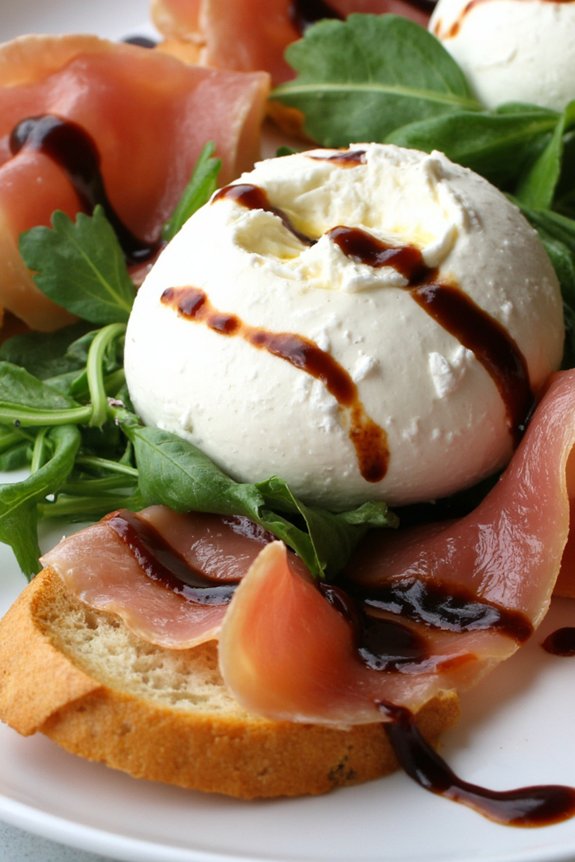
Creamy Burrata With Prosciutto and Arugula is an exquisite Italian appetizer perfect for any party. This dish beautifully combines the creamy texture of burrata cheese with the salty, delicate flavor of prosciutto and the peppery bite of fresh arugula. It’s a dish that’s not only delicious but also visually appealing, making it a centerpiece at any gathering.
The simplicity of the ingredients allows their natural flavors to shine, ensuring that each bite is a delightful experience. The beauty of this recipe lies in its simplicity and the quality of its ingredients. When preparing this dish, choosing fresh and high-quality ingredients is essential.
Burrata cheese is known for its creamy interior, which pairs perfectly with the paper-thin slices of prosciutto. The arugula adds a fresh, peppery note that balances the richness of the cheese and meat. This dish is easy to prepare, making it an ideal choice for a quick yet impressive appetizer for 4-6 people.
Ingredients
- 2 balls of burrata cheese
- 12 slices of prosciutto
- 4 cups of fresh arugula
- 4 tablespoons of extra-virgin olive oil
- 2 tablespoons of balsamic glaze
- Salt and freshly cracked black pepper to taste
- 1 loaf of crusty Italian bread, sliced and toasted
Cooking Instructions
- Prepare the Ingredients: Begin by gathering all the ingredients. Make sure the burrata is at room temperature for the best creamy texture, and the arugula is thoroughly washed and dried.
- Assemble the Dish: On a large serving platter, place the burrata balls in the center. Arrange the prosciutto slices around the burrata, letting them drape naturally for an elegant presentation.
- Add the Arugula: Scatter the arugula around and over the prosciutto, ensuring even distribution. This not only adds color but also enhances the flavor profile of the dish.
- Drizzle with Olive Oil and Balsamic Glaze: Drizzle the extra-virgin olive oil over the burrata, prosciutto, and arugula. Follow with a drizzle of balsamic glaze for a touch of sweetness that complements the salty and creamy elements.
- Season: Lightly season with a pinch of salt and freshly cracked black pepper to taste. Be cautious with the salt, as the prosciutto is already salty.
- Serve with Bread: Arrange the slices of toasted Italian bread around the platter or serve them in a separate basket. Encourage guests to pile the ingredients on the bread for a delicious bite.
Extra Tips
For the best results, use a high-quality balsamic glaze or make your own by reducing balsamic vinegar with a bit of sugar until thickened. This dish is all about balance, so adjust the amount of balsamic glaze to your taste preference.
If you have access to seasonal heirloom tomatoes, consider adding a few slices to the platter for additional color and flavor. Finally, remember that this dish is best served fresh, so try to assemble it just before serving to maintain the crispness of the arugula and the creamy texture of the burrata.
Caprese Skewers With Balsamic Glaze
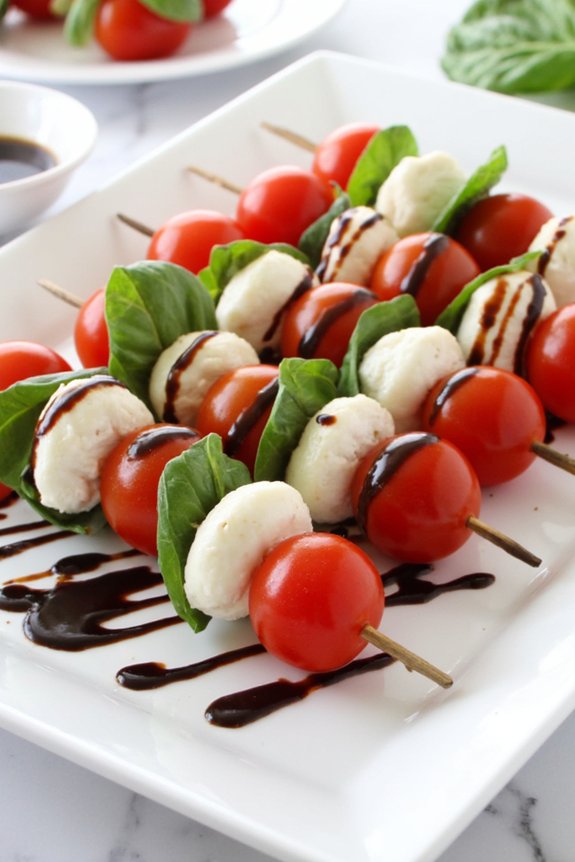
Caprese Skewers With Balsamic Glaze are a delightful Italian appetizer that’s both visually appealing and deliciously fresh. Perfect for parties, these skewers are a simple yet elegant way to showcase the classic flavors of Italy. They combine the vibrant tastes of ripe cherry tomatoes, creamy mozzarella, and fragrant basil, all drizzled with a tangy balsamic glaze.
These skewers not only look beautiful on a platter but also offer a burst of flavor in every bite. Whether you’re hosting a casual gathering or a more formal event, Caprese Skewers With Balsamic Glaze are sure to be a hit with your guests. The preparation is incredibly easy, requiring minimal cooking skills, which makes them an ideal choice for both beginner and experienced cooks.
Plus, the skewers can be assembled ahead of time, allowing you to enjoy the party without being stuck in the kitchen. Here’s how to make this delightful dish for 4-6 people.
Ingredients:
- 24 cherry tomatoes
- 24 small mozzarella balls (bocconcini)
- 24 fresh basil leaves
- 2 tablespoons extra-virgin olive oil
- Salt and freshly ground black pepper, to taste
- 1/2 cup balsamic vinegar
- 1 tablespoon honey
- 24 wooden skewers or cocktail picks
Instructions:
- Prepare the Balsamic Glaze: In a small saucepan, combine the balsamic vinegar and honey. Bring to a gentle boil over medium heat, then reduce the heat to low and let it simmer for about 10-15 minutes. Stir occasionally until it thickens to a syrupy consistency. Remove from heat and let it cool.
- Assemble the Skewers: Take one wooden skewer or cocktail pick and thread a cherry tomato onto it. Follow with a fresh basil leaf, and then add a mozzarella ball. Repeat the layering process until you have two of each ingredient on the skewer, ending with a cherry tomato.
- Season the Skewers: Arrange the assembled skewers on a serving platter. Drizzle them with extra-virgin olive oil and season with a light sprinkle of salt and freshly ground black pepper.
- Add the Balsamic Glaze: Once the balsamic glaze has cooled, drizzle it generously over the skewers. Be sure each skewer gets a good amount of glaze for added flavor.
- Serve: These Caprese Skewers can be served immediately, or you can cover them with plastic wrap and refrigerate for up to two hours before serving. If refrigerated, allow them to sit at room temperature for about 10-15 minutes before serving to enhance the flavors.
Extra Tips: For the best results, use fresh, high-quality ingredients. The sweetness of ripe cherry tomatoes, the creaminess of fresh mozzarella, and the aroma of basil make a big difference in the overall taste.
You can also experiment with flavored balsamic glazes, such as fig or raspberry, for a unique twist. If you’re preparing these skewers in advance, store the balsamic glaze separately and drizzle it right before serving to maintain the vibrant colors and textures.
Antipasto Platter With Italian Meats and Cheeses

An Antipasto Platter is the perfect dish to start any Italian-themed party. This vibrant and colorful platter combines a variety of Italian meats, cheeses, and other delectable bites, offering a taste of Italy in every bite.
It’s not only visually appealing but also incredibly easy to assemble, making it a stress-free option for hosts looking to impress their guests. This platter can be customized to suit your preferences, ensuring there’s something for everyone to enjoy.
Perfect for serving 4-6 people, the Antipasto Platter is a delightful combination of flavors and textures. It typically includes an array of cured Italian meats like prosciutto, salami, and mortadella, paired with a selection of cheeses such as mozzarella, provolone, and gorgonzola.
Complement these with marinated vegetables, olives, and crusty Italian bread or crackers, and you have a delicious spread that invites guests to mix and match their bites.
Ingredients:
- 100g Prosciutto
- 100g Salami
- 100g Mortadella
- 150g Mozzarella, sliced or in balls
- 100g Provolone cheese, sliced
- 100g Gorgonzola cheese, crumbled
- 1 jar of marinated artichoke hearts
- 1 jar of roasted red peppers
- 1 cup mixed olives (green and black)
- 1 cup cherry tomatoes
- 1 bunch of grapes
- 1 loaf of crusty Italian bread or a box of Italian-style crackers
- Fresh basil leaves for garnish
Instructions:
- Prepare the Ingredients: Begin by slicing the meats and cheeses if they aren’t pre-sliced. Arrange them neatly in separate sections on a large serving platter or wooden board.
- Add the Vegetables and Olives: Drain the marinated artichoke hearts and roasted red peppers. Place them into small bowls or directly onto the platter. Add the mixed olives in another section, ensuring they’re pitted for easy eating.
- Incorporate Fresh Elements: Rinse the cherry tomatoes and grapes thoroughly. Arrange them around the meats and cheeses. These fresh elements will add color and variety to your platter.
- Arrange the Bread/Crackers: Slice the Italian bread or open the box of Italian-style crackers. Place them in a basket or directly on the platter, making sure they’re easily reachable.
- Garnish and Serve: Finish by adding fresh basil leaves for a pop of color and a hint of aroma. Serve immediately, allowing guests to help themselves.
Extra Tips:
When creating your Antipasto Platter, consider the balance of flavors and textures. Use a variety of meats and cheeses to keep the platter interesting.
Feel free to add nuts, such as almonds or walnuts, for an added crunch. If you have dietary restrictions among your guests, consider offering a few vegetarian options or gluten-free crackers.
Finally, serve the platter with a selection of Italian wines to enhance the overall dining experience.
Garlic and Herb Focaccia Bread
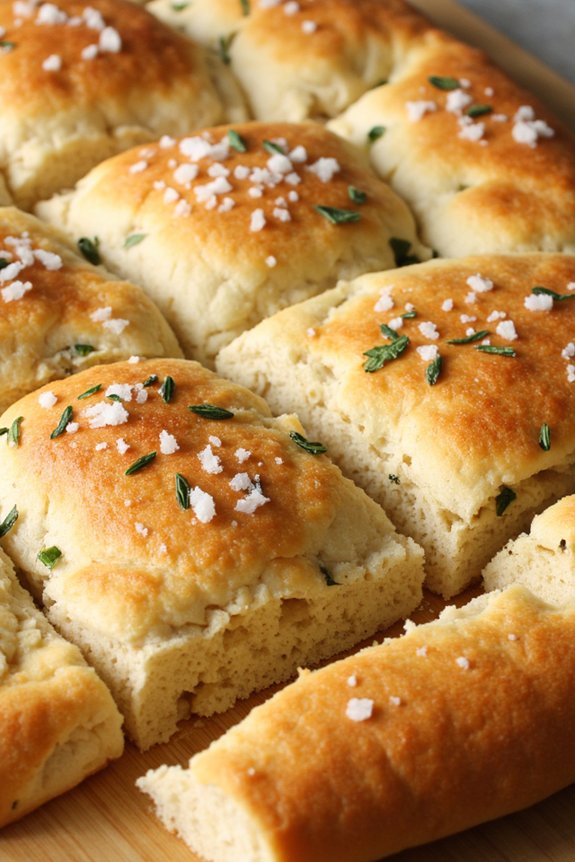
Garlic and Herb Focaccia Bread is a delightful Italian flatbread that pairs beautifully with a variety of meals or can be enjoyed on its own. Known for its soft, airy texture and flavorful crust, this bread makes an excellent addition to any party or gathering. Infused with the aromatic flavors of garlic and fresh herbs, it offers a savory experience that tantalizes the taste buds.
Whether served as an appetizer or alongside a main course, Garlic and Herb Focaccia Bread is sure to impress your guests and elevate your dining experience.
The beauty of this recipe lies in its simplicity and versatility. With just a few basic ingredients, you can create a deliciously satisfying bread that’s perfect for dipping in olive oil, using as a base for sandwiches, or simply enjoying with a glass of wine.
This recipe serves 4-6 people and can be easily adjusted to suit your needs. With a little time and patience, you’ll have a freshly baked focaccia that’s golden brown on the outside and wonderfully soft on the inside, bursting with the flavors of garlic and herbs.
Ingredients (serves 4-6):
- 3 1/2 cups all-purpose flour
- 1 packet (2 1/4 tsp) active dry yeast
- 1 1/4 cups warm water (110°F)
- 1/4 cup olive oil, plus more for drizzling
- 2 teaspoons salt
- 4 cloves garlic, minced
- 2 teaspoons fresh rosemary, chopped
- 2 teaspoons fresh thyme, chopped
- Sea salt, for sprinkling
Instructions:
- Activate the Yeast: In a small bowl, combine the warm water and active dry yeast. Let it sit for about 5-10 minutes until it becomes frothy. This step is essential as it wakes up the yeast, which is vital for the bread to rise.
- Prepare the Dough: In a large mixing bowl, combine the flour and salt. Make a well in the center and add the activated yeast mixture and 1/4 cup of olive oil. Mix until a dough begins to form.
- Knead the Dough: Transfer the dough onto a floured surface and knead for about 10 minutes until it becomes smooth and elastic. If the dough feels sticky, sprinkle a little more flour as needed.
- First Rise: Place the dough in a lightly oiled bowl, cover with a damp cloth, and let it rise in a warm place for about 1-1.5 hours or until it has doubled in size.
- Prepare the Baking Sheet: Once the dough has risen, preheat your oven to 400°F (200°C). Grease a baking sheet with olive oil or line it with parchment paper.
- Shape the Dough: Punch down the risen dough to release air bubbles. Place it on the prepared baking sheet and press it out to form a rectangle or oval shape, about 1 inch thick.
- Add Toppings: Drizzle olive oil over the dough, then use your fingers to make deep dimples all over the surface. Sprinkle the minced garlic, chopped rosemary, chopped thyme, and sea salt evenly over the top.
- Second Rise: Cover the dough with a cloth and let it rise for another 20-30 minutes, allowing the flavors to meld.
- Bake the Focaccia: Bake in the preheated oven for 20-25 minutes or until the focaccia is golden brown and cooked through. Remove from the oven and allow it to cool slightly before slicing.
Extra Tips:
For an extra burst of flavor, consider adding a sprinkle of grated Parmesan cheese or sliced olives before baking. If you prefer a slightly crispier crust, you can bake the focaccia for an additional 5 minutes.
Always verify that your yeast is fresh and active; expired yeast won’t allow the dough to rise properly. Feel free to experiment with other herbs like basil or oregano to customize the flavor profile to your liking. Enjoy your focaccia warm for the best taste experience!
Spinach and Ricotta Stuffed Shells

Spinach and Ricotta Stuffed Shells is a classic Italian dish that’s perfect for parties or family gatherings. This comforting and flavorful meal isn’t only easy to prepare but also a delight to serve and enjoy. The creamy ricotta cheese, combined with fresh spinach and herbs, is stuffed into pasta shells and baked to perfection in a rich tomato sauce. This dish is sure to impress your guests with its beautiful presentation and delicious taste.
Ideal for a serving size of 4-6 people, Spinach and Ricotta Stuffed Shells can be made in advance and easily reheated, making it a convenient option for entertaining. The combination of cheese, spinach, and pasta creates a satisfying, hearty dish that’s sure to please both vegetarians and meat-lovers alike. With just a few ingredients and simple steps, you can create an authentic Italian experience right in your own kitchen.
Ingredients:
- 20 jumbo pasta shells
- 15 oz ricotta cheese
- 1 cup cooked spinach, chopped
- 1 cup shredded mozzarella cheese
- 1/2 cup grated Parmesan cheese
- 1 large egg
- 2 cups marinara sauce
- 1 tablespoon olive oil
- 1 clove garlic, minced
- 1 teaspoon dried Italian herbs
- Salt and pepper to taste
Cooking Instructions:
- Preheat the Oven: Start by preheating your oven to 375°F (190°C).
- Cook the Pasta Shells: Bring a large pot of salted water to a boil. Add the jumbo pasta shells and cook according to the package instructions until al dente. Drain the shells and set them aside to cool slightly.
- Prepare the Ricotta Filling: In a large mixing bowl, combine the ricotta cheese, cooked spinach, 1/2 cup of mozzarella cheese, Parmesan cheese, egg, minced garlic, Italian herbs, and a pinch of salt and pepper. Mix well until all the ingredients are fully combined.
- Stuff the Shells: Using a spoon, fill each cooked pasta shell with the ricotta mixture, being careful not to overstuff them.
- Prepare the Baking Dish: Spread 1 cup of marinara sauce on the bottom of a 9×13 inch baking dish. Arrange the stuffed shells in a single layer on top of the sauce.
- Add More Sauce and Cheese: Pour the remaining 1 cup of marinara sauce evenly over the shells. Sprinkle the remaining mozzarella cheese on top.
- Bake the Shells: Cover the baking dish with aluminum foil and bake in the preheated oven for 20 minutes. Remove the foil and bake for an additional 10 minutes, or until the cheese is melted and bubbly.
- Serve and Enjoy: Once baked, remove the dish from the oven and let it cool slightly before serving. Garnish with extra Parmesan cheese and fresh herbs if desired.
Extra Tips: When preparing the ricotta filling, make sure the spinach is well-drained to avoid excess moisture in the mixture. You can use fresh or frozen spinach; if using frozen, thaw and squeeze out any excess water.
Feel free to customize the dish by adding other ingredients such as sautéed mushrooms or sun-dried tomatoes to the ricotta mixture for additional flavor. If you have extra shells and filling, you can freeze them for later use. Just thaw and bake when needed for a quick and delicious meal.
Pesto Pasta Salad With Cherry Tomatoes

Pesto Pasta Salad with Cherry Tomatoes is an easy yet delightful dish perfect for any Italian-themed party. This vibrant salad combines the fresh, aromatic flavors of basil pesto with the sweet and juicy taste of cherry tomatoes. It’s a versatile dish that can be served as a main course or a side dish, making it a great addition to any festive gathering.
The simplicity of the ingredients allows each flavor to shine, creating a rejuvenating and satisfying dish that’s sure to impress your guests.
The beauty of this Pesto Pasta Salad is in its ease of preparation. With minimal cooking involved, you can whip up this dish in no time, allowing you to spend more time with your guests. The pesto acts as a deliciously creamy dressing for the pasta, while the cherry tomatoes add a pop of color and a burst of flavor.
You can prepare this dish ahead of time, making it ideal for busy hosts who want to enjoy their party without spending too much time in the kitchen.
Ingredients (Serving Size: 4-6 people)
- 400g pasta (fusilli or penne)
- 250g cherry tomatoes, halved
- 150g fresh basil pesto
- 50g Parmesan cheese, grated
- 2 tablespoons pine nuts
- 2 tablespoons olive oil
- Salt to taste
- Black pepper to taste
Cooking Instructions
- Cook the Pasta: Bring a large pot of salted water to a boil. Add the pasta and cook according to the package instructions until al dente. Drain the pasta and rinse it under cold water to stop the cooking process. This will also cool the pasta for the salad.
- Prepare the Cherry Tomatoes: While the pasta is cooking, wash and halve the cherry tomatoes. Set aside.
- Toast the Pine Nuts: In a small skillet, heat 2 tablespoons of olive oil over medium heat. Add the pine nuts and toast them for about 3-5 minutes, stirring frequently, until they’re golden brown. Remove from the skillet and set aside to cool.
- Combine Ingredients: In a large mixing bowl, combine the cooked and cooled pasta with the fresh basil pesto. Stir well to make sure the pasta is evenly coated with the pesto.
- Add Cherry Tomatoes and Cheese: Gently fold in the halved cherry tomatoes and half of the grated Parmesan cheese. Mix until all the ingredients are well incorporated.
- Season and Serve: Season the salad with salt and black pepper to taste. Transfer the salad to a serving dish and sprinkle the toasted pine nuts and the remaining Parmesan cheese on top. Serve immediately or refrigerate for later.
Extra Tips
To enhance the flavors of your Pesto Pasta Salad, consider using homemade basil pesto for a fresher taste. If you prefer a creamier texture, you can add a tablespoon of mayonnaise or Greek yogurt to the pesto before mixing it with the pasta.
This dish can be made a day in advance and stored in the fridge, allowing the flavors to meld together beautifully. Just be sure to give it a good stir before serving. Additionally, feel free to add other ingredients such as mozzarella balls or arugula for an extra twist.
Margherita Pizza Bites

If you’re looking for a delightful appetizer that captures the essence of traditional Italian flavors, Margherita Pizza Bites are the perfect choice. These bite-sized delights bring together the classic combination of tomatoes, mozzarella, and basil, encapsulated in a soft dough that will have your guests reaching for more.
Ideal for parties or casual get-togethers, these pizza bites aren’t only delicious but also simple to prepare, making them a go-to option for any host looking to impress without spending hours in the kitchen.
The beauty of Margherita Pizza Bites lies in their versatility and the fresh ingredients that make them pop with flavor. Whether you’re a fan of traditional Margherita pizza or just looking to try something new, this recipe will cater to your taste buds while adding a touch of Italian elegance to your party spread.
Plus, with a serving size of 4-6 people, they’re perfectly portioned for sharing and enjoying with friends and family.
Ingredients for 4-6 People:
- 1 pound pizza dough
- 1 cup cherry tomatoes, halved
- 1 cup fresh mozzarella, cut into small cubes
- 1/4 cup fresh basil leaves, torn into small pieces
- 2 tablespoons olive oil
- 1 teaspoon salt
- 1/2 teaspoon black pepper
- 1 tablespoon balsamic glaze (optional)
Cooking Instructions:
- Prepare the Ingredients: Start by preheating your oven to 400°F (200°C). While the oven is heating, roll out the pizza dough on a lightly floured surface to about 1/4 inch thickness. Use a small round cookie cutter or a glass to cut the dough into bite-sized circles.
- Assemble the Bites: Place the dough circles on a baking sheet lined with parchment paper. Top each circle with a few pieces of cherry tomato and a cube of mozzarella. Drizzle a little olive oil over each bite and then sprinkle with salt and pepper to taste.
- Bake the Bites: Place the baking sheet in the preheated oven and bake for about 10-12 minutes, or until the dough is golden brown and the cheese is bubbly and slightly browned.
- Finish with Fresh Basil: Once the pizza bites are done baking, remove them from the oven and allow them to cool for a few minutes. Just before serving, garnish each bite with a piece of fresh basil. For an extra touch of flavor, you can drizzle balsamic glaze over the top.
Extra Tips:
For the best results, use fresh, high-quality ingredients as they make a significant difference in flavor. If you’re short on time, pre-made pizza dough can be a great alternative, but homemade dough will always provide that extra touch of authenticity.
Feel free to experiment with additional toppings like olives or roasted red peppers to personalize your pizza bites. If serving at a party, keep them warm in the oven at a low temperature until ready to serve, ensuring they stay deliciously fresh for your guests.
Sausage and Pepper Risotto

Sausage and Pepper Risotto is a delightful and hearty Italian dish that’s certain to be a hit at your next party. The combination of savory sausage, vibrant bell peppers, and creamy risotto creates a symphony of flavors that are both comforting and satisfying.
It’s perfect for entertaining because it can be made in a single pot, allowing you to spend more time with your guests and less time on cleanup. With its rich flavors and aromatic ingredients, this dish captures the essence of Italian cooking and is sure to impress your friends and family.
This risotto is made with Arborio rice, which is known for its high starch content, giving the dish its characteristic creamy texture. The key to a perfect risotto is patience, as the rice absorbs the broth slowly, releasing its starches and creating a luscious consistency.
The addition of Italian sausage adds a depth of flavor, while the bell peppers provide a touch of sweetness and color. Whether you’re planning a casual get-together or a more formal gathering, this Sausage and Pepper Risotto will be a crowd-pleaser that leaves everyone asking for seconds.
Ingredients (Serves 4-6):
- 2 tablespoons olive oil
- 1 pound Italian sausage, casings removed
- 1 large onion, chopped
- 2 cloves garlic, minced
- 2 bell peppers (red and yellow), sliced
- 1 1/2 cups Arborio rice
- 1 cup dry white wine
- 4-5 cups chicken broth, kept warm
- 1 cup grated Parmesan cheese
- Salt and freshly ground black pepper, to taste
- Fresh parsley, chopped, for garnish
Cooking Instructions:
- Prepare the Sausage: Heat the olive oil in a large, heavy-bottomed pot over medium heat. Add the sausage, breaking it up with a spoon, and cook until browned and cooked through. Remove the sausage from the pot and set aside.
- Cook the Vegetables: In the same pot, add the chopped onion, minced garlic, and sliced bell peppers. Cook until the onion becomes translucent and the peppers are tender, about 5-7 minutes.
- Toast the Rice: Add the Arborio rice to the pot with the vegetables. Stir continuously for about 2 minutes, making sure that all the rice grains are well-coated with the oil and start to turn translucent at the edges.
- Deglaze with Wine: Pour in the white wine, stirring constantly until the wine is absorbed by the rice. This step adds depth and a slight acidity to balance the flavors.
- Add Broth Gradually: Begin adding the warm chicken broth, one ladle at a time, stirring frequently. Allow each addition to be absorbed before adding the next, maintaining a gentle simmer. This process should take about 18-20 minutes, or until the rice is al dente and creamy.
- Incorporate Sausage and Cheese: Return the cooked sausage to the pot and mix well. Stir in the grated Parmesan cheese until melted and well combined. Season the risotto with salt and freshly ground black pepper to taste.
- Finish and Serve: Remove the pot from the heat and let the risotto sit for a minute. Garnish with chopped fresh parsley before serving. Enjoy the risotto warm with an optional sprinkle of extra Parmesan on top.
Extra Tips:
When making Sausage and Pepper Risotto, remember to have all your ingredients prepped and ready to go before starting to cook, as this will guarantee a smooth cooking process.
It’s important to keep the chicken broth warm on a separate burner so that it doesn’t cool down the risotto each time you add it. If you prefer a bit of spice, consider using a spicy Italian sausage or adding a pinch of red pepper flakes to the dish.
Finally, remember that risotto should be served immediately for the best texture, as it continues to thicken as it sits.
Chicken Piccata With Lemon and Capers

Chicken Piccata With Lemon and Capers is a classic Italian-American dish known for its fresh, zesty flavors and simplicity. The dish features tender chicken cutlets that are lightly coated in flour, pan-seared to golden brown perfection, and then bathed in a bright lemon-butter sauce with a hint of brininess from capers.
This dish is perfect for any gathering or party, offering a delicious balance of savory and tangy notes that will delight your guests. This recipe is designed to serve 4-6 people, making it ideal for a small dinner party or family meal.
The key to achieving the best flavor is using fresh lemon juice and high-quality capers, which add a burst of flavor to the sauce. With just a few simple ingredients and steps, you can prepare a meal that’s both impressive and easy to make.
Ingredients (Serves 4-6):
- 4 boneless, skinless chicken breasts
- Salt and pepper, to taste
- 1 cup all-purpose flour
- 4 tablespoons olive oil
- 4 tablespoons unsalted butter
- 1/2 cup chicken broth
- 1/4 cup fresh lemon juice
- 1/4 cup capers, drained
- 2 tablespoons chopped fresh parsley
Instructions:
- Prepare the Chicken: Start by pounding the chicken breasts to an even thickness of about 1/2 inch. Season both sides with salt and pepper.
- Coat with Flour: Place the flour in a shallow dish. Dredge each chicken breast in the flour, shaking off any excess.
- Sear the Chicken: In a large skillet, heat olive oil over medium-high heat. Add the chicken breasts and cook for 3-4 minutes on each side, or until golden brown and cooked through. Remove the chicken from the skillet and set aside.
- Make the Sauce: In the same skillet, reduce the heat to medium and add the butter. Once melted, stir in the chicken broth and lemon juice, scraping up any browned bits from the bottom of the pan.
- Add Capers: Stir in the capers and let the sauce simmer for 2-3 minutes, allowing it to reduce slightly.
- Return Chicken to Skillet: Return the chicken breasts to the skillet, spooning the sauce over them. Let them simmer in the sauce for another 2 minutes to warm through.
- Garnish and Serve: Remove the skillet from the heat and sprinkle with fresh parsley. Serve the chicken piccata hot, with the sauce drizzled over the top.
Extra Tips: For the best results, make certain the chicken breasts are of even thickness to promote uniform cooking. You can use a meat mallet or rolling pin to pound them evenly.
If you prefer a thicker sauce, you can add a tablespoon of flour to the butter before adding the broth and lemon juice, stirring to form a roux. Additionally, the dish pairs beautifully with a side of pasta or a simple green salad, allowing the flavors to shine through.
Eggplant Parmesan Stacks
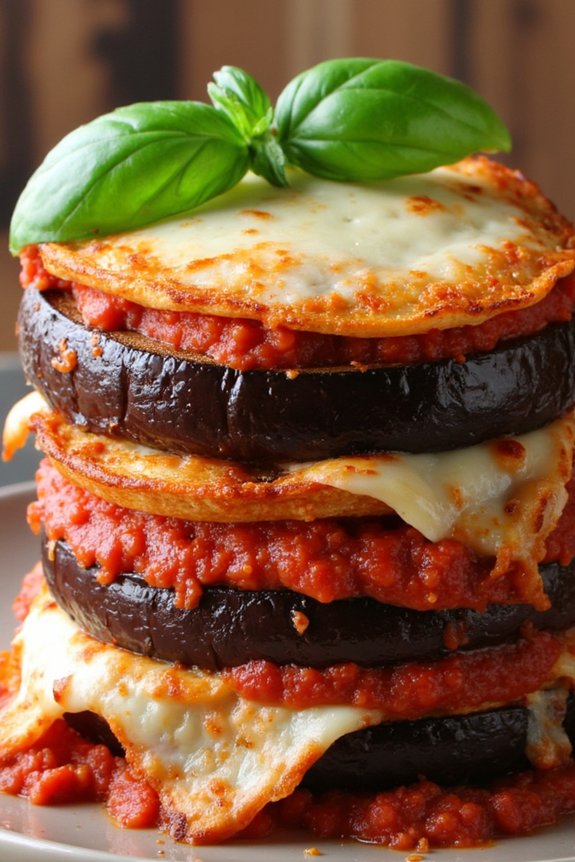
Eggplant Parmesan Stacks are a delightful twist on the classic Italian dish, perfect for entertaining at a party or enjoying as a family meal. This recipe layers crispy, golden-brown eggplant slices with rich marinara sauce and gooey mozzarella cheese, creating a satisfying and flavorful combination. The dish isn’t only visually appealing with its stacked presentation, but it also packs a punch of traditional Italian flavors that are certain to impress your guests.
Whether you’re an Italian cuisine aficionado or a home cook looking to try something new, Eggplant Parmesan Stacks are a must-try for your next gathering.
Preparing this dish involves a few straightforward steps, starting with selecting the freshest eggplants to achieve the best texture and taste. The eggplants are sliced and coated in a seasoned breadcrumb mixture before being baked to perfection.
Layering the baked eggplant with marinara sauce, fresh basil, and melted mozzarella cheese creates a harmonious blend of flavors that capture the essence of Italian comfort food. Served hot, these stacks can be a hearty main course or a delectable side dish that complements a variety of party menus.
Ingredients for 4-6 servings:
- 2 large eggplants
- Salt
- 2 cups breadcrumbs
- 1 cup grated Parmesan cheese
- 1 teaspoon dried oregano
- 1 teaspoon garlic powder
- 3 large eggs
- 2 cups marinara sauce
- 2 cups shredded mozzarella cheese
- Fresh basil leaves
- Olive oil
Cooking Instructions:
- Prepare the Eggplants: Wash and slice the eggplants into 1/2-inch thick rounds. Arrange the slices in a single layer on a large baking sheet. Sprinkle both sides generously with salt and let them sit for about 30 minutes. This step helps to draw out any bitterness from the eggplant.
- Preheat the Oven: While the eggplants are resting, preheat your oven to 400°F (200°C). Line another baking sheet with parchment paper for baking the eggplant.
- Prepare the Coating Mixture: In a shallow bowl, combine the breadcrumbs, Parmesan cheese, dried oregano, and garlic powder. In another bowl, beat the eggs until smooth.
- Coat the Eggplant Slices: Rinse the salted eggplant slices under cold water and pat them dry with a clean kitchen towel. Dip each slice into the beaten eggs, allowing any excess to drip off, then coat them in the breadcrumb mixture, pressing gently to guarantee the crumbs adhere.
- Bake the Eggplant: Place the coated eggplant slices on the prepared baking sheet. Drizzle them lightly with olive oil. Bake in the preheated oven for 25-30 minutes, flipping halfway through, until they’re golden brown and crispy.
- Assemble the Stacks: Reduce the oven temperature to 375°F (190°C). On a clean baking sheet, create stacks by layering a slice of baked eggplant, a spoonful of marinara sauce, a sprinkle of mozzarella cheese, and a fresh basil leaf. Repeat the layers until all ingredients are used, ending with a layer of cheese on top.
- Bake the Stacks: Return the baking sheet to the oven and bake for an additional 15-20 minutes, until the cheese is melted and bubbly.
- Serve: Carefully transfer the eggplant stacks to serving plates, garnishing with extra basil leaves if desired.
Extra Tips:
For an added depth of flavor, consider using homemade marinara sauce, which allows you to adjust the seasoning according to your taste preferences. Additionally, if you prefer a less salty dish, be sure to rinse the salted eggplant slices thoroughly before drying them.
To save time, you can prepare the eggplant slices and sauce ahead of time; then, all that’s left is to assemble and bake before serving. This dish pairs beautifully with a crisp green salad or a side of garlic bread to round out the meal.
Tiramisu With Mascarpone Cream

Tiramisu is a classic Italian dessert that combines rich layers of coffee-soaked ladyfingers with a creamy mascarpone filling, topped with a dusting of cocoa powder. It’s a favorite at parties and gatherings due to its decadent flavor and elegant presentation.
The balance of flavors in Tiramisu With Mascarpone Cream is achieved through the harmonious blend of strong espresso, smooth mascarpone cheese, and a hint of cocoa. This dessert isn’t only delicious but also relatively simple to prepare, making it an ideal choice for those looking to impress guests without spending all day in the kitchen.
The following recipe is designed to serve 4-6 people, perfect for a small gathering or dinner party. The key to a successful Tiramisu is the quality of the ingredients, especially the espresso and mascarpone. Be certain to use fresh, high-quality mascarpone cheese and strong, freshly brewed espresso for the best results. The dish can be prepared in advance, allowing the flavors to meld beautifully before serving.
Ingredients:
- 4 large egg yolks
- 1/2 cup granulated sugar
- 2/3 cup milk
- 1 1/4 cups heavy cream
- 1/2 teaspoon pure vanilla extract
- 8 ounces mascarpone cheese
- 1 cup strong brewed espresso, cooled
- 1 tablespoon coffee liqueur (optional)
- 24-30 ladyfingers
- 2 tablespoons unsweetened cocoa powder
- Dark chocolate shavings (optional)
Instructions:
- Prepare the mascarpone cream: In a medium saucepan, whisk together the egg yolks and sugar until well combined. Gradually whisk in the milk and place the saucepan over medium heat. Stir constantly until the mixture thickens slightly and coats the back of a spoon, about 8-10 minutes. Remove from heat and allow it to cool slightly.
- Whip the cream: In a separate bowl, beat the heavy cream with the vanilla extract until stiff peaks form. Gently fold the mascarpone cheese into the cooled egg yolk mixture until smooth. Then, carefully fold in the whipped cream, ensuring the mixture is well combined and airy.
- Assemble the tiramisu: In a shallow dish, combine the cooled espresso with the coffee liqueur, if using. Quickly dip each ladyfinger into the coffee mixture, ensuring they’re moistened but not soggy. Arrange half of the dipped ladyfingers in a single layer in a 9×13 inch dish.
- Layer the dessert: Spread half of the mascarpone cream mixture over the layer of ladyfingers, smoothing it out with a spatula. Add another layer of dipped ladyfingers on top, followed by the remaining mascarpone cream. Smooth the top layer evenly.
- Chill and finish: Cover the dish with plastic wrap and refrigerate for at least 4 hours, or overnight for best results. Just before serving, dust the top generously with unsweetened cocoa powder. Garnish with dark chocolate shavings if desired.
Extra Tips:
For an extra layer of flavor, consider adding a tablespoon of rum or Marsala wine to the coffee mixture when dipping the ladyfingers. This can enhance the depth of the coffee taste.
If you don’t have access to espresso, strong brewed coffee can be a suitable substitute. When assembling, work quickly to ensure the ladyfingers don’t become too saturated, which can affect the texture of the final dish.
Finally, allowing the tiramisu to chill overnight will deepen the flavors and improve the overall texture, making it even more delicious when served.
Lemon Ricotta Cake With Almonds

Lemon Ricotta Cake With Almonds is a delightful Italian dessert that’s perfect for any party or gathering. This cake is known for its moist, tender crumb and bright, zesty flavor, thanks to the fresh lemon juice and zest that infuse the batter. The addition of ricotta cheese gives the cake a rich, creamy texture, while the almonds add a delightful crunch.
Whether you’re hosting a casual get-together or a more formal celebration, this cake is sure to impress your guests with its balance of flavors and elegant presentation.
This recipe is designed to serve 4-6 people, making it ideal for small gatherings. The cake is simple to prepare and requires just a few ingredients, most of which you may already have in your pantry. By following the step-by-step instructions, you’ll be able to whip up this delicious dessert in no time.
Serve it with a dusting of powdered sugar, a dollop of whipped cream, or a scoop of vanilla ice cream for an extra special treat.
Ingredients:
- 1 cup ricotta cheese
- 3/4 cup granulated sugar
- 1/2 cup unsalted butter, softened
- 3 large eggs
- 1 teaspoon vanilla extract
- Zest of 2 lemons
- Juice of 1 lemon
- 1 cup all-purpose flour
- 1 teaspoon baking powder
- 1/4 teaspoon salt
- 1/2 cup sliced almonds
- Powdered sugar, for dusting
Instructions:
- Preheat the Oven: Start by preheating your oven to 350°F (175°C). Grease a 9-inch round cake pan with butter and line the bottom with parchment paper to prevent sticking.
- Mix Wet Ingredients: In a large mixing bowl, combine the ricotta cheese, granulated sugar, and softened butter. Use an electric mixer to beat the ingredients together until they’re smooth and creamy.
- Add Eggs and Flavorings: Add the eggs one at a time to the ricotta mixture, beating well after each addition. Stir in the vanilla extract, lemon zest, and lemon juice until fully incorporated.
- Combine Dry Ingredients: In a separate bowl, whisk together the all-purpose flour, baking powder, and salt. Gradually add the dry ingredients to the wet mixture, folding gently with a spatula until just combined.
- Add Almonds: Stir in half of the sliced almonds into the batter, reserving the rest for topping.
- Transfer to Cake Pan: Pour the batter into the prepared cake pan and smooth the top with a spatula. Sprinkle the remaining sliced almonds evenly over the top of the batter.
- Bake the Cake: Place the cake in the preheated oven and bake for 35-40 minutes, or until a toothpick inserted into the center comes out clean. The top should be golden brown.
- Cool and Serve: Allow the cake to cool in the pan for about 10 minutes, then transfer it to a wire rack to cool completely. Once cooled, dust the top with powdered sugar before serving.
Extra Tips:
For the best results, use fresh lemons to extract juice and zest, as this will enhance the cake’s flavor with a vibrant citrus note. If you prefer a sweeter cake, increase the sugar by a couple of tablespoons.
This cake can be stored in an airtight container at room temperature for up to two days, but it’s best enjoyed fresh. If you wish to add a decorative touch, consider garnishing with fresh berries or edible flowers before serving.
Affogato With Espresso and Vanilla Gelato
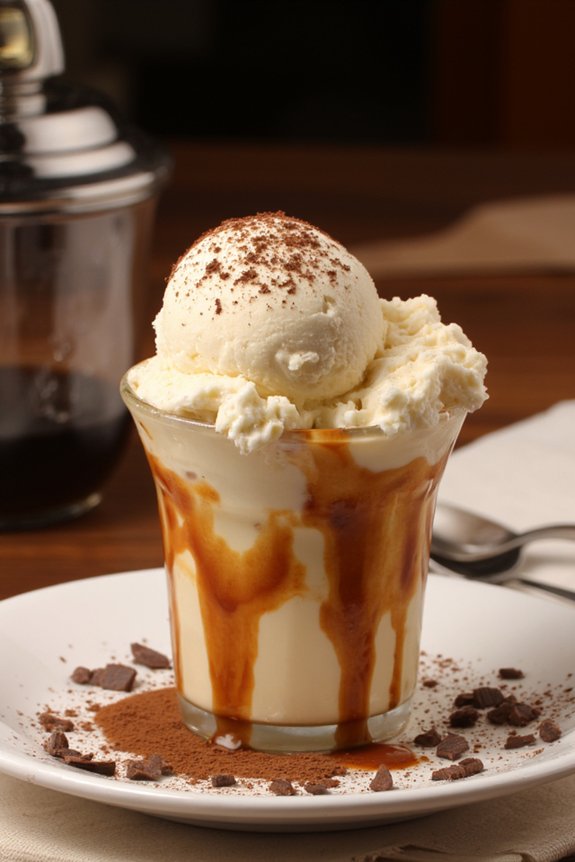
Affogato With Espresso and Vanilla Gelato is an elegant yet simple Italian dessert that combines the rich flavors of espresso with the creamy sweetness of vanilla gelato. This delightful treat is perfect for an easy yet impressive party dessert. The hot espresso is poured over the cold gelato, creating a beautiful contrast of temperatures and a delightful mixture of flavors that will surely impress your guests.
It’s an easy-to-make dessert that requires minimal effort, yet delivers maximum pleasure. This dessert can be a perfect ending to any meal, leaving your guests with a lasting impression of your culinary skills. The rich espresso will awaken your taste buds, while the creamy gelato provides a smooth, sweet balance.
It’s a versatile recipe that can be adjusted to suit different tastes by using flavored gelato or adding a splash of your favorite liqueur. Whether you’re hosting a small gathering or a larger party, Affogato With Espresso and Vanilla Gelato is sure to be a hit.
Ingredients for 4-6 Servings:
- 1 quart vanilla gelato
- 4-6 shots of freshly brewed espresso
- Optional: 1-2 tablespoons of coffee liqueur (such as Kahlúa)
- Optional: Chocolate shavings or cocoa powder for garnish
Instructions:
- Prepare the Gelato: Scoop the vanilla gelato into 4-6 dessert cups or bowls. You can use an ice cream scoop to create perfectly round scoops or simply spoon the gelato into the cups. Place the cups in the freezer to keep the gelato cold while you prepare the espresso.
- Brew the Espresso: Brew 4-6 shots of espresso using an espresso machine or stovetop espresso maker. Confirm the espresso is hot as it needs to melt the gelato slightly to create the desired effect.
- Optional Step – Add Liqueur: If you’re using coffee liqueur, pour about 1-2 teaspoons over each gelato serving. This step adds an extra layer of flavor and sophistication to the dessert.
- Combine and Serve: Remove the cups of gelato from the freezer and immediately pour a hot shot of espresso over each serving. The hot espresso should drizzle over the gelato, creating a lovely marbling effect as it melts slightly.
- Garnish: If desired, sprinkle chocolate shavings or a dusting of cocoa powder over the top of each serving for a decorative touch.
Extra Tips:
For the best flavor, use high-quality espresso beans and fresh vanilla gelato. If you don’t have an espresso machine, strong brewed coffee can be used as an alternative.
If hosting a larger event, set up an “Affogato Station” where guests can pour their own espresso over their gelato, allowing them to customize their dessert. This interactive element adds fun to your party atmosphere.