

When I think of traditional Italian cookies, I’m instantly transported back to family gatherings and festive celebrations. Each cookie, from almond biscotti to lemon taralli, tells a story of shared moments and cherished memories. Picture the satisfying crunch of cantucci paired with a sip of Vin Santo. These recipes aren’t just about flavors. They’re about reliving those joyful times. Curious to know which cookies made the list? Let’s explore together.
Classic Almond Biscotti
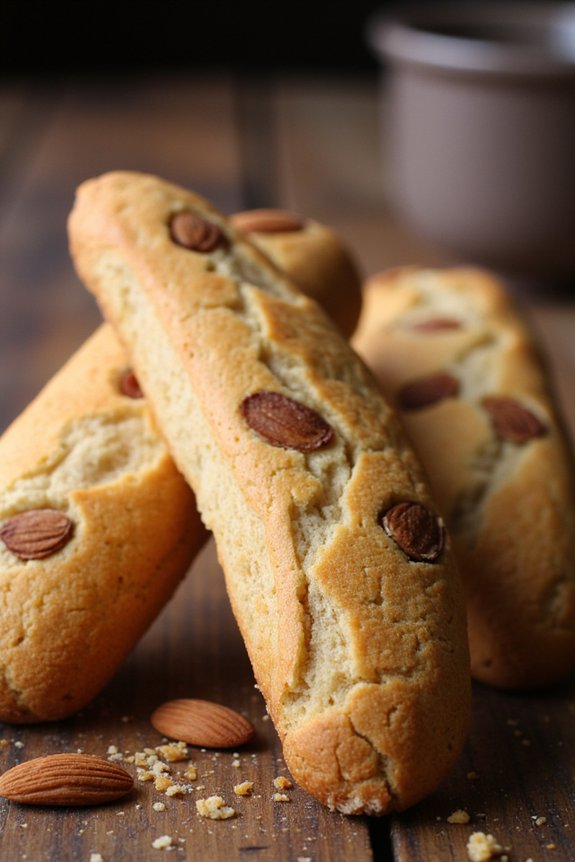
Almond biscotti are a traditional Italian cookie that’s loved for its crisp texture and delightful almond flavor. These twice-baked cookies are perfect for dunking into coffee or tea, making them a favorite among cookie enthusiasts. The classic almond biscotti are simple to make and require just a few basic ingredients, yet they deliver a sophisticated taste that’s sure to impress.
This recipe yields about 24 biscotti, making it ideal for serving 4-6 people. The biscotti are made by first forming a dough with almonds, slicing it into logs, and then baking it twice to achieve the perfect crunchy texture. Whether you’re serving these at a dinner party or enjoying them as a midday snack, these almond biscotti will add a touch of Italian elegance to any occasion.
Ingredients:
- 2 cups all-purpose flour
- 1 cup granulated sugar
- 1 teaspoon baking powder
- 1/2 teaspoon salt
- 3 large eggs
- 1 teaspoon vanilla extract
- 1 teaspoon almond extract
- 1 cup whole almonds, toasted and coarsely chopped
Cooking Instructions:
- Preheat the Oven: Begin by preheating your oven to 350°F (175°C) and line a baking sheet with parchment paper to prevent sticking.
- Mix Dry Ingredients: In a large bowl, whisk together the flour, sugar, baking powder, and salt until well combined. This guarantees the baking powder is evenly distributed, which is essential for the biscotti to rise properly.
- Combine Wet Ingredients: In a separate bowl, beat the eggs, vanilla extract, and almond extract until thoroughly mixed. The extracts will enhance the almond flavor in the biscotti.
- Form the Dough: Gradually add the wet mixture to the dry ingredients, stirring until a dough forms. Add the chopped almonds and mix until they’re evenly distributed throughout the dough.
- Shape the Dough: Divide the dough in half and shape each portion into a log about 12 inches long and 3 inches wide on the prepared baking sheet. Wetting your hands slightly can help prevent the dough from sticking as you shape it.
- First Bake: Place the baking sheet in the preheated oven and bake for 25-30 minutes or until the logs are light brown. Remove from the oven and allow them to cool for about 10 minutes.
- Slice the Biscotti: Once the logs have cooled slightly, use a sharp serrated knife to cut them into 3/4-inch thick slices. Cut at a slight diagonal for a more traditional biscotti shape.
- Second Bake: Arrange the slices cut side down on the baking sheet and return them to the oven. Bake for an additional 10-15 minutes, flipping them halfway through, until they’re golden brown and crisp.
- Cool and Serve: Let the biscotti cool completely on a wire rack before serving. They’ll continue to harden as they cool, achieving the perfect crunchy texture.
Extra Tips:
Toasting the almonds before adding them to the dough intensifies their flavor, providing a deeper and richer taste in the biscotti. When slicing the logs, use a gentle sawing motion with a serrated knife to avoid crumbling.
If you prefer your biscotti a bit softer, reduce the second baking time slightly. These biscotti can be stored in an airtight container for up to two weeks, making them a great make-ahead treat for gatherings or as a delightful companion to your daily coffee break.
Soft and Chewy Amaretti
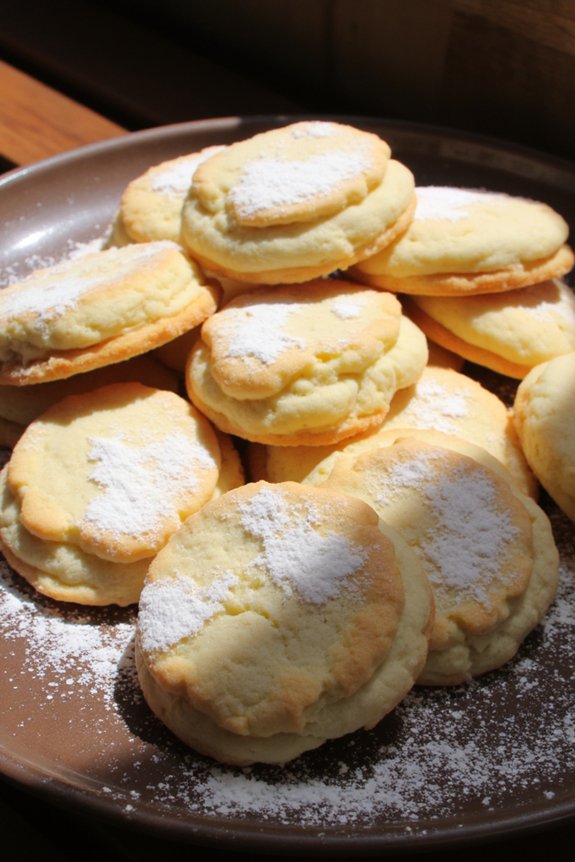
Amaretti are traditional Italian cookies that are known for their delicate almond flavor and satisfyingly chewy texture. Originating from the northern region of Italy, these cookies are a delightful treat that can be enjoyed on their own or paired with a cup of coffee or tea.
Soft and chewy amaretti are perfect for any occasion, whether you’re looking to impress your guests at a dinner party or simply indulging in a sweet snack. Their simple ingredient list makes them easy to whip up, yet they deliver an authentic taste of Italian baking that brings warmth and nostalgia.
Creating these soft and chewy amaretti involves using ground almonds as a base, which gives them their signature almond flavor and chewy texture. The combination of almond flour, sugar, and egg whites results in a dough that bakes into a perfectly soft cookie with a slight crisp around the edges.
A hint of almond extract enhances the flavor, making each bite a delightful experience. This recipe yields enough cookies for a serving size of 4-6 people, making it an ideal choice for small gatherings or family treats.
Ingredients:
- 2 cups almond flour
- 1 cup granulated sugar
- 2 large egg whites
- 1 teaspoon almond extract
- Pinch of salt
- Optional: powdered sugar for dusting
Instructions:
- Preheat the Oven: Preheat your oven to 325°F (160°C) and line a baking sheet with parchment paper to prevent the cookies from sticking.
- Mix Dry Ingredients: In a large mixing bowl, combine the almond flour, granulated sugar, and a pinch of salt. Stir these dry ingredients until well blended, confirming there are no lumps in the almond flour.
- Whip Egg Whites: In a separate bowl, use a hand mixer or stand mixer to beat the egg whites until they form soft peaks. This will incorporate air into the mixture, helping the cookies to rise slightly during baking.
- Combine Ingredients: Gently fold the whipped egg whites into the dry ingredients using a spatula. Add the almond extract and continue folding until the mixture forms a sticky dough. Be careful not to overmix as this can deflate the egg whites.
- Form the Cookies: Using a teaspoon or a small cookie scoop, portion out small balls of dough and place them onto the prepared baking sheet, spacing them about 2 inches apart. If desired, lightly dust the tops with powdered sugar for a decorative touch.
- Bake the Cookies: Place the baking sheet in the preheated oven and bake for 15-18 minutes, or until the cookies are lightly golden around the edges. They should remain soft in the center to achieve that chewy texture.
- Cool and Serve: Remove the cookies from the oven and allow them to cool on the baking sheet for a few minutes before transferring them to a wire rack to cool completely. Serve the amaretti as a delightful accompaniment to your favorite hot beverage.
Extra Tips: For best results, confirm that your almond flour is finely ground, as coarser textures can affect the smoothness of the cookie. If you prefer a stronger almond flavor, consider adding a few drops of Amaretto liqueur in place of some of the almond extract.
These cookies can be stored in an airtight container at room temperature for up to one week, allowing you to enjoy their chewy goodness over several days.
Festive Pizzelle
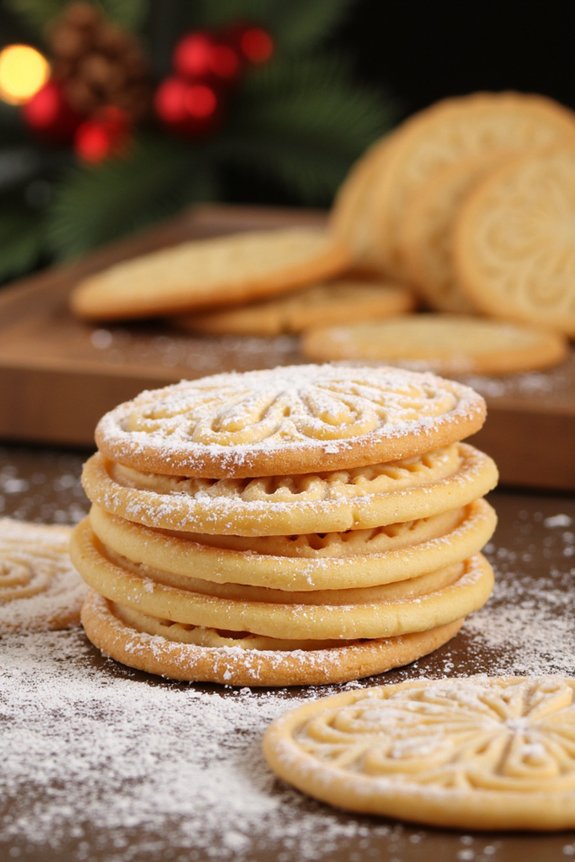
Pizzelle are classic Italian waffle cookies that have been enjoyed for generations, especially during festive occasions such as Christmas and Easter. These delicate, crispy treats are made using a special pizzelle iron, which imprints them with beautiful patterns. The cookies have a rich history dating back to ancient Rome, where they were initially prepared during celebrations.
Today, pizzelle are still a beloved part of Italian culinary tradition, often infused with flavors such as anise, vanilla, or lemon to add a fragrant touch to the crispy delights. Creating pizzelle is more than just baking a cookie; it’s about embracing a tradition that brings people together. The process is relatively simple but necessitates a bit of patience and attention to detail, especially when using the pizzelle iron.
The resulting cookies are light, crisp, and can be served plain, dusted with powdered sugar, or even shaped into cones or bowls while still warm for a unique presentation. Whether you’re making them for a special occasion or simply to enjoy with a cup of coffee, these festive pizzelle are sure to delight your family and friends.
Ingredients for 4-6 servings:
- 3 large eggs
- 3/4 cup granulated sugar
- 1/2 cup unsalted butter, melted and cooled
- 1 tablespoon vanilla extract
- 1 3/4 cups all-purpose flour
- 2 teaspoons baking powder
- 1 tablespoon anise seeds (optional)
- A pinch of salt
Instructions:
- Prepare the Batter: In a large mixing bowl, whisk together the eggs and granulated sugar until the mixture is pale and slightly thickened. This should take about 2-3 minutes. Add the melted butter and vanilla extract, and whisk until just combined.
- Combine Dry Ingredients: In a separate bowl, sift together the all-purpose flour, baking powder, and salt. Gradually add the dry ingredients to the wet mixture, stirring gently with a wooden spoon or spatula until the batter is smooth and free of lumps. If using, fold in the anise seeds.
- Preheat the Pizzelle Iron: Preheat your pizzelle iron according to the manufacturer’s instructions. Lightly brush or spray the plates with a bit of oil or melted butter to prevent sticking.
- Cook the Pizzelle: Drop a tablespoon of batter onto the center of each pizzelle pattern on the iron. Close the lid and cook for 30-60 seconds, or until the pizzelle are golden brown and crisp. The cooking time may vary depending on your pizzelle iron, so keep an eye on them to avoid burning.
- Cool the Pizzelle: Carefully remove the pizzelle from the iron using a spatula or tongs and transfer them to a wire rack to cool completely. If you wish to shape them, do so immediately while they’re still warm and pliable.
- Serve and Enjoy: Once cooled, dust the pizzelle with powdered sugar if desired, and serve. These cookies can be stored in an airtight container for up to a week.
Extra Tips:
For the best results, verify your pizzelle iron is properly preheated before starting. This will help achieve even cooking and the characteristic crispiness of pizzelle.
If you’re making a large batch, consider keeping the cooked pizzelle in a warm oven on low heat while you finish the rest of the batter to maintain their crispness. If you want to experiment with flavors, try adding a tablespoon of cocoa powder for chocolate pizzelle or a teaspoon of lemon zest for a citrusy twist.
Traditional Ricciarelli
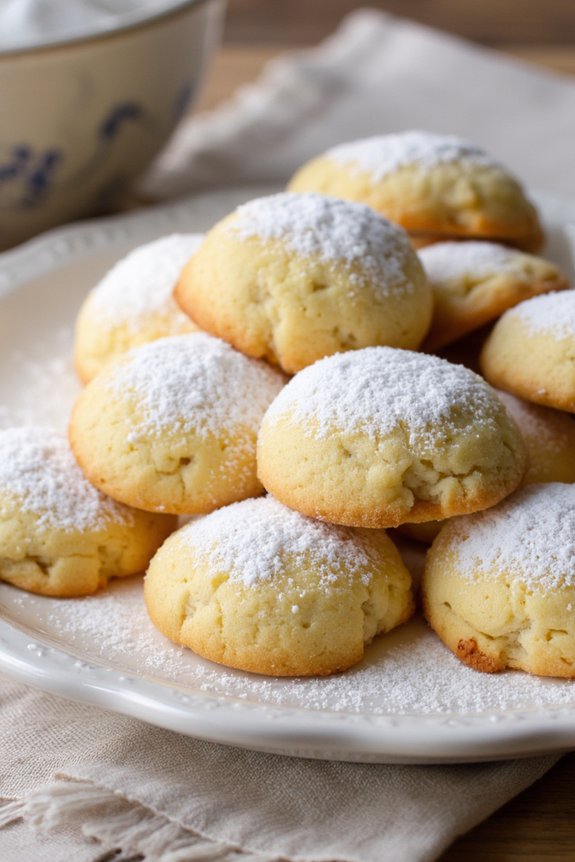
Traditional Ricciarelli are delightful almond cookies originating from Siena, Italy. Known for their chewy center and a slightly crisp exterior, these cookies are often enjoyed during the festive season but can be a treat any time of the year. Ricciarelli have a unique texture and flavor, thanks to the use of almond flour and a touch of orange zest, which brings a subtle citrus note to the cookies. This recipe will guide you through creating these exquisite cookies with ease, perfect for serving 4-6 people.
The history of Ricciarelli dates back to the 14th century, highlighting their longstanding popularity in Italian cuisine. These cookies are traditionally made with simple ingredients, yet they deliver a rich and satisfying taste. While they might seem delicate, Ricciarelli are surprisingly straightforward to make at home. The secret lies in carefully mixing the ingredients and allowing the dough ample time to rest, guaranteeing the perfect texture. Follow this recipe to bring a touch of Italian tradition to your table.
Ingredients:
- 250g almond flour
- 200g granulated sugar
- 2 large egg whites
- 1 teaspoon almond extract
- 1 teaspoon vanilla extract
- Zest of 1 orange
- A pinch of salt
- 1 teaspoon baking powder
- 50g powdered sugar (for dusting)
Cooking Instructions:
- Prepare the Ingredients: Begin by gathering all your ingredients, pre-measured, to guarantee a smooth cooking process. Separate the egg whites from the yolks, and zest the orange.
- Mix the Dry Ingredients: In a large mixing bowl, combine the almond flour, granulated sugar, baking powder, and a pinch of salt. Stir these ingredients until they’re well combined.
- Whisk the Egg Whites: In a separate bowl, whisk the egg whites until they form soft peaks. You can use a hand mixer for convenience. The soft peak stage is when the whites form peaks that gently fall over when the whisk or beaters are lifted from the bowl.
- Combine Mixtures: Gently fold the egg whites into the dry ingredients using a spatula. Add the almond extract, vanilla extract, and orange zest to the mixture. Stir until the dough is well combined and forms a sticky consistency.
- Form the Cookies: Dust your hands with powdered sugar to prevent sticking. Take small portions of the dough and shape them into oval or diamond shapes, approximately 1 inch thick. Place them on a baking sheet lined with parchment paper.
- Rest the Dough: Allow the shaped cookies to rest at room temperature for about 2 hours. This resting period is vital as it helps the cookies develop their signature chewy texture.
- Preheat and Bake: Preheat your oven to 325°F (160°C). Once preheated, bake the cookies for 15-20 minutes or until the tops are lightly golden. Avoid over-baking to maintain their chewy center.
- Cool and Serve: Remove the cookies from the oven and let them cool on the baking sheet for a few minutes before transferring them to a wire rack to cool completely. Dust them generously with powdered sugar before serving.
Extra Tips:
When making Traditional Ricciarelli, it’s critical to use finely ground almond flour to achieve the right texture. If you find your dough too sticky, lightly dust your hands with powdered sugar when shaping the cookies.
Make sure you don’t skip the resting period, as this step is vital for the cookies to develop their characteristic chewy texture. Finally, make sure the cookies are completely cool before dusting them with powdered sugar to prevent it from melting. Enjoy your homemade Ricciarelli with a cup of espresso or dessert wine for an authentic Italian experience.
Rich and Nutty Cantucci
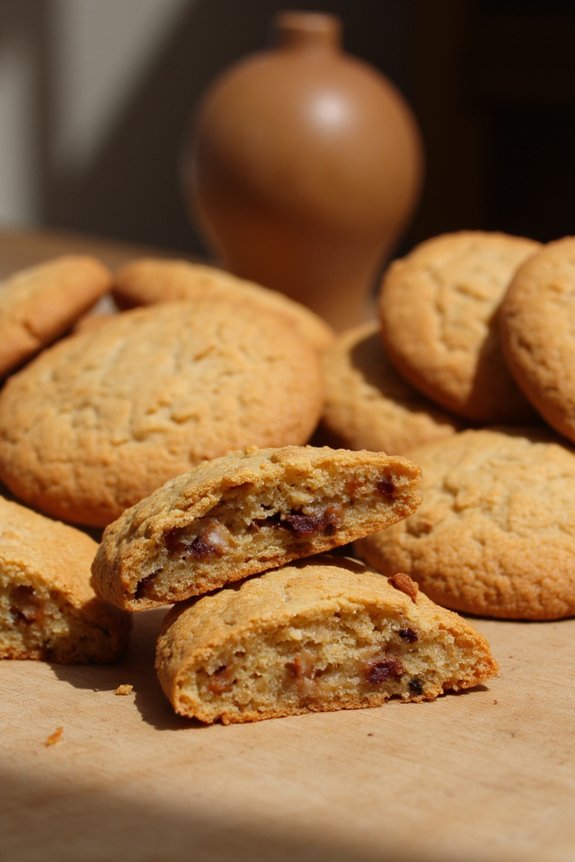
Rich and Nutty Cantucci, also known as Biscotti di Prato, are delightful Italian cookies that perfectly combine the sweet and nutty flavors of almonds with the crispy, twice-baked texture that makes them a favorite treat throughout Italy.
These cookies are traditionally served with Vin Santo, a sweet Tuscan dessert wine, but they’re equally enjoyable with coffee or tea. Cantucci are often enjoyed during festive occasions or as a delightful snack any time of the day. Their unique baking process, which involves baking the dough twice, guarantees a crunchy texture that can be perfectly dipped into your favorite beverage.
This version of Cantucci brings a rich and nutty flavor that’s sure to please any lover of Italian desserts. The combination of almonds and a hint of vanilla creates a balance of flavors that’s both classic and irresistible.
Preparing these cookies is a fairly straightforward process, requiring simple ingredients that come together to create a traditional and timeless treat. Whether you’re making them for a special occasion or simply to enjoy with your afternoon coffee, these Rich and Nutty Cantucci are sure to become a staple in your baking repertoire.
Ingredients for 4-6 servings:
- 2 cups all-purpose flour
- 1 cup granulated sugar
- 1 teaspoon baking powder
- 1/4 teaspoon salt
- 3 large eggs
- 1 teaspoon vanilla extract
- 1 teaspoon almond extract
- 1 1/2 cups whole almonds, toasted
- Zest of 1 lemon (optional)
Cooking Instructions:
- Preheat Oven and Prepare Baking Sheet: Start by preheating your oven to 350°F (175°C). Line a baking sheet with parchment paper or a silicone baking mat to confirm your Cantucci don’t stick during baking.
- Mix Dry Ingredients: In a large bowl, whisk together the flour, sugar, baking powder, and salt. This will be the base of the dough, so make sure the ingredients are well combined.
- Prepare Wet Ingredients: In a separate bowl, lightly beat the eggs. Add the vanilla extract, almond extract, and lemon zest (if using) to the eggs and mix well. The extracts will infuse the dough with rich flavors, while the lemon zest adds a revitalizing hint.
- Combine Wet and Dry Mixtures: Gradually add the wet ingredients to the dry ingredients, stirring continuously until a dough forms. It may be slightly sticky but should hold together well.
- Incorporate Almonds: Fold the toasted almonds into the dough, ensuring they’re evenly distributed throughout.
- Shape the Dough: Divide the dough in half and shape each half into a log approximately 12 inches long and 2 inches wide. Place the logs on the prepared baking sheet, leaving space between them to expand while baking.
- First Bake: Bake the logs in the preheated oven for 25-30 minutes, or until they’re light golden brown and firm to the touch. Remove from the oven and allow them to cool slightly for about 10 minutes.
- Slice and Second Bake: Using a sharp serrated knife, slice the logs diagonally into 1/2-inch thick slices. Arrange the slices cut side down on the baking sheet, and return them to the oven. Bake for an additional 10-12 minutes per side, or until they’re golden and crisp.
- Cool and Serve: Once done, remove the Cantucci from the oven and allow them to cool on a wire rack. Serve them with Vin Santo, coffee, or tea.
Extra Tips:
Toasting the almonds before adding them to the dough enhances their flavor and adds a deeper nuttiness to the cookies. If you prefer a softer Cantucci, you can reduce the second bake time slightly.
Be sure to use a sharp serrated knife for slicing to prevent the cookies from crumbling. For variety, you can experiment by adding other nuts such as hazelnuts or pistachios, or even throw in some dried fruits like cranberries for an additional twist.
Enjoy these delightful cookies as part of your Italian culinary adventures!
Delightful Anisette Cookies

Delightful Anisette Cookies are a cherished treat in Italian households, known for their unique flavor imparted by the aromatic anise seed. These cookies aren’t only delicious but also carry a warm sense of tradition, often baked for special occasions and holidays. Their distinctive licorice-like taste makes them stand out from other cookies, offering a delightful balance of sweetness and spice that’s both comforting and inviting.
Perfect for pairing with a cup of coffee or tea, Anisette Cookies are a reflection of the rich culinary heritage of Italy.
The texture of these cookies is light and airy, with a slight crispness that gives way to a tender crumb. This delicate balance is achieved through the careful mixing and baking process, allowing the natural flavors to shine. Anisette Cookies are often topped with a simple glaze, adding a touch of sweetness that complements the anise flavor beautifully.
Whether you’re an experienced baker or a novice in the kitchen, these cookies are an enjoyable and rewarding project that will fill your home with the irresistible aroma of anise.
Ingredients for 4-6 People:
- 2 cups all-purpose flour
- 1 tablespoon baking powder
- 1/4 teaspoon salt
- 1/2 cup unsalted butter, softened
- 3/4 cup granulated sugar
- 2 large eggs
- 1 teaspoon anise extract
- 1/4 cup milk
- 1 cup powdered sugar
- 2 tablespoons milk (for glaze)
- Colored sprinkles (optional)
Cooking Instructions:
- Preheat the Oven: Begin by preheating your oven to 350°F (175°C). This guarantees that your cookies will bake evenly and properly from the moment they’re placed in the oven.
- Prepare the Dry Ingredients: In a medium bowl, whisk together the flour, baking powder, and salt. This helps to evenly distribute the baking powder and salt throughout the flour.
- Cream the Butter and Sugar: In a large mixing bowl, cream together the softened butter and granulated sugar until light and fluffy, approximately 3 minutes. This process incorporates air into the mixture, contributing to the lightness of the cookies.
- Add Eggs and Anise Extract: Beat in the eggs one at a time, making sure each is fully incorporated before adding the next. Then mix in the anise extract, which will infuse the dough with its distinctive flavor.
- Combine Wet and Dry Ingredients: Gradually add the dry ingredients to the butter mixture, alternating with the 1/4 cup of milk. Begin and end with the flour mixture. Mix until just combined to avoid overworking the dough.
- Shape and Bake the Cookies: Using a tablespoon or small cookie scoop, drop rounded tablespoons of dough onto a parchment-lined baking sheet, spacing them about 2 inches apart. Bake in the preheated oven for 10-12 minutes, or until the edges are lightly golden.
- Prepare the Glaze: While the cookies are baking, mix the powdered sugar with the 2 tablespoons of milk in a small bowl until smooth and pourable.
- Glaze the Cookies: Once baked, allow the cookies to cool slightly on the baking sheet, then transfer them to a wire rack. While they’re still warm, drizzle or brush the glaze over the tops of the cookies. If desired, add colored sprinkles immediately, so they adhere to the glaze.
- Cool and Serve: Allow the glaze to set completely before serving. Enjoy your delightful Anisette Cookies with friends or family.
Extra Tips:
For the best flavor, consider using freshly ground anise seeds instead of the extract if you prefer a more robust and authentic taste. If you like your cookies on the sweeter side, you can increase the amount of glaze or even dip the tops of the cookies directly into the glaze for a thicker coating.
Additionally, make sure that your butter is truly softened to achieve the best creaming consistency with the sugar. Finally, keep a close eye on the baking time, as the cookies can quickly go from perfectly baked to overdone.
Sweet and Spicy Mostaccioli
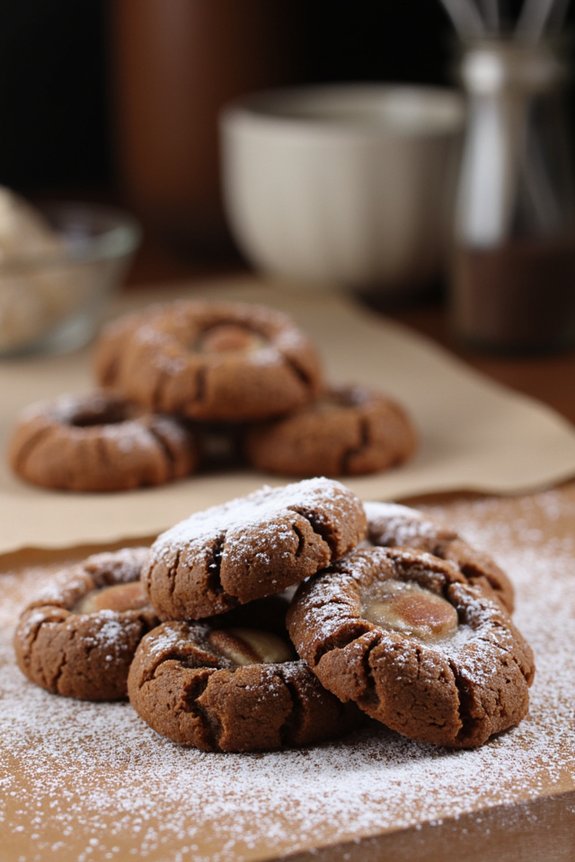
Sweet and Spicy Mostaccioli is a traditional Italian cookie that’s perfect for those who enjoy a delightful blend of flavors. Originating from Southern Italy, these cookies are a harmonious mix of sweetness and a hint of spice, making them a unique treat for any occasion.
Traditionally, Mostaccioli are enjoyed during Christmas time, but their irresistible taste makes them a favorite throughout the year. They’re known for their dense, chewy texture and rich aroma, which are achieved by incorporating a variety of spices and ingredients.
These cookies are often made with honey and spices like cinnamon, cloves, and black pepper, giving them a distinctive spiciness that pairs beautifully with the sweetness of the honey. The addition of cocoa adds depth, while a touch of citrus zest brings a revitalizing balance to the flavor profile.
Mostaccioli cookies are perfect for sharing with family and friends, especially alongside a cup of espresso or a glass of sweet wine. This recipe serves 4-6 people, making it ideal for small gatherings or as a special treat for your household.
Ingredients (serves 4-6 people):
- 2 cups all-purpose flour
- 1/2 cup cocoa powder
- 1 teaspoon baking powder
- 1 teaspoon ground cinnamon
- 1/2 teaspoon ground cloves
- 1/4 teaspoon ground black pepper
- 1/4 teaspoon salt
- 1/2 cup honey
- 1/4 cup granulated sugar
- 1/4 cup unsalted butter, melted
- 1 large egg
- 1 teaspoon vanilla extract
- Zest of 1 orange
- 1/2 cup chopped almonds
- Powdered sugar for dusting
Cooking Instructions:
- Preheat the Oven: Begin by preheating your oven to 350°F (175°C). Line a baking sheet with parchment paper to prevent the cookies from sticking.
- Mix Dry Ingredients: In a large mixing bowl, sift together the all-purpose flour, cocoa powder, baking powder, ground cinnamon, ground cloves, ground black pepper, and salt. This will guarantee that all the dry ingredients are well combined and free of lumps.
- Combine Wet Ingredients: In a separate bowl, whisk together the honey, granulated sugar, melted butter, egg, vanilla extract, and orange zest until smooth and well combined.
- Form the Dough: Gradually add the wet mixture into the bowl of dry ingredients, stirring until a thick dough forms. Fold in the chopped almonds, distributing them evenly throughout the dough.
- Shape the Cookies: Scoop out tablespoon-sized portions of dough, roll them into balls, and place them on the prepared baking sheet. Flatten each ball slightly with the palm of your hand or the bottom of a glass.
- Bake the Cookies: Place the baking sheet in the preheated oven and bake for 12-15 minutes, or until the cookies are firm to the touch and slightly cracked on top.
- Cool and Dust: Remove the cookies from the oven and allow them to cool on the baking sheet for about 5 minutes. Transfer them to a wire rack to cool completely. Once cool, dust the cookies with powdered sugar before serving.
Extra Tips:
For the best results, make sure all your ingredients are at room temperature before starting. This helps them to mix more easily and evenly.
The dough can be quite sticky, so if needed, lightly flour your hands when shaping the cookies. You can also adjust the level of spiciness to your taste by varying the amount of black pepper.
Mostaccioli cookies can be stored in an airtight container for up to a week, making them a convenient make-ahead treat. Enjoy these cookies with a hot beverage or as a sweet end to an Italian meal!
Buttery Baci Di Dama
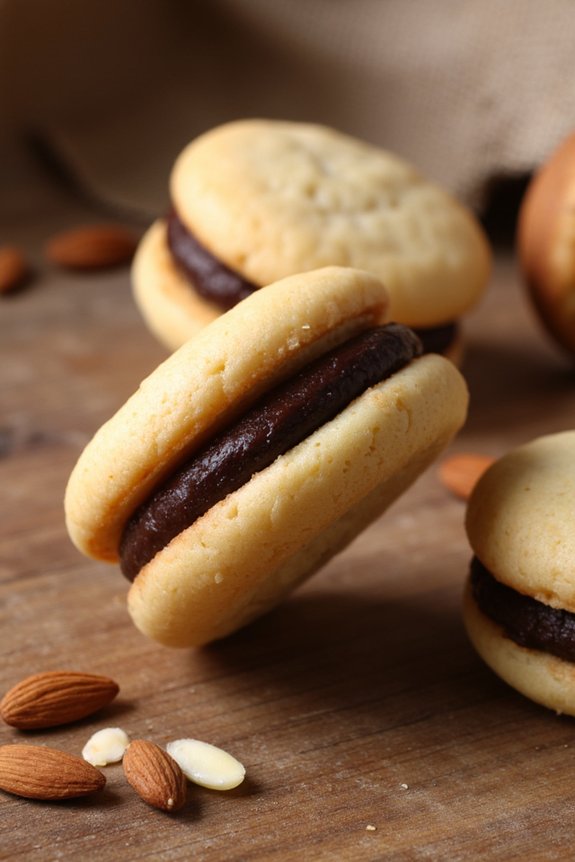
Baci Di Dama, translating to “lady’s kisses” in Italian, are delightful traditional cookies hailing from the Piedmont region of Italy. These charming treats are known for their iconic two halves of buttery almond cookies, sandwiched together with a layer of luscious chocolate. Their melt-in-your-mouth texture and the perfect combination of nutty and sweet flavors make them a favorite among cookie lovers.
Perfect for any occasion, Baci Di Dama are a wonderful example of Italian baking traditions that continue to enchant palates worldwide. Creating these cookies is a joyful and rewarding experience that brings the authentic taste of Italy to your kitchen. While the process involves a few steps, the result is worth the effort. The balance of flavors and textures is achieved through the careful selection of ingredients and precise baking techniques.
Whether you’re preparing them for a special holiday gathering or simply to enjoy with a cup of coffee, Baci Di Dama are sure to impress your family and friends.
Ingredients (serving size: 4-6 people):
- 1 cup (150g) blanched almonds
- 1 cup (125g) all-purpose flour
- 1/2 cup (100g) unsalted butter, softened
- 1/2 cup (100g) granulated sugar
- 1/2 teaspoon vanilla extract
- 1/8 teaspoon salt
- 3 ounces (85g) dark chocolate, finely chopped
Cooking Instructions:
- Prepare the Almonds: Preheat your oven to 350°F (175°C). Spread the blanched almonds evenly on a baking sheet and toast them in the oven for about 10 minutes, or until they’re golden and fragrant. Allow them to cool completely.
- Create Almond Flour: Once the almonds are cool, place them in a food processor and pulse until they’re finely ground, resembling almond flour. Be careful not to over-process, as this can turn the almonds into a paste.
- Make the Dough: In a large mixing bowl, combine the ground almonds, all-purpose flour, softened butter, granulated sugar, vanilla extract, and salt. Use your hands or a spatula to blend the ingredients together until a smooth and cohesive dough forms.
- Chill the Dough: Divide the dough into two portions and shape them into logs. Wrap each log in plastic wrap and refrigerate for at least 30 minutes to firm up the dough, making it easier to handle.
- Form the Cookies: Preheat the oven again to 350°F (175°C). Line a baking sheet with parchment paper. Take the chilled dough out of the fridge, and slice each log into small, equal pieces, about the size of a cherry. Roll each piece into a ball and place them on the prepared baking sheet, leaving some space between each ball.
- Bake the Cookies: Bake the cookies in the preheated oven for 12-15 minutes, or until they’re lightly golden on the edges. Remove them from the oven and let them cool completely on the baking sheet.
- Melt the Chocolate: While the cookies cool, melt the dark chocolate in a heatproof bowl set over a pot of simmering water, stirring until smooth. Alternatively, melt the chocolate in short bursts in the microwave, stirring between each burst.
- Assemble the Cookies: Once the cookies are cool, pair them by size. Spread a small amount of melted chocolate on the flat side of one cookie, and gently press the flat side of a second cookie onto the chocolate to form a sandwich. Allow the chocolate to set before serving.
Extra Tips:
For the best results, verify your butter is at room temperature before starting the recipe. This will help achieve the right consistency for the dough. If you find your dough too sticky to handle after chilling, you can lightly dust your hands with flour.
Additionally, these cookies store well in an airtight container for up to a week, making them a convenient treat to prepare in advance for gatherings or gifting. Enjoy them with a cup of espresso for an authentic Italian experience!
Crunchy Brutti Ma Buoni
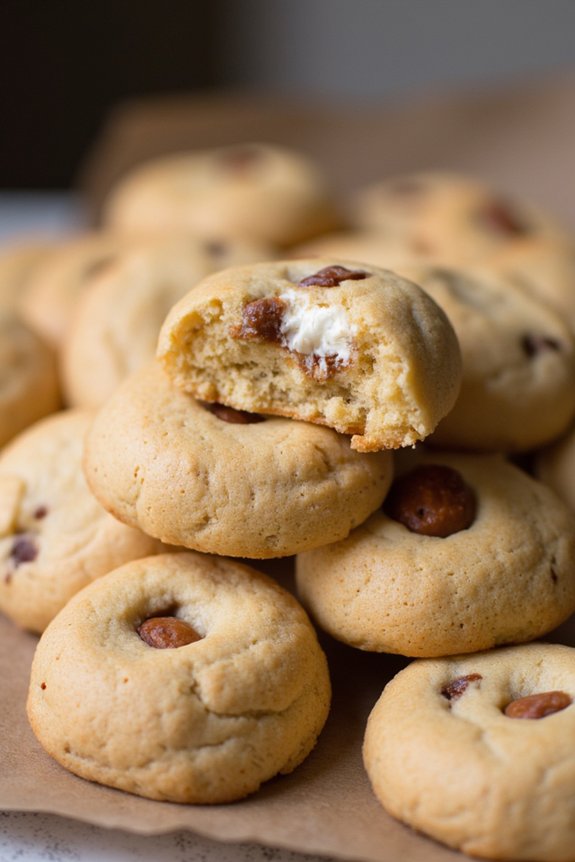
Brutti Ma Buoni, which translates to “Ugly but Good,” is a traditional Italian cookie that hails from Northern Italy, particularly the regions of Lombardy and Piedmont. These delightful treats are known for their rustic appearance and crunchy texture, making them a beloved staple in Italian households. Made primarily with hazelnuts and egg whites, Brutti Ma Buoni cookies are an exquisite combination of simplicity and flavor. Despite their unassuming looks, these cookies deliver a delightful crunch and a nutty, sweet taste that makes them irresistible.
This recipe for Crunchy Brutti Ma Buoni is perfect for a cozy gathering or as a special treat for a family of 4 to 6 people. The ingredients are simple, yet they come together to create a cookie that’s both satisfying and delicious. The process involves a few basic steps, but the result is a batch of cookies that are both crunchy on the outside and soft on the inside. Whether you’re a seasoned baker or trying your hand at cookies for the first time, this recipe is straightforward enough to follow and guarantees a wonderful outcome.
Ingredients (Serving Size: 4-6 people):
- 200 grams hazelnuts
- 150 grams granulated sugar
- 2 large egg whites
- 1 teaspoon vanilla extract
- A pinch of salt
Cooking Instructions:
- Prepare the Hazelnuts: Preheat your oven to 350°F (175°C). Spread the hazelnuts on a baking sheet and toast them for about 10 minutes until they’re fragrant and slightly browned. Allow them to cool, then rub them in a clean kitchen towel to remove most of the skins.
- Chop the Hazelnuts: Once cooled, coarsely chop the hazelnuts. You can do this by hand with a sharp knife or pulse them a few times in a food processor. Be careful not to over-process; you want small chunks, not a fine powder.
- Make the Meringue: In a clean, dry mixing bowl, beat the egg whites with a pinch of salt until soft peaks form. Gradually add the sugar while continuing to beat, until the meringue is glossy and forms stiff peaks. Add the vanilla extract and beat briefly to incorporate.
- Combine Ingredients: Gently fold the chopped hazelnuts into the meringue mixture using a spatula. Be careful to maintain as much air as possible in the meringue.
- Shape the Cookies: Line a baking sheet with parchment paper. Using two teaspoons, scoop small mounds of the mixture onto the prepared baking sheet, spacing them about 2 inches apart.
- Bake: Place the baking sheet in the preheated oven and bake for 20-25 minutes, or until the cookies are a light golden brown and feel firm to the touch.
- Cool: Remove the cookies from the oven and let them cool completely on the baking sheet. They’ll harden as they cool.
Extra Tips:
For the best flavor, use high-quality hazelnuts, and confirm they’re fresh. Toasting the hazelnuts is essential as it enhances their flavor and makes it easier to remove the skins. When making the meringue, make certain that no yolk is mixed with the whites, as this can prevent the whites from reaching the desired peaks.
Be gentle when folding the hazelnuts into the meringue to keep the mixture as airy as possible, which contributes to the cookies’ light texture. Store any leftover cookies in an airtight container to maintain their crunchiness.
Irresistible Lemon Taralli Cookies

Lemon Taralli are a delightful twist on traditional Italian cookies, offering a burst of citrus flavor that makes them a perfect treat for any occasion. Originally from Southern Italy, these cookies are known for their unique texture — a blend of crunchy and tender, with a subtle sweetness that’s beautifully complemented by the tangy lemon zest. Perfect with a cup of espresso or tea, Lemon Taralli are an irresistible snack that captures the essence of Italian baking.
The preparation of Lemon Taralli is simple and rewarding. This recipe yields 4-6 servings, making it ideal for small gatherings or a family treat. The dough is infused with fresh lemon zest, which imparts an invigorating aroma and flavor. Once shaped into rings and baked to golden perfection, these cookies can be enjoyed plain or lightly dusted with powdered sugar for an extra touch of sweetness. Whether you’re a seasoned baker or a beginner, this recipe is sure to become a favorite in your kitchen.
Ingredients:
- 2 ½ cups all-purpose flour
- ½ cup granulated sugar
- 1 teaspoon baking powder
- ¼ teaspoon salt
- Zest of 2 lemons
- ½ cup olive oil
- ½ cup white wine
- 1 large egg
- 1 teaspoon vanilla extract
Instructions:
- Preheat the Oven: Start by preheating your oven to 350°F (175°C). Prepare a baking sheet by lining it with parchment paper to prevent sticking.
- Mix Dry Ingredients: In a large mixing bowl, combine the all-purpose flour, granulated sugar, baking powder, salt, and lemon zest. Stir well to make sure the lemon zest is evenly distributed throughout the dry mixture.
- Combine Wet Ingredients: In a separate bowl, whisk together the olive oil, white wine, egg, and vanilla extract until well blended. The olive oil will add a subtle richness to the cookies while the wine helps to tenderize the dough.
- Form the Dough: Gradually add the wet ingredients to the dry ingredients. Mix until a soft dough forms. If the dough is too sticky, add a bit more flour, a tablespoon at a time, until it reaches the right consistency.
- Shape the Cookies: Take small portions of the dough and roll them into 4-inch long ropes about ½ inch thick. Form each rope into a ring, pressing the ends together to seal.
- Bake: Place the shaped cookies onto the prepared baking sheet, leaving some space between each. Bake in the preheated oven for 20-25 minutes or until they turn a light golden brown.
- Cool and Serve: Once baked, remove the cookies from the oven and allow them to cool on a wire rack. These cookies can be served plain or dusted with powdered sugar for added sweetness.
Extra Tips:
For the best Lemon Taralli, make sure your lemons are fresh and fragrant, as the zest is a key flavor component. If you prefer a slightly sweeter cookie, consider adding a tablespoon of honey to the wet ingredients.
Be mindful of the dough’s consistency; it should be soft but not sticky. If your kitchen is warm, you may want to chill the dough for a few minutes before shaping to make it easier to handle. Enjoy your Lemon Taralli with a hot beverage for a truly delightful Italian experience.