

Hello lovely foodies!
If you’re anything like me, juggling a busy schedule and a love for Italian cuisine, you’re in for a treat.
I’ve gathered some amazing make-ahead dinner recipes that will transform your evenings.
Picture the ease of coming home to a ready-to-go classic beef lasagna or a creamy mushroom risotto.
These recipes are your ticket to effortless, delicious dining.
Classic Beef Lasagna
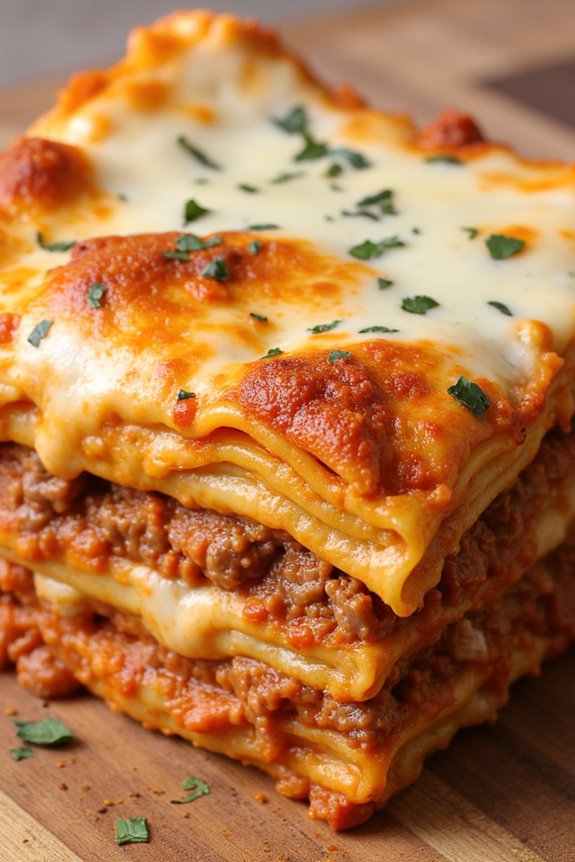
Lasagna is a quintessential Italian dish that has captured the hearts of food lovers around the world. This classic beef lasagna recipe is perfect for those looking to prepare a hearty and satisfying meal ahead of time. The layers of pasta, rich beef sauce, creamy béchamel, and melted cheese make for a comforting and delicious dinner that can be enjoyed by the whole family. Preparing this dish in advance allows the flavors to meld together, creating an even tastier meal when it’s time to serve.
This classic beef lasagna serves 4-6 people and involves a few key components: a robust meat sauce, smooth béchamel sauce, and perfectly cooked pasta sheets. The meat sauce is made with ground beef, tomatoes, and aromatic herbs, while the béchamel sauce adds a creamy layer of richness. Assembling the lasagna requires a bit of time and patience, but the end result is well worth the effort. Whether you’re serving this dish for a special occasion or a cozy family dinner, it’s sure to be a hit.
Ingredients:
- 9 lasagna noodles
- 1 pound ground beef
- 1 large onion, chopped
- 3 cloves garlic, minced
- 1 (28-ounce) can crushed tomatoes
- 2 tablespoons tomato paste
- 1 teaspoon dried oregano
- 1 teaspoon dried basil
- Salt and pepper to taste
- 2 cups ricotta cheese
- 1 egg
- 1/2 cup grated Parmesan cheese
- 2 cups shredded mozzarella cheese
- 3 cups milk
- 1/4 cup unsalted butter
- 1/4 cup all-purpose flour
- Nutmeg, a pinch
Cooking Instructions:
- Prepare the Meat Sauce:
- In a large skillet over medium heat, brown the ground beef until fully cooked. Drain excess fat. Add the chopped onion and minced garlic, sautéing until the onion is translucent.
- Stir in the crushed tomatoes, tomato paste, oregano, basil, salt, and pepper. Let the sauce simmer for about 20 minutes, allowing the flavors to meld together.
- Cook the Lasagna Noodles:
- While the sauce is simmering, cook the lasagna noodles according to package instructions. Drain and set aside.
- Make the Béchamel Sauce:
- In a saucepan, melt the butter over medium heat. Whisk in the flour and cook for 1-2 minutes. Gradually add the milk, continuing to whisk until the sauce thickens. Season with salt, pepper, and a pinch of nutmeg. Remove from heat.
- Prepare the Ricotta Mixture:
- In a bowl, combine the ricotta cheese, egg, and grated Parmesan cheese. Mix until smooth and set aside.
- Assemble the Lasagna:
- Preheat your oven to 375°F (190°C). In a 9×13 inch baking dish, spread a thin layer of meat sauce on the bottom. Place three lasagna noodles over the sauce. Spread half of the ricotta mixture over the noodles, followed by a layer of meat sauce and a layer of béchamel sauce. Sprinkle with mozzarella cheese.
- Repeat the layers, finishing with a layer of noodles topped with béchamel sauce and mozzarella cheese.
- Bake the Lasagna:
- Cover the dish with aluminum foil and bake for 25 minutes. Remove the foil and bake for an additional 15 minutes or until the cheese is bubbly and golden brown. Let the lasagna rest for 10 minutes before serving.
Extra Tips:
When making this classic beef lasagna, it’s important to let the lasagna rest after baking. This resting period allows the layers to set and makes serving easier.
If you’re preparing the dish ahead of time, you can assemble the lasagna and refrigerate it for up to 24 hours before baking. You can also freeze it for up to three months, making it a convenient option for future meals.
If frozen, be sure to thaw it in the refrigerator overnight before baking. Ultimately, feel free to adjust the seasoning to suit your taste, adding more herbs or a touch of red pepper flakes for a bit of heat.
Creamy Mushroom Risotto
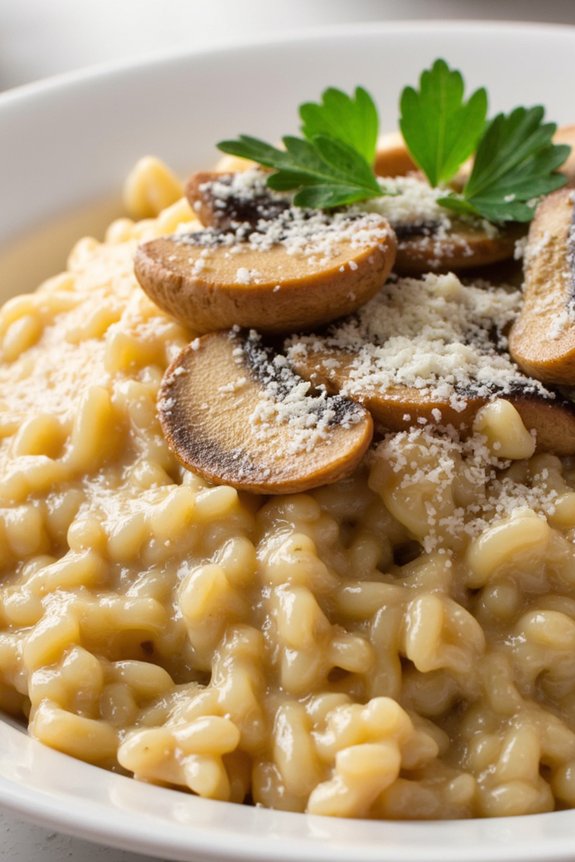
Creamy Mushroom Risotto is an Italian classic that can be prepared ahead of time, making it a perfect choice for a stress-free dinner. This dish is renowned for its creamy texture and earthy mushroom flavor, which harmoniously blend together with the rich taste of Parmesan cheese.
The beauty of risotto lies in its versatility; it can be served as a main course or as a sumptuous side dish. Preparing it in advance allows the flavors to meld, guaranteeing a more profound taste that will impress your guests.
While risotto is often associated with constant stirring and immediate serving, this recipe is tailored for those who seek convenience without sacrificing quality. By partially cooking the risotto ahead of time and finishing it just before serving, you achieve the desired creamy consistency without the last-minute rush. This method not only saves time but also enhances the flavors, making your dining experience both delightful and effortless.
Ingredients (Serves 4-6):
- 2 cups Arborio rice
- 1 pound fresh mushrooms, sliced
- 1 medium onion, finely chopped
- 3 cloves garlic, minced
- 1 cup dry white wine
- 6 cups chicken or vegetable broth
- 1 cup grated Parmesan cheese
- 3 tablespoons olive oil
- 2 tablespoons unsalted butter
- Salt and pepper to taste
- Fresh parsley, chopped (for garnish)
Cooking Instructions:
- Prepare the Broth: In a saucepan, heat the chicken or vegetable broth over medium heat until it simmers. Keep it warm on the stove while you prepare the risotto.
- Sauté the Mushrooms: In a large skillet, heat 1 tablespoon of olive oil over medium-high heat. Add the sliced mushrooms and cook until they’re golden brown and tender, about 5-7 minutes. Remove them from the skillet and set aside.
- Cook the Aromatics: In the same skillet, add the remaining olive oil and butter. Once the butter has melted, add the chopped onion and sauté until translucent, about 3-4 minutes. Stir in the minced garlic and cook for an additional minute.
- Toast the Rice: Add the Arborio rice to the skillet with the onions and garlic. Stir the rice for about 2 minutes, guaranteeing each grain is well-coated with the oil and butter mixture.
- Deglaze with Wine: Pour in the dry white wine, stirring continuously until the liquid is mostly absorbed by the rice.
- Add the Broth Gradually: Begin adding the warm broth to the rice, one ladleful at a time. Stir frequently, allowing each addition of broth to be absorbed before adding the next. Continue until the rice is tender and creamy, about 18-20 minutes, using most of the broth.
- Incorporate Mushrooms and Cheese: Once the rice is cooked, stir in the sautéed mushrooms and grated Parmesan cheese. Season with salt and pepper to taste. Cook for another 2 minutes until the cheese is melted and the risotto is creamy.
- Finish and Serve: Remove the risotto from heat and let it stand for a minute. Garnish with chopped fresh parsley before serving.
Extra Tips:
To make this dish ahead of time, cook the risotto up to the point where you add the mushrooms and cheese, then remove it from the heat. Spread the risotto onto a baking sheet to cool quickly and prevent further cooking.
Before serving, reheat the risotto over low heat, gradually adding a little warm broth to restore its creamy texture. Stir in the mushrooms and Parmesan cheese at this point to finish the dish. This method guarantees that your risotto maintains its signature creaminess even when prepared in advance.
Baked Ziti With Sausage
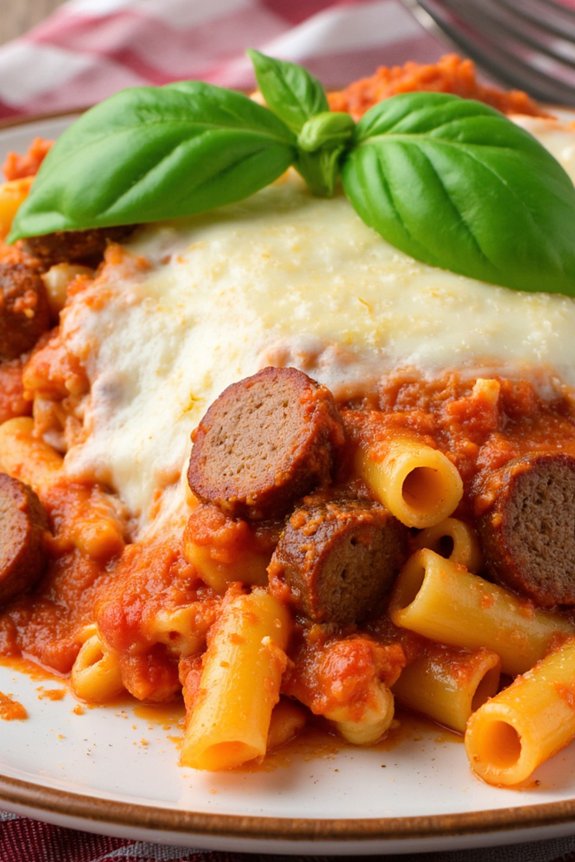
Baked Ziti With Sausage is a classic Italian-American dish that combines the comforting flavors of pasta, savory sausage, and melted cheese into a hearty baked casserole. This dish is perfect for making ahead of time, allowing the flavors to meld together beautifully.
It’s a great option for busy weeknights or for serving a crowd, as it can be prepped in advance and simply heated up when ready to serve. The combination of spicy Italian sausage, tangy marinara sauce, and gooey mozzarella makes it a family favorite that’s sure to please.
The beauty of Baked Ziti With Sausage lies in its simplicity and versatility. You can customize this dish by adding your favorite vegetables, using different types of sausage, or experimenting with various cheeses.
Whether you’re hosting a dinner party or looking for a dish to feed your family, this recipe delivers on both taste and convenience. Serve it with a side salad and some crusty garlic bread for a complete meal that’s sure to satisfy.
Ingredients (serves 4-6):
- 1 pound ziti pasta
- 1 tablespoon olive oil
- 1 pound Italian sausage (sweet or hot), casings removed
- 1 medium onion, diced
- 3 cloves garlic, minced
- 1 teaspoon dried oregano
- 1 teaspoon dried basil
- 1/2 teaspoon red pepper flakes (optional)
- 4 cups marinara sauce
- 1 cup ricotta cheese
- 2 cups shredded mozzarella cheese
- 1/2 cup grated Parmesan cheese
- Salt and pepper to taste
- Fresh basil leaves for garnish (optional)
Cooking Instructions:
- Preheat Oven: Start by preheating your oven to 375°F (190°C). This guarantees that the oven is ready to bake the ziti once it’s assembled.
- Cook Pasta: Bring a large pot of salted water to a boil. Add the ziti pasta and cook until just al dente according to package instructions. Drain the pasta and set aside.
- Cook Sausage: In a large skillet, heat olive oil over medium heat. Add the Italian sausage and cook until browned, breaking it up with a spatula as it cooks. Remove the sausage from the skillet and set aside.
- Sauté Aromatics: In the same skillet, add the diced onion and cook until translucent. Stir in the garlic, oregano, basil, and red pepper flakes, cooking until fragrant.
- Combine Sauce and Sausage: Return the cooked sausage to the skillet. Add the marinara sauce, stirring to combine. Let the mixture simmer for about 10 minutes to allow the flavors to meld together.
- Assemble the Casserole: In a large baking dish, spread a thin layer of the sausage and sauce mixture. Add half of the cooked ziti, followed by dollops of ricotta cheese. Repeat the layers, finishing with a layer of the sauce mixture on top.
- Add Cheese: Sprinkle the mozzarella and Parmesan cheeses evenly over the top of the assembled ziti.
- Bake: Cover the dish with aluminum foil and bake in the preheated oven for 20 minutes. Remove the foil and bake for an additional 10-15 minutes, or until the cheese is bubbly and golden brown.
- Garnish and Serve: Allow the baked ziti to cool for a few minutes before garnishing with fresh basil leaves if desired. Serve warm.
Extra Tips:
For the best results, use high-quality marinara sauce or make your own for a fresher taste. You can prepare this dish up to a day in advance; just cover it tightly with foil and refrigerate until ready to bake.
If you’re adding vegetables like spinach or bell peppers, sauté them with the onions for extra flavor. To prevent the cheese from sticking to the foil, lightly spray the underside with cooking spray before covering the dish.
Chicken Cacciatore
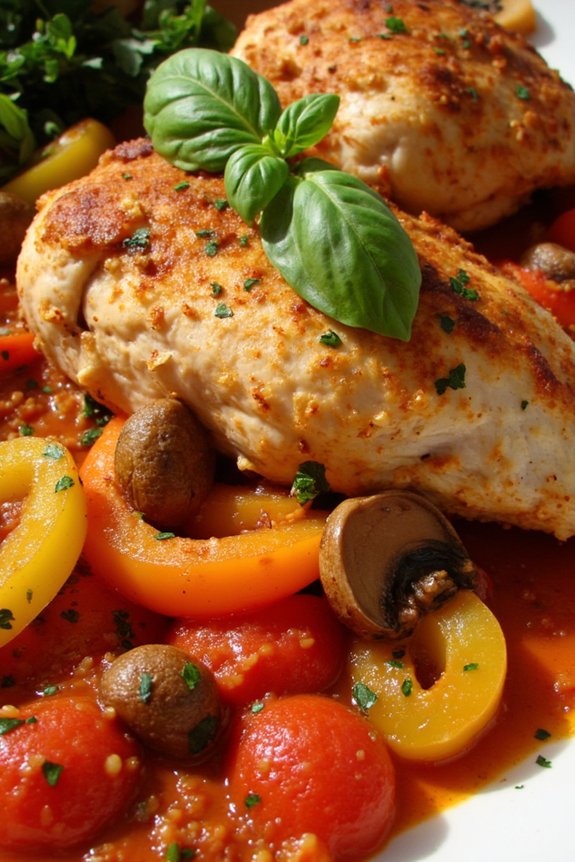
Chicken Cacciatore is a classic Italian dish that’s perfect for a make-ahead dinner. This rustic stew is rich in flavor, featuring tender chicken simmered in a savory tomato sauce with herbs, vegetables, and wine. The beauty of Chicken Cacciatore lies in its versatility and ability to be prepared in advance, making it an ideal choice for busy weeknights or entertaining guests.
The slow cooking process allows the flavors to meld together beautifully, resulting in a deeply satisfying meal that can be easily reheated and enjoyed at any time.
Traditionally, Chicken Cacciatore is made using a whole chicken cut into pieces, but boneless chicken thighs or breasts can also be used for convenience. The dish is typically served with crusty bread or over a bed of pasta, rice, or polenta to soak up the delicious sauce. This recipe serves 4-6 people and can be adjusted to suit your taste preferences by adding different vegetables or adjusting the seasoning.
Ingredients (Serves 4-6):
- 4-6 chicken thighs or drumsticks (bone-in, skin-on)
- Salt and pepper, to taste
- 2 tablespoons olive oil
- 1 large onion, chopped
- 2 cloves garlic, minced
- 1 red bell pepper, sliced
- 1 yellow bell pepper, sliced
- 1 cup mushrooms, sliced
- 1 teaspoon dried oregano
- 1 teaspoon dried basil
- 1/2 teaspoon red pepper flakes (optional)
- 1 cup dry white wine (or chicken broth)
- 1 can (28 ounces) crushed tomatoes
- 1/4 cup tomato paste
- 2 tablespoons capers (optional)
- 1/4 cup chopped fresh parsley
- Fresh basil leaves, for garnish
Cooking Instructions:
- Prepare the Chicken: Season the chicken thighs with salt and pepper on both sides. Heat olive oil in a large skillet or Dutch oven over medium-high heat.
- Brown the Chicken: Add the chicken to the pan, skin-side down, and cook for about 5-7 minutes until the skin is golden brown and crispy. Flip and cook the other side for an additional 5 minutes. Remove the chicken and set aside.
- Sauté the Vegetables: In the same pan, add the chopped onion and garlic. Sauté for about 3 minutes until the onion is translucent. Add the sliced bell peppers and mushrooms, and cook for another 5 minutes until the vegetables start to soften.
- Add Herbs and Wine: Stir in the dried oregano, basil, and red pepper flakes. Pour in the white wine, scraping up any browned bits from the bottom of the pan. Let it simmer for about 3 minutes until the wine reduces by half.
- Combine with Tomatoes: Add the crushed tomatoes, tomato paste, and capers to the pan. Stir well to combine all the ingredients.
- Simmer the Chicken: Return the chicken to the pan, nestling it into the sauce. Cover the pan and reduce the heat to low. Simmer for 30-40 minutes, or until the chicken is cooked through and tender.
- Finish and Serve: Stir in the chopped parsley and adjust the seasoning with more salt and pepper if needed. Serve the Chicken Cacciatore hot, garnished with fresh basil leaves.
Extra Tips: For best results, try to make Chicken Cacciatore a day ahead. This allows the flavors to develop even further and makes for a richer taste.
If you prefer a thicker sauce, remove the lid during the last 10 minutes of cooking to let the sauce reduce. You can also add other vegetables like zucchini or olives for a different flavor profile. When reheating, do so gently over low heat to prevent the chicken from drying out.
Spinach and Ricotta Stuffed Shells
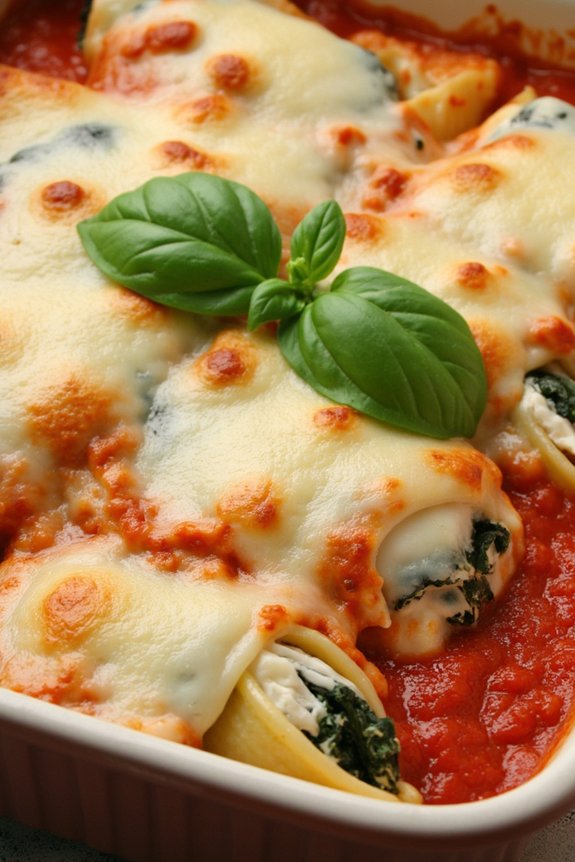
Spinach and Ricotta Stuffed Shells is a delightful Italian dish that’s perfect for a make-ahead dinner. With its creamy ricotta filling and savory tomato sauce, this dish is both comforting and satisfying. It’s an ideal meal to prepare in advance because the flavors meld beautifully after a day in the fridge, making it even more delicious when reheated.
Whether you’re serving it for a family dinner or a special gathering, these stuffed shells are sure to impress your guests with their rich taste and elegant presentation.
To make Spinach and Ricotta Stuffed Shells, you’ll start by cooking pasta shells until they’re just al dente, then fill them with a mixture of ricotta cheese, spinach, and seasonings. The filled shells are nestled in a baking dish with a layer of marinara sauce, topped with mozzarella cheese, and baked until bubbly and golden.
This dish isn’t only easy to prepare but also highly versatile—you can customize the filling or sauce according to your preferences. Plus, it can be made ahead of time and simply popped into the oven when you’re ready to serve.
Ingredients (Serves 4-6):
- 20-24 jumbo pasta shells
- 1 tablespoon olive oil
- 1 cup ricotta cheese
- 1 cup fresh spinach, chopped
- 1 egg
- 1/2 cup grated Parmesan cheese
- 2 cups marinara sauce
- 1 1/2 cups shredded mozzarella cheese
- 1 teaspoon garlic powder
- 1 teaspoon Italian seasoning
- Salt and pepper to taste
- Fresh basil leaves, for garnish (optional)
Instructions:
- Cook the Pasta Shells: Bring a large pot of salted water to a boil. Add the pasta shells and cook them until they’re al dente, following the package instructions. Drain the shells and drizzle with olive oil to prevent sticking. Set aside to cool slightly.
- Prepare the Filling: In a mixing bowl, combine the ricotta cheese, chopped spinach, egg, Parmesan cheese, garlic powder, Italian seasoning, salt, and pepper. Mix until well combined.
- Stuff the Shells: Using a spoon or piping bag, fill each cooked shell with the ricotta and spinach mixture. Be generous with the filling but make sure the shells don’t split.
- Assemble the Dish: Preheat your oven to 375°F (190°C). Spread a thin layer of marinara sauce on the bottom of a 9×13-inch baking dish. Arrange the stuffed shells on top of the sauce in a single layer.
- Add Sauce and Cheese: Pour the remaining marinara sauce over the top of the shells, ensuring they’re well covered. Sprinkle the shredded mozzarella cheese evenly over the sauce.
- Bake: Cover the baking dish with aluminum foil and bake in the preheated oven for 25 minutes. Remove the foil and bake for an additional 10-15 minutes until the cheese is melted and bubbly.
- Serve: Once baked, let the dish rest for a few minutes before serving. Garnish with fresh basil leaves if desired.
Extra Tips:
For a more flavorful filling, consider adding sautéed onions, mushrooms, or additional herbs like oregano and basil. If you prefer a meatier dish, cooked and crumbled Italian sausage or ground beef can be added to the filling or layered into the sauce.
To make this dish even more convenient, prepare the stuffed shells up to a day in advance, cover, and refrigerate. When ready to bake, allow the dish to come to room temperature for about 30 minutes before placing it in the oven. This will facilitate even cooking and prevent the baking dish from cracking due to temperature shock.
Eggplant Parmigiana
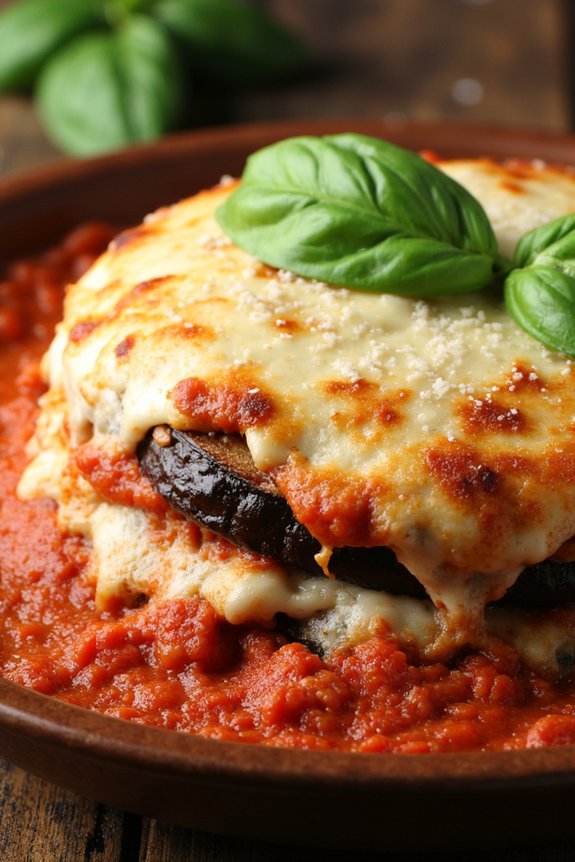
Eggplant Parmigiana is a classic Italian dish that combines layers of crispy fried eggplant, rich tomato sauce, and gooey melted cheese. It’s a comforting and satisfying meal that can be made ahead of time, making it perfect for busy weeknights or when hosting a dinner party.
This dish isn’t only delicious but also versatile, as it can be served as a main course or a side dish.
To prepare Eggplant Parmigiana, you start by slicing the eggplant and coating it in flour before frying it to a golden brown. The fried slices are then layered with homemade tomato sauce and mozzarella cheese, creating a delightful combination of flavors and textures.
Baking the dish allows the flavors to meld together, resulting in a mouthwatering meal that’s sure to delight everyone at the table. This recipe serves 4-6 people, making it ideal for family dinners or small gatherings.
Ingredients:
- 2 large eggplants
- Salt
- 2 cups all-purpose flour
- 4 cups marinara sauce
- 2 cups shredded mozzarella cheese
- 1 cup grated Parmesan cheese
- 3 cups vegetable oil (for frying)
- Fresh basil leaves (for garnish)
Cooking Instructions:
1. Prepare the Eggplant: Slice the eggplants into 1/4-inch thick rounds. Lay them on a baking sheet and sprinkle with salt. Let them sit for 30 minutes to draw out moisture, then pat dry with paper towels.
2. Coat the Eggplant: Dredge each eggplant slice in flour, guaranteeing they’re evenly coated.
3. Fry the Eggplant: Heat the vegetable oil in a large frying pan over medium-high heat. Fry the eggplant slices in batches until they’re golden brown and crispy, about 3-4 minutes per side. Drain on paper towels to remove excess oil.
4. Assemble the Dish: Preheat your oven to 375°F (190°C). Spread a thin layer of marinara sauce at the bottom of a 9×13-inch baking dish. Layer a third of the fried eggplant slices over the sauce, followed by a third of the mozzarella and Parmesan cheeses.
Repeat the layers two more times, ending with a layer of cheese.
5. Bake: Cover the dish with aluminum foil and bake for 25 minutes. Remove the foil and bake for an additional 15 minutes, or until the cheese is bubbly and golden brown.
6. Garnish and Serve: Let the dish cool for a few minutes before garnishing with fresh basil leaves. Serve warm.
Extra Tips:
To ascertain the eggplant slices aren’t too oily, make sure the oil is hot enough before adding the eggplant, and don’t overcrowd the pan when frying.
If you prefer a lighter version, you can bake the eggplant slices instead of frying them. Simply place them on a baking sheet lined with parchment paper, brush with olive oil, and bake at 400°F (200°C) for about 20 minutes, flipping halfway through.
This dish can be made a day in advance and reheated in the oven, making it convenient for meal prep or entertaining guests.
Italian Wedding Soup
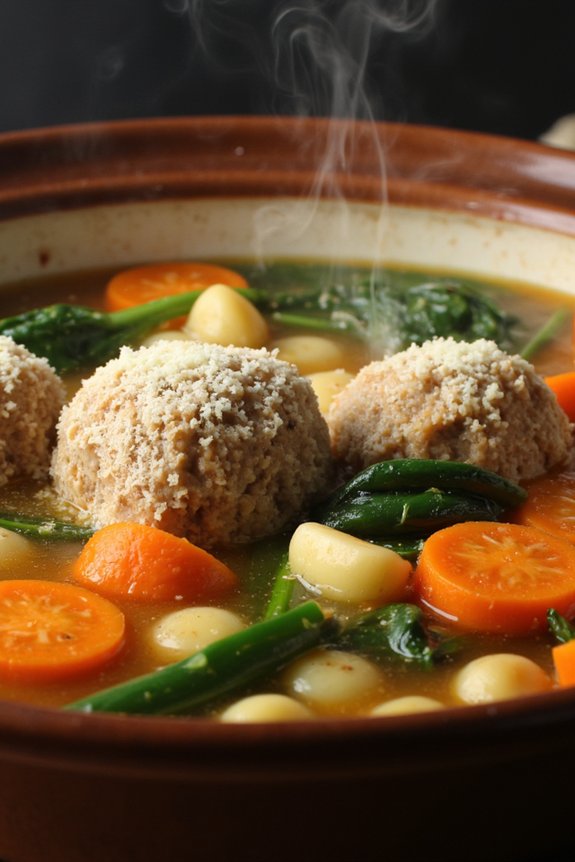
Italian Wedding Soup is a classic dish that combines savory meatballs, tender vegetables, and hearty pasta in a rich, flavorful broth. Despite its name, this soup isn’t traditionally served at Italian weddings. Instead, the name comes from the Italian phrase “minestra maritata,” which means “married soup,” referring to the harmonious blend of flavors.
This comforting soup is perfect for make-ahead meals, as its flavors only deepen and improve after a day or two in the fridge. Ideal for family dinners or gatherings, this recipe yields a satisfying meal that can be prepared in advance and enjoyed anytime.
The beauty of Italian Wedding Soup lies in its simplicity and the quality of its ingredients. Fresh vegetables and herbs, high-quality ground meats, and a rich chicken broth are essential for creating a soup that’s both nutritious and delicious.
The recipe is quite flexible, allowing you to adapt the ingredients to your preferences or what you have on hand. This version is designed to serve 4-6 people, making it perfect for a family meal or for preparing in advance and enjoying throughout the week.
Ingredients (Serves 4-6):
- 1 pound ground beef
- 1/2 pound ground pork
- 1/2 cup breadcrumbs
- 1/4 cup grated Parmesan cheese
- 2 cloves garlic, minced
- 1/4 cup fresh parsley, chopped
- 1 egg
- Salt and pepper to taste
- 1 tablespoon olive oil
- 1 medium onion, chopped
- 3 carrots, diced
- 3 stalks celery, diced
- 8 cups chicken broth
- 1 cup small pasta (such as acini di pepe or orzo)
- 5 ounces fresh spinach, roughly chopped
- Additional grated Parmesan cheese for serving
Cooking Instructions:
1. Prepare the Meatballs:
In a large mixing bowl, combine ground beef, ground pork, breadcrumbs, Parmesan cheese, minced garlic, chopped parsley, egg, salt, and pepper. Mix until all ingredients are evenly incorporated. Shape the mixture into small meatballs, approximately 1 inch in diameter.
2. Brown the Meatballs:
In a large pot, heat olive oil over medium heat. Add the meatballs in batches and cook until browned on all sides, about 5-7 minutes. Remove the meatballs from the pot and set aside.
3. Cook the Vegetables:
In the same pot, add chopped onion, diced carrots, and diced celery. Sauté the vegetables over medium heat until they begin to soften, about 5 minutes.
4. Simmer the Broth:
Pour in the chicken broth and bring the mixture to a gentle boil. Reduce the heat to a simmer and allow the flavors to meld for about 10 minutes.
5. Add Pasta and Meatballs:
Stir in the small pasta and browned meatballs. Continue to simmer until the pasta is cooked al dente, approximately 8-10 minutes.
6. Incorporate Spinach:
Add the chopped spinach to the pot and stir until wilted, about 2 minutes.
7. Serve:
Ladle the soup into bowls and top with additional grated Parmesan cheese if desired. Serve hot.
Extra Tips:
When making Italian Wedding Soup, you can prepare the meatballs and chop the vegetables a day in advance to save time on cooking day. Confirm that the meatballs are evenly sized for consistent cooking.
If you prefer a richer broth, consider using a combination of chicken and beef broth or adding a Parmesan rind while simmering. For a gluten-free version, substitute the pasta with a gluten-free alternative, or omit it entirely for a low-carb option.
Tuscan White Bean Stew
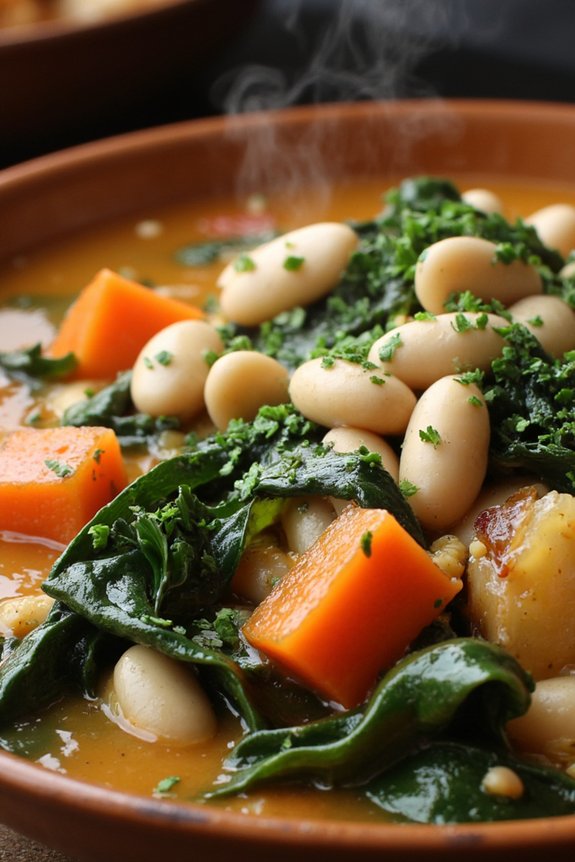
Tuscan White Bean Stew is a hearty and flavorful dish that captures the essence of rustic Italian cooking. This stew is perfect for make-ahead meals, as the flavors deepen and become more complex when allowed to sit overnight. Tuscan White Bean Stew is packed with nutritious ingredients like cannellini beans, tomatoes, and a variety of fresh herbs, making it a healthy yet satisfying choice for lunch or dinner.
Whether you’re hosting a dinner party or simply want a comforting meal to enjoy throughout the week, this stew is an excellent option that can be easily reheated and served.
The beauty of Tuscan White Bean Stew lies in its simplicity and the quality of its ingredients. Olive oil, garlic, and rosemary form the flavor base, while the beans and tomatoes provide a robust body to the stew. Fresh vegetables like carrots and kale add texture and color, creating a visually appealing dish that’s as nourishing as it’s delicious.
To enhance the taste, a hint of lemon juice is added just before serving, balancing the richness with a touch of brightness.
Ingredients for 4-6 servings:
- 2 tablespoons olive oil
- 1 onion, chopped
- 3 garlic cloves, minced
- 2 carrots, diced
- 2 celery stalks, diced
- 1 tablespoon tomato paste
- 1 teaspoon dried rosemary
- 1 teaspoon dried thyme
- 2 cans (15 oz each) cannellini beans, drained and rinsed
- 1 can (14.5 oz) diced tomatoes
- 4 cups vegetable broth
- 1 bay leaf
- Salt and pepper to taste
- 2 cups kale, chopped
- Juice of 1 lemon
- Fresh parsley, chopped (for garnish)
Cooking Instructions:
- Prepare the Base: In a large pot, heat the olive oil over medium heat. Add the chopped onion and sauté for about 5 minutes until translucent. Add the minced garlic, diced carrots, and celery, and continue to cook for another 5 minutes until the vegetables begin to soften.
- Add Aromatics: Stir in the tomato paste, dried rosemary, and thyme. Cook for about 1 minute to allow the tomato paste to caramelize slightly and the herbs to release their fragrance.
- Incorporate the Beans and Tomatoes: Add the drained and rinsed cannellini beans, diced tomatoes, vegetable broth, and bay leaf to the pot. Stir well to combine all the ingredients.
- Simmer the Stew: Bring the mixture to a boil, then reduce the heat to low. Cover the pot and let the stew simmer for about 30 minutes, allowing the flavors to meld together. Stir occasionally to prevent sticking.
- Add the Greens: After 30 minutes, add the chopped kale to the pot. Cook for an additional 10 minutes until the kale is tender but still vibrant green.
- Final Seasoning: Remove the bay leaf from the stew. Stir in the juice of one lemon and season with salt and pepper to taste. Adjust the seasoning as needed.
- Serve: Ladle the stew into bowls, and garnish with freshly chopped parsley before serving.
Extra Tips:
For added depth of flavor, consider using homemade vegetable broth instead of store-bought. If you prefer a thicker stew, you can mash a portion of the beans before adding them to the pot, which will naturally thicken the broth.
Additionally, this stew can be easily customized with other vegetables such as zucchini or bell peppers, depending on your preferences or what you have on hand. To make it a more substantial meal, serve the stew with crusty bread or over a bed of polenta or rice.
Pesto Pasta Salad
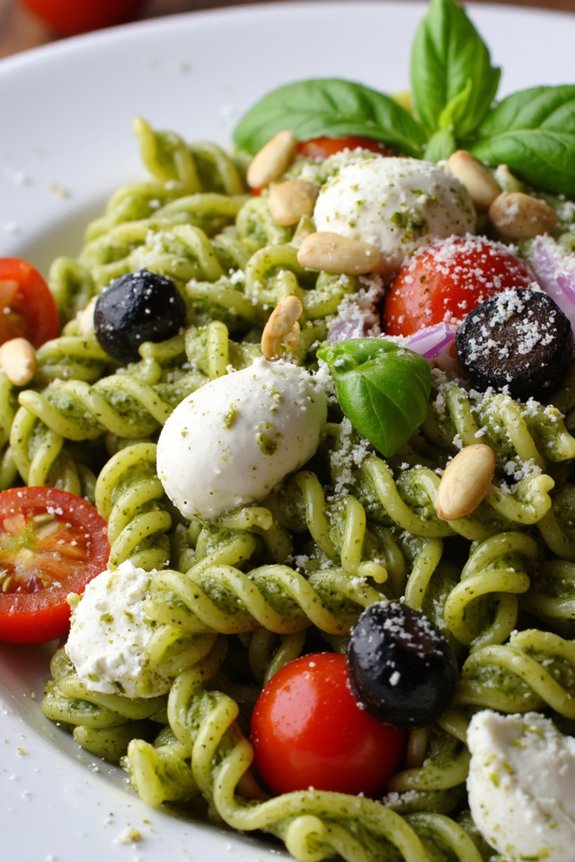
Preparing this Pesto Pasta Salad is straightforward and requires minimal cooking, making it ideal for those hot summer days when you want to avoid using the oven. The key to this dish is to use high-quality ingredients, especially the pesto, which can either be homemade or store-bought.
The salad can be served as a main course or as a side dish, and it pairs beautifully with grilled meats or seafood. Whether you’re planning a picnic, a potluck, or just a casual family dinner, this dish is sure to be a crowd-pleaser.
Ingredients (Serves 4-6 people):
- 12 ounces of pasta (such as fusilli or penne)
- 1 cup of fresh basil pesto
- 1 cup cherry tomatoes, halved
- 1/2 cup mozzarella balls, halved
- 1/4 cup pine nuts, toasted
- 1/2 cup black olives, sliced
- 1/4 cup red onion, thinly sliced
- Salt and pepper, to taste
- Freshly grated Parmesan cheese, for garnish
- Fresh basil leaves, for garnish
Cooking Instructions:
- Cook the Pasta: Bring a large pot of salted water to a boil. Add the pasta and cook according to package instructions until al dente. Drain the pasta and rinse under cold water to stop the cooking process. Set aside to cool completely.
- Prepare the Pesto: If making homemade pesto, blend fresh basil, garlic, pine nuts, Parmesan cheese, and olive oil in a food processor until smooth. Alternatively, use store-bought pesto for convenience.
- Mix Ingredients: In a large mixing bowl, combine the cooled pasta, cherry tomatoes, mozzarella balls, olives, and red onion. Add the pesto and toss everything together until the pasta is evenly coated with the pesto.
- Season and Serve: Season the salad with salt and pepper to taste. Transfer to a serving dish and sprinkle with toasted pine nuts. Garnish with freshly grated Parmesan cheese and basil leaves.
- Chill: Cover the salad and refrigerate for at least 1 hour before serving. This allows the flavors to develop and meld together. Serve chilled or at room temperature.
Extra Tips:
For best results, use fresh, high-quality ingredients, especially the pesto, as it’s the star flavor of the dish. You can prepare this salad up to two days in advance; just make sure to store it in an airtight container in the refrigerator.
If the pasta absorbs too much pesto and seems dry after refrigerating, toss it with a little extra olive oil or pesto before serving. Feel free to add other ingredients such as grilled chicken, shrimp, or roasted vegetables to make it a heartier meal.
Osso Buco With Gremolata
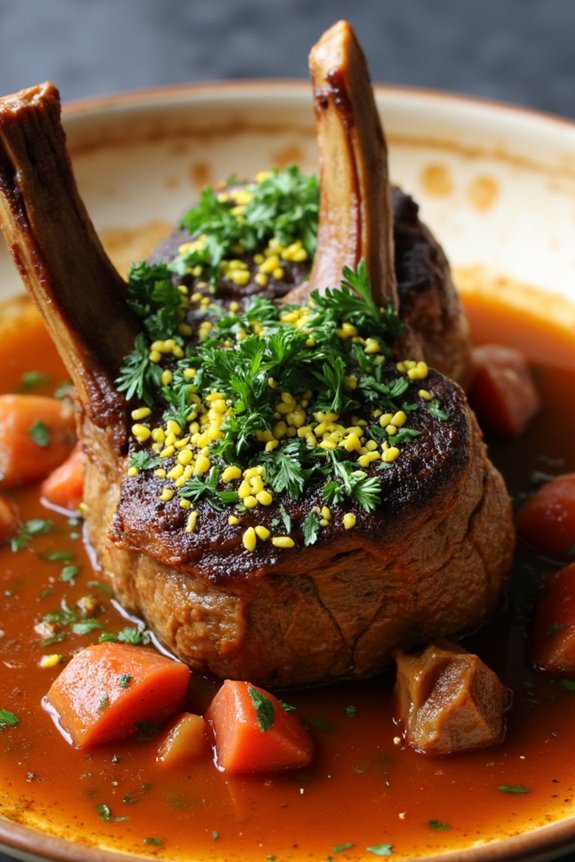
Osso Buco With Gremolata is a classic Italian dish that translates to “bone with a hole,” referring to the marrow-filled veal shanks that are at the center of this rich and flavorful recipe. Traditionally hailing from Milan, this dish is slow-cooked, allowing the meat to become tender and the flavors to meld together beautifully.
The gremolata, a zesty mixture of lemon zest, garlic, and parsley, is sprinkled over the top just before serving, adding a fresh brightness that perfectly complements the rich, savory sauce.
This dish is perfect for a make-ahead dinner, as the flavors deepen and improve when allowed to rest. Osso Buco can easily be reheated, making it an ideal choice for entertaining guests. Serve it with a side of creamy risotto or polenta to soak up the delicious sauce. This recipe serves 4-6 people, ensuring that everyone at your table will be satisfied.
Ingredients:
- 4-6 veal shanks (about 1.5-2 inches thick)
- Salt and freshly ground black pepper
- 1/2 cup all-purpose flour
- 1/4 cup olive oil
- 1 onion, finely chopped
- 2 carrots, diced
- 2 celery stalks, diced
- 4 cloves garlic, minced
- 1 cup dry white wine
- 2 cups chicken or beef broth
- 1 can (14 oz) diced tomatoes
- 1 tablespoon tomato paste
- 2 teaspoons fresh thyme leaves
- 1 bay leaf
- 1/4 cup fresh parsley, chopped
- Zest of 1 lemon
Cooking Instructions:
- Prepare the Veal Shanks: Season the veal shanks generously with salt and pepper. Dredge each shank in flour, shaking off any excess.
- Brown the Shanks: In a large, heavy-bottomed pot or Dutch oven, heat the olive oil over medium-high heat. Add the veal shanks and brown them on all sides, about 3-4 minutes per side. Remove the shanks from the pot and set aside.
- Sauté Vegetables: In the same pot, add the onion, carrots, and celery. Sauté until the vegetables are softened, about 5-7 minutes. Add the minced garlic and cook for an additional minute.
- Deglaze the Pan: Pour in the white wine, scraping up any browned bits from the bottom of the pot. Let the wine reduce by half, which should take about 3-5 minutes.
- Build the Sauce: Stir in the broth, diced tomatoes, tomato paste, thyme, and bay leaf. Bring the mixture to a simmer.
- Braise the Shanks: Return the veal shanks to the pot, ensuring they’re submerged in the sauce. Cover the pot with a lid and reduce the heat to low. Let it simmer gently for 2 to 2.5 hours, or until the meat is tender and falling off the bone.
- Prepare the Gremolata: While the Osso Buco is cooking, combine the parsley, lemon zest, and remaining garlic in a small bowl. This will be your gremolata.
- Serve: Once the meat is tender, remove the bay leaf and serve the Osso Buco topped with a generous sprinkle of gremolata over each shank.
Extra Tips:
When selecting veal shanks, look for pieces with a good amount of marrow in the bone, as this adds richness to the dish. If veal is unavailable, you can substitute with beef shanks, though the cooking time may vary.
To prevent the sauce from becoming too greasy, you may want to skim off some fat during the cooking process. Additionally, for a deeper flavor, consider making the Osso Buco a day ahead and reheating it gently before serving.
The gremolata is a key component, so don’t skip it; it adds a vibrant finish to this sumptuous dish.
Chicken Alfredo Bake
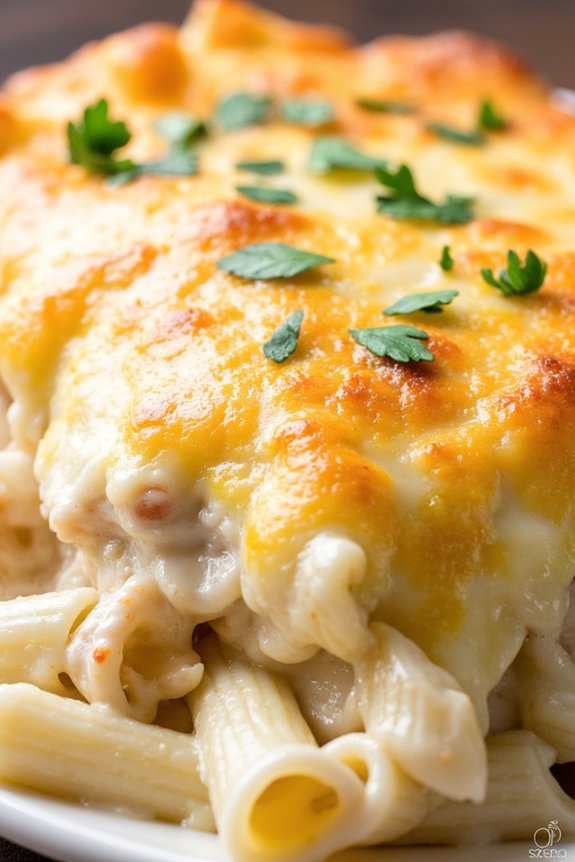
Chicken Alfredo Bake is a comforting and creamy pasta dish that’s perfect for a make-ahead meal. Combining tender chicken pieces with a rich Alfredo sauce and pasta, this dish is topped with cheese and baked until golden and bubbly. It’s an ideal choice for a family dinner or a gathering, as it can be prepared in advance and simply popped into the oven when it’s time to eat. The delightful blend of flavors and textures makes this a crowd-pleaser that will have everyone coming back for seconds.
This Italian-inspired dish is designed to serve 4-6 people, making it perfect for a small get-together or a hearty family dinner. The creamy Alfredo sauce is made from scratch, providing a fresh and rich flavor that pairs beautifully with the chicken and pasta. With the addition of garlic, Parmesan cheese, and a hint of nutmeg, the sauce envelops the pasta and chicken in a luscious creaminess. The baking process not only melds the flavors together but also gives the cheese topping a deliciously crispy finish.
Ingredients (serves 4-6):
- 2 cups cooked chicken breast, shredded or cubed
- 12 ounces penne pasta, cooked al dente
- 2 tablespoons olive oil
- 3 cloves garlic, minced
- 1 1/2 cups heavy cream
- 1 cup whole milk
- 1 1/2 cups grated Parmesan cheese
- 1 teaspoon salt
- 1/2 teaspoon black pepper
- 1/4 teaspoon ground nutmeg
- 1 cup shredded mozzarella cheese
- 2 tablespoons chopped fresh parsley (optional, for garnish)
Cooking Instructions:
- Preheat and Prepare: Preheat your oven to 350°F (175°C). Grease a 9×13 inch baking dish with a little olive oil or non-stick cooking spray to prevent sticking.
- Cook the Pasta: Bring a large pot of salted water to a boil and cook the penne pasta until al dente, according to package instructions. Drain the pasta and set aside.
- Prepare the Sauce: In a large skillet, heat the olive oil over medium heat. Add minced garlic and sauté for about 1 minute until fragrant. Pour in the heavy cream and milk, stirring to combine.
- Thicken the Sauce: Gradually add the Parmesan cheese to the skillet, stirring continuously until the cheese is fully melted and the sauce thickens slightly. Season with salt, pepper, and nutmeg, mixing well to incorporate.
- Combine Pasta and Chicken: In a large mixing bowl, combine the cooked pasta and shredded chicken. Pour the Alfredo sauce over the mixture and toss gently to ascertain everything is evenly coated.
- Assemble the Bake: Transfer the pasta and chicken mixture into the prepared baking dish. Sprinkle the shredded mozzarella cheese evenly over the top.
- Bake: Place the baking dish in the preheated oven and bake for 25-30 minutes, or until the cheese is melted and bubbly with a golden-brown crust.
- Serve and Garnish: Remove from the oven and let it cool for a few minutes before serving. Optionally, garnish with chopped fresh parsley for a pop of color and added flavor.
Extra Tips: For a richer flavor, consider adding a pinch of red pepper flakes to the Alfredo sauce for a subtle kick. You can also customize the dish by incorporating vegetables like spinach or mushrooms, which can be sautéed with the garlic.
If preparing ahead, assemble the dish up to the baking step, cover tightly, and refrigerate for up to 24 hours. Simply bring it to room temperature before baking, or add extra baking time if cooking straight from the fridge.
Caprese Stuffed Chicken
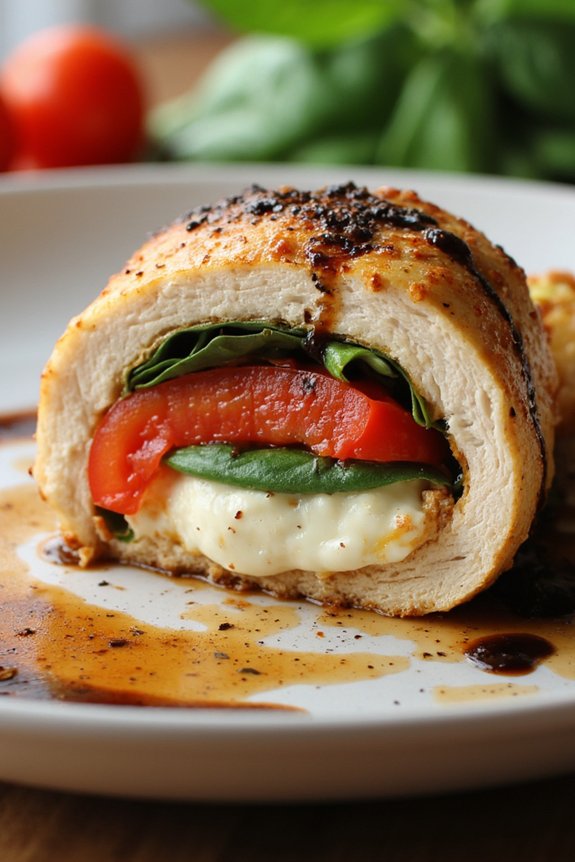
Caprese Stuffed Chicken is a delightful Italian-inspired dish that combines the classic flavors of a Caprese salad with succulent chicken breast. The dish features chicken breasts stuffed with ripe tomatoes, fresh basil, and creamy mozzarella cheese, then baked to perfection. The result is a juicy, flavorful chicken dish that’s sure to impress at any dinner table.
Perfect for a make-ahead meal, Caprese Stuffed Chicken can be prepared in advance and baked just before serving, making it an excellent choice for busy weeknights or entertaining guests.
The beauty of this dish lies in its simplicity and the quality of its ingredients. Choosing fresh, high-quality produce will elevate the flavors, guaranteeing a delicious outcome. This recipe serves 4-6 people, making it suitable for a family dinner or small gathering. The combination of juicy chicken, melted cheese, and aromatic basil creates a symphony of flavors that’s both comforting and elegant.
Ingredients for Caprese Stuffed Chicken (Serves 4-6):
- 4 boneless, skinless chicken breasts
- 2 large ripe tomatoes, sliced
- 8 oz fresh mozzarella cheese, sliced
- 1 bunch fresh basil leaves
- 2 tablespoons olive oil
- Salt and pepper to taste
- 1 teaspoon garlic powder
- 1 teaspoon Italian seasoning
- Balsamic glaze for drizzling (optional)
Cooking Instructions:
- Preheat the oven to 375°F (190°C). This guarantees that the oven reaches the right temperature for even cooking.
- Prepare the chicken: Using a sharp knife, carefully cut a pocket into each chicken breast without slicing all the way through. The pocket should be large enough to hold the stuffing ingredients.
- Season the chicken: Rub each chicken breast with olive oil, then season both sides with salt, pepper, garlic powder, and Italian seasoning. This enhances the flavor of the chicken.
- Stuff the chicken: Insert slices of mozzarella, tomato, and basil leaves into the pocket of each chicken breast. Be generous with the ingredients to guarantee a flavorful bite.
- Secure the stuffing: Use toothpicks to secure the openings of the chicken breasts, preventing the stuffing from falling out during cooking.
- Bake the chicken: Place the stuffed chicken breasts on a baking sheet or in a baking dish. Bake in the preheated oven for 25-30 minutes, or until the chicken is cooked through and the cheese is melted and bubbly.
- Rest and serve: Allow the chicken to rest for a few minutes after removing it from the oven. This helps the juices redistribute within the meat. Drizzle with balsamic glaze before serving, if desired.
Extra Tips:
When preparing Caprese Stuffed Chicken, it’s important to not overstuff the chicken breasts, as this can cause the ingredients to spill out during baking.
Additionally, verify that the chicken is cooked to an internal temperature of 165°F (74°C) for safe consumption. If you find that the cheese is browning too quickly, you can cover the dish with aluminum foil for the last few minutes of baking.
Finally, feel free to experiment with different herbs or add a sprinkle of red pepper flakes for an extra kick. Enjoy your flavorful and satisfying Italian meal!
Seafood Cioppino
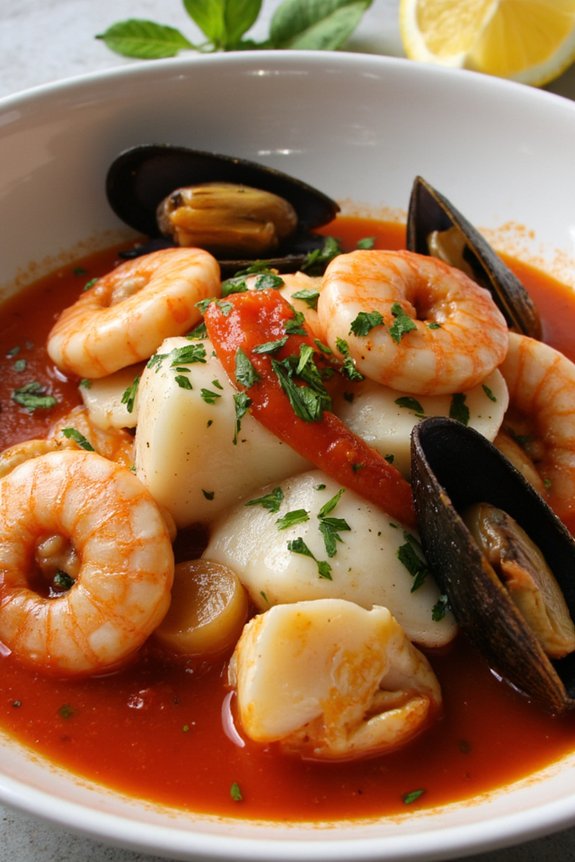
Seafood Cioppino, a classic Italian-American dish, is a hearty and flavorful seafood stew that originated in the Italian fishing communities of San Francisco. This dish brings together a medley of fresh seafood, simmered in a rich tomato-based broth infused with garlic, herbs, and a hint of spice. Perfect for a comforting dinner, Seafood Cioppino isn’t only delicious but also makes an impressive make-ahead dinner option, as the flavors intensify beautifully when prepared in advance.
Ideal for serving 4-6 people, this recipe allows you to enjoy a taste of the sea in the comfort of your home. The dish can be prepared a day ahead, making it perfect for entertaining or a cozy family meal. With a combination of clams, mussels, shrimp, and fish, this stew is versatile and can accommodate whatever fresh seafood is locally available. Pair it with crusty bread to soak up the flavorful broth, and you have a meal that’s both satisfying and elegant.
Ingredients:
- 1/4 cup olive oil
- 1 large onion, chopped
- 4 cloves garlic, minced
- 1 teaspoon red pepper flakes
- 1 (28-ounce) can crushed tomatoes
- 2 cups seafood or fish stock
- 1 cup dry white wine
- 1 bay leaf
- 1 teaspoon dried oregano
- 1 teaspoon dried thyme
- Salt and black pepper to taste
- 1 pound clams, scrubbed
- 1 pound mussels, scrubbed and de-bearded
- 1 pound shrimp, peeled and deveined
- 1 pound firm white fish (such as cod or halibut), cut into chunks
- 1/4 cup chopped fresh parsley
- 2 tablespoons fresh basil, chopped
- Lemon wedges, for serving
Cooking Instructions:
- Prepare the Base: In a large pot or Dutch oven, heat the olive oil over medium heat. Add the chopped onion and cook until translucent, about 5 minutes. Stir in the minced garlic and red pepper flakes, cooking for another minute until fragrant.
- Build the Broth: Add the crushed tomatoes, seafood or fish stock, white wine, bay leaf, oregano, and thyme to the pot. Stir to combine, and season with salt and black pepper. Bring the mixture to a simmer and let it cook for about 15 minutes to allow the flavors to meld.
- Cook the Seafood: Add the clams and mussels to the pot, cover, and cook until they begin to open, about 5 minutes. Then add the shrimp and fish chunks, gently stirring into the broth. Cover and cook for another 5-7 minutes, until the shrimp are pink and opaque, and the fish is cooked through.
- Finish the Dish: Discard any clams or mussels that haven’t opened. Stir in the fresh parsley and basil. Taste and adjust seasoning with more salt and pepper if needed.
- Serve: Ladle the cioppino into bowls, and serve with lemon wedges and crusty bread on the side for dipping.
Extra Tips:
When making Seafood Cioppino, it’s essential to use the freshest seafood available for the best flavor. If you’re preparing this dish in advance, cook the broth and add the seafood just before serving to guarantee it remains tender and not overcooked.
Feel free to adapt the seafood selection based on availability or personal preference, such as adding crab legs or scallops. Remember to scrub and clean the clams and mussels thoroughly to remove any grit. Enjoy your cioppino with a chilled glass of white wine for the perfect pairing.