

As I scroll through this list of 13 sweet Italian cookie recipes, I can almost smell the delicious aroma filling my kitchen. Each cookie, whether it’s the classic almond biscotti or the zesty lemon polenta, carries a touch of tradition and flavor. I’m eager to start baking, and there’s one particular cookie that has caught my eye. Can you guess which one it is?
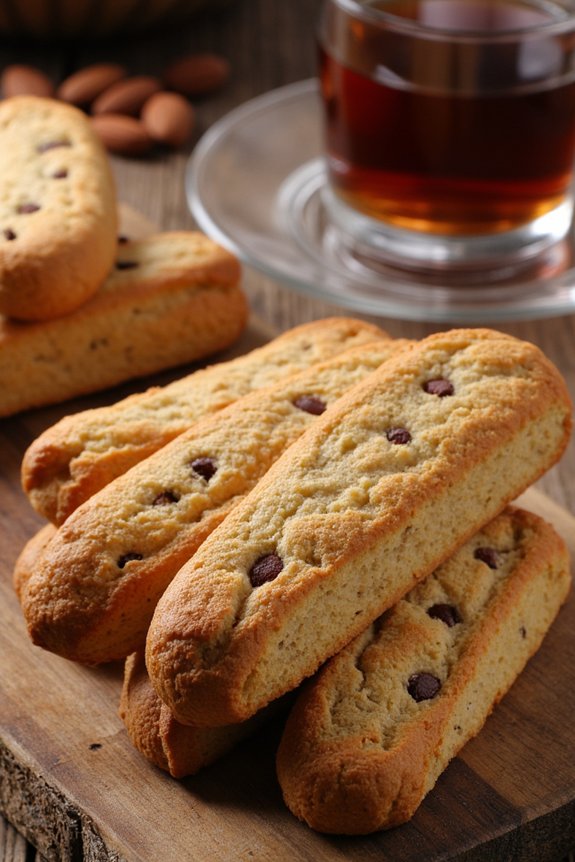
Classic Almond Biscotti

Classic Almond Biscotti is a beloved Italian cookie that’s perfect for dunking in coffee or enjoying on its own. Biscotti, meaning “twice-baked” in Italian, is a crunchy treat that has been enjoyed for centuries. With its origins in the Tuscan region, the combination of almonds and a hint of vanilla in this recipe creates a delightful balance of flavors and textures.
Whether you’re a seasoned baker or new to the world of Italian cooking, this recipe is simple to follow and will yield a batch of delicious biscotti that pairs perfectly with your favorite hot beverage. This recipe makes enough for a serving size of 4-6 people, guaranteeing that you have plenty to share with family and friends.
The almond biscotti are baked twice to achieve their signature crispness, and they stay fresh for weeks when stored properly. With just a few basic ingredients and some patience, you’ll have a batch of classic almond biscotti ready to enjoy or gift to loved ones.
Ingredients:
- 2 cups all-purpose flour
- 1 cup granulated sugar
- 1 teaspoon baking powder
- 1/2 teaspoon salt
- 3 large eggs
- 1 teaspoon vanilla extract
- 1 teaspoon almond extract
- 1 cup whole almonds, toasted and coarsely chopped
- Optional: 1 tablespoon milk for brushing
Instructions:
1. Preheat and Prepare
Preheat your oven to 350°F (175°C). Line a baking sheet with parchment paper or a silicone baking mat to prevent sticking.
2. Mix Dry Ingredients
In a medium bowl, whisk together the flour, sugar, baking powder, and salt. This guarantees that the baking powder is evenly distributed throughout the flour, which is essential for even baking.
3. Combine Wet Ingredients
In a separate large mixing bowl, beat the eggs until frothy. Add the vanilla and almond extracts, mixing until combined.
4. Form the Dough
Gradually add the dry mixture to the wet mixture, stirring until a dough forms. It will be sticky, but this is normal. Fold in the chopped almonds until evenly distributed throughout the dough.
5. Shape and First Bake
Divide the dough in half. On a floured surface, roll each half into a log about 12 inches long and 2 inches wide. Place the logs on the prepared baking sheet, leaving space between them. For a shinier crust, brush the tops with milk. Bake for 25-30 minutes or until lightly golden.
6. Cool and Slice
Remove from the oven and let the logs cool for about 10 minutes. Reduce the oven temperature to 325°F (160°C). Once cool enough to handle, use a sharp serrated knife to slice the logs diagonally into 1/2-inch thick slices.
7. Second Bake
Arrange the slices cut side down back on the baking sheet. Bake for another 10-15 minutes, flipping halfway through, until the biscotti are golden brown and crisp.
8. Cool Completely
Transfer the biscotti to a wire rack to cool completely. They’ll continue to harden as they cool.
Extra Tips:
For the best results, verify that your almonds are fresh and have a robust flavor by toasting them lightly before adding them to the dough. If you prefer a softer biscotti, you can reduce the second baking time slightly.
Additionally, you can experiment with different nuts or add-ins, such as chocolate chips or dried fruit, to personalize the biscotti to your taste. Store the biscotti in an airtight container at room temperature for up to two weeks, or freeze them for longer storage. Enjoy your biscotti with a cup of espresso or a glass of Vin Santo for an authentic Italian experience.
Chewy Ricotta Cookies

Chewy Ricotta Cookies are a delightful Italian treat that combines the creamy texture of ricotta cheese with the sweet, fragrant nuances of vanilla and lemon. These cookies are soft and moist, perfect for a family gathering or a simple indulgence with your afternoon coffee.
Originating from traditional Italian kitchens, the ricotta cookies offer a unique texture that sets them apart from typical butter cookies, making them a quintessential addition to your Italian dessert repertoire.
The beauty of these cookies lies in their simplicity and ease of preparation. With just a few basic ingredients, you can create a batch of these irresistible cookies that are bound to impress your friends and family.
Their delicate flavor and light texture make them a versatile option for any occasion. Whether you’re a seasoned baker or a novice, this recipe will guide you through each step to guarantee perfect results every time.
Ingredients (Serves 4-6):
- 2 cups all-purpose flour
- 1 teaspoon baking powder
- 1/4 teaspoon salt
- 1/2 cup unsalted butter, softened
- 1 cup granulated sugar
- 1 cup ricotta cheese
- 1 large egg
- 1 teaspoon vanilla extract
- 1 teaspoon lemon zest
- Optional: powdered sugar for dusting
Instructions:
1. Preheat the Oven:
Preheat your oven to 350°F (175°C). Line two baking sheets with parchment paper or silicone baking mats to prevent the cookies from sticking.
2. Prepare the Dry Ingredients:
In a medium bowl, whisk together the flour, baking powder, and salt. This will guarantee that the baking powder and salt are evenly distributed throughout the flour.
3. Cream the Butter and Sugar:
In a large mixing bowl, using an electric mixer, beat the softened butter and granulated sugar together until light and fluffy, about 2-3 minutes. This step is fundamental for creating a light texture in the cookies.
4. Add Ricotta and Egg:
Mix in the ricotta cheese, egg, vanilla extract, and lemon zest until well combined. The batter will start to look smooth and creamy.
5. Combine Wet and Dry Ingredients:
Gradually add the flour mixture to the wet ingredients, mixing until just combined. Be careful not to overmix, as this can result in tougher cookies.
6. Shape the Cookies:
Using a tablespoon or small cookie scoop, drop rounded tablespoons of dough onto the prepared baking sheets, leaving about 2 inches between each cookie.
7. Bake:
Bake in the preheated oven for 12-15 minutes or until the edges are lightly golden. The centers should be set but not browned.
8. Cool and Serve:
Allow the cookies to cool on the baking sheets for 5 minutes before transferring them to a wire rack to cool completely. If desired, dust with powdered sugar before serving.
Extra Tips:
To guarantee your Chewy Ricotta Cookies achieve the perfect texture, make sure your butter is softened to room temperature before creaming with the sugar. This will help incorporate air into the mixture, contributing to the cookie’s softness.
Additionally, using fresh ricotta cheese will enhance the flavor and moisture content of the cookies. If you’re looking for a touch more flavor, consider adding a dash of almond extract or dipping the cooled cookies in melted chocolate for a decadent finish.
Traditional Amaretti

Amaretti cookies are a classic Italian treat, known for their delightful almond flavor and slightly chewy texture. Originating from the Lombardy region, these cookies are a staple in Italian households, especially during festive occasions. The name “amaretti” is derived from the Italian word “amaro,” meaning bitter, a nod to the inclusion of bitter almonds or apricot kernels in traditional recipes.
Today, many variations exist, but the essence of the amaretti cookie remains the same: a harmonious balance between sweetness and the subtle bitterness of almonds.
Creating a batch of traditional amaretti cookies is a rewarding experience that brings the authentic taste of Italy to your kitchen. These cookies are perfect for serving with coffee or as an elegant addition to a dessert platter. With just a few ingredients, you can make a delightful treat that captures the essence of Italian baking. This recipe serves 4-6 people, making it ideal for gatherings or a special family dessert.
Ingredients (Serving Size: 4-6 people):
- 2 cups almond flour
- 1 cup granulated sugar
- 3 large egg whites
- 1 teaspoon almond extract
- 1/4 teaspoon salt
- Powdered sugar for dusting
Instructions:
- Prepare the Baking Sheet: Preheat your oven to 325°F (160°C). Line a baking sheet with parchment paper to prevent the cookies from sticking and guarantee even baking.
- Mix Dry Ingredients: In a medium-sized bowl, combine the almond flour, granulated sugar, and salt. Mix thoroughly to guarantee an even distribution of ingredients.
- Whisk Egg Whites: In a separate bowl, whisk the egg whites until they reach a soft peak consistency. This step is essential for giving the cookies their characteristic lightness and slight chewiness.
- Combine Ingredients: Gently fold the whisked egg whites into the almond flour mixture. Add the almond extract and continue to fold until the mixture forms a cohesive dough. Be careful not to overmix.
- Form Cookies: Using a tablespoon, scoop out portions of the dough and roll them into small balls with your hands. Place the balls onto the prepared baking sheet, leaving some space between each as they’ll spread slightly.
- Dust with Powdered Sugar: Lightly dust the top of each ball with powdered sugar. This not only adds a touch of sweetness but also gives the cookies a beautiful finish.
- Bake: Place the baking sheet in the preheated oven and bake for 20-25 minutes, or until the cookies are lightly golden brown. Keep an eye on them to avoid over-baking, which can result in a loss of the desired chewy texture.
- Cool: Once baked, remove the cookies from the oven and allow them to cool on the baking sheet for a few minutes. Transfer them to a wire rack to cool completely.
Extra Tips:
For the best flavor, guarantee your almond flour is fresh and finely ground. This will help achieve the desired texture and taste.
If you prefer a stronger almond flavor, you can increase the almond extract slightly, but be cautious as it can easily overpower the cookies.
Additionally, if you don’t have almond flour, you can make your own by finely grinding blanched almonds in a food processor. Just be sure not to over-process, or you may end up with almond butter!
Enjoy your homemade amaretti cookies with a hot cup of espresso for a true Italian experience.
Lemon Polenta Cookies

Lemon Polenta Cookies are a delightful Italian treat that combines the zesty tang of lemon with the unique texture of polenta. These cookies are perfect for those who enjoy a little crunch in their sweet treats, thanks to the cornmeal that gives them a distinctive texture. The invigorating lemon flavor is balanced with the sweetness of sugar, creating a truly irresistible cookie that’s perfect for any occasion, whether it’s an afternoon tea or a holiday gathering.
Making Lemon Polenta Cookies is a simple process that will fill your kitchen with the delightful aroma of lemon and vanilla. This recipe yields about 24 cookies, making it perfect for serving 4-6 people. With minimal ingredients and straightforward steps, you’ll have a batch of delicious cookies in no time. They not only taste great but also have a rustic charm that adds a homemade touch to your cookie platter.
Ingredients (Serving size: 4-6 people):
- 1 cup all-purpose flour
- 1/2 cup polenta or yellow cornmeal
- 1/2 teaspoon baking powder
- 1/4 teaspoon salt
- 1/2 cup unsalted butter, softened
- 3/4 cup granulated sugar
- 1 large egg
- 1 tablespoon lemon zest
- 2 tablespoons fresh lemon juice
- 1 teaspoon vanilla extract
Instructions:
- Preheat the Oven: Begin by preheating your oven to 350°F (175°C). Line two baking sheets with parchment paper or silicone baking mats to prevent the cookies from sticking.
- Mix Dry Ingredients: In a medium-sized bowl, whisk together the all-purpose flour, polenta, baking powder, and salt. This will guarantee that the baking powder is evenly distributed throughout the mixture.
- Cream Butter and Sugar: In a large mixing bowl, use an electric mixer to beat the softened butter and granulated sugar together until the mixture is light and fluffy. This should take about 2-3 minutes.
- Add Wet Ingredients: Add the egg, lemon zest, lemon juice, and vanilla extract to the butter-sugar mixture. Beat until well combined, ensuring the lemon zest is evenly distributed throughout the batter.
- Combine Dry and Wet Mixtures: Gradually add the dry ingredients to the wet mixture, mixing on low speed until just combined. Be careful not to overmix, as this can result in tough cookies.
- Shape the Cookies: Using a tablespoon, scoop the dough and roll it into balls. Place each ball onto the prepared baking sheets, leaving about 2 inches between each cookie to allow for spreading.
- Bake: Bake in the preheated oven for 12-15 minutes, or until the edges are lightly golden. The centers may seem a bit soft, but they’ll firm up as they cool.
- Cool: Remove the cookies from the oven and allow them to cool on the baking sheets for a few minutes before transferring them to a wire rack to cool completely.
Extra Tips:
For the best flavor, use fresh lemons for both the zest and juice. The natural oils in the zest add a burst of lemon flavor that pre-packaged options just can’t match.
If you prefer your cookies a little sweeter, try sprinkling a bit of sugar on top of each cookie before baking. Additionally, these cookies can be stored in an airtight container at room temperature for up to a week, making them a great make-ahead option for gatherings.
Enjoy your Lemon Polenta Cookies with a cup of tea or coffee for a delightful afternoon treat!
Chocolate Hazelnut Biscotti
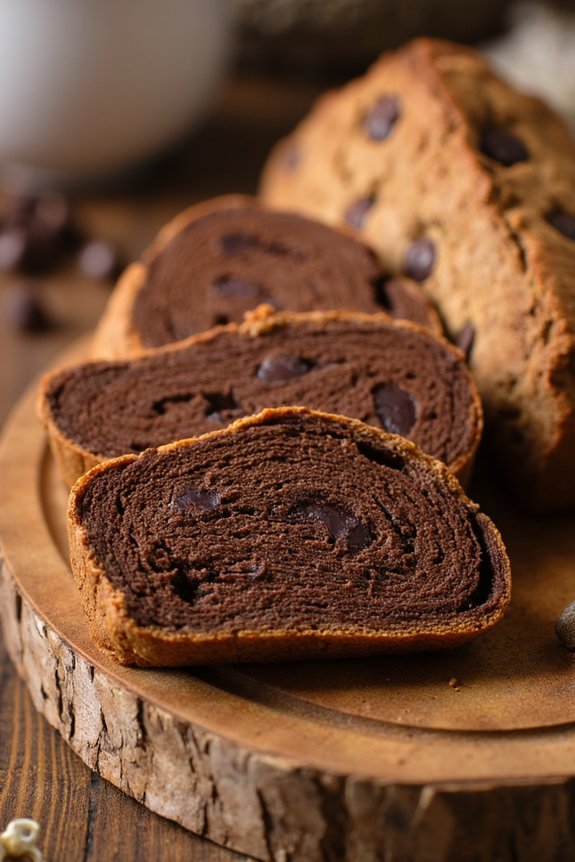
Chocolate Hazelnut Biscotti is a delightful Italian treat that’s perfect for pairing with your favorite coffee or tea. With its crunchy texture and rich flavor, this twice-baked cookie is a wonderful addition to any dessert table. The combination of chocolate and hazelnuts creates a uniquely delicious taste that’s bound to please both kids and adults alike.
Traditionally enjoyed during the holidays, this biscotti recipe can easily become a year-round favorite in your household. Making Chocolate Hazelnut Biscotti at home is a rewarding experience, as it allows you to control the quality of ingredients and customize the recipe to suit your preferences.
This recipe yields a generous batch, perfect for sharing with family and friends or for storing as a treat for yourself. Whether you’re a seasoned baker or a beginner, this recipe is straightforward and will guide you through the process of creating these delectable cookies.
Ingredients (serving size: 4-6 people):
- 2 cups all-purpose flour
- 1/2 cup unsweetened cocoa powder
- 1 teaspoon baking soda
- 1/4 teaspoon salt
- 3/4 cup granulated sugar
- 1/2 cup unsalted butter, softened
- 2 large eggs
- 1 teaspoon vanilla extract
- 1 cup hazelnuts, toasted and chopped
- 3/4 cup semi-sweet chocolate chips
Cooking Instructions:
- Preheat the oven: Start by preheating your oven to 350°F (175°C). Line a baking sheet with parchment paper or a silicone baking mat to prevent sticking.
- Mix dry ingredients: In a medium bowl, whisk together the all-purpose flour, unsweetened cocoa powder, baking soda, and salt. This step guarantees even distribution of the baking soda and cocoa powder throughout the dough.
- Cream butter and sugar: In a large bowl, use an electric mixer to cream together the softened butter and granulated sugar until the mixture is light and fluffy. This should take about 3 minutes.
- Add eggs and vanilla: Beat in the eggs one at a time, followed by the vanilla extract. Mix until fully incorporated, ensuring that the batter is smooth and homogenous.
- Combine wet and dry ingredients: Gradually add the dry ingredients to the wet ingredients, mixing until just combined. Avoid over-mixing to prevent the dough from becoming tough.
- Fold in hazelnuts and chocolate chips: Gently fold in the toasted, chopped hazelnuts and chocolate chips until evenly distributed throughout the dough.
- Shape the dough: Divide the dough in half and shape each portion into a log approximately 12 inches long and 2 inches wide. Place the logs on the prepared baking sheet, leaving space between them.
- First bake: Bake the logs in the preheated oven for 25-30 minutes, or until they’re firm to the touch. Allow them to cool on the baking sheet for 10 minutes.
- Slice the biscotti: Using a serrated knife, carefully slice the logs diagonally into 1/2 inch thick slices.
- Second bake: Arrange the slices cut side down on the baking sheet and return them to the oven. Bake for an additional 10-12 minutes, flipping them halfway through to guarantee even baking. The biscotti should be crisp and dry.
- Cool completely: Allow the biscotti to cool on a wire rack. Once cooled, they can be stored in an airtight container.
Extra Tips:
To enhance the flavor of your Chocolate Hazelnut Biscotti, consider adding a teaspoon of instant espresso powder to the dry ingredients for an extra depth of flavor. Additionally, if you prefer a sweeter touch, drizzle the finished biscotti with melted white chocolate or dark chocolate for an eye-catching presentation.
Remember to keep a close eye on the biscotti during the second bake to avoid over-baking, as they should be crisp but not overly hard. Enjoy your biscotti with a warm beverage for the ultimate Italian experience!
Pignoli Cookies

Pignoli cookies are a classic Italian treat, cherished for their chewy texture and delightful nutty flavor. These cookies are particularly popular in Southern Italy and are often enjoyed during festive occasions. Made with almond paste and coated in pine nuts, or “pignoli,” they offer a rich and aromatic taste that’s simply irresistible.
Their unique combination of flavors and textures makes them a must-try for any cookie lover. The beauty of pignoli cookies lies in their simplicity; with just a few quality ingredients, you can create a delectable dessert that captures the essence of Italian baking.
While traditionally associated with holiday celebrations, these cookies are perfect for any occasion, whether you’re hosting a dinner party or simply indulging a sweet craving. This recipe will guide you through the process of making pignoli cookies for 4-6 people, guaranteeing each bite is as delicious as the last.
Ingredients for 4-6 People:
- 8 ounces almond paste
- 1/2 cup granulated sugar
- 1/2 cup powdered sugar
- 2 large egg whites
- 1/4 teaspoon salt
- 1 teaspoon vanilla extract
- 1 1/2 cups pine nuts
Cooking Instructions:
- Preheat the Oven: Start by preheating your oven to 350°F (175°C). Line two baking sheets with parchment paper to prevent the cookies from sticking.
- Prepare Almond Paste Mixture: In a large mixing bowl, break the almond paste into small pieces to make it easier to mix. Add the granulated sugar and powdered sugar. Using an electric mixer, blend the almond paste and sugars together until the mixture is crumbly.
- Incorporate Wet Ingredients: Add the egg whites, salt, and vanilla extract to the almond paste mixture. Continue mixing until you achieve a smooth, cohesive dough. The dough should be sticky but firm enough to shape.
- Shape the Cookies: With slightly damp hands to prevent sticking, scoop small amounts of dough (about a tablespoon each) and roll them into balls. Press each ball into the pine nuts, ensuring they stick well to the dough and cover the surface.
- Arrange on Baking Sheet: Place the pine nut-coated dough balls onto the prepared baking sheets, leaving about 2 inches of space between each cookie to allow for spreading during baking.
- Bake: Transfer the baking sheets to the preheated oven. Bake the cookies for 15-18 minutes, or until the edges are lightly golden and the tops are slightly puffed. Be careful not to over-bake, as the cookies should remain soft.
- Cool: Remove the cookies from the oven and allow them to cool on the baking sheets for about 5 minutes before transferring them to a wire rack to cool completely.
Extra Tips:
When working with almond paste, ascertain it’s fresh and pliable for the best texture. If the paste is too hard, you can soften it slightly by warming it in the microwave for a few seconds.
Additionally, use fresh pine nuts for the best flavor, as they can turn rancid quickly. If you find the dough too sticky to handle, lightly wet your hands before shaping each cookie.
Pignoli cookies can be stored in an airtight container for up to a week, maintaining their chewy texture and nutty flavor. Enjoy these delightful cookies with a cup of espresso or a glass of dessert wine for a true Italian experience.
Cantucci With Almonds
Cantucci With Almonds is a classic Italian treat that’s often enjoyed with a glass of Vin Santo or a cup of coffee. These crunchy, almond-studded biscotti originate from Tuscany and are known for their signature twice-baked texture. The combination of simple ingredients like flour, sugar, and eggs, enriched with whole almonds, creates a delightful contrast between the crisp exterior and nutty interior. Perfect for dipping, Cantucci With Almonds aren’t only a delicious dessert but also a wonderful gift or addition to any festive table.
The process of making Cantucci With Almonds is straightforward and rewarding. The dough is first shaped into logs and baked until firm, then sliced into individual cookies and baked again to achieve their characteristic crispiness. With a touch of lemon zest or a splash of almond extract, these cookies can be easily customized to suit your personal taste. Whether you’re a seasoned baker or a beginner, this recipe offers a delightful culinary journey through Italian tradition.
Ingredients (Serves 4-6)
- 2 cups all-purpose flour
- 1 cup granulated sugar
- 1 teaspoon baking powder
- 1/4 teaspoon salt
- 3 large eggs
- 1 teaspoon vanilla extract
- 1 teaspoon almond extract
- 1 tablespoon lemon zest
- 1 1/4 cups whole almonds, toasted and coarsely chopped
Instructions
- Prepare the Oven and Baking Sheet: Preheat your oven to 350°F (175°C). Line a baking sheet with parchment paper to guarantee the cookies don’t stick and for easy cleanup.
- Mix Dry Ingredients: In a large bowl, whisk together the flour, sugar, baking powder, and salt. This guarantees that the baking powder is evenly distributed throughout the mixture.
- Combine Wet Ingredients: In a separate bowl, beat the eggs together with the vanilla and almond extracts, and lemon zest. This mixture will add flavor and moisture to your dough.
- Form the Dough: Gradually add the wet ingredients to the dry ingredients, stirring with a wooden spoon or a spatula until a sticky dough forms. Fold in the toasted almonds, making sure they’re evenly distributed.
- Shape the Logs: Divide the dough in half. On a floured surface, shape each half into a log about 10 inches long and 2 inches wide. Place the logs on the prepared baking sheet, leaving some space between them.
- First Bake: Bake the logs in the preheated oven for about 25-30 minutes, or until they’re golden brown and firm to the touch. Remove from the oven and let them cool on the baking sheet for about 10 minutes.
- Slice the Cantucci: Using a sharp serrated knife, slice the logs diagonally into 1/2-inch thick slices. Arrange the slices, cut side down, back on the baking sheet.
- Second Bake: Return the slices to the oven and bake for another 10-12 minutes, turning them halfway through. The cookies should be dry and crisp.
- Cool and Store: Allow the cookies to cool completely on a wire rack. Once cooled, store them in an airtight container to maintain their crispiness.
Extra Tips
For an extra touch of flavor, try adding a pinch of cinnamon or nutmeg to the dough. If you prefer a softer biscotti, reduce the baking time during the second bake.
To toast the almonds, spread them on a baking sheet and bake at 350°F (175°C) for 8-10 minutes, stirring occasionally, until they’re fragrant and lightly golden.
Remember to let the logs cool slightly before slicing to prevent crumbling. Enjoy your Cantucci With Almonds with your favorite beverage for a truly authentic Italian experience.
Pistachio Cranberry Cookies

Pistachio Cranberry Cookies are a delightful treat that infuses the classic Italian cookie with the rich flavors of pistachios and the tartness of cranberries. These cookies are perfect for any occasion, offering a balance of nutty and fruity tastes that make them irresistible.
With their vibrant color and unique texture, they’re sure to be a hit at your next gathering or as a special homemade gift. This recipe is designed to serve 4-6 people, making it ideal for a small group or family. The combination of pistachios and cranberries not only adds a pop of color but also provides a delightful crunch and chewiness to each bite.
The cookies are simple to make and require just a few key ingredients, allowing you to whip them up in no time. Follow the instructions carefully to guarantee your cookies come out perfect every time.
Ingredients:
- 1 cup unsalted butter, softened
- 1 cup granulated sugar
- 1 teaspoon vanilla extract
- 2 large eggs
- 2 ½ cups all-purpose flour
- 1 teaspoon baking powder
- ½ teaspoon salt
- ¾ cup shelled pistachios, roughly chopped
- ¾ cup dried cranberries
- Zest of one orange
Instructions:
- Preheat and Prepare: Preheat your oven to 350°F (175°C). Line two baking sheets with parchment paper to prevent the cookies from sticking and to make cleanup easier.
- Cream Butter and Sugar: In a large mixing bowl, use an electric mixer to cream together the softened butter and granulated sugar until the mixture is light and fluffy. This process should take about 3-4 minutes.
- Add Wet Ingredients: Beat in the vanilla extract and eggs one at a time, guaranteeing each egg is fully incorporated before adding the next. This helps to maintain a smooth texture in the dough.
- Mix Dry Ingredients: In a separate bowl, whisk together the all-purpose flour, baking powder, and salt. This ensures even distribution of the baking powder for uniform cookie rise.
- Combine Ingredients: Gradually add the dry ingredients to the wet mixture, mixing on low speed until just combined. Be careful not to overmix, as this can make the cookies tough.
- Fold in Add-ins: Using a spatula, gently fold in the chopped pistachios, dried cranberries, and orange zest. Make sure these are evenly distributed throughout the dough.
- Shape Cookies: Using a tablespoon or cookie scoop, drop rounded tablespoons of dough onto the prepared baking sheets, spacing them about 2 inches apart to allow for spreading.
- Bake: Place the baking sheets in the preheated oven and bake for 10-12 minutes, or until the edges are lightly golden. The centers may look slightly underdone but will firm up as they cool.
- Cool: Remove the cookies from the oven and let them cool on the baking sheets for about 5 minutes before transferring them to a wire rack to cool completely.
Extra Tips:
For an extra burst of flavor, you can substitute lemon zest for the orange zest or even add a teaspoon of almond extract to complement the pistachios.
If you prefer a chewier cookie, slightly underbake them, as they’ll continue to cook on the baking sheet once removed from the oven. Make sure to use unsalted pistachios to control the saltiness of the cookies.
To store, keep them in an airtight container at room temperature for up to a week.
Soft Anise Cookies

Soft Anise Cookies are a classic Italian treat that melds the unique flavor of anise with a tender, cake-like texture. These cookies are typically enjoyed during the holidays or at family gatherings, where their distinct licorice-like aroma is sure to evoke nostalgia. Anise seeds or anise extract provide the signature taste, which pairs beautifully with a simple glaze, adding a touch of sweetness and shine.
Whether you’re an experienced baker or a novice in the kitchen, these cookies are both easy and rewarding to prepare. This recipe is designed to yield 4-6 servings, making it perfect for a small gathering or for enjoying with family at home. The dough is easy to work with, and the cookies bake quickly, making them an ideal choice for those who want to whip up a delightful dessert without spending hours in the kitchen.
The following ingredients and steps will guide you through creating these delightful Soft Anise Cookies, guaranteeing a delicious result every time.
Ingredients (Serves 4-6 people):
- 2 1/2 cups all-purpose flour
- 2 teaspoons baking powder
- 1/4 teaspoon salt
- 1/2 cup unsalted butter, softened
- 1 cup granulated sugar
- 3 large eggs
- 1 teaspoon anise extract
- 1/4 cup milk
For the Glaze:
- 1 cup powdered sugar
- 2 tablespoons milk
- 1/2 teaspoon anise extract
- Sprinkles (optional)
Instructions:
- Preheat the Oven: Begin by preheating your oven to 350°F (175°C). Line two baking sheets with parchment paper to prevent the cookies from sticking.
- Mix the Dry Ingredients: In a medium bowl, whisk together the all-purpose flour, baking powder, and salt. This will guarantee the baking powder is evenly distributed throughout the flour.
- Cream the Butter and Sugar: In a large mixing bowl, beat the softened butter and granulated sugar together with an electric mixer on medium speed until the mixture is light and fluffy, about 2-3 minutes.
- Add Eggs and Anise Extract: Add the eggs one at a time, beating well after each addition. Then, mix in the anise extract until well combined.
- Combine Wet and Dry Ingredients: Gradually add the dry ingredients to the wet ingredients, alternating with the milk. Begin and end with the flour mixture, mixing until just combined. Be careful not to overmix the dough.
- Shape the Cookies: Using a tablespoon or small cookie scoop, drop rounded spoonfuls of dough onto the prepared baking sheets, spacing them about 2 inches apart.
- Bake the Cookies: Bake in the preheated oven for 10-12 minutes, or until the bottoms are lightly golden. Avoid overbaking as they should remain soft.
- Prepare the Glaze: While the cookies are baking, prepare the glaze by whisking together the powdered sugar, milk, and anise extract in a small bowl until smooth.
- Glaze the Cookies: Once the cookies have cooled slightly, dip the tops into the glaze and return them to the baking sheet. If desired, top with sprinkles before the glaze sets.
- Allow to Set: Let the cookies sit for about 20 minutes to allow the glaze to fully set before serving.
Extra Tips: To guarantee your Soft Anise Cookies turn out perfectly, make sure the butter is properly softened before starting to cream it with the sugar; this will help create a lighter, fluffier texture.
If you prefer a stronger anise flavor, you can increase the amount of anise extract slightly, but be cautious as it can be quite potent. Additionally, these cookies can be stored in an airtight container for up to a week, and they often taste even better the next day as the flavors have had more time to meld.
Italian Rainbow Cookies

Italian Rainbow Cookies, also known as Tricolor Cookies or Seven Layer Cookies, are a delightful treat that combines vibrant colors with rich flavors. Originating from Italian-American bakeries, these cookies aren’t only a feast for the eyes but also a delight to the taste buds. They consist of three layers of almond-flavored cake, each a different color, sandwiched together with apricot or raspberry jam and coated in a thin layer of chocolate. Perfect for festive occasions or everyday indulgence, these cookies bring a pop of color and a burst of flavor to any dessert table.
The process of making Italian Rainbow Cookies may seem intricate, but with careful attention to detail, you can achieve stunning and delicious results. The key to success lies in the preparation of each layer, ensuring that they’re evenly baked and perfectly aligned. The use of almond paste gives the layers their distinct, nutty flavor, which is beautifully complemented by the tangy sweetness of the jam and the richness of the chocolate coating.
While the recipe requires a bit of patience and precision, the end product is well worth the effort, offering a unique and delicious experience for you and your loved ones.
Ingredients (Serves 4-6):
- 1 cup almond paste
- 1 cup granulated sugar
- 1 cup unsalted butter, softened
- 4 large eggs, separated
- 1 teaspoon almond extract
- 2 cups all-purpose flour
- 1/4 teaspoon salt
- Red and green food coloring
- 1/2 cup apricot or raspberry jam
- 1 cup semi-sweet chocolate chips
- 1 tablespoon vegetable oil
Cooking Instructions:
- Preheat and Prepare Pans: Preheat your oven to 350°F (175°C). Line three 9×13 inch baking pans with parchment paper, allowing some overhang on the sides for easy removal later.
- Mix Almond Paste and Sugar: In a large mixing bowl, beat the almond paste and sugar together until well combined and smooth.
- Add Butter and Egg Yolks: Add the softened butter and continue to beat until creamy. Then, add egg yolks one at a time, mixing well after each addition. Stir in the almond extract.
- Combine Dry Ingredients: In a separate bowl, whisk together the flour and salt. Gradually add the dry ingredients to the almond mixture, mixing until just combined.
- Whip Egg Whites: In a clean bowl, beat the egg whites until stiff peaks form. Gently fold the whipped egg whites into the batter to maintain the airiness of the mixture.
- Divide and Color Batter: Divide the batter evenly into three separate bowls. Color one bowl with red food coloring and another with green food coloring, leaving the third portion plain.
- Bake the Layers: Spread each colored batter into its own prepared baking pan. Bake each layer for about 10-12 minutes, or until a toothpick inserted into the center comes out clean. Allow the layers to cool completely.
- Assemble the Layers: Once cooled, spread a thin layer of jam over the green layer. Carefully place the plain layer on top and spread another thin layer of jam. Finally, top with the red layer.
- Prepare Chocolate Coating: Melt the chocolate chips with the vegetable oil in a microwave or over a double boiler until smooth.
- Coat and Chill: Spread the melted chocolate evenly over the top of the layered cake. Refrigerate for at least an hour to set the chocolate.
- Cut and Serve: Once the chocolate is firm, use the parchment paper overhang to lift the cake out of the pan. Trim the edges and cut the cake into small rectangles or squares to serve.
Extra Tips:
When working with food coloring, add a little at a time until you achieve the desired shade. If you prefer a more robust almond flavor, you can increase the almond extract slightly.
Be sure to cool the layers completely before assembling to prevent the jam from seeping into the cake layers. For a cleaner cut, use a sharp knife and wipe it clean between slices. Enjoy your Italian Rainbow Cookies with a cup of coffee or espresso for an authentic Italian experience!
Sbrisolona Almond Cookies

Sbrisolona Almond Cookies are a delightful Italian treat that originates from the Lombardy region, known for their crumbly texture and rich, nutty flavor.
These cookies are traditionally made with a mixture of cornmeal and all-purpose flour, giving them a unique texture that’s both crunchy and tender. The addition of almonds provides a pleasant nutty taste, while the use of butter imparts a luscious richness. The name “sbrisolona” comes from the Italian word “briciola,” meaning crumb, which perfectly describes the cookie’s crumbly nature.
Perfect for pairing with a cup of coffee or tea, Sbrisolona Almond Cookies are often enjoyed during festive occasions or as an everyday indulgence. The preparation of these cookies is straightforward, yet the result is a sophisticated pastry that captures the essence of Italian baking.
When broken into pieces, these cookies are meant to be shared, making them an ideal dessert for gatherings or family meals. Below, you’ll find the ingredients and step-by-step instructions to make Sbrisolona Almond Cookies, serving 4-6 people.
Ingredients:
- 1 cup all-purpose flour
- 1/2 cup cornmeal
- 1/2 cup granulated sugar
- 1/2 cup unsalted butter, softened
- 1/2 teaspoon salt
- 1 teaspoon vanilla extract
- 1/2 cup whole almonds, coarsely chopped
- 1 large egg yolk
- Zest of 1 lemon
Cooking Instructions:
- Preheat the Oven: Begin by preheating your oven to 350°F (175°C). This guarantees that it reaches the right temperature by the time you’re ready to bake the cookies.
- Mix the Dry Ingredients: In a large mixing bowl, combine the all-purpose flour, cornmeal, granulated sugar, and salt. Stir these ingredients together until they’re well-blended, assuring an even distribution of the dry components.
- Incorporate the Butter: Add the softened unsalted butter to the dry mixture. Using your fingers or a pastry cutter, work the butter into the flour mixture until it resembles coarse crumbs. This step is vital for achieving the signature crumbly texture.
- Add Wet Ingredients: Mix in the vanilla extract, lemon zest, and egg yolk. Continue to blend the mixture until all ingredients are just combined. Be careful not to overmix; the dough should remain crumbly.
- Fold in the Almonds: Gently fold the coarsely chopped almonds into the dough. Make sure they’re evenly distributed throughout the mixture for consistent nutty flavor in every bite.
- Prepare the Baking Pan: Line a baking sheet with parchment paper. Transfer the crumbly dough onto the sheet and press it together lightly to form a rough circle or square, about 1/2 inch thick.
- Bake the Cookies: Place the baking sheet in the preheated oven and bake for about 25-30 minutes, or until the edges are golden brown and the center is set.
- Cool and Serve: Once baked, remove the cookies from the oven and let them cool on the baking sheet for about 10 minutes. Break the cookies into pieces and serve them warm, or allow them to cool completely on a wire rack.
Extra Tips:
For an extra burst of flavor, consider toasting the almonds lightly before incorporating them into the dough. This step enhances their natural oils and brings out a deeper nutty aroma.
Additionally, if you prefer a sweeter cookie, sprinkle a bit of powdered sugar on top before serving. Store any leftovers in an airtight container to maintain their crispness, but do note that these cookies are best enjoyed fresh.
Italian Wedding Cookies

Italian Wedding Cookies, also known as “Italian Butterball Cookies,” are a delightful treat often served at weddings and festive occasions. These cookies are rich, buttery, and coated in a generous layer of powdered sugar, making them melt in your mouth. They’ve a nutty flavor, often from almonds or walnuts, and their tender texture makes them irresistible.
Perfect for special occasions or as a sweet indulgence with a cup of coffee, Italian Wedding Cookies are a beloved classic in Italian cuisine. Traditionally, these cookies are made with a simple mixture of butter, flour, and nuts. The dough is rolled into small balls, baked until golden, and then rolled in powdered sugar while still warm. The result is a cookie that’s both crumbly and soft, with a sweet exterior that complements the rich interior.
This recipe will guide you through the steps to create these delectable cookies, guaranteeing they’re perfect for your next gathering or celebration.
Ingredients (Serves 4-6):
- 1 cup unsalted butter, softened
- 1/2 cup powdered sugar (plus extra for rolling)
- 1 teaspoon vanilla extract
- 2 cups all-purpose flour
- 1 cup finely chopped walnuts or almonds
- 1/4 teaspoon salt
Cooking Instructions:
- Preheat the Oven: Preheat your oven to 350°F (175°C). Line a baking sheet with parchment paper to prevent the cookies from sticking.
- Cream the Butter and Sugar: In a large mixing bowl, cream together the softened butter and 1/2 cup of powdered sugar until light and fluffy. This should take about 2-3 minutes using an electric mixer.
- Add Vanilla Extract: Mix in the vanilla extract until well combined with the butter and sugar mixture.
- Combine Dry Ingredients: In a separate bowl, whisk together the flour and salt to guarantee even distribution.
- Form the Dough: Gradually add the dry ingredients to the butter mixture, mixing until just combined. Stir in the chopped nuts until evenly distributed in the dough.
- Shape the Cookies: Scoop tablespoon-sized portions of dough and roll them into balls. Place them about 1 inch apart on the prepared baking sheet.
- Bake the Cookies: Bake in the preheated oven for 15-18 minutes, or until the bottoms are lightly golden. The tops of the cookies should remain pale.
- Coat with Powdered Sugar: Allow the cookies to cool on the baking sheet for about 5 minutes. Then, while they’re still warm, roll each cookie in powdered sugar until fully coated.
- Cool Completely: Transfer the cookies to a wire rack to cool completely. Once cooled, you can roll them in additional powdered sugar for a thicker coating if desired.
Extra Tips:
For the best texture, verify that your butter is at room temperature before beginning. This will help in achieving the light and airy consistency needed for perfect creaming with the sugar.
If you prefer a different nutty flavor, pecans can be substituted for walnuts or almonds. Additionally, storing the cookies in an airtight container will keep them fresh for several days. If you wish to make these cookies ahead of time, they freeze well, allowing you to enjoy a taste of Italy whenever you desire.
Fig and Nut Biscotti
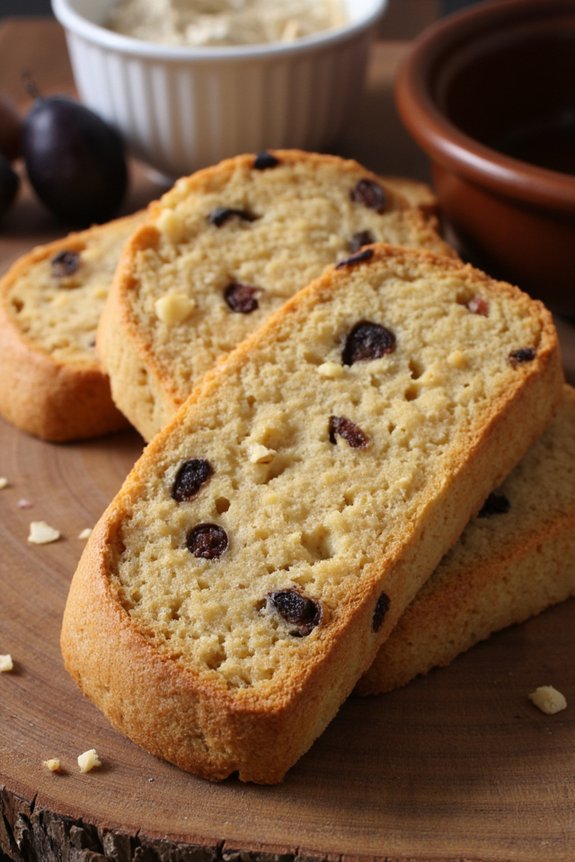
Fig and Nut Biscotti is a delightful Italian treat that combines the sweetness of dried figs with the rich, earthy flavors of mixed nuts. This twice-baked cookie is perfect for dipping into coffee, tea, or enjoying on its own as a flavorful snack. The crunchy texture of the biscotti pairs beautifully with the chewy bits of figs and the satisfying crunch of almonds and walnuts, making it a perfect accompaniment for any occasion.
The origins of biscotti, also known as cantuccini, trace back to the Tuscan region of Italy. Traditionally, these cookies are baked twice to achieve their distinctive crunch. The inclusion of figs and nuts not only enhances the flavor but also adds a nutritional element, making this recipe a wholesome choice. Whether you’re preparing these biscotti for a casual family gathering or as a gift for friends, they’re sure to impress with their unique combination of flavors.
Ingredients (serving size: 4-6):
- 2 cups all-purpose flour
- 1 cup granulated sugar
- 1 teaspoon baking powder
- 1/4 teaspoon salt
- 3 large eggs
- 1 teaspoon vanilla extract
- 1/2 teaspoon almond extract
- 1 cup dried figs, chopped
- 1/2 cup almonds, chopped
- 1/2 cup walnuts, chopped
Cooking Instructions:
- Preheat and Prepare: Preheat your oven to 350°F (175°C). Line a baking sheet with parchment paper to prevent sticking.
- Mix Dry Ingredients: In a large bowl, whisk together the flour, sugar, baking powder, and salt. This guarantees that the baking powder and salt are evenly distributed.
- Combine Wet Ingredients: In a separate bowl, beat the eggs, vanilla extract, and almond extract together until well combined. The extracts add a wonderful aroma and depth of flavor to the biscotti.
- Form the Dough: Gradually add the wet ingredients to the dry ingredients, mixing until a dough forms. It will be sticky but should hold together well.
- Add Figs and Nuts: Gently fold in the chopped figs, almonds, and walnuts until evenly incorporated throughout the dough.
- Shape the Logs: Divide the dough in half. On a lightly floured surface, shape each half into a log about 12 inches long and 2 inches wide. Place the logs on the prepared baking sheet, leaving some space between them.
- First Bake: Bake in the preheated oven for about 25-30 minutes or until the logs are golden brown. Remove from the oven and let them cool for about 10 minutes.
- Slice and Second Bake: Once slightly cooled, use a serrated knife to slice the logs diagonally into 1/2-inch thick slices. Arrange the slices cut side down on the baking sheet.
- Final Bake: Return the slices to the oven and bake for an additional 10-15 minutes, flipping halfway through, until both sides are golden brown and crisp.
- Cool Completely: Transfer the biscotti to a wire rack to cool completely before serving or storing. This guarantees they achieve the desired crunch.
Extra Tips:
For the best texture, make sure your dried figs aren’t too tough; if they are, you might soak them in warm water for a few minutes and pat dry before chopping. When slicing the biscotti logs, use a sharp serrated knife to prevent crumbling. If you prefer a softer biscotti, reduce the second bake time slightly. These biscotti can be stored in an airtight container for up to two weeks, maintaining their crunch and flavor. Enjoy your homemade Fig and Nut Biscotti with a hot cup of espresso or your favorite tea for a truly Italian experience.