

There’s something magical about the way lemon can transform a dish.
Whether it’s the creamy tang of Lemon Risotto or the zesty kick of Spaghetti Al Limone, lemons elevate the flavors beautifully.
My kitchen often feels like a cozy Italian bistro, with lemons taking center stage.
Intrigued?
Let’s explore these simple, sharp Italian lemon recipes that will brighten up every meal.
Lemon Risotto

Lemon Risotto is a creamy and tangy Italian dish that perfectly balances the richness of arborio rice with the bright, zesty flavor of fresh lemons. This dish is a delightful twist on the classic risotto, offering a rejuvenating taste that’s both comforting and invigorating.
Whether served as a main course or a side dish, Lemon Risotto is sure to impress with its vibrant taste and creamy texture. Ideal for a dinner party or a weeknight meal, this risotto recipe serves 4-6 people. The key to achieving the perfect Lemon Risotto is patience and attentiveness, as the rice must be slowly cooked and stirred to attain its characteristic creaminess.
With a few simple ingredients and careful attention, you can create a dish that brings the essence of Italian cuisine right to your table.
Ingredients:
- 1 ½ cups arborio rice
- 4 cups chicken or vegetable broth
- 1 cup dry white wine
- 1 large onion, finely chopped
- 2 cloves garlic, minced
- 2 tablespoons olive oil
- 2 tablespoons unsalted butter
- Zest and juice of 2 large lemons
- ½ cup grated Parmesan cheese
- Salt and freshly ground black pepper to taste
- Fresh parsley, chopped (for garnish)
Cooking Instructions:
- Prepare the Broth: In a medium saucepan, heat the chicken or vegetable broth over medium heat until it’s warm. Keep it on low heat to maintain its temperature throughout the cooking process.
- Sauté Aromatics: In a large, heavy-bottomed skillet or saucepan, heat the olive oil over medium heat. Add the chopped onion and sauté until translucent, about 5 minutes. Add the minced garlic and cook for an additional minute until fragrant.
- Toast the Rice: Add the arborio rice to the skillet and stir to coat the grains with the oil, onion, and garlic mixture. Cook for 2-3 minutes, stirring frequently, until the rice becomes slightly translucent around the edges.
- Deglaze with Wine: Pour in the white wine and stir continuously until the wine is mostly absorbed by the rice.
- Cook the Risotto: Begin adding the warm broth to the rice, one ladleful at a time, stirring frequently. Allow each addition of broth to be absorbed before adding the next. Continue this process, which should take about 18-20 minutes, until the rice is creamy and tender but still has a slight bite.
- Add Lemon and Cheese: Once the risotto is cooked to your liking, remove it from the heat. Stir in the lemon zest, lemon juice, butter, and Parmesan cheese until well combined. Season with salt and freshly ground black pepper to taste.
- Serve: Serve the Lemon Risotto immediately, garnishing with freshly chopped parsley for a burst of color and flavor.
Extra Tips:
For the best results, use high-quality arborio rice as it provides the best creamy texture. If you prefer a less sharp lemon flavor, reduce the amount of lemon juice slightly.
Be patient and avoid rushing through the broth addition; this slow process is essential for achieving the ideal risotto consistency. Finally, if you find the risotto too thick after sitting, you can loosen it with a splash of extra broth or water before serving. Enjoy your delicious Lemon Risotto with a crisp green salad or grilled seafood for a complete meal.
Lemon Chicken Piccata

Lemon Chicken Piccata is a classic Italian dish that combines the zesty flavor of lemons with the savory goodness of chicken. This dish is perfect for those who enjoy a light and tangy meal with a touch of elegance. The combination of lemon juice, capers, and white wine creates a delightful sauce that pairs beautifully with tender chicken breasts.
Whether you’re hosting a dinner party or simply cooking for family, Lemon Chicken Piccata is bound to impress. The beauty of this dish lies in its simplicity and the ability to bring out the natural flavors of the ingredients. It’s a quick and easy recipe that can be prepared in under 30 minutes, making it an excellent choice for a weeknight meal.
The key is to use fresh lemons and high-quality chicken to guarantee the best taste. Served with a side of pasta or a fresh green salad, this dish is a complete meal that will satisfy everyone at the table.
Ingredients for 4-6 Servings:
- 4 boneless, skinless chicken breasts
- Salt and pepper, to taste
- 1/2 cup all-purpose flour
- 4 tablespoons unsalted butter
- 2 tablespoons olive oil
- 1/2 cup dry white wine
- 1/4 cup fresh lemon juice
- 1/4 cup chicken broth
- 1/4 cup capers, drained
- 2 tablespoons fresh parsley, chopped
- Lemon slices, for garnish
Cooking Instructions:
- Prepare the Chicken: Place the chicken breasts between two sheets of plastic wrap and pound them to about 1/2-inch thickness. Season both sides with salt and pepper.
- Coat the Chicken: Dredge the chicken breasts in flour, ensuring they’re evenly coated. Shake off any excess flour.
- Cook the Chicken: In a large skillet, heat 2 tablespoons of butter and the olive oil over medium-high heat. Add the chicken breasts and cook for about 3-4 minutes on each side, or until golden brown and cooked through. Remove the chicken from the skillet and set aside.
- Make the Sauce: In the same skillet, add the white wine and let it simmer for about 2 minutes, scrapping up any browned bits from the bottom of the pan. Add the lemon juice, chicken broth, and capers, and let the mixture simmer for another 5 minutes.
- Finish the Dish: Return the chicken to the skillet and simmer for an additional 5 minutes, allowing the chicken to absorb the flavors of the sauce. Add the remaining 2 tablespoons of butter and stir until melted and the sauce is slightly thickened.
- Serve: Transfer the chicken to a serving platter, pour the sauce over the chicken, and garnish with fresh parsley and lemon slices. Serve immediately.
Extra Tips: For best results, use freshly squeezed lemon juice rather than bottled, as it greatly enhances the flavor of the dish. If you prefer a less tangy sauce, reduce the amount of lemon juice slightly and increase the chicken broth.
Additionally, to guarantee your chicken is extra tender, avoid overcooking it; it should be just cooked through and juicy. For a complete meal, consider serving the Lemon Chicken Piccata with a side of angel hair pasta or sautéed vegetables.
Spaghetti Al Limone

Spaghetti Al Limone is a delightful Italian dish that captures the essence of fresh lemons and the simplicity of Italian cuisine. This dish is perfect for those who appreciate the bright, zesty flavors of citrus combined with the comforting nature of pasta. Originating from the Amalfi Coast, Spaghetti Al Limone is known for its invigorating taste that pairs perfectly with a touch of creaminess from Parmesan cheese.
It’s a wonderful option for a light yet flavorful dinner that’s both quick and easy to prepare.
The key to an authentic Spaghetti Al Limone lies in using fresh, high-quality ingredients. The lemons should be fragrant and juicy, as they play a central role in the dish’s flavor profile. The combination of lemon zest and juice creates a vibrant sauce that clings to the spaghetti, while the addition of freshly grated Parmesan cheese adds richness and depth.
Olive oil, garlic, and fresh basil or parsley enhance the overall taste, making this dish a true celebration of simple yet exquisite flavors.
Ingredients (serving size: 4-6 people):
- 500g spaghetti
- 2 large lemons (zest and juice)
- 100g Parmesan cheese, freshly grated
- 3 tablespoons extra virgin olive oil
- 2 cloves garlic, minced
- Salt and pepper, to taste
- Fresh basil or parsley, chopped, for garnish
Cooking Instructions:
- Cook the Spaghetti: Bring a large pot of salted water to a boil. Add the spaghetti and cook according to package instructions until al dente. Reserve 1 cup of pasta water, then drain the spaghetti.
- Prepare the Lemon Sauce: While the pasta cooks, zest the lemons and squeeze out the juice. In a large skillet over medium heat, add the olive oil and minced garlic. Sauté the garlic until it becomes fragrant, being careful not to let it burn.
- Create the Sauce Base: Add the lemon juice and zest to the skillet with the garlic, stirring to combine. Let it simmer for about 1 minute to slightly reduce and meld the flavors.
- Combine Spaghetti and Sauce: Add the cooked spaghetti to the skillet, tossing it gently to coat with the lemon sauce. Gradually add the reserved pasta water, a little at a time, until the sauce reaches your desired consistency.
- Incorporate the Cheese: Sprinkle the grated Parmesan cheese over the spaghetti and toss again, allowing the cheese to melt and create a creamy texture. Season with salt and pepper to taste.
- Garnish and Serve: Remove the skillet from heat and transfer the Spaghetti Al Limone to serving dishes. Garnish with fresh basil or parsley for an added burst of flavor and color. Serve immediately.
Extra Tips:
When making Spaghetti Al Limone, it’s important not to overcook the pasta; it should be al dente to provide the perfect texture balance with the sauce. If the sauce is too thick, you can adjust it by adding more pasta water until you achieve the desired consistency.
Additionally, using freshly grated Parmesan cheese is essential for achieving the dish’s creamy texture and authentic taste, as pre-grated cheese often contains additives that can affect melting. Finally, feel free to adjust the lemon-to-cheese ratio to suit your personal taste preferences, making the dish as tangy or creamy as you like.
Lemon Ricotta Pancakes

Lemon Ricotta Pancakes are a delightful twist on traditional pancakes, bringing a burst of bright citrus flavor to your morning meal. The addition of ricotta cheese gives these pancakes a rich, creamy texture that pairs beautifully with the zing of fresh lemon. This recipe captures the essence of Italian breakfast cuisine, making it a perfect choice for a leisurely brunch or a special occasion breakfast.
The balance of flavors and the light, fluffy texture make these pancakes a favorite among both adults and children. These pancakes aren’t only delicious but also surprisingly simple to prepare. The key is to use fresh, high-quality ingredients, especially the ricotta and lemons, to guarantee the best flavor and texture.
The lemon zest and juice infuse the batter with a lively, aromatic essence that’s complemented by the mild creaminess of the ricotta. Whether you’re serving them with a drizzle of honey, a dollop of whipped cream, or a sprinkle of powdered sugar, these Lemon Ricotta Pancakes are sure to impress.
Ingredients (serving size 4-6 people):
- 1 cup ricotta cheese
- 1 cup all-purpose flour
- 1/4 cup granulated sugar
- 1 teaspoon baking powder
- 1/2 teaspoon baking soda
- 1/4 teaspoon salt
- 3/4 cup milk
- 2 large eggs
- 2 tablespoons unsalted butter, melted
- Zest of 2 lemons
- Juice of 1 lemon
- 1 teaspoon vanilla extract
- Butter or oil for cooking
Instructions:
- Prepare the dry ingredients: In a large mixing bowl, whisk together the all-purpose flour, granulated sugar, baking powder, baking soda, and salt. Make sure these ingredients are well-combined and set aside.
- Mix the wet ingredients: In another bowl, combine the ricotta cheese, milk, eggs, melted butter, lemon zest, lemon juice, and vanilla extract. Whisk until the mixture is smooth and well-blended.
- Combine wet and dry ingredients: Pour the wet mixture into the bowl with the dry ingredients. Gently stir the combination until just incorporated. Be careful not to overmix, as this can lead to dense pancakes.
- Preheat and grease the pan: Heat a large non-stick skillet or griddle over medium heat. Lightly grease with butter or oil to prevent sticking.
- Cook the pancakes: Pour 1/4 cup of batter onto the hot skillet for each pancake. Cook until bubbles form on the surface and the edges begin to set, about 2-3 minutes. Flip the pancakes and cook for an additional 1-2 minutes, or until golden brown and cooked through.
- Serve: Transfer the pancakes to a warm plate and repeat with the remaining batter. Serve immediately with your choice of toppings.
Extra Tips:
For the fluffiest pancakes, avoid overmixing the batter; a few lumps are perfectly fine. If the batter seems too thick, you can add a bit more milk to reach your desired consistency. Use a gentle hand when flipping the pancakes to keep them airy and light.
Freshly squeezed lemon juice is essential for the best flavor, and you can also experiment with adding fresh berries or nuts to the batter for additional texture and taste. Enjoy these pancakes with your favorite syrup or a dusting of powdered sugar for an extra touch of sweetness.
Limoncello Spritz

The Limoncello Spritz is a revitalizing Italian cocktail that combines the zesty flavors of limoncello with the effervescence of prosecco. This delightful drink is perfect for any occasion, whether you’re hosting a summer gathering or simply enjoying a quiet evening at home.
The sweetness of the limoncello is balanced by the crispness of the prosecco, while a splash of soda water adds a revitalizing finish. Serve this spritz in a wine glass garnished with a slice of lemon for a touch of elegance.
Ideal for serving 4 to 6 people, this Limoncello Spritz recipe is both simple and sophisticated. With just a few ingredients, you can create a cocktail that embodies the essence of Italy’s Amalfi Coast.
It’s an excellent choice for those who appreciate the combination of sweet, tart, and bubbly flavors. Follow these easy steps to whip up this delightful drink and impress your guests with your mixology skills.
Ingredients for 4-6 servings:
- 1 cup of limoncello
- 1 bottle (750ml) of prosecco
- 1 cup of soda water
- Ice cubes
- Lemon slices, for garnish
- Fresh mint leaves, for garnish (optional)
Instructions:
- Prepare the Glasses: Start by chilling your wine glasses in the refrigerator for about 15 minutes. This will guarantee that your Limoncello Spritz is served revitalizingly cold.
- Combine Ingredients: In a large pitcher, combine 1 cup of limoncello with 1 cup of soda water. Stir gently to mix the liquids evenly.
- Add Prosecco: Slowly pour the bottle of prosecco into the pitcher with the limoncello and soda mixture. Be careful to pour the prosecco slowly to maintain its bubbles and avoid overflowing.
- Add Ice: Fill the chilled wine glasses with ice cubes, about halfway full. The ice will keep the drink cool and enhance the revitalizing experience.
- Serve: Pour the limoncello and prosecco mixture over the ice-filled glasses. Guarantee that each glass receives an equal portion of the drink.
- Garnish: Garnish each glass with a slice of lemon on the rim and a sprig of fresh mint if desired. This adds a burst of aroma and a touch of color to your cocktail.
- Enjoy: Serve immediately to enjoy the bubbly, revitalizing taste of the Limoncello Spritz.
Extra Tips:
For an extra burst of flavor, you might consider adding a splash of freshly squeezed lemon juice to the mix. If you prefer your spritz on the sweeter side, adjust the ratio by adding a bit more limoncello.
When selecting prosecco, opt for a dry or extra-dry variety to balance the sweetness of the limoncello. Finally, if you wish to make this cocktail ahead of time, mix the limoncello and soda water in advance but wait to add the prosecco and ice until just before serving to guarantee the drink remains fizzy and revitalizing.
Lemon Panna Cotta
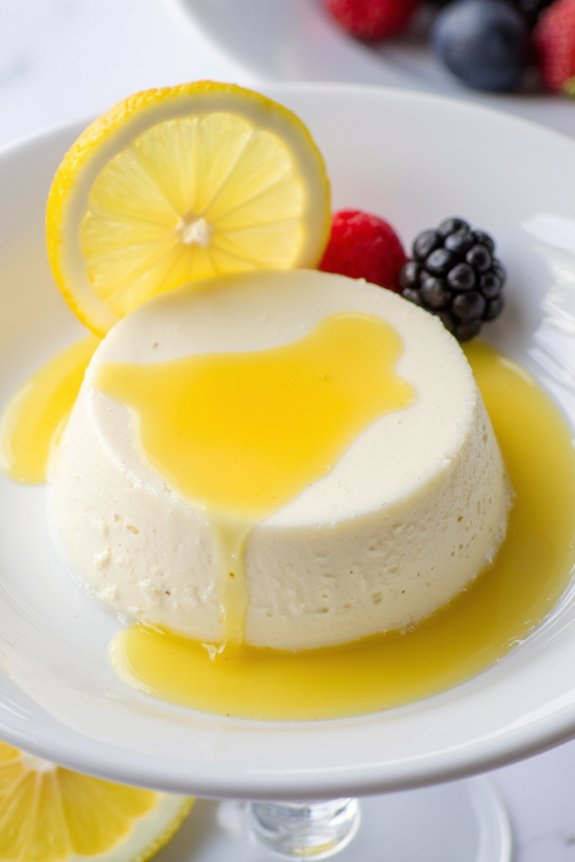
Lemon Panna Cotta is a delightful Italian dessert that brings together the creamy richness of panna cotta with the invigorating zest of lemons. Its silky, smooth texture paired with the tangy citrus flavor makes it a perfect dessert to end any meal on a light and revitalizing note.
This elegant dessert is surprisingly easy to prepare, and it can be made ahead of time, making it an ideal choice for dinner parties or family gatherings.
The key to a successful Lemon Panna Cotta lies in balancing the sweetness with the tartness of the lemon, and making certain the perfect set without being too firm. It’s traditionally served chilled, often garnished with fresh fruit, a drizzle of lemon syrup, or even a sprinkle of candied lemon zest.
With this recipe, you can create a delightful serving for 4-6 people that will surely impress your guests and satisfy your sweet tooth.
Ingredients for 4-6 servings:
- 2 cups heavy cream
- 1 cup whole milk
- 1/2 cup granulated sugar
- 1 tablespoon lemon zest
- 1/4 cup freshly squeezed lemon juice
- 1 teaspoon pure vanilla extract
- 2 1/2 teaspoons unflavored gelatin
- 3 tablespoons cold water
Instructions:
- Prepare the Gelatin: In a small bowl, sprinkle the gelatin over the cold water and let it stand for about 5 minutes until it blooms, meaning it absorbs the water and becomes a jelly-like consistency.
- Heat the Cream Mixture: In a medium saucepan, combine the heavy cream, whole milk, and granulated sugar. Stir over medium heat until the sugar has dissolved and the mixture is just starting to simmer. Don’t let it come to a full boil.
- Incorporate the Flavors: Once the cream mixture is hot, remove it from the heat. Stir in the lemon zest, lemon juice, and vanilla extract. Make certain the mixture is well combined.
- Add the Gelatin: Add the bloomed gelatin to the hot cream mixture. Stir thoroughly until the gelatin has completely dissolved. This step is essential to guarantee a smooth panna cotta.
- Set the Panna Cotta: Pour the mixture into ramekins or dessert glasses. Allow them to cool at room temperature for about 20-30 minutes before covering with plastic wrap and refrigerating for at least 4 hours, or until fully set.
- Serve: Once set, you can serve the panna cotta directly in the ramekins or gently unmold them onto plates. Garnish with lemon slices, fresh berries, or a light drizzle of lemon syrup if desired.
Extra Tips:
For a perfect panna cotta texture, make sure the gelatin is fully dissolved in the cream mixture to avoid any graininess.
If you prefer a more intense lemon flavor, you can increase the amount of lemon zest or juice slightly, but be cautious as too much acidity can affect the setting process.
When serving, allow the panna cotta to sit at room temperature for about 10 minutes to soften slightly—this enhances the creamy texture.
If you plan to unmold the panna cotta, lightly oil the ramekins before pouring in the mixture for easier release.
Lemon and Herb Grilled Fish

Elevate your summer dining experience with a delightful dish that combines the zesty freshness of lemons with the aromatic allure of herbs: Lemon and Herb Grilled Fish. This Italian-inspired recipe brings out the natural flavors of the fish, enhanced by a vibrant marinade. Perfect for a family gathering or a casual dinner party, this dish isn’t only flavorful but also healthy and light, making it a great choice for any occasion.
The key to this dish lies in its simplicity; by using fresh ingredients, you allow the flavors to shine through. Grilling the fish adds a smoky depth that complements the citrus and herb notes. Whether you’re using a charcoal grill or a stovetop grill pan, the result is a beautifully charred exterior and a tender, flaky interior. Serve it with a side of roasted vegetables or a crisp salad for a complete meal that will transport your taste buds to the Italian coast.
Ingredients for 4-6 servings:
- 4-6 fish fillets (such as cod, halibut, or sea bass)
- 2 lemons, sliced and juiced
- 3 tablespoons olive oil
- 3 cloves garlic, minced
- 2 tablespoons fresh parsley, chopped
- 1 tablespoon fresh thyme, chopped
- 1 tablespoon fresh basil, chopped
- Salt and pepper to taste
- Lemon wedges for serving
Instructions:
- Prepare the Marinade: In a medium bowl, combine the lemon juice, olive oil, minced garlic, chopped parsley, thyme, and basil. Mix well to guarantee all the ingredients are evenly distributed. Season the marinade with salt and pepper to taste.
- Marinate the Fish: Place the fish fillets in a shallow dish or a resealable plastic bag. Pour the marinade over the fish, making sure each fillet is well-coated. Cover the dish with plastic wrap or seal the bag, and refrigerate for at least 30 minutes to allow the flavors to meld.
- Preheat the Grill: While the fish is marinating, preheat your grill to medium-high heat. If using a stovetop grill pan, heat it over medium-high heat until hot.
- Grill the Fish: Remove the fish from the marinade, allowing any excess to drain off. Place the fish on the grill, skin side down if applicable. Grill for about 4-5 minutes per side, depending on the thickness of the fillets, until the fish is opaque and flakes easily with a fork.
- Serve: Once the fish is cooked, transfer it to a serving platter. Garnish with lemon slices and additional chopped herbs if desired. Serve immediately with lemon wedges on the side.
Extra Tips:
For an added layer of flavor, consider adding a pinch of red pepper flakes to the marinade for a subtle hint of spice. If you prefer a more intense lemon flavor, zest one of the lemons before juicing, and add the zest to the marinade.
When grilling, make sure to oil the grill grates or grill pan lightly to prevent the fish from sticking. Always keep a close eye on the fish while grilling to avoid overcooking, as fish can become dry if left too long on the heat.
Lemon Tiramisu

Lemon Tiramisu is a delightful twist on the classic Italian dessert, offering a rejuvenating and zesty alternative that’s perfect for any occasion. This version combines the traditional creamy mascarpone with the tangy brightness of lemons, creating a delicious balance of flavors. The luscious layers of lemon-soaked ladyfingers and lemon-flavored mascarpone cream make each bite a rejuvenating treat, ideal for spring and summer gatherings.
This dessert isn’t only visually appealing but also easy to prepare, making it a favorite among lemon lovers. The key to a successful Lemon Tiramisu is using fresh, high-quality ingredients, particularly fresh lemons for their zest and juice, to guarantee a vibrant and aromatic flavor. With its creamy texture and citrusy notes, this dessert is sure to impress your guests and leave them asking for seconds.
Ingredients for Lemon Tiramisu (Serves 4-6):
- 1 ½ cups heavy cream
- 1 cup mascarpone cheese
- ½ cup granulated sugar
- 1 teaspoon vanilla extract
- Zest of 2 lemons
- Juice of 2 lemons
- 1 cup lemon curd
- 1 cup hot water
- 3 tablespoons limoncello (optional)
- 24 ladyfingers
- Powdered sugar, for dusting
- Lemon slices and mint leaves, for garnish
Cooking Instructions:
- Prepare the Cream Mixture: In a large mixing bowl, combine the heavy cream, mascarpone cheese, granulated sugar, and vanilla extract. Use an electric mixer to beat the mixture until it becomes smooth and forms stiff peaks. Gently fold in the lemon zest and half of the lemon juice, making sure everything is well incorporated.
- Make the Lemon Soak: In a separate shallow dish, mix the remaining lemon juice, hot water, and limoncello (if using). Stir well to combine. This mixture will be used to soak the ladyfingers and infuse them with a citrusy flavor.
- Assemble the Tiramisu: Quickly dip each ladyfinger into the lemon soak, ensuring they’re moist but not soggy. Line the bottom of a 9×9-inch dish with a layer of soaked ladyfingers. Spread half of the mascarpone mixture over the ladyfingers, ensuring an even layer. Then, spread a layer of lemon curd over the mascarpone.
- Repeat Layers: Add another layer of soaked ladyfingers on top of the lemon curd. Spread the remaining mascarpone mixture over the second layer of ladyfingers, followed by another layer of lemon curd.
- Chill the Tiramisu: Cover the dish with plastic wrap and refrigerate for at least 4 hours, or overnight if possible. This allows the flavors to meld and the tiramisu to set properly.
- Serve: Before serving, dust the top of the tiramisu with powdered sugar. Garnish with lemon slices and mint leaves for an added touch of rejuvenation and visual appeal.
Extra Tips:
For the best results, use fresh lemons to achieve a more vibrant and authentic lemon flavor. When dipping the ladyfingers in the lemon soak, be careful not to oversaturate them, as this can lead to a soggy texture. If you prefer a non-alcoholic version, simply omit the limoncello; the dessert will still be deliciously lemony.
Preparing the tiramisu a day in advance enhances the flavors, making it a perfect make-ahead dessert for entertaining.
Lemon Arancini

Lemon Arancini combines the zesty brightness of lemons with the comforting, crispy texture of classic arancini. Originating from Sicily, arancini are traditionally made with risotto rice, filled with a variety of ingredients, and then deep-fried to a golden perfection. In this lemon-infused rendition, the citrus flavor enhances the richness of the rice, creating a balance that’s both invigorating and indulgent.
These delicious bite-sized balls can be served as an appetizer or enjoyed as a main course with a light salad. To make Lemon Arancini, you’ll need to prepare a flavorful lemon risotto, allow it to cool, and then shape it into balls, which are filled with a surprise of mozzarella cheese before being coated in breadcrumbs and fried until crispy. This recipe serves 4-6 people, making it perfect for a family gathering or a small dinner party. The combination of creamy risotto, gooey cheese, and a crispy exterior will leave your guests asking for more.
Ingredients:
- 1 1/2 cups Arborio rice
- 4 cups chicken or vegetable broth
- 1 cup dry white wine
- 1 medium onion, finely chopped
- 2 cloves garlic, minced
- Zest of 2 lemons
- Juice of 1 lemon
- 1 cup grated Parmesan cheese
- 2 tablespoons butter
- Salt and pepper to taste
- 1 cup all-purpose flour
- 2 large eggs, beaten
- 2 cups breadcrumbs
- 8 oz mozzarella cheese, cut into small cubes
- Vegetable oil for frying
Cooking Instructions:
- Prepare the Risotto: In a large saucepan, melt the butter over medium heat. Add the chopped onion and garlic, sauté until translucent. Pour in the Arborio rice, stirring for about 2 minutes until the rice is lightly toasted.
- Cook the Risotto: Add the white wine to the rice, stirring constantly until the wine is absorbed. Gradually add the broth, one cup at a time, stirring frequently and allowing each addition to be absorbed before adding the next. Continue until the rice is creamy and al dente, about 18-20 minutes.
- Add Flavor: Remove the saucepan from the heat. Stir in the lemon zest, lemon juice, and Parmesan cheese. Season with salt and pepper to taste. Allow the risotto to cool completely.
- Form the Arancini: Once the risotto is cooled, take a small handful of risotto and flatten it in your palm. Place a cube of mozzarella in the center and shape the risotto around it to form a ball. Repeat until all the risotto is used.
- Coat the Arancini: Place the flour, beaten eggs, and breadcrumbs in separate shallow bowls. Roll each risotto ball in flour, dip in the egg, and then coat with breadcrumbs. Confirm each ball is evenly covered.
- Fry the Arancini: Heat vegetable oil in a large pot or deep fryer to 350°F (175°C). Fry the arancini in batches, turning occasionally, until golden brown and heated through, about 4-5 minutes per batch. Remove with a slotted spoon and drain on paper towels.
Extra Tips:
When preparing Lemon Arancini, it’s important to verify the risotto is fully cooled before forming the balls, as this helps them maintain their shape during frying. If the risotto seems too loose, you can refrigerate it for a short period to make handling easier.
Additionally, using a high smoke point oil like vegetable oil is essential for achieving that perfect crispy exterior without burning. Serve the arancini with a side of marinara sauce or a simple aioli for dipping to enhance the flavors further. Enjoy your delightful Lemon Arancini as a memorable Italian treat.
Lemon and Olive Oil Cake

This Lemon and Olive Oil Cake is a delightful Italian treat that combines the zesty freshness of lemons with the rich, fruity flavor of olive oil. Perfect for a light dessert or even a breakfast treat, this cake boasts a moist and tender crumb that’s sure to impress. The use of olive oil instead of butter not only makes it a healthier alternative but also imparts a unique flavor that pairs excellently with the tanginess of the lemons.
Whether you’re serving it plain or with a dusting of powdered sugar, this cake is destined to be a hit for any occasion. Originating from the sunny Mediterranean region, this cake is a celebration of simplicity and high-quality ingredients. The inclusion of fresh lemon zest and juice guarantees that every bite is bursting with citrusy goodness, while the olive oil keeps it incredibly moist.
It’s a straightforward recipe that requires minimal effort and equipment, making it perfect for both novice and experienced bakers. Serve it with a dollop of whipped cream or a scoop of vanilla gelato for an extra special touch.
Ingredients for 4-6 servings:
- 1 1/2 cups all-purpose flour
- 1 cup granulated sugar
- 1/2 teaspoon baking powder
- 1/2 teaspoon baking soda
- 1/4 teaspoon salt
- 3 large eggs
- 1/2 cup extra virgin olive oil
- 1/2 cup whole milk
- 1/4 cup freshly squeezed lemon juice
- 2 tablespoons lemon zest
- 1 teaspoon vanilla extract
- Powdered sugar for dusting (optional)
Cooking Instructions:
- Preheat the Oven: Begin by preheating your oven to 350°F (175°C). Grease and flour a 9-inch round cake pan, making sure it’s well-coated to prevent sticking.
- Mix Dry Ingredients: In a medium-sized bowl, combine the flour, sugar, baking powder, baking soda, and salt. Whisk these dry ingredients together until they’re thoroughly mixed.
- Combine Wet Ingredients: In a separate large bowl, beat the eggs using a whisk or an electric mixer until they’re light and frothy. Gradually add in the olive oil, followed by the milk, lemon juice, lemon zest, and vanilla extract. Mix until all wet ingredients are well combined.
- Incorporate Dry Ingredients: Slowly add the dry ingredient mixture into the bowl with the wet ingredients, folding them in gently with a spatula or mixing on low speed until just combined. Be careful not to overmix, as this can result in a dense cake.
- Bake the Cake: Pour the batter into the prepared cake pan, smoothing the top with a spatula. Place the pan in the preheated oven and bake for 30-35 minutes, or until a toothpick inserted into the center of the cake comes out clean.
- Cool and Serve: Once baked, remove the cake from the oven and let it cool in the pan for about 10 minutes. Then, gently remove it from the pan and allow it to cool completely on a wire rack. Dust with powdered sugar before serving, if desired.
Extra Tips:
For an extra burst of lemon flavor, consider adding a bit more lemon zest to the batter. You can also experiment with different types of olive oil to find one that suits your taste preference, whether it’s a milder or more robust flavor.
Be sure to use fresh lemons for the juice and zest, as they offer a much more vibrant taste compared to bottled lemon juice. If you want to add a decorative touch, consider garnishing the cake with thin slices of lemon or fresh berries. This cake also pairs beautifully with a cup of tea or coffee, making it a versatile choice for any time of day.
Lemon Caprese Salad
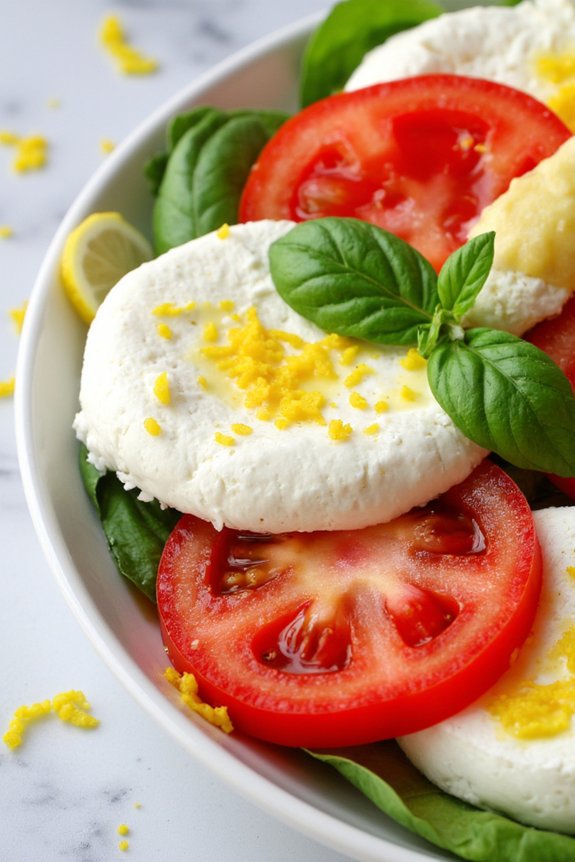
Lemon Caprese Salad is a revitalizing twist on the classic Italian dish, incorporating the zesty brightness of lemons to elevate the traditional flavors of tomatoes, mozzarella, and basil. This salad is perfect for a light lunch or as an impressive side dish at any gathering. The combination of fresh ingredients and the tangy lemon dressing creates a delightful balance that’s both simple and elegant. The vibrant colors and the fragrant aroma of this dish make it a feast for the senses.
This recipe serves 4-6 people and is ideal for any occasion where you want to showcase the freshness of seasonal produce. The key to a successful Lemon Caprese Salad lies in using high-quality ingredients—ripe tomatoes, creamy mozzarella, and fragrant basil leaves. The lemon dressing adds a unique twist that harmonizes beautifully with the other elements, making it a standout dish that will impress your guests and delight your taste buds.
Ingredients:
- 4 large ripe tomatoes
- 1 pound fresh mozzarella cheese
- 1 cup fresh basil leaves
- Zest of 1 lemon
- Juice of 2 lemons
- 1/4 cup extra-virgin olive oil
- Salt and freshly ground black pepper to taste
- Optional: Balsamic glaze for drizzling
Cooking Instructions:
- Prepare the Ingredients: Begin by washing the tomatoes and basil leaves thoroughly. Slice the tomatoes and mozzarella cheese into even slices, about 1/4 inch thick, to guarantee consistent texture and flavor throughout the salad.
- Arrange the Salad: On a large serving platter, alternate layers of tomato and mozzarella slices, slightly overlapping each one. Tuck fresh basil leaves between the layers for added flavor and a pop of color.
- Make the Dressing: In a small bowl, whisk together the lemon zest, lemon juice, and olive oil until well-blended. Season the dressing with salt and freshly ground black pepper to taste.
- Dress the Salad: Drizzle the lemon dressing evenly over the arranged tomatoes, mozzarella, and basil. Be sure to dress the salad just before serving to keep the ingredients fresh.
- Optional Garnish: For an extra touch of sweetness and complexity, drizzle a balsamic glaze over the top of the salad before serving.
Extra Tips:
When making Lemon Caprese Salad, choose tomatoes that are in season and full of flavor—heirloom tomatoes work beautifully for their exceptional taste and color variety.
For the mozzarella, buffalo mozzarella is recommended for its rich, creamy texture. If you prefer a hint of sweetness, the balsamic glaze is a great addition, but it’s entirely optional.
Finally, make sure to serve the salad at room temperature for the best flavors, and consider pairing it with a light, crisp white wine to complement the citrusy notes of the lemon dressing.
Lemon and Artichoke Pasta
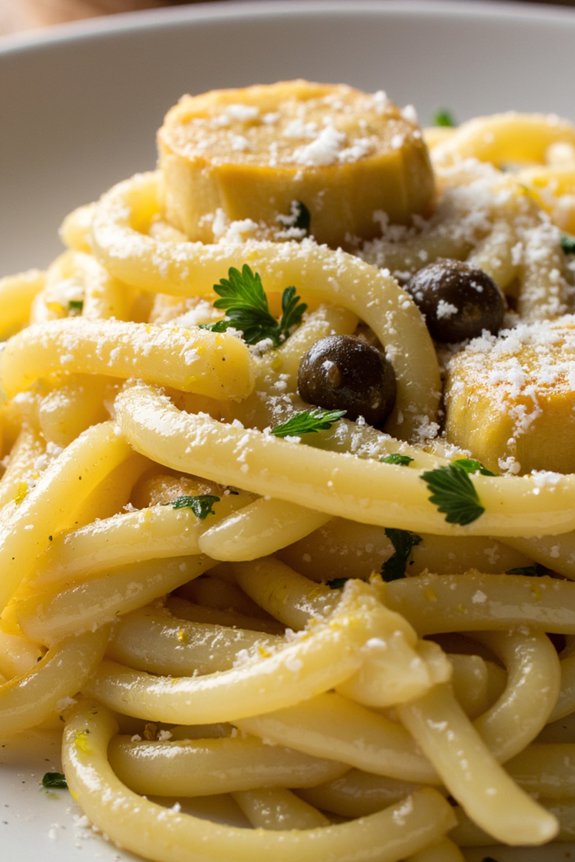
Lemon and Artichoke Pasta is a delightful Italian-inspired dish that combines the invigorating zest of lemons with the earthy flavor of artichokes. This pasta dish is perfect for a light yet satisfying meal, offering a burst of citrus in every bite balanced by the rich flavors of garlic and Parmesan cheese.
The simplicity of the ingredients allows the fresh flavors to shine through, making it an ideal choice for a quick weeknight dinner or a leisurely lunch.
This recipe serves 4-6 people and is perfect for those who appreciate the harmonious blend of tangy and savory. Lemon and Artichoke Pasta not only satisfies your taste buds but also transports you to the sunny landscapes of Italy with its vibrant and aromatic profile.
Whether you’re a seasoned chef or a novice in the kitchen, this recipe is easy to follow and guarantees a delicious outcome every time.
Ingredients:
- 12 oz (340 g) of your favorite pasta (such as fettuccine or spaghetti)
- 1 (14 oz) can of artichoke hearts, drained and quartered
- 3 tablespoons olive oil
- 3 cloves garlic, finely minced
- Zest of 2 lemons
- Juice of 2 lemons
- 1/2 cup (120 ml) white wine (optional)
- 1/2 cup (120 ml) vegetable or chicken broth
- Salt and freshly ground black pepper, to taste
- 1/2 cup (50 g) freshly grated Parmesan cheese
- 2 tablespoons capers, drained
- 1/4 cup fresh parsley, chopped
- Extra lemon wedges for serving
Instructions:
- Cook the Pasta: Begin by boiling a large pot of salted water. Add the pasta and cook according to the package instructions until al dente. Reserve 1 cup of pasta water, then drain the rest and set the pasta aside.
- Prepare the Sauce: In a large skillet over medium heat, add the olive oil and minced garlic. Sauté for about 1-2 minutes until the garlic is fragrant, being careful not to burn it.
- Add the Artichokes: Stir in the drained and quartered artichoke hearts, cooking for another 2-3 minutes until they’re warmed through and slightly golden.
- Incorporate the Lemon and Wine: Add the lemon zest and juice to the skillet, followed by the white wine (if using) and broth. Allow the mixture to simmer for 4-5 minutes, letting the flavors meld together and slightly reduce.
- Combine with Pasta: Add the cooked pasta to the skillet, tossing it with the sauce to guarantee it’s evenly coated. If the pasta seems dry, gradually add some reserved pasta water until you reach the desired consistency.
- Season and Serve: Season the pasta with salt and freshly ground black pepper to taste. Stir in the Parmesan cheese, capers, and fresh parsley. Serve immediately with extra lemon wedges on the side for those who like an additional citrus kick.
Extra Tips:
To enhance the flavors of this dish, consider using freshly squeezed lemon juice and freshly grated Parmesan cheese, as these will provide a more vibrant taste compared to pre-packaged alternatives.
If you prefer a bit of heat, you can add a pinch of red pepper flakes when sautéing the garlic.
Also, while the white wine is optional, it adds a lovely depth to the sauce, so use it if you can.
Finally, if you’re a fan of more vegetables, tossing in some baby spinach or cherry tomatoes during the sauce preparation can offer additional flavors and textures.
Lemon Biscotti
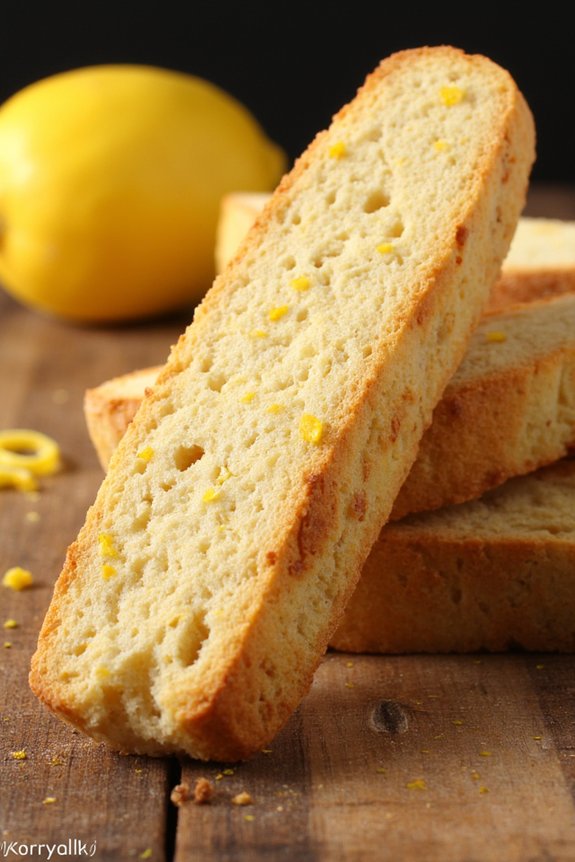
Lemon biscotti is a delightful Italian treat that combines the tangy zest of lemon with the satisfying crunch of twice-baked cookies. Perfect for dipping in a warm cup of tea or coffee, these lemon biscotti are a wonderful addition to any dessert table. With their bright lemon flavor and crisp texture, they offer an invigorating change from the usual sweet snacks. The recipe is simple to follow and results in around 20-24 biscotti, making it suitable for 4-6 people to enjoy.
These biscotti are characterized by their unique baking process, which involves baking the dough twice to achieve their signature crispness. The first bake allows the dough to cook through, while the second bake gives the biscotti their crunchy texture. The addition of lemon zest and juice infuses the biscotti with a vibrant citrus flavor, which is perfectly balanced with a hint of vanilla. This recipe is sure to become a favorite, especially for those who love citrus desserts.
Ingredients (Serves 4-6):
- 2 1/2 cups all-purpose flour
- 1 cup granulated sugar
- 1 teaspoon baking powder
- 1/2 teaspoon salt
- 1 tablespoon lemon zest (from about 2 lemons)
- 2 large eggs
- 1/4 cup fresh lemon juice
- 1/4 cup unsalted butter, melted and slightly cooled
- 1 teaspoon vanilla extract
Cooking Instructions:
- Preheat and Prepare: Preheat your oven to 350°F (175°C). Line a baking sheet with parchment paper or a silicone baking mat to prevent sticking.
- Mix Dry Ingredients: In a large mixing bowl, combine the all-purpose flour, granulated sugar, baking powder, and salt. Stir in the lemon zest to evenly distribute the citrus flavor.
- Combine Wet Ingredients: In a separate bowl, whisk together the eggs, fresh lemon juice, melted butter, and vanilla extract until well blended.
- Form the Dough: Gradually add the wet ingredients to the dry ingredients, stirring with a wooden spoon or spatula until the dough comes together. It should be slightly sticky yet manageable.
- Shape the Logs: Divide the dough in half and transfer each portion to the prepared baking sheet. Shape each into a log about 10 inches long and 2 inches wide, leaving space between the logs for expansion.
- First Bake: Bake the logs in the preheated oven for 25-30 minutes, or until they’re lightly golden and firm to the touch. Remove from the oven and let them cool on the baking sheet for about 10 minutes.
- Slice the Biscotti: Carefully transfer the logs to a cutting board. Using a serrated knife, slice them diagonally into 1/2-inch thick slices.
- Second Bake: Arrange the slices cut side down on the baking sheet. Return them to the oven and bake for an additional 10-12 minutes. Flip the biscotti over and bake for another 10-12 minutes, or until crisp and golden.
- Cool and Serve: Allow the biscotti to cool completely on a wire rack. Once cooled, serve them with your favorite beverage.
Extra Tips:
For the best lemon flavor, make sure to use freshly grated lemon zest and freshly squeezed lemon juice. When shaping the logs, dampen your hands slightly with water to prevent the dough from sticking.
Keep an eye on the biscotti during the second bake to avoid over-browning. For added flavor, consider drizzling the cooled biscotti with a simple lemon glaze made from powdered sugar and lemon juice. Enjoy your lemon biscotti as a delightful treat any time of the day!
Lemon Curd Tart

Lemon Curd Tart is a delightful dessert that perfectly captures the vibrant essence of Italian lemons. This tart features a crisp, buttery crust that beautifully complements the smooth and tangy lemon curd filling. Ideal for any occasion, this tart is a revitalizing treat that showcases the versatility and bright flavor of lemons in Italian cuisine.
Whether you’re serving it as a sweet finale to a dinner party or as an indulgent afternoon treat, this Lemon Curd Tart is sure to impress with its balance of textures and flavors.
The key to a successful Lemon Curd Tart lies in the quality of the lemons and the precision in making the lemon curd. Using fresh, ripe lemons will enhance the zingy citrus notes, making the tart both delicious and fragrant. The crust should be flaky and tender, providing a firm base for the silky lemon curd.
Patience and attention to detail are essential in preparing each component of this dessert, guaranteeing that the final result is both aesthetically pleasing and a delight to the palate.
Ingredients for 4-6 servings:
- 1 1/2 cups all-purpose flour
- 1/2 cup unsalted butter, chilled and cubed
- 1/4 cup granulated sugar
- 1/4 teaspoon salt
- 1 egg yolk
- 2-3 tablespoons ice water
- 1 cup granulated sugar (for curd)
- 1/2 cup freshly squeezed lemon juice
- Zest of 2 lemons
- 4 large eggs
- 1/2 cup unsalted butter, cubed (for curd)
Instructions:
1. Prepare the Tart Crust: In a large mixing bowl, combine the flour, sugar, and salt. Add the chilled, cubed butter and use a pastry cutter or your fingers to blend until the mixture resembles coarse crumbs.
Add the egg yolk and 2 tablespoons of ice water. Mix until the dough begins to come together, adding an additional tablespoon of water if needed. Form the dough into a disk, wrap it in plastic, and chill for at least 30 minutes.
2. Roll Out the Dough: Preheat the oven to 375°F (190°C). On a lightly floured surface, roll the chilled dough into a circle about 1/8-inch thick. Carefully transfer the dough to a 9-inch tart pan with a removable bottom.
Gently press the dough into the edges and trim any excess. Prick the bottom with a fork and line with parchment paper, filling with pie weights or dried beans. Bake for 15 minutes, remove weights and parchment, and bake for an additional 10 minutes until golden. Let it cool completely.
3. Make the Lemon Curd: In a medium saucepan, whisk together the sugar, lemon juice, lemon zest, and eggs. Cook over medium heat, stirring constantly, until the mixture thickens, about 7-10 minutes.
Remove from heat and whisk in the butter, one piece at a time, until smooth. Strain the curd through a fine mesh sieve to remove any cooked egg bits and zest.
4. Assemble the Tart: Pour the lemon curd into the cooled tart crust, spreading it evenly with a spatula. Place the tart in the refrigerator for at least 2 hours or until the curd is set.
5. Serve: Once set, remove the tart from the fridge. Carefully remove the tart from the pan and transfer it to a serving dish. Slice and serve chilled or at room temperature.
Extra Tips:
When making the lemon curd, it’s vital to keep the heat moderate to prevent the eggs from scrambling. Constant stirring and a watchful eye will guarantee a smooth, creamy curd.
Additionally, don’t skip straining the curd; this step guarantees a silky texture free of lumps. For a festive touch, consider garnishing the tart with fresh berries or a dusting of powdered sugar just before serving.
Finally, this tart can be made a day in advance, allowing the flavors to meld and making it a convenient dessert option for gatherings.