

As the leaves start to change and the air grows crisp, my kitchen becomes a cozy haven for seasonal Italian recipes. There’s nothing like whipping up a creamy Butternut Squash Risotto or a hearty Mushroom and Sausage Lasagna to capture the essence of fall. These dishes feel just like a warm hug from Nonna, filled with the flavors of the season. Are you ready to explore these delicious autumn creations together? Let’s get started!
Butternut Squash Risotto

As the leaves begin to turn and the air grows crisp, there’s nothing more comforting than a warm, creamy bowl of risotto. Butternut squash risotto is a quintessential Italian fall dish, celebrating the rich flavors of the season. The natural sweetness of butternut squash pairs beautifully with the creamy texture of Arborio rice, creating a dish that’s both hearty and satisfying.
The golden hue of the squash also adds a touch of autumnal color to your table, making it perfect for any cozy gathering or simply a comforting family meal. This recipe balances the sweetness of the squash with savory elements like Parmesan cheese and fresh herbs, guaranteeing a well-rounded flavor profile.
Caramelizing the squash enhances its sweetness, and the addition of white wine adds a subtle acidity that lifts the dish. This risotto isn’t only delicious but also a wonderful way to enjoy seasonal produce in a comforting and elegant manner.
Ingredients for 4-6 servings:
- 1 medium butternut squash, peeled and diced
- 1 tablespoon olive oil
- Salt and pepper to taste
- 4 cups chicken or vegetable broth
- 2 tablespoons butter
- 1 small onion, finely chopped
- 2 cloves garlic, minced
- 1 ½ cups Arborio rice
- ½ cup dry white wine
- ½ cup grated Parmesan cheese
- 2 tablespoons chopped fresh sage or thyme
- 2 tablespoons mascarpone cheese (optional)
- Freshly ground black pepper
Instructions:
- Prepare the Butternut Squash: Preheat your oven to 400°F (200°C). Toss the diced butternut squash with olive oil, salt, and pepper. Spread it evenly on a baking sheet and roast in the oven for 20-25 minutes, or until the squash is tender and caramelized. Set aside.
- Heat the Broth: In a medium saucepan, bring the chicken or vegetable broth to a gentle simmer over low heat. Keep it warm throughout the cooking process.
- Sauté Aromatics: In a large skillet or saucepan, melt the butter over medium heat. Add the chopped onion and cook until translucent, about 5 minutes. Stir in the minced garlic and cook for another minute until fragrant.
- Cook the Rice: Add the Arborio rice to the skillet and stir to coat the grains with the butter and onion mixture. Cook for about 2 minutes until the rice is slightly translucent around the edges.
- Deglaze with Wine: Pour in the white wine and stir continuously until the wine is absorbed by the rice.
- Add Broth Gradually: Begin adding the warm broth to the rice, one ladleful at a time, stirring frequently. Allow each addition of broth to be absorbed before adding the next. Continue this process until the rice is creamy and tender, about 18-20 minutes.
- Incorporate Squash and Cheese: Once the rice is cooked, gently fold in the roasted butternut squash. Stir in the Parmesan cheese, fresh sage or thyme, and mascarpone cheese (if using) until well combined. Season with freshly ground black pepper to taste.
- Serve Immediately: Serve the risotto hot, garnished with extra Parmesan and herbs if desired.
Extra Tips:
For the best results, use Arborio rice as it has a high starch content that contributes to the creamy texture of the risotto. Be patient with the broth addition process; adding it gradually and stirring frequently guarantees a smooth and creamy consistency.
If you don’t have white wine, you can substitute with a bit more broth. To add more depth, consider using homemade broth. Finally, if you prefer a bit more texture, reserve a few pieces of roasted squash as a garnish before stirring the rest into the risotto.
Mushroom and Sausage Lasagna
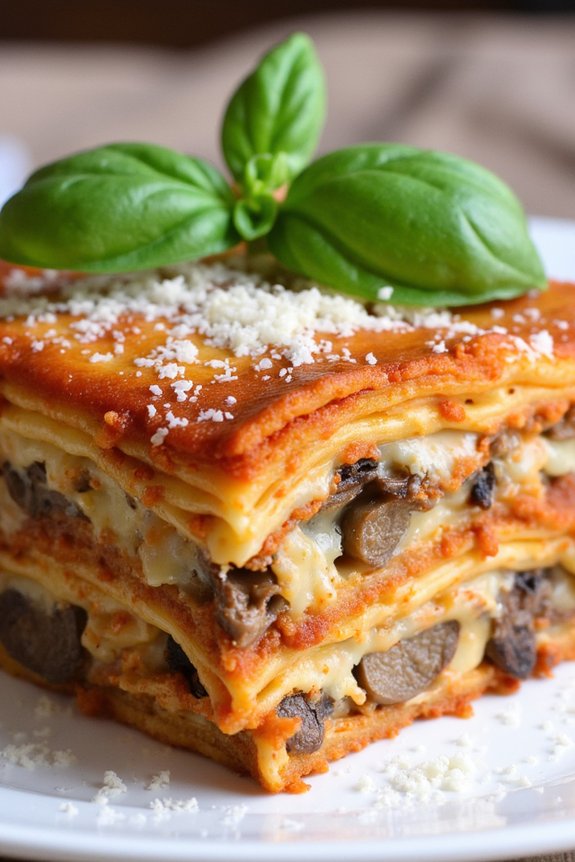
Mushroom and Sausage Lasagna is the perfect dish to warm up your autumn evenings with its rich flavors and comforting layers. This Italian classic takes on a fall twist by incorporating earthy mushrooms that pair beautifully with the savory sausage. The combination of creamy béchamel sauce, tangy tomato sauce, and melted cheese creates a mouthwatering experience in every bite. Ideal for family dinners or gatherings, this lasagna will surely become a seasonal favorite.
The preparation of Mushroom and Sausage Lasagna involves creating various layers of pasta, sauce, and filling. The dish is built by carefully layering cooked lasagna noodles with a flavorful mixture of mushrooms and sausage, and then smothering it with béchamel and tomato sauces. This recipe serves 4-6 people, making it perfect for a cozy dinner or for leftovers to enjoy throughout the week. Let’s explore the ingredients and steps necessary to create this delectable dish.
Ingredients (serves 4-6):
- 12 lasagna noodles
- 1 pound Italian sausage, casings removed
- 1 pound mushrooms, sliced
- 1 onion, chopped
- 3 cloves garlic, minced
- 2 cups tomato sauce
- 2 cups béchamel sauce
- 2 cups shredded mozzarella cheese
- 1 cup grated Parmesan cheese
- 1 tablespoon olive oil
- Salt and pepper to taste
- Fresh basil leaves for garnish
Instructions:
- Prepare the ingredients: Begin by bringing a large pot of salted water to a boil. Cook the lasagna noodles according to package instructions until al dente. Drain and set aside.
- Cook the sausage and mushrooms: In a large skillet, heat the olive oil over medium heat. Add the sausage and cook, breaking it up with a spoon, until browned. Remove the sausage from the pan and set aside. In the same skillet, add the onions and garlic, sautéing until the onions are translucent. Add the mushrooms and cook until they’re softened and any liquid released has evaporated. Season with salt and pepper, then mix the mushrooms with the cooked sausage.
- Assemble the lasagna: Preheat your oven to 375°F (190°C). In a 9×13 inch baking dish, spread a thin layer of tomato sauce on the bottom. Place a layer of lasagna noodles over the sauce. Top with half of the sausage and mushroom mixture, then spoon over some béchamel sauce and sprinkle with mozzarella cheese. Repeat the layers, finishing with a layer of noodles topped with tomato sauce, béchamel sauce, and both mozzarella and Parmesan cheese.
- Bake the lasagna: Cover the dish with aluminum foil and bake in the preheated oven for 25 minutes. Remove the foil and bake for an additional 15 minutes, or until the cheese is bubbly and golden brown. Let it cool for 10 minutes before serving.
Extra Tips: For an extra depth of flavor, consider adding a splash of white wine to the mushroom and sausage mixture as it cooks. This will enhance the savory notes of the dish. If you prefer a vegetarian version, you can substitute the sausage with additional mushrooms or a plant-based sausage alternative.
Finally, garnishing the lasagna with fresh basil leaves right before serving will add a bright, fresh contrast to the rich and creamy layers. Enjoy this comforting dish with a side of garlic bread or a simple green salad.
Pumpkin Gnocchi With Sage Butter

Pumpkin Gnocchi With Sage Butter is a quintessential Italian fall recipe that brings together the earthy sweetness of pumpkin and the aromatic richness of sage. This dish is perfect for a cozy dinner on a crisp autumn evening. The gnocchi, soft and pillowy, are made from a blend of pumpkin purée and flour, creating a delightful taste that captures the essence of the season.
Paired with a sage-infused butter sauce, this meal offers a beautiful harmony of flavors that are both comforting and sophisticated.
Crafting Pumpkin Gnocchi With Sage Butter from scratch may seem challenging, but it’s a rewarding culinary endeavor. The process involves making the gnocchi dough, shaping the gnocchi, and then gently cooking them to perfection. The dish is finished with a simple yet flavorful sage butter sauce that elevates the gnocchi’s taste without overpowering it.
This recipe serves 4-6 people, making it an ideal choice for a family meal or a small gathering with friends.
Ingredients:
- 2 cups pumpkin purée
- 2 cups all-purpose flour
- 1 egg
- 1 teaspoon salt
- 1/2 teaspoon nutmeg
- 1/2 cup unsalted butter
- 12 fresh sage leaves
- Salt and pepper to taste
- Grated Parmesan cheese (for serving)
Cooking Instructions:
- Prepare the Dough: In a large bowl, combine the pumpkin purée, egg, salt, and nutmeg. Gradually add the flour, mixing continuously until a dough forms. The dough should be soft but not sticky. If necessary, add more flour, one tablespoon at a time.
- Shape the Gnocchi: Transfer the dough to a floured surface. Divide it into four equal parts. Roll each part into a long rope, about 1/2 inch in diameter. Cut the ropes into 1-inch pieces. Optionally, you can use a fork to press lightly on each piece to create ridges.
- Cook the Gnocchi: Bring a large pot of salted water to a boil. Add the gnocchi in batches, making sure not to overcrowd the pot. Cook until they float to the surface, about 2-3 minutes. Use a slotted spoon to transfer them to a plate.
- Prepare the Sage Butter: In a large skillet, melt the butter over medium heat. Add the sage leaves and cook until the butter starts to brown and the sage becomes crispy, about 3-4 minutes. Remove from heat and season with salt and pepper.
- Combine and Serve: Add the cooked gnocchi to the skillet with the sage butter. Gently toss to coat the gnocchi evenly. Serve immediately, garnished with grated Parmesan cheese.
Extra Tips:
When making the gnocchi dough, it’s essential to avoid overworking it, as this can make the gnocchi tough. The dough should be soft but manageable. If you’re unsure about the dough’s texture, test-cook a small piece of gnocchi to see if it holds together well in boiling water.
Additionally, make sure the butter doesn’t burn when making the sage butter sauce, as burnt butter can impart a bitter taste. Keep an eye on the butter’s color and remove it from the heat as soon as it turns golden brown.
Tuscan White Bean Soup
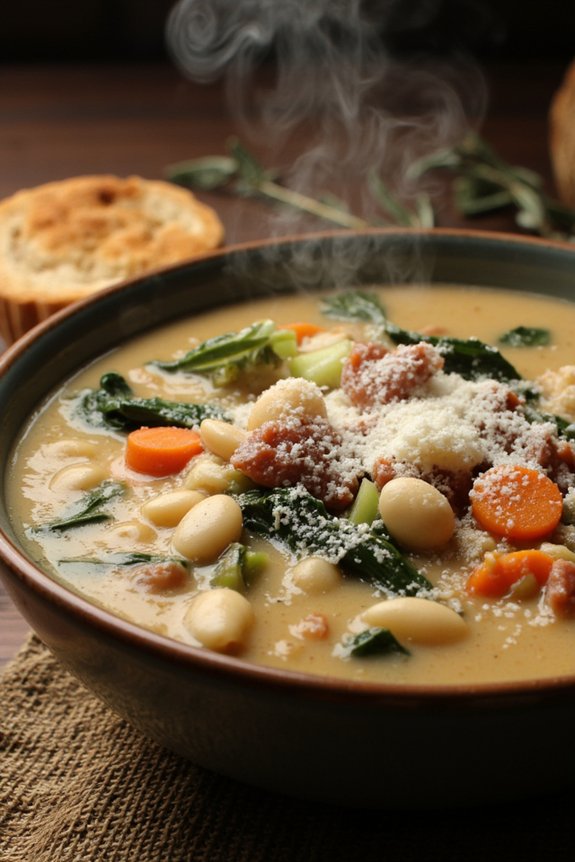
Tuscan White Bean Soup is a classic Italian dish that’s perfect for the fall season. This hearty and flavorful soup is a staple in Tuscan cuisine and is known for its simplicity and rustic charm. The creamy texture of the white beans, combined with aromatic herbs and vegetables, creates a comforting and satisfying meal that warms the soul. Traditionally served with crusty bread, this soup is an excellent way to enjoy the bounty of the autumn harvest.
This recipe is designed to serve 4-6 people and can be easily adjusted to accommodate more or fewer servings. The key to a great Tuscan White Bean Soup is starting with high-quality ingredients. Dried cannellini beans are preferred for their rich, creamy texture, but canned beans can be used for convenience. Fresh herbs like rosemary and sage add an authentic Tuscan flavor, while a touch of pancetta or bacon adds depth and richness to the broth.
Ingredients:
- 1 pound dried cannellini beans (or 3 cans of canned cannellini beans, drained and rinsed)
- 2 tablespoons olive oil
- 1 onion, diced
- 2 carrots, diced
- 2 celery stalks, diced
- 3 garlic cloves, minced
- 4 ounces pancetta or bacon, diced
- 1 tablespoon tomato paste
- 1 teaspoon fresh rosemary, chopped
- 1 teaspoon fresh sage, chopped
- 6 cups chicken or vegetable broth
- Salt and pepper, to taste
- 2 cups kale or spinach, chopped
- 1 tablespoon balsamic vinegar
- Grated Parmesan cheese, for serving
- Crusty bread, for serving
Instructions:
- Prepare the Beans: If using dried beans, place them in a large bowl and cover with water. Soak overnight, then drain and rinse. If using canned beans, simply drain and rinse them.
- Sauté the Aromatics: In a large pot or Dutch oven, heat olive oil over medium heat. Add the diced pancetta or bacon and cook until crispy. Remove and set aside, leaving the rendered fat in the pot.
- Cook the Vegetables: Add the onion, carrots, and celery to the pot. Sauté for about 5 minutes until the vegetables are softened. Stir in the garlic, rosemary, and sage, cooking for an additional 2 minutes until fragrant.
- Add Tomato Paste and Beans: Stir in the tomato paste, cooking it for about a minute. Add the soaked (or canned) beans to the pot, tossing them with the aromatic mixture.
- Simmer the Soup: Pour in the chicken or vegetable broth and bring the soup to a boil. Reduce the heat to low, cover, and let it simmer for 1 to 1.5 hours if using dried beans (30 minutes if using canned beans), until the beans are tender.
- Finish the Soup: Stir in the chopped kale or spinach and the cooked pancetta or bacon. Simmer for an additional 5-10 minutes until the greens are wilted. Stir in the balsamic vinegar and season with salt and pepper to taste.
- Serve: Ladle the soup into bowls and top with grated Parmesan cheese. Serve with slices of crusty bread.
Extra Tips:
For an even creamier texture, you can use an immersion blender to partially blend the soup to your desired consistency before adding the greens.
If you prefer a thicker soup, reduce the amount of broth slightly or simmer it uncovered for a longer time to allow more liquid to evaporate.
To enhance the flavor, consider adding a Parmesan rind to the pot while the soup simmers, removing it before serving.
Additionally, this soup tastes even better the next day, as the flavors continue to meld and develop over time.
Roasted Vegetable Panzanella
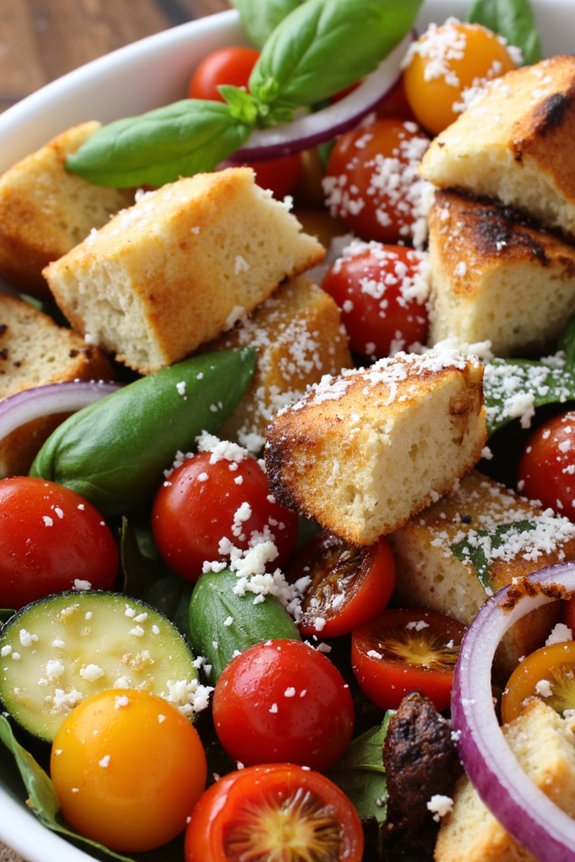
Roasted Vegetable Panzanella is a delightful Italian salad that captures the essence of autumn with its hearty and rustic flavors. This dish is a delicious combination of roasted seasonal vegetables tossed with toasted bread cubes and a tangy vinaigrette. It’s perfect for a cozy fall dinner and makes excellent use of the bountiful harvest of vegetables available at this time of year.
The roasting process enhances the natural sweetness of the vegetables, creating a rich and satisfying salad that’s both comforting and nourishing. Traditionally, Panzanella is a Tuscan salad made with stale bread and tomatoes, but this roasted vegetable version adds a warming twist that’s perfect for cooler months.
The mix of textures from the crunchy bread and tender vegetables, along with the depth of flavors from the garlic and herbs, will make this dish a favorite at your table. It’s an excellent way to utilize leftover bread, and the versatility of the ingredients allows you to customize the salad based on what you have available.
Ingredients for 4-6 servings:
- 1 loaf of day-old bread (preferably rustic or ciabatta)
- 2 cups cherry tomatoes, halved
- 1 red bell pepper, chopped
- 1 yellow bell pepper, chopped
- 1 zucchini, sliced
- 1 red onion, sliced
- 2 cloves garlic, minced
- 1/4 cup olive oil
- 2 tablespoons balsamic vinegar
- 1 tablespoon lemon juice
- Salt and freshly ground black pepper, to taste
- 1/4 cup fresh basil leaves, torn
- 1/4 cup grated Parmesan cheese
Instructions:
- Prepare the Bread: Preheat your oven to 400°F (200°C). Cut the bread into 1-inch cubes and spread them out on a baking sheet. Drizzle with a little olive oil, and toss to coat evenly. Toast in the oven for 10-12 minutes or until the cubes are golden and crispy. Remove from oven and set aside to cool.
- Roast the Vegetables: On a separate baking sheet, spread the cherry tomatoes, bell peppers, zucchini, and red onion. Drizzle with olive oil, sprinkle with salt, pepper, and minced garlic. Toss everything together to guarantee even coating. Roast in the preheated oven for 20-25 minutes, or until the vegetables are tender and slightly caramelized.
- Make the Vinaigrette: In a small bowl, whisk together the balsamic vinegar, lemon juice, and remaining olive oil. Season with salt and pepper to taste.
- Assemble the Salad: In a large salad bowl, combine the toasted bread cubes, roasted vegetables, and torn basil leaves. Drizzle the vinaigrette over the salad and toss well to combine all the ingredients thoroughly.
- Finish the Dish: Sprinkle the grated Parmesan cheese over the top of the salad. Let the salad sit for about 10 minutes before serving to allow the bread to absorb the flavors of the vinaigrette and vegetables.
Extra Tips:
For the best results, use a sturdy, rustic bread that can hold up against the moisture of the vinaigrette and roasted vegetables. If you don’t have day-old bread, you can lightly toast fresh bread to achieve the same texture.
Feel free to experiment with different vegetables, such as butternut squash or eggplant, to suit your taste. For added protein, you can include some chickpeas or grilled chicken. Finally, if you prefer a more robust flavor, add a pinch of red pepper flakes or a few capers to the salad.
Polenta With Wild Mushroom Ragu
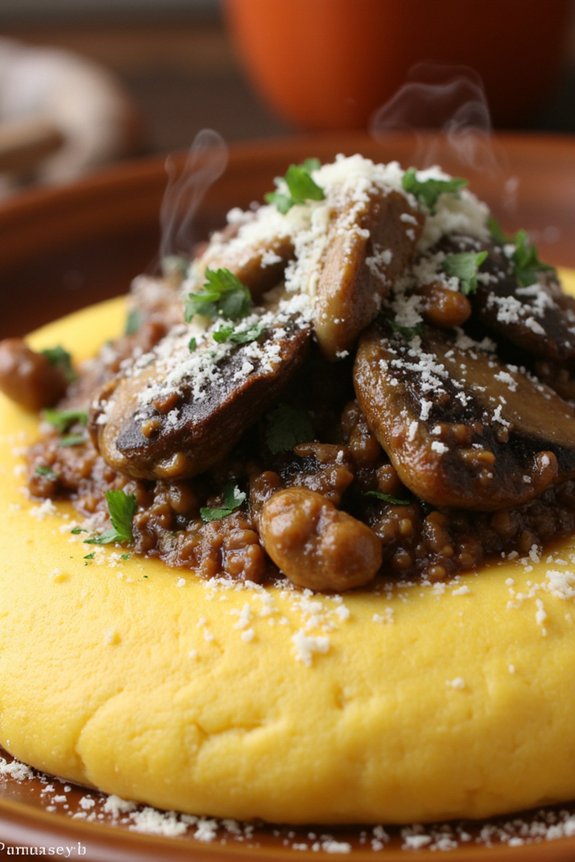
Polenta With Wild Mushroom Ragu is a classic Italian dish that perfectly embodies the flavors of fall. The creamy and comforting texture of polenta provides a delightful contrast to the rich, savory mushroom ragu. This dish isn’t only delicious but also showcases the earthy, robust flavors of wild mushrooms, making it a favorite during the cooler months when mushrooms are in season.
Its simplicity and rustic appeal make it a wonderful choice for both casual family dinners and elegant gatherings.
The key to a perfect Polenta With Wild Mushroom Ragu is using fresh, high-quality ingredients. The polenta should be creamy and smooth, while the ragu should be rich and flavorful, bursting with the umami taste of wild mushrooms. This dish can be easily adapted to suit different dietary preferences, and it can be served as a hearty main course or as a side dish.
Here’s how to make this delicious recipe for 4-6 people.
Ingredients:
- 1 cup of polenta
- 4 cups of water
- 1 tablespoon of salt
- 2 tablespoons of unsalted butter
- 1/2 cup of grated Parmesan cheese
- 2 tablespoons of olive oil
- 1 medium onion, finely chopped
- 3 cloves of garlic, minced
- 1 pound of mixed wild mushrooms, cleaned and sliced
- 1/2 cup of dry white wine
- 1 cup of vegetable or chicken stock
- Salt and pepper, to taste
- 1 teaspoon of fresh thyme leaves
- 1/4 cup of chopped fresh parsley
- Additional Parmesan cheese, for serving
Instructions:
- Prepare the Polenta:
- In a large saucepan, bring 4 cups of water and 1 tablespoon of salt to a boil. Gradually whisk in the polenta. Reduce the heat to low and cook, stirring frequently, until the polenta is thick and creamy, about 30-40 minutes.
- Stir in the butter and Parmesan cheese until fully incorporated. Keep warm and set aside.
- Cook the Mushroom Ragu:
- Heat the olive oil in a large skillet over medium heat. Add the onion and garlic, and sauté until the onion is translucent.
- Add the wild mushrooms to the skillet. Cook for about 5-7 minutes, or until the mushrooms are browned and have released their moisture.
- Pour in the white wine and let it simmer until almost completely evaporated.
- Add the stock, salt, and pepper. Let the mixture simmer for about 10 minutes, allowing the flavors to meld and the ragu to thicken.
- Stir in the thyme and parsley, and adjust seasoning if necessary.
- Assemble the Dish:
- Spoon the polenta onto plates or a serving platter. Top with the mushroom ragu.
- Garnish with additional Parmesan cheese and fresh parsley. Serve immediately.
Extra Tips:
When cooking the polenta, be patient and stir frequently to prevent it from sticking to the bottom of the pan, which can cause burning.
If the polenta becomes too thick, you can thin it out with a bit more water or stock. For the mushroom ragu, feel free to experiment with different types of wild mushrooms, such as chanterelles, porcini, or shiitake, to enhance the flavor profile.
If you prefer a more robust flavor, you can also add a splash of balsamic vinegar or a pinch of red pepper flakes to the ragu. Enjoy your Polenta With Wild Mushroom Ragu with a glass of your favorite Italian wine for a perfect fall meal.
Chestnut and Pancetta Stuffed Pork Loin
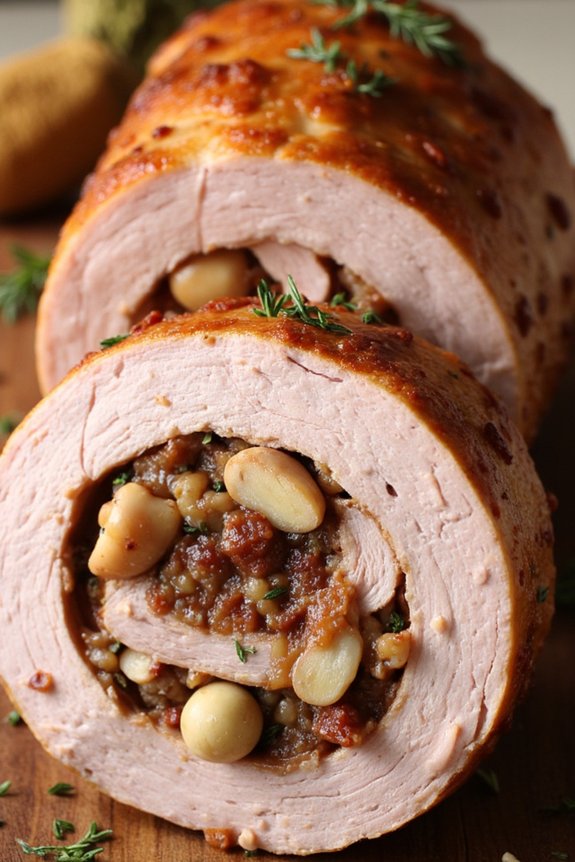
As the leaves turn and the air grows crisp, there’s nothing quite like indulging in a hearty dish that encapsulates the flavors of fall. Chestnut and Pancetta Stuffed Pork Loin is a perfect centerpiece for a cozy autumn meal. The rich, nutty taste of chestnuts combined with the smoky, savory notes of pancetta creates a stuffing that brings out the natural sweetness and juiciness of the pork loin.
This dish isn’t only a feast for the taste buds, but also a visual delight, with its beautifully rolled and roasted presentation. This recipe is ideal for gatherings of 4-6 people, offering a generous serving that invites everyone to enjoy a taste of Italian-inspired comfort. The preparation is straightforward, yet the outcome is impressive enough to wow your guests at any dinner party or family gathering.
By following the steps provided, you’ll master the technique of rolling and roasting a stuffed pork loin, creating a dish that’s sure to become a staple in your fall recipe repertoire.
Ingredients (Serves 4-6):
- 2 1/2 to 3-pound pork loin
- 1 cup chestnuts, cooked and peeled
- 4 ounces pancetta, diced
- 1 small onion, finely chopped
- 2 cloves garlic, minced
- 1/2 cup breadcrumbs
- 1/4 cup fresh parsley, chopped
- 1 tablespoon fresh thyme leaves
- 1/2 cup chicken broth
- 2 tablespoons olive oil
- Salt and pepper to taste
- Kitchen twine
Instructions:
- Prepare the Stuffing: Begin by heating a tablespoon of olive oil in a skillet over medium heat. Add the diced pancetta and cook until crispy. Remove the pancetta and set aside, leaving the rendered fat in the skillet. Add the chopped onion and minced garlic to the skillet, sautéing until they become translucent and fragrant.
- Combine Ingredients: In a large mixing bowl, combine the cooked pancetta, sautéed onion and garlic, chestnuts, breadcrumbs, parsley, thyme, salt, and pepper. Gradually add the chicken broth to the mixture, stirring until it reaches a moist, stuffing-like consistency.
- Prepare the Pork Loin: Preheat your oven to 375°F (190°C). Butterfly the pork loin by slicing it horizontally, being careful not to cut all the way through. Open the pork loin like a book and pound it gently to an even thickness using a meat mallet.
- Stuff and Roll: Spread the stuffing evenly over the inside of the pork loin. Starting with the long edge, roll the pork loin tightly around the stuffing. Secure the roll with kitchen twine at 1-2 inch intervals to guarantee it holds its shape during cooking.
- Sear the Pork Loin: In an ovenproof skillet, heat the remaining olive oil over medium-high heat. Sear the pork loin on all sides until it’s browned, about 2-3 minutes per side.
- Roast: Transfer the skillet to the preheated oven. Roast the pork loin for 45-60 minutes or until an internal temperature of 145°F (63°C) is reached. Remove from the oven and let it rest for 10 minutes before slicing.
- Serve: Slice the pork loin into thick rounds and serve with your choice of sides, such as roasted vegetables or a green salad.
Extra Tips:
To ascertain a perfectly cooked and juicy pork loin, use a meat thermometer for accuracy. Chestnuts can be prepared ahead of time by boiling and peeling them, or you can purchase pre-cooked ones for convenience.
When rolling the pork, apply even pressure to keep the stuffing from spilling out. If you prefer a slightly sweet contrast, consider adding a handful of dried cranberries or apricots to the stuffing mix.
Ultimately, don’t discard the pan drippings; they can be used to make a delicious gravy or sauce to accompany the dish.
Fennel and Orange Salad With Olives
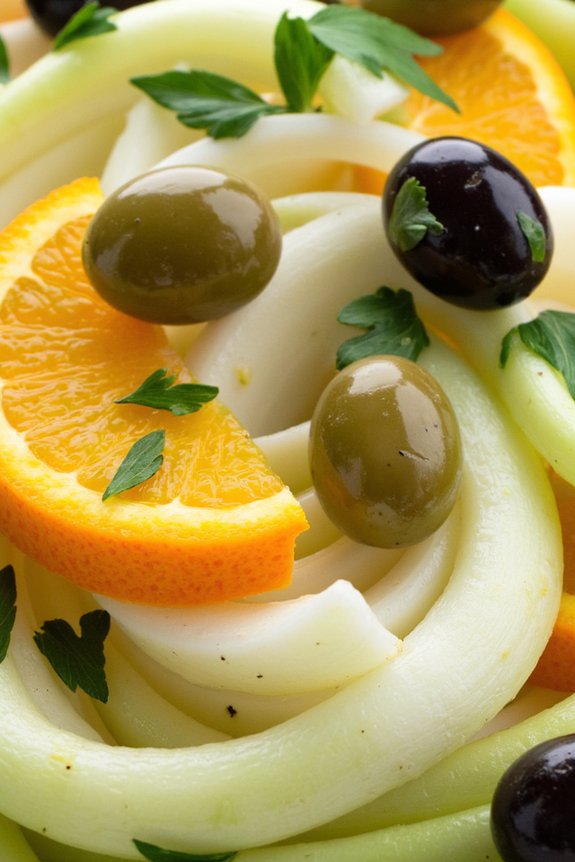
Fennel and Orange Salad With Olives is a rejuvenating and vibrant dish that perfectly captures the essence of fall in Italy. The crisp, anise-like flavor of fennel combined with the sweet and tangy notes of oranges creates a delightful contrast that’s enhanced by the briny taste of olives. This salad isn’t only pleasing to the palate but also a visual treat with its bright colors and elegant presentation. Ideal as a starter or a side dish, it brings a burst of freshness to any autumn meal.
Perfect for gatherings or family dinners, this salad is easy to prepare and requires minimal cooking, allowing the fresh ingredients to shine. The key to this dish is the balance of flavors and textures; the crunchy fennel, juicy oranges, and rich olives create a harmonious blend that’s both satisfying and light. With just a few simple ingredients, you can create a dish that looks gourmet and tastes exquisite, making it a wonderful addition to your fall recipe repertoire.
Ingredients (Serves 4-6):
- 2 large fennel bulbs, thinly sliced
- 3 large oranges, peeled and segmented
- 1/2 cup of mixed olives, pitted and halved
- 1/4 cup of extra virgin olive oil
- 2 tablespoons of lemon juice
- Salt and freshly ground black pepper to taste
- 1/4 cup of fresh parsley, chopped
Instructions:
- Prepare the Fennel: Begin by trimming the fennel bulbs, removing the stalks and saving the fronds for garnish if desired. Cut the bulbs in half lengthwise, then thinly slice using a sharp knife or a mandoline slicer to obtain even slices.
- Segment the Oranges: Carefully peel the oranges, removing all the pith. Using a sharp knife, cut between the membranes to release the segments, collecting any juice in a bowl to use for the dressing.
- Mix the Salad: In a large salad bowl, combine the sliced fennel, orange segments, and olives. Gently toss the ingredients together to evenly distribute.
- Make the Dressing: In a small bowl, whisk together the olive oil, lemon juice, a pinch of salt, and freshly ground black pepper. Add any collected orange juice to the dressing for added flavor.
- Dress the Salad: Pour the dressing over the salad and toss gently to coat all the ingredients. Adjust seasoning with additional salt and pepper if needed.
- Garnish and Serve: Sprinkle the chopped parsley over the salad. If desired, garnish with reserved fennel fronds for a touch of color and texture. Serve immediately to enjoy the fresh flavors at their best.
Extra Tips:
When preparing the fennel, be sure to slice it very thinly to maintain a delicate texture that melds well with the oranges and olives. Using a mandoline slicer can greatly aid in achieving uniformly thin slices.
Additionally, consider using a mix of green and black olives for a more complex flavor profile. If you prefer a bit of heat, adding a pinch of red pepper flakes to the dressing can provide a subtle kick.
Finally, allowing the salad to sit for a few minutes before serving can help the flavors meld together beautifully.
Ossobuco Alla Milanese
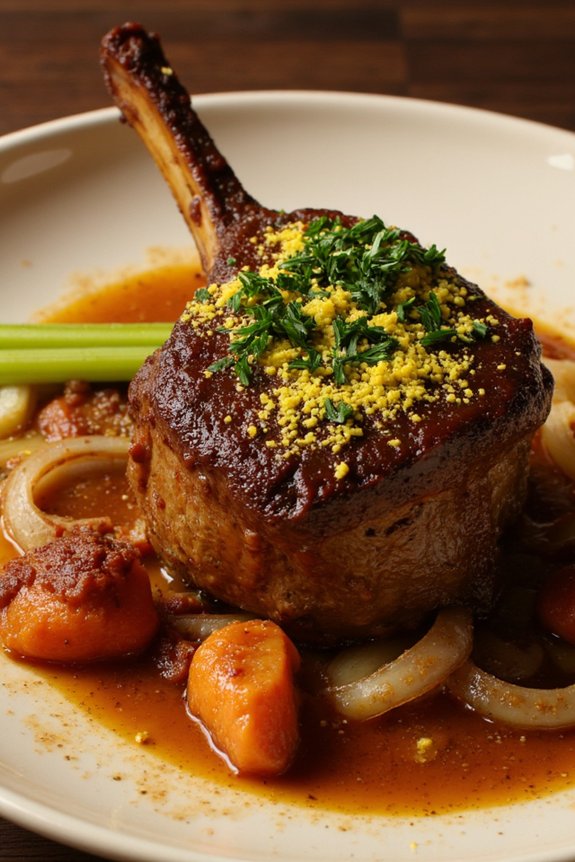
Ossobuco Alla Milanese is a traditional Italian dish that hails from the region of Lombardy, specifically from the city of Milan. This classic recipe features tender veal shanks braised slowly in a rich sauce of white wine, broth, and aromatic vegetables. The dish is typically served with a vibrant and zesty gremolata, a mixture of lemon zest, garlic, and parsley, which adds a fresh contrast to the deep, savory flavors of the braised meat.
Ossobuco Alla Milanese is often accompanied by Risotto alla Milanese, lending a creamy texture that complements the hearty stew. The name “Ossobuco” comes from the Italian words “osso” meaning bone, and “buco” meaning hole, referring to the marrow-filled bone that’s the star of this dish. The marrow is considered a delicacy, adding a luxurious richness to the dish.
This recipe for Ossobuco Alla Milanese serves 4-6 people, perfect for a cozy family dinner or a special occasion meal. With a few key ingredients and some patience, you can recreate this comforting and elegant dish in your own kitchen.
Ingredients:
- 4-6 veal shanks, about 1 1/2 inches thick
- Salt and freshly ground black pepper
- All-purpose flour, for dusting
- 4 tablespoons olive oil
- 2 tablespoons unsalted butter
- 1 onion, finely chopped
- 1 carrot, finely chopped
- 1 celery stalk, finely chopped
- 3 cloves garlic, minced
- 1 cup dry white wine
- 2 cups beef or chicken broth
- 2 tablespoons tomato paste
- 1 teaspoon dried thyme
- 1 bay leaf
- Gremolata: zest of 1 lemon, 2 tablespoons chopped fresh parsley, 1 clove garlic, minced
Cooking Instructions:
- Prepare the Veal Shanks: Pat the veal shanks dry with paper towels and season both sides generously with salt and pepper. Lightly dust with flour, shaking off any excess.
- Brown the Shanks: In a large, heavy-bottomed pot or Dutch oven, heat the olive oil and butter over medium-high heat. Add the veal shanks in a single layer, without overcrowding, and brown them on all sides, about 4-5 minutes per side. Remove the shanks and set aside.
- Sauté the Vegetables: In the same pot, add the chopped onion, carrot, and celery. Cook until the vegetables are soft and translucent, about 5-7 minutes. Add the minced garlic and cook for an additional minute.
- Deglaze the Pot: Pour in the white wine and stir to scrape up any browned bits from the bottom of the pot. Let the wine simmer until it has reduced by half.
- Braise the Shanks: Return the veal shanks to the pot, nestling them among the vegetables. Add the broth, tomato paste, thyme, and bay leaf. Bring to a simmer, then cover and reduce the heat to low. Let the ossobuco braise gently for about 1.5 to 2 hours, or until the meat is tender and easily pulls away from the bone.
- Prepare the Gremolata: While the veal is braising, mix the lemon zest, chopped parsley, and minced garlic in a small bowl. Set aside until ready to serve.
- Serve the Ossobuco: Remove the bay leaf from the pot. Adjust seasoning with salt and pepper if necessary. Serve the ossobuco hot, spooning some of the sauce over the top and garnishing with a sprinkle of gremolata.
Extra Tips: For the best flavor, allow the veal shanks to rest at room temperature for about 30 minutes before browning. This helps them to cook more evenly.
When selecting veal shanks, look for ones with a good amount of marrow in the center, as this adds richness to the sauce. If you prefer a thicker sauce, you can remove the shanks after cooking and reduce the sauce further over medium heat.
Finally, serving Ossobuco Alla Milanese with a side of creamy risotto or polenta will complement the dish beautifully, absorbing the flavorful sauce.
Apple and Walnut Crostata

As the autumn leaves begin to fall, there’s nothing quite like the comforting aroma of a freshly baked Apple and Walnut Crostata wafting through your home. This rustic Italian pastry is a perfect way to showcase the season’s bounty, combining the sweetness of apples with the rich, nutty flavor of walnuts.
The crostata, with its free-form style, isn’t only easy to make but also a beautiful dessert centerpiece for any gathering. Its flaky crust cradles a luscious filling that captures the essence of fall, making it a delightful treat for both the eyes and the palate.
The Apple and Walnut Crostata is versatile and approachable, ideal for both novice and experienced bakers. The straightforward process involves preparing a buttery pastry dough and a simple filling of apples, walnuts, sugar, and spices.
Once assembled, the crostata bakes to a golden perfection, with the sugars caramelizing and the apples softening to create a symphony of flavors and textures. Serve it warm, perhaps with a scoop of vanilla ice cream or a dollop of whipped cream, for a truly indulgent experience.
Ingredients (Serves 4-6):
- 1 1/2 cups all-purpose flour
- 1/4 cup granulated sugar
- 1/2 teaspoon salt
- 1/2 cup unsalted butter, chilled and diced
- 1/4 cup cold water
- 3 medium apples, peeled, cored, and sliced
- 1/2 cup chopped walnuts
- 1/4 cup brown sugar
- 1 teaspoon ground cinnamon
- 1/4 teaspoon ground nutmeg
- 1 tablespoon lemon juice
- 1 tablespoon unsalted butter, melted
- 1 egg, beaten (for egg wash)
- 1 tablespoon coarse sugar (for sprinkling)
Instructions:
1. Prepare the Pastry Dough: In a large bowl, combine the flour, granulated sugar, and salt. Add the chilled and diced butter, and use a pastry cutter or your fingers to blend until the mixture resembles coarse crumbs.
Gradually add the cold water, mixing just until the dough holds together. Shape the dough into a disk, wrap it in plastic, and refrigerate for at least 30 minutes.
2. Make the Apple Filling: In a separate bowl, combine the sliced apples, chopped walnuts, brown sugar, cinnamon, nutmeg, and lemon juice. Toss the ingredients until the apples and walnuts are evenly coated with the sugar and spices. Set aside.
3. Roll Out the Dough: Preheat your oven to 400°F (200°C). On a lightly floured surface, roll out the chilled dough into a rough circle about 12 inches in diameter. Transfer the dough to a parchment-lined baking sheet.
4. Assemble the Crostata: Spoon the apple and walnut filling onto the center of the dough, leaving a 2-inch border around the edges. Gently fold the edges of the dough over the filling, pleating as necessary, to form a rustic edge.
Brush the folded edges with the beaten egg and sprinkle with coarse sugar for added texture and sweetness.
5. Bake the Crostata: Drizzle the melted butter over the exposed apple filling. Place the crostata in the preheated oven and bake for 35-40 minutes, or until the crust is golden brown and the apples are tender.
6. Cool and Serve: Allow the crostata to cool slightly on the baking sheet before transferring it to a wire rack. Serve warm or at room temperature, optionally with vanilla ice cream or whipped cream.
Extra Tips:
For the best results, use a mix of apple varieties to add complexity to the flavor and texture of your crostata. Granny Smith apples provide a tart contrast, while Honeycrisp or Fuji apples add natural sweetness.
To prevent the filling from becoming too watery, drain any excess liquid from the apple mixture before placing it onto the dough. If you’re short on time, store-bought pie dough can be a convenient substitute, though making your own will yield the flakiest results.
Enjoy this delightful dessert with a warm beverage for a cozy fall treat.