

There’s nothing quite like the smell of freshly baked Italian bread filling your kitchen. These rustic recipes will make your home feel warm and inviting. From classic focaccia to a simple no-knead boule, each bread is a taste of Italy’s rich culinary heritage. If you’re curious about creating these delightful loaves, you’re in the right place. Let’s explore these easy Italian bread recipes together.
Classic Focaccia With Rosemary
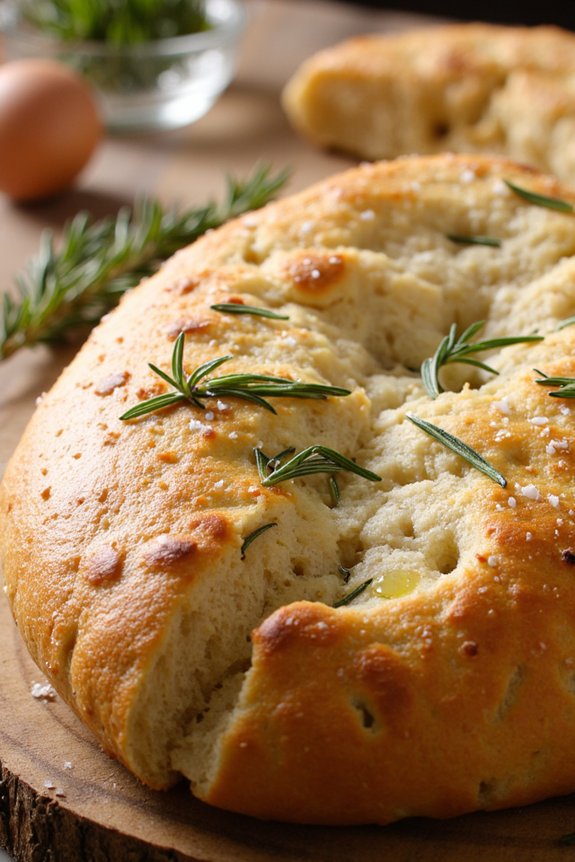
Focaccia, a traditional Italian flatbread, is renowned for its fluffy interior and slightly crispy exterior. It’s an incredibly versatile bread that can be enjoyed on its own, as a side dish, or even used for sandwiches. The Classic Focaccia With Rosemary is a simple yet flavorful variation that highlights the aromatic essence of fresh rosemary.
This delightful bread is perfect for any occasion, offering a comforting blend of textures and flavors that are sure to impress your family and friends. The simplicity of this recipe allows the quality of the ingredients to shine through, producing a deliciously fragrant and savory bread. By using a good quality olive oil, fresh rosemary, and sea salt, you’ll create a focaccia that’s both a feast for the senses and a joy to bake.
With a serving size fit for 4-6 people, this Classic Focaccia With Rosemary is an ideal accompaniment to your next Italian-inspired meal or as a delicious snack on its own.
Ingredients (For 4-6 servings):
- 500g all-purpose flour
- 325ml warm water
- 2 teaspoons salt
- 2 teaspoons sugar
- 2 teaspoons active dry yeast
- 60ml extra virgin olive oil, plus extra for drizzling
- 1 tablespoon fresh rosemary leaves
- Coarse sea salt, for sprinkling
Cooking Instructions:
- Prepare the Yeast: In a small bowl, mix the warm water with sugar and active dry yeast. Let it sit for about 5-10 minutes until it becomes frothy. This indicates that the yeast is active and ready to use.
- Make the Dough: In a large mixing bowl, combine the flour and salt. Create a well in the center and pour in the yeast mixture and olive oil. Stir until a sticky dough forms.
- Knead the Dough: Transfer the dough onto a floured surface and knead for about 10 minutes until the dough is smooth and elastic. If the dough is too sticky, sprinkle a little more flour as needed.
- First Rise: Place the dough in a lightly oiled bowl, cover with a damp cloth, and let it rise in a warm place for about 1-2 hours, or until it has doubled in size.
- Shape the Focaccia: Once risen, punch down the dough to release the air. Transfer the dough to a generously oiled baking sheet, and gently stretch it to fit the sheet. Use your fingers to create dimples all over the surface.
- Second Rise: Cover the dough again and let it rise for another 30 minutes.
- Add Toppings: Preheat your oven to 220°C (428°F). Drizzle the dough with olive oil, sprinkle with fresh rosemary leaves, and add a generous pinch of coarse sea salt.
- Bake: Place the focaccia in the preheated oven and bake for 20-25 minutes, or until golden brown and the edges are crispy.
- Cool and Serve: Allow the focaccia to cool slightly on a wire rack before cutting into pieces. Serve warm or at room temperature.
Extra Tips: For the best results, use fresh rosemary as it imparts a more intense flavor compared to dried rosemary. If you prefer a softer crust, cover the focaccia with a clean kitchen towel while it cools.
Additionally, you can experiment with other toppings such as olives, sun-dried tomatoes, or garlic to customize your focaccia to suit your taste preferences. Remember, the key to a great focaccia is giving the dough enough time to rise, ensuring a light and airy texture.
Traditional Ciabatta Loaf
Ciabatta is a classic Italian bread known for its rustic appearance, light, airy texture, and deliciously crisp crust. The name “ciabatta” translates to “slipper” in Italian, which reflects its unique shape. Originating from the region of Veneto, this bread has become a staple in Italian cuisine and is beloved worldwide for its versatility.
Whether you’re using it for sandwiches, dipping it in olive oil, or simply enjoying it on its own, ciabatta is a delightful addition to any meal.
Making a traditional ciabatta loaf involves creating a wet and sticky dough, which is necessary for its signature open crumb structure. The process is relatively simple and requires a handful of basic ingredients, but patience is key as the dough needs time to develop its flavors and texture.
With its chewy interior and crunchy crust, this bread is sure to impress your family and friends. The following recipe yields a serving size of 4-6 people, perfect for sharing.
Ingredients:
- 4 cups all-purpose flour
- 2 teaspoons salt
- 1 teaspoon sugar
- 1 package (2 1/4 teaspoons) active dry yeast
- 1 1/2 cups warm water (about 110°F)
- 2 tablespoons olive oil
Cooking Instructions:
- Activate the Yeast: In a small bowl, combine the warm water and sugar. Stir in the active dry yeast and let it sit for about 5-10 minutes until it becomes frothy. This indicates that the yeast is active.
- Mix the Dough: In a large mixing bowl, combine the flour and salt. Make a well in the center and pour in the yeast mixture and olive oil. Stir with a wooden spoon until a sticky dough forms.
- Knead the Dough: Turn the dough onto a well-floured surface. Knead it for about 8-10 minutes, adding flour as necessary to prevent sticking, until it becomes smooth and elastic.
- First Rise: Place the dough in a lightly oiled bowl, cover it with a damp towel or plastic wrap, and let it rise in a warm place for about 1-2 hours or until it has doubled in size.
- Shape the Loaf: After the dough has risen, gently punch it down to release the air. Turn it out onto a well-floured surface, divide it into two equal parts, and shape each into a rectangle. Place each rectangle on a baking sheet lined with parchment paper.
- Second Rise: Cover the shaped loaves with a towel and let them rise again for about 45 minutes to 1 hour until they’ve puffed up slightly.
- Preheat the Oven: While the loaves are rising, preheat your oven to 425°F (220°C).
- Bake the Loaves: Once the loaves have risen, bake them in the preheated oven for 20-25 minutes until they’re golden brown and sound hollow when tapped on the bottom.
- Cool the Bread: Remove the loaves from the oven and let them cool on a wire rack for at least 30 minutes before slicing.
Extra Tips:
When making ciabatta, it’s essential to work with a sticky dough, as this contributes to the bread’s light and airy texture. If you find the dough too sticky to handle, lightly dust your hands and work surface with flour, but avoid adding too much extra flour to the dough itself.
Additionally, letting the dough rise in a warm, draft-free area will guarantee a better rise. Finally, for a crispier crust, you can place a pan of water in the oven during baking to create steam. Enjoy your homemade ciabatta with your favorite toppings or accompaniments!
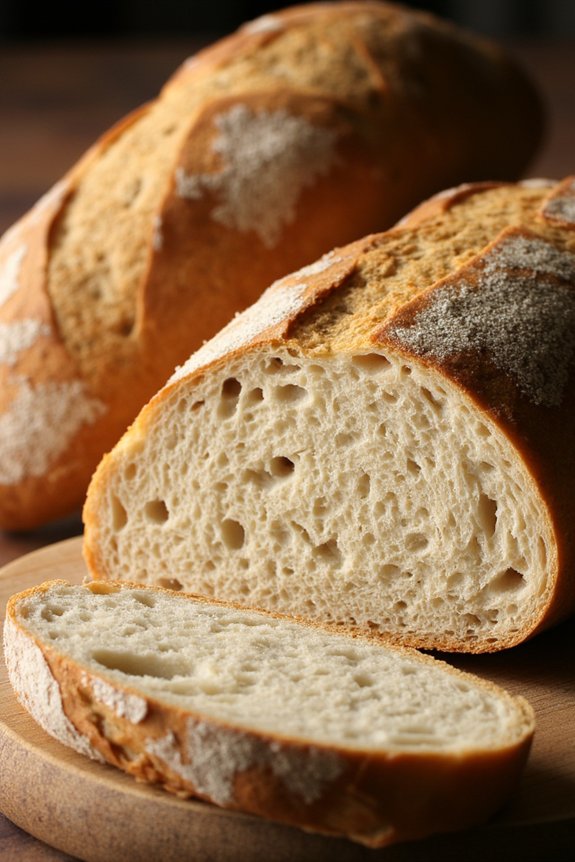
Simple Rustic Italian Bread
There’s something incredibly satisfying about baking your own bread, and this Simple Rustic Italian Bread recipe is perfect for beginners and seasoned bakers alike. With its crispy crust and soft, airy interior, this bread is the quintessential accompaniment to any Italian meal, or delicious just on its own with a bit of olive oil or butter.
Made with just a few basic ingredients, this bread allows the natural flavors of the wheat to shine through, offering an authentic taste of Italy right from your oven. This recipe yields a loaf that’s perfect for serving 4-6 people and is designed to fit seamlessly into your busy schedule, as it requires minimal hands-on time.
The magic happens during the resting and fermenting processes, allowing the dough to develop its characteristic flavor and texture. Follow the steps below to create a loaf that will impress your family and friends with its rustic charm.
Ingredients for 4-6 people:
- 4 cups all-purpose flour
- 1 1/2 teaspoons salt
- 1 teaspoon sugar
- 1 packet (2 1/4 teaspoons) active dry yeast
- 1 1/2 cups warm water (about 110°F or 45°C)
- 1 tablespoon olive oil (plus more for greasing)
Cooking Instructions:
- Prepare the Yeast Mixture: In a small bowl, combine the warm water, sugar, and yeast. Stir gently and let it sit for about 5-10 minutes until the mixture becomes frothy. This indicates that the yeast is active and ready to use.
- Mix the Dough: In a large mixing bowl, combine the flour and salt. Make a well in the center and pour in the yeast mixture along with the olive oil. Using a wooden spoon or your hands, mix until a sticky dough forms.
- Knead the Dough: Transfer the dough to a lightly floured surface. Knead it for about 8-10 minutes, adding a bit more flour if necessary, until the dough is smooth and elastic. The dough should be slightly tacky but not sticky.
- First Rise: Lightly oil a large bowl with olive oil. Place the dough in the bowl, turning it over to coat all sides with oil. Cover the bowl with plastic wrap or a clean kitchen towel and let it rise in a warm, draft-free area for about 1-2 hours, or until it has doubled in size.
- Shape the Dough: Once risen, punch down the dough to release any air bubbles. Turn it out onto a floured surface and shape it into a round or oval loaf, tucking the edges underneath to create surface tension.
- Second Rise: Place the shaped loaf on a parchment-lined baking sheet. Cover with a kitchen towel and let it rise again for about 30-45 minutes, or until slightly puffed.
- Preheat the Oven: While the dough is rising for the second time, preheat your oven to 425°F (220°C). Place an empty baking dish on the lower rack of the oven to preheat as well.
- Bake the Bread: Before placing the bread in the oven, make a few shallow slashes on the top with a sharp knife. This allows the bread to expand properly during baking. Fill the preheated baking dish with hot water to create steam, then immediately place the bread in the oven on the middle rack. Bake for 25-30 minutes, or until the bread is golden brown and sounds hollow when tapped on the bottom.
- Cool the Bread: Remove the bread from the oven and let it cool on a wire rack for at least 15 minutes before slicing. This cooling period allows the interior to set properly.
Extra Tips:
For best results, confirm that your yeast is fresh by checking the expiration date before starting. The warm water should be between 105°F and 110°F to activate the yeast without killing it. If you don’t have a thermometer, it should feel comfortably warm to the touch.
Additionally, creating steam in the oven is vital for achieving the bread’s signature crispy crust, so don’t skip this step. Finally, resist the temptation to cut into the loaf immediately after baking; giving it time to cool allows the flavors to develop fully and the texture to firm up properly.
Olive and Herb Focaccia
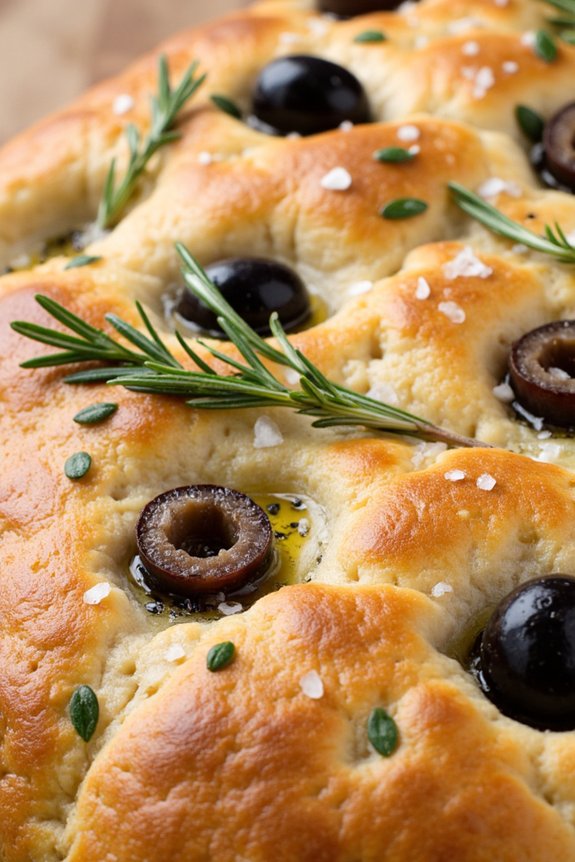
Focaccia is a classic Italian bread that’s beloved for its soft and airy texture, often topped with a flavorful blend of olive oil, herbs, and sometimes garlic. The Olive and Herb Focaccia is a delightful variation that combines the rich flavors of olives and aromatic herbs, making it a perfect accompaniment to any meal or a delicious snack on its own.
This recipe will guide you through creating a homemade focaccia that’s crispy on the outside and tender on the inside, bursting with the earthy notes of olives and herbs. Making Olive and Herb Focaccia involves a simple dough preparation, followed by allowing it to rise and infuse with the flavors of fresh herbs and olives.
The key to a successful focaccia is to guarantee the dough is well-hydrated and given ample time to rise, which results in its characteristic light and airy texture. This recipe is designed to serve 4-6 people, making it an ideal choice for family gatherings or dinner parties.
Ingredients (serves 4-6):
- 500g all-purpose flour
- 2 teaspoons salt
- 1 teaspoon sugar
- 1 packet (7g) active dry yeast
- 350ml warm water
- 4 tablespoons extra virgin olive oil, divided
- 1/2 cup pitted black olives, sliced
- 2 tablespoons fresh rosemary, chopped
- 1 tablespoon fresh thyme leaves
- Coarse sea salt for sprinkling
Cooking Instructions:
- Prepare the Dough: In a large bowl, combine the flour, salt, and sugar. In a separate small bowl, dissolve the yeast in warm water and let it sit for about 5 minutes until it becomes frothy. Pour the yeast mixture and 2 tablespoons of olive oil into the flour mixture. Mix everything together until a sticky dough forms.
- Knead the Dough: Transfer the dough onto a floured surface and knead for about 10 minutes until it becomes smooth and elastic. Alternatively, use a stand mixer with a dough hook attachment to knead the dough for about 5 minutes.
- First Rise: Place the dough in a lightly oiled bowl, cover it with a damp cloth or plastic wrap, and let it rise in a warm, draft-free area for 1-1.5 hours, or until it has doubled in size.
- Preheat the Oven: Preheat your oven to 220°C (430°F) while the dough is rising.
- Prepare the Baking Tray: Grease a large baking sheet with 1 tablespoon of olive oil. Once the dough has risen, punch it down gently to release excess air and transfer it to the prepared baking sheet.
- Shape the Focaccia: Gently stretch and press the dough out to fit the baking sheet. Use your fingers to make deep dimples all over the surface of the dough. Drizzle the remaining olive oil over the top.
- Add Toppings: Evenly distribute the sliced olives, chopped rosemary, and thyme over the dough. Sprinkle a generous amount of coarse sea salt on top.
- Final Rise: Let the prepared focaccia rest for another 20 minutes for a final rise, allowing it to puff up slightly.
- Bake the Focaccia: Place the focaccia in the preheated oven and bake for 20-25 minutes, or until the top is golden brown and crispy.
- Cool and Serve: Once baked, remove the focaccia from the oven and allow it to cool slightly on a wire rack before slicing and serving.
Extra Tips:
For additional flavor, you can incorporate minced garlic into the olive oil before drizzling it over the dough. If you prefer a more intense herb flavor, feel free to add a variety of fresh herbs such as basil or oregano.
To achieve a crispier crust, you can add a small pan of water to the bottom of the oven during baking to create steam. This will help develop a lovely crust while keeping the interior moist and tender.
Enjoy your Olive and Herb Focaccia warm, paired with a dipping sauce of olive oil and balsamic vinegar for an authentic Italian experience.
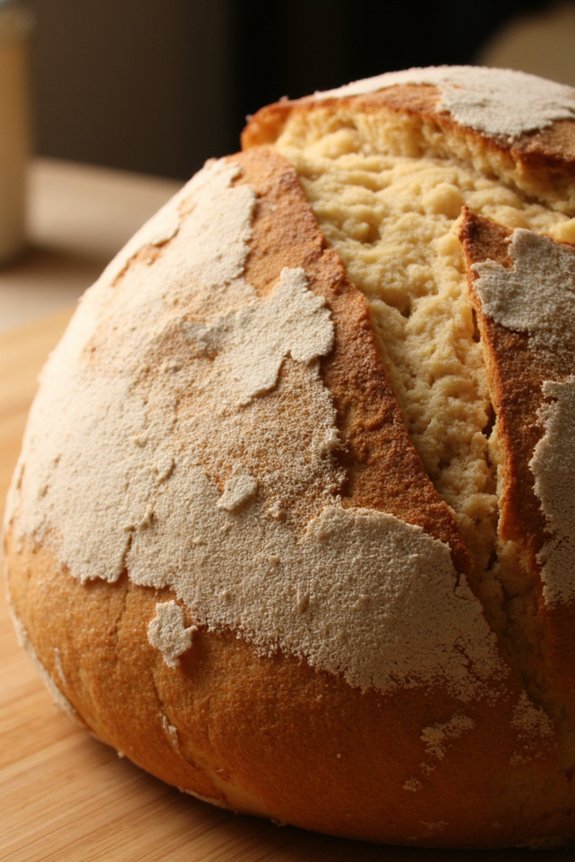
No-Knead Italian Boule
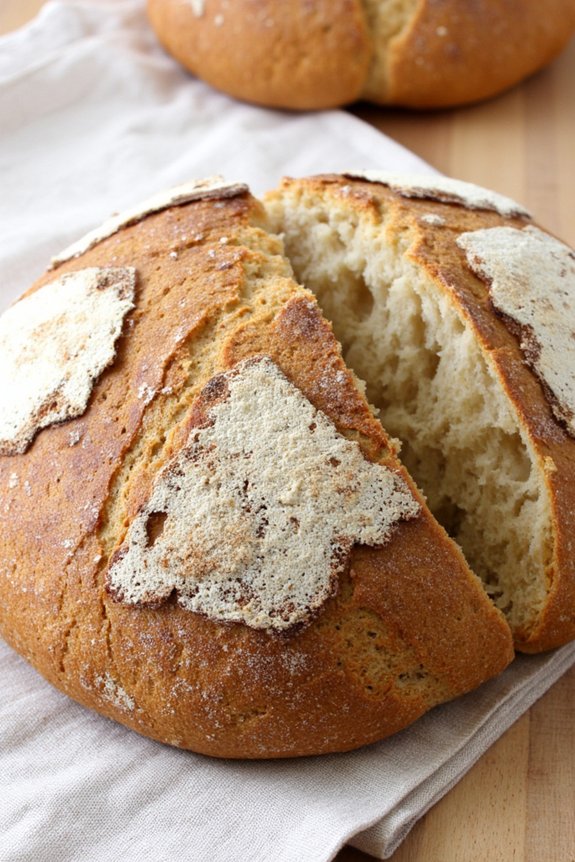
This No-Knead Italian Boule is a delightful bread choice for those who love the rustic charm and hearty taste of Italian bread but wish to skip the time-consuming kneading process. Perfect for any meal, its crusty exterior and soft, airy interior make it a versatile addition to your dining table.
Whether you’re serving it alongside a pasta dish, using it to soak up a rich sauce, or simply enjoying it with a drizzle of olive oil and a sprinkle of sea salt, this bread will surely impress both family and friends.
The secret to this bread’s perfect texture lies in its long fermentation time. By allowing the dough to rest and rise slowly, the gluten develops naturally, resulting in a chewy crumb without any elbow grease on your part. This recipe is perfect even for beginners, requiring minimal ingredients and equipment.
Let’s plunge into making this delicious Italian Boule that serves 4-6 people.
Ingredients:
- 4 cups all-purpose flour
- 1/4 teaspoon instant yeast
- 2 teaspoons salt
- 1 1/2 cups warm water (about 110°F)
- Cornmeal or additional flour for dusting
Instructions:
1. Mix the Dough:
In a large mixing bowl, combine the all-purpose flour, instant yeast, and salt. Stir these dry ingredients together until evenly distributed. Add the warm water, and using a wooden spoon or your hand, mix until a shaggy dough forms. Confirm that all the flour is incorporated.
2. First Rise:
Cover the bowl with plastic wrap or a damp kitchen towel and let the dough rest at room temperature for 12-18 hours. The dough should double in size and be bubbly on top when ready.
3. Shape the Dough:
Generously flour a clean work surface and turn the dough out onto it. With floured hands, gently shape the dough into a ball by folding the edges towards the center. Avoid kneading the dough.
4. Second Rise:
Place the dough seam-side down onto a piece of parchment paper sprinkled with cornmeal or flour. Cover with a kitchen towel and let it rise for about 2 hours, until it has doubled in size.
5. Preheat the Oven:
About 30 minutes before the end of the second rise, place a Dutch oven (or heavy pot with a lid) into your oven and preheat to 450°F (230°C). The pot will be hot when the dough is ready to bake.
6. Bake the Boule:
Carefully remove the hot pot from the oven and uncover it. Lift the risen dough with the parchment paper and place it into the pot. Cover with the lid and bake for 30 minutes. Remove the lid and bake for an additional 15-20 minutes, or until the crust is golden brown and sounds hollow when tapped.
7. Cool the Bread:
Transfer the boule onto a wire rack and let it cool completely before slicing. This confirms the crumb sets properly and slicing is easier.
Extra Tips:
For a crispier crust, consider leaving the boule in the oven for an extra 5 minutes after turning off the heat, with the door slightly ajar.
You can also experiment with adding herbs like rosemary or thyme to the dough for added flavor. If you don’t have a Dutch oven, use any oven-safe pot with a tight-fitting lid to create a steamy environment that helps in achieving that perfect crust.
Garlic Parmesan Breadsticks
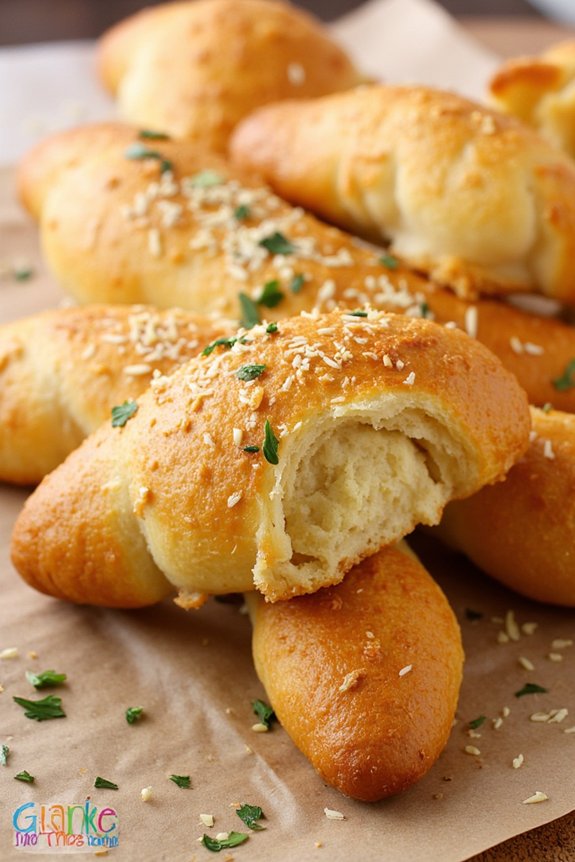
Garlic Parmesan Breadsticks are a classic Italian-inspired delight, perfect for serving alongside pasta dishes or enjoying on their own as a savory snack. These breadsticks are soft, buttery, and bursting with the rich flavors of garlic and Parmesan cheese. They’re easy to make and require only a handful of ingredients, making them a great go-to recipe for any occasion.
Whether you’re hosting a dinner party or simply want to indulge in a tasty homemade treat, these breadsticks are sure to impress.
The key to achieving the perfect texture in these Garlic Parmesan Breadsticks lies in the dough preparation and the balance of flavors. The dough is enriched with butter and seasoned with garlic powder and Parmesan, resulting in a tender inside and a slightly crisp outside.
Once baked to golden perfection, the breadsticks are brushed with a garlic butter glaze and sprinkled with more Parmesan cheese for an extra layer of flavor. Enjoy them fresh out of the oven for the best taste experience.
Ingredients (Serves 4-6):
- 1 1/2 cups warm water (about 110°F)
- 2 tablespoons granulated sugar
- 1 tablespoon active dry yeast
- 3 1/2 cups all-purpose flour
- 1 teaspoon salt
- 1/4 cup unsalted butter, melted
- 1 teaspoon garlic powder
- 1/2 cup grated Parmesan cheese
- 2 tablespoons olive oil
- 2 tablespoons chopped fresh parsley (optional)
Cooking Instructions:
- Prepare the Dough: In a large mixing bowl, combine the warm water, sugar, and yeast. Stir gently to dissolve the sugar and yeast. Let the mixture sit for about 5 minutes until it becomes frothy, indicating that the yeast is active.
- Mix the Ingredients: Add the flour, salt, melted butter, and garlic powder to the yeast mixture. Stir until a dough begins to form. Transfer the dough to a floured surface and knead for about 8-10 minutes until it becomes smooth and elastic.
- First Rise: Shape the dough into a ball and place it in a lightly oiled bowl. Cover the bowl with a clean kitchen towel and let it rise in a warm place for about 1 hour or until it has doubled in size.
- Shape the Breadsticks: Once the dough has risen, preheat your oven to 400°F (200°C). Punch down the dough to release excess air, then roll it out on a floured surface into a rectangle about 1/2 inch thick. Cut the dough into strips approximately 6-8 inches long and 1 inch wide.
- Second Rise: Place the dough strips onto a baking sheet lined with parchment paper. Cover them again with a kitchen towel and let them rise for an additional 20 minutes.
- Bake the Breadsticks: Brush the tops of the breadsticks with olive oil. Bake them in the preheated oven for 12-15 minutes or until they’re golden brown.
- Add Garlic Butter and Parmesan: While the breadsticks are baking, melt some additional butter and mix it with a bit more garlic powder. As soon as the breadsticks are out of the oven, brush them with the garlic butter and sprinkle with Parmesan cheese and chopped parsley, if using.
Extra Tips:
For an extra burst of flavor, consider adding a pinch of red pepper flakes to the garlic butter mixture for a hint of heat. If you prefer a stronger garlic flavor, you can also add minced fresh garlic to the butter instead of garlic powder.
Be sure to use freshly grated Parmesan cheese for the best taste and texture. Ultimately, these breadsticks are best enjoyed warm, so consider serving them straight from the oven or reheating them briefly before serving.
Sun-Dried Tomato and Olive Loaf
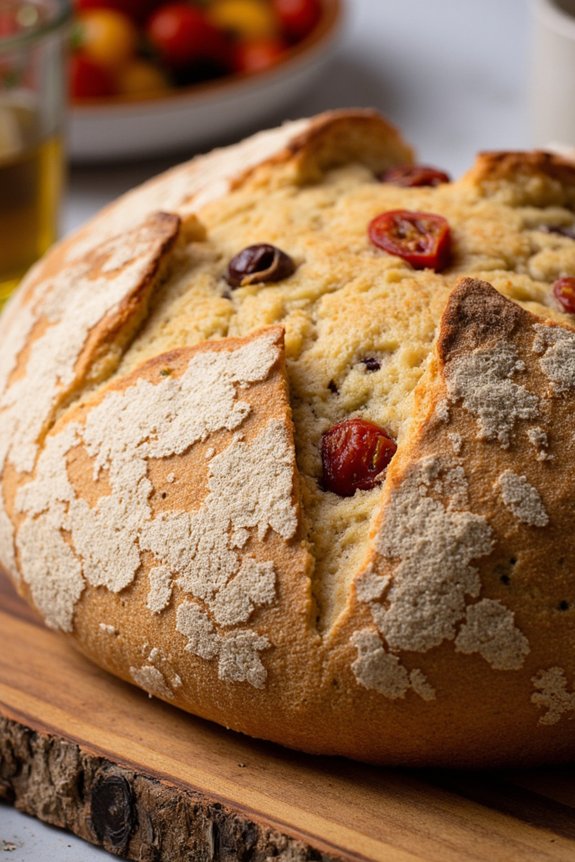
Sun-Dried Tomato and Olive Loaf is a delightful Italian bread that combines the rustic flavors of sun-dried tomatoes and briny olives into a savory loaf. This bread is perfect for enhancing any meal, whether it’s served alongside a hearty soup, a fresh salad, or simply enjoyed with a drizzle of olive oil.
The rich taste of sun-dried tomatoes melds beautifully with the slight saltiness of olives, bringing a burst of Mediterranean flavor to your table. Not only is it delicious, but it also fills your home with an irresistible aroma as it bakes.
Making this loaf is a rewarding experience, with each step allowing you to connect with traditional Italian baking methods. This recipe requires a bit of patience, as the dough needs time to rise, but the result is well worth the wait.
The crust of the loaf is perfectly crunchy, while the inside remains soft and filled with the delightful inclusions of tomatoes and olives. Whether you’re a seasoned baker or trying your hand at bread-making for the first time, this Sun-Dried Tomato and Olive Loaf will surely impress your family and friends.
Ingredients (serves 4-6 people):
- 3 1/2 cups all-purpose flour
- 1 packet (2 1/4 teaspoons) active dry yeast
- 1 cup warm water (about 110°F)
- 1 teaspoon sugar
- 1 teaspoon salt
- 1/4 cup extra-virgin olive oil
- 1/2 cup sun-dried tomatoes, chopped
- 1/2 cup pitted olives, chopped
- 1 teaspoon dried oregano
- 1/2 teaspoon garlic powder
Instructions:
- Activate the Yeast: In a small bowl, mix the warm water, sugar, and yeast. Let it sit for about 5-10 minutes until it becomes frothy. This step guarantees that the yeast is active and ready to leaven the bread.
- Make the Dough: In a large mixing bowl, combine the flour and salt. Create a well in the center and add the frothy yeast mixture and olive oil. Mix until a dough starts to form.
- Add Flavors: Incorporate the chopped sun-dried tomatoes, olives, oregano, and garlic powder into the dough. Knead the mixture either by hand on a floured surface or using a stand mixer with a dough hook, for about 8-10 minutes, until the dough is smooth and elastic.
- First Rise: Place the kneaded dough in a lightly oiled bowl, cover it with a damp cloth or plastic wrap, and let it rise in a warm, draft-free area for about 1-1.5 hours, or until it has doubled in size.
- Shape the Loaf: Once risen, punch down the dough to release any air bubbles. Shape it into a loaf and place it on a parchment-lined baking sheet. Cover it again and let it rise for another 30-45 minutes.
- Preheat Oven: Meanwhile, preheat your oven to 375°F (190°C).
- Bake the Bread: Once the loaf has risen, bake it in the preheated oven for 30-35 minutes, or until the crust is golden brown and the loaf sounds hollow when tapped on the bottom.
- Cool Before Serving: Allow the loaf to cool on a wire rack for at least 15 minutes before slicing. This helps retain its moisture and makes cutting easier.
Extra Tips:
When preparing the sun-dried tomatoes and olives, make sure they’re well-drained to avoid adding excess moisture to the dough. If you prefer a more intense flavor, consider adding a bit more garlic powder or fresh herbs like rosemary or basil.
Additionally, for a crispier crust, you can place a small pan of water on the bottom rack of the oven while baking; the steam will create a delightful crust. Finally, remember to let the bread cool slightly before slicing to guarantee it holds its shape and texture.
Italian Semolina Bread
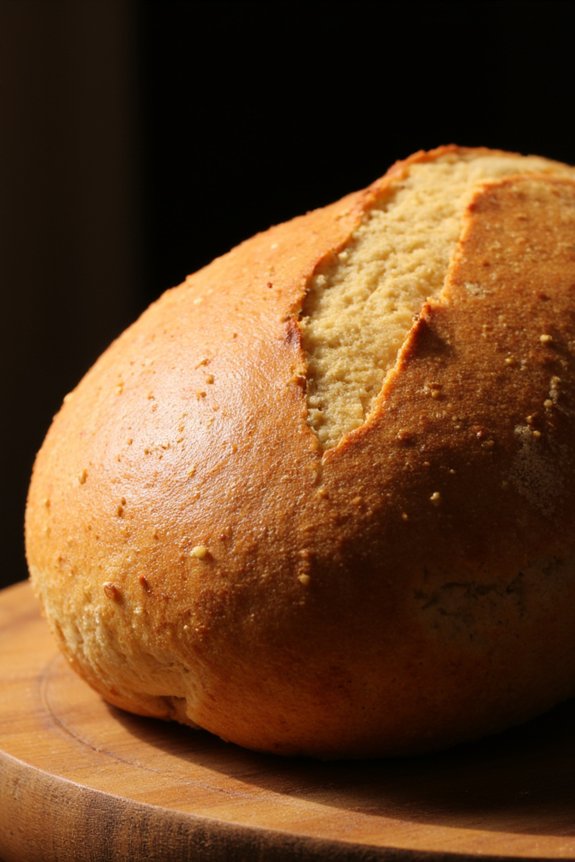
Italian Semolina Bread is a delicious and traditional bread that showcases the unique qualities of semolina flour. Known for its golden color and slightly nutty flavor, this bread is a staple in many Italian households. Its crusty exterior and soft, tender crumb make it an ideal choice for everything from sandwiches to table bread.
While making bread from scratch might seem intimidating, this recipe simplifies the process, allowing you to bring the authentic taste of Italian Semolina Bread to your own kitchen.
To begin, you’ll combine semolina flour with all-purpose flour to achieve the perfect texture. The addition of olive oil enhances the bread’s flavor and helps keep it moist. Yeast and sugar work together to give the bread its rise, while salt balances the flavors. Once mixed, the dough is kneaded until smooth and then left to rise until doubled in size. After shaping, a second rise guarantees a light and airy loaf. Finally, the bread is baked to a golden perfection, filling your kitchen with an irresistible aroma.
Ingredients for 4-6 Servings:
- 2 cups semolina flour
- 1 cup all-purpose flour
- 1 1/2 cups warm water (about 110°F)
- 1 tablespoon active dry yeast
- 1 tablespoon sugar
- 2 teaspoons salt
- 2 tablespoons olive oil
Cooking Instructions:
- Activate the Yeast: In a small bowl, combine the warm water, sugar, and yeast. Stir gently and let it sit for about 5-10 minutes until the mixture becomes frothy. This indicates that the yeast is active.
- Mix the Dough: In a large mixing bowl, combine the semolina flour, all-purpose flour, and salt. Create a well in the center and pour in the activated yeast mixture and olive oil. Stir until a dough begins to form.
- Knead the Dough: Transfer the dough onto a lightly floured surface. Knead it for about 10 minutes until it becomes smooth and elastic. If the dough is too sticky, add a bit more flour, a tablespoon at a time.
- First Rise: Place the kneaded dough in a lightly oiled bowl, turning it to coat the surface with oil. Cover the bowl with a damp cloth and let the dough rise in a warm, draft-free area for about 1 to 1.5 hours, or until it doubles in size.
- Shape the Loaf: Once risen, punch down the dough and transfer it back to a floured surface. Shape it into a loaf by folding and rolling it into a tight cylinder. Place the loaf on a baking sheet lined with parchment paper.
- Second Rise: Cover the loaf with a damp cloth and let it rise again for about 45 minutes to 1 hour, or until it has doubled in size.
- Preheat and Bake: Preheat your oven to 425°F (220°C). Once the oven is ready, bake the bread for 25-30 minutes, or until the crust is golden brown and the loaf sounds hollow when tapped on the bottom.
- Cool: Remove the bread from the oven and let it cool on a wire rack for at least 20 minutes before slicing. This helps the interior to set properly.
Extra Tips:
To get a nice crust on your Italian Semolina Bread, consider placing a small pan of water on the bottom rack of your oven while baking. The steam from the water will create a crusty exterior.
Additionally, you can lightly brush the loaf with olive oil or egg wash before baking for an extra sheen. If you have a baking stone, use it to help achieve an even bake.
Cheesy Pesto Swirl Bread
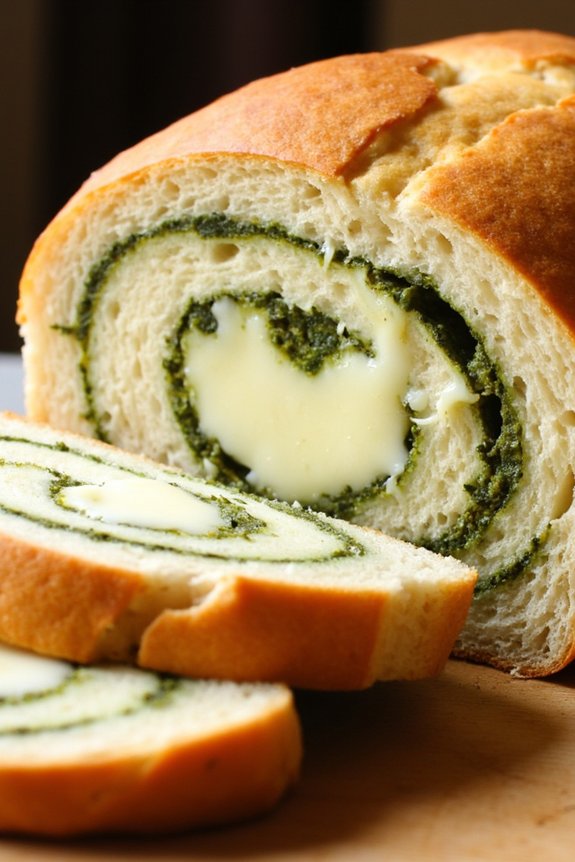
Cheesy Pesto Swirl Bread is a delightful Italian-inspired bread that combines the rich flavors of cheese and basil pesto swirled into a soft, homemade loaf. This bread is perfect for serving with pasta dishes, soups, or as an appetizer on its own. The aroma of fresh-baked bread with cheesy pesto notes wafting through your kitchen will make this a family favorite recipe.
It’s an impressive bread that’s surprisingly easy to make, and it will leave your guests asking for seconds. This recipe creates a beautiful presentation with its swirling pattern, making it not only delicious but also visually appealing. The combination of mozzarella cheese and pesto provides a savory, cheesy flavor profile that pairs well with the soft texture of the bread.
Making this bread from scratch allows you to control the ingredients, guaranteeing a fresh, homemade taste. Whether you’re a seasoned baker or a novice, this recipe will guide you through creating a flavorful Cheesy Pesto Swirl Bread that serves 4-6 people.
Ingredients
- 3 cups all-purpose flour
- 1 packet (2 1/4 teaspoons) instant yeast
- 1 tablespoon sugar
- 1 teaspoon salt
- 1 cup warm water (about 110°F)
- 2 tablespoons olive oil
- 1 cup mozzarella cheese, shredded
- 1/2 cup prepared basil pesto
- 1/4 cup grated Parmesan cheese
- 1 egg, beaten (for egg wash)
Instructions
1. Prepare the Dough: In a large mixing bowl, combine the flour, instant yeast, sugar, and salt. Add the warm water and olive oil, and mix until the dough begins to form. Knead the dough on a lightly floured surface for about 8-10 minutes until it’s smooth and elastic.
Place the dough in a lightly oiled bowl, cover with a damp cloth, and let it rise in a warm place for about 1-1.5 hours or until it has doubled in size.
2. Shape the Bread: Once the dough has risen, punch it down to release the air. Roll the dough out into a rectangle about 12×18 inches on a floured surface. Spread the pesto evenly over the dough, leaving a little space at the edges. Sprinkle the mozzarella and Parmesan cheese evenly over the pesto.
3. Form the Swirl: Starting from one of the longer sides, roll the dough tightly into a log. Pinch the edges to seal. Carefully transfer the log onto a parchment-lined baking sheet.
4. Second Rise: Cover the dough with a towel and let it rise again for about 30-45 minutes until it puffs up slightly.
5. Prepare for Baking: Preheat your oven to 375°F (190°C). Brush the top of the loaf with the beaten egg to give it a nice golden color when baked.
6. Bake the Bread: Bake the loaf in the preheated oven for 25-30 minutes, or until the bread is golden brown and sounds hollow when tapped on the bottom. Remove from the oven and let it cool on a wire rack before slicing.
Extra Tips
For the best flavor, use fresh basil pesto, either homemade or high-quality store-bought. Feel free to experiment with different cheeses like provolone or cheddar for a different flavor profile.
If your kitchen is cool and the dough is taking longer to rise, place it in a slightly warm oven (turned off) to speed up the process. Make sure to let the bread cool completely before slicing to guarantee a clean cut and avoid the cheese pulling away from the loaf. Enjoy your Cheesy Pesto Swirl Bread fresh or lightly toasted.
Classic Pane Toscano

Pane Toscano is a traditional Italian bread known for its rustic texture and slightly tangy flavor. Originating from the Tuscany region, this bread is unique because it’s made without salt, which allows the flavors of accompanying dishes to be more pronounced. Its crusty exterior and soft, chewy interior make it an excellent choice for sandwiches, dipping in olive oil, or accompanying hearty soups and stews.
Making Pane Toscano at home requires patience due to its lengthy fermentation process, but the end result is well worth the effort. The key to achieving its classic flavor and texture is in the use of a naturally fermented starter, which gives the bread its characteristic tanginess and airiness. This recipe yields a loaf suitable for serving 4-6 people.
Ingredients:
- 3 cups all-purpose flour
- 1 1/4 cups water
- 1/2 cup sourdough starter
- 1/4 teaspoon active dry yeast
- Olive oil for greasing
- Cornmeal for dusting
Instructions:
- Prepare the Starter: Combine the sourdough starter and 1/4 cup of water in a large mixing bowl. Stir until well mixed. Add 1/2 cup of flour and mix until a smooth batter is formed. Cover the bowl with a damp cloth and let it sit at room temperature for 12-16 hours or until it’s bubbly and has doubled in size.
- Mix the Dough: In the same bowl with the starter, add the remaining water and mix until dissolved. Gradually add the remaining flour and yeast. Mix until a shaggy dough forms.
- Knead the Dough: Turn the dough onto a lightly floured surface and knead for about 10 minutes until it becomes smooth and elastic. If the dough is too sticky, add a little more flour as needed.
- First Rise: Place the dough in a lightly greased bowl. Cover it with a damp cloth and let it rise in a warm place for 2 hours or until it has doubled in size.
- Shape the Loaf: Once the dough has risen, punch it down to release the air. Shape it into a round loaf and place it on a baking sheet lined with parchment paper and dusted with cornmeal.
- Second Rise: Cover the shaped loaf with a cloth and let it rise for another 30-45 minutes until it has expanded noticeably.
- Preheat the Oven: Preheat your oven to 450°F (230°C). Place a shallow pan of water on the bottom rack of the oven to create steam, which will help develop the crust.
- Bake the Bread: Place the baking sheet with the loaf in the oven and bake for 25-30 minutes or until the bread is golden brown and sounds hollow when tapped on the bottom.
- Cool the Bread: Remove the bread from the oven and let it cool on a wire rack before slicing.
Extra Tips:
For the best flavor, use a mature sourdough starter. If you don’t have one on hand, you can create a poolish by mixing equal parts water and flour with a pinch of yeast and letting it ferment overnight.
Be patient with the rising times, as fermentation is key to developing the bread’s flavor. If you prefer a slightly salted version, add a small pinch of salt to the dough.
This bread can also be frozen after it has cooled completely; just wrap it tightly in plastic wrap and then foil for longer storage.
Easy Italian Bread Rolls
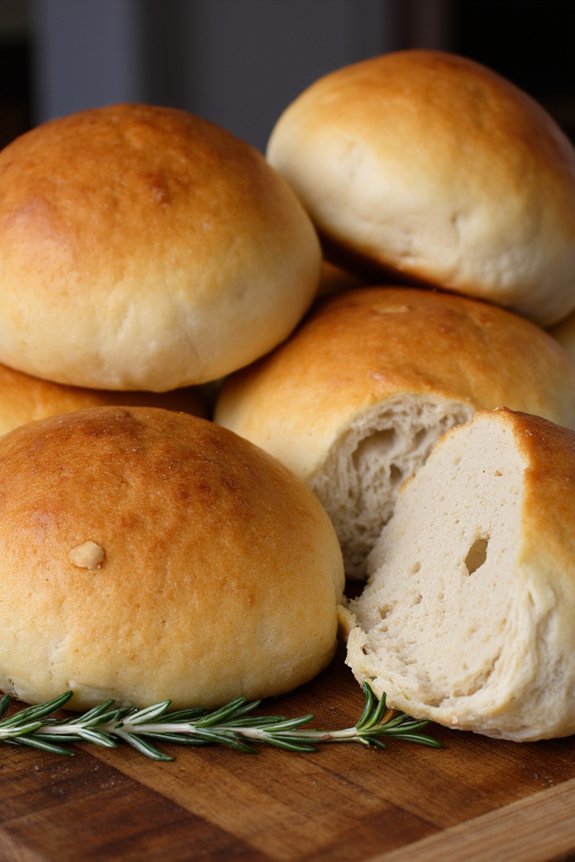
Italian bread rolls are a delightful addition to any meal, perfect for soaking up sauces or enjoying with a simple olive oil dip. These rolls are light and fluffy on the inside with a golden, crisp exterior. They’re versatile enough to complement a wide variety of main courses, making them a staple in Italian cuisine.
Whether served during a family dinner or at a festive gathering, these bread rolls are bound to impress your guests with their authentic taste and texture.
Creating these easy Italian bread rolls requires only a few basic ingredients and a bit of time for the dough to rise. The process is simple, making it an ideal recipe for both novice bakers and seasoned chefs. With a few steps, you can create homemade bread rolls that rival those found in Italian bakeries. This recipe serves 4-6 people, guaranteeing there’s plenty to go around.
Ingredients:
- 4 cups all-purpose flour
- 1 packet (2 1/4 teaspoons) active dry yeast
- 1 1/2 cups warm water (110°F)
- 2 tablespoons olive oil
- 2 teaspoons salt
- 1 teaspoon sugar
- Additional flour for dusting
- Olive oil for brushing
Instructions:
- Activate the Yeast: In a large mixing bowl, combine the warm water and sugar. Sprinkle the active dry yeast over the top and let it sit for about 5 minutes until it becomes frothy. This indicates that the yeast is active and ready to use.
- Mix the Dough: Add the olive oil, salt, and 2 cups of flour to the yeast mixture. Stir with a wooden spoon until the mixture is smooth. Gradually add the remaining flour, about 1/2 cup at a time, mixing well after each addition. The dough should be soft and slightly sticky.
- Knead the Dough: Transfer the dough onto a lightly floured surface. Knead the dough for about 8-10 minutes until it’s smooth and elastic. If the dough is too sticky, sprinkle a little more flour as needed.
- First Rise: Place the kneaded dough in a lightly oiled bowl, turning the dough to coat it with oil. Cover the bowl with a clean kitchen towel or plastic wrap. Allow the dough to rise in a warm, draft-free area for about 1 hour or until it has doubled in size.
- Shape the Rolls: Once the dough has risen, punch it down to release the air. Divide the dough into 12 equal pieces. Roll each piece into a ball and place them on a baking sheet lined with parchment paper. Make sure the rolls are spaced about 2 inches apart.
- Second Rise: Cover the rolls with a kitchen towel and let them rise for another 30 minutes until they’ve puffed up.
- Preheat the Oven: Preheat your oven to 400°F (200°C) while the rolls are undergoing their second rise.
- Bake the Rolls: Once the rolls have risen, brush the tops lightly with olive oil. Bake in the preheated oven for 15-20 minutes or until the rolls are golden brown.
- Cool and Serve: Remove the rolls from the oven and let them cool slightly on a wire rack before serving. Enjoy them warm with butter or olive oil.
Extra Tips:
For an extra flavor boost, consider adding herbs such as rosemary or thyme to the dough. You can also sprinkle sesame seeds or coarse sea salt on top before baking for added texture.
If you want a softer crust, brush the rolls with melted butter immediately after removing them from the oven. To ascertain your bread rolls are perfectly baked, use an instant-read thermometer to check if the internal temperature has reached about 190°F.
Enjoy your homemade Italian bread rolls fresh out of the oven for the best taste and texture.
Rustic Whole Wheat Baguette
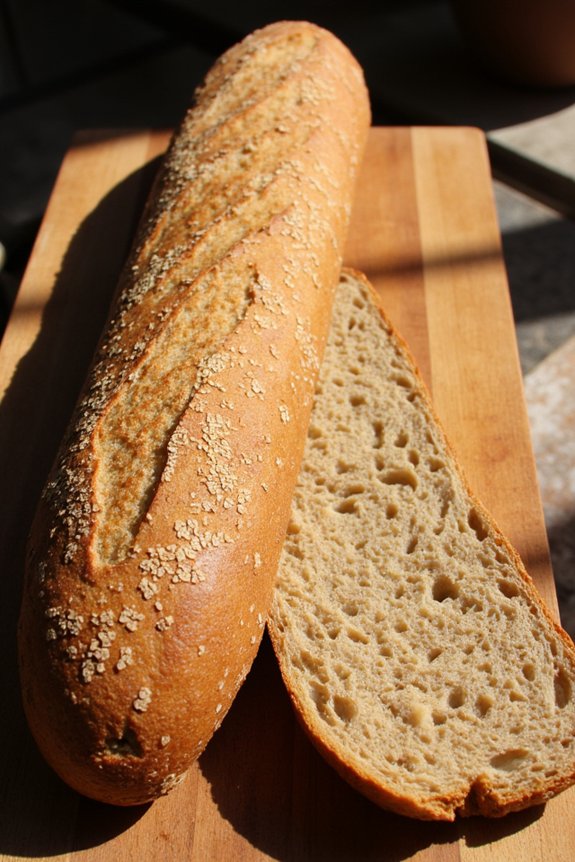
Rustic Whole Wheat Baguette is a delightful variation of the classic French bread, providing a wholesome twist with the use of whole wheat flour. This bread boasts a crispy crust and a soft, chewy interior, making it perfect for sandwiches, dipping in soups, or enjoying on its own with some butter.
While it may require a bit of patience and technique, the end result is a rewarding addition to any meal. Baking your own baguette at home allows you to experience the joy of fresh bread with the added benefits of whole grains.
Creating a Rustic Whole Wheat Baguette involves a few simple ingredients, but the process requires attention to detail, especially in the fermentation and shaping stages. The use of whole wheat flour not only adds nutritional value but also imparts a nutty flavor that complements the traditional taste of a baguette.
The key to achieving the characteristic texture and flavor lies in allowing the dough to ferment properly, which develops the gluten and enhances the overall taste. This recipe is designed to serve 4-6 people, perfect for a family meal or a small gathering.
Ingredients:
- 3 1/2 cups whole wheat flour
- 1 1/2 cups all-purpose flour
- 2 1/4 teaspoons active dry yeast
- 2 teaspoons salt
- 2 cups warm water (about 110°F)
- 1 teaspoon sugar
- Olive oil (for greasing)
Cooking Instructions:
- Prepare the Yeast Mixture: In a small bowl, dissolve the sugar in 1 cup of warm water. Add the active dry yeast and stir gently. Let it sit for about 5-10 minutes until it becomes frothy, indicating that the yeast is active.
- Mix the Dough: In a large mixing bowl, combine the whole wheat flour, all-purpose flour, and salt. Make a well in the center and pour in the yeast mixture along with the remaining warm water. Stir with a wooden spoon until the dough begins to come together.
- Knead the Dough: Transfer the dough to a lightly floured surface and knead for about 10 minutes, until the dough is smooth and elastic. If the dough is sticky, add a little more flour, a tablespoon at a time.
- First Rise: Lightly oil a large bowl with olive oil and place the dough inside, turning it to coat with oil. Cover with a damp cloth and let it rise in a warm, draft-free place for about 1 to 1 1/2 hours, or until it has doubled in size.
- Shape the Baguettes: Punch down the risen dough to release air. Divide the dough into two equal pieces. Shape each piece into a long baguette by flattening the dough into a rectangle, folding it lengthwise, and rolling it gently to form a log.
- Second Rise: Place the shaped baguettes on a parchment-lined baking sheet. Cover them with a damp cloth and let them rise for another 45 minutes, or until they’ve visibly puffed up.
- Preheat the Oven: About 20 minutes before baking, preheat your oven to 450°F (230°C). Place a shallow pan of water on the bottom rack for steam, which helps create a crispy crust.
- Score the Baguettes: Using a sharp knife or a bread lame, make several diagonal slashes about 1/4 inch deep on the top of each baguette.
- Bake: Place the baking sheet with the baguettes in the oven and bake for 20-25 minutes, or until the baguettes are golden brown and sound hollow when tapped on the bottom. Rotate the sheet halfway through for even baking.
- Cool: Remove the baguettes from the oven and let them cool on a wire rack for at least 15 minutes before serving.
Extra Tips:
For the best results, verify your water is at the right temperature to activate the yeast without killing it, which is around 110°F.
If your kitchen is cool, you can let your dough rise in an oven that’s turned off but has been slightly warmed.
Also, don’t skip the step of placing a pan of water in the oven, as the steam is essential for developing a crispy crust.
If you prefer a slightly lighter texture, you can adjust the ratio of whole wheat flour to all-purpose flour, keeping in mind that more whole wheat flour will make the bread denser.
Savory Stuffed Bread With Prosciutto

Indulge in the rich flavors of Italy with this Savory Stuffed Bread with Prosciutto. This delightful dish combines the savory taste of prosciutto with the comforting aroma of freshly baked bread. Perfect as an appetizer or a main course, this stuffed bread is sure to impress your family and friends.
The bread is filled with a mixture of prosciutto, cheese, and aromatic herbs, creating a harmonious blend of flavors that are both satisfying and delicious. Paired with a salad or a glass of wine, this recipe makes for a perfect meal or a party favorite.
The process of making Savory Stuffed Bread with Prosciutto isn’t only rewarding but also surprisingly easy. The key is in preparing a simple dough and allowing it to rise while gathering the flavorful filling. Once stuffed and baked to perfection, the bread develops a beautiful golden crust, while the inside remains soft and flavorful.
This recipe is designed to serve 4-6 people, making it an ideal choice for a family gathering or a casual dinner with friends.
Ingredients:
- 3 cups all-purpose flour
- 1 packet (2 1/4 teaspoons) instant yeast
- 1 teaspoon salt
- 1 tablespoon sugar
- 1 cup warm water (about 110°F/45°C)
- 1 tablespoon olive oil
- 6 ounces prosciutto, thinly sliced
- 1 1/2 cups shredded mozzarella cheese
- 1/4 cup grated Parmesan cheese
- 1 tablespoon dried Italian herbs (such as oregano, basil, and thyme)
- 1 egg, beaten (for egg wash)
- Optional: 1 tablespoon sesame seeds for topping
Instructions:
1. Make the Dough: In a large bowl, combine the flour, instant yeast, salt, and sugar. Add the warm water and olive oil, stirring until a dough begins to form. Knead the dough on a lightly floured surface for about 8-10 minutes until it’s smooth and elastic.
Place the dough in a lightly oiled bowl, cover it with a damp cloth, and let it rise in a warm place for about 1 hour or until it has doubled in size.
2. Prepare the Filling: While the dough is rising, prepare the filling. In a medium bowl, mix the shredded mozzarella cheese, grated Parmesan cheese, and dried Italian herbs. Set aside.
3. Roll Out the Dough: Once the dough has risen, punch it down and transfer it to a floured surface. Roll it out into a rectangular shape, approximately 12×18 inches.
4. Assemble the Bread: Evenly distribute the prosciutto slices over the rolled dough, leaving a small border around the edges. Sprinkle the cheese and herb mixture over the prosciutto.
5. Roll and Shape the Bread: Starting from one of the longer sides, carefully roll the dough into a log, sealing the edges as you go. Pinch the seam to secure it and tuck the ends under.
Place the rolled bread seam-side down on a baking sheet lined with parchment paper.
6. Apply Egg Wash: Brush the top of the bread with the beaten egg. Optionally, sprinkle sesame seeds over the top for extra texture and flavor.
7. Bake: Preheat your oven to 375°F (190°C). Bake the bread for 25-30 minutes or until the crust is golden brown and the bread sounds hollow when tapped on the bottom.
8. Cool and Serve: Allow the bread to cool on a wire rack for at least 10 minutes before slicing. Serve warm or at room temperature.
Extra Tips:
For best results, ascertain that your water is at the correct temperature (about 110°F/45°C) to activate the yeast effectively. If you prefer, you can experiment with different herbs or add extras like chopped olives or sun-dried tomatoes to the filling for added flavor.
Keep an eye on the bread as it bakes; if the crust is browning too quickly, you can loosely cover it with aluminum foil to prevent burning. Enjoy your homemade savory stuffed bread as a standalone dish or alongside a fresh salad for a complete meal.
Sweet Italian Easter Bread

Sweet Italian Easter Bread, known as “Pane di Pasqua,” is a traditional treat that brings vibrant colors and delightful flavors to the Easter table. This bread is characterized by its soft, sweet dough adorned with colorful sprinkles and often decorated with hard-boiled eggs, making it both a delicious and visually appealing centerpiece. The bread is slightly sweet with a hint of citrus, offering a perfect balance of flavors that’s bound to please both children and adults alike.
The tradition of baking Sweet Italian Easter Bread is a cherished one, passed down through generations, and it often involves the whole family in the preparation process. The bread’s braided form symbolizes the unity and continuity of family and tradition. Baking this bread isn’t only an opportunity to enjoy a tasty treat but also a chance to connect with Italian heritage and celebrate the spirit of Easter with loved ones. Below is a recipe suited for serving 4-6 people, perfect for a small family gathering.
Ingredients:
- 4 cups all-purpose flour
- 1/2 cup granulated sugar
- 1 packet (2 1/4 tsp) active dry yeast
- 1/2 cup warm milk (about 110°F)
- 1/4 cup unsalted butter, melted
- 3 large eggs (plus an additional egg for egg wash)
- 1 teaspoon vanilla extract
- 1 teaspoon salt
- Zest of 1 orange
- 1/4 cup rainbow sprinkles
- 4-6 dyed hard-boiled eggs (optional)
Instructions:
- Prepare the Yeast Mixture: In a small bowl, dissolve the yeast in warm milk and let it sit for about 5-10 minutes until it becomes frothy. This activates the yeast, guaranteeing the bread will rise properly.
- Mix the Dough: In a large mixing bowl, combine the flour, sugar, and salt. Make a well in the center and add the yeast mixture, melted butter, eggs, vanilla extract, and orange zest. Mix the ingredients until a soft dough forms.
- Knead the Dough: On a lightly floured surface, knead the dough for about 8-10 minutes until it’s smooth and elastic. This step is essential for developing the gluten structure, which gives the bread its chewy texture.
- First Rise: Place the dough in a greased bowl, cover it with a clean kitchen towel, and let it rise in a warm place for about 1-2 hours, or until it has doubled in size. The rising time may vary depending on the room temperature.
- Shape the Bread: Once the dough has risen, punch it down to release the air. Divide the dough into three equal parts and roll each into a long rope. Braid the ropes together, then shape the braided dough into a circle, pinching the ends to seal.
- Second Rise: Transfer the braided dough onto a baking sheet lined with parchment paper. Cover it again and let it rise for another 30-45 minutes until slightly puffed.
- Decorate and Bake: Preheat your oven to 350°F (175°C). Lightly beat the remaining egg and brush it over the dough for a shiny crust. Gently press the dyed hard-boiled eggs into the dough, if using, and sprinkle with rainbow sprinkles. Bake for 25-30 minutes, or until the bread is golden brown and sounds hollow when tapped on the bottom.
- Cool and Serve: Remove the bread from the oven and let it cool on a wire rack before serving. This helps set the bread’s crust and enhances its flavor.
Extra Tips:
When preparing Sweet Italian Easter Bread, make certain all your ingredients are at room temperature to help the dough rise more efficiently. If the dough is too sticky during kneading, add a little more flour, but be cautious not to add too much, as it can make the bread dense.
If you prefer a more pronounced citrus flavor, you can add some lemon zest along with the orange zest. When inserting the dyed eggs, make sure they’re nestled securely, as they tend to move during baking. Enjoy this bread fresh, or lightly toasted with a bit of butter for a delightful treat.