

There’s a secret ingredient no Italian kitchen should be without—ricotta cheese. Its creamy texture and mild flavor make it a versatile addition to both savory and sweet dishes. Whether you’re planning a special dinner or treating yourself to something indulgent, these 12 ricotta recipes will surely impress. Think of a luscious ricotta cheesecake or classic spinach-stuffed shells. Hungry for more? Let’s explore these delightful recipe ideas together.
Classic Ricotta and Spinach Stuffed Shells
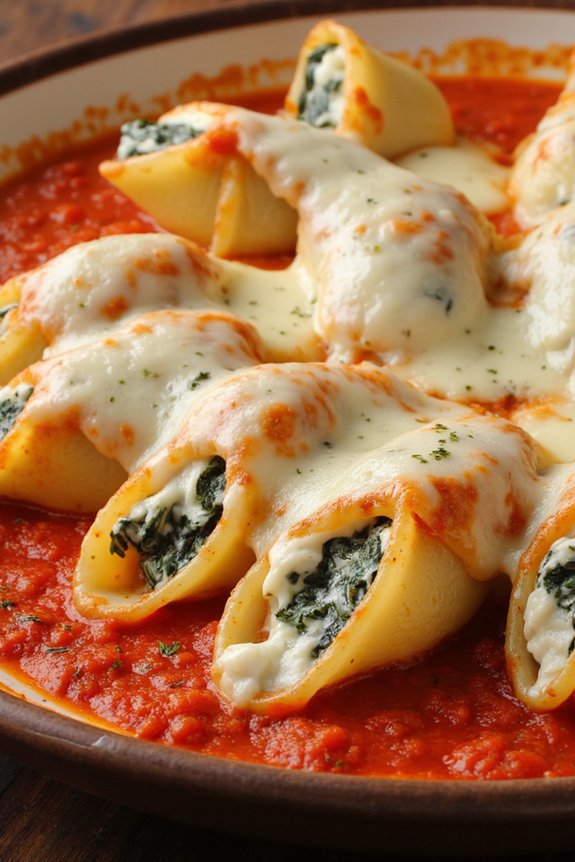
Classic Ricotta and Spinach Stuffed Shells are a delightful Italian dish that’s perfect for a family dinner or a gathering with friends. Combining creamy ricotta cheese with nutritious spinach, this dish is both tasty and wholesome. The large pasta shells are filled with the rich mixture and baked in a savory tomato sauce, making every bite a burst of flavor.
It’s a comforting meal that brings the authentic taste of Italy to your table. The simplicity of the ingredients makes this dish a favorite among many home cooks. With a blend of herbs, cheeses, and vegetables, Classic Ricotta and Spinach Stuffed Shells aren’t only delicious but also quite easy to prepare.
Ideal for a serving size of 4-6 people, this recipe guarantees everyone gets to enjoy a generous helping of this Italian classic.
Ingredients:
- 20-24 jumbo pasta shells
- 1 tablespoon olive oil
- 2 cups ricotta cheese
- 1 cup cooked spinach, drained and chopped
- 1 cup grated mozzarella cheese
- 1/2 cup grated Parmesan cheese
- 1 large egg
- 2 cloves garlic, minced
- 1 teaspoon dried basil
- 1 teaspoon dried oregano
- Salt and pepper to taste
- 3 cups marinara sauce
Instructions:
- Preheat and Prepare: Preheat your oven to 375°F (190°C). Cook the jumbo pasta shells in a large pot of boiling salted water until al dente, according to package instructions. Drain and set aside to cool slightly.
- Prepare the Filling: In a large mixing bowl, combine the ricotta cheese, cooked spinach, half of the mozzarella cheese, Parmesan cheese, egg, minced garlic, basil, oregano, salt, and pepper. Mix until well incorporated.
- Stuff the Shells: Carefully fill each of the pasta shells with the ricotta and spinach mixture. Be generous with the filling, assuring each shell is well stuffed.
- Assemble the Dish: Spread 1 cup of the marinara sauce on the bottom of a large baking dish. Arrange the stuffed shells on top of the sauce in a single layer.
- Top with Sauce and Cheese: Pour the remaining marinara sauce over the stuffed shells. Sprinkle the rest of the mozzarella cheese evenly over the top.
- Bake: Cover the baking dish with foil and bake in the preheated oven for 25 minutes. Remove the foil and bake for an additional 10-15 minutes, or until the cheese is melted and bubbly.
- Serve: Allow the dish to cool for a few minutes before serving. Garnish with extra Parmesan cheese or fresh basil if desired.
Extra Tips: For added flavor, consider incorporating other herbs such as thyme or rosemary into the filling. If you prefer a bit of heat, a pinch of red pepper flakes can be added to the ricotta mixture.
To make certain the pasta shells don’t stick together after boiling, toss them with a bit of olive oil before stuffing. Finally, this dish can be prepared a day in advance and stored in the refrigerator, making it a convenient option for busy schedules.
Decadent Ricotta Cheesecake
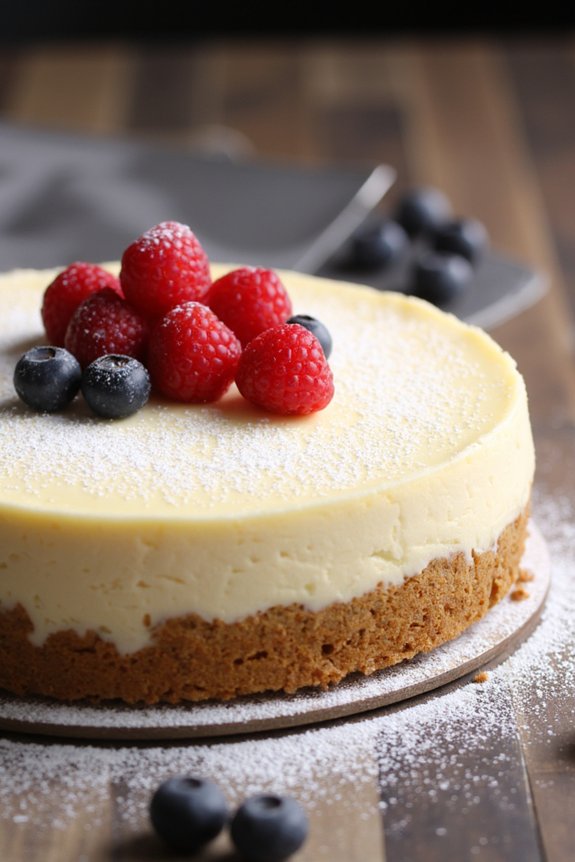
Indulge in the creamy, luscious world of Italian desserts with this Decadent Ricotta Cheesecake. Known for its smooth texture and rich flavor, ricotta cheesecake is a delightful twist on the classic cheesecake, offering a lighter and more delicate experience. This dessert is perfect for any occasion, whether you’re hosting a dinner party or simply treating yourself to a bit of indulgence.
The combination of ricotta cheese with a hint of lemon zest creates a tangy, sweet, and utterly irresistible treat that will have your guests coming back for more. This recipe is designed to serve 4-6 people, making it ideal for a small gathering or family dessert. The preparation is straightforward, and with the right ingredients and a little patience, you can achieve a cheesecake that rivals any Italian bakery.
The key to this recipe is high-quality ricotta cheese, which provides the creamy base and signature flavor to this dessert. Pair it with a buttery graham cracker crust, and you’ll have a cheesecake that’s truly unforgettable.
Ingredients:
- 1 1/2 cups graham cracker crumbs
- 1/2 cup unsalted butter, melted
- 1 tablespoon sugar
- 2 cups ricotta cheese
- 1 cup cream cheese, softened
- 3/4 cup granulated sugar
- 3 large eggs
- 1 teaspoon vanilla extract
- Zest of 1 lemon
- 1 tablespoon all-purpose flour
Instructions:
- Prepare the Crust: Preheat your oven to 350°F (175°C). In a medium bowl, combine the graham cracker crumbs, melted butter, and sugar. Mix until the crumbs are evenly coated with butter. Press the mixture into the bottom of a 9-inch springform pan to form an even crust. Bake the crust for 10 minutes, then remove it from the oven and let it cool.
- Make the Filling: In a large mixing bowl, beat the ricotta cheese and cream cheese together until smooth and creamy. Gradually add the granulated sugar and continue to beat until well incorporated. Add the eggs, one at a time, mixing well after each addition. Stir in the vanilla extract, lemon zest, and flour until just combined.
- Assemble the Cheesecake: Pour the ricotta mixture over the cooled crust in the springform pan. Use a spatula to smooth the top and ascertain an even layer.
- Bake the Cheesecake: Place the cheesecake in the preheated oven and bake for 50-60 minutes, or until the center is set but still slightly jiggly. Avoid opening the oven door frequently to prevent the cheesecake from cracking.
- Cool and Chill: Once baked, remove the cheesecake from the oven and let it cool in the pan for about 30 minutes. Run a knife around the edge of the pan to loosen the cheesecake, then refrigerate for at least 4 hours or overnight to set completely.
- Serve: Before serving, gently remove the sides of the springform pan. Slice and serve chilled, optionally garnished with fresh berries or a dusting of powdered sugar.
Extra Tips:
To guarantee a smooth and creamy ricotta cheesecake, make sure all your ingredients are at room temperature before you begin mixing. This helps the cheeses blend more easily and results in a smoother texture.
Additionally, to prevent cracking, avoid over-mixing the batter once you’ve added the eggs, and be gentle when incorporating the flour. If you notice any cracks on the surface after baking, they can be easily covered with a topping of fresh fruit or a light dusting of powdered sugar. Enjoy your homemade Italian masterpiece!
Creamy Ricotta and Lemon Pancakes
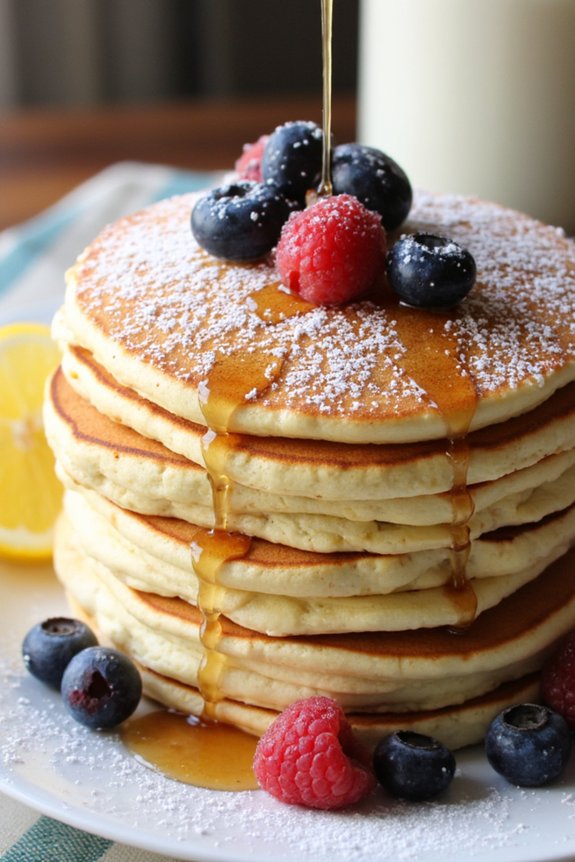
Creamy Ricotta and Lemon Pancakes are a delightful twist on the classic breakfast favorite, bringing a burst of fresh, zesty flavor to your morning meal. These pancakes are exceptionally light and fluffy thanks to the addition of creamy ricotta cheese, which also adds a subtle richness to the batter. The lemon zest and juice infuse the pancakes with a bright citrus flavor that pairs perfectly with a drizzle of maple syrup or a dusting of powdered sugar.
Perfect for a leisurely weekend brunch or a special breakfast treat, these pancakes are sure to impress family and friends with their delicate texture and invigorating taste. The combination of ricotta and lemon creates a harmonious balance that makes each bite a delicious experience. Whether you’re serving a crowd or simply indulging yourself, these pancakes are a delightful way to start the day.
Ingredients for 4-6 people:
- 1 cup ricotta cheese
- 1 cup milk
- 2 large eggs
- 1 teaspoon vanilla extract
- 1/4 cup granulated sugar
- 1 tablespoon lemon zest
- 2 tablespoons lemon juice
- 1 cup all-purpose flour
- 1 tablespoon baking powder
- 1/4 teaspoon salt
- Butter or oil for cooking
Instructions:
- Prepare the Wet Ingredients: In a large mixing bowl, combine the ricotta cheese, milk, eggs, and vanilla extract. Whisk together until smooth and well combined. This mixture will form the base for your pancake batter and guarantee all ingredients are evenly distributed.
- Add Sugar and Lemon: Add the granulated sugar, lemon zest, and lemon juice to the wet ingredients. Stir until the sugar is dissolved and the lemon is evenly incorporated, giving the batter a lovely citrus aroma.
- Mix the Dry Ingredients: In a separate bowl, whisk together the all-purpose flour, baking powder, and salt. Mixing these dry ingredients separately helps to evenly distribute the baking powder, guaranteeing the pancakes rise properly and have a consistent texture.
- Combine Wet and Dry Ingredients: Gradually add the dry ingredients to the wet ingredients, stirring gently until just combined. Be careful not to overmix, as this can result in dense pancakes. The batter should be slightly lumpy.
- Heat the Pan: Heat a non-stick skillet or griddle over medium heat. Add a small amount of butter or oil to the pan to prevent sticking.
- Cook the Pancakes: Pour approximately 1/4 cup of batter onto the hot skillet for each pancake. Cook until bubbles form on the surface and the edges look set, about 2-3 minutes. Flip and cook for an additional 2 minutes, or until golden brown. Adjust the heat as needed to avoid burning.
- Serve: Remove pancakes from the skillet and serve warm. Top with your favorite toppings such as maple syrup, fresh berries, or a sprinkle of powdered sugar.
Extra Tips:
To guarantee the lightest and fluffiest pancakes, avoid overmixing the batter — a few lumps are perfectly normal. If you prefer a stronger lemon flavor, feel free to add an extra teaspoon of lemon zest. For an even richer texture, you can substitute part of the milk with buttermilk.
Finally, if you’re making a large batch, keep cooked pancakes warm in a preheated oven at 200°F (93°C) while you prepare the rest. Enjoy your delicious homemade Creamy Ricotta and Lemon Pancakes!
Savory Ricotta and Herb Frittata

The Savory Ricotta and Herb Frittata is a delightful Italian dish that perfectly combines the creamy texture of ricotta cheese with the aromatic flavors of fresh herbs. This frittata isn’t only simple to prepare but also versatile enough to be served for breakfast, brunch, or even as a light dinner.
The blend of ricotta with herbs such as basil, parsley, and chives creates a frittata that’s both fluffy and flavorful, making it a crowd-pleaser for any occasion.
This recipe is designed to serve 4-6 people, providing a generous portion for each. The dish is baked to golden perfection, guaranteeing that the ricotta remains moist and the herbs infuse the eggs with their fragrant essence.
Whether enjoyed warm out of the oven or at room temperature, the Savory Ricotta and Herb Frittata is a proof of the beauty of simple, fresh ingredients coming together to create something truly special.
Ingredients:
- 8 large eggs
- 1 cup ricotta cheese
- 1/4 cup grated Parmesan cheese
- 1/4 cup chopped fresh basil
- 1/4 cup chopped fresh parsley
- 2 tablespoons chopped fresh chives
- 1/2 teaspoon salt
- 1/4 teaspoon black pepper
- 2 tablespoons olive oil
- 1 small onion, finely chopped
- 2 cloves garlic, minced
Instructions:
- Preheat the Oven: Preheat your oven to 350°F (175°C) to guarantee it’s ready for baking the frittata.
- Prepare the Egg Mixture: In a large mixing bowl, whisk together the eggs, ricotta cheese, Parmesan cheese, salt, and black pepper until well combined. The mixture should be smooth and creamy.
- Sauté the Aromatics: In a large oven-safe skillet, heat the olive oil over medium heat. Add the chopped onion and sauté until it becomes translucent, about 3-4 minutes. Stir in the minced garlic and cook for an additional minute until fragrant.
- Combine Ingredients: Add the fresh basil, parsley, and chives to the egg mixture, stirring to evenly distribute the herbs. Pour this mixture over the sautéed onions and garlic in the skillet.
- Cook on the Stovetop: Allow the frittata to cook on the stovetop over medium heat for about 5-7 minutes, or until the edges begin to set. You should see the frittata starting to pull away from the sides of the skillet.
- Bake the Frittata: Transfer the skillet to the preheated oven and bake for 15-20 minutes, or until the frittata is puffed, golden brown, and the center is set. You can check for doneness by inserting a toothpick in the center; it should come out clean.
- Cool and Serve: Remove the skillet from the oven and let the frittata cool for a few minutes before slicing. Serve warm or at room temperature.
Extra Tips:
For the best results, use fresh, high-quality ricotta cheese as it greatly impacts the texture and flavor of the frittata.
Feel free to experiment with additional herbs or vegetables, such as spinach or bell peppers, to suit your taste preferences.
If you don’t have an oven-safe skillet, you can transfer the partially cooked frittata to a baking dish before placing it in the oven.
Finally, be sure not to overbake the frittata, as this can cause it to become dry. Enjoy your Savory Ricotta and Herb Frittata as a standalone dish or pair it with a fresh salad or crusty bread for a complete meal.
Traditional Italian Cannoli With Ricotta Filling
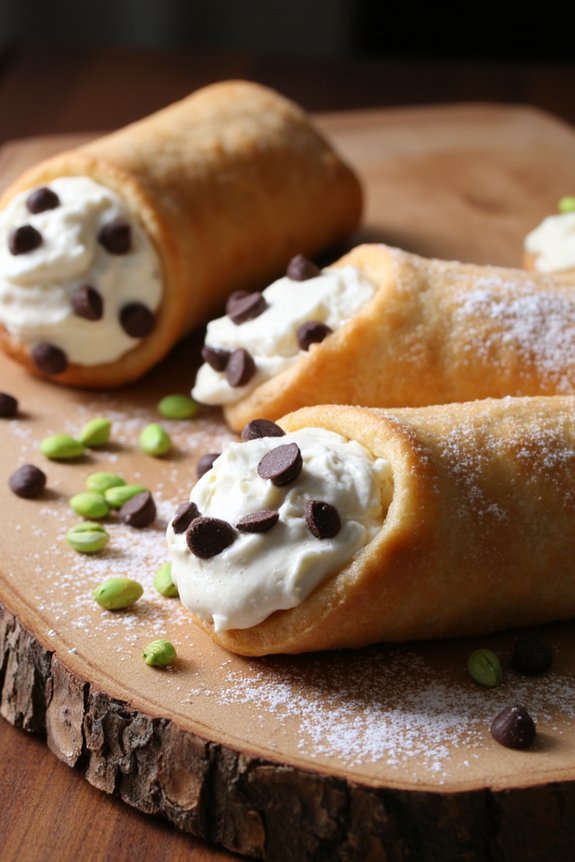
Cannoli are a quintessential Italian pastry that have delighted taste buds around the world. Originating from Sicily, these crispy, tube-shaped shells filled with a sweet and creamy ricotta filling offer a perfect blend of textures and flavors. Making traditional Italian cannoli at home may seem intimidating, but with the right ingredients and a bit of patience, you can recreate this beloved Italian dessert in your own kitchen.
The key to authentic cannoli lies in the quality of the ricotta and the delicate balance of flavors in the filling.
Preparing cannoli involves two main components: the shell and the filling. The shell is a crispy, fried pastry that provides a delightful crunch. The filling, made primarily from ricotta cheese, is sweetened and flavored with ingredients like vanilla, chocolate chips, and candied fruit. When assembling cannoli, it’s crucial to fill them just before serving to maintain their crispiness. This recipe is designed to serve 4-6 people, guaranteeing everyone can enjoy this Italian treat.
Ingredients for Cannoli (Serves 4-6):
*For the Shells:*
- 2 cups all-purpose flour
- 2 tablespoons granulated sugar
- 1/4 teaspoon salt
- 3 tablespoons unsalted butter, chilled and cubed
- 1 large egg yolk
- 1/2 cup sweet Marsala wine
- Vegetable oil, for frying
For the Ricotta Filling:
- 2 cups ricotta cheese, drained
- 1 cup powdered sugar
- 1 teaspoon vanilla extract
- 1/2 cup mini chocolate chips
- 1/2 cup candied orange peel, finely chopped (optional)
Garnishes:
- Powdered sugar, for dusting
- Chopped pistachios or additional chocolate chips (optional)
Cooking Instructions:
- Prepare the Shell Dough:
- In a large bowl, combine the flour, sugar, and salt. Add the chilled butter cubes and mix until the mixture resembles coarse crumbs.
- Add the egg yolk and Marsala wine, mixing until a dough forms. Knead the dough on a floured surface until smooth.
- Wrap the dough in plastic wrap and refrigerate for at least 1 hour.
- Prepare the Ricotta Filling:
- In a medium bowl, combine the ricotta cheese, powdered sugar, and vanilla extract. Mix until smooth and creamy.
- Fold in the mini chocolate chips and candied orange peel. Cover and refrigerate until ready to use.
- Roll and Cut the Dough:
- Roll out the chilled dough on a floured surface to about 1/8-inch thickness. Use a round cutter to cut out circles, approximately 4 inches in diameter.
- Shape and Fry the Shells:
- Wrap each dough circle around a cannoli form, sealing the edges with a bit of water.
- Heat vegetable oil in a deep fryer or large pot to 350°F (175°C). Fry the cannoli shells in batches until golden brown, about 2-3 minutes per batch.
- Carefully remove the shells and let them drain on paper towels. Once cool, gently slide them off the forms.
- Fill the Cannoli:
- Just before serving, fill a pastry bag with the ricotta mixture and pipe it into each cannoli shell.
- Dust with powdered sugar and garnish with chopped pistachios or additional chocolate chips if desired.
Extra Tips:
To guarantee your cannoli shells are perfectly crispy, make sure the dough is rolled out evenly and not too thick. If you don’t have a pastry bag, you can use a plastic sandwich bag with a corner snipped off to fill the shells.
For an extra flavor boost, consider adding a touch of cinnamon or a splash of orange zest to the ricotta filling. Finally, always serve the cannoli shortly after filling them to maintain their crisp texture and enjoy the freshest taste.
Fluffy Ricotta and Parmesan Gnocchi
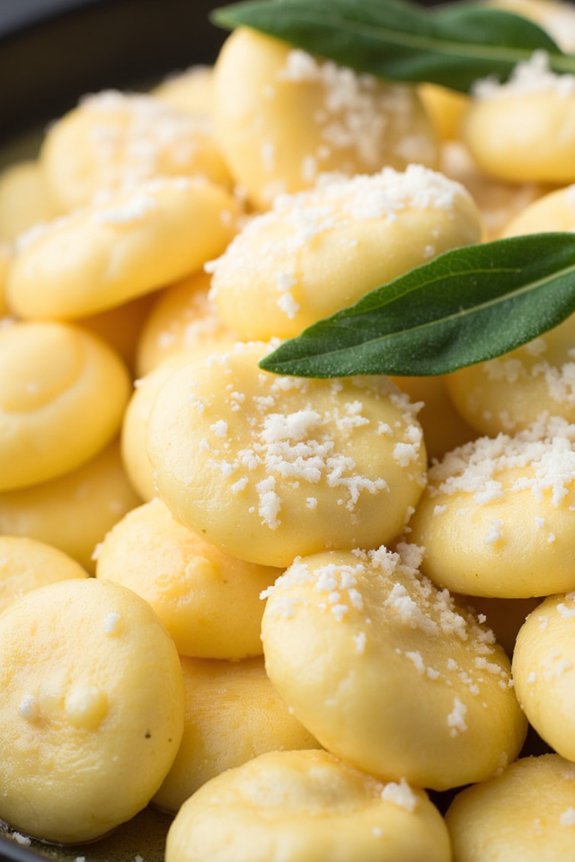
Fluffy Ricotta and Parmesan Gnocchi is a delightful Italian dish that brings together the creamy texture of ricotta cheese and the robust flavor of Parmesan. This gnocchi is lighter than its potato-based counterpart, making it a perfect choice for a comforting yet elegant meal. The combination of ricotta and Parmesan creates a pillowy texture that’s both satisfying and rich, yet not overly heavy.
Whether served with a simple butter and sage sauce or tossed with fresh tomato and basil, these gnocchi are sure to impress.
Making Fluffy Ricotta and Parmesan Gnocchi at home is easier than you might think. The key is using high-quality ricotta, which adds moisture and softness, while the Parmesan provides a savory depth that enhances the overall flavor. The process involves creating a dough with these ingredients, which is then shaped into gnocchi and cooked to perfection.
This dish is ideal for a family dinner or a gathering with friends, offering a taste of Italy that everyone will enjoy.
Ingredients for 4-6 servings:
- 1 cup ricotta cheese
- 1 cup grated Parmesan cheese
- 1 large egg
- 1 teaspoon salt
- 1 cup all-purpose flour, plus more for dusting
- 1/4 teaspoon freshly ground black pepper
- 1 tablespoon unsalted butter
- Fresh sage leaves (optional)
- Grated Parmesan for serving
- Salt for boiling water
Cooking Instructions:
- Prepare the Dough: In a large mixing bowl, combine the ricotta cheese, grated Parmesan, egg, and salt. Mix well until the ingredients are thoroughly combined. Gradually add the flour and black pepper, mixing until a soft dough forms. It should be slightly sticky but hold together when shaped. If needed, add more flour, a tablespoon at a time, until the dough reaches the right consistency.
- Shape the Gnocchi: Lightly flour a clean surface and divide the dough into four equal portions. Roll each portion into a long rope, about 1/2 inch thick. Cut the ropes into 1-inch pieces to form the gnocchi. If desired, you can gently press each piece with a fork to create ridges, which help the sauce cling to the gnocchi.
- Cook the Gnocchi: Bring a large pot of salted water to a boil. Carefully add the gnocchi in batches, making certain they don’t stick together. Cook the gnocchi until they float to the surface, about 2-3 minutes. Use a slotted spoon to transfer them to a plate lined with paper towels to drain.
- Finish and Serve: In a large skillet, melt the butter over medium heat. Add the cooked gnocchi and sage leaves, if using, and sauté for 2-3 minutes until the gnocchi are lightly golden. Serve immediately with a sprinkle of grated Parmesan.
Extra Tips:
To guarantee the ricotta isn’t too wet, you can drain it in a fine-mesh sieve for about 30 minutes before using. This will help the dough hold together better.
Additionally, when rolling out the dough, work quickly and avoid overworking it to prevent the gnocchi from becoming dense. If you’re not serving them immediately, briefly reheating the gnocchi in the skillet with butter or olive oil helps revive their fluffy texture.
Finally, feel free to experiment with different sauces or incorporate seasonal herbs for a unique twist on this classic dish.
Delicious Ricotta and Honey Bruschetta
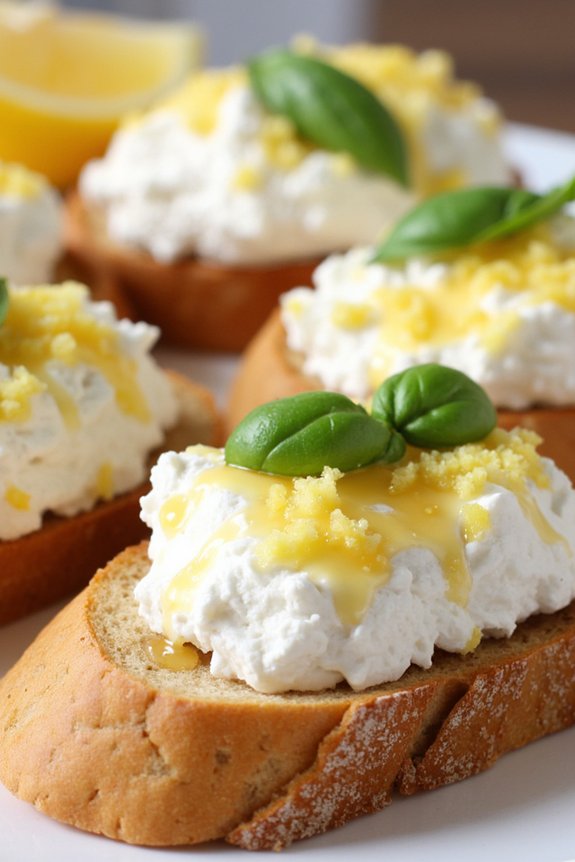
Delicious Ricotta and Honey Bruschetta is a simple yet sophisticated appetizer that brings together the creamy texture of ricotta cheese with the sweetness of honey and the crunch of toasted bread. This dish is perfect for a light snack, a starter at dinner parties, or even a delightful brunch option.
The balance of flavors and textures makes it a crowd-pleaser, and it’s exceptionally easy to prepare, making it accessible for cooks of all skill levels. This recipe is designed to serve 4-6 people and is best enjoyed fresh.
The combination of the creamy ricotta with the slight tang of lemon zest, the sweetness of honey, and the crunch of toasted bread creates a symphony of flavors that’s both comforting and indulgent. Topped with a sprinkle of fresh herbs, this dish not only tastes amazing but also looks visually appealing, making it a beautiful addition to any table.
Ingredients:
- 1 baguette, sliced into 1/2 inch thick slices
- 1 cup ricotta cheese
- 1/4 cup honey
- Zest of 1 lemon
- Salt to taste
- Freshly ground black pepper to taste
- 2 tablespoons extra virgin olive oil
- Fresh basil or mint leaves for garnish
Instructions:
1. Prepare the Bread: Preheat your oven to 400°F (200°C). Arrange the baguette slices on a baking sheet and brush each slice lightly with olive oil.
Place the baking sheet in the oven and toast the bread for 5-7 minutes, or until the slices are golden brown and crisp. Keep an eye on them to verify they don’t burn.
2. Mix the Ricotta: In a medium bowl, combine the ricotta cheese, lemon zest, a pinch of salt, and a dash of freshly ground black pepper. Mix well until the ingredients are fully combined and the ricotta is smooth and creamy.
3. Assemble the Bruschetta: Once the bread is toasted, remove it from the oven and let it cool slightly. Spread a generous amount of the ricotta mixture on each slice of bread.
Drizzle the honey over the ricotta-topped slices, making sure each piece gets a nice coating of honey.
4. Garnish and Serve: Finish off the bruschetta by garnishing each slice with fresh basil or mint leaves. Serve immediately while the bread is still warm, allowing guests to enjoy the full experience of textures and flavors.
Extra Tips:
To elevate this dish, consider using high-quality, artisanal honey, as its flavor will greatly impact the overall taste. If you prefer a bit of heat, add a pinch of crushed red pepper flakes to the ricotta mixture for a subtle kick.
Additionally, you can experiment with different herbs like thyme or rosemary for a unique twist. Remember that the key to a perfect bruschetta is the quality of the ingredients, so opt for the freshest ricotta and herbs you can find.
Enjoy your Delicious Ricotta and Honey Bruschetta with a glass of white wine for a truly delightful experience.
Ricotta and Chocolate Chip Cookies
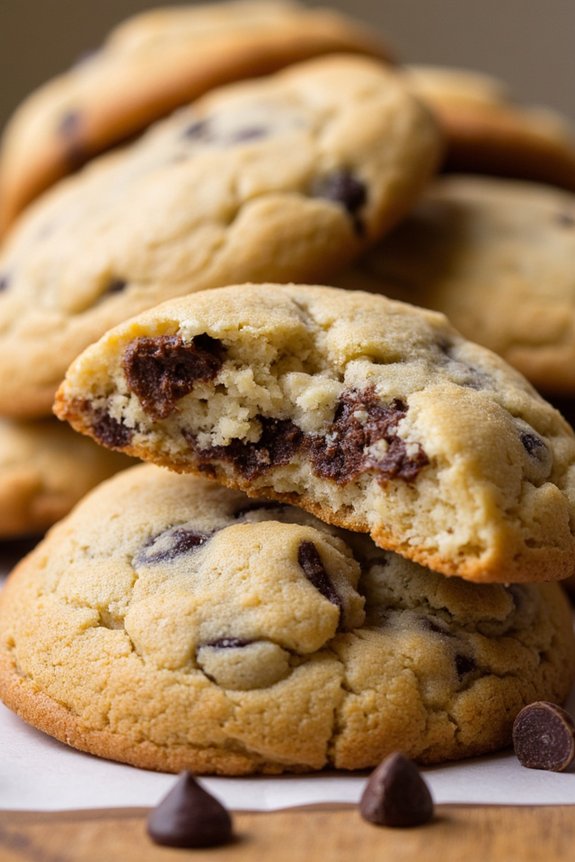
Indulge in the delightful fusion of creamy ricotta cheese and rich chocolate chips with this irresistible cookie recipe. The ricotta not only adds a unique flavor but also keeps the cookies exceptionally moist and tender. Perfect for any occasion, these cookies offer a sophisticated twist on a classic favorite, making them a hit at family gatherings or as an afternoon treat with coffee or tea.
Whether you’re a seasoned baker or just starting out, this recipe is straightforward and rewarding, promising a batch of delectable cookies that everyone will enjoy. This recipe yields approximately 24 cookies, making it ideal for serving 4-6 people, depending on their appetite for sweets. The combination of textures and flavors will have everyone reaching for seconds, and maybe even thirds.
The cookies are best enjoyed fresh out of the oven when the chocolate chips are still gooey, but they retain their deliciousness for several days if stored properly. Now, let’s gather the ingredients and get started on creating these scrumptious Ricotta and Chocolate Chip Cookies.
Ingredients:
- 1 cup ricotta cheese
- 1 cup granulated sugar
- 1/2 cup unsalted butter, softened
- 1 teaspoon vanilla extract
- 1 large egg
- 2 cups all-purpose flour
- 1/2 teaspoon baking powder
- 1/2 teaspoon baking soda
- 1/4 teaspoon salt
- 1 cup chocolate chips
Instructions:
- Preheat the Oven: Start by preheating your oven to 350°F (175°C). Line two baking sheets with parchment paper or lightly grease them to prevent the cookies from sticking.
- Mix Wet Ingredients: In a large bowl, combine the ricotta cheese, granulated sugar, and softened butter. Beat the mixture using an electric mixer on medium speed until it’s creamy and well-blended. Add the vanilla extract and the egg, then continue to mix until all the ingredients are fully incorporated.
- Combine Dry Ingredients: In a separate bowl, whisk together the all-purpose flour, baking powder, baking soda, and salt. This helps to evenly distribute the leavening agents and salt throughout the flour.
- Create the Dough: Gradually add the dry ingredients to the wet mixture, mixing on low speed until just combined. Be careful not to overmix, as this can lead to tougher cookies. Gently fold in the chocolate chips using a spatula.
- Shape the Cookies: Using a tablespoon or a small cookie scoop, drop rounded spoonfuls of dough onto the prepared baking sheets, leaving about 2 inches between each cookie to allow for spreading.
- Bake the Cookies: Place the baking sheets in the preheated oven and bake for 12-15 minutes, or until the edges of the cookies are lightly golden. The centers should still be soft, as they’ll continue to firm up as the cookies cool.
- Cool and Serve: Remove the cookies from the oven and allow them to cool on the baking sheets for about 5 minutes before transferring them to a wire rack to cool completely. Enjoy them warm or at room temperature.
Extra Tips:
For an extra burst of flavor, consider adding a teaspoon of orange zest to the dough, which complements the ricotta and chocolate beautifully. If you prefer a softer cookie, reduce the baking time slightly, making sure the centers are just set.
To keep the cookies fresh, store them in an airtight container at room temperature for up to 5 days. You can also freeze the dough for up to a month; just thaw it in the refrigerator before baking. Enjoy experimenting with different types of chocolate chips, such as dark or white chocolate, to suit your taste preferences.
Hearty Ricotta and Tomato Tart

The Hearty Ricotta and Tomato Tart is a savory delight that brings together the creamy richness of ricotta cheese with the bright, tangy flavors of ripe tomatoes. Perfect as a main dish or a flavorful appetizer, this tart is both elegant and comforting, making it an ideal choice for a family dinner or a gathering with friends.
With a flaky pastry crust as its base, the tart is layered with a luscious ricotta mixture, topped with vibrant tomatoes, and finished with fresh herbs. The balance of textures and flavors guarantees that every bite is a delightful experience.
This recipe is designed to serve 4-6 people, making it a versatile option for various occasions. The ingredients are simple and can be easily found at your local grocery store. Preparing this tart is straightforward, requiring only a few steps to bring everything together. Whether you’re an experienced cook or a kitchen novice, this recipe is accessible and rewarding.
Follow the steps below to create a dish that’s sure to impress your guests or satisfy your family’s taste buds.
Ingredients:
- 1 sheet of puff pastry, thawed
- 1 cup of ricotta cheese
- 1/2 cup of grated Parmesan cheese
- 1 large egg
- Salt and black pepper to taste
- 1 tablespoon of olive oil
- 2 cups of cherry tomatoes, halved
- 2 tablespoons of fresh basil, chopped
- 1 tablespoon of fresh thyme leaves
Instructions:
- Preheat the Oven: Begin by preheating your oven to 400°F (200°C). This guarantees that the tart will bake evenly and the pastry will become perfectly flaky.
- Prepare the Puff Pastry: Roll out the puff pastry on a lightly floured surface to guarantee it fits your tart pan or baking sheet. Transfer the pastry to the pan, gently pressing it into the corners and trimming any excess.
- Make the Ricotta Mixture: In a mixing bowl, combine the ricotta cheese, Parmesan cheese, egg, salt, and black pepper. Mix well until the ingredients are fully incorporated and smooth.
- Assemble the Tart: Spread the ricotta mixture evenly over the puff pastry, leaving a small border around the edges. This will allow the edges to puff up nicely during baking.
- Add the Tomatoes: Arrange the halved cherry tomatoes on top of the ricotta layer. You can place them cut-side up or down, depending on your preference.
- Season and Bake: Drizzle the olive oil over the tomatoes and sprinkle the fresh basil and thyme leaves on top. Bake the tart in the preheated oven for about 25-30 minutes, or until the pastry is golden brown and the tomatoes are slightly blistered.
- Cool and Serve: Once baked, remove the tart from the oven and allow it to cool for a few minutes before slicing. Serve warm or at room temperature.
Extra Tips:
For best results, make sure that the puff pastry is properly thawed before rolling it out, as this will prevent it from cracking.
If you’re looking for an extra layer of flavor, consider adding a sprinkle of red pepper flakes for a bit of heat. This tart is versatile, so feel free to experiment with additional toppings such as caramelized onions or roasted garlic for added depth.
Finally, if you have leftovers, store them in an airtight container in the refrigerator and reheat gently in the oven to maintain the crispness of the pastry.
Velvety Ricotta and Pesto Pasta
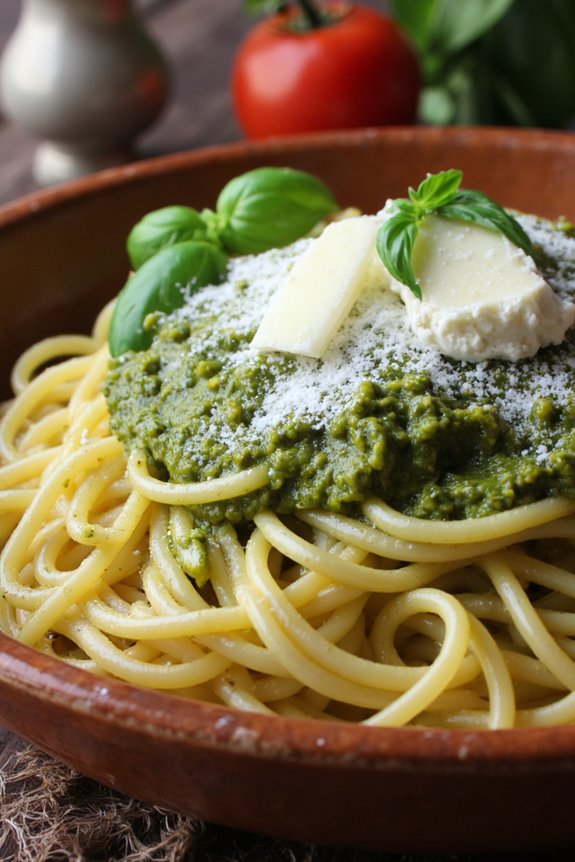
Velvety Ricotta and Pesto Pasta is a delightful Italian dish that combines the creamy texture of ricotta cheese with the aromatic flavors of basil pesto. This dish is perfect for a quick yet impressive meal that can be prepared in under 30 minutes. The velvety sauce coats the pasta beautifully, creating a harmonious blend of flavors that’s both satisfying and comforting.
Whether you’re serving it for a family dinner or a casual gathering with friends, this recipe is sure to please everyone at the table.
The key to this dish lies in the quality of the ingredients. Fresh basil, high-quality ricotta cheese, and a good olive oil are essential to achieving the rich and creamy texture that makes this pasta so special. Pair it with your choice of pasta—spaghetti, fettuccine, or penne all work wonderfully—and serve it with a sprinkle of Parmesan cheese for an added touch of indulgence.
The following recipe will guide you through the process of making Velvety Ricotta and Pesto Pasta for 4-6 people, ensuring a delicious and satisfying meal.
Ingredients (Serves 4-6)
- 1 lb (450g) pasta (spaghetti, fettuccine, or penne)
- 1 cup ricotta cheese
- 1 cup fresh basil pesto
- 1/2 cup grated Parmesan cheese
- 1/4 cup olive oil
- 2 cloves garlic, minced
- Salt and pepper to taste
- Fresh basil leaves for garnish
Cooking Instructions
- Cook the Pasta: Bring a large pot of salted water to a boil. Add the pasta of your choice and cook according to package instructions until al dente. Reserve 1 cup of pasta water, then drain the pasta and set aside.
- Prepare the Sauce: In a large skillet over medium heat, add the olive oil and minced garlic. Sauté the garlic until fragrant, about 1 minute. Be careful not to burn the garlic.
- Combine Ricotta and Pesto: In a large mixing bowl, combine the ricotta cheese and basil pesto. Mix well until smooth. Add the sautéed garlic and olive oil mixture to the ricotta and pesto, stirring to combine.
- Toss Pasta with Sauce: Add the cooked pasta to the mixing bowl with the ricotta-pesto mixture. Toss the pasta until it’s well coated with the sauce. If the sauce is too thick, gradually add some reserved pasta water until you achieve the desired consistency.
- Season and Serve: Season the pasta with salt and pepper to taste. Transfer to a serving dish and top with grated Parmesan cheese. Garnish with fresh basil leaves and serve immediately.
Extra Tips
For the best flavor, use fresh basil pesto, either homemade or from a reputable store. If you prefer a smoother sauce, you can blend the ricotta and pesto mixture in a food processor before combining with the pasta.
Additionally, if you enjoy a bit of heat, consider adding a pinch of red pepper flakes to the garlic sauté for an extra kick. Enjoy this dish with a side of garlic bread or a simple green salad for a complete meal.
Sweet Ricotta and Berry Parfait
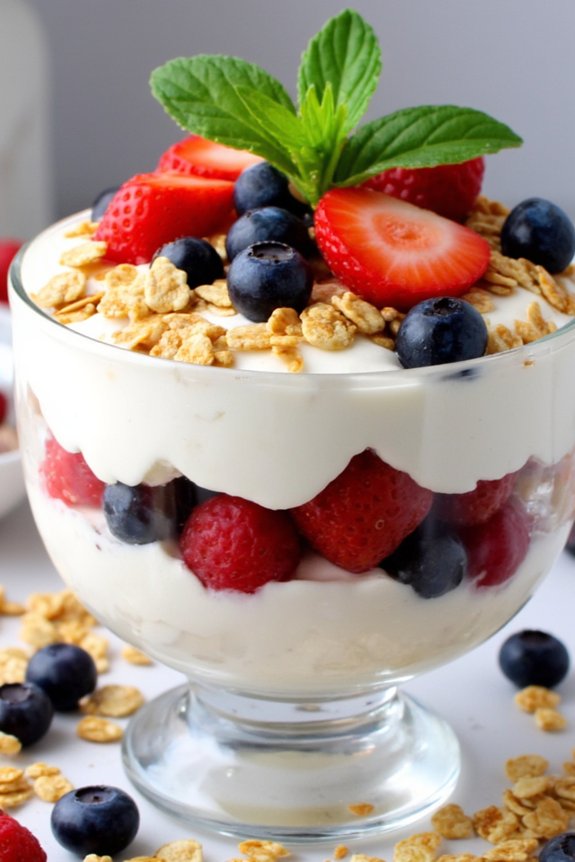
Sweet Ricotta and Berry Parfait is a delightful and invigorating dessert that combines the creamy texture of ricotta cheese with the natural sweetness of fresh berries. This dessert is perfect for warm weather and can be prepared in advance, making it an ideal choice for dinner parties or casual family gatherings.
The layers of ricotta, berries, and a touch of honey or maple syrup create a beautiful presentation and a symphony of flavors that will satisfy your sweet tooth without being overly indulgent.
This recipe is simple to assemble and doesn’t require any cooking, making it a quick and easy option for dessert lovers. The key to a perfect parfait is using high-quality ricotta and the freshest berries you can find. The ricotta should be smooth and slightly sweet, while the berries should be ripe and juicy.
You can use a mix of your favorite berries, such as strawberries, blueberries, raspberries, or blackberries, to add color and variety to the dish. With minimal ingredients and maximum flavor, this Sweet Ricotta and Berry Parfait is sure to become a favorite in your dessert repertoire.
Ingredients for 4-6 servings:
- 2 cups ricotta cheese
- 1/4 cup honey or maple syrup
- 1 teaspoon vanilla extract
- 1 cup strawberries, hulled and sliced
- 1 cup blueberries
- 1 cup raspberries
- 1 cup granola
- Fresh mint leaves for garnish (optional)
Cooking Instructions:
- Prepare the Ricotta Mixture: In a medium-sized bowl, combine the ricotta cheese, honey (or maple syrup), and vanilla extract. Mix well until the ingredients are fully incorporated, and the ricotta is smooth and creamy. Adjust the sweetness to your liking by adding more honey or maple syrup if necessary.
- Layer the Parfait: Take 4-6 serving glasses or small bowls and begin layering the parfait. Start by adding a spoonful of the ricotta mixture to the bottom of each glass. Follow with a layer of sliced strawberries, then a layer of blueberries, and a layer of raspberries. Add a spoonful of granola on top of the berries.
- Repeat the Layers: Repeat the layering process until the glasses are filled, ending with a layer of ricotta on top. Finish with a final sprinkle of granola and a few fresh berries for garnish.
- Chill and Serve: Place the parfaits in the refrigerator for at least 30 minutes to allow the flavors to meld together. Before serving, garnish with fresh mint leaves for an added touch of invigorating essence.
Extra Tips:
For the best results, use full-fat ricotta cheese for a creamier texture. If you prefer, you can substitute the granola with crushed nuts or toasted oats for a different texture.
To make the parfait more indulgent, consider adding a layer of chocolate chips or drizzling chocolate sauce between the layers. This dessert is highly versatile, so feel free to experiment with different flavors and ingredients to suit your taste.
If preparing in advance, keep the granola separate until just before serving to maintain its crunch.
Rustic Ricotta and Zucchini Lasagna
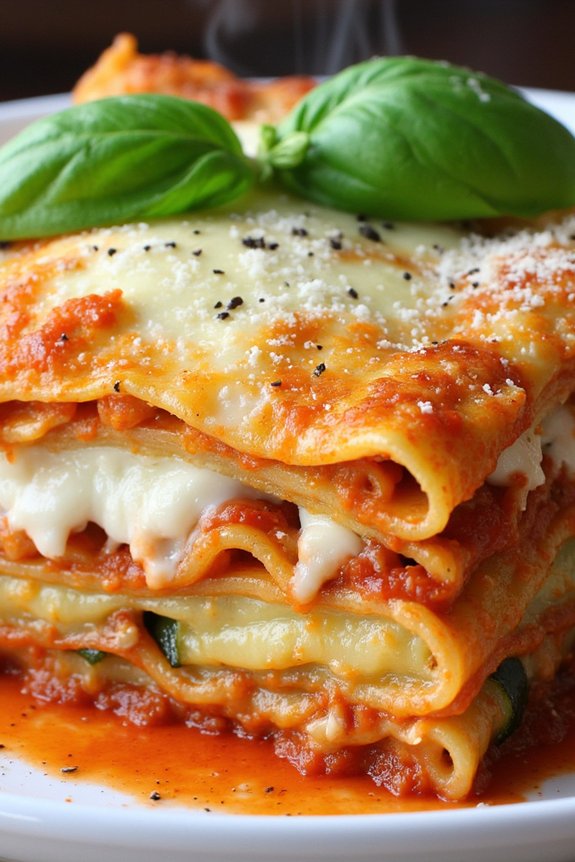
Rustic Ricotta and Zucchini Lasagna is a delightful twist on the classic Italian favorite, offering a lighter and fresher take on traditional lasagna. This dish combines creamy ricotta cheese with thinly sliced zucchini, layered with tender pasta sheets and a savory tomato sauce infused with herbs. The zucchini adds a subtle crunch and a hint of sweetness, perfectly complementing the rich, creamy texture of the ricotta.
Perfect for vegetarians and those looking for a lighter meal, this lasagna is both hearty and wholesome, making it an ideal choice for a family dinner or a special occasion.
The magic of this Rustic Ricotta and Zucchini Lasagna lies in its simplicity and the freshness of its ingredients. The dish is versatile enough to accommodate additional herbs or vegetables you might’ve on hand, making it a great way to use up seasonal produce. With a serving size suitable for 4-6 people, this dish can be doubled easily for larger gatherings or halved for a cozy meal for two.
Whether you’re an experienced home cook or a beginner looking to try something new, this recipe promises a satisfying and delicious result.
Ingredients for 4-6 servings:
- 12 lasagna sheets
- 2 medium zucchinis, thinly sliced
- 2 cups ricotta cheese
- 1 large egg
- 2 cups mozzarella cheese, shredded
- 1 cup Parmesan cheese, grated
- 3 cups marinara sauce
- 2 tablespoons olive oil
- 2 cloves garlic, minced
- 1 teaspoon dried oregano
- 1 teaspoon dried basil
- Salt and pepper to taste
- Fresh basil leaves for garnish (optional)
Cooking Instructions:
1. Preheat the Oven: Start by preheating your oven to 375°F (190°C). This will guarantee the lasagna bakes evenly.
2. Prepare the Zucchini: In a large skillet, heat the olive oil over medium heat. Add the sliced zucchini and minced garlic, sautéing for about 5 minutes until the zucchini is just tender. Season with salt, pepper, oregano, and basil. Remove from heat and set aside.
3. Mix the Ricotta Filling: In a mixing bowl, combine the ricotta cheese, egg, and half of the grated Parmesan. Mix well and season with a bit of salt and pepper.
4. Assemble the Lasagna: Spread a thin layer of marinara sauce on the bottom of a 9×13 inch baking dish. Lay down a single layer of lasagna sheets. Spread half of the ricotta mixture over the pasta, add a layer of sautéed zucchini, and top with a third of the shredded mozzarella.
Repeat the layers once more: lasagna sheets, ricotta, zucchini, mozzarella. Finish with a final layer of lasagna sheets, the remaining marinara sauce, the rest of the mozzarella, and the remaining Parmesan.
5. Bake the Lasagna: Cover the baking dish with aluminum foil and bake in the preheated oven for 25 minutes. Remove the foil and bake for an additional 15 minutes, or until the cheese on top is golden and bubbly.
6. Rest and Serve: Allow the lasagna to rest for about 10 minutes before slicing. This will help the layers set and make serving easier. Garnish with fresh basil leaves if desired.
Extra Tips:
For an even creamier texture, try using a mix of ricotta and mascarpone cheese. You can also add a layer of sautéed mushrooms or spinach for extra flavor and nutrition.
If you prefer a crispier top, broil the lasagna for the last 2-3 minutes of baking. It’s important to let the lasagna rest before serving, as this helps the layers firm up and makes it easier to cut clean slices.
Enjoy your Rustic Ricotta and Zucchini Lasagna with a side salad and some crusty bread for a complete meal!