

Whenever I think of Italian cuisine, I picture rich, hearty dishes. But trust me, there’s a lighter side that’s just as flavorful. I once hosted a summer gathering where I served zesty lemon arugula salad and grilled eggplant Parmesan, and it was a hit. These dishes burst with fresh ingredients and bold flavors, proving that light doesn’t mean bland. Curious about how these vibrant recipes can transform your meals? You won’t want to miss what’s next.
Zesty Lemon Arugula Salad
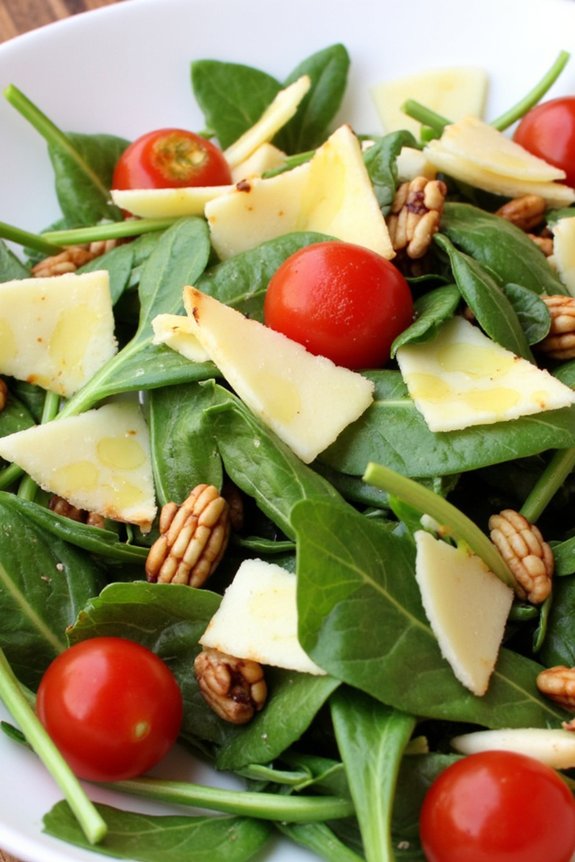
Zesty Lemon Arugula Salad is a revitalizing and vibrant dish that’s perfect for a light lunch or as a side to complement your main meal. With its peppery arugula leaves and a zesty lemon dressing, this salad isn’t only easy to prepare but also packed with nutrients. The combination of fresh ingredients makes it a healthy choice, ideal for those looking to enjoy a delicious meal without compromising on flavor.
This salad is perfect for serving 4-6 people and can be prepared in just a few minutes. The key to this dish is using fresh, high-quality ingredients to guarantee the best taste and nutritional benefits. The lemon dressing adds a tangy and revitalizing twist, while the addition of shaved Parmesan and toasted pine nuts provides a satisfying crunch and a hint of creaminess. The balance of flavors and textures makes this Zesty Lemon Arugula Salad a delightful addition to any meal.
Ingredients (serving size: 4-6 people):
- 6 cups fresh arugula leaves
- 1 cup cherry tomatoes, halved
- 1/2 cup shaved Parmesan cheese
- 1/4 cup pine nuts, toasted
- 1 lemon, juiced
- 1/4 cup extra-virgin olive oil
- Salt and freshly ground black pepper, to taste
Cooking Instructions:
- Prepare the Arugula: Rinse the arugula leaves thoroughly under cold water and pat them dry using a clean kitchen towel or salad spinner. This guarantees that the leaves remain crisp and fresh.
- Toast the Pine Nuts: In a small skillet over medium heat, toast the pine nuts until they’re golden brown and fragrant, about 3-4 minutes. Stir frequently to prevent burning. Once toasted, remove from heat and let them cool.
- Mix the Dressing: In a small mixing bowl, whisk together the lemon juice, extra-virgin olive oil, salt, and freshly ground black pepper. Adjust the seasoning to your preference.
- Assemble the Salad: In a large salad bowl, combine the arugula leaves, halved cherry tomatoes, and shaved Parmesan cheese. Drizzle the lemon dressing over the salad and toss gently to coat the ingredients evenly.
- Add the Pine Nuts: Sprinkle the toasted pine nuts over the salad just before serving, to maintain their crunchiness.
- Serve Immediately: For the best taste and texture, serve the Zesty Lemon Arugula Salad immediately after preparing.
Extra Tips: For an even more flavorful salad, consider adding thinly sliced red onions or a handful of fresh basil leaves. If you prefer a more substantial salad, grilled chicken or shrimp can be added for protein.
Light Caprese Skewers

Light Caprese Skewers are a delightful and healthy Italian appetizer that captures the essence of summer in every bite. This dish combines the classic flavors of a Caprese salad – ripe tomatoes, fresh mozzarella, and fragrant basil – in a convenient, bite-sized skewer form. Perfect for parties or a simple family dinner, these skewers aren’t only easy to prepare but also visually appealing, making them a favorite for gatherings.
The beauty of Light Caprese Skewers lies in their simplicity and the quality of the ingredients. By choosing fresh, high-quality produce and cheese, you can elevate this simple dish into a gourmet experience. The drizzle of balsamic glaze at the end adds a touch of sweetness and tang, perfectly balancing the creamy mozzarella and fresh tomatoes. This recipe yields enough skewers to serve 4-6 people.
Ingredients:
- 20 cherry tomatoes
- 20 mini mozzarella balls (bocconcini)
- 20 fresh basil leaves
- 2 tablespoons of extra virgin olive oil
- Salt and pepper to taste
- Balsamic glaze for drizzling
- 20 wooden skewers
Cooking Instructions:
- Prepare the Ingredients: Begin by rinsing the cherry tomatoes and basil leaves under cold water. Pat them dry with a kitchen towel. Drain the mini mozzarella balls and set aside.
- Assemble the Skewers: Take a wooden skewer and start by threading a cherry tomato onto it. Follow with a basil leaf, folding it if necessary to make it more manageable. Next, add a mozzarella ball. Repeat this sequence once more on the same skewer if it’s long enough, ending with another cherry tomato. Continue this process until all skewers are assembled.
- Season the Skewers: Arrange the skewers on a serving platter. Drizzle them with extra virgin olive oil, ensuring each skewer is lightly coated. Sprinkle a pinch of salt and pepper over the top to taste.
- Add the Final Touch: Just before serving, drizzle a small amount of balsamic glaze over the skewers for an added layer of flavor. Serve immediately to enjoy them at their best.
Extra Tips:
For the best flavor, use ripe and juicy cherry tomatoes and fresh mozzarella balls. If you can’t find mini mozzarella balls, you can cut a regular mozzarella block into 1-inch cubes.
To make the skewers ahead of time, assemble them without the balsamic glaze and store them in the fridge, covered with plastic wrap. Add the glaze just before serving. If you’re hosting a larger gathering, you can easily double the ingredients to accommodate more guests.
Grilled Eggplant Parmesan
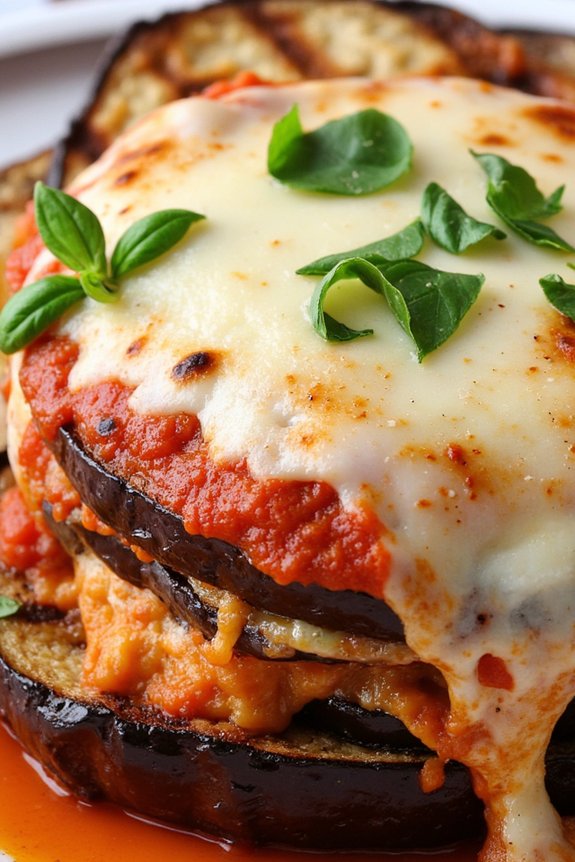
Grilled Eggplant Parmesan is a delightful twist on the classic Italian dish, offering a healthier alternative without sacrificing flavor. This recipe takes advantage of the smoky taste that grilled eggplant provides, complementing the rich, savory tomato sauce and creamy mozzarella cheese. By grilling the eggplant rather than frying it, the dish retains its satisfying texture while reducing the amount of oil used, making it a perfect choice for those seeking a lighter, yet equally delicious, meal.
Ideal for a family dinner or a casual gathering with friends, Grilled Eggplant Parmesan is both nutritious and satisfying. The layers of grilled eggplant slices, topped with tangy marinara sauce and melted cheese, create a harmonious balance of flavors that’s sure to please everyone’s palate. This dish can easily be paired with a side salad or whole-grain pasta to complete the meal, ensuring a well-rounded and heart-healthy experience.
Ingredients (Serves 4-6):
- 2 large eggplants, sliced into 1/2-inch rounds
- 2 tablespoons olive oil
- Salt and pepper, to taste
- 3 cups marinara sauce
- 2 cups shredded mozzarella cheese
- 1/2 cup grated Parmesan cheese
- 1/4 cup chopped fresh basil
- 1 teaspoon dried oregano
- Cooking spray
Instructions:
- Prepare the Eggplant: Start by preheating your grill to medium-high heat. Brush both sides of the eggplant slices with olive oil and season them with salt and pepper.
- Grill the Eggplant: Place the eggplant slices on the grill and cook for about 3-4 minutes on each side, or until they’re tender and have distinct grill marks. Remove from the grill and set aside.
- Preheat the Oven: While the eggplant is grilling, preheat your oven to 375°F (190°C).
- Assemble the Dish: In a baking dish, spread a thin layer of marinara sauce on the bottom. Arrange half of the grilled eggplant slices over the sauce. Top with half of the remaining marinara sauce, half of the mozzarella cheese, and half of the Parmesan cheese. Repeat the layers with the remaining ingredients.
- Bake: Sprinkle the top with dried oregano and cover the dish with aluminum foil. Bake in the preheated oven for 20 minutes. Remove the foil and continue baking for an additional 10 minutes, or until the cheese is bubbly and golden brown.
- Garnish and Serve: Once baked, remove from the oven and let it cool slightly. Garnish with chopped fresh basil before serving.
Extra Tips:
For the best results, select firm and glossy eggplants that are free from blemishes. To avoid a bitter taste, you can sprinkle the eggplant slices with salt and let them sit for about 30 minutes before grilling, then rinse and pat them dry. This process draws out any excess moisture and bitterness.
If you prefer a spicier kick, consider adding a pinch of red pepper flakes to the marinara sauce. Enjoy this dish fresh out of the oven for the most satisfying flavors and textures.
Whole Wheat Spaghetti With Fresh Tomato Sauce
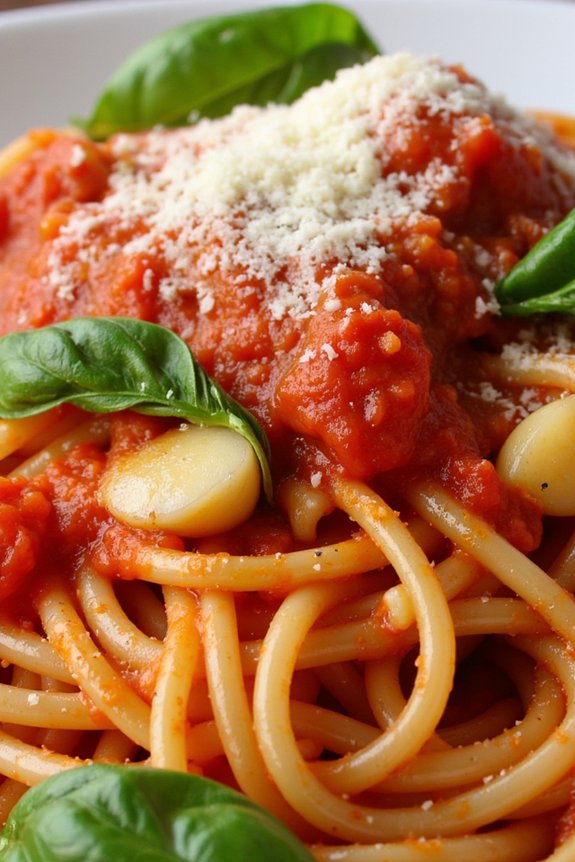
Whole Wheat Spaghetti With Fresh Tomato Sauce is a delightful and healthy Italian dish that combines the nutty flavor of whole wheat pasta with a vibrant, fresh tomato sauce. This recipe is perfect for those who are looking to enjoy a classic Italian meal while keeping it nutritious and delicious. The use of fresh tomatoes, garlic, and basil guarantees that the sauce is bursting with flavor, while the whole wheat spaghetti provides a wholesome base that’s rich in fiber and nutrients.
To make this dish, you’ll start by preparing the fresh tomato sauce, which is the star of the recipe. The sauce is made using ripe tomatoes, garlic, olive oil, and a touch of seasoning, allowing the natural sweetness and acidity of the tomatoes to shine through. Once the sauce is ready, it’s tossed with perfectly cooked whole wheat spaghetti and garnished with fresh basil and Parmesan cheese.
This simple yet satisfying meal can be enjoyed as a hearty lunch or dinner, offering a taste of Italy right at home.
Ingredients for 4-6 servings:
- 1 pound whole wheat spaghetti
- 2 pounds ripe tomatoes
- 4 cloves garlic
- 1/4 cup extra-virgin olive oil
- Salt and freshly ground black pepper to taste
- 1/4 teaspoon red pepper flakes (optional)
- 1/4 cup fresh basil leaves
- 1/4 cup grated Parmesan cheese
Cooking Instructions:
- Prepare the Tomatoes: Begin by blanching the tomatoes. Bring a pot of water to a boil and carefully add the tomatoes for 30-60 seconds until the skins start to peel away. Transfer them to a bowl of ice water to stop the cooking process. Once cooled, peel the skins off, remove the seeds, and chop the tomatoes into small pieces.
- Cook the Garlic: In a large skillet, heat the olive oil over medium heat. Add the minced garlic and sauté for about 2 minutes until it becomes fragrant and lightly golden, being careful not to burn it.
- Make the Sauce: Add the chopped tomatoes to the skillet with the garlic. Season with salt, black pepper, and red pepper flakes if using. Let the mixture simmer for about 15-20 minutes, stirring occasionally, until the tomatoes break down and the sauce thickens.
- Cook the Pasta: While the sauce is simmering, cook the whole wheat spaghetti in a large pot of salted boiling water according to package instructions until al dente. Drain the pasta, reserving 1/2 cup of the pasta water.
- Combine Pasta and Sauce: Add the cooked spaghetti to the tomato sauce in the skillet. Toss to combine, adding reserved pasta water a little at a time until you achieve the desired consistency for the sauce.
- Finish and Serve: Remove the skillet from heat and stir in freshly torn basil leaves. Serve immediately, topped with grated Parmesan cheese.
Extra Tips: When selecting tomatoes for the sauce, opt for the ripest ones you can find as they’ll provide the best flavor. If fresh tomatoes aren’t in season, canned whole tomatoes can be used as a substitute.
Make sure to let the sauce simmer long enough to allow the flavors to meld, but not so long that it becomes too thick. Adjust the seasoning to your taste, and feel free to add more garlic or basil if you prefer a stronger flavor.
Enjoy your Whole Wheat Spaghetti With Fresh Tomato Sauce with a side of crusty bread or a green salad for a complete meal.
Quinoa Stuffed Bell Peppers
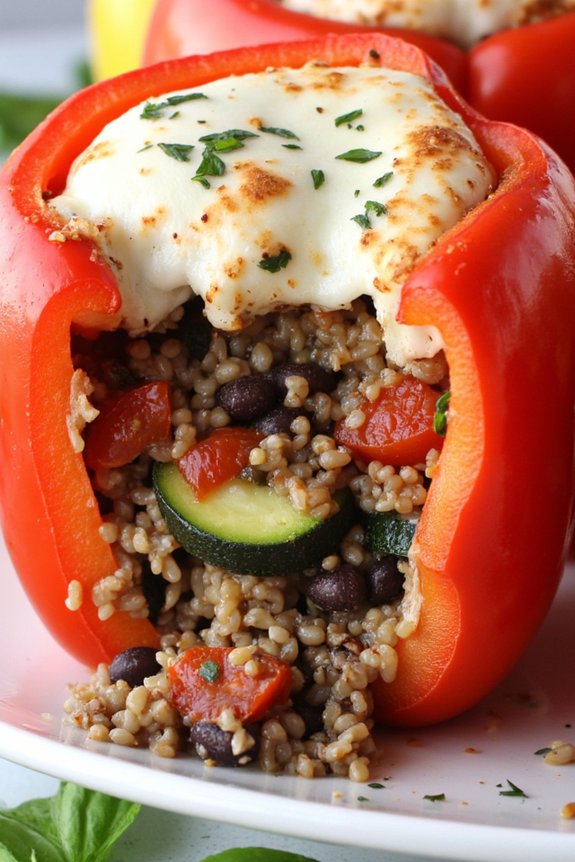
Quinoa Stuffed Bell Peppers are a delightful and nutritious twist on a classic dish, perfect for those looking to enjoy a healthy and satisfying meal. These stuffed peppers are packed with protein-rich quinoa, a variety of vegetables, and a blend of Italian herbs and spices that make them a flavorful and hearty dish. Ideal for a family dinner or a gathering with friends, this recipe is both simple to prepare and bound to impress your guests.
The vibrant colors of the bell peppers not only make for a beautiful presentation but also provide a wealth of vitamins and nutrients. By using quinoa as the primary filling ingredient, this recipe becomes an excellent source of plant-based protein and fiber, making it a wholesome option for vegetarians and those seeking to incorporate more plant-based meals into their diets. With a serving size of 4-6 people, this dish is perfect for sharing and enjoying with loved ones.
Ingredients for 4-6 People:
- 6 large bell peppers (any color)
- 1 cup quinoa
- 2 cups vegetable broth or water
- 1 tablespoon olive oil
- 1 medium onion, chopped
- 2 cloves garlic, minced
- 1 zucchini, diced
- 1 cup cherry tomatoes, halved
- 1 cup canned black beans, rinsed and drained
- 1 teaspoon dried oregano
- 1 teaspoon dried basil
- 1/2 teaspoon red pepper flakes (optional)
- Salt and pepper to taste
- 1 cup mozzarella cheese, shredded
- Fresh basil leaves for garnish (optional)
Cooking Instructions:
- Preheat the Oven: Preheat your oven to 375°F (190°C). This guarantees that the oven is at the right temperature when you’re ready to bake the stuffed peppers.
- Prepare the Quinoa: Rinse the quinoa under cold water to remove any bitterness. In a medium saucepan, bring the vegetable broth or water to a boil. Add the quinoa, reduce heat to low, cover, and simmer for about 15 minutes or until all the liquid is absorbed. Fluff with a fork and set aside.
- Sauté the Vegetables: In a large skillet, heat olive oil over medium heat. Add the chopped onion and sauté until translucent, about 5 minutes. Stir in the minced garlic and cook for another 1 minute until fragrant.
- Cook the Filling: Add the diced zucchini and cherry tomatoes to the skillet. Cook for about 5 minutes until the vegetables are softened. Stir in the black beans, cooked quinoa, oregano, basil, red pepper flakes, salt, and pepper. Mix well and cook for an additional 2-3 minutes to combine flavors.
- Prepare the Peppers: While the filling is cooking, cut the tops off the bell peppers and remove the seeds and membranes. Arrange the peppers cut side up in a baking dish.
- Stuff the Peppers: Spoon the quinoa mixture into each bell pepper, pressing down gently to pack the filling. Top each pepper with shredded mozzarella cheese.
- Bake the Peppers: Cover the baking dish with aluminum foil and bake in the preheated oven for 25 minutes. Remove the foil and bake for an additional 10 minutes, or until the cheese is golden and bubbly.
- Garnish and Serve: Remove from the oven and let cool for a few minutes before serving. Garnish with fresh basil leaves if desired.
Extra Tips:
For an even more robust flavor, consider roasting the bell peppers before stuffing them. This can be done by placing them under a broiler for a few minutes until the skin is slightly charred.
Additionally, feel free to customize the stuffing by adding your favorite vegetables or protein sources like cooked chicken or tofu. Be sure to adjust the seasoning according to your taste preferences.
Finally, these stuffed peppers can be prepared ahead of time and stored in the fridge, making them a convenient meal option for busy weeknights.
Healthy Pesto Zoodles
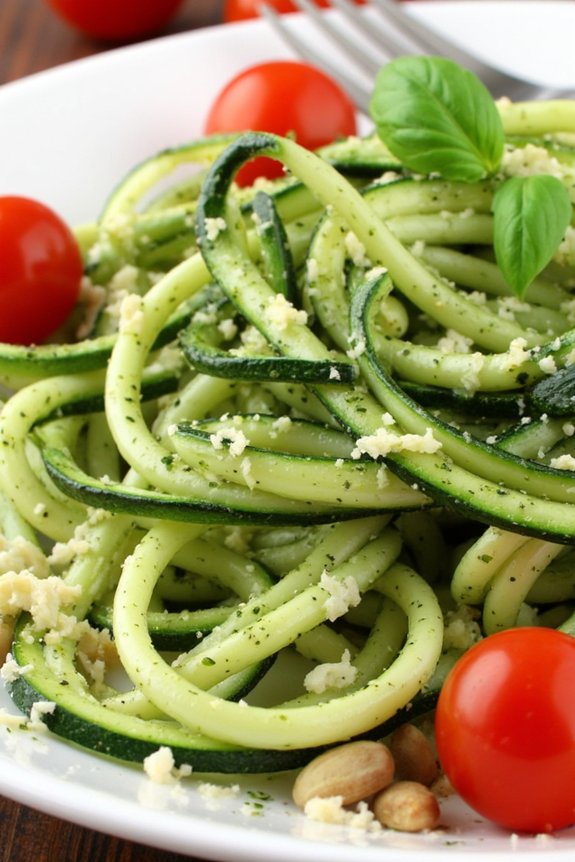
Healthy Pesto Zoodles are a delightful and nutritious twist on traditional pasta dishes. This recipe replaces carb-heavy pasta with zucchini noodles, commonly known as “zoodles,” which are rich in vitamins and minerals. The zoodles are tossed with a vibrant homemade pesto sauce, made from fresh basil, garlic, pine nuts, Parmesan cheese, and olive oil. This dish not only satisfies your pasta cravings but also keeps your meal light and healthy, making it perfect for a wholesome family dinner.
The beauty of this recipe lies in its simplicity and freshness. It takes very little time to prepare and cook, making it an excellent choice for busy weeknights. The pesto sauce can be made in advance and stored in the refrigerator, allowing you to whip up this delicious meal in just minutes.
Whether you’re looking to cut down on carbs, increase your vegetable intake, or simply enjoy a tasty Italian-inspired dish, Healthy Pesto Zoodles are sure to become a favorite.
Ingredients (serving size: 4-6 people):
- 4 medium zucchinis
- 2 cups fresh basil leaves
- 1/2 cup grated Parmesan cheese
- 1/3 cup pine nuts
- 2 cloves garlic
- 1/2 cup extra virgin olive oil
- Salt and pepper, to taste
- 1 lemon (optional, for zest or juice)
- Cherry tomatoes (optional, for garnish)
- Extra Parmesan cheese (optional, for garnish)
Cooking Instructions:
- Prepare the Zoodles: Start by washing the zucchinis thoroughly. Using a spiralizer, create zucchini noodles (zoodles). If you don’t have a spiralizer, a vegetable peeler or julienne peeler can also be used to make thin strips. Set the zoodles aside.
- Make the Pesto Sauce: In a food processor, combine the fresh basil leaves, grated Parmesan cheese, pine nuts, and garlic cloves. Pulse until the ingredients are finely chopped. Slowly drizzle in the olive oil while continuing to pulse the food processor. Blend until the mixture is smooth and creamy. Season with salt and pepper to taste. If desired, add a squeeze of lemon juice or some zest for a bright, tangy flavor.
- Cook the Zoodles: Heat a large skillet over medium heat. Add a small amount of olive oil to the pan and let it warm up. Add the zoodles to the skillet and sauté for 3-4 minutes, stirring occasionally, until they’re just tender but still have a slight crunch.
- Combine Zoodles and Pesto: Remove the skillet from heat and add the prepared pesto sauce to the zoodles. Toss the zoodles gently to guarantee they’re evenly coated with the pesto. Be careful not to overcook the zoodles, as they can become mushy.
- Serve: Transfer the pesto zoodles to serving plates. If desired, garnish with cherry tomatoes and extra Parmesan cheese for additional flavor and presentation. Serve immediately.
Extra Tips:
When making Healthy Pesto Zoodles, it’s important to not overcook the zoodles to maintain their texture and prevent them from releasing too much water. If your zucchini is particularly watery, you can blot the zoodles with a paper towel or let them sit for a few minutes after spiralizing to remove excess moisture.
Additionally, feel free to experiment with the pesto by adding different herbs like parsley or mint for a unique twist. For those with nut allergies, you can substitute pine nuts with sunflower seeds or omit them entirely.
Balsamic Glazed Chicken With Spinach

Balsamic Glazed Chicken With Spinach is a delightful Italian-inspired dish that combines tender chicken breasts with a rich, tangy balsamic glaze, perfectly complemented by the vibrant flavors of fresh spinach. This recipe not only captures the essence of Italian cuisine but also prioritizes health by using wholesome ingredients and a simple cooking method.
The dish is perfect for a weeknight dinner or a special occasion, offering a delicious balance of savory and sweet flavors while being nutritious and satisfying. This dish is ideal for serving 4-6 people, making it a great choice for family meals or entertaining guests.
The balsamic glaze adds a depth of flavor to the chicken, while the spinach provides a fresh and nutritious element, guaranteeing the meal is both delicious and health-conscious. With its quick preparation and cooking time, Balsamic Glazed Chicken With Spinach is a go-to recipe for anyone looking to enjoy a healthy Italian meal without spending hours in the kitchen.
Ingredients:
- 4-6 boneless, skinless chicken breasts
- Salt and pepper, to taste
- 1 tablespoon olive oil
- 1 cup balsamic vinegar
- 2 tablespoons honey
- 2 cloves garlic, minced
- 1 teaspoon dried oregano
- 2 cups fresh baby spinach
- 1 tablespoon butter
- 1/4 cup grated Parmesan cheese
Cooking Instructions:
- Prepare the Chicken: Season the chicken breasts with salt and pepper on both sides. This will enhance the flavor of the chicken and make it more tender.
- Sear the Chicken: In a large skillet, heat the olive oil over medium-high heat. Add the chicken breasts and cook for about 5-7 minutes on each side, or until they’re golden brown and cooked through. Remove the chicken from the skillet and set aside on a plate.
- Make the Balsamic Glaze: In the same skillet, reduce the heat to medium and add the balsamic vinegar, honey, minced garlic, and oregano. Stir the mixture and let it simmer for about 5 minutes, or until it has thickened slightly and reduced by half.
- Glaze the Chicken: Return the chicken breasts to the skillet, spoon the balsamic glaze over them, and let them cook for an additional 2-3 minutes, confirming they’re well-coated with the glaze.
- Wilt the Spinach: In a separate pan, melt the butter over medium heat. Add the fresh spinach and cook until it’s just wilted, which should take about 2-3 minutes. Season with a pinch of salt to taste.
- Serve: Arrange the chicken breasts on a serving platter, drizzle with any remaining balsamic glaze from the skillet, and sprinkle with grated Parmesan cheese. Serve the wilted spinach on the side or underneath the chicken for a beautiful presentation.
Extra Tips:
When preparing Balsamic Glazed Chicken With Spinach, it’s important to monitor the balsamic glaze closely to prevent it from burning. It should be thick enough to coat the back of a spoon but not too thick that it becomes sticky.
To guarantee the chicken breasts cook evenly, consider pounding them to an even thickness before cooking. Additionally, feel free to experiment with other herbs like thyme or basil for a different flavor profile, or add a splash of lemon juice to the spinach for a revitalizing twist.
Tuscan White Bean Soup

Tuscan White Bean Soup is a hearty and comforting dish that embodies the essence of Italian cuisine with its simple yet flavorful ingredients. This soup is a staple in Tuscany, known for its earthy flavors and nourishing qualities. It’s perfect for a cozy dinner, offering a blend of creamy cannellini beans, aromatic herbs, and fresh vegetables.
Whether you’re looking to warm up on a chilly day or enjoy a light and healthy meal, this soup is a delightful choice that can be prepared with minimal effort. Originating from the heart of Italy, Tuscan White Bean Soup is a nutritious dish that highlights the importance of using fresh and seasonal ingredients.
It’s a versatile recipe that can easily be adapted to suit your taste preferences or dietary needs. The beans provide a rich source of protein and fiber, while the vegetables and herbs add layers of flavor and aroma. This soup isn’t only delicious but also easy to prepare, making it a great option for both novice and experienced cooks alike.
Ingredients for 4-6 servings:
- 2 tablespoons olive oil
- 1 medium onion, chopped
- 2 cloves garlic, minced
- 2 carrots, diced
- 2 celery stalks, diced
- 4 cups vegetable broth
- 2 cans (15 ounces each) cannellini beans, drained and rinsed
- 1 can (14 ounces) diced tomatoes, with juice
- 1 teaspoon dried thyme
- 1 teaspoon dried rosemary
- 1 bay leaf
- Salt and pepper to taste
- 2 cups kale, chopped
- 1 tablespoon lemon juice
- Grated Parmesan cheese, for serving (optional)
Cooking Instructions:
- Prepare the Vegetables: Begin by heating the olive oil in a large pot over medium heat. Add the chopped onion and sauté until it becomes translucent, about 5 minutes. Stir in the minced garlic, and continue cooking for another minute until fragrant.
- Add the Carrots and Celery: Incorporate the diced carrots and celery into the pot. Sauté the mixture for an additional 5 minutes, allowing the vegetables to soften slightly and release their flavors.
- Combine Broth and Beans: Pour in the vegetable broth, followed by the cannellini beans. Stir everything together, making sure the beans are well-coated with the broth and vegetable mixture.
- Introduce Tomatoes and Herbs: Add the diced tomatoes along with their juice to the pot. Sprinkle in the thyme, rosemary, and add the bay leaf. Season with salt and pepper to taste, then bring the soup to a gentle simmer.
- Simmer the Soup: Reduce the heat to low, cover the pot, and let the soup simmer for about 25 to 30 minutes. This allows the flavors to meld together beautifully, and the beans to soften further.
- Add Kale and Finish: About 5 minutes before the soup is done, stir in the chopped kale. Allow it to wilt and incorporate into the soup. Just before serving, remove the bay leaf and stir in the lemon juice for a hint of brightness.
- Serve: Ladle the soup into bowls and, if desired, top with grated Parmesan cheese for added richness. Serve hot alongside crusty bread if you like.
Extra Tips:
For an even creamier texture, consider blending a portion of the soup using an immersion blender before adding the kale. This will create a thicker consistency without the need for cream.
Additionally, feel free to substitute spinach for kale if preferred. If you have leftovers, Tuscan White Bean Soup will taste even better the next day as the flavors continue to develop. Remember to adjust the seasoning before reheating to confirm the soup remains flavorful.
Roasted Vegetable Risotto
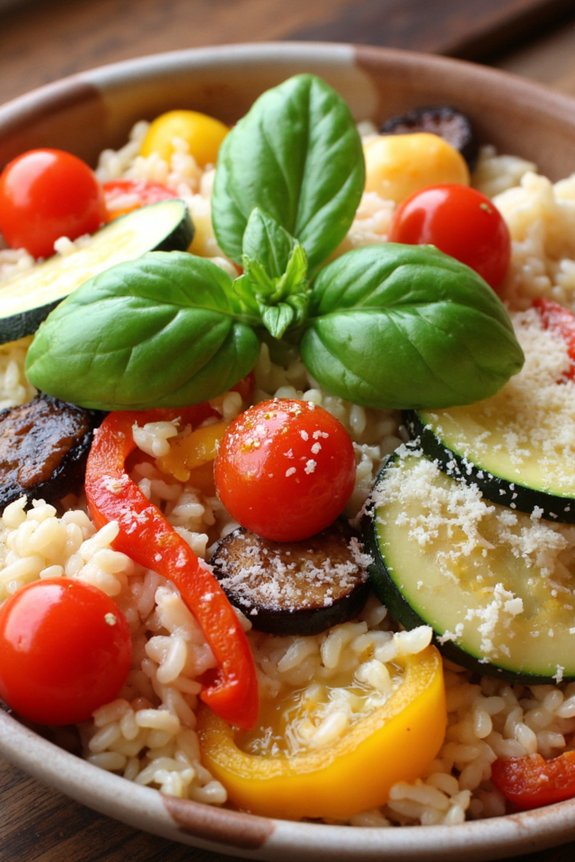
Roasted Vegetable Risotto is a delightful Italian dish that combines the creamy texture of risotto with the vibrant flavors of roasted vegetables. This recipe isn’t only healthy but also offers a hearty and satisfying meal that can be enjoyed by the whole family. The use of seasonal vegetables adds a fresh and colorful touch to the dish, while the arborio rice guarantees a luscious and creamy base. Perfect for a cozy dinner, this risotto is both nutritious and delicious.
To achieve the best results, it’s important to focus on the quality of ingredients and the cooking process. Roasting the vegetables enhances their natural sweetness and brings out a depth of flavor that complements the creamy risotto. The gradual addition of broth and continuous stirring are essential steps in achieving the perfect consistency. This dish is a great way to incorporate more vegetables into your diet while enjoying a classic Italian favorite.
Ingredients (Serves 4-6):
- 2 tablespoons olive oil
- 1 large onion, diced
- 3 cloves garlic, minced
- 1 1/2 cups arborio rice
- 1/2 cup white wine (optional)
- 4 cups vegetable broth
- 1/2 cup grated Parmesan cheese
- 1 cup cherry tomatoes, halved
- 1 red bell pepper, diced
- 1 zucchini, sliced
- 1 eggplant, diced
- Salt and pepper, to taste
- Fresh basil leaves, for garnish
Instructions:
- Preheat the Oven and Roast Vegetables: Preheat your oven to 400°F (200°C). On a baking sheet, spread the cherry tomatoes, red bell pepper, zucchini, and eggplant. Drizzle with 1 tablespoon of olive oil, season with salt and pepper, and toss to coat. Roast in the oven for 25-30 minutes, or until the vegetables are tender and slightly caramelized.
- Prepare the Risotto Base: In a large saucepan, heat the remaining tablespoon of olive oil over medium heat. Add the diced onion and sauté for 5 minutes until translucent. Stir in the minced garlic and cook for an additional minute.
- Cook the Arborio Rice: Add the arborio rice to the saucepan and stir for 2 minutes to lightly toast the grains. If using, pour in the white wine and stir until it’s mostly absorbed by the rice.
- Gradually Add Broth: Begin adding the vegetable broth, one cup at a time. Stir the rice continuously, allowing the broth to be absorbed before adding more. Repeat this process, stirring often, until the rice is creamy and cooked to al dente, about 18-20 minutes.
- Combine Roasted Vegetables and Cheese: Once the rice is cooked, gently fold in the roasted vegetables and grated Parmesan cheese. Stir until everything is well combined and the cheese is melted. Season with additional salt and pepper if needed.
- Serve and Garnish: Serve the risotto hot, garnished with fresh basil leaves. Enjoy as a main dish or alongside a fresh salad.
Extra Tips:
When making Roasted Vegetable Risotto, it’s important to use a good quality arborio rice as it’s specifically designed for risottos due to its high starch content which gives the dish its creamy texture.
Always keep the broth warm in a separate pot while adding it to the rice to maintain an even cooking temperature. If you prefer a vegan version, simply omit the Parmesan cheese or substitute it with nutritional yeast for a cheesy flavor.
Finally, feel free to experiment with different seasonal vegetables to keep the recipe exciting and tailored to your taste preferences.
Spinach and Ricotta Stuffed Shells
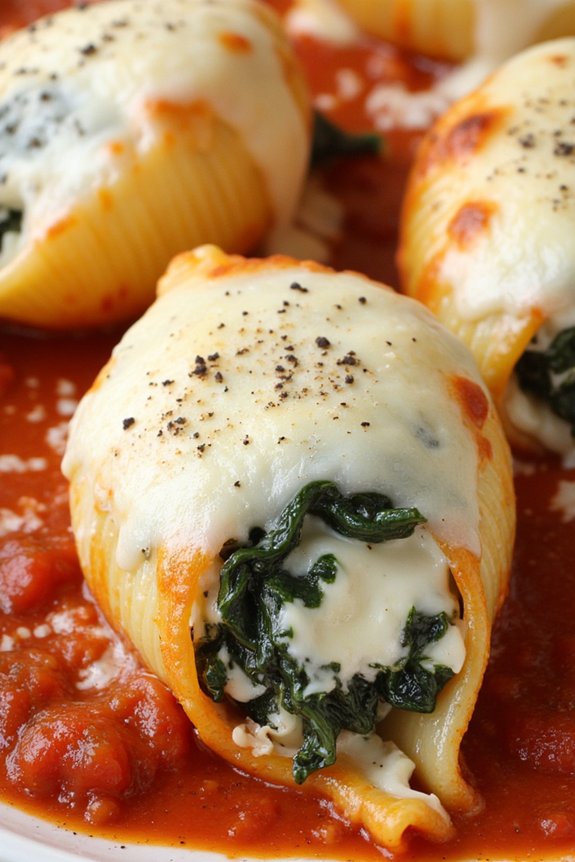
Spinach and Ricotta Stuffed Shells is a classic Italian dish that’s not only delicious but also offers a nutritious option for those seeking a healthier meal. This dish combines the creamy texture of ricotta cheese with the rich flavor of spinach, all wrapped in tender pasta shells and topped with a zesty tomato sauce. It’s perfect for a family dinner or a small gathering, providing a satisfying meal that can easily be paired with a fresh salad or garlic bread.
The beauty of this dish lies in its simplicity and the balance of flavors. The spinach provides a good source of vitamins A and C, while the ricotta adds protein and calcium. The tomato sauce brings everything together with its tangy and slightly sweet taste, complementing the filling’s creaminess. This recipe is all about bringing out the natural flavors of each ingredient, guaranteeing a wholesome and delightful dining experience.
Ingredients (Serves 4-6)
- 20-24 jumbo pasta shells
- 1 tablespoon olive oil
- 2 cloves garlic, minced
- 10 ounces fresh spinach, chopped
- 15 ounces ricotta cheese
- 1 cup grated Parmesan cheese
- 1 egg, beaten
- 1 teaspoon salt
- 1/2 teaspoon black pepper
- 2 cups marinara sauce
- 1 cup shredded mozzarella cheese
Cooking Instructions
- Preheat the Oven: Start by preheating your oven to 375°F (190°C) to prepare it for baking the shells later.
- Cook the Pasta: Bring a large pot of salted water to a boil. Add the jumbo pasta shells and cook them until they’re al dente, following the package instructions. Once done, drain and set aside to cool slightly.
- Prepare the Filling: In a large skillet, heat the olive oil over medium heat. Add the minced garlic and sauté until fragrant, about 1 minute. Add the chopped spinach and cook until wilted, approximately 3-4 minutes. Remove from heat and allow to cool.
- Mix the Filling: In a large bowl, combine the cooked spinach, ricotta cheese, Parmesan cheese, beaten egg, salt, and black pepper. Stir until well mixed and the ingredients are evenly distributed.
- Stuff the Shells: Carefully fill each pasta shell with the spinach and ricotta mixture using a spoon. Be gentle to avoid tearing the shells.
- Prepare for Baking: Spread 1 cup of marinara sauce evenly across the bottom of a 9×13-inch baking dish. Arrange the stuffed shells in the dish, open side up. Pour the remaining marinara sauce over the shells and sprinkle with shredded mozzarella cheese.
- Bake the Dish: Cover the baking dish with aluminum foil and bake in the preheated oven for 25 minutes. Remove the foil and bake for an additional 10 minutes, or until the cheese is bubbly and golden.
- Serve: Once cooked, remove the dish from the oven and let it cool for a few minutes before serving. Enjoy the stuffed shells warm.
Extra Tips
For a richer flavor, consider adding a pinch of nutmeg to the ricotta filling, which complements the spinach beautifully. If you prefer a little heat, sprinkle some red pepper flakes over the top before baking.
You can also prepare this dish in advance; simply assemble the shells, cover with foil, and refrigerate. When ready to bake, add an extra 10 minutes to the baking time to guarantee it’s heated through. This dish also freezes well, making it ideal for meal prep or a quick weeknight dinner.
Citrus Marinated Grilled Fish

Citrus Marinated Grilled Fish is a delightful Italian-inspired dish that combines the fresh and zesty flavors of citrus with the succulent texture of grilled fish. This recipe is perfect for those who want a healthy meal that’s both easy to prepare and full of flavor. The citrus marinade not only enhances the taste of the fish but also helps to keep it moist and tender during grilling.
Grilling fish can sometimes be tricky, but with this recipe, you’ll impress your family and friends with perfectly cooked, delicious fish every time. The bright and invigorating marinade is made with a combination of lemon, lime, and orange juices, along with fresh herbs and garlic, to infuse the fish with a vibrant flavor. This dish serves 4-6 people and is perfect for a light summer dinner or a special occasion.
Ingredients:
- 4-6 fish fillets (such as sea bass, grouper, or snapper)
- 2 lemons, juiced
- 1 lime, juiced
- 1 orange, juiced
- 3 tablespoons olive oil
- 3 cloves garlic, minced
- 1 tablespoon fresh parsley, chopped
- 1 tablespoon fresh thyme, chopped
- Salt and pepper, to taste
- Lemon wedges, for serving
Instructions:
- Prepare the Marinade: In a mixing bowl, combine the lemon juice, lime juice, orange juice, olive oil, minced garlic, chopped parsley, and chopped thyme. Whisk the ingredients together until well combined. Season the marinade with salt and pepper to taste.
- Marinate the Fish: Place the fish fillets in a large resealable plastic bag or a shallow dish. Pour the citrus marinade over the fish, making sure each fillet is well coated. Seal the bag or cover the dish with plastic wrap and refrigerate for at least 30 minutes, allowing the flavors to meld.
- Preheat the Grill: While the fish is marinating, preheat your grill to medium-high heat. Make sure the grates are clean and lightly oiled to prevent the fish from sticking.
- Grill the Fish: Remove the fish from the marinade and discard the marinade. Place the fish fillets on the preheated grill. Grill for about 3-4 minutes on each side, or until the fish is opaque and flakes easily with a fork.
- Serve: Transfer the grilled fish to a serving platter and garnish with lemon wedges. Serve immediately, while hot, alongside your favorite side dishes.
Extra Tips:
When grilling fish, it’s important to keep an eye on the cooking time, as fish can overcook quickly. If using a grill pan indoors, ensure it’s properly heated before placing the fish on it.
Additionally, you can use a fish basket or aluminum foil to grill the fish, which can help keep the fillets intact and make flipping easier. For an extra burst of flavor, consider adding a pinch of red pepper flakes to the marinade for a subtle kick.
Enjoy your Citrus Marinated Grilled Fish with a fresh salad or a side of grilled vegetables for a complete meal.
Chickpea and Avocado Salad
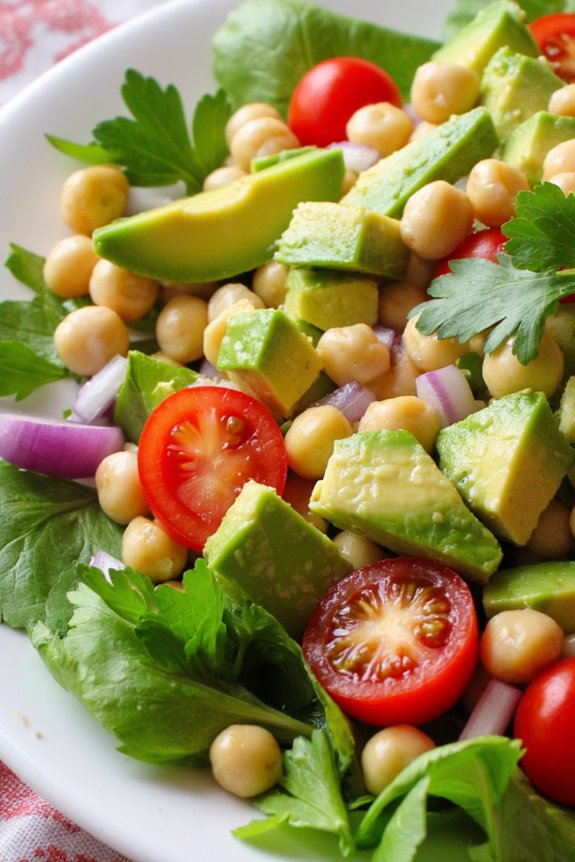
Chickpea and Avocado Salad is a delightful and nutritious dish that effortlessly combines creamy avocados with hearty chickpeas. This salad is perfect for a quick lunch, a light dinner, or as a side dish. The novelty of the ingredients and the simple dressing make it a healthy choice for anyone looking to enjoy a satisfying meal.
With its vibrant colors and flavors, this salad isn’t only pleasing to the palate but also visually appealing, making it a great addition to any meal spread.
Preparing Chickpea and Avocado Salad is straightforward and requires minimal cooking skills, making it suitable for beginner cooks. The key is using fresh ingredients to enhance the natural flavors of the dish. The combination of chickpeas, avocado, tomatoes, and a touch of lemon creates an invigorating and filling salad that’s both versatile and nutritious.
It’s perfect for serving 4-6 people and can be customized with additional ingredients to suit personal preferences.
Ingredients (Serves 4-6):
- 2 cans (15 oz each) of chickpeas, drained and rinsed
- 2 ripe avocados, diced
- 1 cup cherry tomatoes, halved
- 1 small red onion, finely chopped
- 1/4 cup fresh cilantro, chopped
- 1/4 cup fresh lemon juice
- 3 tablespoons extra virgin olive oil
- Salt and pepper to taste
Instructions:
- Prepare the Chickpeas: Start by draining and rinsing the canned chickpeas thoroughly under cold water. This helps remove excess sodium and improves the texture.
- Dice the Avocados: Cut the avocados in half, remove the pits, and carefully scoop out the flesh. Dice the avocado into bite-sized pieces and set aside.
- Chop the Vegetables: Halve the cherry tomatoes and finely chop the red onion. Chop the fresh cilantro finely, which will add a burst of flavor and color to the salad.
- Mix the Ingredients: In a large mixing bowl, combine the chickpeas, diced avocados, cherry tomatoes, red onion, and cilantro. Toss gently to combine without mashing the avocados.
- Prepare the Dressing: In a small bowl, whisk together fresh lemon juice and extra virgin olive oil. Season with salt and pepper to taste.
- Combine and Serve: Pour the dressing over the salad mixture and gently toss to coat all ingredients evenly. Be careful not to over-mix to keep the avocados intact. Serve immediately or refrigerate for up to an hour before serving.
Extra Tips:
For best results, use ripe but firm avocados to maintain their shape in the salad. If you prefer a bit more heat, consider adding a chopped jalapeño or a sprinkle of chili flakes.
This salad can be prepared a few hours in advance but is best enjoyed fresh to prevent the avocados from browning. If you want to make it a complete meal, consider adding some grilled chicken or feta cheese for additional protein and flavor.
Mushroom and Herb Frittata

Mushroom and Herb Frittata is a delightful Italian dish that combines the earthy flavors of mushrooms with the freshness of herbs, all enveloped in a fluffy, golden egg mixture. This versatile dish can be served for breakfast, brunch, or even a light dinner, offering a healthy and satisfying option for any meal.
With the addition of fresh herbs, this frittata not only bursts with flavor but also presents a vibrant and appetizing appearance. This recipe is designed to serve 4-6 people, making it perfect for a family meal or a gathering with friends. The combination of mushrooms and herbs guarantees a nutritious meal packed with vitamins and minerals, while the eggs provide a good source of protein.
Preparing this dish is straightforward, allowing you to enjoy a taste of Italy without spending hours in the kitchen.
Ingredients:
- 8 large eggs
- 1/4 cup milk
- Salt and pepper, to taste
- 2 tablespoons olive oil
- 1 small onion, chopped
- 2 cups mushrooms, sliced
- 1/4 cup fresh parsley, chopped
- 2 tablespoons fresh basil, chopped
- 1/4 cup grated Parmesan cheese
- 1/2 cup cherry tomatoes, halved (optional)
Cooking Instructions:
- Preheat and Prepare: Preheat your oven to 350°F (175°C). This guarantees that the oven is at the right temperature when you’re ready to bake the frittata.
- Mix Eggs: In a large bowl, whisk together the eggs and milk until well combined. Season the mixture with salt and pepper to taste, ensuring a balanced seasoning throughout the frittata.
- Sauté Vegetables: Heat olive oil in an oven-safe skillet over medium heat. Add the chopped onion and sauté for about 2-3 minutes until it becomes translucent. Stir in the sliced mushrooms and continue to cook for another 5 minutes, or until the mushrooms are tender and have released their moisture.
- Add Herbs: Once the mushrooms are cooked, add the chopped parsley and basil to the skillet. Stir these into the mixture, allowing the herbs to release their aromas and integrate their flavors with the vegetables.
- Combine and Cook: Pour the egg mixture over the sautéed vegetables and herbs in the skillet. Gently stir to distribute the ingredients evenly. Sprinkle the grated Parmesan cheese over the top. If using, add the cherry tomato halves on top, cut side up.
- Bake: Transfer the skillet to the preheated oven and bake for 20-25 minutes, or until the frittata is set in the center and lightly golden on top. A toothpick inserted in the middle should come out clean.
- Serve: Once cooked, remove the frittata from the oven and allow it to cool slightly before slicing. Serve warm, garnished with additional fresh herbs if desired.
Extra Tips:
To guarantee a perfectly cooked frittata, avoid over-stirring the eggs as this can make them tough. Using an oven-safe skillet is essential, as it allows you to seamlessly shift from stovetop to oven.
Additionally, feel free to experiment with other herbs such as thyme or oregano, or even add a touch of garlic for an extra layer of flavor. Finally, if you prefer a creamier texture, you can substitute the milk with cream or half-and-half.
Watermelon and Feta Salad

Watermelon and Feta Salad is a revitalizing and delightful dish that captures the essence of summer with its vibrant colors and contrasting flavors. The sweetness of the juicy watermelon pairs perfectly with the creamy, salty feta cheese, creating a harmonious balance that’s both light and satisfying.
This salad isn’t only visually appealing but also incredibly easy to prepare, making it a perfect appetizer or side dish for any occasion, whether it’s a casual family gathering or a sophisticated dinner party.
The addition of fresh mint leaves adds an aromatic touch, while a drizzle of olive oil and a squeeze of lime juice elevate the flavors, bringing a zesty brightness to the dish. This Italian-inspired salad is both healthy and simple, guaranteeing that you can enjoy a nutritious meal without compromising on taste.
Serving 4-6 people, this dish is ideal for sharing and is sure to become a favorite go-to recipe for anyone seeking a quick and nutritious meal option.
Ingredients (Serving Size: 4-6 people):
- 1 small seedless watermelon (about 4 pounds), cubed
- 1 cup crumbled feta cheese
- 1/2 cup fresh mint leaves, roughly torn
- 1 small red onion, thinly sliced
- 3 tablespoons extra-virgin olive oil
- Juice of 1 lime
- Salt and freshly ground black pepper to taste
Cooking Instructions:
- Prepare the Watermelon: Start by cutting the watermelon into bite-sized cubes. Confirm that the watermelon is seedless to save time and effort. Place the cubes into a large serving bowl.
- Slice the Onion: Thinly slice the red onion and add it to the bowl with the watermelon. The onion will add a slight pungency that balances the sweetness of the watermelon.
- Add Feta Cheese: Crumble the feta cheese over the watermelon and onion mixture. The salty feta will complement the sweet and juicy watermelon chunks.
- Add Mint Leaves: Roughly tear the fresh mint leaves and sprinkle them over the salad. The mint will add a revitalizing aroma and flavor.
- Dress the Salad: In a small bowl, whisk together the olive oil and lime juice until emulsified. Drizzle this dressing over the salad ingredients.
- Season the Salad: Season the salad with salt and freshly ground black pepper to taste. Be cautious with the salt, as feta is already salty.
- Toss and Serve: Gently toss all the ingredients together to guarantee even distribution of flavors. Serve the salad immediately for the freshest taste.
Extra Tips:
To enhance the presentation of the Watermelon and Feta Salad, consider using a melon baller to create uniform watermelon balls instead of cubes. This adds an appealing visual element to the dish.
When selecting a watermelon, look for one that feels heavy for its size and has a yellow spot on the rind, indicating ripeness. For an added twist, you can include a handful of arugula or add a sprinkle of toasted pine nuts for extra texture.