

Hosting an intimate dinner is all about creating the perfect atmosphere with delicious appetizers that celebrate the flavors of Italy.
Think warm, crispy focaccia with a hint of rosemary and the delightful crunch of prosciutto-wrapped asparagus.
These recipes are more than just food; they set the mood for a memorable culinary experience.
There’s always that one appetizer that stands out, leaving everyone excited for what’s next.
Curious to know which one it is?
Classic Tomato and Basil Bruschetta

Classic Tomato and Basil Bruschetta is a quintessential Italian appetizer that perfectly captures the essence of Mediterranean flavors. This simple yet elegant dish combines the freshness of ripe tomatoes with the aromatic essence of basil, all served atop a crispy slice of toasted bread.
It’s the ideal starter for any Italian-themed dinner, providing a burst of flavor that sets the tone for the rest of the meal. The beauty of Bruschetta lies in its simplicity and the quality of ingredients used, making it a favorite for both casual gatherings and sophisticated dinners.
The origins of Bruschetta trace back to Central Italy, where it was traditionally made to salvage stale bread. Today, it has evolved into a beloved appetizer worldwide. When preparing Classic Tomato and Basil Bruschetta, it’s vital to use the freshest ingredients available.
The key components—ripe tomatoes, fragrant basil, and robust olive oil—combine to create a harmonious blend of flavors that are both revitalizing and satisfying. Whether you’re hosting a dinner party or enjoying a quiet meal at home, this dish is sure to impress.
Ingredients for 4-6 servings:
- 6 ripe Roma tomatoes
- 1/4 cup fresh basil leaves
- 3 cloves garlic
- 1/4 cup extra virgin olive oil
- 1 tablespoon balsamic vinegar
- Salt and freshly ground black pepper to taste
- 1 French baguette or Italian bread loaf
- Optional: grated Parmesan cheese for garnish
Cooking Instructions:
- Prepare the Tomatoes: Begin by washing the Roma tomatoes thoroughly. Dice them into small, even pieces and place them in a large mixing bowl. This will be the base for your Bruschetta topping.
- Mix the Topping: Add finely chopped basil leaves to the diced tomatoes. Mince two cloves of garlic and add them to the bowl. Drizzle the mixture with extra virgin olive oil and balsamic vinegar. Season generously with salt and freshly ground black pepper. Toss everything together until well combined. Let the mixture sit for at least 15 minutes to allow the flavors to meld.
- Toast the Bread: Preheat your oven to 400°F (200°C). Slice the baguette into 1/2-inch thick pieces. Arrange the slices on a baking sheet and brush each piece lightly with olive oil. Toast in the oven for about 5-7 minutes, or until the edges become golden brown and crisp.
- Assemble the Bruschetta: Once the bread is toasted, remove it from the oven. Cut the remaining clove of garlic in half and gently rub the cut side over the surface of each toasted bread slice for added flavor.
- Serve: Spoon a generous amount of the tomato and basil mixture onto each piece of toasted bread. If desired, sprinkle with grated Parmesan cheese for an extra layer of taste. Serve immediately while the bread is still warm.
Extra Tips:
For the best results, use high-quality ingredients. Opt for vine-ripened tomatoes for their superior flavor and juiciness. Fresh basil is essential, as dried won’t provide the same aromatic quality.
If possible, use a good quality, cold-pressed extra virgin olive oil for its rich taste. Additionally, this appetizer is best served immediately to guarantee the bread remains crispy. If preparing in advance, keep the tomato mixture separate and assemble just before serving to maintain the perfect texture.
Creamy Burrata With Sweet Figs

Creamy Burrata With Sweet Figs is a delightful Italian appetizer that perfectly balances the creaminess of burrata cheese with the natural sweetness of fresh figs. This dish isn’t only visually stunning but also a delicious way to start any dinner party or casual gathering. The rich texture of the burrata complements the juicy figs, creating a harmonious blend of flavors that will leave your guests craving more.
With just a handful of ingredients, this recipe is both simple and sophisticated, making it an ideal choice for any home cook looking to impress. The combination of creamy burrata, ripe figs, and a hint of honey or balsamic glaze creates an irresistible appetizer that’s sure to please.
Whether you’re serving it as a starter or a light snack, this recipe captures the essence of Italian cuisine with its emphasis on fresh, high-quality ingredients. Perfect for late summer evenings or early fall gatherings, Creamy Burrata With Sweet Figs brings a taste of Italy to your table, inviting everyone to savor the simplicity and elegance of this classic dish.
Ingredients (serves 4-6):
- 2 balls of burrata cheese
- 8 fresh figs, halved
- 2 tablespoons honey or balsamic glaze
- 2 tablespoons extra-virgin olive oil
- Salt and freshly ground black pepper to taste
- Fresh basil leaves for garnish
- Crusty bread or crostini for serving
Cooking Instructions:
1. Prepare the Burrata and Figs: Start by gently removing the burrata cheese from its packaging and letting it sit at room temperature for about 15 minutes. This allows the cheese to become creamy and enhances its flavor.
Meanwhile, wash the figs thoroughly and pat them dry with a paper towel. Cut each fig in half vertically to expose their beautiful interiors.
2. Assemble the Dish: On a large serving platter, arrange the burrata cheese balls in the center. Place the halved figs around the burrata, ensuring they’re evenly distributed for a visually appealing presentation.
3. Add Flavor: Drizzle the honey or balsamic glaze over the burrata and figs. This will add a touch of sweetness and acidity that enhances the natural flavors of the dish.
Then, drizzle the extra-virgin olive oil over the entire platter, adding a rich, fruity note.
4. Season and Garnish: Sprinkle a pinch of salt and freshly ground black pepper over the dish to taste. Finally, garnish with fresh basil leaves, which add a pop of color and a fragrant aroma.
5. Serve: Accompany the dish with slices of crusty bread or crostini. Encourage guests to scoop the creamy burrata onto the bread, pairing it with a fig half for a perfect bite.
Extra Tips:
When preparing Creamy Burrata With Sweet Figs, the quality of the ingredients is key. Opt for ripe, fresh figs that are plump and aromatic, as they’ll have the best natural sweetness.
Similarly, choose high-quality burrata cheese with a creamy interior. If fresh figs aren’t in season, consider using dried figs that have been rehydrated in warm water for a similar effect.
Adjust the amount of honey or balsamic glaze based on personal preference and the sweetness of the figs. Finally, this dish is best enjoyed immediately after preparation, as the burrata maintains its creamy texture and the figs remain juicy and fresh.
Savory Prosciutto-Wrapped Asparagus

Savory Prosciutto-Wrapped Asparagus is a delightful Italian appetizer that combines the rich, salty flavor of prosciutto with the fresh, crisp taste of asparagus. This dish is perfect for entertaining guests or starting a meal with a touch of elegance. The key to this recipe is using fresh, tender asparagus spears and high-quality prosciutto to guarantee each bite is bursting with flavor.
Whether you’re hosting a dinner party or looking to add a sophisticated touch to your family dinner, this appetizer is sure to impress.
The preparation of Savory Prosciutto-Wrapped Asparagus is simple yet rewarding. The asparagus is lightly blanched to bring out its vibrant green color and tender texture while maintaining a satisfying crunch. Once wrapped in prosciutto, the asparagus spears are baked to perfection, allowing the prosciutto to become crispy and the asparagus to absorb its savory essence.
This dish isn’t only delicious but also visually stunning, making it a beautiful addition to any table setting.
Ingredients (Serves 4-6):
- 1 pound of fresh asparagus spears, trimmed
- 12 slices of prosciutto
- 2 tablespoons of olive oil
- 1/4 teaspoon of black pepper
- 1/4 teaspoon of garlic powder
- 1/4 cup of grated Parmesan cheese
Cooking Instructions:
- Preheat the Oven: Preheat your oven to 400°F (200°C). Line a baking sheet with parchment paper for easy cleanup.
- Prepare the Asparagus: Trim the woody ends of the asparagus spears. Bring a pot of water to a boil, add the asparagus, and blanch for about 2-3 minutes. Immediately transfer them to an ice bath to stop the cooking process and maintain their bright green color.
- Season the Asparagus: Once cooled, dry the asparagus with a paper towel. Drizzle with olive oil and sprinkle with black pepper and garlic powder. Toss to guarantee even coating.
- Wrap with Prosciutto: Take one slice of prosciutto and wrap it around each asparagus spear, starting from the base and spiraling up to the tip. Ensure the prosciutto is snug but not too tight.
- Bake the Wrapped Asparagus: Arrange the wrapped asparagus spears on the prepared baking sheet. Place them in the preheated oven and bake for 10-12 minutes, or until the prosciutto is crispy and the asparagus is tender.
- Garnish with Parmesan: Remove the baking sheet from the oven and sprinkle the grated Parmesan cheese over the top of the warm prosciutto-wrapped asparagus. Allow the cheese to melt slightly from the residual heat.
Extra Tips:
To enhance the flavor of this dish, consider adding a dash of lemon juice or zest after baking to provide a fresh, zesty contrast to the rich prosciutto and asparagus.
If you prefer a smokier flavor, try roasting the asparagus spears on a grill instead of baking them in the oven. Additionally, guarantee the prosciutto slices are thin enough to become crispy during baking, but not so thin that they tear easily while wrapping.
Traditional Caprese Salad Skewers
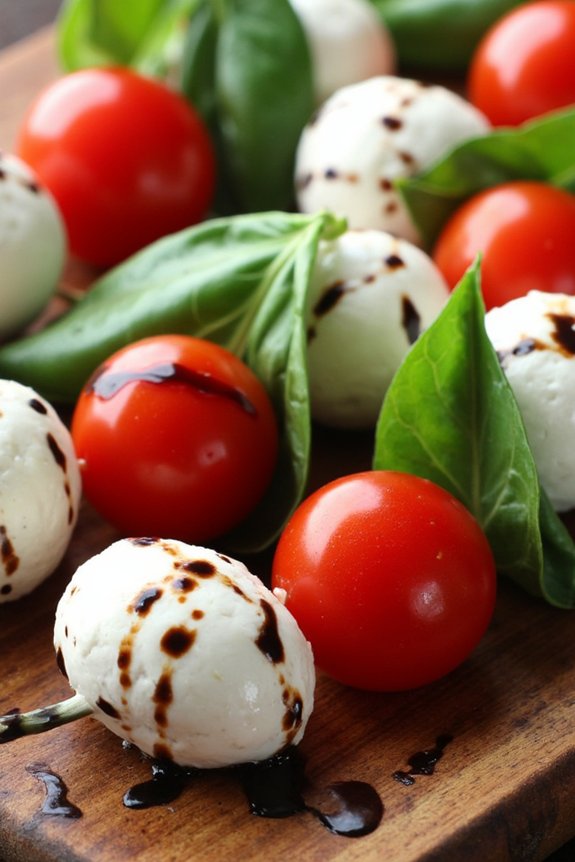
The Traditional Caprese Salad Skewers are a delightful and elegant Italian appetizer that perfectly embodies the simplicity and freshness of Italian cuisine. This dish is a skewered variation of the classic Caprese salad and is perfect for serving at dinner parties or as a light starter. It features a harmonious blend of fresh mozzarella, ripe cherry tomatoes, and fragrant basil leaves, all drizzled with a touch of balsamic glaze for added depth and sweetness.
These skewers aren’t only visually appealing but also incredibly easy to prepare, making them an ideal choice for both novice and experienced cooks. The combination of creamy mozzarella, juicy tomatoes, and aromatic basil creates a burst of flavor with every bite, while the balsamic glaze adds a subtle tang that ties all the ingredients together.
Whether you’re hosting a casual get-together or a more formal dinner, these Traditional Caprese Salad Skewers are sure to impress your guests with their vibrant colors and delicious taste.
Ingredients for 4-6 Servings:
- 20 cherry tomatoes
- 20 fresh basil leaves
- 20 small fresh mozzarella balls (bocconcini)
- Salt and freshly ground black pepper, to taste
- 2 tablespoons extra-virgin olive oil
- 1 tablespoon balsamic glaze
- 10-12 wooden skewers
Cooking Instructions:
- Preparation of Ingredients: Begin by washing the cherry tomatoes and basil leaves thoroughly under cold running water. Pat them dry with paper towels to remove excess moisture.
- Assembly of Skewers: Take a wooden skewer and start by threading one cherry tomato onto it. Follow with a basil leaf, folding it in half if it’s large. Add a mozzarella ball next. Repeat this pattern (tomato, basil, mozzarella) until each skewer holds about 4-5 pieces of each ingredient, leaving some space at the top and bottom for easy handling.
- Seasoning the Skewers: Once all the skewers are assembled, place them on a serving platter. Drizzle the extra-virgin olive oil evenly over the skewers. Season with a sprinkle of salt and freshly ground black pepper to enhance the flavors.
- Adding the Balsamic Glaze: Finally, drizzle the balsamic glaze over the skewers. Be careful not to overdo it, as the glaze is quite potent and a little goes a long way.
- Serving: Serve the skewers immediately, or refrigerate them for up to an hour if you want to prepare them ahead of time. They should be brought back to room temperature before serving for the best flavor.
Extra Tips: For a more robust flavor, consider using a high-quality balsamic glaze or making your own by reducing balsamic vinegar until it thickens. If you prefer a more intense herb flavor, experiment with additional herbs like oregano or mint. To add a touch of crunch, you can also incorporate small toasted pine nuts onto the skewers.
Crunchy Arancini Rice Balls

Crunchy Arancini Rice Balls are a delightful Italian appetizer that combines creamy risotto with a crispy, golden-brown exterior.
Originating from Sicily, these rice balls are a popular street food and are often filled with a variety of ingredients, from simple cheese to hearty meats and vegetables. The combination of flavors and textures makes them a favorite choice for gatherings and special occasions, offering a taste of traditional Italian cuisine right in your home.
To prepare the perfect Arancini, it’s crucial to start with a well-cooked risotto, which provides the creamy base necessary for forming the balls. Once the risotto is prepared and cooled, it’s rolled into balls, stuffed with your choice of filling, coated in breadcrumbs, and then fried until crispy. The result is a delicious appetizer that’s both satisfying and versatile, making it easy to tailor to your personal taste preferences.
Ingredients for 4-6 servings:
- 2 cups Arborio rice
- 4 cups chicken or vegetable broth
- 1/2 cup white wine
- 1 small onion, finely chopped
- 2 cloves garlic, minced
- 1/2 cup grated Parmesan cheese
- 2 tablespoons unsalted butter
- Salt and pepper, to taste
- 1 cup mozzarella cheese, cut into small cubes
- 1 cup all-purpose flour
- 2 large eggs, beaten
- 2 cups breadcrumbs
- Vegetable oil, for frying
Cooking Instructions:
- Prepare the Risotto: In a large saucepan, melt the butter over medium heat. Add the chopped onion and garlic, and sauté until the onion becomes translucent. Stir in the Arborio rice, cooking for 2-3 minutes until the grains are lightly toasted.
- Cook the Rice: Add the white wine to the rice, stirring until the liquid is absorbed. Gradually add the broth, one cup at a time, stirring frequently and allowing the liquid to be absorbed before adding more. Cook until the rice is creamy and tender, about 18-20 minutes.
- Finish the Risotto: Once the rice is cooked, remove it from heat and stir in the grated Parmesan cheese. Season with salt and pepper to taste. Allow the risotto to cool completely, preferably spreading it on a baking sheet to speed up the process.
- Form the Rice Balls: Take a handful of the cooled risotto and flatten it in your palm. Place a cube of mozzarella in the center and shape the rice around it to form a ball. Repeat until all the risotto is used.
- Coat the Arancini: Roll each rice ball in the flour, then dip it in the beaten eggs, making sure it’s well-coated. Finally, roll the ball in breadcrumbs, pressing gently to adhere.
- Fry the Arancini: In a large pot or deep fryer, heat vegetable oil to 350°F (175°C). Fry the rice balls in batches, turning occasionally, until golden brown and crispy on all sides, about 4-5 minutes per batch.
- Drain and Serve: Remove the fried Arancini with a slotted spoon and drain on paper towels. Serve warm, with marinara sauce or your favorite dipping sauce.
Extra Tips:
For best results, make certain the risotto is completely cooled before forming into balls, as warm risotto can be difficult to handle and may fall apart.
You can prepare the risotto a day in advance and refrigerate it overnight to save time. When frying, maintain the oil temperature to guarantee even cooking and a perfectly crispy exterior.
Experiment with fillings such as cooked sausage, peas, or mushrooms to create different flavor profiles.
Flavorful Stuffed Mushrooms

Flavorful Stuffed Mushrooms are an exquisite Italian appetizer that brings a burst of savory goodness to any dinner table. These bite-sized delights are perfect for starting a meal or serving at a party, offering a rich combination of flavors and textures. The mushrooms are filled with a mixture of breadcrumbs, herbs, cheese, and other savory ingredients, making each bite a delightful experience.
Whether you’re a seasoned cook or a beginner, this recipe is straightforward and rewarding, guaranteeing your guests will be impressed with your culinary skills.
The key to creating the perfect stuffed mushrooms lies in balancing the flavors of the stuffing with the natural earthiness of the mushrooms. By using fresh ingredients and herbs, you can elevate this classic dish to new heights. The use of quality cheeses like Parmesan or Pecorino adds a creamy and decadent layer to the stuffing, while garlic and parsley infuse it with vibrant flavor.
Whether served hot out of the oven or at room temperature, these stuffed mushrooms are sure to be a hit.
Ingredients (for 4-6 people):
- 24 large button mushrooms
- 1 cup breadcrumbs
- 1/2 cup grated Parmesan cheese
- 2 tablespoons olive oil
- 3 cloves garlic, minced
- 1/4 cup fresh parsley, finely chopped
- 1/4 teaspoon salt
- 1/4 teaspoon freshly ground black pepper
- 1/4 cup chicken or vegetable broth
- 1 tablespoon lemon juice
- Additional Parmesan cheese for topping (optional)
Cooking Instructions:
- Preheat the Oven: Begin by preheating your oven to 375°F (190°C) to guarantee it’s hot when your mushrooms are ready to be baked.
- Prepare the Mushrooms: Gently clean the mushrooms with a damp cloth to remove any dirt. Remove the stems carefully and set them aside. These stems will be used in the stuffing.
- Make the Stuffing: Finely chop the mushroom stems and place them in a mixing bowl. Add the breadcrumbs, grated Parmesan cheese, minced garlic, chopped parsley, salt, and pepper. Mix well to combine all the ingredients.
- Moisten the Stuffing: Pour olive oil and lemon juice over the stuffing mixture and stir to combine. Add the chicken or vegetable broth gradually, stirring until the stuffing is moist but not soggy.
- Stuff the Mushrooms: Using a small spoon, carefully fill each mushroom cap with the stuffing mixture, pressing gently to make sure it’s well-packed.
- Bake the Mushrooms: Arrange the stuffed mushrooms in a single layer on a baking sheet or in a baking dish. Sprinkle additional Parmesan cheese on top if desired. Bake in the preheated oven for 20-25 minutes, or until the mushrooms are tender and the tops are golden brown.
- Serve: Allow the mushrooms to cool slightly before serving. Transfer to a serving platter and enjoy while warm.
Extra Tips:
For an extra burst of flavor, consider adding finely chopped sun-dried tomatoes or cooked pancetta to the stuffing. If you prefer a spicier kick, a pinch of crushed red pepper flakes can add a delightful heat to the dish.
Guarantee that the mushrooms are evenly sized for consistent cooking, and avoid overcrowding the baking dish to allow even heat circulation. If making ahead, the mushrooms can be stuffed and refrigerated a few hours before baking, making them a convenient option for busy hosts.
Zesty Marinated Olives and Artichokes

Zesty Marinated Olives and Artichokes is a vibrant and flavorful appetizer that brings together the rich, salty flavors of olives and the tender, earthy taste of artichokes. This Italian-inspired dish is perfect for setting the tone at any dinner party or family gathering.
The key to this dish is a perfectly balanced marinade that infuses the ingredients with a zesty and aromatic flavor profile. With the right combination of herbs and spices, this appetizer will tantalize your taste buds and leave your guests wanting more.
The preparation of this dish is straightforward and requires minimal cooking, making it an ideal choice for those who want to impress without spending hours in the kitchen. By allowing the olives and artichokes to marinate, you give them time to absorb the flavors of the marinade, enhancing their natural tastes.
This dish can be prepared ahead of time, which makes it a convenient option for entertaining. Let’s explore the list of ingredients and the steps needed to create this delicious appetizer for 4-6 people.
Ingredients:
- 1 cup mixed olives (green and black)
- 1 cup canned artichoke hearts, drained and quartered
- 1/4 cup extra-virgin olive oil
- 2 tablespoons red wine vinegar
- 2 cloves garlic, minced
- 1 teaspoon lemon zest
- 1/2 teaspoon crushed red pepper flakes
- 1 teaspoon dried oregano
- 1 teaspoon dried thyme
- Salt and pepper to taste
- 2 tablespoons fresh parsley, chopped
Cooking Instructions:
- Prepare the Marinade: In a large mixing bowl, combine the extra-virgin olive oil, red wine vinegar, minced garlic, lemon zest, crushed red pepper flakes, dried oregano, and dried thyme. Whisk the ingredients together until well blended. This mixture will serve as the flavorful marinade for your olives and artichokes.
- Marinate the Ingredients: Add the mixed olives and quartered artichoke hearts to the bowl with the marinade. Toss the ingredients gently to guarantee that the olives and artichokes are evenly coated with the marinade. Cover the bowl with plastic wrap or transfer the mixture to an airtight container.
- Refrigerate: Place the marinated olives and artichokes in the refrigerator for at least 2 hours, or overnight if possible. This allows the flavors to meld together, creating a more intense and delicious taste.
- Season and Garnish: Before serving, taste the mixture and add salt and pepper as needed. Garnish with freshly chopped parsley for a burst of color and additional flavor.
- Serve: Arrange the marinated olives and artichokes on a serving platter and enjoy them as a delightful appetizer alongside crusty bread or crackers.
Extra Tips:
For an even more flavorful dish, consider using a variety of olive types such as Kalamata, Castelvetrano, or Ligurian olives. The different textures and tastes will add depth to your appetizer.
Additionally, you can customize the heat level by adjusting the amount of crushed red pepper flakes to suit your taste. If you’re preparing this dish ahead of time, remember that the flavors will continue to develop, so it might taste even better the next day.
Enjoy your Zesty Marinated Olives and Artichokes with a glass of your favorite Italian wine for a truly authentic experience.
Crispy Calamari With Lemon Aioli

Crispy Calamari With Lemon Aioli is a delightful Italian appetizer that’s sure to impress your guests. This dish features tender rings of calamari, lightly coated in a seasoned flour mixture, and fried to golden perfection. The crispiness of the calamari is perfectly complemented by a zesty lemon aioli, adding a rejuvenating tang to each bite.
Whether you’re hosting a dinner party or simply craving something special, this recipe is guaranteed to be a crowd-pleaser. The calamari is first marinated with a splash of lemon juice and a hint of garlic to infuse it with flavor before being coated and fried. The lemon aioli is a simple yet sophisticated dipping sauce made with fresh lemon juice, mayonnaise, and a touch of garlic.
When served together, the combination offers a delightful contrast in textures and flavors, making it a perfect start to any Italian-themed dinner. With a serving size designed for 4-6 people, this recipe is ideal for gatherings and special occasions.
Ingredients for Crispy Calamari With Lemon Aioli (Serves 4-6):
- 1 1/2 pounds of calamari, cleaned and cut into rings
- 1 cup all-purpose flour
- 1/2 cup cornmeal
- 1 teaspoon salt
- 1 teaspoon black pepper
- 1/2 teaspoon paprika
- 1/2 teaspoon garlic powder
- 2 lemons, juiced
- 2 cloves garlic, minced
- 1 cup mayonnaise
- Vegetable oil for frying
- Fresh parsley, chopped (for garnish)
Cooking Instructions:
- Prepare the Calamari: In a bowl, mix the calamari rings with the juice of one lemon and minced garlic. Allow it to marinate for about 20 minutes in the refrigerator.
- Make the Lemon Aioli: In a separate bowl, combine mayonnaise, the juice from the second lemon, and a pinch of minced garlic. Stir until smooth, then cover and refrigerate until ready to serve.
- Prepare the Coating: In a shallow dish, mix together the all-purpose flour, cornmeal, salt, black pepper, paprika, and garlic powder.
- Coat the Calamari: Remove the calamari from the marinade and pat dry with a paper towel. Dredge each piece in the flour mixture, confirming it’s well coated. Shake off any excess flour.
- Heat the Oil: In a large pot or deep fryer, heat vegetable oil to 350°F (175°C). Make sure there’s enough oil to submerge the calamari completely.
- Fry the Calamari: Carefully place the coated calamari into the hot oil in batches, making sure not to overcrowd the pot. Fry for about 2-3 minutes or until golden and crispy. Use a slotted spoon to transfer the cooked calamari to a paper towel-lined plate to drain excess oil.
- Garnish and Serve: Transfer the fried calamari to a serving platter. Garnish with chopped fresh parsley and serve immediately with the lemon aioli on the side.
Extra Tips:
When preparing Crispy Calamari With Lemon Aioli, it’s important to keep a few things in mind for the best results. First, verify the oil is at the correct temperature before frying; this will help achieve that perfect crispiness without making the calamari greasy.
If you don’t have a thermometer, you can test the oil by dropping a little flour mixture into it; if it sizzles immediately, the oil is ready. Additionally, avoid overcrowding the frying pot, as this can lower the oil temperature and result in less crispy calamari.
Finally, serve the calamari immediately after frying for peak texture and flavor.
Rustic Focaccia With Rosemary and Sea Salt
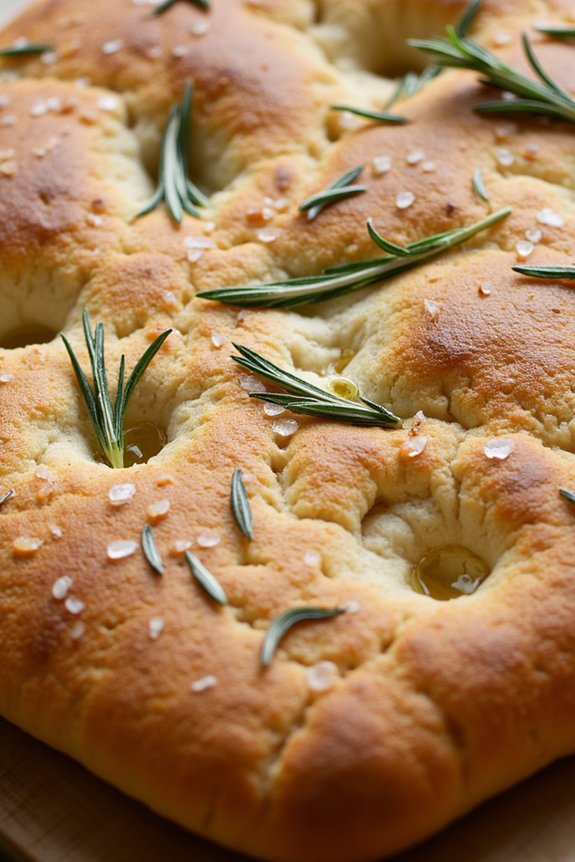
Rustic Focaccia With Rosemary and Sea Salt is a classic Italian appetizer that brings the essence of the Mediterranean to your table. This bread is characterized by its soft, airy texture and a deliciously crisp crust, making it the perfect starter or accompaniment to any Italian meal. Infused with the aromatic scent of fresh rosemary and the subtle crunch of sea salt, this focaccia is both simple and delightful, capturing the rustic charm of traditional Italian baking.
In this recipe, we’ll guide you through the process of creating this flavorful focaccia from scratch. With just a few basic ingredients and some patience, you’ll be able to craft a bread that not only tastes incredible but also fills your kitchen with the comforting aroma of freshly baked goods. Perfect for serving 4-6 people, this focaccia can be enjoyed on its own, dipped in olive oil, or as a base for various toppings.
Ingredients for 4-6 servings:
- 500g all-purpose flour
- 325ml warm water
- 2 1/4 teaspoons active dry yeast (1 packet)
- 2 teaspoons sugar
- 1 teaspoon salt
- 1/4 cup extra-virgin olive oil, plus more for drizzling
- 3 tablespoons fresh rosemary leaves
- 1 tablespoon coarse sea salt
Cooking Instructions:
- Prepare the Yeast Mixture: In a small bowl, combine the warm water, sugar, and active dry yeast. Stir gently to dissolve and let it sit for about 5-10 minutes until the mixture becomes frothy. This indicates that the yeast is active and ready to use.
- Mix the Dough: In a large mixing bowl, combine the flour and salt. Make a well in the center and pour in the yeast mixture along with 1/4 cup of olive oil. Stir with a wooden spoon until a rough dough forms.
- Knead the Dough: Transfer the dough onto a lightly floured surface and knead for about 10 minutes or until it becomes smooth and elastic. The dough should be slightly sticky but manageable. Add a little more flour if needed.
- First Rise: Place the dough in a lightly oiled bowl, cover it with a damp cloth, and let it rise in a warm place for about 1-2 hours or until it has doubled in size.
- Prepare the Baking Sheet: Preheat your oven to 220°C (428°F). Generously oil a baking sheet with olive oil. Punch down the dough to release air bubbles and transfer it to the baking sheet. Stretch and press the dough into a rectangle or oval shape, about 1.5cm thick.
- Second Rise: Cover the dough with a damp cloth again and let it rise for another 20-30 minutes, allowing it to become puffy.
- Add Toppings: With your fingers, gently dimple the surface of the dough. Drizzle a little more olive oil over the top, then sprinkle the rosemary leaves and sea salt evenly.
- Bake: Place the baking sheet in the preheated oven and bake for 20-25 minutes, or until the focaccia is golden brown and the edges are crispy. Remove from the oven and let it cool slightly on a wire rack before serving.
Extra Tips:
When making focaccia, the key is to ascertain that the dough is well-hydrated, as this creates the characteristic airy texture. The dimpling process not only adds texture to the bread but also helps to retain the olive oil, enhancing the flavor.
For an extra burst of flavor, you can add toppings like cherry tomatoes, olives, or caramelized onions before baking. Remember, focaccia is best enjoyed fresh, so try to serve it warm from the oven for the ultimate experience.
Hearty Antipasto Platter

The Hearty Antipasto Platter is a delicious and visually appealing Italian appetizer that’s perfect for any dinner party or gathering. This vibrant platter is loaded with a variety of textures and flavors that will tantalize your taste buds and leave your guests craving for more. It typically includes a mix of cured meats, cheeses, marinated vegetables, olives, and crusty bread, making it a versatile and satisfying option for starting any meal.
Creating this platter isn’t just about assembling ingredients; it’s about creating a balance of flavors. The salty and savory cured meats complement the rich and creamy cheeses, while the tangy marinated vegetables and olives add a revitalizing zing. The crusty bread or crispy crackers serve as the perfect vehicle for enjoying each component. This antipasto platter serves 4-6 people, making it an ideal choice for a small gathering.
Ingredients:
- 150g prosciutto
- 150g salami
- 150g mortadella
- 200g assorted cheeses (such as mozzarella, provolone, and Parmesan)
- 1 cup marinated artichoke hearts
- 1 cup roasted red peppers
- 1 cup mixed olives (green and black)
- 1 cup cherry tomatoes
- 1/2 cup sun-dried tomatoes
- 1/2 cup marinated mushrooms
- 1/4 cup balsamic glaze (optional)
- Fresh basil leaves for garnish
- 1 baguette or assorted crackers
Cooking Instructions:
- Prepare the Meats and Cheeses: Slice the prosciutto, salami, and mortadella into thin slices if they aren’t already pre-sliced. Arrange them in sections on a large serving platter. Cut the cheeses into bite-sized cubes or wedges and place them in separate sections on the platter.
- Add the Vegetables: Drain the marinated artichoke hearts, roasted red peppers, and marinated mushrooms. Arrange these vegetables around the meats and cheeses on the platter.
- Include the Olives and Tomatoes: Add the mixed olives and cherry tomatoes to the platter, ensuring they’re evenly distributed to add color and variety.
- Enhance with Sun-Dried Tomatoes: Scatter the sun-dried tomatoes around the platter, tucking them between other ingredients for visual interest and added flavor.
- Finish with Garnishes: Drizzle a little balsamic glaze over the platter for a touch of sweetness, if desired. Garnish with fresh basil leaves for a pop of color and aroma.
- Serve with Bread or Crackers: Slice the baguette into thin rounds and toast lightly if preferred, or arrange a selection of crackers on the side of the platter for guests to pair with the antipasto ingredients.
Extra Tips:
When assembling your Hearty Antipasto Platter, aim for a balance of flavors and textures. Be mindful of how the ingredients are arranged; alternating colors and shapes can make the platter more visually appealing.
If possible, use a large wooden board or a rustic platter for an authentic Italian feel. You can also personalize the platter by adding seasonal fruits or nuts for added depth in flavor.
Finally, remember that antipasto platters are meant to be shared, so encourage your guests to mix and match the different components to discover their favorite combinations.
Roasted Red Pepper and Ricotta Crostini
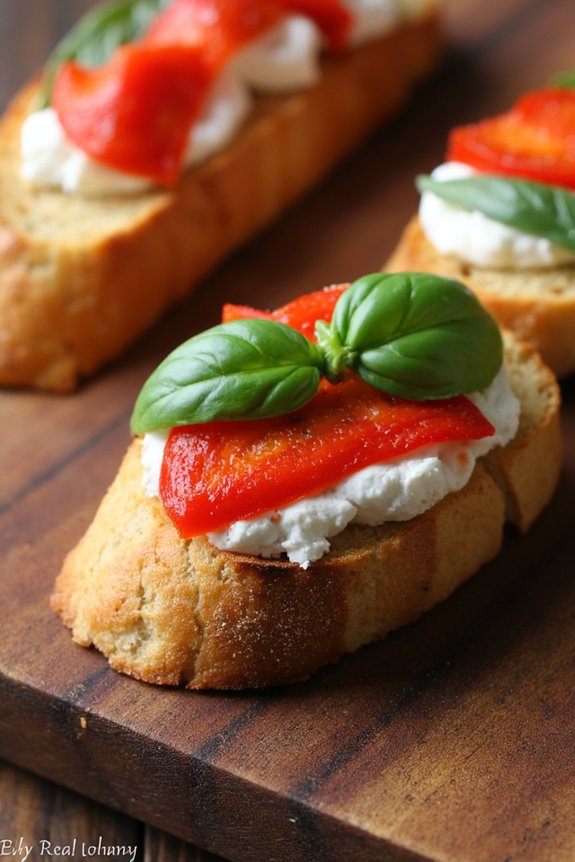
Roasted Red Pepper and Ricotta Crostini is a delightful Italian appetizer that brings a harmonious blend of flavors and textures to your table. This dish combines the sweetness of roasted red peppers with the creamy, rich texture of ricotta cheese, all resting on a crispy, golden crostini. It’s a perfect start to any Italian meal, offering a burst of flavor with every bite.
These crostini aren’t only delicious but also visually appealing, making them an excellent choice for entertaining guests or enjoying a cozy meal at home. This recipe is designed to serve 4-6 people, making it an ideal choice for small gatherings or family dinners.
The preparation doesn’t require extensive cooking skills, and the ingredients are simple and easy to find. With a little bit of patience and attention to detail, you’ll be able to create a beautiful and tasty appetizer that will impress your friends and family. Whether you’re a seasoned cook or a beginner in the kitchen, this Roasted Red Pepper and Ricotta Crostini is sure to become a favorite in your recipe collection.
Ingredients (Serves 4-6):
- 1 baguette, sliced into 1/2-inch rounds
- 2 large red bell peppers
- 1 cup ricotta cheese
- 2 tablespoons olive oil
- 1 clove garlic, peeled and halved
- Salt and pepper to taste
- Fresh basil leaves for garnish
Instructions:
- Roast the Peppers: Preheat your oven to 450°F (230°C). Place the red bell peppers on a baking sheet and roast them in the oven for about 20-25 minutes, turning occasionally, until the skins are charred and blistered. Remove from the oven and immediately place the peppers in a bowl and cover with plastic wrap. Let them steam for about 10 minutes, which will make peeling easier.
- Prepare the Crostini: While the peppers are cooling, arrange the baguette slices on a baking sheet. Brush each slice lightly with olive oil and season with salt and pepper. Bake in the preheated oven for 5-7 minutes or until they’re golden brown and crisp. Once out of the oven, rub each warm crostini with the cut side of the garlic clove.
- Peel and Slice the Peppers: After steaming, peel the charred skin off the peppers, remove the stems and seeds, and slice them into thin strips.
- Assemble the Crostini: Spread a generous amount of ricotta cheese onto each crostini. Top with a few strips of roasted red pepper. Drizzle with a bit more olive oil if desired, and season with a little salt and pepper.
- Garnish and Serve: Garnish each crostini with fresh basil leaves for a burst of color and flavor. Serve immediately for the best texture and taste.
Extra Tips:
For an added layer of flavor, consider using a smoked ricotta cheese or adding a touch of lemon zest to the ricotta before spreading it on the crostini.
If you have extra time, marinate the roasted red peppers in olive oil, garlic, and herbs for an hour before assembling the crostini. This dish is best served fresh, but if you need to prepare in advance, keep the components separate and assemble just before serving to maintain the crispness of the crostini.