

I’ve always been charmed by the delightful world of Italian street food. Each bite offers a delicious taste of tradition with a hint of surprise. Picture yourself enjoying a crispy arancini or a sweet zeppole—it’s like a mini tour of Italy’s bustling streets. Every golden-fried treat has its own story. Are you ready to explore these culinary treasures?
Arancini: The Classic Rice Balls

Arancini, also known as classic Italian rice balls, are a delicious and satisfying snack that originates from Sicily. These golden-fried delights are a staple in Italian cuisine and are enjoyed by many around the world.
Arancini are traditionally made using leftover risotto, which is molded into balls, filled with a tasty center, coated in breadcrumbs, and deep-fried until crispy and golden. The name “arancini” means “little oranges” in Italian, owing to their round shape and color, reminiscent of small oranges.
Creating arancini is a delightful culinary process that involves a careful balance of textures and flavors. The outside is crispy and golden, while the inside is creamy and savory, often featuring a surprise filling such as mozzarella, ragu, or peas. This recipe yields approximately 4-6 servings, making it perfect for a family gathering or a small party. The following ingredients and detailed steps will guide you in making these delightful rice balls at home.
Ingredients (for 4-6 servings):
- 2 cups of arborio rice
- 4 cups of chicken or vegetable broth
- 1/2 cup grated Parmesan cheese
- 2 tablespoons unsalted butter
- 2 tablespoons olive oil
- 1 small onion, finely chopped
- 2 cloves garlic, minced
- Salt and pepper to taste
- 2 eggs
- 1 cup all-purpose flour
- 2 cups breadcrumbs
- 1 cup mozzarella cheese, diced
- 1/2 cup of frozen peas (optional)
- Vegetable oil for frying
Cooking Instructions:
1. Prepare the Risotto Base:
In a large saucepan, heat the olive oil and butter over medium heat. Add the chopped onion and garlic, and sauté until the onion becomes translucent. Add the arborio rice and stir well to coat each grain with the oil.
2. Cook the Rice:
Gradually add the chicken or vegetable broth, one cup at a time, stirring constantly. Allow the rice to absorb the broth before adding more. Continue this process until the rice is cooked al dente, which should take about 18-20 minutes. Stir in the Parmesan cheese, salt, and pepper, and allow the mixture to cool.
3. Form the Arancini Balls:
Once the rice mixture is cooled, take a small handful and flatten it into a disc. Place a cube of mozzarella and a few peas (if using) in the center. Enclose the filling by shaping the rice into a ball around it. Repeat this process with the remaining rice.
4. Coat the Arancini:
In separate bowls, place the flour, beaten eggs, and breadcrumbs. Roll each rice ball in flour, dip it into the egg, and coat it with breadcrumbs. Verify each ball is evenly coated for a crispy finish.
5. Fry the Arancini:
Heat the vegetable oil in a deep fryer or a large pot to about 350°F (175°C). Carefully lower the arancini into the hot oil, a few at a time, and fry until they’re golden brown and crispy, about 3-4 minutes per batch. Remove the arancini with a slotted spoon and drain on paper towels.
Extra Tips:
For the best results, verify that the rice is completely cooled before forming the balls, as this will help them hold their shape while frying.
If you prefer a vegetarian option, substitute the chicken broth with vegetable broth and experiment with different fillings like mushrooms or spinach. Always monitor the oil temperature to avoid burning the arancini or undercooking them.
Arancini can also be made ahead of time and frozen; simply reheat them in the oven before serving. Enjoy your homemade arancini with a side of marinara sauce for extra flavor!
Panzerotti: Stuffed and Fried Delights

Panzerotti are a beloved Italian street food, originating from the Puglia region. These delectable treats are similar to small calzones, featuring a crisp, golden-brown exterior and a warm, gooey filling. Traditionally, they’re filled with tomato and mozzarella, but there are countless variations, including ham, mushrooms, or even sweet fillings like chocolate.
Perfect for a casual gathering or a cozy evening at home, panzerotti are a versatile dish that offers a delightful culinary experience with each bite.
The preparation of panzerotti involves making a simple dough that’s soft and pliable, ideal for encasing the delicious fillings. After the dough has been allowed to rise, it’s divided into smaller portions, rolled out, and filled with the ingredients of your choice. The filled dough is then closed and sealed, guaranteeing that no filling escapes during frying. The final cooking step involves frying the panzerotti until they’re beautifully golden and crisp, ready to be enjoyed hot.
Ingredients for 4-6 servings:
- 500g all-purpose flour
- 7g instant yeast
- 1 teaspoon sugar
- 1 teaspoon salt
- 250ml lukewarm water
- 2 tablespoons olive oil
- 200g mozzarella cheese, diced
- 200g tomato sauce
- 100g ham, diced (optional)
- Vegetable oil for frying
Cooking Instructions:
- Prepare the Dough: In a large mixing bowl, combine the flour, instant yeast, sugar, and salt. Mix well. Gradually add the lukewarm water and olive oil, stirring until a dough begins to form. Knead the dough on a floured surface for about 10 minutes, until it becomes smooth and elastic.
- Let the Dough Rise: Place the dough in a lightly greased bowl, cover it with a damp cloth, and let it rise in a warm area for about 1 hour, or until it has doubled in size.
- Prepare the Filling: While the dough is rising, prepare the filling by mixing the diced mozzarella cheese with the tomato sauce. Add diced ham if desired. Set the mixture aside.
- Divide and Roll the Dough: Once the dough has risen, punch it down to release the air. Divide it into 8-10 equal portions. Roll each portion into a ball, then flatten it with a rolling pin into a circle about 5-6 inches in diameter.
- Fill the Dough: Place a tablespoon of the filling mixture in the center of each dough circle. Fold the dough over to create a half-moon shape, then press the edges together firmly to seal. Use a fork to crimp the edges for added security.
- Heat the Oil: In a deep frying pan, heat the vegetable oil over medium heat until it reaches 180°C (350°F).
- Fry the Panzerotti: Carefully add the panzerotti to the hot oil, a few at a time, and fry for about 3-4 minutes on each side, or until they’re golden brown and crispy. Use a slotted spoon to remove them from the oil and drain on a paper towel-lined plate.
- Serve Hot: Serve the panzerotti hot, allowing the cheese to ooze out with every delightful bite.
Extra Tips:
For best results, confirm that the oil isn’t too hot, as this can cause the panzerotti to brown too quickly on the outside while remaining undercooked inside.
Experiment with different fillings to suit your taste preferences, such as adding sautéed mushrooms or using a spicy tomato sauce for a kick. Remember to seal the edges of the dough thoroughly to prevent the filling from leaking out during frying.
Enjoy your panzerotti with a side of fresh salad or a simple marinara sauce for dipping.
Zeppole: Sweet Italian Doughnuts

Zeppole, also known as sweet Italian doughnuts, are a delightful treat that captures the essence of Italian culinary tradition. These delectable pastries are typically enjoyed during celebrations and holidays, especially during St. Joseph’s Day in Italy. Zeppole are characterized by their light and airy texture, with a crisp exterior and a soft, fluffy interior. They’re often dusted with powdered sugar and sometimes filled with custard, ricotta, or jelly, making them a versatile and beloved dessert.
Making zeppole at home is a rewarding experience that allows you to savor the authentic flavors of Italy. While they’re traditionally deep-fried, these doughnuts can also be baked for a lighter alternative. The key to perfect zeppole lies in achieving the right consistency of the dough and guaranteeing that the oil is at the correct temperature for frying. With a few simple ingredients and some patience, you can create a batch of these mouthwatering doughnuts that will delight family and friends.
Ingredients (serving size: 4-6 people):
- 1 cup of water
- 1/2 cup of unsalted butter
- 1 tablespoon of granulated sugar
- Pinch of salt
- 1 cup of all-purpose flour
- 4 large eggs
- Vegetable oil for frying
- Powdered sugar for dusting
- Optional: Custard, ricotta, or jelly for filling
Cooking Instructions:
- Prepare the Dough: In a medium saucepan, combine the water, butter, granulated sugar, and salt. Bring the mixture to a boil over medium heat. Once boiling, remove the saucepan from heat and add the flour all at once. Stir vigorously with a wooden spoon until the mixture forms a ball and pulls away from the sides of the pan.
- Incorporate the Eggs: Allow the dough to cool slightly, then transfer it to a mixing bowl. Add the eggs one at a time, beating well after each addition until the dough is smooth and glossy. The final dough should be thick and sticky.
- Heat the Oil: In a deep, heavy-bottomed pot, heat about 2 inches of vegetable oil to 350°F (175°C). It’s important to maintain this temperature to guarantee even cooking and a golden-brown exterior.
- Shape and Fry the Doughnuts: Using a pastry bag fitted with a large star tip, pipe 3-inch circles of dough onto parchment paper. Carefully slide the doughnuts into the hot oil, frying a few at a time to avoid overcrowding the pot. Fry each zeppola for about 4-5 minutes, turning occasionally, until they’re puffed and golden brown.
- Drain and Dust: Use a slotted spoon to remove the zeppole from the oil and place them on a plate lined with paper towels to drain excess oil. Allow them to cool slightly, then dust generously with powdered sugar.
- Optional Filling: If desired, use a pastry bag to fill the cooled zeppole with custard, ricotta, or jelly before serving.
Extra Tips: When making zeppole, confirm that your oil is at the correct temperature before frying. If the oil is too hot, the exterior may brown too quickly while the inside remains undercooked. Conversely, if the oil isn’t hot enough, the doughnuts will absorb too much oil and become greasy.
Also, make sure to pipe the dough in even circles to guarantee uniform cooking. If you’re adding fillings, let the zeppole cool completely to prevent the filling from melting or becoming runny. Enjoy these delightful treats fresh for the best taste and texture!
Supplì: Roman Rice Croquettes

Supplì, also known as Roman Rice Croquettes, is a beloved Italian street food that hails from the heart of Rome. These delicious, deep-fried rice balls are traditionally stuffed with mozzarella cheese, which melts into a gooey center when cooked. The outer layer, crispy and golden brown, offers a delightful contrast to the soft, savory interior. Supplì makes for a perfect appetizer or a tasty snack, embodying the rich flavors of Italian cuisine with every bite.
The origins of Supplì can be traced back to the 19th century, and it remains a popular dish across Italy today. While similar to the Sicilian arancini, Supplì has its own unique charm and flavor profile. The rice is typically cooked with a tomato-based sauce and mixed with parmesan cheese, creating a rich and filling base. These delectable croquettes are then coated in breadcrumbs and deep-fried to perfection, making them an irresistible treat for both locals and tourists alike.
Ingredients (Serves 4-6)
- 1 ¼ cups Arborio rice
- 1 medium onion, finely chopped
- 2 tablespoons olive oil
- 1 cup tomato passata (pureed tomatoes)
- ½ cup dry white wine
- 4 cups chicken or vegetable broth
- ½ cup grated Parmesan cheese
- Salt and pepper to taste
- 2 eggs
- 1 ½ cups breadcrumbs
- 8 ounces mozzarella cheese, cut into small cubes
- Vegetable oil for frying
Cooking Instructions
- Prepare the Rice: In a large saucepan, heat the olive oil over medium heat and sauté the chopped onion until it becomes translucent. Add the Arborio rice and toast it for about 2 minutes, stirring frequently.
- Cook with Wine and Broth: Pour in the dry white wine and let it simmer until it has mostly evaporated. Gradually add the chicken or vegetable broth, one ladle at a time, allowing the rice to absorb the liquid before adding more. Stir occasionally to prevent sticking.
- Incorporate Tomato Passata: Once the rice is al dente, stir in the tomato passata. Cook for another 5 minutes until well combined and the rice is fully cooked. Season with salt and pepper to taste.
- Cool and Mix Cheese: Remove the rice from heat and stir in the grated Parmesan cheese. Let the mixture cool completely before proceeding to the next step.
- Form the Supplì: Take a small handful of the rice mixture and flatten it in your palm. Place a cube of mozzarella in the center and mold the rice around it to form a ball. Repeat until all the rice mixture is used.
- Coat the Supplì: Beat the eggs in a bowl. Dip each rice ball into the beaten eggs, then roll them in breadcrumbs until fully coated.
- Fry the Supplì: In a deep frying pan or pot, heat vegetable oil to 350°F (175°C). Carefully lower each supplì into the hot oil and fry until they’re golden brown and crispy on the outside. This should take about 3-4 minutes per batch.
- Drain and Serve: Remove the fried supplì with a slotted spoon and place them on paper towels to drain excess oil. Serve hot to enjoy the melted mozzarella center.
Extra Tips
When cooking Supplì, ensuring the rice mixture is completely cool before forming the croquettes is vital as it helps maintain the shape during frying.
Also, using Arborio rice is essential for its creamy texture, which binds well when cooled. If you prefer, you can experiment with different fillings such as minced meat or mushrooms for a unique twist.
Keeping the oil temperature consistent is important to achieve even cooking and prevent the supplì from becoming too oily. Enjoy this Roman delicacy as an appetizer or snack, and savor the authentic taste of Italy in every bite!
Frittelle Di Zucchine: Zucchini Fritters

Frittelle Di Zucchine, or Zucchini Fritters, are a classic Italian dish that embodies the simplicity and deliciousness of Italian cuisine. These savory fritters are perfect as an appetizer or a light meal, offering a delightful combination of crispy exterior and tender, flavorful interior. The key to a great Frittelle Di Zucchine lies in the freshness of the zucchini and the perfect balance of ingredients that enhance the natural sweetness of the zucchini without overpowering it.
The dish is relatively easy to make and requires only a handful of ingredients that are commonly found in most kitchens. The zucchini is shredded and then combined with a few simple ingredients to form a batter, which is then fried to golden perfection. The fritters are best served hot, with a sprinkle of salt and a squeeze of lemon juice, which enhances their flavor and makes them irresistible.
Ingredients for 4-6 servings:
- 4 medium zucchini
- 2 large eggs
- 1 cup of all-purpose flour
- 1/4 cup of grated Parmesan cheese
- 2 cloves of garlic, minced
- 1/4 cup of chopped fresh parsley
- Salt and pepper to taste
- Vegetable oil for frying
- Lemon wedges for serving
Cooking Instructions:
- Prepare the Zucchini: Wash the zucchini thoroughly and trim the ends. Grate the zucchini using a box grater or a food processor. Place the grated zucchini in a colander, sprinkle with a teaspoon of salt, and let it sit for about 10 minutes. This will help draw out excess moisture.
- Drain the Zucchini: After 10 minutes, use your hands or a clean kitchen towel to squeeze out as much liquid as possible from the zucchini. This step is essential to guarantee that the fritters don’t become soggy.
- Make the Batter: In a large mixing bowl, beat the eggs. Add the flour, grated Parmesan cheese, minced garlic, and chopped parsley. Mix until well combined. Add the drained zucchini to the mixture and stir until everything is evenly incorporated. Season with salt and pepper to taste.
- Heat the Oil: Pour vegetable oil into a large skillet, enough to cover the bottom, and heat over medium-high heat.
- Fry the Fritters: Once the oil is hot (you can test it by dropping a small amount of batter into the oil; it should sizzle immediately), use a spoon or small ladle to drop portions of the batter into the skillet. Flatten them slightly with the back of the spoon to form patties.
- Cook the Fritters: Fry the fritters for about 3-4 minutes on each side, or until golden brown and crispy. Be sure not to overcrowd the pan; cook in batches if necessary.
- Drain and Serve: Once cooked, remove the fritters from the skillet and place them on a plate lined with paper towels to drain excess oil. Serve hot with lemon wedges on the side.
Extra Tips: For an extra crispy texture, make sure that the oil is adequately hot before adding the batter. You can also experiment by adding other herbs like basil or mint for a different flavor profile. If you want to make the dish gluten-free, you can substitute the all-purpose flour with chickpea flour or a gluten-free flour blend.
Mozzarella in Carrozza: Fried Cheese Sandwiches
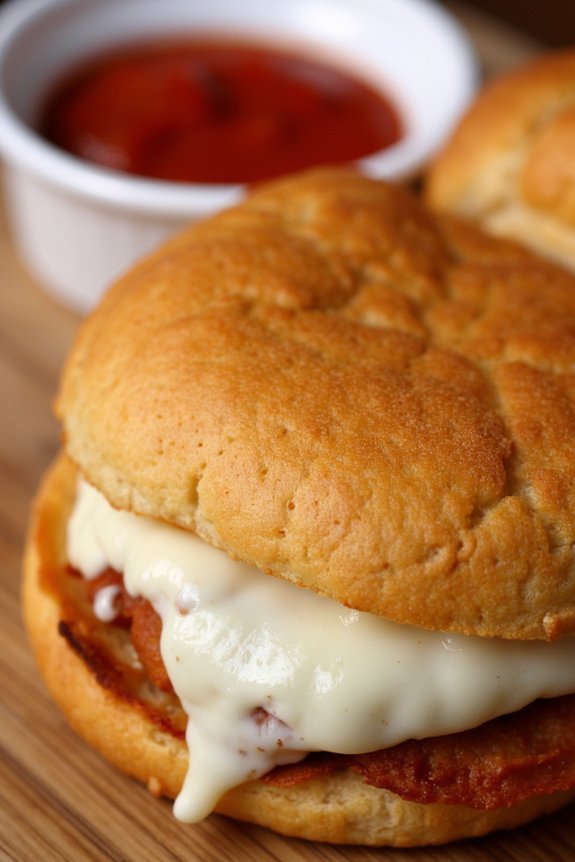
Mozzarella in Carrozza is a classic Italian dish that translates to “Mozzarella in a Carriage,” a perfect name for these indulgent fried cheese sandwiches. This dish is a delightful combination of gooey melted mozzarella cheese encased in a crispy, golden-brown bread exterior. Often enjoyed as an appetizer or a light meal, mozzarella in carrozza is a comforting treat that can be served with a side of marinara sauce for dipping, adding a touch of tanginess to the rich flavors of the sandwich.
Originating from Southern Italy, particularly Naples, this dish showcases the Italian flair for transforming simple ingredients into something irresistibly delicious. The process involves sandwiching slices of mozzarella cheese between pieces of bread, dipping the assembly in a light batter, and frying it until the exterior is perfectly crisped.
Whether you’re serving it as part of a larger Italian feast or enjoying it on its own, mozzarella in carrozza is destined to be a crowd-pleaser.
Ingredients for 4-6 servings:
- 8 slices of white bread
- 16 ounces of fresh mozzarella cheese, sliced
- 3 large eggs
- 1 cup of milk
- 1 cup of all-purpose flour
- Salt, to taste
- Pepper, to taste
- Vegetable oil, for frying
Instructions:
- Prepare the Bread and Cheese: Start by cutting the mozzarella into slices that are about 1/4 inch thick. Place a generous amount of mozzarella slices between two pieces of white bread to make a sandwich. Make certain the edges align so the cheese is fully encased.
- Prepare the Batter: In a shallow bowl, beat the eggs and mix them with the milk until well combined. Add a pinch of salt and pepper to taste. In another shallow dish, place the all-purpose flour for coating.
- Assemble the Sandwiches: Lightly press the sandwiches together. Trim the crusts off the sandwiches if desired, which helps seal the edges and prevent cheese from leaking out during frying.
- Coat the Sandwiches: Dip each sandwich first in the flour, ensuring all sides are coated. Then, dip it into the egg and milk mixture, turning it to cover all sides thoroughly.
- Heat the Oil: In a deep skillet or frying pan, heat vegetable oil over medium-high heat. The oil should be hot enough that a small piece of bread dropped in will sizzle immediately.
- Fry the Sandwiches: Carefully place each sandwich into the hot oil. Fry for about 2-3 minutes on each side, or until the bread is golden brown and crispy. Use a slotted spoon to turn the sandwiches and remove them from the oil once cooked.
- Drain and Serve: Place the fried sandwiches on a plate lined with paper towels to absorb any excess oil. Serve immediately, preferably with a side of marinara sauce for dipping.
Extra Tips:
For the best results, use day-old bread, which tends to absorb less oil and hold its shape better during frying. If fresh mozzarella is too watery, pat it dry with paper towels before assembling the sandwiches to prevent sogginess.
Additionally, make sure the oil is hot enough before frying; otherwise, the bread will absorb too much oil and become greasy. Adjust the heat as needed to maintain a steady frying temperature and guarantee an even, golden-brown crust.
Panelle: Sicilian Chickpea Fritters

Panelle, also known as Sicilian Chickpea Fritters, are a delightful and savory treat from the heart of Sicily. These golden, crispy fritters are made primarily from chickpea flour, making them a wonderful gluten-free option for an appetizer or snack. Often served as street food in Palermo, panelle can also be enjoyed at home with just a few simple ingredients.
The fritters are traditionally served hot, typically in a sesame seed roll, sometimes with a squeeze of lemon or a sprinkle of salt, making them irresistibly delicious.
The preparation of panelle involves creating a smooth, thick batter from chickpea flour, water, and a few seasonings, which is then cooled, sliced, and fried to perfection. This process results in fritters that are crispy on the outside and tender on the inside. The simplicity of the ingredients allows the rich, nutty flavor of the chickpeas to shine through.
Whether you’re hosting a gathering or simply want to try your hand at a classic Italian recipe, panelle are sure to captivate.
Ingredients for 4-6 servings:
- 2 cups chickpea flour
- 4 cups water
- 1 teaspoon salt
- 1 tablespoon finely chopped parsley
- 1 teaspoon freshly ground black pepper
- Olive oil for frying
- Lemon wedges for serving
Cooking Instructions:
1. Prepare the Batter:
In a large saucepan, whisk together the chickpea flour and water until smooth and free of lumps. Add the salt and place the saucepan over medium heat.
2. Cook the Mixture:
Stir the mixture continuously with a wooden spoon as it begins to thicken. This process will take about 10-15 minutes. Continue to stir until the mixture pulls away from the sides of the pan and forms a thick, smooth paste.
3. Add Seasonings:
Remove the pan from heat and stir in the chopped parsley and black pepper. Mix well to guarantee the seasonings are evenly distributed throughout the batter.
4. Cool the Mixture:
Spread the mixture evenly onto a parchment-lined baking sheet or a smooth, flat surface to a thickness of about 1/4 inch. Allow it to cool completely, which will take around 30 minutes. Once cooled, it should be firm to the touch.
5. Slice the Panelle:
Cut the cooled mixture into rectangular or triangular shapes, depending on your preference. Guarantee the pieces are of uniform size for even frying.
6. Fry the Fritters:
In a large frying pan, heat olive oil over medium-high heat. Once the oil is hot, carefully add the sliced panelle in batches, ensuring not to overcrowd the pan. Fry each piece for about 2-3 minutes per side, or until golden brown and crispy.
7. Drain and Serve:
Remove the fritters from the oil and drain on paper towels to remove excess oil. Serve immediately with lemon wedges on the side for squeezing over the fritters, if desired.
Extra Tips:
To achieve the best texture for your panelle, make sure to stir the chickpea batter continuously while cooking to prevent it from sticking to the pan. The frying oil should be at the right temperature—hot but not smoking—so that the fritters become crispy without absorbing too much oil.
If you prefer a twist, try adding a pinch of chili flakes or cumin to the batter for an extra kick of flavor. Panelle are best enjoyed fresh and hot, so prepare them just before serving for a delightful culinary experience.
Olive Ascolane: Stuffed and Fried Olives

Olive Ascolane, or stuffed and fried olives, is a celebrated Italian appetizer hailing from the Marche region. This dish features large, green olives filled with a savory mixture of meats and spices, lightly breaded, and then fried to golden perfection.
Olive Ascolane is often enjoyed as a part of antipasto platters or as a delightful snack alongside a chilled glass of wine. The combination of tender, flavorful filling encased in the briny olive and crispy coating makes this dish irresistible.
The preparation of Olive Ascolane requires a bit of patience, as each olive needs to be carefully pitted and stuffed, but the result is well worth the effort. Traditionally, the filling is made from a mixture of beef, pork, and chicken, seasoned with nutmeg and cheese, then encased in the olive before being breaded and fried.
With a few simple steps and a bit of care, you can recreate this Italian classic in your own kitchen, bringing a taste of the Mediterranean to your table.
Ingredients (Serves 4-6):
- 500g large green olives, pitted
- 100g ground beef
- 100g ground pork
- 100g chicken breast, finely chopped
- 1 small onion, finely chopped
- 2 tablespoons olive oil
- 1/4 cup grated Parmesan cheese
- 1/4 teaspoon ground nutmeg
- 2 eggs
- 1 cup all-purpose flour
- 1 cup breadcrumbs
- Salt and pepper, to taste
- Vegetable oil, for frying
Instructions:
- Prepare the Filling:
- Heat olive oil in a pan over medium heat. Add the chopped onion and cook until soft and translucent, about 5 minutes.
- Add the ground beef, pork, and chopped chicken to the pan. Cook until the meat is browned and fully cooked, breaking it up with a spoon as it cooks.
- Remove the pan from heat. Stir in the grated Parmesan cheese and ground nutmeg. Season with salt and pepper to taste. Allow the mixture to cool.
- Stuff the Olives:
- Once the meat mixture is cool, take a small amount and stuff each pitted olive. Press the filling firmly into the olive to guarantee it’s well-packed.
- Prepare the Breading Station:
- Set up three shallow bowls: one with flour, one with beaten eggs, and one with breadcrumbs.
- Roll each stuffed olive first in the flour, then dip it in the beaten eggs, and finally coat it evenly with breadcrumbs.
- Fry the Olives:
- Heat vegetable oil in a deep saucepan or fryer to 180°C (350°F).
- Carefully add the breaded olives to the hot oil in batches. Fry them until golden brown, approximately 3-4 minutes.
- Use a slotted spoon to remove the olives from the oil, and drain them on paper towels.
- Serve:
- Serve the Olive Ascolane hot, as part of an antipasto platter or on their own as a delicious appetizer.
Extra Tips:
When preparing Olive Ascolane, selecting the right type of olives is essential. Choose large, firm green olives for ease of stuffing and the best flavor.
If a pitter is unavailable, carefully slice the olives lengthwise to remove the pits without cutting them completely in half. Additionally, verify the oil is hot enough before frying to achieve a crispy exterior without absorbing too much oil, which keeps the olives light and delicious.
Enjoy them fresh for the best taste and texture.
Pizza Fritta: Neapolitan Fried Pizza

Pizza Fritta: Neapolitan Fried Pizza is a delicious and indulgent treat that hails from the streets of Naples, Italy. Unlike the traditional oven-baked pizza, Pizza Fritta is deep-fried, resulting in a crispy yet soft dough filled with a variety of delightful ingredients. This dish is often enjoyed as a street food snack or a special treat at home, offering a unique twist on classic pizza flavors.
With its crispy exterior and savory fillings, Pizza Fritta is the ideal comfort food for those who love to explore traditional Italian culinary delights.
Making Pizza Fritta at home is a fun and rewarding experience, allowing you to experiment with different fillings and create a dish that suits your personal taste. The dough is simple to prepare and requires a bit of resting time to achieve the best texture.
Once fried, the pizza is filled with a mixture of cheese, meats, and sometimes vegetables, creating a savory explosion of flavors with each bite. Whether you’re hosting a gathering or simply craving something different, Pizza Fritta is sure to impress your friends and family with its distinctive taste and texture.
Ingredients for 4-6 servings:
- 500g all-purpose flour
- 325ml warm water
- 10g salt
- 5g sugar
- 10g fresh yeast or 4g dry yeast
- 250g ricotta cheese
- 200g mozzarella cheese, shredded
- 150g cooked ham, diced
- 150g salami, sliced
- Oil for frying (vegetable or sunflower oil recommended)
Cooking Instructions:
- Prepare the Dough:
- In a large mixing bowl, dissolve the yeast and sugar in the warm water. Let it sit for about 5 minutes until it becomes frothy.
- Gradually add the flour and salt to the yeast mixture, stirring until a rough dough forms.
- Knead the dough on a floured surface for about 10 minutes until it becomes smooth and elastic.
- Place the dough in a lightly oiled bowl, cover it with a damp cloth, and let it rise for 1-2 hours or until it doubles in size.
- Prepare the Filling:
- In a separate bowl, mix the ricotta cheese, shredded mozzarella, diced ham, and sliced salami together until well combined.
- Shape and Fill the Dough:
- Once the dough has risen, divide it into 8 equal portions for smaller pizzas or 4 for larger ones.
- Roll each portion into a ball, then flatten it into a disk about 1/4 inch thick using a rolling pin.
- Place a generous spoonful of the cheese and meat mixture in the center of each disk.
- Fold the dough over the filling to create a half-moon shape, and press the edges firmly to seal.
- Fry the Pizza:
- Heat the oil in a deep frying pan or pot to 180°C (350°F).
- Carefully lower the filled dough into the hot oil, frying each side for about 3-4 minutes until golden brown and crispy.
- Remove the fried pizzas from the oil and drain on a paper towel-lined plate.
- Serve:
- Allow the Pizza Fritta to cool slightly before serving, as the filling will be hot.
Extra Tips:
For best results, verify the oil is at the correct temperature before frying to prevent the dough from absorbing excess oil and becoming greasy.
If you prefer a lighter filling, consider adding some fresh basil or sliced cherry tomatoes to the cheese mixture for a burst of fresh flavor. Additionally, make sure to seal the edges of the dough properly to prevent the filling from leaking out during frying.
Enjoy your Pizza Fritta hot for the best taste experience!
Calzoncelli: Sweet Fried Pastries

Calzoncelli are delightful Italian sweet fried pastries that hail from the southern regions of Italy, particularly popular during the festive season. These little parcels are typically filled with a nutty, sweet mixture and are a true indication of the rich culinary traditions of Italy. The pastry is thin and crispy, while the filling is rich and flavorful, often containing ingredients like chocolate, nuts, and sometimes even a splash of liquor.
Making Calzoncelli isn’t just about the end result, but also about enjoying the process of crafting these small treats, which are perfect for sharing with friends and family.
The preparation of Calzoncelli involves making a simple dough that’s rolled out thin, filled with a delicious mixture, and then fried until golden brown. Once fried, they’re dusted with powdered sugar to add a touch of sweetness and enhance their presentation. This recipe serves 4-6 people and is perfect for those looking to explore Italian desserts beyond the usual offerings.
Whether you’re making them for a special occasion or just to enjoy a taste of Italy at home, Calzoncelli are sure to impress.
Ingredients for Calzoncelli (serving size: 4-6 people):
- 2 cups all-purpose flour
- 1/4 cup granulated sugar
- 1/4 cup unsalted butter, melted
- 2 large eggs
- 1/4 cup milk
- Pinch of salt
- 1 teaspoon vanilla extract
- 1 cup ground almonds or hazelnuts
- 1/2 cup dark chocolate chips
- 1/4 cup honey
- 1 teaspoon cinnamon
- Vegetable oil for frying
- Powdered sugar for dusting
Cooking Instructions:
- Prepare the dough: In a large bowl, combine the flour, granulated sugar, and pinch of salt. Make a well in the center and add the melted butter, eggs, milk, and vanilla extract. Mix with a wooden spoon until a dough begins to form, then knead on a lightly floured surface until smooth and elastic, about 5 minutes. Wrap in plastic wrap and let it rest for 30 minutes.
- Make the filling: In a medium bowl, combine the ground almonds or hazelnuts, chocolate chips, honey, and cinnamon. Mix until all ingredients are well incorporated into a thick paste.
- Roll out the dough: Divide the dough into two equal portions. Roll each portion out on a floured surface into a thin sheet, roughly 1/8 inch thick.
- Assemble the pastries: Cut the rolled dough into squares or circles, about 3-4 inches in diameter. Place a teaspoon of the filling in the center of each piece. Fold the dough over the filling to form a half-moon shape and press the edges together with a fork to seal.
- Fry the pastries: In a deep frying pan, heat about 2 inches of vegetable oil to 350°F (175°C). Fry the Calzoncelli in batches, turning occasionally until they’re golden brown and crispy, about 2-3 minutes per side. Remove with a slotted spoon and drain on paper towels.
- Finish and serve: Once cooled slightly, dust the Calzoncelli with powdered sugar and serve warm or at room temperature.
Extra Tips:
When making Calzoncelli, verify the oil is at the right temperature before frying to achieve that perfect golden color without absorbing too much oil. If the dough seems too sticky while kneading, add a bit more flour until it reaches the desired consistency.
Additionally, feel free to experiment with the filling by adding a splash of your favorite liquor or substituting chocolate chips with dried fruits for a different twist. Enjoy these pastries fresh for the best taste and texture.
Frittatine Di Pasta: Fried Pasta Fritters

Frittatine Di Pasta, also known as Fried Pasta Fritters, is a delicious Neapolitan street food that combines the comfort of pasta with the irresistible crispiness of a fritter. This recipe is perfect for utilizing leftover pasta, transforming it into a new and exciting dish that’s perfect as a snack or a unique appetizer. The outer layer is golden and crispy, while the inside remains soft and flavorful, making it a delightful contrast in textures and tastes.
This dish is a reflection of the simplicity and creativity of Italian cuisine, offering a delightful blend of cheese, pasta, and béchamel sauce fried to perfection. The origins of Frittatine Di Pasta can be traced back to Naples, where it’s commonly sold in local friggitorias (shops specializing in fried foods). Although traditionally made with leftover spaghetti or bucatini, you can choose any pasta you prefer.
The key to this recipe is the creamy béchamel sauce, which binds the pasta together and adds a layer of richness to the fritters. With a crispy exterior and a rich, cheesy interior, these fritters are sure to become a favorite at your dining table.
Ingredients (serves 4-6):
- 300g leftover spaghetti or bucatini
- 200ml béchamel sauce
- 100g cooked ham, diced
- 100g mozzarella cheese, diced
- 50g grated Parmesan cheese
- 2 large eggs
- 100g plain flour
- 150g breadcrumbs
- Salt and pepper to taste
- Vegetable oil for frying
Cooking Instructions:
- Prepare the Pasta Mixture: In a large mixing bowl, combine the leftover pasta with the béchamel sauce, diced ham, mozzarella, and Parmesan cheese. Mix well until all the ingredients are evenly distributed. Season with salt and pepper to taste.
- Form the Fritters: Using your hands, divide the pasta mixture into small balls or patties, roughly the size of a golf ball. Press them gently to confirm they hold together. You should be able to make about 12-15 fritters, depending on their size.
- Prepare the Coating: Set up a breading station by placing the flour in one shallow dish, beaten eggs in another, and breadcrumbs in the third.
- Coat the Fritters: Roll each pasta fritter first in the flour, shaking off any excess, then dip into the beaten eggs, and finally coat with breadcrumbs, confirming each fritter is fully covered.
- Heat the Oil: In a deep frying pan, heat vegetable oil over medium-high heat. You’ll need enough oil to submerge the fritters halfway.
- Fry the Fritters: Once the oil is hot, gently place the fritters into the pan in batches to avoid overcrowding. Fry each side for about 3-4 minutes, or until golden brown and crispy.
- Drain and Serve: Remove the fritters from the oil using a slotted spoon and drain them on paper towels to remove excess oil. Serve the Frittatine Di Pasta hot, alongside your favorite dipping sauce if desired.
Extra Tips: For best results, make sure the pasta mixture is well chilled before forming the fritters, as this helps them hold their shape better during frying. If you don’t have béchamel sauce on hand, you can make a quick version by melting butter, adding flour to form a roux, and gradually whisking in milk until smooth and thickened.
Additionally, you can experiment with different fillings, such as adding peas or using different cheeses, to suit your taste preferences.