

Discovering how to create gluten-free Italian recipes felt like unlocking a world of delicious possibilities. Picture the bright hues of a Caprese salad or the soothing scent of homemade gnocchi, all enjoyed without gluten concerns. Each dish brings everyone together, ensuring no one feels left out at the table. There’s one recipe that took me by surprise, and it might just become your new go-to favorite. Let’s explore these gentle and easy Italian gluten-free recipes that everyone will love.
Gluten-Free Caprese Salad

The Caprese Salad is a classic Italian dish known for its simplicity and fresh ingredients, making it a perfect choice for those seeking a gluten-free option. Named after the island of Capri, this salad is a vibrant combination of ripe tomatoes, fresh mozzarella, and fragrant basil leaves, drizzled with olive oil and balsamic vinegar.
It’s not only visually appealing but also offers a delightful blend of flavors that highlight the quality of its ingredients. The Gluten-Free Caprese Salad is an ideal appetizer or side dish that can be prepared quickly, allowing you to enjoy a taste of Italy without any gluten concerns.
Preparing a Gluten-Free Caprese Salad is straightforward and requires minimal cooking, making it a go-to recipe for any occasion. The key to achieving the best flavor lies in selecting high-quality, fresh ingredients. Opt for vine-ripened tomatoes, creamy fresh mozzarella, and aromatic basil to elevate the dish.
A drizzle of extra virgin olive oil and balsamic vinegar enhances the taste while keeping it light and healthy. This recipe serves 4-6 people, ensuring that everyone can savor the deliciousness of this gluten-free delight.
Ingredients (Serves 4-6):
- 4 large ripe tomatoes
- 1 pound fresh mozzarella cheese
- 1 bunch fresh basil leaves
- ¼ cup extra virgin olive oil
- 2 tablespoons balsamic vinegar
- Salt, to taste
- Freshly ground black pepper, to taste
Cooking Instructions:
- Prepare the Tomatoes: Wash the tomatoes under cold water and pat them dry with a towel. Using a sharp knife, slice the tomatoes into approximately ¼-inch thick rounds. Arrange them on a large serving platter, slightly overlapping each slice.
- Slice the Mozzarella: Drain the mozzarella and slice it into ¼-inch thick rounds. Place a slice of mozzarella on top of each tomato slice, ensuring even coverage across the platter.
- Add Fresh Basil: Gently wash and dry the basil leaves. Tear them into smaller pieces or leave them whole, depending on your preference. Arrange the basil leaves over the tomato and mozzarella slices, distributing them evenly.
- Drizzle with Oil and Vinegar: In a small bowl, mix the extra virgin olive oil and balsamic vinegar. Drizzle this mixture evenly over the salad. This step is essential as it ties all the flavors together.
- Season the Salad: Season the salad with salt and freshly ground black pepper to taste. Be careful not to over-salt, as the mozzarella already contains some saltiness.
- Serve Immediately: The Gluten-Free Caprese Salad is best served fresh. Once seasoned, allow the salad to sit for a few minutes to let the flavors meld, then serve immediately as an appetizer or side dish.
Extra Tips:
To enhance the flavor of your Gluten-Free Caprese Salad, consider using heirloom tomatoes for added color and taste complexity. If you prefer a sweeter salad, use a balsamic reduction instead of regular balsamic vinegar.
For a twist, add a sprinkle of sea salt flakes just before serving for an extra burst of flavor. Remember, the quality of the olive oil and mozzarella can greatly impact the overall taste, so choose the best you can find. Always serve the salad at room temperature to appreciate the full depth of flavors.
Zucchini Noodles With Pesto
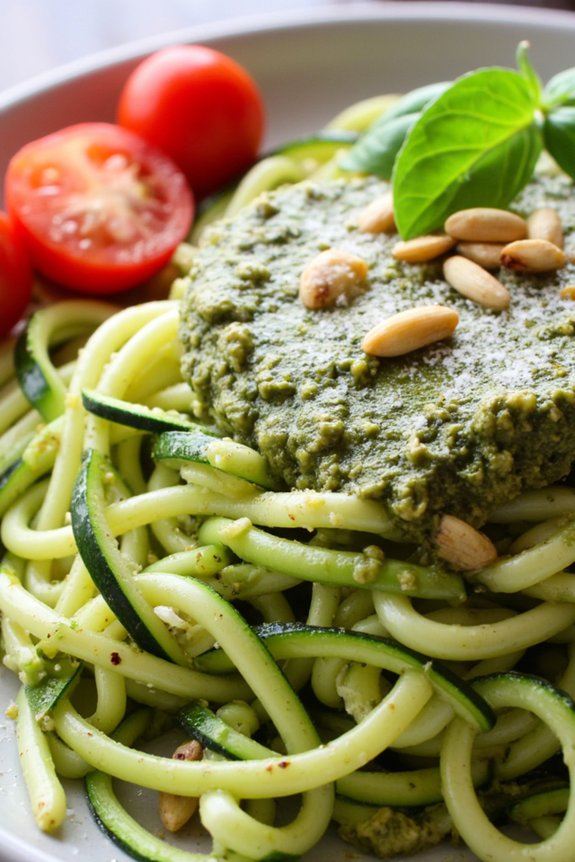
Zucchini noodles with pesto are a delightful and healthy alternative to traditional pasta, perfect for those following a gluten-free diet. This dish combines the freshness of zucchini with the rich flavors of homemade basil pesto, resulting in a meal that’s both light and satisfying. The recipe isn’t only easy to prepare but also allows you to enjoy the essence of Italian cuisine without the gluten.
Whether you’re looking for a quick weeknight dinner or a dish to impress your guests, zucchini noodles with pesto offer a nutritious and delicious option.
To make this dish, you’ll need fresh zucchinis spiraled into noodles and a vibrant pesto sauce made from fresh basil, pine nuts, parmesan cheese, garlic, and olive oil. The key to this recipe is the balance of flavors – the nuttiness of the pesto perfectly complements the crispness of the zucchini.
This recipe serves 4-6 people, making it ideal for a family meal or a gathering with friends. With its vibrant colors and aromatic flavors, this dish will surely become a favorite in your gluten-free recipe collection.
Ingredients for 4-6 servings:
- 4 medium zucchinis
- 2 cups fresh basil leaves
- 1/2 cup grated parmesan cheese
- 1/3 cup pine nuts
- 2 garlic cloves
- 1/2 cup extra-virgin olive oil
- Salt and pepper to taste
- Optional: cherry tomatoes and grated parmesan for garnish
Cooking Instructions:
- Prepare the zucchini noodles: Start by washing the zucchinis thoroughly. Using a spiralizer, create zucchini noodles and set them aside. If you don’t have a spiralizer, you can use a vegetable peeler to create thin strips.
- Make the pesto sauce: In a food processor, combine the fresh basil leaves, grated parmesan cheese, pine nuts, and garlic cloves. Pulse the mixture until it’s finely chopped. With the processor running, slowly drizzle in the olive oil until the pesto reaches a smooth consistency. Season with salt and pepper to taste.
- Cook the zucchini noodles: Heat a large skillet over medium heat. Add a small amount of olive oil to the pan. Once hot, add the zucchini noodles and sauté them for 3-4 minutes until they’re slightly tender but still firm to the bite. Avoid overcooking to prevent them from becoming mushy.
- Combine the noodles and pesto: Remove the skillet from heat and add the pesto sauce to the zucchini noodles. Toss gently to coat the noodles evenly with the pesto. Make certain that the noodles are well mixed with the sauce for full flavor integration.
- Serve and garnish: Transfer the zucchini noodles with pesto to serving plates. Optionally, garnish with halved cherry tomatoes and additional grated parmesan cheese for extra flavor and color. Serve immediately.
Extra Tips:
To enhance the flavor of your zucchini noodles with pesto, consider toasting the pine nuts before adding them to the pesto sauce; this will bring out a deeper nutty flavor.
If you prefer a spicier kick, add a pinch of red pepper flakes to the pesto. It’s essential to remember that zucchini noodles release water as they cook, so avoid adding salt until the end to prevent them from becoming too watery.
Enjoy your gluten-free Italian feast!
Gluten-Free Margherita Pizza

Experience the classic taste of Italy with a twist by making a Gluten-Free Margherita Pizza. This recipe is perfect for those who love the traditional flavors of a Margherita pizza but need to avoid gluten. The crispy and chewy gluten-free crust topped with fresh tomato sauce, creamy mozzarella, and fragrant basil leaves will transport you straight to the heart of Naples.
Whether you’re serving it up for a family meal or a casual dinner with friends, this pizza promises to be a hit with everyone.
Crafting a Gluten-Free Margherita Pizza requires a few special ingredients to guarantee the crust has the right texture and flavor. With a blend of gluten-free flours, this recipe produces a dough that’s just as satisfying as its wheat-based counterpart.
By following these steps, you can create a delicious pizza that accommodates dietary needs without sacrificing taste or enjoyment. This recipe makes enough for 4-6 people, perfect for sharing.
Ingredients:
- 2 cups gluten-free all-purpose flour
- 1 packet (7g) instant yeast
- 1 teaspoon sugar
- 1 teaspoon salt
- 1 tablespoon olive oil
- 3/4 cup warm water (110°F/45°C)
- 1 cup tomato sauce
- 2 cups fresh mozzarella cheese, sliced
- 1/4 cup fresh basil leaves
- 1/2 teaspoon dried oregano
- Salt and pepper to taste
- Extra olive oil for drizzling
Instructions:
- Prepare the Dough: In a large mixing bowl, combine the gluten-free all-purpose flour, instant yeast, sugar, and salt. Mix thoroughly. Add the olive oil and warm water, then stir until a sticky dough forms. Knead the dough gently for a few minutes on a floured surface until smooth.
- Let the Dough Rise: Place the dough back in the bowl and cover it with a damp cloth. Allow it to rise in a warm area for about 45 minutes or until it doubles in size.
- Preheat the Oven: Preheat your oven to 475°F (245°C). Place a pizza stone or baking sheet inside the oven to heat as well.
- Shape the Pizza: Once the dough has risen, transfer it to a lightly floured surface and roll it out into a round shape, about 12 inches in diameter. Use your hands to slightly stretch and shape the crust, creating a slight edge or lip around the perimeter.
- Assemble the Pizza: Remove the hot pizza stone or baking sheet from the oven. Carefully place the rolled-out dough onto the stone or sheet. Spread the tomato sauce evenly over the surface of the dough. Arrange the mozzarella slices on top, ensuring even coverage.
- Bake the Pizza: Place the pizza in the oven and bake for 12-15 minutes, or until the crust is golden brown and the cheese is bubbly and slightly browned.
- Finish with Toppings: Remove the pizza from the oven. Sprinkle the dried oregano, and place the fresh basil leaves on top. Season with salt and pepper to taste. Drizzle a little extra olive oil over the pizza for added flavor.
- Serve: Slice the pizza into wedges and serve hot. Enjoy your delicious Gluten-Free Margherita Pizza!
Extra Tips:
For the best results, confirm your oven is fully preheated before baking the pizza. Using a pizza stone can help achieve a crisper crust, but if you don’t have one, a preheated baking sheet will work well too.
If the dough is too sticky while kneading, add a little more gluten-free flour to make it manageable. Experiment with different types of gluten-free flours to find your preferred texture and flavor.
Italian Stuffed Bell Peppers
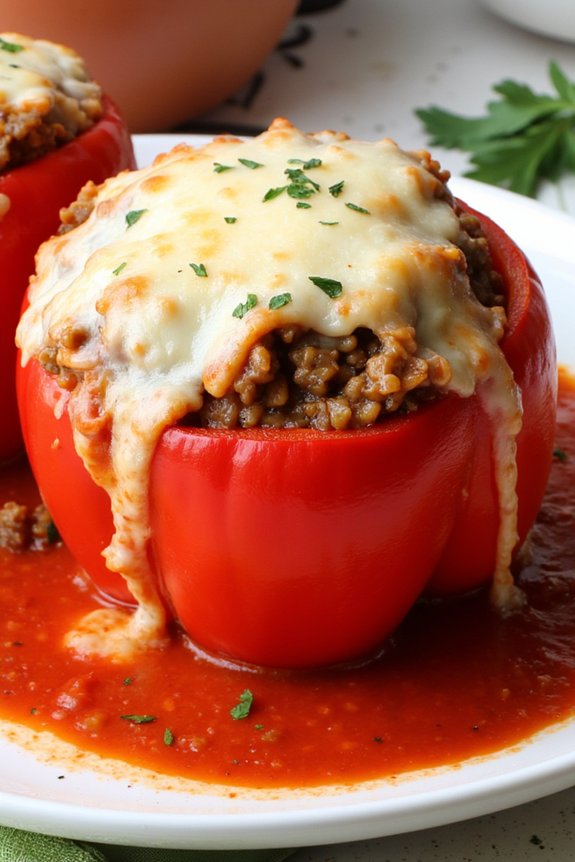
Italian stuffed bell peppers are a delicious and hearty meal that brings the flavors of Italy to your table while being completely gluten-free. This dish features vibrant bell peppers filled with a savory mixture of seasoned ground meat, fluffy rice, and aromatic herbs, all topped with a melty layer of cheese. The combination of textures and flavors makes it a satisfying meal perfect for any gathering or family dinner.
Whether you’re catering to dietary restrictions or simply want to enjoy a classic Italian-inspired dish, these stuffed peppers are sure to please.
The beauty of this recipe lies in its versatility and simplicity. You can customize the filling to suit your taste preferences, adding more vegetables, switching up the protein, or incorporating your favorite Italian seasonings. The bell peppers themselves act as both a cooking vessel and a vibrant, edible container, adding a subtle sweetness that complements the savory filling.
Not only is this dish flavorful and nutritious, but it also presents beautifully, making it an ideal centerpiece for a cozy dinner or a festive occasion.
Ingredients (serving size: 4-6 people):
- 6 large bell peppers (any color)
- 1 pound ground beef or turkey
- 1 cup uncooked rice
- 1 medium onion, chopped
- 3 cloves garlic, minced
- 1 can (14 oz) diced tomatoes, drained
- 1 cup mozzarella cheese, shredded
- 1 teaspoon dried oregano
- 1 teaspoon dried basil
- Salt and pepper to taste
- 2 tablespoons olive oil
- 1 1/2 cups tomato sauce
- Fresh parsley for garnish (optional)
Cooking Instructions:
- Prepare the Peppers: Preheat your oven to 375°F (190°C). Cut the tops off the bell peppers and remove the seeds and membranes. Rinse the peppers and set them aside while you prepare the filling.
- Cook the Rice: In a medium-sized pot, cook the rice according to package instructions. Once cooked, fluff with a fork and set aside.
- Sauté the Aromatics: Heat olive oil in a large skillet over medium heat. Add the chopped onion and garlic, and sauté until the onion becomes translucent, about 3-4 minutes.
- Cook the Meat: Add the ground beef or turkey to the skillet. Cook until the meat is browned and cooked through, breaking it up with a spoon as it cooks. Drain any excess fat from the skillet.
- Combine Ingredients: Stir in the drained diced tomatoes, cooked rice, oregano, basil, salt, and pepper. Mix everything well and let it cook for another 2-3 minutes to allow the flavors to meld together.
- Stuff the Peppers: Place the hollowed-out bell peppers in a baking dish. Spoon the meat and rice mixture into each pepper, packing it down slightly. Pour tomato sauce over the stuffed peppers and around them in the baking dish.
- Bake: Cover the dish with aluminum foil and bake in the preheated oven for 30 minutes. Remove the foil, sprinkle the shredded mozzarella cheese on top of each pepper, and return to the oven for an additional 10-15 minutes, or until the cheese is melted and bubbly.
- Serve: Once done, remove the dish from the oven. Let the peppers cool for a few minutes before serving. Garnish with fresh parsley if desired.
Extra Tips:
When selecting bell peppers, choose ones that are firm and relatively the same size so they cook evenly. If you’re short on time, you can prepare the filling in advance and refrigerate it until you’re ready to stuff and bake the peppers.
For an extra kick, you can add a pinch of red pepper flakes to the meat mixture. Finally, feel free to experiment with different types of cheese or add some grated Parmesan to the top for an extra layer of flavor. Enjoy your Italian stuffed bell peppers hot from the oven!
Gluten-Free Gnocchi With Tomato Sauce

Gluten-Free Gnocchi With Tomato Sauce is a classic Italian dish reimagined for those with gluten sensitivities. Gnocchi, traditionally made from potatoes and flour, is transformed into a gluten-free delight by substituting regular flour with gluten-free alternatives. This dish isn’t only delicious but also comforting, offering a rich blend of flavors from the homemade tomato sauce that complements the tender, pillow-like gnocchi.
Whether you’re serving it for a family dinner or a special occasion, this recipe is sure to impress both gluten-free and non-gluten-free diners alike.
The key to this recipe is using high-quality ingredients, especially for the tomato sauce, which is made from ripe tomatoes, fresh herbs, and a touch of garlic for depth of flavor. Paired with the gnocchi, the sauce becomes a luscious coating that envelops each piece, creating a harmonious balance of taste and texture.
The gnocchi itself should be light and airy, melting in your mouth with every bite. With a little patience and attention to detail, you can create a comforting and satisfying meal that stays true to the authentic flavors of Italian cuisine while accommodating dietary restrictions.
Ingredients (Serves 4-6):
- 2 pounds russet potatoes
- 1 cup gluten-free all-purpose flour (plus extra for dusting)
- 1 large egg
- 1 teaspoon salt
- 1 can (28 ounces) whole peeled tomatoes
- 2 tablespoons olive oil
- 2 cloves garlic, minced
- 1 small onion, chopped
- 1 teaspoon dried oregano
- 1 teaspoon sugar
- Salt and pepper to taste
- Fresh basil leaves for garnish
- Grated Parmesan cheese, optional
Instructions:
- Prepare the Potatoes: Begin by boiling the potatoes in their skins for about 20-25 minutes or until they’re fork-tender. Drain them and let them cool slightly. Once cool enough to handle, peel the potatoes and pass them through a potato ricer or mash them until smooth.
- Make the Gnocchi Dough: In a large bowl, combine the mashed potatoes, gluten-free flour, egg, and salt. Mix gently until the ingredients are just combined to form a dough. Avoid overworking the dough to keep the gnocchi light.
- Shape the Gnocchi: Lightly dust a clean work surface with gluten-free flour. Take a portion of the dough and roll it into a long rope about 3/4 inch thick. Cut the rope into 1-inch pieces. If desired, roll each piece over the back of a fork to create ridges.
- Cook the Gnocchi: Bring a large pot of salted water to a boil. Drop the gnocchi in batches into the boiling water. Cook until they float to the surface, then let them cook for an additional 2 minutes. Remove with a slotted spoon and set aside.
- Prepare the Tomato Sauce: In a large skillet, heat olive oil over medium heat. Add the chopped onion and sauté until translucent, about 5 minutes. Stir in the minced garlic and cook for another minute. Add the whole peeled tomatoes (crushed by hand or with a spoon), oregano, sugar, salt, and pepper. Simmer for 20 minutes, stirring occasionally, until the sauce thickens.
- Combine and Serve: Add the cooked gnocchi to the tomato sauce, gently stirring to coat the gnocchi evenly. Serve hot, garnished with fresh basil leaves and grated Parmesan cheese, if desired.
Extra Tips:
When making gnocchi, it’s essential not to overwork the dough; doing so can result in dense, chewy gnocchi rather than light, tender ones.
Also, make certain the potatoes are thoroughly mashed without lumps for a smooth dough. If the dough feels too sticky, add a bit more flour, but be cautious not to add too much.
The sauce can be made ahead of time and reheated, which allows the flavors to develop further. Finally, for a richer flavor, consider adding a splash of red wine or a pinch of red pepper flakes to the tomato sauce during cooking.
Polenta With Mushroom Ragu

Polenta with Mushroom Ragu is a classic Italian dish that’s naturally gluten-free and bursting with rich, earthy flavors. This comforting meal combines creamy polenta with a savory mushroom ragu, offering a delightful texture contrast that’s both satisfying and delicious. The polenta acts as a perfect canvas, absorbing the deep and aromatic flavors of the ragu, making it a hearty dish that will warm you up from the inside out.
Ideal for both casual family dinners and elegant occasions, this recipe is bound to become a favorite in your culinary repertoire.
The key to a well-rounded Mushroom Ragu lies in the quality of the mushrooms and the depth of flavors achieved through slow cooking. By using a variety of mushrooms, such as cremini and shiitake, you can enhance the complexity of the dish. Combined with aromatic herbs and a hint of wine, the ragu develops a robust flavor profile that perfectly complements the creamy polenta.
This dish serves 4-6 people, allowing you to share this delicious meal with family or friends.
Ingredients:
- 1 cup polenta
- 4 cups vegetable broth
- 1 cup Parmesan cheese, grated
- 2 tablespoons unsalted butter
- Salt and pepper to taste
- 2 tablespoons olive oil
- 1 onion, finely chopped
- 3 cloves garlic, minced
- 1 pound mixed mushrooms (e.g., cremini, shiitake), sliced
- 1/2 cup white wine
- 1 can (14 ounces) crushed tomatoes
- 1 teaspoon dried thyme
- 1 teaspoon dried oregano
- Fresh parsley, chopped, for garnish
Instructions:
- Prepare the Polenta: In a large saucepan, bring the vegetable broth to a boil. Gradually whisk in the polenta, reducing the heat to low. Stir continuously to avoid lumps. Cook for about 30-35 minutes until the polenta is thick and creamy. Stir in the grated Parmesan cheese and unsalted butter. Season with salt and pepper to taste. Keep warm.
- Cook the Mushrooms: While the polenta is cooking, heat olive oil in a large skillet over medium heat. Add the chopped onion and minced garlic, sautéing until the onion is translucent.
- Add the Mushrooms: Add the sliced mushrooms to the skillet, cooking until they’re browned and have released their moisture, about 8-10 minutes.
- Deglaze the Pan: Pour in the white wine, scraping up any browned bits from the bottom of the skillet. Allow the wine to reduce by half.
- Simmer the Ragu: Stir in the crushed tomatoes, dried thyme, and oregano. Reduce the heat to low and simmer the ragu for about 20 minutes, allowing the flavors to meld.
- Season the Ragu: Taste and adjust the seasoning of the ragu with salt and pepper.
- Serve: Spoon the creamy polenta into bowls and top with the mushroom ragu. Garnish with freshly chopped parsley.
Extra Tips:
When making polenta, consistency is key, so be sure to stir frequently to prevent it from sticking to the pot. If the polenta becomes too thick, you can add a little more broth to loosen it up.
For the mushroom ragu, take your time with the cooking process to allow the flavors to fully develop; the longer it simmers, the richer the taste. If desired, you can add a splash of cream to the ragu for extra richness.
Enjoy your Polenta with Mushroom Ragu with a side of crusty gluten-free bread for a complete meal.
Gluten-Free Eggplant Parmesan

Gluten-Free Eggplant Parmesan is a delightful twist on the classic Italian dish, offering all the rich flavors and textures you love, without the gluten. This recipe uses gluten-free breadcrumbs and flour, guaranteeing that those with gluten sensitivities can still enjoy a comforting, cheesy meal. The eggplant slices are perfectly seasoned and baked to a golden crisp, then layered with rich tomato sauce and gooey melted cheese for a dish that’s both satisfying and hearty.
Perfect for a family dinner or a special occasion, this Gluten-Free Eggplant Parmesan serves 4-6 people. It’s a wonderful choice for anyone looking to enjoy a traditional Italian meal that accommodates dietary restrictions. By using fresh ingredients and simple preparation techniques, this recipe guarantees that you won’t miss the gluten at all — just the delicious taste of Italy on your plate.
Ingredients:
- 2 large eggplants, sliced into 1/4-inch rounds
- 2 cups gluten-free breadcrumbs
- 1 cup gluten-free all-purpose flour
- 4 large eggs
- 2 cups marinara sauce
- 2 cups shredded mozzarella cheese
- 1 cup grated Parmesan cheese
- 1 teaspoon garlic powder
- 1 teaspoon dried oregano
- 1 teaspoon salt
- 1/2 teaspoon black pepper
- 1/4 cup olive oil
- Fresh basil leaves for garnish
Instructions:
- Prepare the Eggplant: Preheat your oven to 375°F (190°C). Slice the eggplants into 1/4-inch rounds and sprinkle them with salt. Let them sit for about 20 minutes to draw out excess moisture. Pat dry with paper towels.
- Set Up Breading Station: In separate shallow dishes, place the gluten-free flour, beaten eggs, and gluten-free breadcrumbs mixed with garlic powder, oregano, salt, and pepper.
- Bread the Eggplant: Dip each eggplant slice first in the flour, then the eggs, and finally coat with the breadcrumb mixture. Confirm each slice is evenly coated.
- Bake the Eggplant: Arrange the breaded eggplant slices on a baking sheet lined with parchment paper. Drizzle olive oil over the slices. Bake for 25-30 minutes, flipping halfway through, until golden and crispy.
- Assemble the Dish: In a baking dish, spread a thin layer of marinara sauce. Arrange a layer of baked eggplant slices over the sauce, then sprinkle with mozzarella and Parmesan cheese. Repeat layers until all ingredients are used, finishing with a generous layer of cheese on top.
- Bake the Parmesan: Place the assembled dish in the oven and bake for 20-25 minutes until the cheese is melted and bubbly.
- Garnish and Serve: Remove from the oven and let cool for a few minutes. Garnish with fresh basil leaves before serving.
Extra Tips:
For best results, choose firm, fresh eggplants to prevent the dish from becoming soggy. If you prefer a sharper flavor, you can add a pinch of red pepper flakes to the breadcrumb mixture.
To guarantee even cooking, make sure the eggplant slices are of uniform thickness. Finally, for a creamier texture, consider adding a layer of ricotta cheese between the eggplant and sauce layers. Enjoy your delicious, gluten-free Italian meal!
Italian Sausage and Peppers
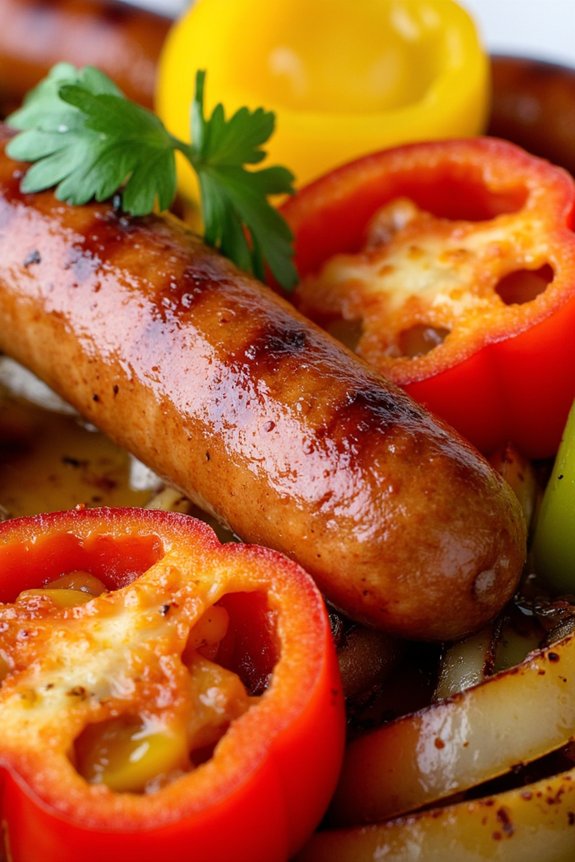
Italian Sausage and Peppers is a classic and hearty dish that embodies the rich flavors of Italian cuisine. This gluten-free version allows everyone, including those with gluten sensitivities, to indulge in its savory goodness. The combination of juicy Italian sausages, vibrant bell peppers, and aromatic onions creates a dish that’s both visually appealing and deliciously satisfying.
Whether you’re preparing a family meal or entertaining guests, this recipe is sure to be a hit. The beauty of this dish lies in its simplicity and the way the flavors meld together during cooking. The sausages are browned to perfection, releasing their flavorful juices, which then infuse the peppers and onions with a delicious essence.
The result is a colorful and flavorful medley that can be served on its own, over gluten-free pasta, or with a side of crusty gluten-free bread. This recipe serves 4-6 people, making it perfect for a family dinner or a small gathering.
Ingredients:
- 1 1/2 pounds gluten-free Italian sausage links
- 3 tablespoons olive oil
- 1 large red bell pepper, sliced
- 1 large yellow bell pepper, sliced
- 1 large green bell pepper, sliced
- 1 large onion, sliced
- 3 cloves garlic, minced
- 1 teaspoon dried oregano
- 1 teaspoon dried basil
- Salt and pepper to taste
- 1/2 cup chicken broth (gluten-free)
- 1/4 cup fresh parsley, chopped
- Optional: gluten-free pasta or bread for serving
Cooking Instructions:
- Prepare the Sausages: Heat 1 tablespoon of olive oil in a large skillet over medium heat. Add the sausage links and cook until browned on all sides, about 8-10 minutes. Remove the sausages from the skillet and set aside.
- Sauté the Vegetables: In the same skillet, add the remaining 2 tablespoons of olive oil. Add the sliced onions and garlic, sautéing until the onions become translucent and the garlic is fragrant, about 2-3 minutes.
- Add the Peppers: Incorporate the sliced bell peppers into the skillet. Cook for about 5-7 minutes until the peppers are tender, stirring occasionally to ascertain even cooking.
- Season and Simmer: Stir in the dried oregano, dried basil, salt, and pepper. Return the sausages to the skillet and pour in the chicken broth. Cover and let the mixture simmer for 10-12 minutes, allowing the flavors to meld together.
- Finish with Fresh Herbs: Once the sausages are fully cooked and the peppers are tender, remove the skillet from the heat. Sprinkle chopped fresh parsley over the dish before serving.
Extra Tips:
For a richer flavor, consider using a mix of hot and sweet Italian sausages, depending on your spice preference. If you prefer a thicker sauce, you can reduce the amount of chicken broth or let the mixture simmer uncovered for a few extra minutes to allow the liquid to evaporate.
Additionally, you can customize the dish by adding other vegetables like mushrooms or zucchini for added texture and flavor. Be sure to use a trusted gluten-free chicken broth to maintain the gluten-free integrity of the dish. Enjoy this comforting and flavorful meal with your favorite gluten-free pasta or bread for a complete Italian experience.
Gluten-Free Lasagna

Lasagna is a classic Italian dish loved by many, and creating a gluten-free version guarantees that those with gluten sensitivities can also indulge in its rich flavors. This Gluten-Free Lasagna recipe maintains the traditional layers of pasta, savory meat sauce, creamy ricotta, and melted cheese, all while using gluten-free noodles. The result is a comforting, delicious meal that’s perfect for family dinners or gatherings with friends.
The key to a successful gluten-free lasagna is choosing the right gluten-free noodles and verifying that the sauce and fillings are well-seasoned. This recipe incorporates a hearty meat sauce made from ground beef and Italian sausage, balanced with aromatic herbs and a touch of red wine for depth. The creamy ricotta layer is enhanced with parmesan and fresh spinach, adding a nutritious element to the dish. With these flavors working together, this lasagna is sure to be a hit on any dinner table.
Ingredients (for 4-6 people):
- 12 gluten-free lasagna noodles
- 1 pound ground beef
- 1/2 pound Italian sausage, casing removed
- 1 medium onion, finely chopped
- 3 cloves garlic, minced
- 1 can (28 ounces) crushed tomatoes
- 2 tablespoons tomato paste
- 1/2 cup red wine (optional)
- 1 teaspoon dried oregano
- 1 teaspoon dried basil
- Salt and pepper to taste
- 2 cups ricotta cheese
- 1 egg
- 1/2 cup grated Parmesan cheese
- 2 cups fresh spinach, chopped
- 3 cups shredded mozzarella cheese
- Olive oil
Cooking Instructions:
- Preheat the Oven: Set your oven to 375°F (190°C) to prepare for baking the lasagna.
- Cook the Meat Sauce: In a large skillet, heat a tablespoon of olive oil over medium heat. Add the chopped onion and garlic, sautéing until translucent. Next, add the ground beef and Italian sausage, cooking until browned. Drain excess fat. Stir in the crushed tomatoes, tomato paste, and red wine. Sprinkle in the oregano and basil, and season with salt and pepper. Let simmer on low heat for about 20 minutes, stirring occasionally.
- Prepare the Ricotta Mixture: In a medium bowl, combine the ricotta cheese, egg, Parmesan cheese, and chopped spinach. Mix well until combined, and set aside.
- Cook the Noodles: Bring a large pot of salted water to a boil. Cook the gluten-free lasagna noodles according to package instructions, usually about 8-10 minutes. Drain and lay flat on a clean surface to prevent sticking.
- Assemble the Lasagna: In a 9×13-inch baking dish, spread a thin layer of meat sauce on the bottom. Place a layer of noodles over the sauce, followed by half of the ricotta mixture and a third of the shredded mozzarella. Repeat the layers, finishing with a final layer of noodles topped with the remaining meat sauce and mozzarella cheese.
- Bake the Lasagna: Cover the dish with foil and bake in the preheated oven for 25 minutes. Remove the foil and continue baking for an additional 15 minutes, or until the cheese is bubbly and golden brown.
- Rest and Serve: Let the lasagna cool for about 10 minutes before slicing. This will help set the layers for easier serving.
Extra Tips:
When working with gluten-free noodles, be careful not to overcook them as they tend to break more easily than traditional pasta. If you prefer a richer flavor, consider adding a pinch of nutmeg to the ricotta mixture.
Additionally, letting the lasagna rest before serving is vital for maintaining its structure and verifying a clean slice. Feel free to experiment with herbs or add vegetables like mushrooms or zucchini for extra nutrition and flavor.
Lemon Risotto
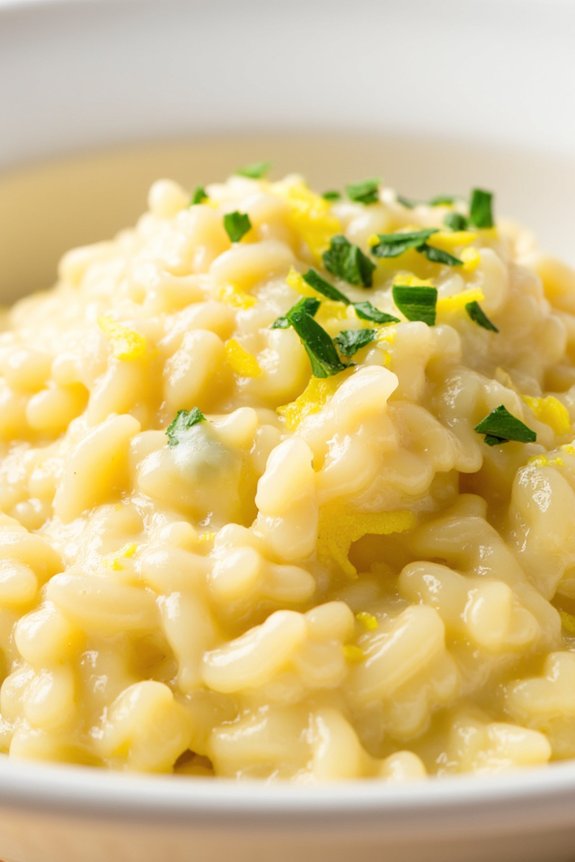
Lemon Risotto is a delightful Italian dish that perfectly combines the creamy texture of traditional risotto with the invigorating zing of lemon. This gluten-free recipe isn’t only a feast for the taste buds but also a comforting dish that can easily become a family favorite. The balance of the tangy lemon with the creaminess of the risotto creates a harmonious blend, making it an excellent choice for a light dinner or a sophisticated side dish.
This Lemon Risotto recipe serves 4-6 people and is perfect for those who are conscious about their gluten intake. The preparation involves using Arborio rice, which is naturally gluten-free and renowned for its ability to absorb flavors while maintaining a creamy consistency. With a few simple ingredients and some mindful stirring, you can create this elegant dish in under an hour.
Ingredients:
- 2 tablespoons olive oil
- 1 small onion, finely chopped
- 2 cloves garlic, minced
- 1 1/2 cups Arborio rice
- 1/2 cup dry white wine
- 5 cups gluten-free chicken or vegetable broth, warmed
- Zest and juice of 2 lemons
- 1/2 cup grated Parmesan cheese
- 2 tablespoons unsalted butter
- Salt and freshly ground black pepper, to taste
- Fresh parsley, chopped (for garnish)
Cooking Instructions:
- Prepare Ingredients: Begin by gathering and preparing all your ingredients. Finely chop the onion, mince the garlic, and zest and juice the lemons. This guarantees a smooth cooking process.
- Sauté Aromatics: In a large saucepan, heat the olive oil over medium heat. Add the chopped onion and sauté until translucent, about 4 minutes. Add the minced garlic and cook for another minute, until fragrant.
- Toast the Rice: Stir in the Arborio rice, making sure it’s well coated with the oil, onion, and garlic. Cook for about 2 minutes, until the rice becomes slightly translucent around the edges.
- Deglaze with Wine: Pour in the white wine and stir continuously until it’s almost entirely absorbed by the rice. This step helps to build layers of flavor in the risotto.
- Add Broth Gradually: Begin adding the warmed broth, one ladle at a time, to the rice mixture. Stir frequently, allowing each addition of broth to be absorbed before adding the next. This process should take about 18-20 minutes.
- Incorporate Lemon: Once the rice is creamy and al dente, stir in the lemon zest and juice. Mix thoroughly to make sure the risotto is evenly infused with the lemon flavor.
- Finish with Cheese and Butter: Remove the saucepan from heat and stir in the Parmesan cheese and unsalted butter. Season with salt and pepper to taste, and let the risotto sit for a couple of minutes to thicken slightly.
- Serve: Plate the risotto and garnish with freshly chopped parsley. Serve immediately for the best taste and texture.
Extra Tips: When cooking Lemon Risotto, it’s vital to keep the broth warm, as adding cold liquid to the rice can slow down the cooking process. Stirring is essential for achieving the creamy texture, so don’t skip on the stirring. If you prefer a more intense lemon flavor, you can add an extra squeeze of lemon juice right before serving. Finally, be cautious with the salt, as both the broth and Parmesan cheese contribute to the dish’s saltiness.
Gluten-Free Tiramisu

Tiramisu is a classic Italian dessert that combines the rich flavors of coffee, cocoa, and mascarpone cheese. For those following a gluten-free diet, traditional Tiramisu recipes may pose a challenge due to the use of ladyfingers made with wheat flour. However, with a few simple substitutions, you can create a delicious and authentic Gluten-Free Tiramisu that everyone can enjoy. This version retains all the traditional flavors and textures, guaranteeing that your dessert is as indulgent as the original.
The key to a successful Gluten-Free Tiramisu lies in finding or making gluten-free ladyfingers and confirming that all other ingredients are gluten-free. This recipe serves 4-6 people, making it perfect for a small gathering or a special family treat. With layers of gluten-free ladyfingers soaked in espresso, a smooth mascarpone mixture, and a dusting of cocoa powder, this dessert will surely become a favorite.
Ingredients:
- 24 gluten-free ladyfingers
- 2 cups brewed espresso, cooled
- 1 cup mascarpone cheese
- 1 cup heavy cream
- 1/2 cup granulated sugar
- 1 teaspoon vanilla extract
- 2 tablespoons coffee liqueur (optional)
- Unsweetened cocoa powder, for dusting
- Dark chocolate shavings, for garnish (optional)
Cooking Instructions:
- Prepare the Espresso Mixture: Brew 2 cups of espresso and let it cool to room temperature. If using, stir in the coffee liqueur to the cooled espresso for added flavor.
- Make the Mascarpone Mixture: In a large mixing bowl, combine the mascarpone cheese, heavy cream, sugar, and vanilla extract. Use an electric mixer to beat the mixture until it becomes smooth and forms soft peaks. Be careful not to over-whip.
- Dip and Layer the Ladyfingers: Quickly dip each gluten-free ladyfinger into the espresso mixture, confirming they’re well-coated but not soggy. Place a layer of dipped ladyfingers at the bottom of a 9×9-inch dish or a similar-sized serving dish.
- Add the Mascarpone Layer: Spread half of the mascarpone mixture evenly over the layer of ladyfingers. Use a spatula to smooth it out.
- Repeat Layers: Add another layer of dipped ladyfingers on top of the mascarpone mixture. Then spread the remaining mascarpone mixture over this second layer of ladyfingers.
- Chill the Tiramisu: Cover the dish with plastic wrap and refrigerate for at least 4 hours, or overnight if possible. This allows the flavors to meld together and the dessert to set properly.
- Finish with Cocoa and Chocolate: Before serving, dust the top of the tiramisu generously with unsweetened cocoa powder. For an added touch, sprinkle dark chocolate shavings over the top.
Extra Tips:
When making Gluten-Free Tiramisu, it’s crucial to verify that all your ingredients, including the ladyfingers and any flavorings like vanilla extract or coffee liqueur, are certified gluten-free.
Gluten-free ladyfingers can be found in specialty grocery stores or made at home with gluten-free flour. Allowing the tiramisu to chill overnight will enhance the flavors and help achieve a better texture. For a non-alcoholic version, simply omit the coffee liqueur without compromising the taste.
Almond Biscotti

Almond Biscotti are a delightful Italian treat, perfect for those who crave a crunchy, nutty snack while avoiding gluten. These twice-baked cookies are traditionally served with coffee or tea, and their crisp texture makes them ideal for dipping. By using gluten-free flour, almond flour, and a touch of almond extract, this recipe guarantees that everyone at the table can enjoy the classic taste of biscotti without the gluten.
This almond biscotti recipe is designed to serve 4-6 people, making it perfect for a small gathering or to enjoy over a few days with family. The combination of almonds and a hint of vanilla creates a delightful aroma that fills the kitchen during baking, while the simple process of making biscotti allows even novice bakers to achieve great results. Follow the steps below and enjoy homemade gluten-free almond biscotti.
Ingredients (serves 4-6):
- 2 cups gluten-free all-purpose flour
- 1 cup almond flour
- 1 cup granulated sugar
- 1 teaspoon baking powder
- 1/4 teaspoon salt
- 2 large eggs
- 1 teaspoon vanilla extract
- 1/2 teaspoon almond extract
- 1 cup whole almonds, toasted and coarsely chopped
Instructions:
- Preheat and Prepare: Preheat your oven to 350°F (175°C). Line a baking sheet with parchment paper to prevent sticking.
- Mix Dry Ingredients: In a large mixing bowl, combine the gluten-free all-purpose flour, almond flour, sugar, baking powder, and salt. Stir the ingredients together until they’re well blended.
- Combine Wet Ingredients: In a separate bowl, beat the eggs with vanilla extract and almond extract until well mixed. The extracts will add depth to the biscotti’s flavor.
- Form the Dough: Gradually add the wet ingredients to the dry ingredients, stirring until a dough forms. The mixture should be slightly sticky. Fold in the chopped almonds, making sure they’re evenly distributed throughout the dough.
- Shape and First Bake: Divide the dough in half. On the prepared baking sheet, shape each half into a log about 10 inches long and 2 inches wide. Place the logs at least 3 inches apart. Bake in the preheated oven for 25-30 minutes, or until the logs are golden brown and firm to the touch.
- Cool and Slice: Remove the logs from the oven and allow them to cool on the baking sheet for 10 minutes. Reduce the oven temperature to 325°F (160°C). Using a serrated knife, slice each log diagonally into 1/2-inch thick slices.
- Second Bake: Arrange the slices cut side down on the baking sheet. Return to the oven and bake for an additional 10-15 minutes, flipping halfway through. The biscotti should be dry and crisp.
- Cool Completely: Allow the biscotti to cool completely on a wire rack. They’ll continue to harden as they cool.
Extra Tips:
To guarantee your biscotti have the perfect texture, make sure to let them cool slightly before slicing, as this will help prevent crumbling.
Toasting the almonds before incorporating them into the dough enhances their flavor, giving your biscotti a richer taste.
Store the cooled biscotti in an airtight container to maintain their crunchiness. If you prefer a softer biscotti, reduce the second baking time slightly. Enjoy with your favorite hot beverage!
Panna Cotta With Berry Compote

Panna Cotta, a classic Italian dessert, is renowned for its creamy texture and subtle sweetness. Its name translates to “cooked cream,” and it’s a delightful treat that’s both simple and elegant. The smooth, velvety panna cotta is perfectly complemented by a vibrant berry compote, which adds a burst of flavor and a touch of tartness.
This gluten-free recipe is perfect for those who want to enjoy a taste of Italy without the gluten and is sure to impress your guests with its sophisticated presentation and delicious taste. This recipe serves 4-6 people and is ideal for a dinner party or a special occasion.
The panna cotta is made with a few simple ingredients and set in the refrigerator to achieve its signature silky texture. Meanwhile, the berry compote is quickly simmered to enhance the natural sweetness of the berries. Together, the combination of creamy panna cotta and luscious berry compote creates a dessert that’s as beautiful as it’s delicious.
Ingredients:
- 2 cups heavy cream
- 1 cup whole milk
- 1/2 cup granulated sugar
- 1 tablespoon vanilla extract
- 2 1/2 teaspoons powdered gelatin
- 3 tablespoons cold water
- 2 cups mixed berries (such as strawberries, blueberries, raspberries)
- 1/4 cup granulated sugar
- 1 tablespoon lemon juice
- Fresh mint leaves for garnish (optional)
Cooking Instructions:
- Prepare the Gelatin: In a small bowl, sprinkle the powdered gelatin over 3 tablespoons of cold water. Let it sit for about 5 minutes until it blooms and softens.
- Heat the Cream Mixture: In a saucepan, combine the heavy cream, whole milk, and 1/2 cup of granulated sugar. Heat the mixture over medium heat, stirring occasionally until the sugar dissolves and the mixture is hot but not boiling.
- Incorporate Gelatin: Remove the saucepan from the heat and stir in the vanilla extract. Add the bloomed gelatin to the hot cream mixture and whisk until the gelatin is completely dissolved.
- Pour into Molds: Carefully pour the panna cotta mixture into individual serving molds or ramekins. Allow the panna cotta to cool slightly before covering with plastic wrap, making certain the wrap doesn’t touch the surface of the panna cotta.
- Chill: Refrigerate the panna cotta for at least 4 hours or until set. You can prepare this a day in advance if necessary.
- Make the Berry Compote: In a separate saucepan, combine the mixed berries, 1/4 cup of sugar, and lemon juice. Cook over medium heat, stirring occasionally, until the berries release their juices and the mixture thickens slightly (about 10 minutes).
- Cool the Compote: Remove the berry compote from the heat and let it cool to room temperature.
- Serve: To serve, carefully unmold the panna cotta onto dessert plates. Spoon the berry compote over the top and garnish with fresh mint leaves if desired.
Extra Tips:
For the perfect panna cotta, verify that the gelatin is fully dissolved in the cream mixture to avoid any lumps.
Be patient while allowing the panna cotta to set in the refrigerator; rushing this step may result in a less than ideal texture.
You can experiment with different types of berries or even use a single type for the compote, depending on your preference and what’s in season.
If you find unmolding the panna cotta challenging, briefly dip the molds in warm water to help release them easily.