

As someone who adores the comforting aroma of freshly baked bread, I’m thrilled to share my go-to Italian yeast bread recipes with you. Think of the rustic charm of ciabatta and the delightful scent of rosemary focaccia filling your kitchen. These recipes ensure a perfect rise every time, with quality ingredients and tried-and-true methods. Ready to enhance your bread-making skills and enjoy a taste of Italy? Let’s get started.
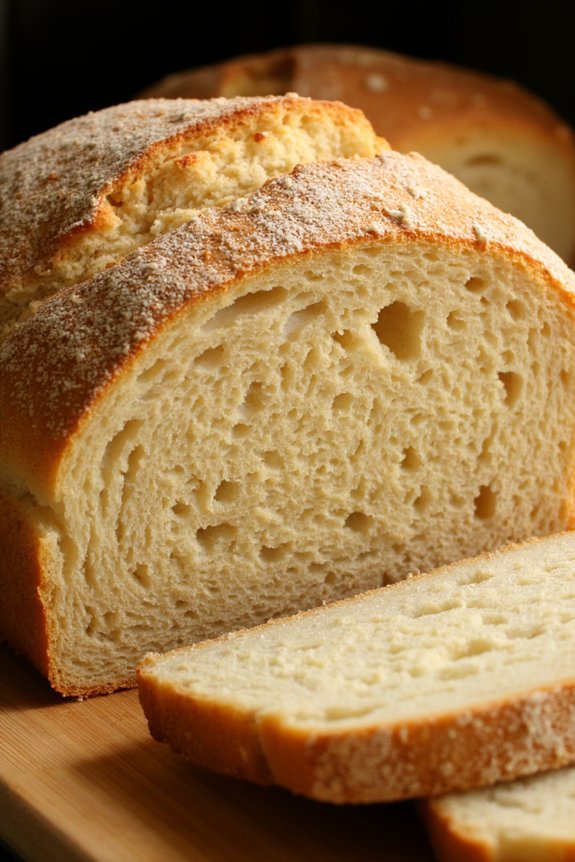
Classic Ciabatta
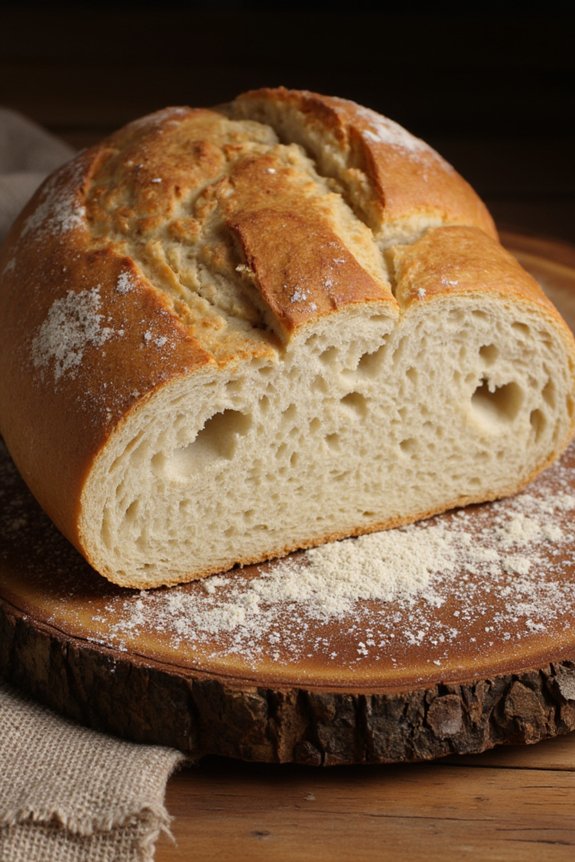
Ciabatta is a rustic Italian bread known for its crisp crust and chewy texture, with an open crumb that’s perfect for soaking up sauces and oils. This bread originated in the Veneto region of Italy and has become a beloved staple in many households worldwide. Its name, which translates to “slipper” in Italian, is a nod to its distinctive shape.
Making ciabatta at home can seem intimidating, but with a little patience and the right technique, you can achieve a loaf that rivals those found in artisan bakeries. The key to a successful ciabatta is its high hydration dough, which requires a long fermentation period to develop its characteristic flavor and texture.
The process involves making a starter, or “biga,” which ferments overnight and contributes to the bread’s complex taste. The dough is then mixed, proofed, and shaped with minimal handling to preserve its airy structure. With this recipe, you’ll produce a classic ciabatta that serves 4-6 people, perfect for sandwiches or as an accompaniment to your favorite Italian dishes.
Ingredients (serving size: 4-6 people)
- 2 cups all-purpose flour
- 1 cup bread flour
- 1 1/2 teaspoons salt
- 1 teaspoon active dry yeast
- 1 1/2 cups water (room temperature)
- Olive oil (for greasing)
Cooking Instructions
- Make the Biga (Starter): In a medium bowl, combine 1 cup of all-purpose flour, 1/4 teaspoon of yeast, and 1/2 cup of water. Stir until well mixed, cover with plastic wrap, and let it sit at room temperature overnight or for at least 12 hours.
- Prepare the Dough: In a large mixing bowl, combine the remaining all-purpose flour, bread flour, salt, and remaining yeast. Add the biga and the rest of the water. Mix until the ingredients are incorporated and a sticky dough forms.
- First Rise: Cover the bowl with plastic wrap and let the dough rise at room temperature for about 1-2 hours or until it has doubled in size.
- Stretch and Fold: Turn the dough onto a well-floured surface. Gently stretch and fold the dough over itself from each side, repeating this process 2-3 times. Be careful not to deflate the dough too much.
- Second Rise: Line a baking sheet with parchment paper and generously dust with flour. Shape the dough into a rectangular loaf and transfer it to the prepared baking sheet. Cover with a clean kitchen towel and let it rise for another 45 minutes to 1 hour.
- Preheat the Oven: Preheat your oven to 425°F (220°C) and place a baking stone or an inverted baking sheet in the oven to heat up as well.
- Bake the Bread: Slide the parchment paper with the dough onto the hot baking stone or sheet. Bake for 25-30 minutes, or until the crust is golden brown and the loaf sounds hollow when tapped on the bottom.
- Cool the Bread: Remove the ciabatta from the oven and let it cool on a wire rack for at least 30 minutes before slicing.
Extra Tips
For the best results, use a kitchen scale to measure your ingredients by weight rather than volume. This guarantees accuracy, especially with a high hydration dough like ciabatta. If your dough is too sticky, lightly wet your hands instead of adding more flour, as this can affect the final texture of the bread.
Additionally, if you have a steam function in your oven, use it to help develop a crispier crust, or place a pan of water on the bottom rack of your oven while baking.
Rosemary Focaccia
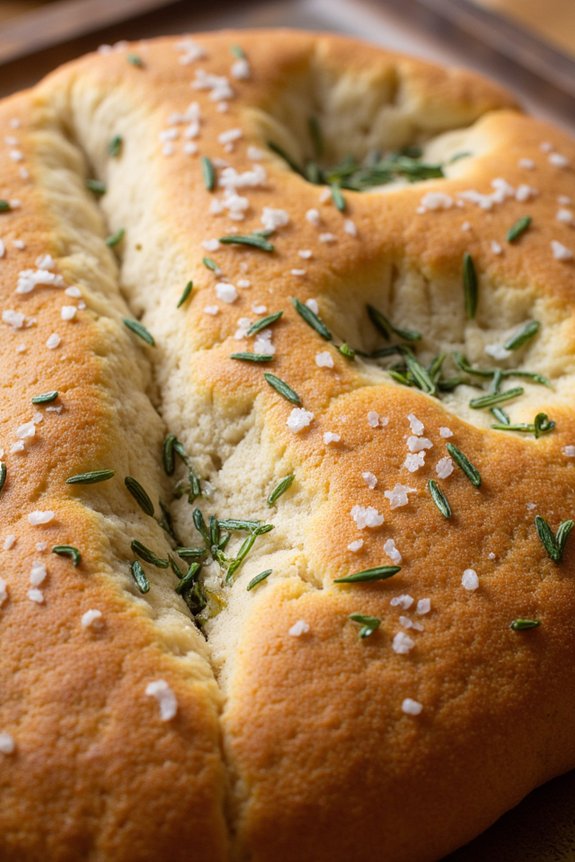
Rosemary Focaccia is a classic Italian yeast bread that’s both aromatic and delicious. Known for its soft, airy texture and rich olive oil flavor, this bread is a staple in Italian cuisine, often enjoyed as an appetizer or side dish. The infusion of rosemary adds a fragrant, earthy note that perfectly complements the bread’s subtle saltiness.
Whether you’re hosting a dinner party or simply want to indulge in a delightful homemade bread, rosemary focaccia is a wonderful choice that’s sure to impress.
This recipe is designed to serve 4-6 people and offers a straightforward approach to making focaccia from scratch. The process includes making a simple dough, allowing it to rise, and baking it to golden perfection. With a few basic ingredients and some patience for the dough to develop its flavors, you can create a bakery-quality focaccia right in your own kitchen.
Ingredients (Serves 4-6):
- 4 cups all-purpose flour
- 2 teaspoons salt
- 1 teaspoon sugar
- 1 packet (2 1/4 teaspoons) active dry yeast
- 1 1/3 cups warm water (about 110°F)
- 1/4 cup extra virgin olive oil, plus more for greasing
- 2 tablespoons fresh rosemary, chopped
- Coarse sea salt for topping
Instructions:
- Prepare the Yeast: In a small bowl, combine the warm water and sugar. Sprinkle the yeast over the water and let it sit for about 5-10 minutes, until it becomes frothy. This indicates that the yeast is active and ready to use.
- Mix the Dough: In a large mixing bowl, combine the flour and salt. Create a well in the center and pour in the yeast mixture along with 1/4 cup of olive oil. Mix with a wooden spoon until the dough begins to come together.
- Knead the Dough: Transfer the dough onto a floured surface and knead for about 10 minutes until it becomes smooth and elastic. If the dough is too sticky, add a little more flour as needed.
- First Rise: Lightly oil a large bowl with olive oil. Place the dough in the bowl, turning it to coat with oil. Cover with a damp cloth and let it rise in a warm place for 1-2 hours, or until it has doubled in size.
- Prepare the Baking Sheet: Once the dough has risen, preheat your oven to 400°F (200°C). Grease a baking sheet with olive oil or line it with parchment paper.
- Shape the Dough: Punch down the risen dough to release air and transfer it to the prepared baking sheet. Gently stretch and press the dough to fit the size of the pan, ensuring an even thickness throughout.
- Second Rise and Toppings: Cover the dough with a damp cloth and let it rise again for about 20-30 minutes. Once risen, use your fingers to poke small indentations all over the surface. Drizzle generously with olive oil, sprinkle with chopped rosemary, and finish with a pinch of coarse sea salt.
- Bake: Place the baking sheet in the preheated oven and bake for 20-25 minutes, or until the focaccia is golden brown and cooked through. Remove from the oven and allow it to cool slightly on a wire rack before slicing.
Extra Tips:
For the best flavor, use high-quality extra virgin olive oil and fresh rosemary. This will enhance the overall taste of the focaccia.
If you prefer a crispier crust, bake the focaccia a few minutes longer, keeping an eye on it to prevent burning. Additionally, you can experiment with other toppings like sliced olives, sun-dried tomatoes, or caramelized onions to customize your focaccia to your preferences.
Olive and Herb Bread
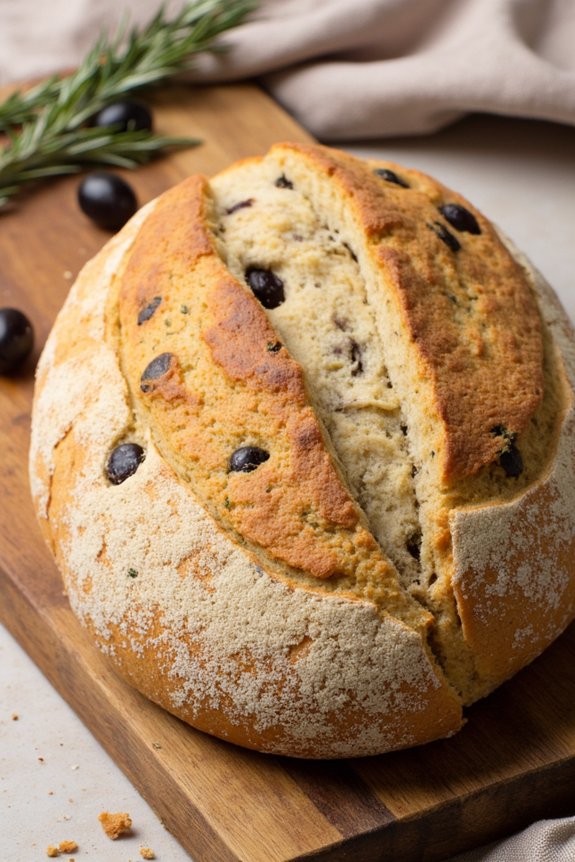
Olive and Herb Bread is a delightful Italian yeast bread that brings together the rich flavors of ripe olives and aromatic herbs, all encased in a golden, crusty loaf. This bread is perfect for serving alongside pasta dishes, soups, or simply as a flavorful appetizer with a drizzle of olive oil. The combination of fresh herbs like rosemary and thyme with the briny taste of olives creates a taste experience that’s both comforting and sophisticated.
The texture is light and airy, thanks to the careful fermentation of the yeast, making each bite an indulgent treat. Baking this bread at home allows you to enjoy the delightful aroma of freshly baked bread filling your kitchen, and it’s surprisingly simple to prepare. With a few basic ingredients and some patience, you can create a delicious loaf that will impress family and friends.
This recipe is designed to yield a loaf that serves 4-6 people, making it perfect for a dinner party or a family meal. Whether you’re an experienced baker or just starting out, this Olive and Herb Bread will become a favorite in your bread-baking repertoire.
Ingredients for 4-6 people:
- 3 1/2 cups all-purpose flour
- 1 packet (2 1/4 teaspoons) active dry yeast
- 1 1/2 teaspoons salt
- 1 cup warm water (about 110°F/45°C)
- 1/4 cup olive oil
- 1 cup pitted Kalamata olives, chopped
- 2 tablespoons fresh rosemary, chopped
- 1 tablespoon fresh thyme, chopped
- Extra flour for dusting
- Cornmeal or additional flour for dusting baking sheet
Cooking Instructions:
- Activate the Yeast: In a large mixing bowl, dissolve the active dry yeast in warm water. Let it sit for about 5-10 minutes until the mixture becomes frothy, indicating that the yeast is active.
- Mix Ingredients: Add the olive oil, salt, and 1 cup of flour to the yeast mixture. Stir until well combined. Gradually add the remaining flour, about 1/2 cup at a time, mixing until a soft dough forms.
- Knead the Dough: Turn the dough out onto a lightly floured surface. Knead it for about 8-10 minutes, until it becomes smooth and elastic. If the dough is sticky, add more flour, a tablespoon at a time.
- Incorporate Olives and Herbs: Flatten the dough slightly and sprinkle the chopped olives, rosemary, and thyme over it. Fold the dough over the added ingredients and continue kneading until the olives and herbs are evenly distributed throughout the dough.
- First Rise: Place the dough in a lightly oiled bowl, turning it to coat with oil. Cover with a damp cloth and let it rise in a warm place until doubled in size, about 1 to 1.5 hours.
- Shape the Loaf: Punch down the dough to release air. Shape it into a round or oval loaf. Place the loaf on a baking sheet dusted with cornmeal or flour. Cover it again with a damp cloth and let it rise for another 30-45 minutes.
- Preheat and Bake: Preheat your oven to 400°F (200°C). Once the loaf has risen, make a few slashes on the top with a sharp knife. Bake in the preheated oven for 25-30 minutes or until the bread is golden brown and sounds hollow when tapped on the bottom.
- Cool and Serve: Remove the bread from the oven and let it cool on a wire rack for at least 20 minutes before slicing. Enjoy warm or at room temperature.
Extra Tips:
For an even deeper flavor, try using a combination of different olives, such as green and black, to add complexity to your bread. Confirm your water is at the right temperature before dissolving the yeast; too hot, and it might kill the yeast, too cold, and it mightn’t activate properly.
If you prefer a softer crust, wrap the bread in a clean kitchen towel while it cools. You can also experiment with other herbs like oregano or basil to tailor the bread to your taste preferences. Enjoy this bread fresh, or store it in an airtight container for up to two days.
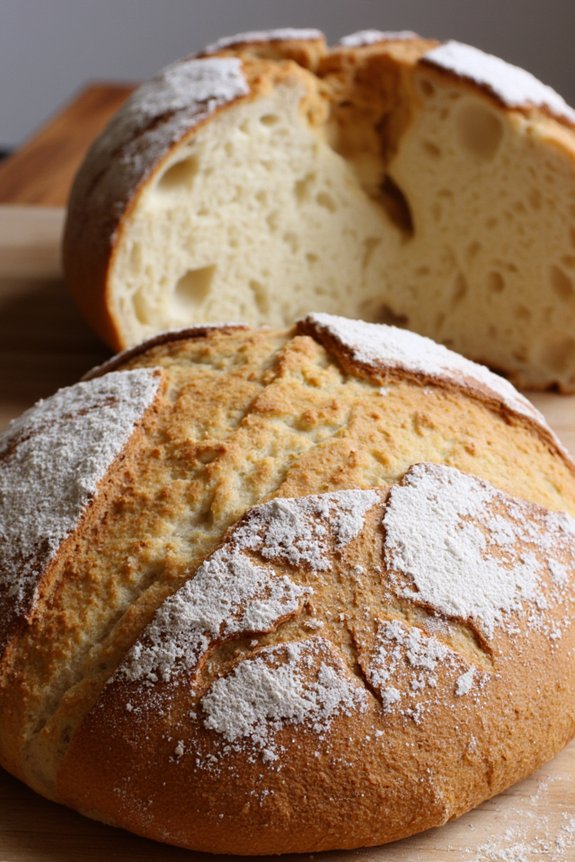
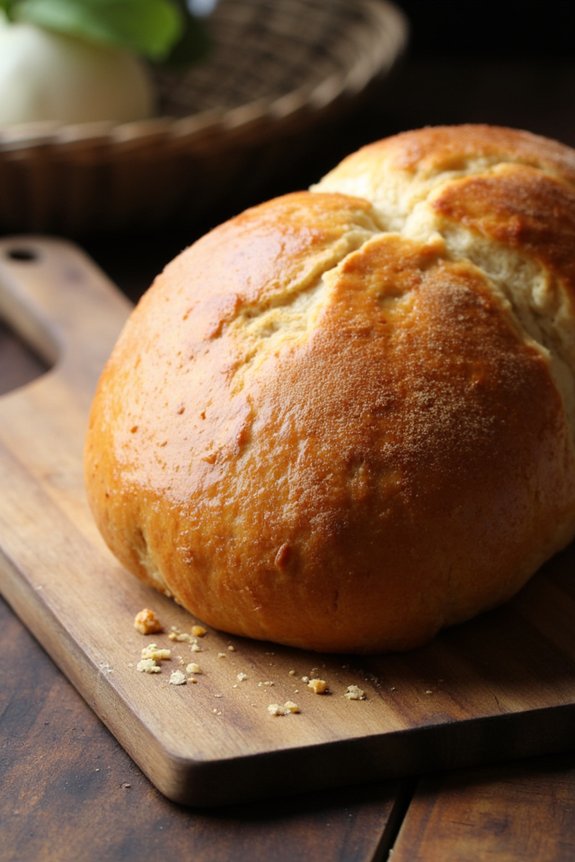
Pane Toscano
Pane Toscano, an iconic Italian yeast bread, originates from the lush region of Tuscany. Known for its distinctive lack of salt, Pane Toscano boasts a mild, slightly sweet flavor that perfectly complements the robust and savory dishes of Tuscan cuisine. Its soft, chewy crumb and golden, crispy crust make it an ideal accompaniment for a variety of meals.
Traditionally, Pane Toscano is baked in a wood-fired oven, which imparts a subtle smokiness to the bread, but it can also be successfully made in a conventional home oven. This recipe will guide you through the process of making this traditional bread, bringing a touch of Tuscany to your kitchen.
Historically, the absence of salt in Pane Toscano is attributed to a long-standing salt tax dispute between Pisa and Florence during the Middle Ages. This resulted in bread being made without salt, a tradition that has continued to this day. When making Pane Toscano, it’s important to plan ahead, as the bread requires a two-step fermentation process to develop its unique flavor and texture.
The first step involves creating a “biga,” or starter dough, which ferments overnight, and the second is the final dough, which incorporates the biga and allows for a slow rise that enhances flavor.
Ingredients (serves 4-6 people):
- 2 cups all-purpose flour
- 1 cup whole wheat flour
- 1 cup water
- 1/4 teaspoon active dry yeast
- 1 cup lukewarm water (for the final dough)
- 3 1/2 cups bread flour
- 1/2 teaspoon active dry yeast (for the final dough)
Cooking Instructions:
- Prepare the Biga: In a mixing bowl, combine 1 cup of water, 2 cups of all-purpose flour, and 1/4 teaspoon of active dry yeast. Stir until all ingredients are well incorporated. Cover the bowl with plastic wrap or a damp cloth and let it ferment at room temperature for 12-16 hours, or until it becomes bubbly and has a pleasant aroma.
- Mix the Final Dough: In a large bowl, combine the biga with 3 1/2 cups of bread flour, 1 cup of whole wheat flour, 1/2 teaspoon of active dry yeast, and 1 cup of lukewarm water. Mix until a shaggy dough forms.
- Knead the Dough: Turn the dough out onto a floured surface and knead for about 10 minutes, until it becomes smooth and elastic. If the dough is too sticky, sprinkle a bit more flour as needed.
- First Rise: Place the kneaded dough in a lightly oiled bowl, cover it, and let it rise in a warm place for about 1.5 to 2 hours, or until it doubles in size.
- Shape the Dough: Punch down the dough gently to deflate it, then shape it into a round loaf. Place the loaf on a parchment-lined baking sheet and cover it with a damp cloth. Let it rise for another hour.
- Preheat the Oven: During the final rise, preheat your oven to 450°F (230°C). Place a baking stone or an inverted baking sheet in the oven to preheat as well.
- Score and Bake: Once the dough has risen, use a sharp knife to make a few shallow slashes on the top of the loaf. Transfer the loaf, along with the parchment, onto the preheated baking stone or sheet. Bake for 25-30 minutes, or until the bread is golden brown and sounds hollow when tapped on the bottom.
- Cool: Remove the bread from the oven and let it cool on a wire rack before slicing.
Extra Tips:
To achieve the best crust, consider placing a pan of water in the oven to create steam during the initial phase of baking. This will help the bread develop a beautifully crisp exterior.
If you find the dough too sticky to handle, dampen your hands slightly instead of adding extra flour, which can alter the bread’s texture. Finally, allow the bread to cool completely before slicing to ensure a clean cut and to let the crumb set properly. Enjoy Pane Toscano with a drizzle of olive oil or as a base for hearty Tuscan soups and stews.
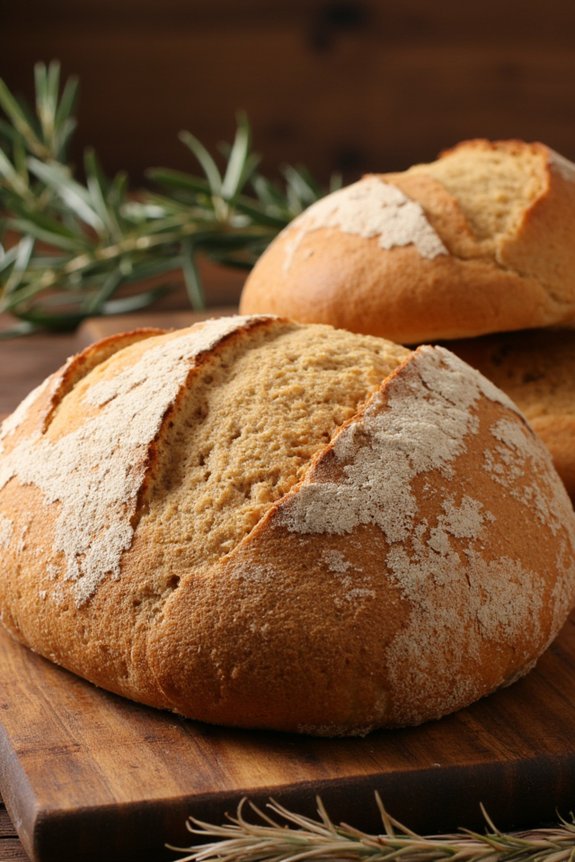
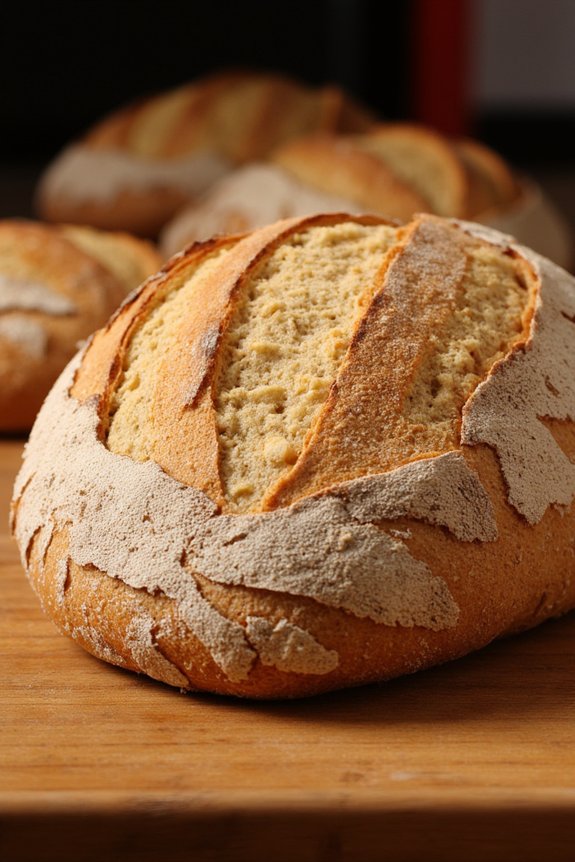
Sicilian Semolina Bread
Sicilian Semolina Bread is a traditional Italian loaf renowned for its golden hue and nutty flavor, thanks to the distinctive semolina flour used in its preparation. This bread is perfect for enjoying with a drizzle of olive oil, paired with cheeses, or used as a base for bruschetta.
With its crisp crust and soft, moist interior, Sicilian Semolina Bread captures the essence of Italian baking, offering a taste of Sicily in every bite. Whether you’re an experienced baker or a novice, this recipe provides a straightforward approach to creating an authentic Italian loaf at home.
This recipe yields a serving size of 4-6 people, making it ideal for family meals or small gatherings. The combination of semolina and all-purpose flour gives the bread its characteristic texture, while the incorporation of olive oil lends a subtle richness.
Patience is key in this recipe, as allowing the dough to rise properly will guarantee a light and airy crumb. With careful attention to detail, you can recreate this iconic bread that’s both visually appealing and incredibly flavorful.
Ingredients:
- 2 cups semolina flour
- 1 cup all-purpose flour
- 1 1/2 teaspoons salt
- 1 teaspoon sugar
- 1 packet (2 1/4 teaspoons) active dry yeast
- 1 1/4 cups warm water (about 110°F)
- 2 tablespoons olive oil
- Extra semolina flour for dusting
Instructions:
- Prepare the Yeast Mixture: In a small bowl, combine the warm water and sugar, then sprinkle the yeast on top. Let it sit for about 5-10 minutes until it becomes frothy, indicating that the yeast is active.
- Mix the Dry Ingredients: In a large mixing bowl, combine the semolina flour, all-purpose flour, and salt. Stir well to guarantee the salt is evenly distributed.
- Form the Dough: Create a well in the center of the dry ingredients and add the yeast mixture along with the olive oil. Mix until a rough dough forms.
- Knead the Dough: Turn the dough out onto a lightly floured surface and knead for about 10 minutes, or until it becomes smooth and elastic. If the dough is too sticky, add a little more flour as needed.
- First Rise: Place the dough in a lightly oiled bowl, turning it to coat all sides. Cover with a damp cloth or plastic wrap and let it rise in a warm place for about 1 to 1 1/2 hours, or until doubled in size.
- Shape the Loaf: Punch down the risen dough to release air bubbles. Shape it into a loaf by rolling it into a tight oval or round shape. Place the shaped dough on a baking sheet dusted with semolina flour.
- Second Rise: Cover the loaf loosely with a damp cloth and allow it to rise again for 45 minutes to 1 hour, or until it has doubled in size.
- Preheat the Oven: Preheat your oven to 425°F (220°C) about 20 minutes before the bread is ready to bake.
- Bake the Bread: Using a sharp knife, make a few slashes on the top of the loaf to allow it to expand while baking. Place the bread in the preheated oven and bake for 25-30 minutes, or until it’s golden brown and sounds hollow when tapped on the bottom.
- Cool and Serve: Remove the bread from the oven and let it cool on a wire rack before slicing. Enjoy it warm or at room temperature.
Extra Tips:
For a crispy crust, place a shallow pan of water on the bottom rack of the oven while baking. The steam will help create a desirable crust. If you prefer a softer crust, you can brush the top of the bread with olive oil after baking.
Make sure your water is at the right temperature for activating the yeast; too hot can kill the yeast, while too cold can slow down the rising process. Finally, allow the bread to cool completely before storing it in an airtight container to maintain its freshness.
Pugliese Bread
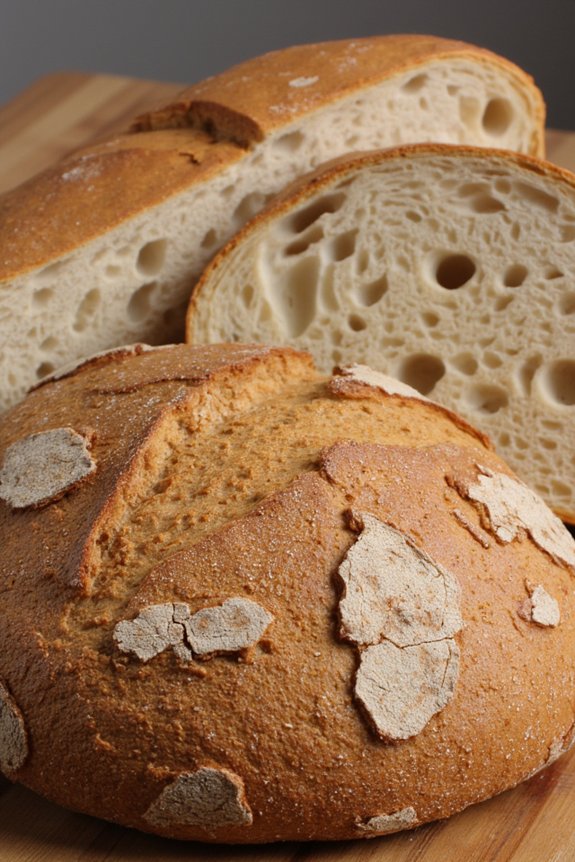
Pugliese Bread is a traditional Italian yeast bread hailing from the Apulia region, known for its rustic texture and large, airy crumb. This bread is characterized by a thick, crunchy crust and a slightly tangy flavor, making it a perfect accompaniment to hearty soups or as a base for bruschetta.
The use of high-hydration dough and a slow fermentation process gives Pugliese bread its distinctive open crumb and chewy texture, reminiscent of the landscape of southern Italy where it originates.
Creating this delightful bread at home involves a few key steps, including developing a strong gluten structure and allowing enough time for the dough to rise and develop flavor. While Pugliese bread requires some patience due to its long fermentation period, the result is a loaf that’s both rewarding and delicious. This recipe will guide you through the process of making Pugliese bread for 4-6 people, ensuring each slice is a reflection of the art of bread-making.
Ingredients:
- 500g (4 cups) bread flour
- 350g (1.5 cups) water, at room temperature
- 2 teaspoons salt
- 1 teaspoon active dry yeast
- 1 tablespoon olive oil
Cooking Instructions:
1. Prepare the Dough: In a large mixing bowl, combine the bread flour and salt. In a separate small bowl, dissolve the yeast in the room temperature water, then let it sit for about 5 minutes until it becomes frothy. Pour the water and yeast mixture into the flour and mix until a shaggy dough begins to form.
2. Knead and Rest: Transfer the dough onto a lightly floured surface and knead it for about 10 minutes until it becomes smooth and elastic. You can also use a stand mixer with a dough hook attachment for this step.
Once kneaded, place the dough in a lightly oiled bowl, cover it with a damp cloth, and allow it to rest for about 1 hour or until it doubles in size.
3. Shape the Loaf: Once the dough has risen, gently deflate it and transfer it to a lightly floured work surface. Shape it into a round loaf by folding the edges towards the center.
Place the shaped dough onto a parchment-lined baking sheet, cover it again with a damp cloth, and let it rise for another 45 minutes.
4. Preheat and Bake: Meanwhile, preheat your oven to 220°C (430°F). Once the dough has completed its second rise, make a few shallow slashes on the top with a sharp knife.
Place the baking sheet in the preheated oven for 30-35 minutes or until the bread has a deep golden-brown crust. The loaf should sound hollow when tapped on the bottom.
5. Cool and Serve: Remove the bread from the oven and let it cool on a wire rack for at least 20 minutes before slicing. This allows the interior to set properly.
Extra Tips:
To achieve an even more rustic crust, consider placing a small pan of boiling water on the bottom of the oven to create steam during the first 10 minutes of baking. This helps the crust to develop its characteristic crunch.
Additionally, using a preheated baking stone can further enhance the bread’s texture, delivering a perfectly crispy base. Remember to allow the dough to rise fully during each resting period, as this is essential for achieving the airy crumb that Pugliese bread is known for.
Rustic Italian Sourdough
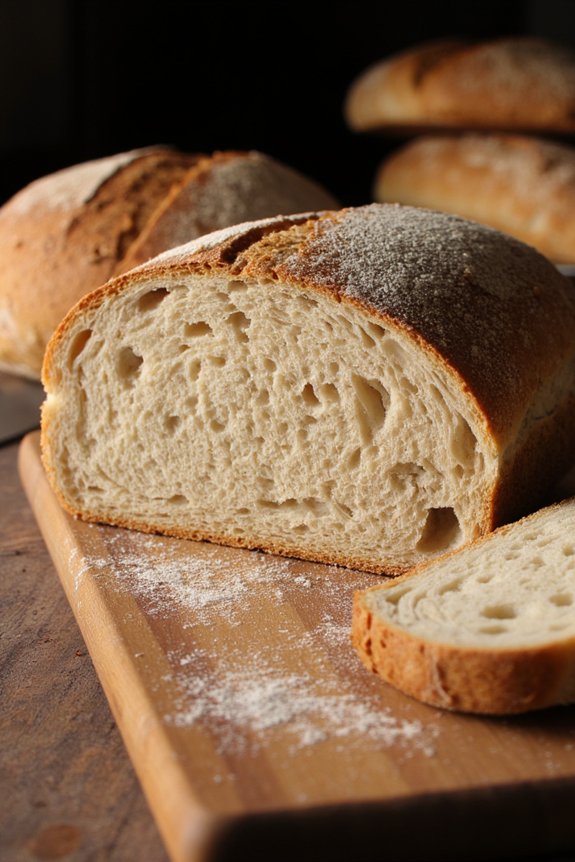
Rustic Italian Sourdough is a classic bread that captures the essence of traditional Italian baking. With its hearty crust and soft, chewy interior, this bread is perfect for any occasion, from everyday meals to special gatherings. The sourdough starter gives it a distinct tangy flavor, while the long fermentation process guarantees a texture that’s both airy and satisfying. This recipe will guide you through creating a delicious loaf that embodies the rustic charm of Italian cuisine.
Making Rustic Italian Sourdough requires patience and attention to detail, but the result is well worth the effort. The process begins with preparing a sourdough starter, which serves as the base for your bread. This natural leavening agent is made from flour and water and needs time to develop its unique flavor profile.
Once your starter is active and bubbly, you can begin crafting your dough, allowing it to ferment slowly for ideal flavor and texture. With this recipe, you’ll be able to enjoy the delightful experience of baking and savoring authentic Italian sourdough bread.
Ingredients (for 4-6 servings):
- 1 cup (240g) active sourdough starter
- 2 1/2 cups (600ml) lukewarm water
- 5 1/2 cups (660g) bread flour
- 2 teaspoons (10g) salt
- Cornmeal or flour, for dusting
Cooking Instructions:
- Prepare the Starter:
- Verify your sourdough starter is active by feeding it 4-8 hours before you begin making your bread. It should be bubbly and doubled in size.
- Mix the Dough:
- In a large mixing bowl, combine the active sourdough starter and lukewarm water. Stir until the starter is dissolved.
- Add the bread flour and salt to the mixture. Stir with a wooden spoon or dough whisk until a rough dough forms.
- Knead the Dough:
- Turn the dough onto a floured surface and knead for about 10 minutes until it becomes smooth and elastic. Alternatively, you can use a stand mixer with a dough hook attachment.
- First Rise:
- Place the dough in a lightly greased bowl, cover it with a damp cloth or plastic wrap, and let it rise at room temperature for 4-6 hours, or until it doubles in size.
- Shape the Dough:
- Gently deflate the dough and turn it out onto a lightly floured surface. Shape it into a round or oval loaf, being careful not to overwork the dough.
- Second Rise:
- Place the shaped dough on a baking sheet lined with parchment paper or a floured banneton basket. Cover and let it rise for another 2-4 hours, or until it has expanded noticeably.
- Preheat the Oven:
- Preheat your oven to 450°F (230°C) with a baking stone or an inverted baking sheet inside.
- Score and Bake:
- Dust the top of the loaf with cornmeal or flour. Use a sharp knife or a bread lame to score the top of the loaf.
- Carefully transfer the dough onto the preheated baking stone or baking sheet. Bake for 30-35 minutes, or until the bread is golden brown and sounds hollow when tapped on the bottom.
- Cool the Bread:
- Remove the bread from the oven and let it cool on a wire rack for at least an hour before slicing.
Extra Tips:
For the best results, make sure your sourdough starter is well-fed and active before you begin. The ambient temperature of your kitchen can affect the rising time, so be patient and adjust as needed.
If your dough is rising too slowly, consider placing it in a slightly warmer spot. Conversely, if it’s rising too quickly, try finding a cooler area. Additionally, using a steam pan in the oven during the first 15 minutes of baking can help achieve a crustier exterior.
Enjoy your homemade Rustic Italian Sourdough with olive oil, cheese, or as a delightful accompaniment to any meal.
Pane Di Altamura
Pane Di Altamura is a traditional Italian yeast bread hailing from the Altamura region in Puglia. Known for its rich flavor and distinct texture, this bread is made using durum wheat semolina, which gives it a characteristic yellow hue and a chewy crust.
The bread is named after the town of Altamura, where it has been baked for centuries and holds a special place in Italian culinary tradition. Recognized for its unique qualities, Pane Di Altamura has even been granted PDO (Protected Designation of Origin) status, guaranteeing its authenticity and connection to its place of origin.
The beauty of Pane Di Altamura lies in its simplicity and the slow fermentation process which enhances its flavor. Making this bread at home is a rewarding experience that requires patience and respect for the traditional methods. The process involves creating a starter that ferments overnight, followed by a long kneading and rising period.
The result is a loaf with a thick, crunchy crust and a soft, airy interior. Perfect for serving alongside a hearty Italian meal or simply enjoyed with a drizzle of olive oil, Pane Di Altamura is a delightful addition to any bread lover’s repertoire.
Ingredients for Pane Di Altamura (Serves 4-6):
- 500 grams durum wheat semolina
- 10 grams active dry yeast
- 350 ml warm water
- 10 grams salt
Cooking Instructions:
- Prepare the Starter:
- In a small bowl, dissolve 5 grams of active dry yeast in 100 ml of warm water. Add 100 grams of durum wheat semolina and mix to form a smooth paste. Cover the bowl with a cloth and let it ferment at room temperature for 12-16 hours.
- Make the Dough:
- In a large mixing bowl, combine the remaining 400 grams of durum wheat semolina, 5 grams of yeast, and salt. Add the starter and gradually pour in the remaining 250 ml of warm water while mixing the ingredients with your hands or a wooden spoon.
- Knead the Dough:
- Turn the dough onto a floured surface and knead it for about 10-15 minutes until it becomes smooth and elastic. You can add a little more flour if the dough is too sticky, but it should remain slightly tacky.
- First Rise:
- Place the kneaded dough into a lightly oiled bowl. Cover it with a damp cloth and let it rise in a warm place for about 2 hours, or until it has doubled in size.
- Shape the Loaf:
- After the first rise, punch down the dough to release gas. Turn it out onto a floured surface and shape it into a round or oval loaf. Place the shaped loaf onto a parchment-lined baking sheet.
- Second Rise:
- Cover the loaf with a damp cloth and let it rise again for about 1 hour, until it has increased in size.
- Preheat the Oven:
- Preheat your oven to 220°C (428°F). Place a baking stone or an inverted baking sheet in the oven to heat up.
- Bake the Bread:
- Once the loaf has risen, make a few slashes on its surface with a sharp knife. Slide the loaf onto the preheated baking stone or sheet and bake for 30-35 minutes until the crust is golden brown and the bread sounds hollow when tapped on the bottom.
- Cool the Bread:
- Remove the loaf from the oven and let it cool on a wire rack before slicing.
Extra Tips:
To achieve the perfect Pane Di Altamura, confirm that your yeast is fresh and active. The fermentation process is essential, so be patient and allow the dough to rise properly.
If you live in a particularly dry or cool area, consider placing the dough in a slightly warm (but turned off) oven to help with rising. For added flavor, you can incorporate a small amount of olive oil into the dough during mixing.
Finally, remember that practice makes perfect, so don’t be discouraged if your first attempt isn’t flawless. Keep experimenting with the process and enjoy the rich rewards of homemade Italian bread.
Soft Italian Rolls
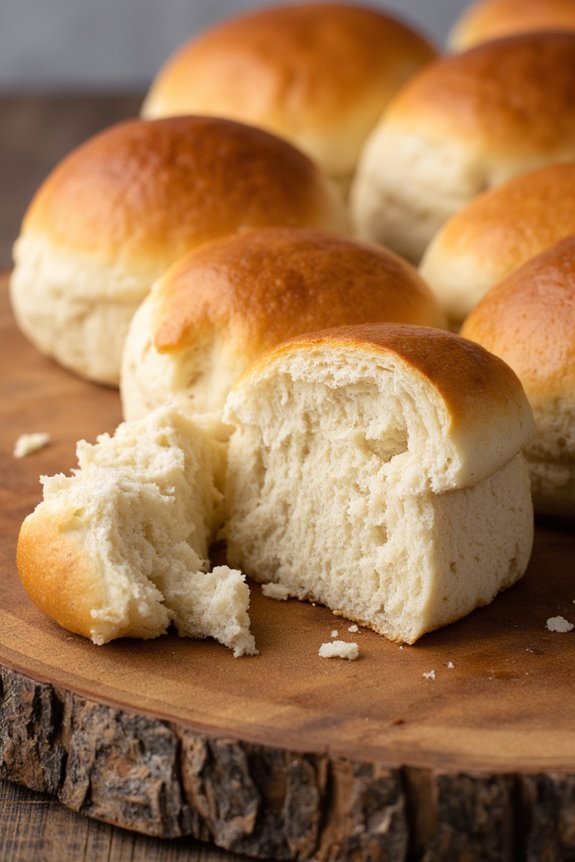
Soft Italian Rolls are a delightful addition to any meal, offering a tender and fluffy texture that pairs beautifully with soups, salads, and main courses. These rolls are known for their slightly sweet flavor and golden-brown crust, making them a family favorite in many households.
Perfect for holiday gatherings or a casual dinner, these rolls are versatile and can be served warm with a pat of butter or used as a base for mini sandwiches.
The secret to these Soft Italian Rolls lies in the dough’s rich combination of ingredients, which includes a blend of all-purpose flour, yeast, and olive oil. This recipe will guide you through the process of creating these delicious rolls, perfect for serving 4-6 people. With a little patience and attention to detail, you can achieve bakery-quality results right in your own kitchen.
Ingredients:
- 4 cups all-purpose flour
- 2 1/4 teaspoons active dry yeast
- 1 cup warm water (110°F/45°C)
- 1/4 cup sugar
- 1/4 cup olive oil
- 1 teaspoon salt
- 1 large egg
- 2 tablespoons melted butter (for brushing)
Instructions:
- Activate the Yeast: In a small bowl, combine the warm water and sugar, stirring until the sugar dissolves. Sprinkle the yeast over the water and let it sit for about 5-10 minutes until it becomes frothy, indicating the yeast is active.
- Prepare the Dough: In a large mixing bowl, combine the flour and salt. Make a well in the center and add the activated yeast mixture, olive oil, and egg. Mix until the ingredients come together to form a dough.
- Knead the Dough: Transfer the dough to a lightly floured surface and knead for about 8-10 minutes until it becomes smooth and elastic. Alternatively, you can use a stand mixer with a dough hook attachment.
- First Rise: Place the dough in a greased bowl, cover it with a damp cloth, and let it rise in a warm place for about 1-2 hours, or until it has doubled in size.
- Shape the Rolls: Punch down the dough to release air, then divide it into 12 equal portions. Shape each portion into a ball and place them on a baking sheet lined with parchment paper, leaving enough space between each roll.
- Second Rise: Cover the rolls with a damp cloth and let them rise again for about 30-45 minutes, or until they’ve nearly doubled in size.
- Preheat and Prepare for Baking: Preheat your oven to 375°F (190°C). Once the rolls have risen, brush them with melted butter to give them a golden, shiny finish.
- Bake: Bake the rolls in the preheated oven for about 15-20 minutes, or until they’re golden brown on top.
- Cool and Serve: Remove the rolls from the oven and let them cool slightly on a wire rack before serving.
Extra Tips:
To guarantee your Soft Italian Rolls turn out perfectly, make sure the water used for activating the yeast isn’t too hot, as this can kill the yeast. Room temperature ingredients, especially the egg, help the dough rise more uniformly.
If you wish to add a personal touch, consider incorporating herbs like rosemary or thyme into the dough for an aromatic twist. Finally, for a softer crust, cover the freshly baked rolls with a clean towel as they cool.
Garlic Parmesan Breadsticks
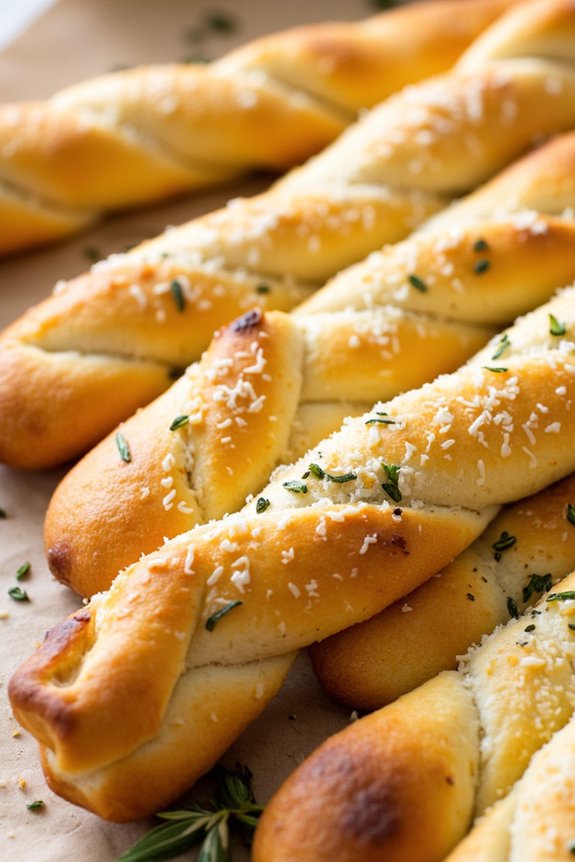
Garlic Parmesan Breadsticks are a delicious addition to any meal, offering a blend of savory garlic and rich Parmesan that perfectly complements the soft, chewy texture of the bread. These breadsticks are perfect for serving alongside pasta, salads, or soups, adding a delightful burst of flavor to your table.
The yeast-based dough is easy to prepare and can be shaped into elegant twists or simple sticks, depending on your preference. With just a few simple ingredients, you can create a homemade treat that will impress your family and friends.
The key to achieving the perfect Garlic Parmesan Breadsticks lies in allowing the dough to rise adequately, which guarantees a light and airy texture. Once baked, the breadsticks are brushed with a melted garlic butter mixture and generously sprinkled with Parmesan cheese, creating a golden, crispy exterior that’s simply irresistible.
This recipe is designed to serve 4-6 people, making it ideal for family dinners or small gatherings. Let’s explore the ingredients and steps needed to make these flavorful breadsticks.
Ingredients:
- 2 1/4 teaspoons active dry yeast
- 1 cup warm water (about 110°F)
- 2 tablespoons sugar
- 3 cups all-purpose flour
- 1 teaspoon salt
- 3 tablespoons unsalted butter, melted
- 2 cloves garlic, minced
- 1/4 cup grated Parmesan cheese
- 1 tablespoon dried Italian herbs (optional)
- 1 tablespoon olive oil
Cooking Instructions:
- Activate the Yeast: In a large mixing bowl, combine the warm water, sugar, and yeast. Stir gently and let the mixture sit for about 5-10 minutes until it becomes frothy, indicating that the yeast is active.
- Prepare the Dough: Add the flour and salt to the yeast mixture. Mix until a dough begins to form. Knead the dough on a floured surface for about 5-7 minutes until it’s smooth and elastic. If the dough is too sticky, add a little more flour as needed.
- First Rise: Lightly coat a large bowl with olive oil and place the dough inside. Cover the bowl with a clean kitchen towel or plastic wrap. Allow the dough to rise in a warm, draft-free area for about 1 hour or until it has doubled in size.
- Shape the Breadsticks: Punch down the risen dough to release excess air. Divide the dough into 12 equal portions. Roll each portion into a rope shape, about 8-10 inches long. You can twist the ropes for a decorative effect or leave them straight.
- Second Rise: Place the shaped breadsticks onto a baking sheet lined with parchment paper. Cover with a towel and let them rise for another 30 minutes.
- Prepare the Topping: Preheat your oven to 375°F (190°C). In a small bowl, combine the melted butter and minced garlic.
- Bake: Brush the risen breadsticks with the garlic butter mixture, sprinkle with Parmesan cheese, and, if desired, a pinch of dried Italian herbs. Bake in the preheated oven for 12-15 minutes or until the breadsticks are golden brown.
- Serve: Remove the breadsticks from the oven and allow them to cool slightly before serving. Enjoy your homemade Garlic Parmesan Breadsticks with your favorite dish.
Extra Tips: To guarantee your breadsticks have a uniform size, use a kitchen scale to weigh each dough portion before shaping. If you prefer a softer crust, cover the breadsticks with a clean cloth immediately after baking to trap steam.
Additionally, you can adjust the amount of garlic and Parmesan to suit your taste preferences. For a spicier kick, consider adding a pinch of red pepper flakes to the garlic butter mixture. Enjoy experimenting and customizing this recipe to make it your own!
Pane Casereccio
Pane Casereccio is a traditional Italian yeast bread known for its rustic charm and hearty flavor. Originating from the countryside, this bread captures the essence of Italian home baking with its crusty exterior and soft, airy interior.
It’s a staple that pairs beautifully with a variety of dishes, from soups to salads, or simply enjoyed on its own with a drizzle of olive oil. Preparing Pane Casereccio is a rewarding process that takes time and patience, allowing the flavors to develop fully.
The slow fermentation process is essential to achieving the rich taste and texture that distinguishes Pane Casereccio from other bread. This recipe will guide you through creating this delightful bread, guaranteeing that your kitchen is filled with the warm, comforting aroma of freshly baked bread.
With a serving size suitable for 4-6 people, you’ll have enough to share with family or friends, making it perfect for gatherings or a cozy family meal.
Ingredients (Serves 4-6):
- 500g all-purpose flour
- 10g salt
- 7g active dry yeast
- 350ml warm water
- 1 tablespoon olive oil
- Extra flour for dusting
Cooking Instructions:
- Activate the Yeast: In a small bowl, combine 100ml of the warm water with the active dry yeast. Stir gently and let it sit for about 10 minutes until it becomes frothy. This step guarantees that the yeast is active and ready to help the bread rise.
- Mix the Dough: In a large mixing bowl, combine the flour and salt. Make a well in the center and pour in the activated yeast mixture, the remaining warm water, and olive oil. Mix the ingredients together until a shaggy dough forms.
- Knead the Dough: Transfer the dough onto a floured surface. Knead it for about 10 minutes until it becomes smooth and elastic. This process develops the gluten, giving the bread its structure.
- First Rise: Place the kneaded dough in a lightly oiled bowl, cover it with a damp cloth, and let it rise in a warm place for 1 to 2 hours, or until it doubles in size. This slow rise enhances the flavor and texture of the bread.
- Shape the Loaf: Once the dough has risen, punch it down gently to release the air. Shape it into a round loaf by folding the edges into the center and then flipping it over so the seams are underneath.
- Second Rise: Place the shaped loaf on a floured baking sheet or a proofing basket. Cover it again with a damp cloth and let it rise for another hour until it nearly doubles in size.
- Preheat the Oven: Preheat your oven to 220°C (430°F) with a baking stone if you have one, or a baking sheet inside to heat up. This guarantees a hot surface for the bread to bake on, creating a crispy crust.
- Bake the Bread: Dust the top of the loaf with a little flour, and make a few slashes with a sharp knife to help it expand while baking. Carefully transfer the risen loaf to the hot baking stone or sheet. Bake for 25-30 minutes, or until the bread is golden brown and sounds hollow when tapped on the bottom.
- Cool the Bread: Remove the bread from the oven and let it cool on a wire rack. This step is essential as it allows the bread to finish cooking inside and prevents a soggy bottom.
Extra Tips:
When baking Pane Casereccio, the quality of your flour can greatly affect the result, so using a good quality all-purpose or bread flour is recommended.
If the dough feels too sticky during kneading, add a little more flour, but be cautious not to add too much as it can make the bread dense. Additionally, a cup of water can be placed in a pan at the bottom of the oven during baking to create steam, which contributes to a crispier crust.
Enjoy your Pane Casereccio fresh out of the oven for the best taste experience.
Grissini Torinesi
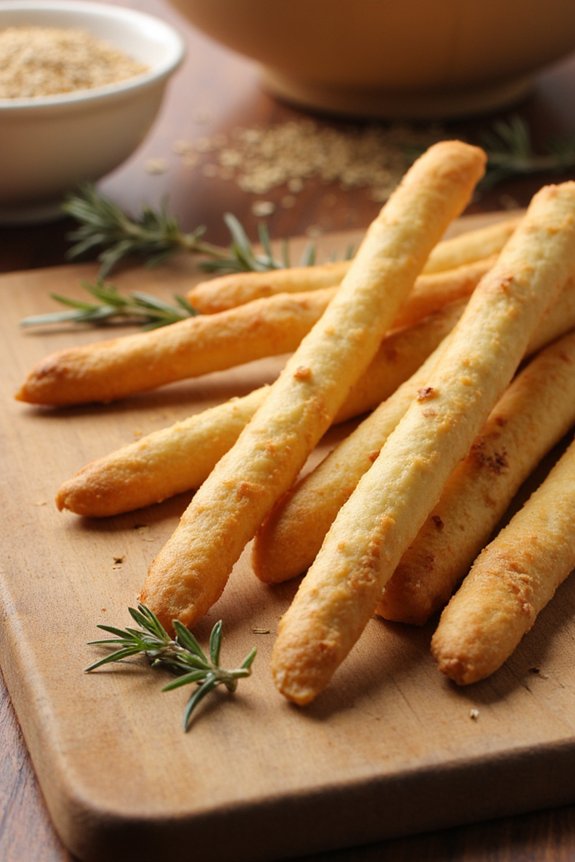
Grissini Torinesi are classic Italian breadsticks originating from Turin, Italy. Known for their crispy texture and slender shape, these breadsticks are perfect for snacking or as an accompaniment to antipasti. Traditionally, they’re made by hand-rolling the dough into thin, elongated shapes, which allows for a delicate crunch. The process of making Grissini Torinesi is relatively straightforward, requiring simple ingredients and some patience to achieve their signature crispiness.
The beauty of Grissini lies in their versatility. They can be flavored with a variety of ingredients such as rosemary, sesame seeds, or even a sprinkle of sea salt. When served, they add a touch of elegance to any meal. Whether you’re hosting a dinner party or simply enjoying a quiet evening at home, these Italian breadsticks are sure to delight your guests or family. Below is a detailed recipe to make Grissini Torinesi for a serving size of 4-6 people.
Ingredients:
- 500g all-purpose flour
- 250ml lukewarm water
- 2 tablespoons olive oil
- 1 tablespoon honey
- 1 teaspoon salt
- 1 packet (7g) active dry yeast
- Optional: sesame seeds, poppy seeds, or rosemary for topping
Instructions:
- Activate the Yeast: In a small bowl, combine the lukewarm water, honey, and active dry yeast. Stir gently and let it sit for about 5-10 minutes until the mixture becomes frothy. This indicates that the yeast is active.
- Prepare the Dough: In a large mixing bowl, combine the flour and salt. Make a well in the center and pour in the yeast mixture and olive oil. Mix the ingredients until a dough forms.
- Knead the Dough: Transfer the dough onto a floured surface and knead for about 10 minutes until it becomes smooth and elastic. If the dough is sticky, sprinkle a little more flour as needed.
- First Rise: Place the kneaded dough in a lightly oiled bowl, cover with a damp cloth, and let it rise in a warm place for approximately 1 hour, or until it has doubled in size.
- Shape the Breadsticks: Preheat your oven to 200°C (390°F). Once the dough has risen, punch it down to release the air. Divide the dough into small, equal-sized pieces. Roll each piece into a long, thin stick, about 30 cm (12 inches) in length.
- Add Toppings: If desired, sprinkle sesame seeds, poppy seeds, or rosemary onto a plate and roll the breadsticks over them to coat.
- Bake: Place the breadsticks on a baking sheet lined with parchment paper. Confirm they’re spaced apart to allow for even cooking. Bake in the preheated oven for 15-20 minutes, or until golden brown and crispy.
- Cool: Remove from the oven and let the Grissini cool on a wire rack before serving.
Extra Tips: For the best results, verify that the water used for activating the yeast is lukewarm, as hot water can kill the yeast, and cold water won’t activate it properly. To achieve an even crispiness, make sure the breadsticks are of uniform thickness. If you prefer a more rustic look, you can hand-pull the dough to form irregular shapes. Additionally, storing them in an airtight container will help maintain their crunchiness for several days.
Sweet Brioche Loaf
The Sweet Brioche Loaf is a delightful Italian yeast bread known for its rich, tender crumb and slightly sweet flavor. This luxurious bread is perfect for breakfast, afternoon tea, or as a decadent treat on special occasions.
With its origins rooted in the French brioche tradition, the Italian variation often includes a hint of citrus zest or vanilla to enhance its sweetness. The loaf is light, buttery, and incredibly soft, making it irresistible when served warm with a pat of butter or a dollop of fruit preserves.
Crafting a Sweet Brioche Loaf requires patience and a delicate touch, as the dough is enriched with eggs and butter, resulting in a soft and elastic texture. The dough needs ample time to rise and develop its flavors, so it’s best to plan ahead when preparing this bread.
While the process may seem intimidating, following the steps carefully will guarantee a beautiful loaf that will impress your family and friends. Below is a recipe to make a Sweet Brioche Loaf for a serving size of 4-6 people.
Ingredients:
- 3 1/2 cups all-purpose flour
- 1/3 cup granulated sugar
- 1 packet (2 1/4 tsp) active dry yeast
- 1 teaspoon salt
- 4 large eggs, at room temperature
- 1/2 cup whole milk, warm (110°F/45°C)
- 1 teaspoon vanilla extract
- Zest of 1 lemon
- 1/2 cup unsalted butter, softened
- 1 egg yolk mixed with 1 tablespoon milk (for egg wash)
Instructions:
- Activate the Yeast: In a small bowl, combine the warm milk and yeast. Let it sit for about 5-10 minutes until it becomes frothy, indicating that the yeast is active.
- Mix Dry Ingredients: In a large mixing bowl, whisk together the flour, sugar, and salt. Create a well in the center and add the eggs, vanilla extract, lemon zest, and the yeast mixture.
- Combine Ingredients: Using a wooden spoon or a stand mixer with a dough hook attachment, mix the ingredients until they form a rough dough. Gradually add the softened butter, a few pieces at a time, ensuring each addition is fully incorporated before adding the next.
- Knead the Dough: Knead the dough on a floured surface or in the stand mixer for about 10-15 minutes until it’s smooth and elastic. The dough should be slightly sticky, but not too wet.
- First Rise: Transfer the dough to a lightly oiled bowl, cover it with a damp cloth or plastic wrap, and let it rise in a warm place for about 1-2 hours or until it has doubled in size.
- Shape the Loaf: Once risen, gently deflate the dough and transfer it to a floured surface. Shape it into a loaf and place it in a greased loaf pan. Cover it loosely and let it rise for another 30-45 minutes until it has puffed up.
- Preheat and Brush: Preheat your oven to 350°F (175°C). Brush the loaf gently with the egg wash, ensuring even coverage for a shiny, golden crust.
- Bake: Bake the brioche loaf in the preheated oven for 30-35 minutes, or until it’s golden brown and sounds hollow when tapped on the bottom. If the top browns too quickly, tent it with foil.
- Cool and Serve: Allow the bread to cool in the pan for 10 minutes, then transfer it to a wire rack to cool completely before slicing and serving.
Extra Tips:
When making a Sweet Brioche Loaf, make sure all ingredients are at room temperature, as this helps the dough to blend smoothly and rise consistently.
If your kitchen is cold, you can create a warm environment for the dough to rise by placing it in an oven with the light on. Additionally, patience is key; allow the dough to rise fully during both the initial and final proofs to achieve the desired texture and flavor.
For added flavor, you can incorporate chocolate chips or nuts into the dough during the final kneading.
Pane Pugliese Al Pomodoro
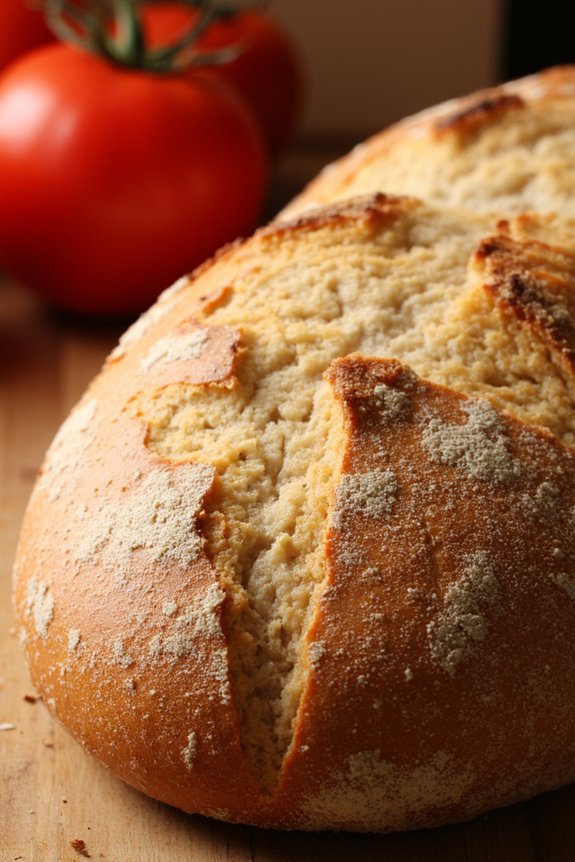
Pane Pugliese Al Pomodoro is a delightful Italian yeast bread that originates from the Puglia region, known for its rustic and hearty culinary traditions. This bread is infused with the rich flavor of tomatoes, which adds a vibrant color and a subtle tang to the dough. The crust is typically golden and crisp, while the inside remains soft and chewy, making it an ideal accompaniment to soups, salads, or as a standalone snack.
This recipe is perfect for those looking to bring a taste of Italy into their kitchen, with its simple ingredients and rewarding process. The distinctive flavor of Pane Pugliese Al Pomodoro comes from the combination of fresh tomatoes and a long fermentation process, which enhances the bread’s complexity and depth. The use of yeast helps the dough rise beautifully, creating an airy loaf with a deliciously chewy texture.
The bread is versatile enough to be used for sandwiches, bruschetta, or simply enjoyed with a drizzle of olive oil. Whether you’re an experienced baker or a novice, this recipe is accessible and promises to deliver a stunning loaf that captures the essence of Italian baking.
Ingredients (Serves 4-6):
- 500 grams of bread flour
- 300 ml of lukewarm water
- 1 packet (7 grams) of active dry yeast
- 1 teaspoon of sugar
- 1 teaspoon of salt
- 200 grams of ripe tomatoes, peeled and chopped
- 2 tablespoons of olive oil
- 1 tablespoon of tomato paste
Instructions:
- Activate the Yeast: In a small bowl, dissolve the sugar in lukewarm water, then sprinkle the yeast over the top. Let it sit for about 10 minutes until it becomes frothy, indicating that the yeast is activated.
- Prepare the Tomato Mixture: In a separate bowl, mix the chopped tomatoes with olive oil and tomato paste. Use a fork to mash the mixture slightly, releasing the juices and incorporating the flavors.
- Mix the Dough: In a large mixing bowl, combine the bread flour and salt. Make a well in the center and pour in the yeast mixture and the tomato mixture. Stir with a wooden spoon until the dough begins to come together.
- Knead the Dough: Transfer the dough onto a floured surface and knead for about 10 minutes, or until the dough is smooth and elastic. Add a little more flour if the dough is too sticky.
- First Rise: Place the dough in a lightly oiled bowl, cover it with a damp cloth, and let it rise in a warm place for about 1.5 to 2 hours, or until doubled in size.
- Shape the Bread: Once risen, punch down the dough to release the air, then shape it into a round loaf. Place the loaf on a parchment-lined baking sheet.
- Second Rise: Cover the loaf with a damp cloth and let it rise again for about 30 minutes.
- Preheat the Oven: While the loaf is rising, preheat your oven to 220°C (430°F).
- Bake the Bread: Make a few slashes on top of the loaf with a sharp knife, then bake in the preheated oven for 25-30 minutes, or until the crust is golden brown and the bread sounds hollow when tapped on the bottom.
- Cool the Bread: Remove the bread from the oven and let it cool on a wire rack before slicing.
Extra Tips:
For the best results, use ripe, juicy tomatoes to maximize the flavor infusion into the bread. If fresh tomatoes aren’t available, canned tomatoes can be a good substitute.
Make sure your water is at the right temperature (lukewarm) to activate the yeast properly without killing it. Additionally, be careful not to add too much flour during kneading, as this can make the bread dense.
Finally, allow the bread to cool completely before slicing to maintain its texture and prevent it from becoming gummy.
Traditional Panettone
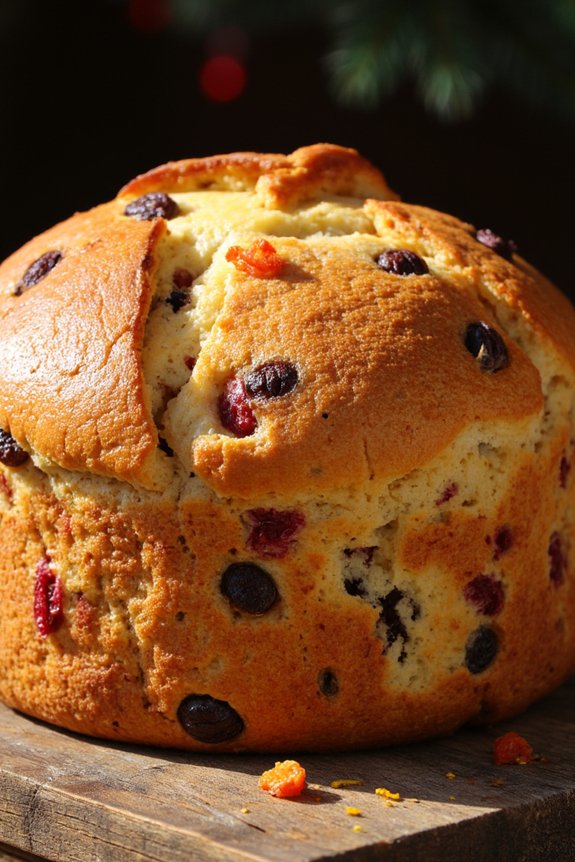
Panettone is a classic Italian yeast bread that’s traditionally enjoyed during the holiday season. This sweet bread is known for its light, airy texture and rich, buttery flavor, speckled with candied fruits and raisins. Originating from Milan, panettone has become a beloved treat around the world, often served as a dessert or breakfast alongside coffee or sweet wine.
Making this delightful bread from scratch takes some time and patience, but the result is well worth the effort. Crafting an authentic panettone involves preparing a dough enriched with butter and eggs, which is then left to rise slowly to develop its characteristic fluffy texture. The dough is typically flavored with vanilla and citrus zest, adding a fragrant aroma that complements the sweetness of the fruit.
This recipe yields a panettone that serves 4-6 people, making it perfect for sharing with family and friends during festive gatherings.
Ingredients (Serves 4-6):
- 1/2 cup warm water
- 2 1/4 teaspoons active dry yeast
- 1/2 cup sugar
- 4 cups all-purpose flour
- 1/2 teaspoon salt
- 1/2 cup unsalted butter, softened
- 4 large eggs
- 1 teaspoon vanilla extract
- Zest of 1 lemon
- Zest of 1 orange
- 1 cup mixed candied fruits
- 1/2 cup raisins
- 2 tablespoons rum (optional)
- 1 tablespoon melted butter (for brushing)
Cooking Instructions:
- Prepare the Yeast Mixture: In a small bowl, combine the warm water and active dry yeast. Stir gently and let it sit for about 5-10 minutes until it becomes frothy. This indicates that the yeast is active.
- Mix the Dry Ingredients: In a large mixing bowl, whisk together the sugar, 3 1/2 cups of flour, and salt. Make a well in the center and set aside.
- Combine Wet Ingredients: In another bowl, beat together the softened butter, eggs, vanilla extract, lemon zest, and orange zest until well combined. Add the frothy yeast mixture and stir to integrate.
- Form the Dough: Pour the wet mixture into the well of dry ingredients. Using a wooden spoon or a stand mixer with a dough hook, mix until a sticky dough forms. Gradually add the remaining flour if needed.
- Knead the Dough: Turn the dough onto a lightly floured surface and knead for about 10 minutes until smooth and elastic. If using a stand mixer, knead on medium speed for 5-7 minutes.
- First Rise: Place the dough in a lightly greased bowl, cover with a kitchen towel, and let it rise in a warm place for 2 hours or until doubled in size.
- Prepare the Fruits: If using rum, soak the candied fruits and raisins in it for about 30 minutes, then drain well.
- Incorporate Fruits: Punch down the risen dough and knead in the soaked fruits until evenly distributed.
- Shape and Second Rise: Shape the dough into a round loaf and place it in a greased, round panettone mold or a high-sided cake pan. Cover and let it rise again for about 1-1.5 hours until it has risen above the rim of the mold.
- Bake the Panettone: Preheat the oven to 350°F (175°C). Brush the top of the dough with melted butter. Bake for 35-45 minutes or until golden brown and a skewer inserted into the center comes out clean.
- Cool and Serve: Allow the panettone to cool completely on a wire rack before slicing. Serve with butter or a dusting of powdered sugar, if desired.
Extra Tips: For the best results, confirm that all ingredients are at room temperature before starting. The slow rising time is essential for developing the panettone’s unique texture, so be patient and allow it to rise fully.
If you don’t have a panettone mold, a high-sided cake pan or a springform pan lined with parchment paper will work as well. To maintain freshness, store the panettone in an airtight container or wrap it tightly in plastic wrap. Enjoy your homemade panettone as part of your holiday celebrations!