

There’s something truly heartwarming about the flavors of Italian cuisine. Think of a plate of Spaghetti Alla Carbonara or the tender Osso Buco Alla Milanese. Each bite is like a little journey to Italy. With these 15 authentic recipes, you can turn your table into a cozy trattoria. Ready to explore the secrets of genuine Italian cooking?
Spaghetti Alla Carbonara
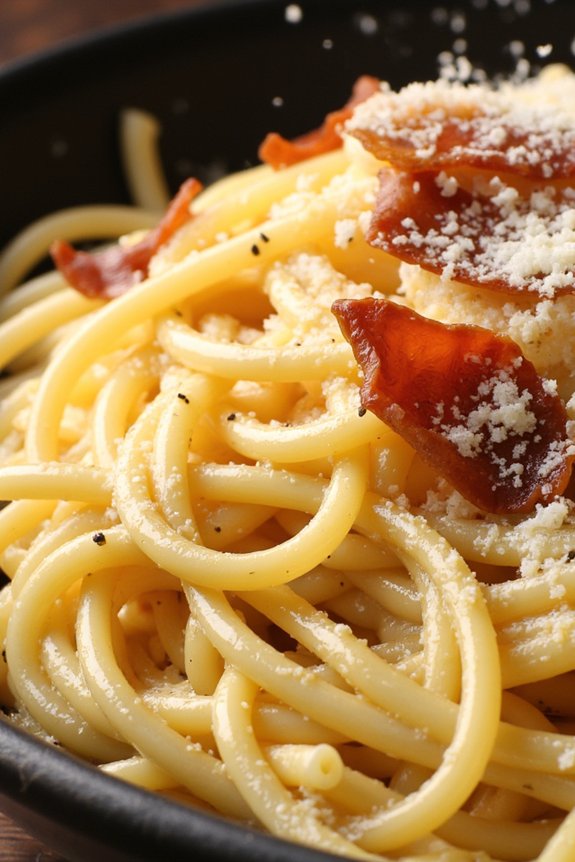
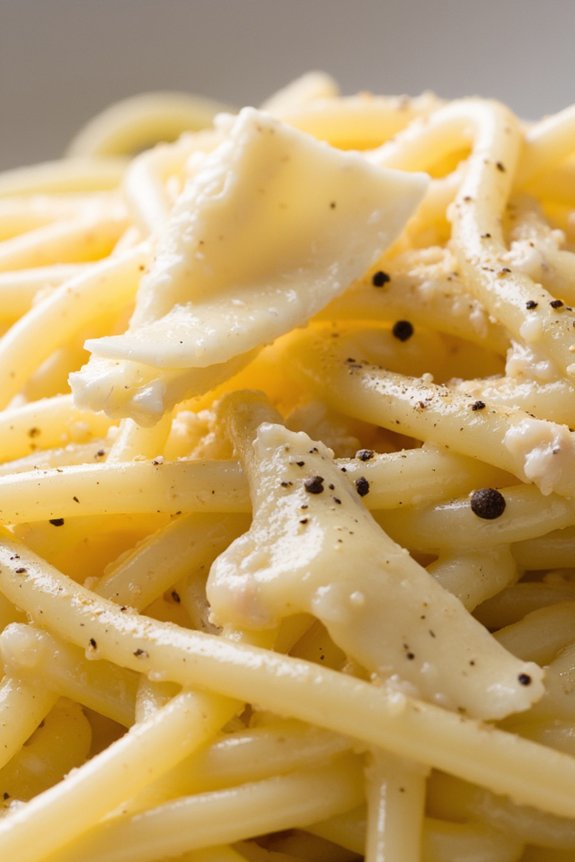
Spaghetti Alla Carbonara is a traditional Italian pasta dish that’s both simple and delicious. Known for its creamy texture and rich flavor, the dish is a favorite among pasta lovers.
Originating from Rome, Carbonara combines the bold flavors of eggs, cheese, pancetta, and pepper to create a delightful meal that’s both comforting and satisfying. The key to mastering this dish is to blend the ingredients in a way that creates a silky, smooth sauce that clings to every strand of spaghetti.
Though the recipe is straightforward, the timing and technique are essential in achieving the perfect Carbonara. It’s important to use the freshest eggs and high-quality Pecorino Romano cheese to elevate the dish’s flavor.
Pancetta or guanciale is traditionally used, but bacon can be a substitute if necessary. The pasta should be cooked al dente and the sauce prepared quickly so that it doesn’t scramble or become too thick. This dish is best served immediately to enjoy its full texture and taste.
Ingredients (Serves 4-6)
- 500g (1 lb) spaghetti
- 150g (5 oz) pancetta or guanciale, diced
- 4 large eggs
- 100g (3.5 oz) Pecorino Romano cheese, finely grated
- Salt, to taste
- Freshly ground black pepper, to taste
Cooking Instructions
- Prepare the Sauce: In a mixing bowl, whisk together the eggs and grated Pecorino Romano cheese until smooth. Add a generous amount of freshly ground black pepper to the mixture and set aside.
- Cook the Pancetta: In a large pan over medium heat, add the diced pancetta or guanciale. Cook until the fat renders and the meat becomes crispy, about 5-7 minutes. Remove from heat and set aside, keeping the fat in the pan.
- Boil the Pasta: In a large pot, bring salted water to a boil and add the spaghetti. Cook the pasta until al dente according to package instructions, usually about 8-10 minutes. Reserve about 1 cup of pasta water, then drain the spaghetti.
- Combine Ingredients: Return the pan with pancetta to low heat. Add the cooked spaghetti to the pan and toss with the rendered fat for about 1 minute. Remove the pan from heat and slowly add the egg and cheese mixture, stirring quickly to prevent the eggs from scrambling. If the sauce is too thick, add reserved pasta water, a little at a time, until the desired consistency is reached.
- Serve: Divide the spaghetti among serving plates and top with additional grated Pecorino Romano and freshly ground black pepper. Serve immediately.
Extra Tips
To prevent the eggs from scrambling, make sure that the pan is off the heat before adding the egg mixture. Stir the pasta vigorously during this step to create a creamy sauce.
If possible, use freshly ground black pepper and Pecorino Romano cheese for a more authentic taste. Adjust the amount of pasta water based on how creamy or thick you prefer the sauce. Always serve Carbonara right away, as it’s best enjoyed fresh.
Osso Buco Alla Milanese
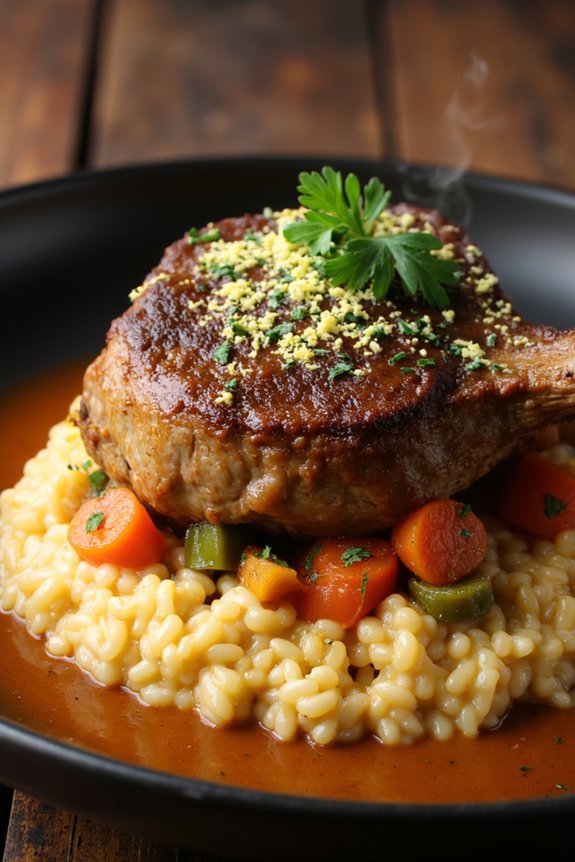
Osso Buco Alla Milanese is a classic Italian dish that originates from the Lombardy region, specifically Milan. This traditional dish features cross-cut veal shanks braised with vegetables, white wine, and broth. The name “osso buco” translates to “bone with a hole,” a nod to the marrow-filled center of the veal shank, which is a delicacy in itself.
Traditionally, Osso Buco is served with a rich, creamy risotto, making it a hearty and comforting meal perfect for family gatherings or special occasions.
The key to a successful Osso Buco Alla Milanese lies in the slow cooking process, allowing the meat to become tender and absorb the flavors of the aromatic vegetables and wine. The dish is usually finished with a gremolata, a zesty mixture of lemon zest, garlic, and parsley, which adds a fresh and vibrant contrast to the rich flavors of the braised veal.
This recipe serves 4-6 people, making it an ideal choice for a small dinner party or a cozy family dinner.
Ingredients for 4-6 people:
- 4 veal shanks (about 1 1/2 to 2 inches thick)
- Salt and freshly ground black pepper
- 1/4 cup all-purpose flour
- 1/4 cup olive oil
- 2 tablespoons unsalted butter
- 1 onion, finely chopped
- 2 carrots, diced
- 2 stalks celery, diced
- 3 cloves garlic, minced
- 1 cup dry white wine
- 1 1/2 cups beef or veal broth
- 1 can (14 ounces) diced tomatoes, drained
- 1 sprig fresh thyme
- 1 bay leaf
- Zest of 1 lemon
- 1/4 cup fresh parsley, chopped
Cooking Instructions:
- Prepare the Veal Shanks: Season the veal shanks with salt and pepper, and then dredge them lightly in flour, shaking off any excess.
- Brown the Meat: In a large, heavy-bottomed pot or Dutch oven, heat the olive oil and butter over medium-high heat. Add the veal shanks and brown them on all sides, approximately 3-4 minutes per side. Remove the shanks and set them aside.
- Sauté the Vegetables: In the same pot, add the onions, carrots, and celery. Sauté until the vegetables are softened and the onions are translucent, about 5-7 minutes. Add the minced garlic and cook for another minute.
- Deglaze the Pot: Pour in the white wine and bring it to a boil, scraping up any browned bits from the bottom of the pot. Let the wine reduce by half.
- Braise the Shanks: Return the veal shanks to the pot. Add the beef broth, diced tomatoes, thyme, and bay leaf. The liquid should cover the shanks about halfway. Bring to a gentle simmer.
- Cook Slowly: Cover the pot and reduce the heat to low. Let the osso buco cook for about 1 1/2 to 2 hours, or until the meat is tender and falling off the bone. Turn the shanks occasionally and check that the liquid level is maintained.
- Prepare the Gremolata: In a small bowl, mix together the lemon zest, chopped parsley, and a pinch of minced garlic. Set aside.
- Serve: Once the osso buco is done, remove the thyme sprig and bay leaf. Serve the veal shanks over a bed of risotto or polenta, topped with a spoonful of the vegetable sauce from the pot. Sprinkle the gremolata over each serving for a burst of flavor.
Extra Tips:
When cooking Osso Buco Alla Milanese, be sure to choose veal shanks with a good amount of marrow for the best flavor.
If you prefer a thicker sauce, you can remove the shanks once cooked and let the sauce simmer uncovered to reduce further.
Also, don’t rush the browning of the meat or the cooking time; these steps are essential for developing the deep, rich flavors characteristic of this dish.
For an added layer of flavor, you might even want to try adding a little bit of saffron to the risotto, enhancing the classic Milanese touch.
Risotto Ai Funghi Porcini
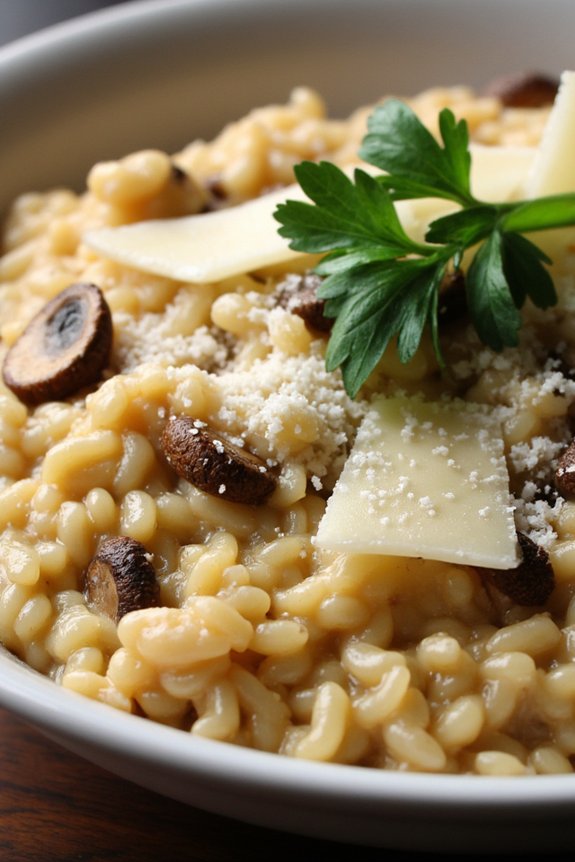
Risotto Ai Funghi Porcini, or Porcini Mushroom Risotto, is a classic Italian dish that brings together the earthy flavors of porcini mushrooms and the creamy texture of arborio rice. This dish is perfect for mushroom lovers and is often enjoyed as a comforting and luxurious main course. The combination of the rich aroma of porcini mushrooms and the delicate creaminess of the risotto makes it a must-try for anyone wanting to experience authentic Italian cuisine.
Whether you’re preparing a dinner party or a cozy meal for family and friends, this Risotto Ai Funghi Porcini will surely impress your guests.
The key to mastering Risotto Ai Funghi Porcini lies in the careful preparation and patience required to achieve the perfect texture. Unlike other rice dishes, risotto is stirred consistently to release the starches from the rice, creating a creamy consistency without the need for cream.
Porcini mushrooms, with their deep, woodsy flavor, are the star of this dish, and when combined with savory broth, aromatic herbs, and a touch of parmesan, they create a symphony of flavors that’s both rich and satisfying. Follow the steps below to create this delightful Italian dish for 4-6 people.
Ingredients:
- 2 cups arborio rice
- 1 ounce dried porcini mushrooms
- 6 cups chicken or vegetable broth
- 1 cup dry white wine
- 2 tablespoons olive oil
- 1 medium onion, finely chopped
- 3 cloves garlic, minced
- 1 cup fresh mushrooms, sliced (optional)
- 1/2 cup grated parmesan cheese
- 2 tablespoons unsalted butter
- Salt and pepper to taste
- Fresh parsley, chopped (for garnish)
Cooking Instructions:
- Prepare the Porcini Mushrooms: Start by soaking the dried porcini mushrooms in a bowl with 2 cups of hot water for about 20 minutes, until they’re soft. Once rehydrated, remove the mushrooms from the liquid, squeeze excess water, and chop them finely. Reserve the soaking liquid by straining it through a fine sieve to remove any grit, and set aside.
- Heat the Broth: In a medium saucepan, bring the chicken or vegetable broth to a gentle simmer. Keep it warm over low heat as you prepare the risotto.
- Sauté the Aromatics: In a large pan or skillet, heat the olive oil over medium heat. Add the chopped onion and cook until translucent, about 5 minutes. Add the minced garlic and sauté for another minute until fragrant.
- Cook the Rice: Add the arborio rice to the pan and stir to coat the grains with oil. Cook for 2-3 minutes until the edges of the rice become translucent, stirring frequently.
- Add Wine and Porcini: Pour in the dry white wine and let it simmer until the liquid is mostly absorbed. Stir in the chopped porcini mushrooms and optional fresh mushrooms, if using.
- Incorporate Broth Gradually: Begin adding the warm broth one ladleful at a time, stirring consistently and allowing each addition to be absorbed before adding the next. This process should take about 18-20 minutes. Use the reserved porcini soaking liquid as part of the broth. The risotto should be creamy and slightly firm to the bite when done.
- Finish the Risotto: Once the rice is cooked to your desired consistency, remove the pan from heat. Stir in the unsalted butter and grated parmesan cheese until melted and well combined. Season with salt and pepper to taste.
- Serve: Spoon the risotto into bowls and garnish with fresh parsley before serving.
Extra Tips:
For the best results, use high-quality arborio rice as it has the perfect starchy texture for creamy risotto. Always keep the broth warm while cooking to maintain the cooking temperature.
Be patient and stir regularly to achieve the creamy texture, but avoid over-stirring, which can break the rice grains. If you prefer a richer flavor, you can add a splash of cream at the end, but it’s not necessary.
Finally, adjusting the seasoning at the end will guarantee that the flavors are balanced perfectly. Enjoy your Risotto Ai Funghi Porcini with a glass of your favorite white wine for a complete Italian dining experience.
Eggplant Parmigiana
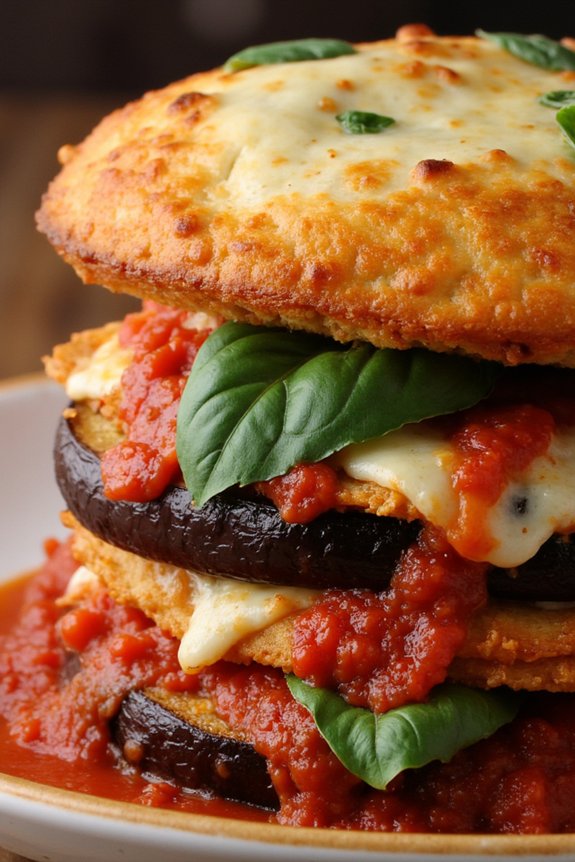
Eggplant Parmigiana is a classic Italian dish that combines layers of fried eggplant, rich tomato sauce, and melted cheese to create a comforting and delicious meal. Originating from the southern regions of Italy, this dish is a staple in many Italian households and is loved for its hearty flavors and satisfying texture.
Whether you’re cooking for a family dinner or entertaining guests, Eggplant Parmigiana is certain to impress with its authentic taste and elegant presentation.
The key to a perfect Eggplant Parmigiana lies in the preparation of the eggplant itself. By slicing, salting, and frying the eggplant before layering it with sauce and cheese, you guarantee that each bite is packed with flavor.
The combination of fresh basil, garlic, and tangy tomato sauce creates a delectable base, while a generous topping of mozzarella and Parmesan cheese adds a creamy, savory finish. Here’s how to make this delightful dish for 4-6 people.
Ingredients:
- 3 large eggplants
- Salt
- 2 cups all-purpose flour
- 4 large eggs
- 2 cups breadcrumbs
- 1 cup olive oil
- 2 cups marinara sauce
- 2 cups shredded mozzarella cheese
- 1 cup grated Parmesan cheese
- Fresh basil leaves
- Ground black pepper
Cooking Instructions:
1. Prepare the Eggplant: Begin by slicing the eggplants into 1/4-inch thick rounds. Sprinkle each slice with salt and let them sit for about 30 minutes to draw out excess moisture and bitterness. Rinse the slices under cold water and pat them dry with paper towels.
2. Coat the Eggplant: Set up a breading station with three shallow bowls: one with flour, one with beaten eggs, and one with breadcrumbs. Dredge each eggplant slice in flour, dip it in the egg, and coat it with breadcrumbs.
3. Fry the Eggplant: In a large skillet, heat the olive oil over medium-high heat. Fry the breaded eggplant slices in batches until golden brown on both sides, about 3-4 minutes per side. Transfer the fried slices to a paper towel-lined plate to drain excess oil.
4. Assemble the Parmigiana: Preheat your oven to 375°F (190°C). In a 9×13-inch baking dish, spread a thin layer of marinara sauce. Arrange a layer of fried eggplant slices over the sauce. Add a layer of mozzarella cheese, some Parmesan cheese, and a few fresh basil leaves.
Repeat the layers until all the ingredients are used, finishing with a generous topping of sauce and cheeses.
5. Bake the Dish: Cover the baking dish with foil and bake in the preheated oven for 25 minutes. Remove the foil and bake for an additional 15 minutes, or until the cheese is bubbly and golden brown.
6. Rest and Serve: Allow the Eggplant Parmigiana to cool for about 10 minutes before serving. Garnish with extra basil leaves and freshly ground black pepper.
Extra Tips:
For a healthier version of Eggplant Parmigiana, you can bake the eggplant slices instead of frying them. Simply brush the slices with olive oil and bake at 400°F (200°C) for about 20 minutes until golden and tender.
Additionally, to add a little extra flavor, consider using a combination of mozzarella and provolone cheese. This dish can also be prepared in advance, as the flavors tend to meld and improve after sitting overnight in the refrigerator.
Enjoy your culinary journey through Italy with this delightful Eggplant Parmigiana!
Cacio E Pepe
Cacio e Pepe is a classic Roman pasta dish that translates to “cheese and pepper.” It’s a simple yet delicious meal that relies on the quality of its ingredients to shine. Traditionally made with just three ingredients—pasta, Pecorino Romano cheese, and black pepper—this dish is a demonstration of the beauty of simplicity in Italian cooking.
The key to mastering Cacio e Pepe lies in the technique, making certain that the cheese melts perfectly to create a creamy sauce that coats every strand of pasta. This dish is perfect for those who appreciate the bold flavors of Italian cuisine. The sharpness of the Pecorino Romano pairs beautifully with the heat of freshly cracked black pepper, creating a harmonious balance of flavors.
While it may seem straightforward, the challenge of Cacio e Pepe is achieving the perfect creamy consistency without the cheese clumping. With a few simple tricks and attention to detail, you can recreate this iconic Italian dish in your own kitchen.
Ingredients for 4-6 servings:
- 400 grams of spaghetti or tonnarelli
- 200 grams of Pecorino Romano cheese, finely grated
- 2 teaspoons of freshly cracked black pepper
- Salt, for pasta water
Cooking Instructions:
- Prepare the Pasta Water: Fill a large pot with water, add a generous amount of salt, and bring it to a boil. The water should be as salty as the sea to properly season the pasta.
- Cook the Pasta: Add the spaghetti or tonnarelli to the boiling water and cook until al dente, according to package instructions. Reserve about 1.5 cups of pasta water before draining the pasta.
- Toast the Pepper: While the pasta is cooking, heat a large pan over medium heat and add the freshly cracked black pepper. Toast it gently for about 1-2 minutes until fragrant, being careful not to burn it.
- Create the Sauce Base: Gradually pour about 1 cup of the reserved hot pasta water into the pan with the toasted pepper. The hot water will help release the pepper’s oils and create a base for the sauce.
- Combine Pasta and Sauce: Add the drained pasta to the pan and toss it well in the pepper-infused water. The pasta will absorb some of the water, which is essential for creating the sauce.
- Emulsify with Cheese: Lower the heat and gradually add the grated Pecorino Romano to the pasta, tossing continuously. The cheese should melt smoothly, forming a creamy sauce. If the sauce is too thick, add more reserved pasta water, a little at a time, until the desired consistency is achieved.
- Serve Immediately: Serve the Cacio e Pepe immediately on warmed plates to make certain the sauce stays creamy and coats the pasta beautifully.
Extra Tips:
To make certain a smooth sauce, use finely grated Pecorino Romano cheese and add it off the heat to avoid clumping. Toss the pasta continuously when adding the cheese to help it emulsify with the pasta water. If the sauce becomes too thick, adjust by adding more pasta water gradually.
Lasagna Bolognese
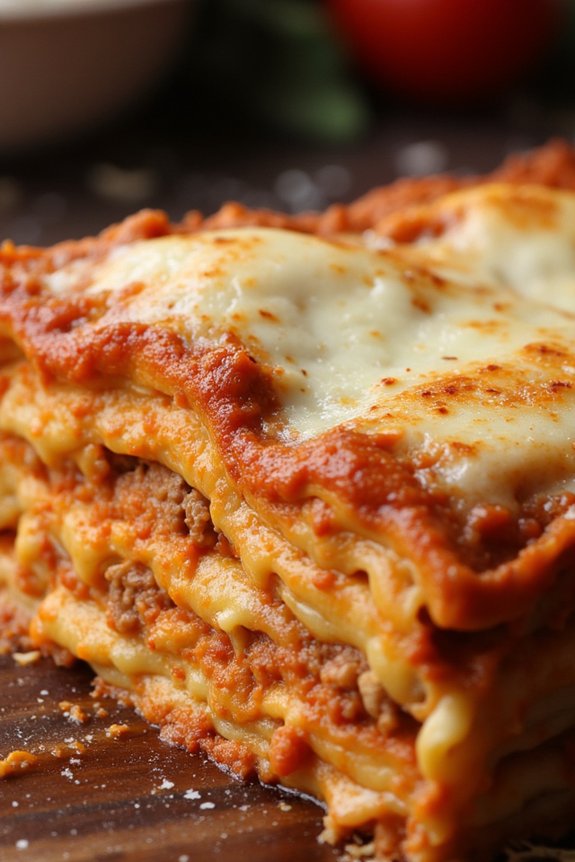
Lasagna Bolognese is a classic Italian dish that embodies the richness of Italian cooking. It’s a layered masterpiece of pasta sheets, hearty Bolognese sauce, creamy béchamel sauce, and melted cheese, all baked to perfection. This dish is perfect for family gatherings or any occasion where you want to impress your guests with an authentic Italian meal.
The depth of flavors in Lasagna Bolognese comes from slowly simmered meat sauce, combined with the delicate creaminess of béchamel, creating a comforting and satisfying meal.
Preparing Lasagna Bolognese requires some time and patience, but the end result is truly worth it. This recipe will serve 4-6 people, making it ideal for a cozy dinner or a small dinner party. With a blend of fresh ingredients and traditional techniques, you’ll be able to recreate this Italian classic right in your own kitchen.
Follow the steps carefully to guarantee a delicious and authentic Lasagna Bolognese that your family and friends will love.
Ingredients (Serves 4-6):
- 12 lasagna sheets
- 1 pound ground beef
- 1 pound ground pork
- 1 onion, finely chopped
- 2 carrots, finely chopped
- 2 celery stalks, finely chopped
- 3 cloves garlic, minced
- 1 cup red wine
- 1 can (28 ounces) crushed tomatoes
- 2 tablespoons tomato paste
- 2 bay leaves
- 1 teaspoon dried oregano
- Salt and pepper to taste
- 4 tablespoons butter
- 1/4 cup all-purpose flour
- 3 cups milk
- 1/4 teaspoon nutmeg
- 1 1/2 cups grated Parmesan cheese
- 2 cups shredded mozzarella cheese
- Olive oil
Instructions:
- Prepare the Bolognese Sauce: In a large pan, heat a little olive oil over medium heat. Add the onion, carrots, and celery, and sauté for about 5-7 minutes until softened. Add the garlic and cook for an additional minute. Increase the heat to medium-high and add the ground beef and pork. Cook until browned, breaking it up with a spoon as it cooks.
- Simmer the Sauce: Pour in the red wine and allow it to simmer for about 5 minutes, reducing slightly. Add the crushed tomatoes, tomato paste, bay leaves, oregano, salt, and pepper. Stir well and bring to a simmer. Lower the heat and let it cook for about 1.5 to 2 hours, stirring occasionally, until the sauce is thick and flavorful.
- Make the Béchamel Sauce: In a separate saucepan, melt the butter over medium heat. Stir in the flour and cook for about 1-2 minutes to form a roux. Gradually whisk in the milk, guaranteeing there are no lumps. Cook for about 10 minutes, stirring constantly, until the sauce thickens. Add the nutmeg and season with salt and pepper to taste.
- Cook the Pasta: Bring a large pot of salted water to a boil. Cook the lasagna sheets according to the package instructions until al dente. Drain and set aside.
- Assemble the Lasagna: Preheat your oven to 375°F (190°C). In a baking dish, spread a thin layer of Bolognese sauce. Place a layer of lasagna sheets over the sauce. Add another layer of Bolognese, followed by béchamel, and a sprinkle of Parmesan cheese. Repeat the layers, finishing with a final layer of béchamel and topping with mozzarella and remaining Parmesan cheese.
- Bake the Lasagna: Cover the dish with foil and bake in the preheated oven for 25 minutes. Remove the foil and bake for an additional 15 minutes, or until the top is golden and bubbling. Let it rest for about 10 minutes before serving.
Extra Tips:
For the best results, make the Bolognese sauce a day ahead to allow the flavors to develop further. Confirm the béchamel is smooth and lump-free by whisking continuously while adding the milk slowly.
If you want to save time, no-boil lasagna sheets can be used, but make sure there’s enough sauce to cook them properly in the oven. Finally, let the lasagna rest for a few minutes after baking to make slicing and serving easier.
Enjoy your homemade Lasagna Bolognese with a side of fresh salad or garlic bread for a complete Italian dinner experience.
Pollo Alla Cacciatora
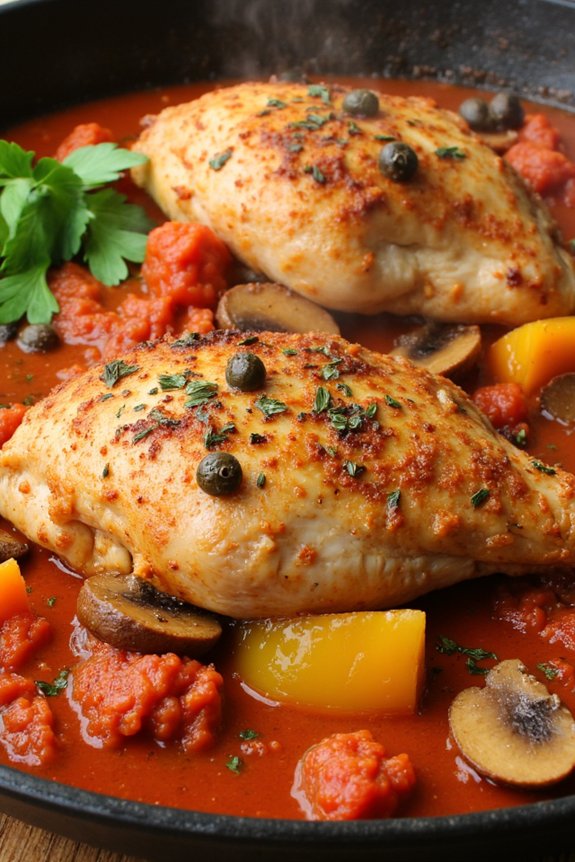
Pollo Alla Cacciatora, also known as Hunter’s Chicken, is a classic Italian dish that combines tender chicken with a rich and flavorful sauce made from tomatoes, aromatic vegetables, and herbs.
This rustic dish is perfect for a cozy family dinner or a special gathering, and it brings the comforting taste of Italy to your table. The combination of garlic, onions, and bell peppers, along with the subtle notes of rosemary and thyme, creates a hearty and savory sauce that envelops the juicy chicken pieces.
The dish is traditionally served with crusty bread or over a bed of pasta or polenta, allowing you to soak up every bit of the delectable sauce. The slow cooking process guarantees that the chicken is perfectly tender, and the flavors meld together beautifully.
Whether you’re a seasoned cook or a beginner, Pollo Alla Cacciatora is a straightforward recipe that delivers impressive results.
Ingredients (Serves 4-6):
- 4-6 bone-in, skin-on chicken thighs or drumsticks
- Salt and freshly ground black pepper
- 2 tablespoons olive oil
- 1 large onion, thinly sliced
- 2 cloves garlic, minced
- 1 red bell pepper, sliced
- 1 yellow bell pepper, sliced
- 1 cup mushrooms, sliced
- 1/2 cup dry white wine
- 1 can (28 ounces) crushed tomatoes
- 1/4 cup chicken broth
- 1 teaspoon dried oregano
- 1 teaspoon dried thyme
- 1 sprig fresh rosemary
- 2 tablespoons capers, drained
- 1/4 cup chopped fresh parsley
Instructions:
- Prepare the Chicken: Pat the chicken pieces dry with paper towels. Season them generously with salt and pepper on both sides.
- Brown the Chicken: In a large skillet or Dutch oven, heat the olive oil over medium-high heat. Add the chicken pieces, skin-side down, and cook until golden brown on both sides, about 5 minutes per side. Remove the chicken from the pan and set aside.
- Sauté the Vegetables: In the same pan, add the sliced onions and cook until they’re soft and translucent, about 4 minutes. Add the minced garlic, sliced bell peppers, and mushrooms, and sauté for another 5 minutes until the vegetables are tender.
- Deglaze the Pan: Pour in the white wine and scrape up any browned bits from the bottom of the pan with a wooden spoon. Allow the wine to reduce by half, which should take about 2-3 minutes.
- Add the Tomatoes and Herbs: Stir in the crushed tomatoes, chicken broth, oregano, thyme, rosemary, and capers. Bring the mixture to a simmer.
- Simmer the Dish: Return the chicken pieces to the pan, nestling them into the sauce. Cover and let it simmer on low heat for 30-40 minutes, until the chicken is cooked through and tender. Stir occasionally and adjust seasoning with salt and pepper to taste.
- Finish and Serve: Once the chicken is cooked, remove the rosemary sprig. Sprinkle the dish with fresh parsley before serving. Serve hot with your choice of pasta, polenta, or crusty bread.
Extra Tips:
For the best flavor, use bone-in, skin-on chicken pieces, as they contribute richness to the sauce.
If you prefer a smoother sauce, you can remove the chicken after cooking and use an immersion blender to blend the sauce to your desired consistency.
Be sure to taste and adjust the seasoning throughout the cooking process to suit your preference. If you want to add a bit of spice, consider including a pinch of red pepper flakes.
Ultimately, this dish can be prepared in advance and tastes even better the next day, making it a great option for meal prep or entertaining.
Fettuccine Alfredo
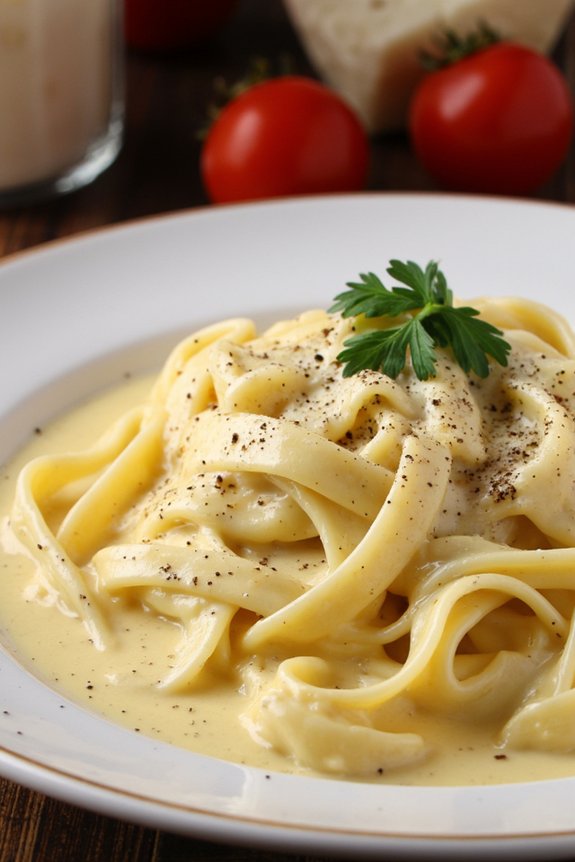
Fettuccine Alfredo is a classic Italian pasta dish that’s known for its creamy, rich, and indulgent flavor. Originating in Rome, this dish has become a favorite around the world due to its simplicity and deliciousness. The key ingredients are fettuccine pasta, butter, and Parmesan cheese, which come together to create a velvety sauce that coats the pasta beautifully.
Traditionally, Fettuccine Alfredo doesn’t include cream, but many modern versions do add it for extra richness.
Preparing Fettuccine Alfredo is quick and straightforward, making it an excellent choice for a weeknight dinner or a special occasion. The dish is best enjoyed fresh, as the creamy sauce can thicken upon reheating. Serve it alongside a crisp green salad and a glass of white wine for a complete Italian dining experience. This recipe serves 4-6 people, making it perfect for a family meal or a small dinner party.
Ingredients (Serves 4-6):
- 1 pound fettuccine pasta
- 1 cup unsalted butter
- 1 1/2 cups grated Parmesan cheese
- 1 cup heavy cream (optional)
- Salt, to taste
- Freshly ground black pepper, to taste
- Chopped fresh parsley, for garnish
Cooking Instructions:
- Cook the Pasta: Fill a large pot with water, add a generous pinch of salt, and bring to a boil. Add the fettuccine pasta and cook according to package instructions until al dente. Reserve 1 cup of pasta water, then drain the pasta.
- Prepare the Sauce: In a large skillet or saucepan over medium heat, melt the butter. If using, pour in the heavy cream and stir until well combined and heated through.
- Combine with Cheese: Gradually add the grated Parmesan cheese to the butter (and cream, if used), stirring continuously until the cheese has melted and the sauce is smooth.
- Assemble the Dish: Add the cooked fettuccine to the sauce, tossing to coat the pasta evenly. If the sauce is too thick, add a little reserved pasta water, a tablespoon at a time, until you reach the desired consistency.
- Season: Season the pasta with salt and freshly ground black pepper to taste. Toss everything together to guarantee the flavors are well distributed.
- Serve: Transfer the Fettuccine Alfredo to a serving platter or individual plates. Garnish with chopped fresh parsley and additional Parmesan cheese, if desired.
Extra Tips:
For the best results, use freshly grated Parmesan cheese rather than pre-grated varieties, as it melts more smoothly into the sauce. If you want to add a protein element, grilled chicken or shrimp are excellent accompaniments to Fettuccine Alfredo.
To prevent the pasta from sticking together after draining, toss it with a small amount of olive oil if you don’t plan to mix it with the sauce immediately. Finally, remember that the sauce will thicken as it cools, so serve the dish promptly for the creamiest texture.
Panzanella Salad
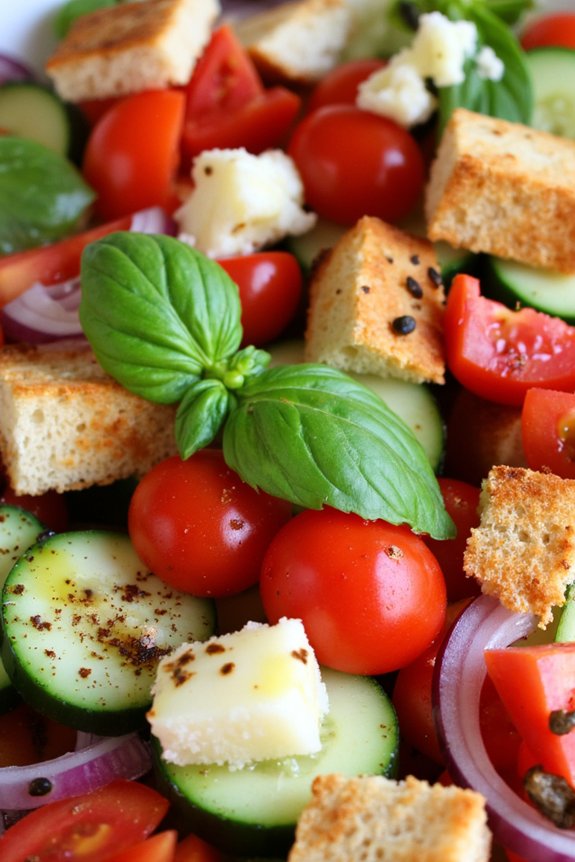
Panzanella, a classic Italian salad, is a delightful way to enjoy fresh produce and day-old bread in a rejuvenating and flavorful dish. Originating from Tuscany, this salad primarily features ripe tomatoes, crisp cucumbers, and fragrant basil, combined with stale bread that soaks up a tangy vinaigrette.
This simple yet satisfying salad is perfect for summer gatherings or as a staple dish in a light Italian dinner. The contrasting textures and vibrant flavors make Panzanella a dish that’s both delicious and visually appealing.
To prepare Panzanella salad, it’s important to use quality ingredients. Opt for ripe, juicy tomatoes and fresh basil to bring out the authentic flavors of the traditional Italian salad. The bread, preferably a day or two old, should be hearty enough to absorb the dressing without becoming too soggy.
With a drizzle of olive oil and a splash of vinegar, this salad is both a treat for the taste buds and a celebration of Italian culinary simplicity.
Ingredients (Serves 4-6):
- 4 cups of day-old Italian bread, cubed
- 1/2 cup extra virgin olive oil
- 2 tablespoons red wine vinegar
- 1 clove garlic, minced
- Salt and freshly ground black pepper to taste
- 4 large ripe tomatoes, chopped
- 1 cucumber, sliced
- 1 red onion, thinly sliced
- 1/2 cup fresh basil leaves
- Optional: 1/4 cup capers or pitted olives
Cooking Instructions:
- Prepare the Bread: Begin by cutting the day-old Italian bread into cubes. If the bread is fresh, you can lightly toast the cubes in an oven at 350°F (175°C) for about 10 minutes until they’re dry but not browned.
- Make the Dressing: In a small bowl, whisk together the olive oil, red wine vinegar, minced garlic, salt, and freshly ground black pepper. Adjust the seasoning according to your taste.
- Prepare the Vegetables: Chop the tomatoes into bite-sized pieces, slice the cucumber, and thinly slice the red onion. Combine these vegetables in a large salad bowl.
- Combine Ingredients: Add the bread cubes to the salad bowl with the vegetables. Pour the dressing over the top and toss everything together gently to guarantee that the bread absorbs the dressing.
- Add Fresh Herbs: Tear the fresh basil leaves into smaller pieces and add them to the salad. If desired, add capers or olives for an extra burst of flavor.
- Let it Rest: Allow the salad to sit for at least 30 minutes before serving. This resting period lets the flavors meld together and the bread soak up the dressing.
Extra Tips:
When preparing Panzanella, the quality of the olive oil and vinegar can greatly impact the taste of the dish, so choose the best you can find.
For a more robust flavor, consider adding a splash of balsamic vinegar in addition to red wine vinegar. If you prefer a bit of a kick, a pinch of crushed red pepper flakes can also be added to the dressing.
Gnocchi Al Pesto
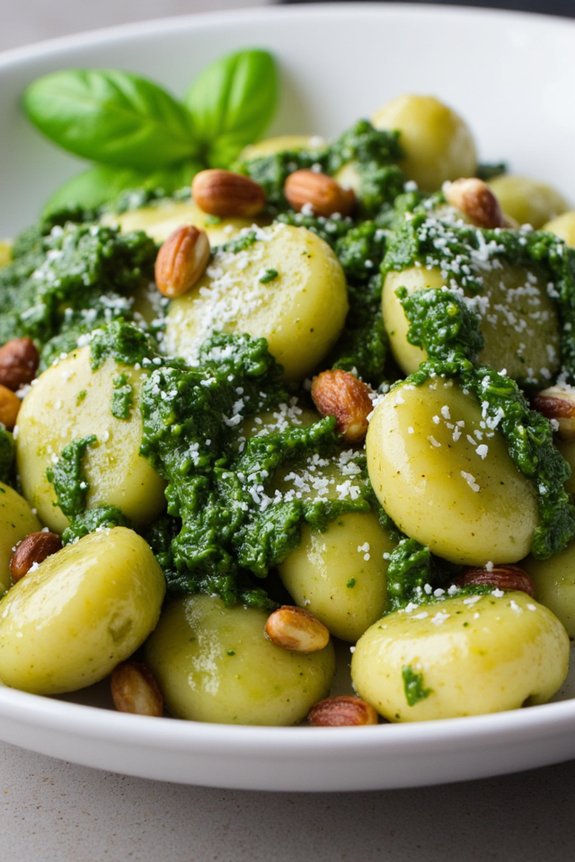
Gnocchi Al Pesto is a delightful Italian dish that combines the soft, pillowy texture of potato gnocchi with the fresh and vibrant flavors of basil pesto. This dish is perfect for a weeknight dinner or a special occasion, offering a taste of Italy in every bite.
The pesto, made from fresh basil leaves, garlic, pine nuts, Parmesan cheese, and olive oil, coats the gnocchi beautifully, creating a rich and aromatic meal that’s sure to impress your family and friends.
The beauty of Gnocchi Al Pesto lies in its simplicity and the quality of its ingredients. The homemade pesto sauce can be made in advance, allowing you to quickly assemble the dish when needed.
Whether you’re an experienced cook or a beginner in the kitchen, this recipe is straightforward and rewarding. The combination of flavors and textures in Gnocchi Al Pesto is sure to become a favorite in your household.
Ingredients (for 4-6 people):
- 1 kg potato gnocchi
- 2 cups fresh basil leaves
- 2 cloves garlic
- 1/2 cup pine nuts
- 1/2 cup grated Parmesan cheese
- 1/2 cup extra virgin olive oil
- Salt to taste
- Freshly ground black pepper to taste
Cooking Instructions:
- Prepare the Pesto: In a food processor, combine the basil leaves, garlic, and pine nuts. Pulse until the mixture is finely chopped. Add the Parmesan cheese and pulse again to combine.
- Add the Olive Oil: With the food processor running, slowly drizzle in the olive oil until the mixture is smooth and emulsified. Season with salt and freshly ground black pepper to taste. Set the pesto aside.
- Cook the Gnocchi: Bring a large pot of salted water to a boil. Add the gnocchi and cook according to the package instructions, usually until they float to the surface (about 2-3 minutes).
- Combine Gnocchi and Pesto: Drain the gnocchi and return them to the pot or a large mixing bowl. Add the prepared pesto to the gnocchi and gently toss until the gnocchi are well coated with the pesto.
- Serve: Transfer the Gnocchi Al Pesto to serving plates. Garnish with additional Parmesan cheese and a sprinkle of pine nuts, if desired. Serve immediately while hot.
Extra Tips:
For the best results, use fresh basil leaves and high-quality olive oil as they greatly impact the flavor of the pesto.
If you prefer a creamier pesto, you can add a tablespoon of heavy cream or a dollop of ricotta cheese to the sauce.
Additionally, when cooking the gnocchi, be careful not to overcook them as they can become mushy; they’re done when they float to the surface of the boiling water.
For added texture, lightly toast the pine nuts before adding them to the pesto. Enjoy your Gnocchi Al Pesto with a side of crusty bread or a simple green salad for a complete Italian meal.
Veal Saltimbocca

Veal Saltimbocca is a classic Italian dish that combines tender veal cutlets with savory prosciutto and fragrant sage, all enveloped in a rich, buttery sauce. Renowned for its simplicity and exquisite taste, this dish translates to “jumps in the mouth,” a nod to its delightful flavors.
Originating from Rome, Veal Saltimbocca has become a beloved staple in Italian cuisine, celebrated for its quick preparation and the harmonious blend of ingredients that create a truly memorable dining experience. This dish is perfect for gatherings and special occasions, offering a touch of elegance and sophistication to your dinner table.
The key to achieving the perfect Veal Saltimbocca lies in carefully selecting high-quality ingredients and executing each step with precision. When cooked to perfection, the tender veal, crispy prosciutto, and aromatic sage create a symphony of flavors that are sure to impress your guests.
Ingredients for 4-6 servings:
- 8 veal cutlets, pounded thin
- 8 slices of prosciutto
- 16 fresh sage leaves
- 2 tablespoons of olive oil
- 1/4 cup of dry white wine
- 1/2 cup of chicken broth
- 2 tablespoons of unsalted butter
- Salt and black pepper to taste
- Toothpicks
Cooking Instructions:
- Prepare the Veal: Lay out the veal cutlets on a clean surface. Season them lightly with salt and black pepper. Place a slice of prosciutto and two sage leaves on each cutlet. Secure everything with a toothpick, creating neat little bundles.
- Sear the Veal: Heat the olive oil in a large skillet over medium-high heat. Once the oil is hot, add the veal cutlets, prosciutto side down. Sear for about 2-3 minutes, or until the prosciutto is crispy. Flip the cutlets and cook for another 2 minutes on the other side. Remove the veal from the skillet and set aside.
- Make the Sauce: In the same skillet, pour in the white wine, scraping up any browned bits from the bottom of the pan. Allow the wine to reduce by half, then add the chicken broth. Let the mixture simmer for 3-4 minutes until it thickens slightly.
- Finish the Dish: Lower the heat and return the veal cutlets to the skillet. Spoon the sauce over the cutlets and add the butter. Continue to cook for another 2-3 minutes, basting the veal with the sauce until it’s heated through and the butter has melted into the sauce.
- Serve: Remove the toothpicks before plating. Serve the Veal Saltimbocca hot, drizzled with the sauce from the skillet. For an added touch, garnish with additional fresh sage leaves if desired.
For extra tips, remember that quality ingredients make all the difference in this simple dish, so opt for fresh and organic produce whenever possible.
If you can’t find veal, thinly sliced chicken breasts can be a good substitute. Additionally, using a dry white wine, such as a Pinot Grigio or Sauvignon Blanc, will enhance the flavors without overpowering the dish. Always verify that the skillet is hot before adding the veal to achieve a perfect sear that locks in moisture and flavor.
Caprese Stuffed Chicken

Caprese Stuffed Chicken is a delicious and satisfying Italian-inspired dish that combines the classic flavors of a Caprese salad with succulent chicken breasts. This recipe is perfect for a family dinner or when you want to impress guests with a sophisticated yet straightforward meal. The combination of fresh mozzarella, juicy tomatoes, and aromatic basil stuffed into tender chicken breasts creates a burst of flavors with every bite.
To conclude, a drizzle of balsamic reduction adds a sweet and tangy note, making this dish a delightful centerpiece for any Italian dinner.
The preparation of Caprese Stuffed Chicken is relatively simple and requires minimal ingredients, yet it yields a flavorful and visually appealing dish. By carefully stuffing each chicken breast with the right balance of ingredients, you guarantee that the flavors meld together perfectly during the cooking process. This recipe serves 4-6 people, making it ideal for a small gathering or a cozy family meal.
Pair it with a side of roasted vegetables or a light salad for a complete and satisfying dinner.
Ingredients:
- 4-6 boneless, skinless chicken breasts
- 8 ounces fresh mozzarella cheese, sliced
- 2 large tomatoes, sliced
- 1 cup fresh basil leaves
- 2 tablespoons olive oil
- Salt and pepper, to taste
- 1 teaspoon garlic powder
- 1 teaspoon Italian seasoning
- Balsamic reduction for drizzling
Cooking Instructions:
- Preheat the Oven: Preheat your oven to 375°F (190°C) to guarantee it’s hot and ready for baking the chicken.
- Prepare the Chicken: Carefully slice each chicken breast horizontally to create a pocket, being mindful not to cut all the way through. This pocket will hold the Caprese filling.
- Season the Chicken: Season both sides of the chicken breasts with salt, pepper, garlic powder, and Italian seasoning. This will enhance the flavor of the chicken.
- Stuff the Chicken: Place slices of mozzarella cheese, tomato, and a few basil leaves inside each pocket. Confirm the filling is evenly distributed to achieve a balanced flavor.
- Secure the Chicken: Use toothpicks to secure the edges of the chicken breasts, preventing the filling from spilling out during cooking.
- Sear the Chicken: Heat olive oil in a large oven-safe skillet over medium-high heat. Add the stuffed chicken breasts and sear for 3-4 minutes per side until golden brown. This step locks in the juices and adds color to the dish.
- Bake the Chicken: Transfer the skillet to the preheated oven and bake for 20-25 minutes or until the chicken is cooked through and the mozzarella is melted. The internal temperature should reach 165°F (74°C).
- Drizzle with Balsamic Reduction: Remove the chicken from the oven, and let it rest for a few minutes. Drizzle with balsamic reduction before serving to add a sweet and tangy contrast.
Extra Tips:
For the best results, choose chicken breasts that are uniform in size to guarantee even cooking. When slicing the chicken pockets, be gentle to avoid tearing the meat. If fresh basil is unavailable, you can substitute with a smaller amount of dried basil.
To make the dish even more flavorful, consider marinating the chicken breasts in olive oil, garlic, and Italian herbs a few hours before cooking. Finally, prepare the balsamic reduction ahead of time or use store-bought to save time.
Enjoy your Caprese Stuffed Chicken with a crisp white wine for a delightful dining experience.
Seafood Linguine
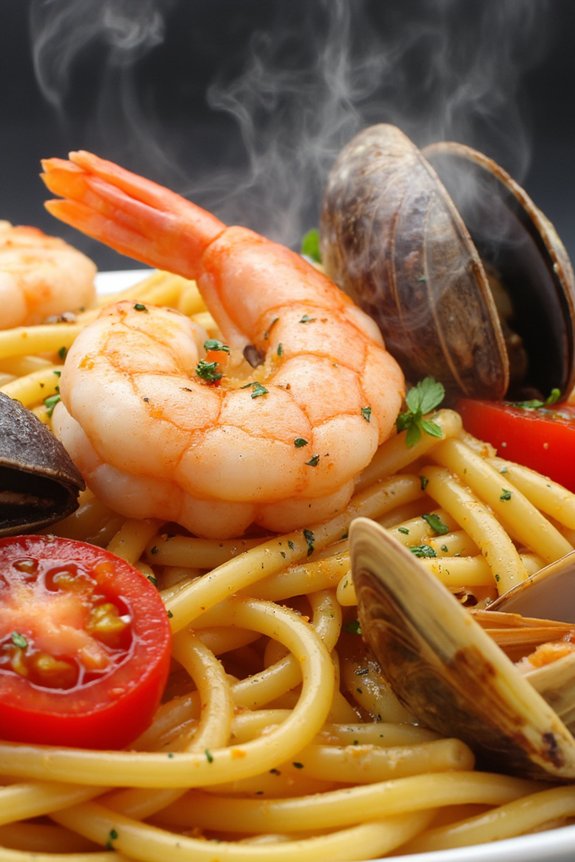
Seafood Linguine is a classic Italian dish that beautifully combines the flavors of fresh seafood with the simplicity of pasta. This dish is a celebration of the sea, featuring a medley of shrimp, mussels, and clams, all tossed in a light and flavorful garlic and white wine sauce. The linguine serves as the perfect canvas, soaking up the savory essence of the seafood and the subtle hints of parsley and lemon.
Ideal for a family dinner or a special occasion, Seafood Linguine is both elegant and comforting, bringing a taste of the Italian coast to your dining table.
To create this delightful dish, it’s important to use the freshest seafood available to guarantee the flavors are vibrant and true. The combination of garlic, olive oil, and white wine creates a luscious sauce that coats each strand of linguine, while the addition of fresh herbs and a squeeze of lemon brightens the dish, making it both aromatic and appetizing.
Whether you’re a seafood aficionado or just looking to impress guests with an authentic Italian meal, this Seafood Linguine recipe is sure to be a hit.
Ingredients (Serves 4-6):
- 1 pound linguine
- 3 tablespoons olive oil
- 4 cloves garlic, minced
- 1/2 teaspoon red pepper flakes
- 1 pound shrimp, peeled and deveined
- 1 pound mussels, cleaned and debearded
- 1 pound clams, scrubbed
- 1 cup cherry tomatoes, halved
- 1 cup dry white wine
- 1/2 cup parsley, chopped
- 1 lemon, zested and juiced
- Salt and pepper to taste
Instructions:
- Cook the Pasta: Bring a large pot of salted water to a boil. Add the linguine and cook according to package instructions until al dente. Reserve 1 cup of the pasta water, then drain the linguine and set aside.
- Prepare the Seafood: In a large, deep skillet, heat the olive oil over medium heat. Add the minced garlic and red pepper flakes, sautéing for about 1 minute until fragrant.
- Cook the Shrimp: Add the shrimp to the skillet and cook for 2-3 minutes until they turn pink. Remove the shrimp and set aside, leaving the oil and garlic in the pan.
- Cook the Mussels and Clams: Add the mussels and clams to the skillet. Pour in the white wine and increase the heat to medium-high. Cover the skillet and cook for about 5-7 minutes until the mussels and clams have opened. Discard any that don’t open.
- Combine Ingredients: Add the cherry tomatoes to the skillet, along with the cooked linguine. Toss everything together gently. If the mixture seems dry, add some of the reserved pasta water a little at a time until you reach the desired consistency.
- Finish the Dish: Return the shrimp to the skillet and add the chopped parsley, lemon zest, and juice. Season with salt and pepper to taste. Toss everything together to make sure the pasta is well coated and the ingredients are evenly distributed.
- Serve: Transfer the Seafood Linguine to a large serving bowl or individual plates. Garnish with additional parsley and a lemon wedge if desired.
Extra Tips:
For the best results, make certain that all your seafood is fresh and properly cleaned before cooking. It’s essential not to overcook the shrimp, as they can become rubbery; they should be just pink and firm to the touch.
When cooking the mussels and clams, any that don’t open should be discarded as they may not be safe to eat. If you prefer a bit more heat, you can adjust the red pepper flakes to your taste.
Finally, pairing this dish with a crisp white wine, such as Pinot Grigio or Sauvignon Blanc, can enhance the flavors and provide a perfect complement to the meal.
Porchetta Roast
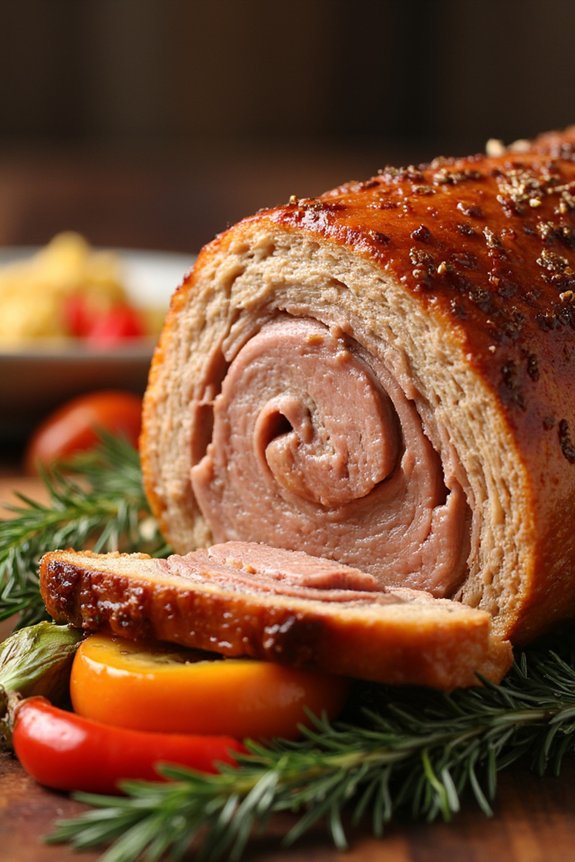
Porchetta is a classic Italian dish, renowned for its flavorful and aromatic profile. Originating from central Italy, this dish traditionally consists of a whole, boneless pork roast, seasoned with a blend of herbs, spices, and garlic, and then slow-roasted to perfection. The result is a succulent, tender meat encased in a crispy, golden-brown skin that’s both a delight to the senses and a centerpiece of any dinner gathering.
Perfect for a festive occasion or a cozy family meal, Porchetta is a dish that embodies the essence of Italian culinary tradition.
To make a Porchetta Roast that serves 4-6 people, you’ll need a pork belly or a pork loin with the skin on, which is then rolled and tied to guarantee even cooking. The magic of this dish lies in the seasoning – a mixture of fennel seeds, garlic, rosemary, and lemon zest, which penetrate the meat and imbue it with an irresistible aroma.
Served with roasted vegetables or a simple salad, this dish offers a perfect balance of flavors and textures that will leave your guests asking for seconds.
Ingredients (serving size: 4-6 people):
- 4 lbs pork belly or pork loin with skin on
- 1 tablespoon fennel seeds
- 6 cloves garlic, minced
- 2 tablespoons chopped fresh rosemary
- Zest of 1 lemon
- 1 tablespoon salt
- 1 teaspoon black pepper
- 2 tablespoons olive oil
- Cooking twine
Cooking Instructions:
- Prepare the Meat: Start by laying the pork belly or loin skin-side down on a clean surface. Score the meat lightly with a knife, being careful not to cut all the way through. This will help the seasoning penetrate the meat.
- Season the Pork: In a bowl, mix together the fennel seeds, minced garlic, rosemary, lemon zest, salt, and black pepper. Spread this mixture evenly over the scored surface of the pork, pressing it into the cuts.
- Roll and Secure: Carefully roll the pork tightly, starting from one end, so that the skin is on the outside. Use cooking twine to tie the roll at 1-inch intervals. This will help maintain the shape during cooking and guarantee even heat distribution.
- Prepare for Roasting: Preheat your oven to 325°F (160°C). Rub the outside of the rolled pork with olive oil and an additional sprinkle of salt. This will help the skin crisp up during roasting.
- Roast the Porchetta: Place the rolled pork on a rack in a roasting pan. Roast in the preheated oven for about 2.5 to 3 hours, or until the internal temperature reaches 145°F (63°C). During the last 20 minutes of cooking, increase the oven temperature to 450°F (230°C) to crisp up the skin.
- Rest and Serve: Once cooked, remove the Porchetta from the oven and let it rest for at least 15 minutes. This resting period allows the juices to redistribute, guaranteeing a moist and flavorful roast. Slice and serve with your choice of sides.
Extra Tips:
For the crispiest skin, make sure the pork is as dry as possible before you start the cooking process. Pat the skin dry with paper towels and leave it uncovered in the fridge for a couple of hours, or even overnight. This drying process helps achieve that coveted crackling effect.
Additionally, if you find the skin isn’t as crispy as desired at the end of cooking, a few minutes under the broiler can help achieve the perfect texture. Always keep an eye on the meat during this step to prevent burning.
Tiramisu for Dessert

Tiramisu is an iconic Italian dessert that has won hearts globally with its rich and creamy texture interlaced with the bold flavors of coffee and cocoa. Originating from the Veneto region of Italy, Tiramisu translates to “pick me up” or “cheer me up,” which is exactly what this delightful dessert does.
The classic recipe consists of layers of coffee-soaked ladyfingers, a luscious mascarpone cheese mixture, and a dusting of cocoa powder that creates an indulgent end to any meal. Perfect for gatherings and celebrations, this dessert is a crowd-pleaser that can be prepared ahead of time, making it both convenient and impressive.
Creating Tiramisu at home allows you to control the quality and freshness of the ingredients, resulting in a dessert that’s far superior to store-bought versions. With a balance of creamy mascarpone, robust espresso, and a hint of sweet cocoa, Tiramisu is a sophisticated yet simple dessert that strikes the perfect harmony of flavors.
While there are modern variations of Tiramisu, sticking to the traditional recipe guarantees an authentic experience that stays true to its Italian roots. This recipe will guide you through the process of making a classic Tiramisu that serves 4-6 people, ideal for a dinner party or a family treat.
Ingredients for 4-6 servings:
- 6 egg yolks
- 3/4 cup granulated sugar
- 2/3 cup milk
- 1 1/4 cups heavy cream
- 1/2 teaspoon pure vanilla extract
- 8 ounces mascarpone cheese
- 1 cup strong brewed espresso, cooled
- 1/4 cup coffee liqueur (optional)
- 24 ladyfingers
- 2 tablespoons unsweetened cocoa powder
- 1/4 cup grated semi-sweet chocolate or chocolate shavings (optional)
Cooking Instructions:
- Prepare the Custard Base: In a medium saucepan, whisk together the egg yolks and sugar until well blended. Stir in the milk and cook over medium heat, stirring constantly, until the mixture boils. Allow it to boil gently for 1 minute, then remove it from the heat. Cover the custard with plastic wrap, pressing it directly onto the surface to prevent a skin from forming, and refrigerate until cooled, about 1 hour.
- Whip the Cream: In a large mixing bowl, beat the heavy cream and vanilla extract until soft peaks form. Gently fold in the mascarpone cheese until the mixture is smooth and well combined.
- Combine the Layers: In a shallow dish, combine the cooled espresso and coffee liqueur (if using). Quickly dip each ladyfinger into the espresso mixture, making sure they’re soaked but not overly saturated. Arrange a layer of soaked ladyfingers at the bottom of a 9×9 inch baking dish.
- Layer the Tiramisu: Spread half of the mascarpone mixture over the layer of ladyfingers. Repeat the process with another layer of soaked ladyfingers and the remaining mascarpone mixture. Smooth the top with a spatula.
- Chill and Set: Cover the dish with plastic wrap and refrigerate for at least 4 hours, or overnight, to allow the flavors to meld and the dessert to set properly.
- Finish and Serve: Before serving, dust the top of the Tiramisu generously with cocoa powder. Optionally, sprinkle grated chocolate or chocolate shavings over the top for added texture and flavor. Slice and serve chilled.
Extra Tips:
When making Tiramisu, it’s crucial to use fresh, high-quality ingredients, particularly the mascarpone cheese, as it greatly impacts the dessert’s texture and flavor. If you don’t have access to espresso, strong brewed coffee can be a suitable substitute.
For an added depth of flavor, consider incorporating a splash of coffee liqueur into the espresso mixture. Be cautious not to oversoak the ladyfingers; a quick dip is sufficient to prevent them from becoming too soggy.
Finally, allowing the Tiramisu to chill overnight enhances its taste and guarantees a firm, sliceable dessert.