

Hosting a gathering? There’s nothing like Italian appetizers to kick things off with flair. Picture a spread featuring tomato bruschetta, crispy calamari, and creamy burrata with fresh basil. Each bite brings a taste of Italy’s sunlit charm right to your table. These recipes promise not just flavor but also the joy of using quality ingredients. Curious to learn more?
Classic Tomato Bruschetta

Bruschetta is a quintessential Italian appetizer that captures the essence of fresh and vibrant flavors. Classic Tomato Bruschetta is a simple yet delicious dish, perfect for any gathering or as a starter to a delightful Italian meal. The combination of ripe tomatoes, fragrant basil, and crunchy bread creates a symphony of taste and texture that’s sure to please any crowd. This dish highlights the beauty of using fresh, high-quality ingredients, letting each component shine through with minimal preparation.
The origins of bruschetta can be traced back to the central regions of Italy, where it was originally a way to salvage stale bread. Today, it has become a beloved appetizer worldwide, with numerous variations to suit different palates. In this recipe, we’ll focus on the classic version, which is incredibly easy to prepare and requires only a handful of ingredients. Ideal for serving 4 to 6 people, this Classic Tomato Bruschetta will surely be a hit at your next gathering.
Ingredients (serves 4-6):
- 1 French baguette or Italian loaf
- 4 ripe tomatoes
- 3 cloves of garlic
- 1/4 cup fresh basil leaves
- 2 tablespoons extra virgin olive oil
- 1 tablespoon balsamic vinegar
- Salt and pepper to taste
Cooking Instructions:
- Prepare the Bread: Preheat your oven to 400°F (200°C). Slice the baguette into 1/2-inch thick slices. Arrange the slices on a baking sheet and lightly brush each side with olive oil. Toast in the oven for about 5-7 minutes on each side until golden brown and crispy. Remove from the oven and let them cool slightly.
- Prepare the Tomato Mixture: While the bread is toasting, dice the tomatoes into small cubes and place them in a mixing bowl. Mince the garlic cloves and add them to the tomatoes. Chop the fresh basil leaves and mix them into the tomato mixture.
- Season the Topping: Add the extra virgin olive oil and balsamic vinegar to the tomato mixture. Season with salt and pepper to taste. Toss everything gently to combine, ensuring the tomatoes are well coated with the seasoning and flavors are evenly distributed.
- Assemble the Bruschetta: Take the toasted bread slices and gently rub one side of each with a cut garlic clove for an extra hint of garlic flavor. Spoon the tomato mixture generously onto each slice, ensuring each piece gets a good topping of tomatoes and basil.
- Serve and Enjoy: Arrange the bruschetta on a platter and serve immediately as a delightful appetizer. The contrast of the crispy bread and juicy tomato topping is best enjoyed fresh.
Extra Tips: For the best results, use the freshest tomatoes available, preferably heirloom or vine-ripened for their superior flavor and juiciness. You can also experiment with different kinds of bread, such as ciabatta, for a slightly different texture. If you prefer a little kick, add a pinch of crushed red pepper flakes to the tomato mixture. For a more luxurious twist, consider adding a drizzle of high-quality balsamic glaze over the top just before serving.
Savory Arancini Balls

Arancini, the classic Sicilian street food, are crispy, golden-brown rice balls filled with a delightful mix of flavors, perfect for a delicious appetizer or snacking option. These savory treats are traditionally made using leftover risotto, but you can start from scratch if needed. The combination of a crispy outer layer and a warm, gooey interior of cheese and peas makes for a perfect bite-sized indulgence.
This recipe will guide you through creating your own batch of these delectable arancini balls, suitable for a gathering of 4-6 people. Making arancini involves preparing a simple risotto, allowing it to cool, forming it into balls, stuffing them with a cheese and peas filling, and finally breading and frying them to perfection.
The beauty of arancini lies in their versatility; you can customize the filling to suit your taste preferences, whether that means adding meats, different cheeses, or even a variety of herbs. Follow this recipe to achieve crispy, flavorful arancini that will transport your taste buds straight to Italy.
Ingredients for 4-6 Servings:
- 2 cups Arborio rice
- 4 cups chicken or vegetable broth
- 1 small onion, finely chopped
- 2 cloves garlic, minced
- 1/2 cup dry white wine
- 1 cup grated Parmesan cheese
- 1 cup frozen peas, thawed
- 8 ounces mozzarella cheese, cut into small cubes
- 2 large eggs
- 1 cup all-purpose flour
- 2 cups breadcrumbs
- Salt and pepper, to taste
- Vegetable oil, for frying
Cooking Instructions:
- Prepare the Risotto:
- In a large saucepan, heat a tablespoon of oil over medium heat. Add the chopped onion and garlic, sautéing until translucent.
- Stir in the Arborio rice, allowing it to toast lightly for about 2 minutes.
- Pour in the white wine, stirring until it’s mostly absorbed by the rice.
- Gradually add the broth, one ladleful at a time, stirring frequently and allowing the liquid to be absorbed before adding more. Continue until the rice is creamy and cooked al dente, about 18-20 minutes.
- Stir in the Parmesan cheese and peas, then season with salt and pepper. Spread the risotto on a baking sheet to cool completely.
- Shape the Arancini:
- Once cooled, take a small handful of risotto and flatten it slightly in your palm.
- Place a cube of mozzarella in the center and shape the risotto around the cheese to form a ball. Repeat with the remaining risotto and cheese.
- Breading the Arancini:
- Set up a breading station with three bowls: one with flour, one with beaten eggs, and one with breadcrumbs.
- Roll each rice ball first in the flour, then dip it in the eggs, and finally coat it with breadcrumbs. Confirm each ball is thoroughly coated.
- Fry the Arancini:
- Heat vegetable oil in a deep fryer or a large pot to 350°F (175°C).
- Fry the arancini in batches, ensuring they’re fully submerged in the oil, until golden brown on all sides, about 3-4 minutes.
- Remove with a slotted spoon and drain on a paper towel-lined plate.
Extra Tips:
To achieve the best results, confirm that the risotto is thoroughly cooled before forming the arancini balls; this helps the mixture hold its shape better during frying.
If you’re short on time, prepare the risotto a day ahead and refrigerate. When frying, maintain a consistent oil temperature to ensure even cooking and prevent the arancini from becoming too oily.
For a healthier variation, consider baking the arancini in a preheated oven at 400°F (200°C) until crispy. Enjoy these delightful bites with a side of marinara sauce for dipping!
Creamy Burrata With Basil and Tomatoes

Creamy Burrata With Basil and Tomatoes is a delightful Italian appetizer that’s both simple and elegant. This dish celebrates the classic combination of fresh tomatoes and basil, enhanced by the rich, creamy texture of burrata cheese. Perfect for a warm summer day or as a starter for a dinner party, this recipe underscores the importance of using fresh, high-quality ingredients.
The burst of flavors from the tomatoes and basil, combined with the silky burrata, creates a revitalizing and satisfying experience for your taste buds. This dish isn’t only visually appealing but also quick to prepare, making it an ideal choice for those who want to impress their guests without spending hours in the kitchen.
The freshness of the ingredients is key, as it allows the natural flavors to shine through. Serve this appetizer with crusty bread or crackers to scoop up the creamy goodness, and pair it with a light white wine or sparkling water for a complete culinary experience.
Ingredients (serves 4-6):
- 2 large burrata balls
- 4 medium-sized ripe tomatoes
- 1 bunch of fresh basil leaves
- 3 tablespoons extra-virgin olive oil
- 1 tablespoon balsamic glaze
- Salt to taste
- Freshly ground black pepper to taste
- Optional: crusty bread or crackers for serving
Cooking Instructions:
- Prepare the Tomatoes: Wash the tomatoes thoroughly under running water. Pat them dry with a clean kitchen towel. Slice the tomatoes into 1/4-inch thick rounds and arrange them in a single layer on a large serving platter.
- Season the Tomatoes: Sprinkle the sliced tomatoes with a generous pinch of salt and freshly ground black pepper to taste. Drizzle 2 tablespoons of extra-virgin olive oil evenly over the tomatoes. This will enhance their natural sweetness and flavor.
- Prepare the Burrata: Carefully remove the burrata balls from their packaging, taking care not to tear them. Pat them dry gently with a paper towel. Place the burrata balls in the center of the platter, on top of the arranged tomato slices.
- Add the Basil: Pick the fresh basil leaves from the stems, discarding any that are wilted or damaged. Scatter the basil leaves over the tomatoes and burrata, ensuring even distribution for maximum flavor.
- Drizzle with Balsamic Glaze: Pour the balsamic glaze in a thin stream over the entire dish, focusing on the burrata and tomatoes. The balsamic glaze will add a tangy sweetness that complements the creaminess of the burrata.
- Final Touch: Finish by drizzling an additional tablespoon of extra-virgin olive oil over the entire dish. This adds a rich, fruity note that ties all the flavors together.
- Serve: Accompany the dish with slices of crusty bread or crackers on the side for guests to enjoy the burrata mixture. Serve immediately for the best texture and flavor.
Extra Tips:
To guarantee your Creamy Burrata With Basil and Tomatoes shines, select the freshest ingredients possible. Opt for vine-ripened tomatoes for the best flavor, and use fresh basil leaves to enhance the dish’s aroma and taste.
If you can, purchase burrata from a quality cheese shop where it’s made fresh. Remember, the balsamic glaze should be used sparingly; a little goes a long way in adding complexity without overwhelming the dish. Finally, serve this appetizer as soon as it’s assembled to enjoy the textures and flavors at their peak.
Crispy Calamari With Marinara Sauce

Crispy Calamari With Marinara Sauce is a classic Italian appetizer that combines tender calamari with a crispy coating, served alongside a flavorful marinara sauce. This dish is perfect for serving at gatherings or as a starter to a delicious Italian meal. The key to achieving that perfect crunch lies in the batter and the precise cooking technique, making certain the calamari is cooked to perfection without becoming rubbery.
Pairing it with a homemade marinara sauce enhances the flavor profile, offering a delightful balance of textures and tastes. When preparing Crispy Calamari With Marinara Sauce, it’s crucial to use fresh squid and the right combination of spices in the batter to elevate the dish. The marinara sauce can be made ahead of time, allowing the flavors to meld beautifully before serving.
This recipe serves 4-6 people, making it ideal for a small dinner party or family meal. Enjoy the satisfaction of making this restaurant-quality appetizer in the comfort of your own home.
Ingredients:
- 1 ½ pounds fresh calamari, cleaned and cut into rings
- 1 cup all-purpose flour
- 1 cup cornmeal
- 1 teaspoon salt
- ½ teaspoon black pepper
- ½ teaspoon paprika
- ½ teaspoon garlic powder
- 1 cup buttermilk
- Vegetable oil for frying
- Lemon wedges, for serving
For the Marinara Sauce:
- 2 tablespoons olive oil
- 3 cloves garlic, minced
- 1 can (28 ounces) crushed tomatoes
- 1 teaspoon dried oregano
- ½ teaspoon salt
- ¼ teaspoon black pepper
- 1 teaspoon sugar
- Fresh basil leaves, for garnish
Cooking Instructions:
- Prepare the Marinara Sauce:
- Heat the olive oil in a saucepan over medium heat. Add the minced garlic and sauté for about 1 minute until fragrant.
- Stir in the crushed tomatoes, oregano, salt, pepper, and sugar. Bring to a simmer and let cook for 20-25 minutes, stirring occasionally. Once done, remove from heat and set aside.
- Prepare the Calamari:
- In a medium bowl, combine the flour, cornmeal, salt, pepper, paprika, and garlic powder. Mix well.
- Pour the buttermilk into a separate bowl. Dip the calamari rings into the buttermilk, making sure they’re well coated.
- Coat the Calamari:
- Remove the calamari from the buttermilk, allowing excess to drip off, and then dredge in the flour mixture. Make sure each ring is fully coated.
- Fry the Calamari:
- Heat the vegetable oil in a deep pan or fryer to 350°F (175°C). Carefully place the coated calamari into the hot oil in batches, being cautious not to overcrowd the pan.
- Fry for 2-3 minutes or until golden brown and crispy. Remove with a slotted spoon and drain on paper towels.
- Serve:
- Serve the crispy calamari immediately with the warm marinara sauce on the side. Garnish the sauce with fresh basil leaves and lemon wedges for squeezing over the calamari.
Extra Tips:
For the best results, make certain the oil is at the correct temperature before frying; if it’s too cool, the calamari will absorb more oil and become greasy, while too hot oil can burn the coating.
It’s also helpful to pat the calamari dry with paper towels before dipping in buttermilk to make sure the batter adheres well. If you prefer a spicier kick, consider adding a pinch of cayenne pepper to the flour mixture. Preparing the marinara sauce a day ahead allows the flavors to deepen, making it even more delicious.
Prosciutto-Wrapped Melon

Prosciutto-wrapped melon is a classic Italian appetizer that perfectly combines the natural sweetness of ripe melon with the savory, salty flavor of thinly sliced prosciutto. This invigorating dish isn’t only simple to prepare but also makes for an elegant addition to any dinner party or gathering.
The contrast between the juicy melon and the delicate prosciutto creates a delightful balance of flavors and textures that’s sure to impress your guests. This appetizer is best served chilled, making it an ideal choice for warm weather or as a light starter before a hearty meal.
The key to success with this recipe lies in selecting the right ingredients: choose a ripe, sweet melon and high-quality prosciutto for the best possible flavor. The combination of these two simple ingredients will deliver an unforgettable taste experience.
Ingredients for 4-6 servings:
- 1 ripe cantaloupe or honeydew melon
- 12 thin slices of prosciutto
- Freshly ground black pepper (optional)
- Fresh basil leaves (optional)
Cooking Instructions:
- Prepare the Melon: Begin by cutting the melon in half and removing the seeds with a spoon. Slice each half into 12 equal wedges. For ease of eating, consider removing the rind from each wedge, though this step is optional.
- Wrap with Prosciutto: Lay out the prosciutto slices flat. Carefully wrap a slice of prosciutto around each melon wedge, starting at one end and spiraling it around until the entire melon piece is covered. Aim for a snug wrap but avoid tearing the prosciutto.
- Arrange and Season: Arrange the prosciutto-wrapped melon wedges on a serving platter. If desired, sprinkle a small amount of freshly ground black pepper over the top for an added hint of flavor. For a touch of freshness, garnish with whole fresh basil leaves.
- Chill and Serve: Place the platter in the refrigerator for at least 30 minutes before serving. This step allows the flavors to meld together and guarantees the appetizer is served at an invigorating, cool temperature.
Extra Tips:
When selecting a melon, look for one that feels heavy for its size and has a sweet, fragrant aroma—this typically indicates ripeness. For the prosciutto, opt for a high-quality variety that’s thinly sliced, as this will provide the best texture and flavor.
If you’re preparing the dish ahead of time, wrap the melon wedges and cover the platter with plastic wrap to prevent the prosciutto from drying out. Serve the appetizer soon after removing it from the fridge for the best experience.
Stuffed Mushrooms With Italian Sausage

Stuffed mushrooms with Italian sausage are an irresistible appetizer that combines the earthy flavor of mushrooms with the savory kick of Italian sausage, creating a perfect harmony of taste and texture. This classic Italian dish is a favorite at gatherings and parties, offering a delectable bite-sized treat that’s both satisfying and flavorful.
The stuffing, a mix of sausage, aromatic herbs, cheese, and breadcrumbs, is nestled within the mushroom caps and baked to perfection, giving you a delightful blend of crisp and tender in every bite.
This recipe is designed to serve 4-6 people, making it a wonderful choice for intimate dinners or festive occasions. The preparation is straightforward and the results are spectacular, ensuring that these stuffed mushrooms will be a hit at your next event. Whether you’re a seasoned cook or a kitchen novice, you’ll find this recipe easy to follow and rewarding to serve.
Ingredients for 4-6 servings:
- 16 large white or cremini mushrooms
- 1 pound Italian sausage (mild or spicy, based on preference)
- 1 small onion, finely chopped
- 2 cloves garlic, minced
- 1/2 cup breadcrumbs
- 1/2 cup grated Parmesan cheese
- 1 tablespoon fresh parsley, chopped
- 1 tablespoon olive oil
- Salt and pepper to taste
Cooking Instructions:
- Prepare the Mushrooms: Preheat your oven to 375°F (190°C). Carefully remove the stems from the mushrooms and set the caps aside on a baking sheet. Finely chop the stems and reserve them for the stuffing mixture.
- Cook the Sausage: In a large skillet over medium heat, add the olive oil. Once heated, add the Italian sausage, breaking it apart with a wooden spoon. Cook until the sausage is browned and cooked through, about 5-7 minutes. Remove the sausage from the skillet and set aside.
- Sauté Aromatics: In the same skillet, add the chopped onion and garlic. Sauté until the onion becomes translucent, about 3 minutes. Add the chopped mushroom stems to the skillet and cook for an additional 2 minutes.
- Make the Stuffing: Return the cooked sausage to the skillet with the onion, garlic, and mushroom stems. Stir in the breadcrumbs, Parmesan cheese, and chopped parsley. Season with salt and pepper to taste. Mix until all ingredients are well combined.
- Stuff the Mushrooms: Using a spoon, fill each mushroom cap with the sausage mixture, pressing gently to pack the stuffing into the cap. Place each stuffed mushroom back on the baking sheet.
- Bake the Mushrooms: Bake in the preheated oven for 20-25 minutes, or until the tops are golden brown and the mushrooms are tender.
- Serve: Remove from the oven and let them cool slightly before serving. Garnish with additional parsley if desired.
Extra Tips:
When selecting mushrooms for stuffing, choose ones that are firm and have a nice, rounded cap to hold the stuffing well. If you prefer a spicier version, opt for spicy Italian sausage or add a pinch of red pepper flakes to the stuffing mixture.
You can also experiment with adding other cheeses, such as mozzarella or fontina, for a different flavor profile. Ultimately, these stuffed mushrooms can be prepared in advance and refrigerated, then baked just before serving, making them convenient for entertaining.
Caprese Skewers With Balsamic Glaze
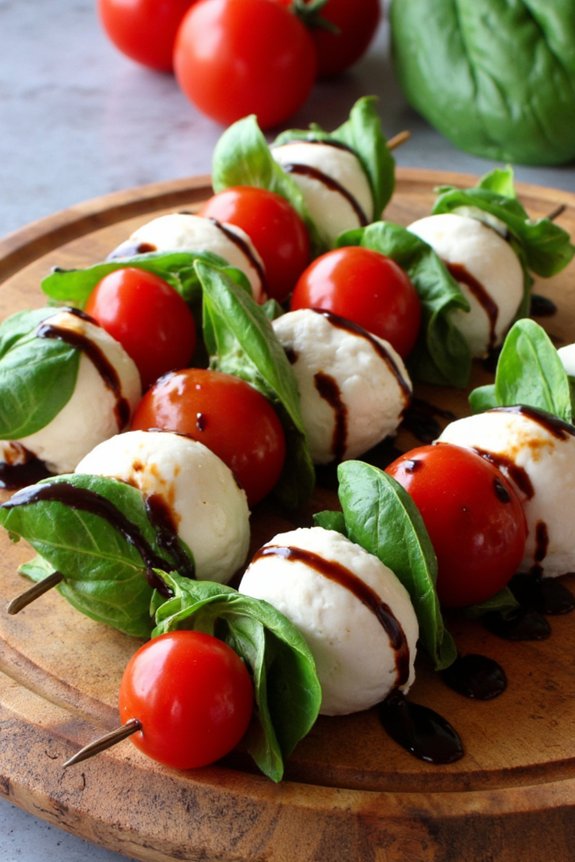
Caprese Skewers With Balsamic Glaze are a delightful appetizer that combines the vibrant flavors of fresh mozzarella, ripe cherry tomatoes, and aromatic basil leaves. This dish is a classic Italian favorite, perfect for any gathering or as a revitalizing start to a meal. The skewers are easy to prepare, visually appealing, and the balsamic glaze adds a touch of sweetness that perfectly complements the savory ingredients.
These skewers aren’t only delicious but also healthy, providing a great source of fresh vegetables and calcium-rich cheese. The simplicity of the ingredients allows for their natural flavors to shine through, while the balsamic glaze ties everything together with its tangy yet sweet profile. Whether you’re hosting a dinner party or looking for a quick and tasty appetizer, Caprese Skewers With Balsamic Glaze are sure to impress your guests.
Ingredients (serving size: 4-6 people):
- 24 cherry tomatoes
- 24 small fresh mozzarella balls (bocconcini)
- 24 fresh basil leaves
- 2 tablespoons extra virgin olive oil
- Salt and pepper to taste
- ½ cup balsamic vinegar
- 2 tablespoons honey
- 12 wooden or metal skewers
Cooking Instructions:
- Prepare the Balsamic Glaze: In a small saucepan over medium heat, combine the balsamic vinegar and honey. Stir well and bring the mixture to a gentle simmer. Allow it to cook for about 10-15 minutes, until it has reduced by half and has a syrupy consistency. Stir occasionally to prevent burning. Once done, remove from heat and let it cool.
- Assemble the Skewers: While the glaze is cooling, begin assembling the skewers. On each skewer, thread one cherry tomato, followed by a fresh basil leaf and a mozzarella ball. Repeat this sequence twice to have two sets of each ingredient on a single skewer. Continue this process for all skewers.
- Season the Skewers: Once all skewers are assembled, drizzle them lightly with extra virgin olive oil. Season with salt and pepper to taste, ensuring even coverage for a balanced flavor.
- Serve with Glaze: Arrange the skewers on a serving platter. Just before serving, drizzle the cooled balsamic glaze over the skewers, or serve the glaze on the side for dipping. This allows guests to enjoy the skewers with as much glaze as they desire.
Extra Tips:
To make the most of your Caprese Skewers, choose high-quality, fresh ingredients. The freshness of the basil and the ripeness of the tomatoes greatly enhance the flavor of the dish. Opt for mozzarella that’s packed in water, as it tends to be more flavorful and softer.
If possible, prepare the balsamic glaze in advance and store it in a sealed container. This will give it time to thicken further and enhance its flavor. Additionally, if using wooden skewers, soak them in water for about 30 minutes before assembling to prevent them from burning if you plan to grill the skewers slightly for added flavor.
Garlic and Herb Focaccia Bread

Garlic and Herb Focaccia Bread is a delightful Italian appetizer that perfectly combines the aromatic flavors of garlic and fresh herbs with the soft, chewy texture of artisan bread. This versatile dish can be enjoyed on its own, used as a sandwich base, or served alongside soups and salads.
Making this bread at home allows you to infuse it with your preferred herbs and seasonings, providing a personalized touch to a classic recipe. The following recipe will guide you through creating a delicious Garlic and Herb Focaccia Bread that can serve 4-6 people, perfect for a family gathering or a cozy dinner with friends.
The key to a great focaccia lies in its simplicity and the quality of its ingredients. With a few pantry staples and fresh herbs, you can create a bread that’s both flavorful and visually appealing. The generous use of olive oil not only enhances the taste but also contributes to the bread’s signature crusty exterior.
This recipe will take you through the steps of preparing the dough, infusing it with garlic and herbs, and baking it to perfection. Whether you’re an experienced baker or a novice in the kitchen, you’ll find this focaccia recipe straightforward and rewarding.
Ingredients (serving size: 4-6 people)
- 4 cups all-purpose flour
- 1 packet (2 1/4 teaspoons) active dry yeast
- 1 1/2 cups warm water (110°F/45°C)
- 1 teaspoon sugar
- 2 teaspoons salt
- 1/4 cup olive oil, plus more for drizzling
- 4 cloves garlic, minced
- 2 tablespoons fresh rosemary, chopped
- 1 tablespoon fresh thyme, chopped
- Coarse sea salt, to taste
Cooking Instructions:
- Prepare the Yeast Mixture: In a small bowl, combine warm water, sugar, and yeast. Stir gently and let it sit for about 5-10 minutes until it becomes frothy. This indicates that the yeast is active.
- Make the Dough: In a large mixing bowl, combine the flour and salt. Make a well in the center and pour in the yeast mixture and 1/4 cup olive oil. Mix the ingredients until a rough dough forms.
- Knead the Dough: Transfer the dough onto a lightly floured surface. Knead for about 10 minutes until the dough is smooth and elastic. If the dough is too sticky, add a small amount of flour as needed.
- First Rise: Place the dough in a lightly oiled bowl, cover it with a damp cloth, and let it rise in a warm place for about 1-2 hours, or until doubled in size.
- Prepare the Baking Sheet: Preheat your oven to 400°F (200°C). Line a baking sheet with parchment paper and drizzle with olive oil.
- Shape the Dough: Punch down the risen dough to release the air. Transfer it to the prepared baking sheet and stretch it into a rectangular shape, about 1/2 inch thick.
- Add Flavorings: Press your fingers into the dough to create dimples. Spread the minced garlic, rosemary, and thyme evenly over the top. Drizzle with additional olive oil and sprinkle with coarse sea salt.
- Second Rise: Let the dough rest for another 20-30 minutes to puff up slightly.
- Bake: Place the baking sheet in the preheated oven and bake for 20-25 minutes, or until the focaccia is golden brown and sounds hollow when tapped.
- Cool and Serve: Remove the bread from the oven and let it cool slightly on a wire rack before slicing and serving.
Extra Tips:
To enhance the flavor of your Garlic and Herb Focaccia Bread, consider adding other herbs like oregano or basil, or even a sprinkle of grated Parmesan cheese before baking.
If you prefer a softer crust, cover the bread with aluminum foil for the last 10 minutes of baking. For a more intense garlic flavor, you can infuse the olive oil with garlic by gently heating the minced garlic in the oil before drizzling it over the dough.
Remember that focaccia is best enjoyed fresh, but leftovers can be wrapped in foil and reheated in the oven to regain their delightful texture.
Grilled Eggplant Rolls With Ricotta

Grilled Eggplant Rolls with Ricotta is a delightful Italian appetizer that offers a perfect balance of smoky, creamy, and savory flavors. This dish isn’t only visually appealing but also a treat for the taste buds, making it an excellent choice for a dinner party or a cozy family meal.
The tender grilled eggplant slices are filled with a luscious mixture of ricotta cheese, fresh herbs, and a hint of lemon zest, creating a harmonious blend of flavors that will impress your guests. Preparing these rolls is an enjoyable culinary experience, allowing you to explore the rich flavors and textures of Italian cuisine.
The key to this recipe is to grill the eggplant slices to perfection and guarantee the ricotta filling is well-seasoned. This dish is best served warm, offering a comforting bite with every roll. Perfect for a serving size of 4-6 people, this recipe will surely become a favorite in your culinary repertoire.
Ingredients:
- 2 large eggplants
- 1 cup ricotta cheese
- 1/4 cup grated Parmesan cheese
- 1 garlic clove, minced
- 1 tablespoon fresh basil, chopped
- 1 tablespoon fresh parsley, chopped
- Zest of 1 lemon
- Salt and pepper to taste
- Olive oil for brushing
- Fresh basil leaves for garnish (optional)
Cooking Instructions:
- Prepare the Eggplant: Start by slicing the eggplants lengthwise into 1/4-inch thick slices. You should get about 10-12 slices from each eggplant. Sprinkle a little salt on each slice and let them sit for about 15 minutes to remove excess moisture and bitterness.
- Make the Ricotta Filling: In a mixing bowl, combine the ricotta cheese, Parmesan cheese, minced garlic, chopped basil, chopped parsley, lemon zest, salt, and pepper. Mix well until all ingredients are thoroughly combined.
- Grill the Eggplant: Preheat your grill or grill pan over medium-high heat. Pat the eggplant slices dry with a paper towel. Brush each slice with olive oil on both sides. Grill the slices for about 3-4 minutes per side until they’re tender and have nice grill marks. Remove them from the grill and let them cool slightly.
- Assemble the Rolls: Take a grilled eggplant slice and place a spoonful of the ricotta mixture at one end. Gently roll the eggplant slice around the filling. Repeat this process with the remaining eggplant slices and ricotta mixture.
- Serve: Arrange the eggplant rolls on a serving platter. Garnish with fresh basil leaves if desired. Serve warm and enjoy.
Extra Tips:
For the best results, choose firm, fresh eggplants without any bruises or soft spots. It’s important to salt the eggplant slices before grilling to draw out excess moisture and enhance their flavor.
If you prefer a bit of spice, you can add a pinch of red pepper flakes to the ricotta mixture. Additionally, if you don’t have a grill, you can use a broiler to cook the eggplant slices. Adjust the seasoning of the ricotta filling to your taste, and feel free to experiment with different herbs and spices to suit your preferences.
Antipasto Platter With Italian Meats and Cheeses

An Antipasto Platter with Italian Meats and Cheeses is a delightful and visually appealing appetizer that brings the flavors of Italy to your table. This dish is perfect for gatherings and parties, offering a variety of textures and tastes to please any palate. The antipasto platter typically includes an assortment of cured meats, a selection of cheeses, marinated vegetables, and olives. The beauty of this dish lies in its versatility; you can customize it to your liking using seasonal ingredients or whatever you have on hand.
When preparing an antipasto platter, the key is to balance flavors and textures. Select a mix of soft and hard cheeses, such as mozzarella and Parmesan, to contrast with the savory and sometimes spicy notes of Italian meats like prosciutto and salami. Add a variety of colors with roasted red peppers, artichoke hearts, and bright green olives.
Don’t forget to include some crusty bread or crispy breadsticks for added crunch. This appetizer not only tastes amazing but also makes for a stunning presentation that will impress your guests.
Ingredients for 4-6 People:
- 100g Prosciutto
- 100g Salami
- 100g Mortadella
- 150g Mozzarella balls
- 150g Aged Parmesan, thinly sliced
- 150g Provolone cheese
- 1 cup Marinated artichoke hearts
- 1 cup Roasted red peppers
- 1 cup Mixed olives (green and black)
- 1 cup Cherry tomatoes
- 1 cup Marinated mushrooms
- Fresh basil leaves
- 1 French baguette, sliced
- Olive oil for drizzling
- Salt and pepper to taste
Cooking Instructions:
- Prepare the Ingredients: Start by slicing the meats and cheeses. Cut the salami and mortadella into thin slices. For the mozzarella balls, you can leave them whole or slice them in half for easier serving. Thinly slice the aged Parmesan and provolone cheese.
- Arrange the Meats: On a large serving platter or wooden board, arrange the prosciutto, salami, and mortadella in separate sections. You can fold the prosciutto into delicate ribbons for an elegant touch.
- Add the Cheeses: Place the mozzarella balls in a small bowl or arrange them directly on the platter. Add the thinly sliced Parmesan and provolone around the platter, making sure they’re easily accessible.
- Incorporate the Vegetables: Distribute the marinated artichoke hearts, roasted red peppers, cherry tomatoes, and marinated mushrooms evenly around the meats and cheeses. This adds color and texture variety to the platter.
- Include the Olives and Garnishes: Scatter the mixed olives in small bowls or directly on the platter. Add fresh basil leaves for a touch of freshness and a pop of green.
- Finish with Bread and Seasoning: Arrange slices of the French baguette or breadsticks alongside the antipasto items. Drizzle a little olive oil over the vegetables and cheeses, then season with salt and pepper to taste.
- Serve: Confirm everything is arranged attractively, and serve the platter at room temperature for the best flavor experience.
Extra Tips:
When selecting ingredients for your antipasto platter, opt for high-quality meats and cheeses for the best flavor. Feel free to experiment with different types of meats and cheeses to suit your preferences. You can also add nuts, dried fruits, or pickled vegetables for additional variety.
If you’re preparing the platter in advance, refrigerate it until ready to serve but allow it to come to room temperature before serving to enhance the flavors. Finally, use a large enough platter to accommodate all ingredients comfortably, confirming each item has its own space to shine.
Marinated Olives and Artichokes
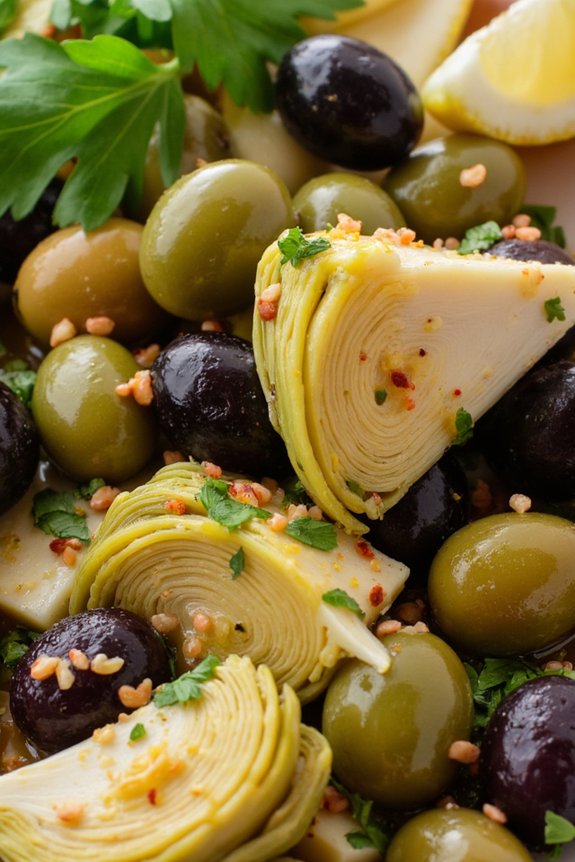
Marinated olives and artichokes are a classic Italian appetizer that’s both flavorful and easy to prepare. This dish combines the briny taste of olives with the tender texture of artichokes, all marinated in a fragrant blend of herbs and spices. It’s perfect for serving at gatherings or as a starter for a delicious Italian meal.
The marination process allows the ingredients to soak up the flavors, creating a harmonious blend that will delight your taste buds. This recipe is designed to serve 4-6 people and can be prepared in advance, making it a convenient option for entertaining guests.
The combination of olives and artichokes isn’t only delicious but also healthy, providing a good source of fiber and antioxidants. With just a few simple ingredients, you can create an appetizer that’s sure to impress.
Ingredients:
- 1 cup mixed olives (green and black)
- 1 cup marinated artichoke hearts, quartered
- 1/4 cup extra virgin olive oil
- 3 cloves garlic, minced
- 1 tablespoon fresh lemon juice
- 1 teaspoon lemon zest
- 1 teaspoon dried oregano
- 1/2 teaspoon crushed red pepper flakes
- 2 tablespoons fresh parsley, chopped
- Salt and pepper to taste
Instructions:
- Rinse and Prepare Ingredients: Start by rinsing the olives under cold water to remove any excess brine. Drain the marinated artichoke hearts thoroughly. This will help guarantee that the flavors of the marinade are absorbed well.
- Combine Marinade Ingredients: In a large mixing bowl, whisk together the extra virgin olive oil, minced garlic, lemon juice, lemon zest, dried oregano, and crushed red pepper flakes. This mixture will serve as the marinade for the olives and artichokes.
- Mix Olives and Artichokes: Add the rinsed olives and drained artichoke hearts to the bowl with the marinade. Toss everything together until the olives and artichokes are well coated with the marinade.
- Season and Marinate: Season the mixture with salt and pepper to taste. Add the chopped fresh parsley and give everything a final toss. Cover the bowl with plastic wrap or transfer the mixture to an airtight container.
- Chill: Place the marinated olives and artichokes in the refrigerator for at least 2 hours, or overnight for the best flavor. This allows the ingredients to absorb the flavors of the marinade.
- Serve: Before serving, allow the dish to come to room temperature for about 15-20 minutes. This will enhance the flavors. Serve the marinated olives and artichokes in a decorative bowl, garnished with additional parsley if desired.
Extra Tips:
For an extra burst of flavor, consider adding a few slices of fresh lemon or orange to the marinade. You can also experiment with different herbs such as thyme or rosemary for a unique twist.
If you have access to gourmet olives, such as Castelvetrano or Kalamata, use them for an elevated taste. Finally, make sure to adjust the amount of crushed red pepper flakes to suit your heat preference. Enjoy this appetizer with crusty bread or crackers for a complete Italian experience.