

There’s something truly magical about turning simple vegetables into mouthwatering Italian dishes. I still remember the first time I roasted bell peppers with garlic and olive oil—the aroma was unforgettable. From zucchini parmesan bakes to a caprese salad with a twist, each recipe has its own delicious story to tell. The vibrant colors and rich flavors are waiting to be discovered. Ready to see how everyday produce can transform into a culinary masterpiece?
Roasted Bell Peppers With Garlic and Olive Oil

Roasted Bell Peppers With Garlic and Olive Oil is a classic Italian dish that highlights the natural sweetness of bell peppers, enhanced by the rich flavors of garlic and olive oil. This vibrant dish isn’t only visually appealing but also incredibly delicious, making it a fantastic appetizer or side dish for any meal.
The roasting process brings out a smoky depth in the peppers, while the garlic adds a savory punch, perfectly balanced by the smooth, fruity notes of extra virgin olive oil.
This recipe is perfect for gatherings or family dinners, serving 4-6 people. The simplicity of the ingredients allows the fresh flavors to shine, and the dish pairs beautifully with a variety of main courses. It’s also versatile enough to be enjoyed warm, at room temperature, or even cold, making it a great option for any occasion.
Whether you’re a seasoned cook or a beginner, this recipe is easy to follow and sure to impress.
Ingredients:
- 6 large bell peppers (red, yellow, and orange)
- 6 cloves of garlic, thinly sliced
- 1/4 cup extra virgin olive oil
- Salt, to taste
- Black pepper, to taste
- Fresh basil leaves, for garnish
Cooking Instructions:
- Preheat the Oven: Preheat your oven to 450°F (230°C). This high temperature is essential for properly roasting the peppers, allowing them to char and develop their rich flavor.
- Prepare the Bell Peppers: Wash the bell peppers thoroughly. Cut each pepper in half lengthwise and remove the seeds and membranes. Flatten the pepper halves slightly with your hand.
- Arrange the Peppers: Place the bell pepper halves, cut side down, on a baking sheet lined with parchment paper or a silicone baking mat. This will prevent them from sticking and help with easy cleanup.
- Add Garlic and Olive Oil: Scatter the thinly sliced garlic evenly over the peppers. Drizzle the extra virgin olive oil generously over the peppers and garlic, ensuring each piece is well-coated.
- Season the Peppers: Sprinkle salt and black pepper over the peppers to taste. This will enhance their natural flavors during roasting.
- Roast the Peppers: Place the baking sheet in the preheated oven and roast for about 25-30 minutes, or until the peppers are soft and their skins are charred and blistered.
- Cool and Peel: Once roasted, remove the peppers from the oven and let them cool slightly. When cool enough to handle, peel off the charred skin from the peppers. This step is optional but recommended for a smoother texture.
- Serve: Arrange the peeled peppers on a serving platter. Pour any remaining juices from the baking sheet over the peppers. Garnish with fresh basil leaves for a touch of color and freshness.
Extra Tips:
For an added layer of flavor, consider adding a splash of balsamic vinegar or a sprinkle of crushed red pepper flakes before serving.
You can also experiment with different types of peppers, such as poblano or Anaheim, for a unique twist. Leftover roasted peppers make an excellent addition to salads, sandwiches, or pasta dishes.
If you prefer a smoky flavor, consider roasting the peppers on a grill instead of in the oven.
Classic Eggplant Caponata

The Classic Eggplant Caponata is a traditional Italian dish that beautifully marries the flavors of sweet and sour, known as “agrodolce” in Italian cuisine. Hailing from Sicily, this vegetable medley is a reflection of the rich agricultural heritage of the region. Caponata is typically served as an appetizer or side dish, but its hearty nature allows it to stand alone as a main course as well.
With its deep, robust flavors and vibrant colors, this dish isn’t only a feast for the palate but also for the eyes. Ideal for vegetarians and vegans alike, Eggplant Caponata is a versatile dish that can be enjoyed hot, cold, or at room temperature. The key to a good caponata is in achieving the right balance between the sweetness from the raisins and the tang from the vinegar, which complements the savory depth of the eggplant and other vegetables.
This dish isn’t only easy to prepare, but it also allows for some flexibility regarding ingredients, making it a perfect choice for those who enjoy experimenting in the kitchen.
Ingredients (Serving size: 4-6 people):
- 2 medium eggplants, diced
- 1 large onion, chopped
- 3 cloves garlic, minced
- 2 celery stalks, diced
- 1 red bell pepper, diced
- 1 yellow bell pepper, diced
- 1/4 cup olive oil
- 1/4 cup capers, rinsed and drained
- 1/2 cup green olives, pitted and sliced
- 1/4 cup pine nuts, toasted
- 1/4 cup raisins
- 2 tablespoons tomato paste
- 1/4 cup red wine vinegar
- 2 tablespoons sugar
- Salt and pepper to taste
- Fresh basil leaves for garnish
Cooking Instructions:
- Prepare the Eggplant: Start by salting the diced eggplant. Place it in a colander, sprinkle with salt, and let it sit for about 30 minutes. This process helps to draw out any bitterness. Rinse the eggplant under cold water and pat dry with paper towels.
- Cook the Vegetables: In a large skillet, heat the olive oil over medium heat. Add the eggplant and sauté until golden brown and slightly tender, about 8-10 minutes. Remove the eggplant from the skillet and set aside.
- Sauté Aromatics: In the same skillet, add a little more olive oil if necessary. Add the onions, garlic, celery, and bell peppers. Sauté until the vegetables are soft and the onions are translucent, approximately 5-7 minutes.
- Combine Ingredients: Return the eggplant to the skillet. Stir in the capers, olives, pine nuts, and raisins. Mix in the tomato paste, ensuring it coats the vegetables evenly.
- Create the Agrodolce: Add the red wine vinegar and sugar to the mixture. Stir well and bring the mixture to a simmer. Allow it to cook for an additional 10-15 minutes, stirring occasionally, until the flavors meld together, and the sauce thickens slightly.
- Season and Serve: Season the caponata with salt and pepper to taste. Let it cool slightly before serving. Garnish with fresh basil leaves before serving.
Extra Tips:
When preparing Classic Eggplant Caponata, verify your eggplant pieces are evenly diced to allow for uniform cooking. This dish can be made ahead of time as the flavors develop and enhance with time.
Store it in the refrigerator and serve it chilled or at room temperature for a revitalizing taste, especially during warmer months. For added depth, consider using a mix of green and black olives, and don’t be afraid to adjust the sugar and vinegar levels to suit your taste preferences. Enjoy this versatile dish with crusty bread or as a topping for pasta or grilled meats.
Zucchini Parmesan Bake

The Zucchini Parmesan Bake is a delightful dish that combines the tender texture of zucchini with the rich flavors of tomato sauce and gooey melted cheese. It’s a perfect way to enjoy fresh zucchini, offering a satisfying and comforting meal that’s both nutritious and delicious. Ideal for a family dinner or a gathering with friends, this dish brings a touch of Italian flair to your table and is sure to please both vegetarians and meat-eaters alike.
This dish isn’t only easy to prepare but also makes the most of seasonal produce. Zucchini is sliced and layered with savory tomato sauce, aromatic herbs, and generous amounts of Parmesan and mozzarella cheese. Baked to perfection, this casserole-style dish results in a bubbling, cheesy delight that’s incredibly flavorful and hearty. It’s perfect as a main course or as a side dish to complement any meal.
Ingredients for 4-6 servings:
- 4 medium zucchinis, sliced into 1/4-inch rounds
- 2 cups marinara sauce
- 1 cup grated Parmesan cheese
- 2 cups shredded mozzarella cheese
- 2 tablespoons olive oil
- 1 teaspoon dried oregano
- 1 teaspoon garlic powder
- Salt and pepper to taste
- 1/2 cup breadcrumbs
- Fresh basil leaves for garnish (optional)
Cooking Instructions:
- Preheat the Oven: Start by preheating your oven to 375°F (190°C). This guarantees that the oven is hot enough to bake the dish evenly.
- Prepare the Zucchini: Slice the zucchinis into 1/4-inch rounds. You can use a knife or a mandolin for even slices. Sprinkle them with a little salt and let them sit for about 10 minutes. This step helps draw out excess moisture from the zucchini.
- Make the Sauce Base: In a pan, heat the olive oil over medium heat. Add the dried oregano and garlic powder, stirring for about 1 minute until fragrant. Pour in the marinara sauce and let it simmer for 5 minutes.
- Assemble the Bake: In a 9×13 inch baking dish, spread a thin layer of tomato sauce at the bottom. Arrange a layer of zucchini slices over the sauce. Sprinkle a portion of the Parmesan and mozzarella cheese over the zucchini layer. Repeat layering with the remaining zucchini, sauce, and cheeses until all ingredients are used, finishing with a layer of cheese on top.
- Add Breadcrumbs: Sprinkle the breadcrumbs evenly over the top layer of cheese. This will create a deliciously crispy topping once baked.
- Bake the Dish: Place the baking dish in the preheated oven and bake for about 25-30 minutes, or until the cheese is bubbly and golden brown. Check to make sure the zucchini is tender by inserting a fork into the layers.
- Garnish and Serve: Once baked, remove from the oven and let it cool for a few minutes. Garnish with fresh basil leaves if desired, and serve warm.
Extra Tips:
For the best results, make sure the zucchini slices are of uniform thickness to guarantee even cooking. If you prefer a thicker sauce, reduce the marinara by simmering it longer before assembling the dish.
You can also experiment by adding other vegetables like sliced mushrooms or bell peppers for additional flavors. To make the dish gluten-free, substitute the breadcrumbs with a gluten-free version or omit them entirely. Enjoy your delicious Zucchini Parmesan Bake with a side of crusty bread or a fresh salad!
Spinach and Ricotta Stuffed Shells

Spinach and Ricotta Stuffed Shells are a classic Italian dish that combines the rich flavors of creamy ricotta cheese with the fresh taste of spinach, all encased in tender pasta shells. This dish is perfect for a cozy family dinner or a special occasion meal.
It’s a comforting, satisfying dish that’s both nutritious and delicious, making it a favorite in many households. The combination of cheese, spinach, and marinara sauce creates a harmonious flavor profile that will delight your taste buds.
To prepare this delightful dish, you’ll start by cooking large pasta shells until they’re al dente. While the pasta cooks, you’ll mix together ricotta cheese, freshly sautéed spinach, some Parmesan cheese, and a hint of nutmeg to create a flavorful filling.
Once the shells are stuffed with this creamy mixture, they’ll be laid in a baking dish, covered with marinara sauce, and topped with mozzarella cheese before baking to perfection. This recipe serves 4-6 people, making it ideal for a small gathering or a family meal.
Ingredients for 4-6 servings:
- 20-24 large pasta shells
- 2 cups ricotta cheese
- 1 cup freshly grated Parmesan cheese
- 2 cups fresh spinach leaves
- 1/4 teaspoon nutmeg
- 2 cups marinara sauce
- 1 cup shredded mozzarella cheese
- 1 tablespoon olive oil
- Salt and pepper to taste
Instructions:
- Prepare the Pasta Shells: Bring a large pot of salted water to a boil. Add the pasta shells and cook them until they’re al dente, approximately 8-10 minutes. Drain and set aside to cool.
- Cook the Spinach: In a large skillet, heat olive oil over medium heat. Add the spinach and sauté until wilted, about 3-4 minutes. Remove from heat and allow to cool slightly, then chop finely.
- Make the Filling: In a large mixing bowl, combine the ricotta cheese, Parmesan cheese, chopped spinach, nutmeg, salt, and pepper. Mix well until all ingredients are thoroughly incorporated.
- Stuff the Shells: Preheat your oven to 375°F (190°C). Using a spoon, carefully fill each pasta shell with the ricotta and spinach mixture.
- Assemble the Dish: Spread 1 cup of marinara sauce on the bottom of a 9×13 inch baking dish. Arrange the stuffed shells on top of the sauce. Pour the remaining marinara sauce over the shells, ensuring they’re evenly covered.
- Add Mozzarella Cheese: Sprinkle the shredded mozzarella cheese over the top of the shells.
- Bake: Cover the baking dish with aluminum foil and bake in the preheated oven for 25 minutes. Remove the foil and bake for an additional 10-15 minutes, or until the cheese is bubbly and golden brown.
- Serve: Allow the dish to cool for a few minutes before serving. Enjoy hot with a side salad or garlic bread.
Extra Tips: For a richer flavor, consider adding some minced garlic to the sautéed spinach. If you prefer a spicier dish, you can sprinkle some red pepper flakes over the top before baking.
Be sure to let the dish cool slightly before serving to allow the flavors to meld together. If you have leftovers, these stuffed shells reheat well and can be stored in the refrigerator for up to three days.
Grilled Vegetables With Balsamic Glaze

Grilled Vegetables With Balsamic Glaze is a simple yet delightful dish that embodies the fresh flavors of Italian cuisine. This recipe is perfect for a summer barbeque or as a vibrant side dish to any meal. The natural sweetness of the vegetables is enhanced by the tangy and slightly sweet balsamic glaze, creating a harmonious balance that’s both healthy and delicious.
Whether you’re a seasoned chef or a home cook, this recipe is easy to follow and will impress your guests with its colorful presentation and bold flavors.
Preparing Grilled Vegetables With Balsamic Glaze involves selecting a variety of fresh vegetables, marinating them, and then grilling to perfection. The balsamic glaze adds a layer of sophistication and richness to the dish, making it a standout option for any occasion. This recipe serves 4-6 people and can be customized with your favorite vegetables or whatever is in season. Enjoy the vibrant tastes of Italy with this easy-to-make and nutritious dish.
Ingredients (serves 4-6 people):
- 1 zucchini, sliced into rounds
- 1 red bell pepper, cut into strips
- 1 yellow bell pepper, cut into strips
- 1 red onion, sliced into rings
- 8 oz. mushrooms, halved
- 1 small eggplant, sliced into rounds
- 2 tablespoons olive oil
- Salt and pepper to taste
- 1/4 cup balsamic vinegar
- 2 tablespoons honey
- 1 clove garlic, minced
- Fresh basil leaves for garnish
Cooking Instructions:
- Prepare the Balsamic Glaze: In a small saucepan, combine the balsamic vinegar, honey, and minced garlic. Heat over medium heat, stirring occasionally, until the mixture starts to thicken and reduce by half, about 10-15 minutes. Remove from heat and set aside.
- Prepare the Vegetables: Wash and dry all the vegetables. Slice the zucchini and eggplant into rounds, the bell peppers into strips, the onion into rings, and halve the mushrooms.
- Marinate the Vegetables: In a large bowl, combine the sliced vegetables with olive oil, salt, and pepper. Toss until the vegetables are evenly coated.
- Preheat the Grill: Heat the grill to medium-high temperature. If using a grill pan, place it on the stove over medium-high heat.
- Grill the Vegetables: Place the vegetables directly onto the grill or grill pan in a single layer. Cook for about 5-7 minutes on each side, or until the vegetables are tender and have nice grill marks.
- Serve: Arrange the grilled vegetables on a serving platter. Drizzle the balsamic glaze over the top and garnish with fresh basil leaves.
Extra Tips:
For the best results, make sure the grill is hot before adding the vegetables to guarantee they cook evenly and develop those characteristic grill marks.
If you’re using wooden skewers, soak them in water for at least 30 minutes before grilling to prevent burning. You can adjust the sweetness of the balsamic glaze by adding more or less honey according to your taste.
Feel free to experiment with different vegetables, such as asparagus or cherry tomatoes, to add variety to the dish.
Tomato and Basil Bruschetta

Tomato and Basil Bruschetta is a classic Italian appetizer that highlights the simplicity and freshness of its ingredients. This dish is perfect for warm summer days or as a light starter for any meal. The combination of ripe tomatoes, fragrant basil, garlic, and a drizzle of olive oil on top of crusty bread is a delightful burst of flavors that’s both satisfying and invigorating. The key to this recipe is using the freshest ingredients available, which brings out the natural flavors and makes this dish shine.
This recipe is designed to serve 4-6 people, making it ideal for a small gathering or family dinner. The preparation is straightforward and quick, allowing you to spend more time enjoying your meal with friends and loved ones. Whether you’re a seasoned cook or a beginner in the kitchen, this bruschetta is an easy dish to master, and it’s sure to impress your guests with its vibrant colors and delicious taste.
Ingredients (for 4-6 people):
- 6 ripe tomatoes, diced
- 1/2 cup fresh basil leaves, chopped
- 3 cloves garlic, minced
- 1/4 cup extra virgin olive oil
- 1 tablespoon balsamic vinegar
- Salt and freshly ground black pepper, to taste
- 1 baguette or Italian bread loaf
- Additional olive oil for brushing
- Optional: grated Parmesan cheese for garnish
Cooking Instructions:
- Prepare the Tomato Mixture: In a medium-sized bowl, combine the diced tomatoes, chopped basil, and minced garlic. Add the olive oil and balsamic vinegar to the mixture. Season with salt and freshly ground black pepper to taste. Mix everything gently until all the ingredients are well coated. Allow the mixture to marinate for at least 10 minutes, which will help the flavors meld together.
- Prepare the Bread: Preheat your oven to 400°F (200°C). Slice the baguette or loaf into 1/2-inch thick slices. Arrange the slices on a baking sheet and lightly brush each piece with olive oil on both sides. Place the baking sheet in the preheated oven and toast the bread for about 5-7 minutes, or until the slices are golden brown and crisp.
- Assemble the Bruschetta: Once the bread is toasted, remove it from the oven. While the bread is still warm, spoon the tomato mixture generously onto each slice. If desired, sprinkle a little grated Parmesan cheese on top for added flavor.
- Serve and Enjoy: Arrange the bruschetta on a serving platter and serve immediately. This dish is best enjoyed fresh, while the bread is still warm and crisp, and the tomato mixture is juicy and flavorful.
Extra Tips:
When making Tomato and Basil Bruschetta, it’s important to use high-quality olive oil as it greatly enhances the flavor of the dish. If possible, opt for an extra virgin olive oil with a rich, fruity taste.
Additionally, using a variety of tomatoes, such as heirloom or cherry tomatoes, can add depth and sweetness to the bruschetta. If you find the tomato mixture too watery, drain some of the excess liquid before topping the bread.
For a more robust flavor, consider rubbing a cut clove of garlic directly onto the toasted bread slices before adding the tomato mixture.
Sautéed Broccoli Rabe With Lemon

Sautéed Broccoli Rabe With Lemon is a classic Italian vegetable dish that brings a burst of flavor with its simple yet vibrant ingredients. This dish is perfect for those who appreciate a balance of bitter greens with the invigorating zest of lemon. Often served as a side, it can complement a variety of main courses, from meats to pasta. Its simplicity allows the natural flavors of the broccoli rabe to shine, making it a delightful addition to any meal.
Broccoli rabe, also known as rapini, is a leafy green vegetable that’s similar to broccoli but with a more bitter taste. When sautéed with garlic and olive oil, it becomes tender and flavorful, with the lemon juice adding a touch of acidity to balance the bitterness. This recipe is designed to serve 4-6 people and is a quick and easy way to incorporate healthy greens into your diet. The key to success with this dish is to not overcook the broccoli rabe, ensuring it retains its slight crunch and vibrant color.
Ingredients (Serves 4-6):
- 2 bunches of broccoli rabe, about 2 pounds
- 3 tablespoons extra-virgin olive oil
- 4 cloves garlic, thinly sliced
- 1/4 teaspoon red pepper flakes (optional)
- Salt to taste
- 1 lemon, juiced and zested
- Ground black pepper to taste
Cooking Instructions:
- Prepare the Broccoli Rabe: Start by trimming the ends of the broccoli rabe and cutting it into 2-3 inch pieces. Rinse thoroughly under cool water to remove any dirt or grit.
- Blanch the Broccoli Rabe: Fill a large pot with water and bring it to a boil. Add a generous pinch of salt, then add the broccoli rabe. Blanch for about 2-3 minutes until it turns bright green and slightly tender. Drain and immediately plunge it into a bowl of ice water to stop the cooking process. Drain again and set aside.
- Sauté the Garlic: In a large skillet, heat the olive oil over medium heat. Add the sliced garlic and sauté for about 1-2 minutes until it becomes fragrant and golden brown, being careful not to burn it.
- Cook the Broccoli Rabe: Add the drained broccoli rabe to the skillet with the garlic. Toss well to coat the greens in the oil and garlic. Sprinkle with red pepper flakes, if using, and season with salt and black pepper to taste.
- Finish with Lemon: Continue to sauté the broccoli rabe for another 3-5 minutes until tender but still bright green. Remove from heat and stir in the lemon juice and zest. Adjust seasoning if necessary.
- Serve: Transfer the sautéed broccoli rabe to a serving platter and enjoy immediately as a delightful side dish.
Extra Tips:
When preparing Sautéed Broccoli Rabe With Lemon, be mindful of the cooking time to avoid overcooking, which can lead to a loss of color and texture. If you prefer a milder flavor, you can blanch the broccoli rabe for a bit longer to reduce its natural bitterness.
For added depth, consider adding a splash of chicken broth or white wine during the sautéing process. Finally, remember that the lemon zest is just as important as the juice, contributing a bright, citrusy aroma that enhances the overall taste of the dish.
Italian-Style Stuffed Artichokes

Italian-Style Stuffed Artichokes is a classic dish that showcases the versatility of artichokes, a beloved vegetable in Italian cuisine. This recipe involves filling tender artichokes with a savory mixture of breadcrumbs, herbs, and cheese, which creates a delightful contrast of textures and flavors. The stuffing is rich with Italian seasonings and provides a deliciously aromatic experience with every bite.
Perfect as a side dish or a main course, these stuffed artichokes are certain to impress your family or guests with their elegant presentation and delectable taste.
Preparing Italian-Style Stuffed Artichokes involves selecting fresh artichokes and carefully trimming them to create a perfect vessel for the flavorful stuffing. The stuffing is made with simple yet flavorful ingredients that complement the natural taste of the artichokes. This recipe serves 4-6 people, making it an excellent choice for family dinners or gatherings.
Whether you’re an experienced cook or a beginner looking to explore Italian cuisine, this recipe is straightforward and rewarding to make.
Ingredients (Serves 4-6):
- 4 large fresh artichokes
- 1 cup breadcrumbs
- 1/2 cup grated Parmesan cheese
- 1/4 cup chopped fresh parsley
- 3 cloves garlic, minced
- 1 teaspoon dried oregano
- 1/2 teaspoon salt
- 1/4 teaspoon black pepper
- 1/4 cup olive oil
- 1 cup chicken or vegetable broth
- 1 lemon, cut into wedges
Cooking Instructions:
- Prepare the Artichokes: Begin by trimming the artichokes. Cut off the top inch of the artichoke with a sharp knife and snip off the pointed tips of the leaves using kitchen scissors. Trim the stems to allow the artichokes to sit flat, then rub the cut edges with a lemon wedge to prevent browning.
- Make the Stuffing: In a mixing bowl, combine the breadcrumbs, Parmesan cheese, chopped parsley, minced garlic, dried oregano, salt, and black pepper. Mix well to guarantee all ingredients are evenly distributed.
- Stuff the Artichokes: Gently separate the leaves of each artichoke to make room for the stuffing. Spoon the breadcrumb mixture between the leaves, making sure it’s evenly distributed.
- Prepare the Cooking Liquid: In a pot large enough to hold all the artichokes standing upright, pour the chicken or vegetable broth. Add the olive oil to the broth, and place the stuffed artichokes in the pot.
- Cook the Artichokes: Cover the pot and bring the broth to a simmer over medium heat. Reduce the heat to low and cook for about 45-60 minutes, or until the artichokes are tender and the stuffing is golden brown. You can test the tenderness by pulling a leaf; it should come away easily.
- Serve: Carefully remove the artichokes from the pot and let them cool slightly before serving. Serve with lemon wedges on the side for squeezing over the top.
Extra Tips:
When selecting artichokes, look for ones that are firm and heavy for their size, with tightly packed leaves. If you find that the stuffing is browning too quickly during cooking, you can tent the pot with foil to prevent it from burning.
Additionally, if you prefer a more intense flavor, add a splash of white wine to the cooking broth. Enjoy these artichokes warm or at room temperature, and feel free to experiment with different herbs or cheeses based on your taste preferences.
Caprese Salad With a Twist

Caprese Salad With a Twist is a delightful variation on the classic Italian dish, bursting with vibrant colors and invigorating flavors. This recipe brings a new dimension to the traditional Caprese by incorporating seasonal vegetables and a zesty dressing that elevates the taste profile. Ideal for a summer appetizer or a light meal, this salad captures the essence of Mediterranean cuisine and offers a healthy and delicious option for your dining table.
In this unique version, you’ll find juicy heirloom tomatoes paired with creamy mozzarella, fresh basil, and a variety of roasted vegetables such as bell peppers and zucchini. The salad is finished with a drizzle of balsamic reduction and a sprinkle of toasted pine nuts, adding a nutty crunch that complements the softness of the cheese and the tang of the tomatoes. Perfect for serving 4-6 people, this Caprese Salad With a Twist is sure to impress your guests with its blend of textures and flavors.
Ingredients:
- 4 large heirloom tomatoes, sliced
- 1 pound fresh mozzarella, sliced
- 1 cup fresh basil leaves
- 2 medium bell peppers, sliced
- 1 medium zucchini, sliced
- 2 tablespoons olive oil
- Salt and pepper to taste
- 1/4 cup balsamic reduction
- 1/4 cup toasted pine nuts
Instructions:
- Prepare the Vegetables: Preheat your oven to 400°F (200°C). Place the sliced bell peppers and zucchini on a baking sheet, drizzle with olive oil, and season with salt and pepper. Roast in the preheated oven for about 15-20 minutes until the vegetables are tender and slightly charred. Remove from the oven and allow them to cool.
- Assemble the Salad: Arrange the sliced heirloom tomatoes and mozzarella on a large serving platter, alternating between the two. Tuck fresh basil leaves between the slices for added flavor and color.
- Add the Roasted Vegetables: Once cooled, scatter the roasted bell peppers and zucchini slices over the arranged tomatoes and mozzarella, ensuring an even distribution across the platter.
- Drizzle the Dressing: Drizzle the balsamic reduction over the entire salad, ensuring each component is lightly coated. This adds a sweet and tangy flavor that enhances the overall taste.
- Garnish and Serve: Sprinkle toasted pine nuts over the top of the salad for a crunchy texture. Serve immediately at room temperature, allowing the flavors to meld together beautifully.
Extra Tips:
For an even more flavorful salad, consider marinating the mozzarella slices in olive oil and herbs like oregano or thyme before assembling. If you prefer a spicier kick, add a pinch of red pepper flakes to the roasted vegetables.
To save time, the roasted vegetables can be prepared a day in advance and stored in the refrigerator until ready to use. Confirm the salad is served fresh for the best taste and presentation.
Mushroom Risotto With Fresh Herbs
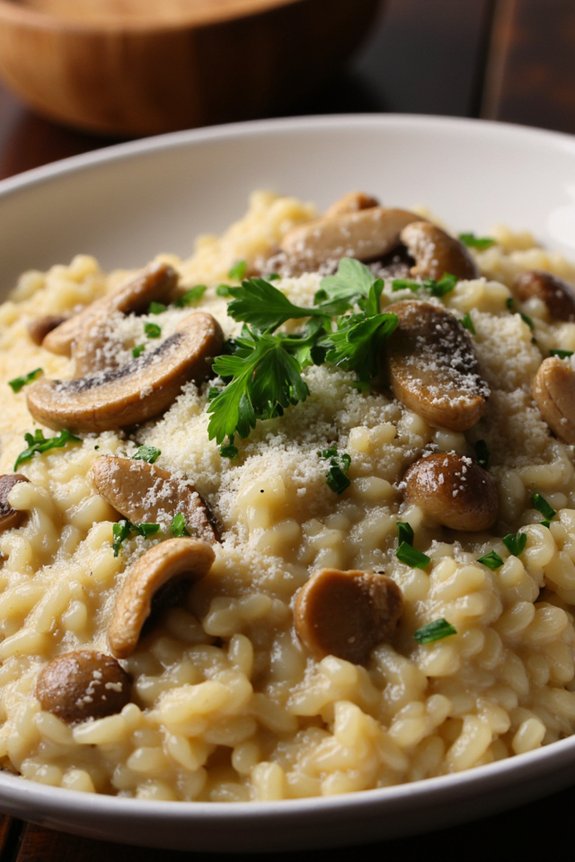
Mushroom Risotto With Fresh Herbs is a delightful Italian dish that combines the earthy flavors of mushrooms with the aromatic freshness of herbs. This creamy risotto is perfect for a cozy dinner or a special occasion, offering a comforting experience that’s both luxurious and satisfying.
The slow cooking process allows the Arborio rice to absorb the flavors of the broth and mushrooms, resulting in a rich and velvety texture. Fresh herbs such as parsley, thyme, and chives enhance the dish with their vibrant flavors, making every bite a celebration of Italian cuisine.
Perfect for serving 4-6 people, this Mushroom Risotto With Fresh Herbs can be paired with a crisp white wine or a revitalizing green salad for a complete meal. The key to success is patience and constant stirring, guaranteeing that the rice is cooked to perfection and each grain is infused with flavor. This recipe will guide you through the process, providing tips and techniques to help you create a restaurant-quality risotto in your own kitchen.
Ingredients:
- 1 1/2 cups Arborio rice
- 8 cups chicken or vegetable broth
- 1 pound fresh mushrooms (such as cremini or button), sliced
- 1 small onion, finely chopped
- 2 cloves garlic, minced
- 1/2 cup dry white wine
- 1/2 cup grated Parmesan cheese
- 2 tablespoons olive oil
- 2 tablespoons unsalted butter
- 1/4 cup fresh parsley, chopped
- 1 tablespoon fresh thyme leaves
- 1 tablespoon fresh chives, chopped
- Salt and pepper to taste
Cooking Instructions:
- Prepare the Broth: In a medium saucepan, warm the chicken or vegetable broth over low heat. Keep it hot but not boiling throughout the cooking process to guarantee it blends smoothly with the risotto.
- Cook the Mushrooms: In a large skillet, heat 1 tablespoon of olive oil over medium-high heat. Add the sliced mushrooms and cook until they’re golden brown and have released their moisture, about 5-7 minutes. Remove the mushrooms from the skillet and set aside.
- Sauté Onions and Garlic: In the same skillet, add the remaining 1 tablespoon of olive oil and 2 tablespoons of butter. Once the butter is melted, add the chopped onion and cook until translucent, about 3-4 minutes. Stir in the minced garlic and cook for an additional 1 minute.
- Toast the Rice: Add the Arborio rice to the skillet with the onions and garlic. Stir frequently for about 2 minutes until the rice is lightly toasted and coated in the oil and butter mixture.
- Deglaze with Wine: Pour in the white wine and stir until it’s mostly absorbed by the rice. This process will add depth of flavor to the risotto.
- Add Broth Gradually: Begin adding the hot broth to the rice, one ladle at a time. Stir constantly and allow each addition to be absorbed before adding the next. Continue this process for about 18-20 minutes until the rice is creamy and cooked al dente.
- Incorporate Mushrooms and Cheese: Once the rice is cooked, stir in the cooked mushrooms, grated Parmesan cheese, and fresh herbs (parsley, thyme, and chives). Season with salt and pepper to taste.
- Rest and Serve: Remove the risotto from heat and let it rest for a couple of minutes. Serve hot, garnishing with additional fresh herbs if desired.
Extra Tips:
When making risotto, it’s essential to use Arborio rice as its high starch content gives risotto its creamy consistency. Always keep the broth warm to guarantee the rice cooks evenly and absorbs the liquid properly.
Stirring constantly is key to achieving the perfect texture, as it helps release the rice’s starches. Feel free to experiment with different types of mushrooms or add a splash of truffle oil for an extra touch of luxury.
Enjoy your homemade Mushroom Risotto With Fresh Herbs as a main course or as an elegant side dish.
Fennel and Orange Salad
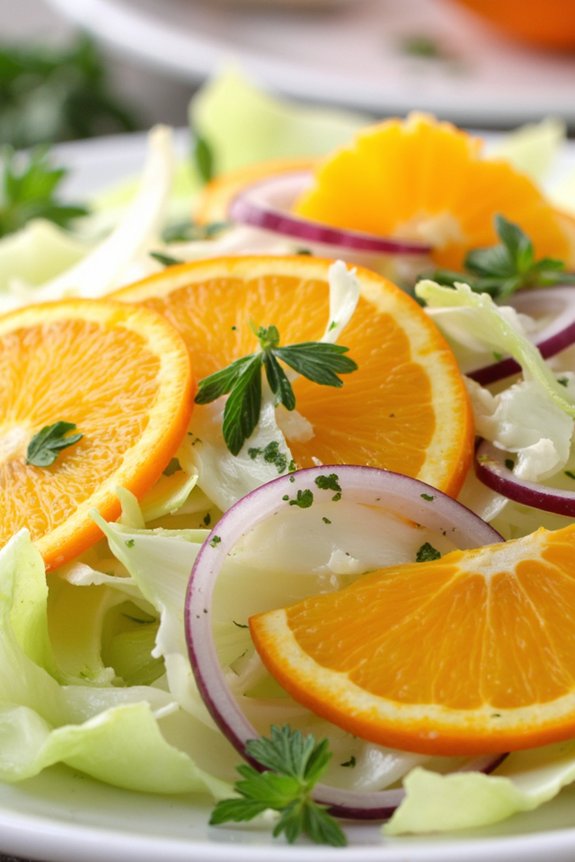
Fennel and Orange Salad is a classic Italian dish that perfectly balances the fresh, crisp flavors of fennel with the sweet, citrusy notes of oranges. This revitalizing salad isn’t only visually appealing but also offers a delightful combination of flavors that can serve as a perfect starter or side dish. The salad is simple to prepare and requires minimal ingredients, making it an excellent choice for a light, healthy meal that can be enjoyed by the whole family.
This salad is ideal for serving 4-6 people and can be prepared in a matter of minutes. The key to this dish is using fresh, high-quality ingredients to guarantee that the flavors are vibrant and the textures are just right. The addition of a light vinaigrette enhances the natural flavors of the fennel and oranges, while a sprinkle of fresh herbs adds a touch of color and an extra layer of taste.
Ingredients for 4-6 servings:
- 2 large fennel bulbs
- 3 large oranges
- 1 small red onion
- 1/4 cup extra-virgin olive oil
- 2 tablespoons fresh lemon juice
- Salt to taste
- Freshly ground black pepper to taste
- 1/4 cup fresh mint leaves, chopped
- 1/4 cup fresh parsley leaves, chopped
Cooking Instructions:
- Prepare the Fennel: Begin by cutting off the stalks from the fennel bulbs. Slice the bulbs in half lengthwise, then cut out the tough core. Thinly slice the fennel bulbs and place the slices in a large salad bowl.
- Segment the Oranges: Using a sharp knife, peel the oranges by cutting away the skin and pith. Hold each orange over the salad bowl to catch any juice, and carefully cut between the membranes to segment the oranges. Add the orange segments to the bowl with the fennel.
- Slice the Onion: Peel and thinly slice the red onion. Add the slices to the salad bowl, ensuring they’re evenly distributed among the fennel and oranges.
- Make the Vinaigrette: In a small bowl, whisk together the extra-virgin olive oil, fresh lemon juice, a pinch of salt, and freshly ground black pepper. Adjust the seasoning to taste, then drizzle the vinaigrette over the salad ingredients in the bowl.
- Toss the Salad: Gently toss the salad to guarantee all the ingredients are coated with the vinaigrette. Be careful not to break the orange segments as you mix.
- Garnish: Finish the salad by sprinkling the chopped mint and parsley over the top. This will add color and an additional layer of fresh flavor to the dish.
Extra Tips:
When preparing the Fennel and Orange Salad, it’s important to slice the fennel and onion as thinly as possible to guarantee that the textures are light and enjoyable. Use a mandoline slicer if available for even slices.
For a more intense flavor, consider adding a pinch of fennel seeds or a dash of balsamic vinegar to the vinaigrette. Serve the salad immediately after preparing it to enjoy the freshest flavors, or chill it in the refrigerator for about 30 minutes if you prefer a slightly colder salad.
Rustic Minestrone Soup
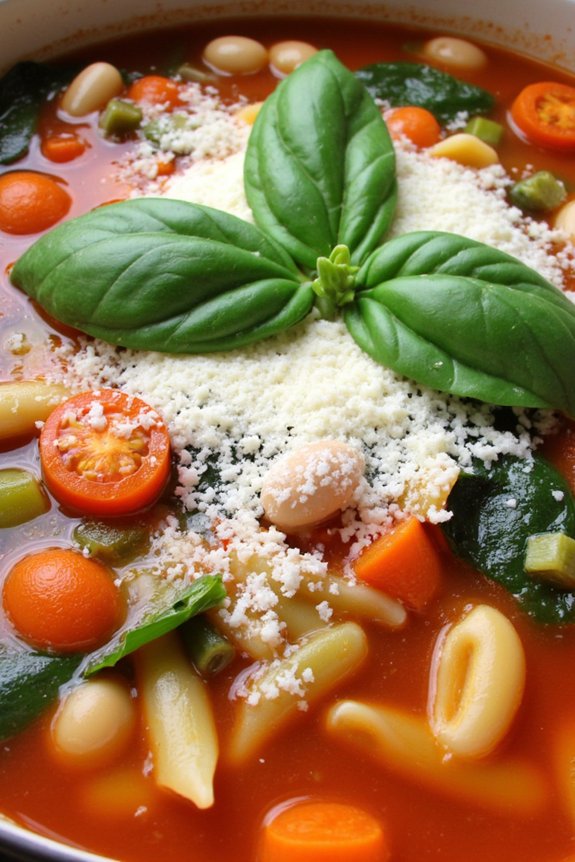
Minestrone soup is a quintessential Italian dish that embodies the heart and soul of Italian cuisine: simplicity, seasonality, and nourishment. This rustic version of Minestrone is loaded with fresh vegetables, making it a healthy and hearty meal perfect for any time of the year. Its rich, aromatic broth is enhanced by an array of seasonal vegetables, beans, and pasta, offering a beautifully balanced dish that’s both filling and nutritious.
This recipe serves 4-6 people, making it perfect for a family meal or a cozy gathering with friends. The soup is versatile, allowing you to use whatever vegetables you have on hand, but this classic combination guarantees a robust and flavorful pot of soup. Easy to prepare and utterly comforting, this Rustic Minestrone Soup is a true celebration of Italian culinary tradition.
Ingredients:
- 2 tablespoons olive oil
- 1 large onion, diced
- 2 cloves garlic, minced
- 2 carrots, diced
- 2 celery stalks, diced
- 1 zucchini, diced
- 1 potato, peeled and diced
- 1 cup green beans, trimmed and cut into 1-inch pieces
- 1 (14-ounce) can diced tomatoes
- 4 cups vegetable broth
- 1 (15-ounce) can cannellini beans, drained and rinsed
- 1 cup small pasta (such as ditalini or elbow macaroni)
- 1 teaspoon dried oregano
- 1 teaspoon dried basil
- Salt and pepper to taste
- 2 cups fresh spinach leaves
- Grated Parmesan cheese, for serving
- Fresh basil leaves, for garnish
Cooking Instructions:
- Sauté Aromatics: In a large pot, heat the olive oil over medium heat. Add the onion and garlic, sautéing until the onion becomes translucent, about 5 minutes.
- Add Vegetables: Stir in the carrots and celery, allowing them to cook for another 5 minutes until they begin to soften. Add the zucchini, potato, and green beans, stirring well to incorporate all the vegetables.
- Simmer the Soup: Pour in the diced tomatoes and vegetable broth. Bring the mixture to a boil, then reduce the heat to low and let it simmer for about 20 minutes, or until the vegetables are tender.
- Incorporate Beans and Pasta: Stir in the cannellini beans and pasta. Season with oregano, basil, salt, and pepper. Continue to simmer for another 10 minutes, or until the pasta is al dente.
- Finish with Spinach: Add the spinach leaves, stirring them into the soup until they wilt. Adjust seasoning as necessary.
- Serve: Ladle the soup into bowls and top with grated Parmesan cheese and fresh basil leaves. Serve hot.
Extra Tips:
For the best flavor, use fresh, high-quality ingredients, especially when it comes to the vegetables and herbs. If you have the time, allow the soup to simmer a little longer for deeper flavors.
This soup is also a great way to use up any leftover vegetables you have on hand. Feel free to swap or add other vegetables you enjoy. To make the soup more filling, you can add more beans or pasta.
If you prefer a thicker consistency, mash some of the beans before adding them to the soup. Finally, remember that Minestrone often tastes even better the next day, so consider making it ahead of time.