

There’s something truly magical about Italian pastries. From the first bite of a crispy cannoli to the tender layers of sfogliatelle, each treat feels like a little piece of Italy. These flaky desserts are perfect for indulging your sweet tooth and exploring new flavors. Whether you’re a fan of creamy fillings or sugary toppings, this list of recipes will have something for everyone. Let’s explore the delicious world of Italian pastry delights together.
Classic Cannoli

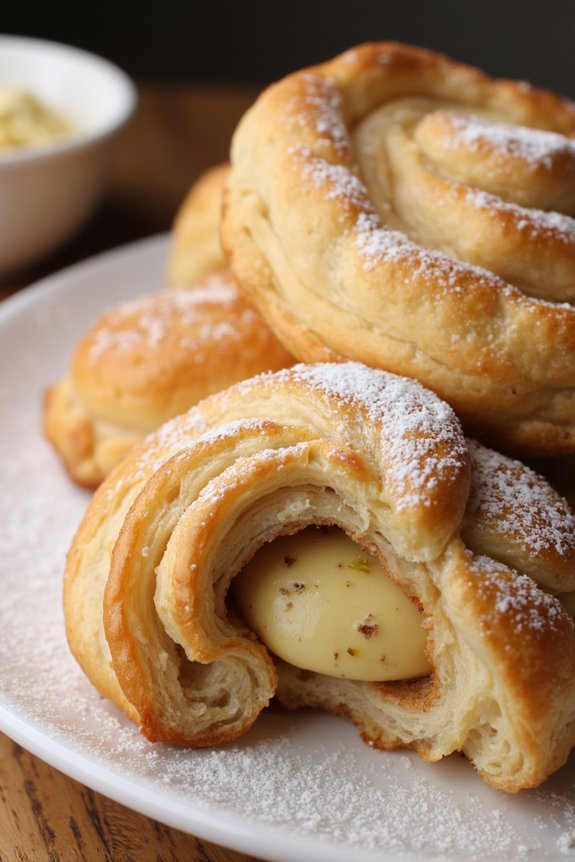
Cannoli are a quintessential Italian pastry dessert that have delighted taste buds for centuries. Originating from the Sicilian region, these delicious treats feature a crispy, fried pastry shell filled with a sweet and creamy ricotta cheese mixture. The contrast between the crunchy exterior and the smooth, flavorful filling makes cannoli a beloved dessert for any occasion.
Whether enjoyed as an end to an Italian feast or as a standalone indulgence, classic cannoli are sure to impress both family and friends.
Making cannoli at home may seem intimidating, but with the right recipe and a bit of patience, you can create this iconic dessert in your own kitchen. The key to perfect cannoli is balancing the textures and flavors, making sure the shells are crisp and the filling is rich yet light. By following the steps below, you’ll be able to craft cannoli that rival those found in Italian bakeries, bringing a taste of Sicily right to your table.
Ingredients (serves 4-6 people):
*For the shells:*
- 2 cups all-purpose flour
- 2 tablespoons granulated sugar
- 1/2 teaspoon salt
- 2 tablespoons unsalted butter, chilled and cubed
- 1 large egg yolk
- 1/2 cup Marsala wine (or red wine)
- Vegetable oil, for frying
For the filling:
- 1 1/2 cups ricotta cheese, drained
- 3/4 cup powdered sugar
- 1/2 teaspoon vanilla extract
- 1/4 cup mini chocolate chips
- 1 teaspoon grated orange zest
- Optional: 1/4 cup chopped pistachios for garnish
Cooking Instructions:
- Prepare the Dough: In a large bowl, combine the flour, sugar, and salt. Add the cubed butter and use your fingers to mix until the mixture resembles coarse crumbs. Stir in the egg yolk, then gradually add the Marsala wine, mixing until a dough forms. Knead the dough on a lightly floured surface until smooth, about 5 minutes. Wrap in plastic wrap and refrigerate for at least 1 hour.
- Make the Filling: While the dough is chilling, prepare the filling. In a medium bowl, combine the drained ricotta, powdered sugar, and vanilla extract. Mix until smooth and creamy. Gently fold in the mini chocolate chips and orange zest. Cover and refrigerate until ready to use.
- Roll and Cut the Dough: Once the dough has chilled, divide it into four equal parts. On a floured surface, roll out each piece to about 1/8-inch thickness. Using a round cutter (about 4 inches in diameter), cut circles from the dough. Wrap each circle around a metal cannoli tube, sealing the edges with a bit of beaten egg white to make sure they hold their shape during frying.
- Fry the Shells: Heat the vegetable oil in a deep pot to 360°F (182°C). Carefully lower the wrapped tubes into the hot oil, frying until golden brown, about 2-3 minutes. Remove and drain on paper towels. Once cool enough to handle, gently slide the shells off the tubes.
- Fill the Cannoli: Just before serving, fill a piping bag with the ricotta mixture. Pipe the filling into each end of the cannoli shells, making sure they’re generously filled. If desired, dip the ends in chopped pistachios for added texture and flavor.
- Serve and Enjoy: Arrange the filled cannoli on a serving platter. Optionally, dust with additional powdered sugar before serving.
Extra Tips:
To make sure the best texture for your cannoli filling, make sure to thoroughly drain the ricotta cheese before using it. You can do this by placing the ricotta in a fine mesh strainer over a bowl and allowing it to drain for a few hours in the refrigerator.
Additionally, it’s important to fill the cannoli shells just before serving to maintain their crispness. If filled too far in advance, the shells may become soggy.
Also, feel free to experiment with different fillings by adding ingredients like cinnamon or nutmeg for a unique twist on the classic recipe.
Sfogliatelle
Sfogliatelle are a traditional Italian pastry hailing from the Campania region, particularly popular in Naples. These pastries are known for their unique shell shape with a crisp, flaky exterior and a sweet, creamy filling. The name “sfogliatelle” translates to “small, thin layers,” referring to the delicate layers of dough that make up the shell. The filling typically consists of a ricotta-based mixture, often flavored with citrus zest and a hint of cinnamon, offering a delightful contrast to the crisp layers of pastry.
Making sfogliatelle from scratch can be a rewarding experience, though it requires a bit of patience and attention to detail. The preparation involves creating a dough similar to puff pastry, which is then rolled and shaped into the iconic shell form. The filling combines ricotta cheese, semolina, and sugar, which is then infused with orange zest and cinnamon for added flavor. This recipe yields enough sfogliatelle to serve 4-6 people, making it perfect for a family gathering or a special occasion.
Ingredients for 4-6 Servings:
- 2 cups all-purpose flour
- 1/4 teaspoon salt
- 3/4 cup water
- 1/2 cup unsalted butter, softened
- 1 cup ricotta cheese
- 1/2 cup semolina flour
- 1/2 cup granulated sugar
- 1 teaspoon vanilla extract
- 1 teaspoon orange zest
- 1/2 teaspoon ground cinnamon
- 1 egg yolk
- Powdered sugar for dusting
Cooking Instructions:
- Prepare the Dough: In a mixing bowl, combine the all-purpose flour and salt. Gradually add the water while mixing until a rough dough forms. Knead the dough on a floured surface for about 5 minutes until smooth. Wrap it in plastic wrap and let it rest for at least 30 minutes at room temperature.
- Make the Filling: In another bowl, mix together the ricotta cheese, semolina flour, granulated sugar, vanilla extract, orange zest, cinnamon, and egg yolk. Stir until the mixture is smooth and well combined. Cover and refrigerate until needed.
- Roll the Dough: Divide the rested dough into four pieces. Roll each piece into a very thin sheet (about 1/16 inch thick). Spread a thin layer of softened butter over each sheet of dough.
- Form the Layers: Roll each buttered sheet into a tight log, starting from the short side. Wrap each log in plastic wrap and refrigerate for at least 1 hour, allowing the dough to firm up.
- Shape the Pastry: Preheat your oven to 375°F (190°C). Cut each log into 1/2-inch thick slices. Using your fingers, gently press the center of each slice to create a cone shape. Fill each cone with the prepared ricotta mixture, then pinch the open end to seal.
- Bake the Sfogliatelle: Place the shaped pastries on a baking sheet lined with parchment paper. Bake in the preheated oven for 25-30 minutes, or until golden brown and crisp.
- Serve: Allow the sfogliatelle to cool slightly before dusting with powdered sugar. Serve warm or at room temperature for the best flavor.
Extra Tips:
When making sfogliatelle, verify that the butter is soft enough to spread easily but not melted, as this will help in achieving the desired flaky texture.
Also, while rolling the dough, try to maintain even pressure to create uniform layers. If the dough becomes too difficult to handle, refrigerate it for a few minutes to firm up.
Finally, work quickly when shaping the pastries to prevent the dough from becoming too warm, as this can affect the final texture of the sfogliatelle.
Bomboloni
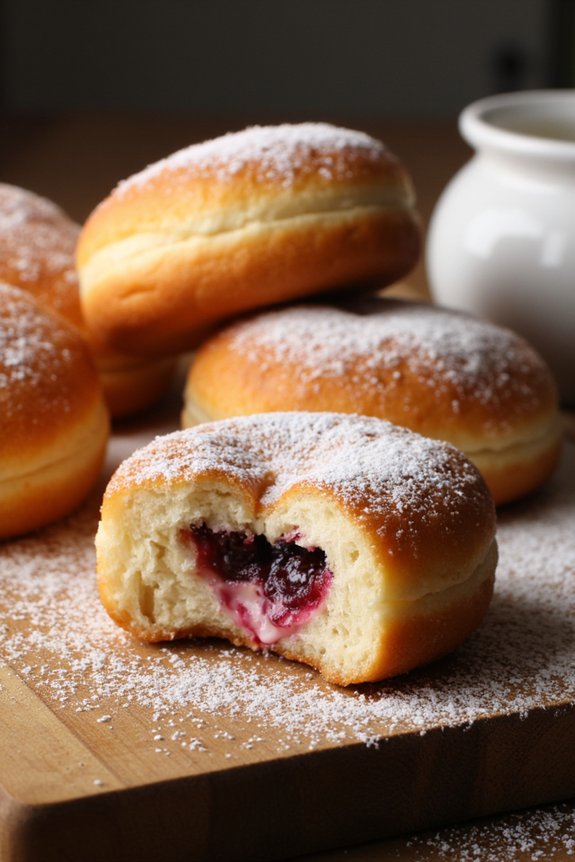
Bomboloni are delightful Italian doughnuts that are light, fluffy, and perfect for satisfying your sweet tooth. These traditional treats are often filled with a rich pastry cream or fruit preserves and are dusted with sugar, making them an irresistible indulgence.
Originating from Tuscany, bomboloni are enjoyed at any time of the day, whether as a breakfast treat, a mid-afternoon snack, or a delightful dessert. Preparing bomboloni at home is a rewarding experience that allows you to enjoy them fresh and warm, straight from your kitchen.
To make a batch of bomboloni that serves 4-6 people, you’ll start by preparing a yeast-based dough that will rise to create that ideal, airy texture. Once you have your dough, the bomboloni are shaped, fried to golden perfection, and filled with your choice of luscious fillings. This recipe will guide you through each step, guaranteeing your homemade bomboloni turn out irresistibly delicious.
Ingredients:
- 2 ½ cups all-purpose flour
- 1 packet (2 ¼ teaspoons) active dry yeast
- ¼ cup granulated sugar
- ½ teaspoon salt
- ¾ cup whole milk, warmed
- 2 large eggs
- 4 tablespoons unsalted butter, softened
- Vegetable oil, for frying
- 1 cup pastry cream or fruit preserves (for filling)
- Powdered sugar, for dusting
Instructions:
- Prepare the Dough: In a small bowl, combine the warm milk and yeast. Allow it to sit for about 5 minutes until foamy. In a large mixing bowl, whisk together the flour, sugar, and salt. Add the yeast mixture, eggs, and softened butter to the dry ingredients. Mix until a dough forms.
- Knead and Rise: Transfer the dough onto a lightly floured surface and knead for about 8-10 minutes until smooth and elastic. Place the dough in a greased bowl, cover with a clean cloth, and let it rise in a warm place for about 1-2 hours or until doubled in size.
- Shape the Bomboloni: Once risen, punch down the dough to release the air. Roll the dough out to about ½ inch thickness. Use a round cutter to cut out circles, re-rolling the scraps if needed. Place the circles on a baking sheet lined with parchment paper, cover, and let them rise for another 30 minutes.
- Fry the Bomboloni: Heat vegetable oil in a deep frying pan to 350°F (175°C). Carefully place a few dough circles into the hot oil, frying them for about 1-2 minutes on each side until golden brown. Remove with a slotted spoon and drain on paper towels.
- Fill and Dust: Once the bomboloni have cooled slightly, use a pastry bag fitted with a small tip to fill each with pastry cream or preserves. Dust generously with powdered sugar before serving.
Extra Tips:
For best results, make sure your oil maintains a consistent temperature to avoid soggy or undercooked bomboloni. If you don’t have a thermometer, test the oil by dropping a small piece of dough into it; it should sizzle and rise to the top.
Additionally, if you want a variety of flavors, you can fill the bomboloni with different types of jams or custards. Enjoy these delicious treats fresh for the best texture and flavor. Store any leftovers in an airtight container and consume them within a day or two for maximum freshness.
Zeppole Di San Giuseppe

Zeppole di San Giuseppe are delightful Italian pastries traditionally made to celebrate St. Joseph’s Day on March 19th. These light and airy doughnut-like treats are filled with a rich custard or sweet ricotta and often topped with a cherry or dusted with powdered sugar.
Originating from Southern Italy, particularly Naples, Zeppole di San Giuseppe have become a beloved dessert enjoyed by Italians and pastry lovers worldwide. Their delicate texture and sweet, creamy filling make them a perfect indulgence for any occasion.
The dough for Zeppole di San Giuseppe is typically choux pastry, which is versatile and can be used in both sweet and savory dishes. Once fried or baked, the zeppole are filled with a luscious and smooth pastry cream, often flavored with vanilla or lemon zest.
While they may seem complex, making these delicious pastries at home is quite achievable with the right ingredients and techniques. This recipe will guide you through the process of creating Zeppole di San Giuseppe for a serving size of 4-6 people, guaranteeing a delightful treat for your family and friends.
Ingredients:
- 1 cup water
- 1/2 cup unsalted butter
- 1 cup all-purpose flour
- 4 large eggs
- 1/4 teaspoon salt
- 2 tablespoons granulated sugar
- Vegetable oil (for frying)
- 2 cups whole milk
- 1/2 cup granulated sugar
- 1/4 cup cornstarch
- 4 large egg yolks
- 1 teaspoon vanilla extract
- Zest of 1 lemon
- Maraschino cherries (optional)
- Powdered sugar (for dusting)
Cooking Instructions:
1. Prepare the Choux Pastry: In a medium-sized saucepan, combine the water, butter, salt, and granulated sugar. Bring the mixture to a boil over medium heat. Once boiling, add the flour all at once, stirring vigorously with a wooden spoon until the dough forms a ball and pulls away from the sides of the pan.
Remove from heat and let it cool slightly.
2. Incorporate the Eggs: Transfer the dough to a mixing bowl. Beat in the eggs one at a time, making certain each egg is fully incorporated before adding the next. The dough should become smooth and glossy.
3. Shape and Fry the Zeppole: Heat vegetable oil in a deep fryer or a large, deep pot to 350°F (175°C). Using a piping bag fitted with a large star tip, pipe circles of dough onto small squares of parchment paper.
Carefully drop the dough, paper-side up, into the hot oil. Fry until golden brown on both sides, about 4-5 minutes. Remove with a slotted spoon and drain on paper towels.
4. Prepare the Pastry Cream: In a saucepan, whisk together the milk, 1/2 cup granulated sugar, and cornstarch. In a separate bowl, beat the egg yolks.
Slowly whisk the hot milk mixture into the egg yolks, then return the mixture to the saucepan. Cook over medium heat, whisking constantly until thickened and bubbling. Remove from heat and stir in the vanilla extract and lemon zest. Let it cool completely.
5. Fill the Zeppole: Once the zeppole and pastry cream are cooled, use a piping bag fitted with a small tip to fill each zeppole with the pastry cream. Alternatively, slice the zeppole in half and spoon the cream inside.
6. Garnish and Serve: Top each filled zeppola with a maraschino cherry, if desired, and dust with powdered sugar before serving.
Extra Tips:
To guarantee your zeppole are perfectly light and crispy, make sure the oil temperature is consistent throughout the frying process. If the oil is too hot, the outside will cook too quickly while the inside remains doughy.
If baking instead of frying, preheat your oven to 400°F (200°C) and bake for 20-25 minutes until golden brown. Allow the zeppole to cool completely before filling to prevent the pastry cream from melting.
Enjoy these delightful treats fresh on the day they’re made for the best taste and texture.
Ricciarelli
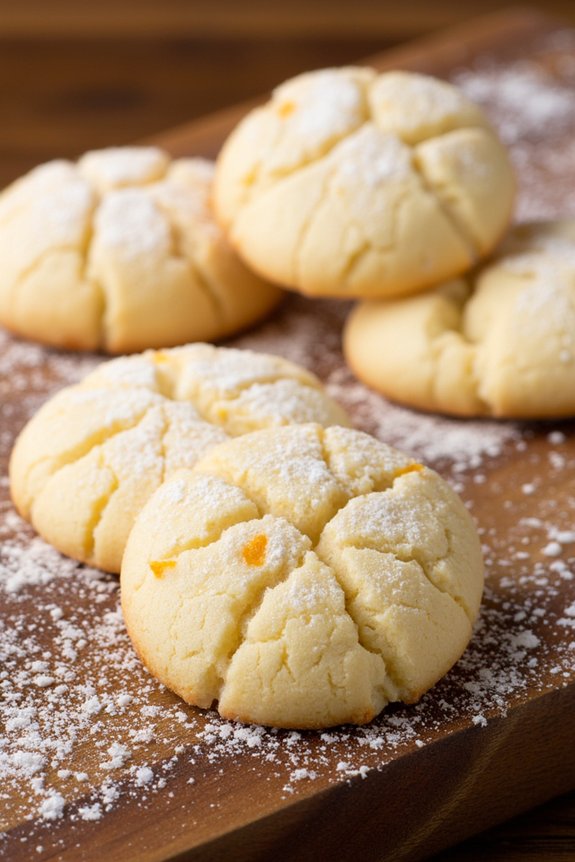
Ricciarelli is a classic Italian pastry that hails from the region of Tuscany, known for its rich almond flavor and soft, chewy texture. Traditionally enjoyed during the Christmas season, these delightful cookies are enjoyed by many throughout the year.
Ricciarelli are characterized by their oval shape, dusting of powdered sugar, and a subtle hint of orange. The combination of almond flour and orange zest creates a wonderfully fragrant and delicious treat that pairs perfectly with a cup of espresso or a glass of dessert wine.
These almond cookies are relatively simple to make, requiring just a few key ingredients to achieve their signature taste and texture. The secret to their chewy consistency lies in the careful folding of egg whites into the almond dough, which contributes to their lightness.
Once baked, the cookies develop a delicate, crackled surface that’s both visually appealing and indicative of their tender interior. Whether you’re hosting a festive gathering or simply craving a sweet indulgence, Ricciarelli are sure to captivate with their authentic Italian charm.
Ingredients (Serves 4-6)
- 250g almond flour
- 200g granulated sugar
- 2 large egg whites
- Zest of 1 orange
- 1 teaspoon almond extract
- 1/2 teaspoon vanilla extract
- 1/2 teaspoon baking powder
- A pinch of salt
- Powdered sugar for dusting
Cooking Instructions
- Prepare the Dough: In a large mixing bowl, combine the almond flour, granulated sugar, orange zest, baking powder, and a pinch of salt. Mix well to ascertain that all the dry ingredients are evenly distributed.
- Whip the Egg Whites: In a separate bowl, beat the egg whites until they form soft peaks. Be careful not to overbeat, as this can affect the texture of the cookies. The soft peaks should hold their shape but still be smooth and glossy.
- Combine Ingredients: Gently fold the beaten egg whites into the dry ingredients using a spatula. Add the almond extract and vanilla extract as you fold. Mix until a sticky dough forms, being careful not to deflate the egg whites too much.
- Shape the Cookies: Preheat your oven to 160°C (320°F) and line a baking sheet with parchment paper. Using your hands, shape the dough into small ovals, approximately 1 inch wide and 2 inches long. Place them on the prepared baking sheet, spacing them at least 1 inch apart.
- Dust with Powdered Sugar: Generously dust the tops of the shaped cookies with powdered sugar. This will give them their characteristic crackled appearance when baked.
- Bake: Bake in the preheated oven for about 15-20 minutes or until the cookies are lightly golden and set. They should remain soft and chewy on the inside.
- Cool: Remove from the oven and allow the cookies to cool on the baking sheet for a few minutes before transferring them to a wire rack to cool completely.
Extra Tips
To guarantee the best results, use high-quality almond flour for a finer texture and richer flavor. The dough can be sticky, so lightly dusting your hands with powdered sugar or using a bit of water can help with shaping the cookies.
If you prefer a stronger almond flavor, you can adjust the almond extract to taste. For a festive touch, consider adding a few drops of orange liqueur to the dough.
Biscotti Di Prato

Biscotti Di Prato, also known as Cantucci, is a classic Italian dessert that hails from the picturesque region of Tuscany. These almond-studded cookies are traditionally enjoyed with a glass of sweet Vin Santo wine, which adds a delightful complement to their crunchy texture.
Biscotti Di Prato are twice-baked, resulting in their characteristic crispness. They’re perfect for dipping, whether in the traditional wine or a hot cup of coffee or tea. This recipe will guide you through creating these delightful treats, capturing the authentic flavors and textures that have made them a beloved dessert across Italy and beyond.
Crafting Biscotti Di Prato at home is a rewarding experience that allows you to enjoy fresh, homemade cookies with a personal touch. The process involves forming a dough enriched with whole almonds, which are then shaped into logs and baked until golden.
After the initial bake, the logs are sliced into the characteristic biscotti shape and baked again until they reach the perfect level of crispness. This recipe yields enough biscotti to serve 4-6 people, making it ideal for a cozy gathering with friends or family.
Ingredients for Biscotti Di Prato (serving size: 4-6 people):
- 2 cups all-purpose flour
- 1 cup granulated sugar
- 1 teaspoon baking powder
- 1/4 teaspoon salt
- 3 large eggs
- 1 teaspoon vanilla extract
- 1 teaspoon almond extract
- 1 cup whole almonds, toasted
- Zest of 1 lemon (optional)
Cooking Instructions:
- Preheat the Oven: Start by preheating your oven to 350°F (175°C). Line a baking sheet with parchment paper to prevent sticking.
- Prepare the Dough: In a large mixing bowl, combine the flour, sugar, baking powder, and salt. In a separate bowl, whisk together the eggs, vanilla extract, and almond extract. Gradually add the wet ingredients to the dry ingredients, mixing until a dough forms.
- Incorporate Almonds and Zest: Gently fold in the toasted almonds and lemon zest (if using) into the dough. Confirm the almonds are evenly distributed throughout.
- Shape the Logs: Divide the dough into two equal portions. On a lightly floured surface, shape each portion into a log about 12 inches long and 2 inches wide. Place the logs onto the prepared baking sheet.
- First Bake: Bake the logs in the preheated oven for 25-30 minutes, or until they’re lightly golden and firm to the touch. Remove them from the oven and allow them to cool for about 10 minutes.
- Slice the Biscotti: Once slightly cooled, transfer the logs to a cutting board. Using a serrated knife, slice the logs into 1/2-inch thick slices on a slight diagonal.
- Second Bake: Arrange the slices on the baking sheet, cut side down. Return them to the oven and bake for an additional 10-15 minutes, flipping them halfway through, until they’re crisp and golden.
- Cool and Serve: Remove the biscotti from the oven and let them cool completely on a wire rack. Serve the biscotti with a glass of Vin Santo or your favorite coffee or tea.
Extra Tips:
For best results, confirm that your almonds are thoroughly toasted before incorporating them into the dough; this enhances their flavor and adds a delightful crunch.
If you prefer a slightly softer biscotti, reduce the time for the second bake by a few minutes. Feel free to experiment with additional flavorings such as orange zest or even a touch of cinnamon for a unique twist.
Biscotti Di Prato can be stored in an airtight container for up to two weeks, making them a convenient and delicious treat to have on hand for unexpected guests or a quick snack.
Tiramisu Puffs

For those who love the classic Italian dessert Tiramisu but are looking for a lighter, more playful twist, Tiramisu Puffs are the perfect solution. These delightful pastries capture the essence of traditional Tiramisu with layers of coffee-infused cream and rich mascarpone, but are encased in a delicate puff pastry shell that makes them both satisfying and visually appealing.
Ideal for a dinner party or a cozy family dessert, these puffs deliver the familiar flavors of coffee, cocoa, and cream with a revitalizing new texture. This recipe yields 4-6 servings, making it perfect for sharing. The combination of crispy puff pastry and creamy filling creates a dessert that’s both sophisticated and approachable.
The preparation involves baking the pastry shells to golden perfection and filling them with a luscious mascarpone mixture, creating a dessert that will impress both the eyes and taste buds of your guests.
Ingredients (Serves 4-6):
- 1 sheet puff pastry, thawed
- 1 cup heavy cream
- 1/2 cup mascarpone cheese
- 1/4 cup powdered sugar
- 1 teaspoon vanilla extract
- 1 tablespoon instant coffee granules
- 1/2 cup hot water
- 2 tablespoons cocoa powder
- 2 tablespoons coffee liqueur (optional)
- Powdered sugar for dusting
Instructions:
- Preheat and Prepare: Preheat your oven to 400°F (200°C). Roll out the puff pastry sheet on a lightly floured surface to smooth any creases. Cut the pastry into 12 equal squares and place them on a baking sheet lined with parchment paper.
- Bake the Puff Pastry: Bake the pastry squares in the preheated oven for 12-15 minutes or until they’re puffed and golden brown. Remove from the oven and allow them to cool completely on a wire rack.
- Prepare the Coffee Mixture: Dissolve the instant coffee granules in hot water, adding the coffee liqueur if using. Allow this mixture to cool completely.
- Make the Filling: In a large mixing bowl, beat the heavy cream until soft peaks form. In a separate bowl, mix the mascarpone cheese with powdered sugar and vanilla extract until smooth. Gently fold the whipped cream into the mascarpone mixture to create a light and airy filling.
- Assemble the Puffs: Once the puff pastry squares are cooled, gently split them in half horizontally. Dip the bottom half of each square lightly in the coffee mixture, ensuring it soaks up the coffee without becoming soggy.
- Fill the Puffs: Spoon or pipe the mascarpone filling onto the bottom half of each pastry square. Place the top halves back on, dust with cocoa powder and powdered sugar for a classic Tiramisu look.
- Chill and Serve: Refrigerate the assembled puffs for at least 30 minutes to allow the flavors to meld. Serve chilled, optionally garnished with coffee beans or chocolate shavings.
Extra Tips:
For best results, confirm all ingredients are properly chilled before starting the recipe to help the filling set well. If you’re in a rush, the puff pastry squares can be prepared a day in advance. Just store them in an airtight container and add the filling just before serving to maintain the perfect texture.
Additionally, feel free to adjust the amount of coffee liqueur to taste, or omit it altogether for a non-alcoholic version. Enjoy your Tiramisu Puffs with a hot espresso or a sweet dessert wine for a complete Italian-inspired dessert experience.
Almond Croissants

Indulge in the rich, flaky delight of Almond Croissants, a classic Italian pastry that promises to elevate your breakfast or teatime experience. Originating from Italy, these croissants are known for their crisp exterior, buttery layers, and the luscious almond filling that runs through the center. Perfectly balanced between sweet and savory, Almond Croissants are a pastry lover’s dream, bringing together the nutty flavor of almonds with the delicate essence of a well-baked croissant.
Preparing Almond Croissants at home might seem like an intimidating task, but with the right ingredients and a little patience, you can achieve bakery-quality results in your own kitchen. Whether you’re a seasoned baker or a beginner, this recipe will guide you through each step to create croissants that aren’t only delicious but also visually stunning. The following recipe is designed to serve 4-6 people, guaranteeing everyone gets to enjoy this delightful treat.
Ingredients for 4-6 people:
- 2 sheets of puff pastry
- 1 cup almond flour
- 1/2 cup granulated sugar
- 1/4 cup unsalted butter, softened
- 2 large eggs
- 1 teaspoon vanilla extract
- 1/4 teaspoon almond extract
- 1/4 teaspoon salt
- 1/2 cup sliced almonds
- Powdered sugar for dusting
Cooking Instructions:
- Prepare the Almond Filling: In a medium bowl, combine almond flour, granulated sugar, softened butter, one egg, vanilla extract, almond extract, and salt. Mix until you achieve a smooth and creamy consistency. This almond cream will serve as the delicious filling for your croissants.
- Preheat the Oven: Preheat your oven to 375°F (190°C). Line a baking sheet with parchment paper to prevent the croissants from sticking and guarantee even baking.
- Roll and Cut the Puff Pastry: On a lightly floured surface, roll out the puff pastry sheets to ensure they’re even. Cut each sheet into triangles, approximately 6 inches wide at the base.
- Fill and Shape the Croissants: Place a generous tablespoon of the almond filling onto the base of each triangle. Gently roll the pastry from base to tip to form a crescent shape. Ensure the tip of the triangle is tucked under to keep the shape intact during baking.
- Egg Wash and Garnish: In a small bowl, beat the remaining egg and brush it over the croissants to encourage a golden-brown finish. Sprinkle sliced almonds on top for added texture and flavor.
- Bake: Arrange the croissants on the prepared baking sheet, leaving space between each one. Bake in the preheated oven for 18-20 minutes, or until the croissants are puffed and golden brown.
- Cool and Serve: Allow the croissants to cool slightly on a wire rack. Dust with powdered sugar before serving for a final touch of sweetness.
Extra Tips: When working with puff pastry, make sure it remains chilled until you’re ready to use it; this helps maintain its structure and flakiness. If time allows, refrigerate the shaped croissants for 15-20 minutes before baking to prevent the butter from melting too quickly. For an extra almond punch, you can add a touch of almond extract to the egg wash. Enjoy your Almond Croissants fresh from the oven for the best taste and texture.
Pasticciotti

Pasticciotti are delightful Italian pastries that originate from the southern region of Puglia. Traditionally, they’re filled with a rich, creamy custard and encased in a buttery, crumbly pastry shell. These bite-sized delights are perfect for breakfast, as a dessert, or even as a sweet snack throughout the day.
The classic Pasticciotti boasts a beautiful golden crust, with a luscious vanilla custard hidden within. Some variations may include chocolate or fruit fillings, but the simplicity and elegance of the original vanilla custard Pasticciotti remain a favorite among pastry lovers.
Making Pasticciotti at home may seem like an ambitious task, but with the right ingredients and a bit of patience, you can recreate this beloved Italian pastry in your own kitchen. The process involves preparing a tender pastry dough and a smooth, flavorful custard.
Once assembled, the pastries are baked to perfection, creating a contrast of textures and flavors that are sure to impress. Whether you’re an experienced baker or a novice, this recipe is designed to guide you through each step to guarantee your Pasticciotti are as authentic and delicious as those found in Italian bakeries.
Ingredients (for 4-6 servings):
For the Pastry Dough:
- 2 cups all-purpose flour
- 1/2 cup sugar
- 1/2 cup unsalted butter, chilled and cubed
- 2 eggs
- 1 teaspoon vanilla extract
- 1 teaspoon baking powder
- Pinch of salt
For the Custard Filling:
- 2 cups whole milk
- 1/2 cup sugar
- 1/4 cup all-purpose flour
- 4 egg yolks
- 1 teaspoon vanilla extract
- Zest of 1 lemon
Cooking Instructions:
1. Prepare the Pastry Dough: In a large bowl, mix the flour, sugar, baking powder, and salt. Add the cubed butter and use your fingers or a pastry cutter to blend until the mixture resembles coarse crumbs.
Add the eggs and vanilla extract. Mix until the dough comes together. Form the dough into a ball, wrap in plastic wrap, and refrigerate for at least 1 hour.
2. Make the Custard Filling: In a saucepan, heat the milk over medium heat until steaming but not boiling. In a separate bowl, whisk together the sugar, flour, and egg yolks until smooth.
Gradually add the hot milk to the egg mixture, whisking constantly. Return the mixture to the saucepan and cook over low heat, stirring continuously, until the custard thickens. Remove from heat, stir in the vanilla extract and lemon zest, and let cool to room temperature.
3. Preheat the Oven: Set your oven to 350°F (175°C) and allow it to preheat while you prepare the pastries.
4. Assemble the Pasticciotti: Roll out the chilled dough on a lightly floured surface to about 1/8 inch thickness. Cut the dough into circles slightly larger than your pastry molds.
Line each mold with a dough circle, pressing gently to fit. Fill each pastry shell with the cooled custard filling, then cover with another dough circle, sealing the edges.
5. Bake the Pasticciotti: Place the assembled pastries on a baking sheet and bake in the preheated oven for 20-25 minutes, or until the tops are golden brown.
Allow to cool slightly before removing from the molds.
6. Serve: Once cooled, dust with powdered sugar if desired and serve warm or at room temperature.
Extra Tips:
To guarantee your pastry is tender and flaky, be careful not to overwork the dough when mixing. Keeping the butter cold is essential, as it helps create the crumbly texture of the pastry.
When making the custard, patience is key; stir continuously to prevent lumps and achieve a silky, smooth texture. If you have extra time, allowing the custard to cool completely in the refrigerator will make it easier to work with when filling the pastries.
Finally, for a fun variation, consider adding a small piece of dark chocolate in the center of the custard for a delightful surprise.
Cenci

Cenci, also known as “chiacchiere” or “bugie,” are traditional Italian pastries that are often enjoyed during the Carnival season. These delightful treats are made from a simple dough that’s rolled thin, cut into various shapes, and then fried until crispy and golden brown. Lightly dusted with powdered sugar, Cenci are sweet, crunchy, and utterly addictive. Their light and airy texture makes them a perfect treat to enjoy with a cup of coffee or tea, and they’re popular in various regions of Italy, each offering slight variations in the recipe.
The beauty of Cenci lies in their simplicity and the joy they bring to those who make and share them. The dough is flavored with a hint of citrus and a splash of liquor, which gives the pastries a subtle and delightful aroma. Whether you’re making them for a festive occasion or simply to enjoy with family and friends, Cenci are sure to bring smiles and a taste of Italian tradition to your table. Below, you’ll find a recipe designed to serve 4-6 people, guaranteeing there’s plenty to go around.
Ingredients for 4-6 servings:
- 2 cups all-purpose flour
- 2 tablespoons granulated sugar
- 2 large eggs
- 2 tablespoons unsalted butter, melted
- 2 tablespoons milk
- Zest of 1 lemon or orange
- 1 tablespoon of your choice of liquor (e.g., grappa, rum, or vin santo)
- A pinch of salt
- Vegetable oil for frying
- Powdered sugar for dusting
Cooking Instructions:
- Prepare the dough: In a large mixing bowl, combine the flour, granulated sugar, and salt. Create a well in the center and add the eggs, melted butter, milk, citrus zest, and liquor. Mix the ingredients together until a dough forms.
- Knead the dough: Transfer the dough to a lightly floured surface and knead it for about 5-7 minutes, or until it becomes smooth and elastic. Wrap the dough in plastic wrap and let it rest for at least 30 minutes at room temperature.
- Roll out the dough: Once rested, divide the dough into smaller portions for easier handling. Roll each portion out on a floured surface to about 1/8 inch thickness. The thinner the dough, the crispier the Cenci will be.
- Cut the dough: Using a pastry cutter or sharp knife, cut the rolled-out dough into strips or rectangles. You can also make slits in the center of each piece for a traditional look.
- Heat the oil: In a large, heavy-bottomed pan, heat the vegetable oil to 350°F (175°C). Make sure there’s enough oil to submerge the dough strips completely.
- Fry the Cenci: Carefully place a few pieces of dough into the hot oil, being mindful not to overcrowd the pan. Fry them for about 1-2 minutes on each side, or until they’re golden brown and crispy. Use a slotted spoon to remove them and drain on paper towels.
- Dust with sugar: Once the Cenci are cool enough to handle, dust them generously with powdered sugar.
Extra Tips:
To verify your Cenci are as light and crispy as possible, make sure the dough is rolled out thinly and evenly. The resting period allows the gluten to relax, making it easier to roll.
When frying, maintain a consistent oil temperature to avoid undercooking or over-browning. If you’re preparing these for a large gathering, they can be made a day ahead and stored in an airtight container. Just remember to re-dust them with powdered sugar before serving to refresh their appearance.
Struffoli

Struffoli is a delightful Italian pastry dessert that’s often enjoyed during the holiday season, particularly around Christmas. Originating from the Campania region, this sweet treat consists of small, deep-fried dough balls coated in honey and sprinkles, creating a vibrant and festive presentation.
The crispy texture of the dough combined with the sticky sweetness of the honey makes Struffoli a favorite among both children and adults. Traditionally, this dessert is arranged in a pyramid shape or a ring, symbolizing unity and celebration.
The preparation of Struffoli involves creating a simple dough, which is then rolled into small balls and fried to a golden brown. Once fried, the dough balls are tossed in warm honey and garnished with colorful sugar sprinkles, candied fruit, or even nuts, depending on personal preference.
This dish not only offers a delightful taste but also presents an opportunity to gather family and friends together, as the preparation can be a shared activity. Whether you’re making it for a festive occasion or just to enjoy a taste of Italy, Struffoli is sure to impress with its combination of texture, flavor, and visual appeal.
Ingredients for 4-6 servings:
- 2 1/2 cups all-purpose flour
- 4 large eggs
- 1/4 cup granulated sugar
- 1/4 cup unsalted butter, softened
- Zest of 1 lemon
- 1/4 teaspoon salt
- 1 teaspoon vanilla extract
- Vegetable oil, for frying
- 1 cup honey
- 1/4 cup colorful sugar sprinkles
- Optional: candied fruit or chopped nuts for garnish
Cooking Instructions:
- Prepare the Dough: In a large mixing bowl, combine the flour, granulated sugar, salt, and lemon zest. Make a well in the center and add the eggs, softened butter, and vanilla extract. Mix together until a dough forms.
- Knead the Dough: Transfer the dough onto a lightly floured surface and knead for about 5-7 minutes until it’s smooth and elastic. Wrap the dough in plastic wrap and let it rest for 30 minutes at room temperature.
- Shape the Dough: After resting, divide the dough into four equal pieces. Roll each piece into a long rope about 1/2-inch thick. Cut the ropes into small pieces, approximately the size of a marble.
- Fry the Dough Balls: Heat vegetable oil in a deep pan or fryer to 350°F (175°C). Fry the dough balls in batches until they’re golden brown, about 2-3 minutes per batch. Remove with a slotted spoon and drain on paper towels.
- Coat with Honey: In a large saucepan, gently heat the honey over low heat until it becomes runny. Add the fried dough balls to the honey and stir until they’re fully coated.
- Assemble the Dish: Arrange the honey-coated Struffoli on a serving platter in a mound or ring shape. Immediately sprinkle with colorful sprinkles and any optional garnishes like candied fruit or nuts.
Extra Tips:
When making Struffoli, verify that the oil is at the right temperature before frying to achieve the perfect golden brown color and crispy texture. If the oil is too hot, the dough balls will brown too quickly and may be raw inside. Conversely, if the oil is too cool, the dough will absorb excess oil and become greasy.
Additionally, when coating the Struffoli with honey, it’s important to work quickly so the honey doesn’t harden before the sprinkles are added. Enjoy this treat fresh for the best texture and flavor, and store any leftovers in an airtight container to maintain their crispiness.
Maritozzi

Maritozzi are delightful Italian sweet buns that originate from Rome, known for their soft, fluffy texture and a generous filling of fresh whipped cream. Traditionally enjoyed as a breakfast delicacy, maritozzi are ideal for those who enjoy a sweet start to their day.
These buns have a slight citrusy aroma due to the inclusion of orange zest in the dough, which perfectly complements the rich cream filling. The golden-brown exterior gives a satisfying crust, while the interior remains soft and tender, making them irresistible to anyone with a sweet tooth.
Making maritozzi at home may require a bit of time and patience, but the result is worth the effort. The process involves preparing a yeast-based dough, allowing it to rise, baking it to perfection, and finally, filling it with freshly whipped cream.
While the dough is rising, your kitchen will be filled with the warm, inviting aroma of yeast and citrus, setting the stage for a delightful culinary experience. Whether you’re making them for a special breakfast, brunch, or dessert, these sweet buns are sure to impress your family and friends.
Ingredients (Serves 4-6):
- 3 cups all-purpose flour
- 1 packet (2 1/4 teaspoons) active dry yeast
- 1/2 cup granulated sugar
- 1/2 cup warm milk (about 110°F or 43°C)
- 1/4 cup unsalted butter, melted
- 1 large egg
- Zest of 1 orange
- 1/2 teaspoon salt
- 1 cup heavy cream
- 2 tablespoons powdered sugar
- 1 teaspoon vanilla extract
Instructions:
- Prepare the Yeast Mixture: In a small bowl, combine warm milk, a tablespoon of sugar, and the active dry yeast. Stir gently and let it sit for about 5-10 minutes until it becomes frothy. This step guarantees the yeast is active and ready to leaven the dough.
- Mix the Dough: In a large mixing bowl, combine the flour, remaining sugar, salt, and orange zest. Add the frothy yeast mixture, melted butter, and egg. Mix until the ingredients are well combined and form a sticky dough.
- Knead the Dough: Transfer the dough onto a lightly floured surface and knead for about 10 minutes until smooth and elastic. If the dough is too sticky, add a little more flour, but be careful not to add too much, as this can make the buns dense.
- First Rise: Place the kneaded dough in a greased bowl, cover it with a clean kitchen towel, and let it rise in a warm place for about 1-2 hours or until it has doubled in size.
- Shape the Buns: Once the dough has risen, punch it down to release the air. Divide it into 4-6 equal portions and shape each portion into an oval bun. Place the buns on a baking sheet lined with parchment paper.
- Second Rise: Cover the shaped buns with the kitchen towel again and let them rise for another 30-45 minutes or until they’ve doubled in size.
- Bake the Buns: Preheat the oven to 350°F (175°C). Bake the buns for about 15-20 minutes or until they’re golden brown. Remove from the oven and let them cool completely on a wire rack.
- Prepare the Whipped Cream: While the buns are cooling, whip the heavy cream, powdered sugar, and vanilla extract together in a chilled bowl until stiff peaks form.
- Fill the Buns: Once the buns have cooled, slice each bun lengthwise, taking care not to cut all the way through. Fill each bun generously with the whipped cream.
Extra Tips:
For best results, verify all ingredients are at room temperature before starting, as this helps the yeast activate more effectively. If you prefer a richer flavor, you can add a teaspoon of honey to the dough along with the orange zest.
To make the buns even more indulgent, try adding a touch of chocolate chips or a drizzle of chocolate sauce over the whipped cream filling. Remember to store any leftover maritozzi in the refrigerator due to the whipped cream, but they’re best enjoyed fresh for peak texture and flavor.
Torta Della Nonna

Torta Della Nonna, or “Grandmother’s Cake,” is a classic Italian dessert that combines the rich flavors of a creamy custard filling with a delicate, buttery pastry crust. This delightful treat is traditionally topped with pine nuts and a dusting of powdered sugar, making it both visually appealing and irresistibly tasty.
Often enjoyed during family gatherings and special occasions, Torta Della Nonna is a beloved staple in Italian cuisine that captures the essence of home-cooked warmth and comfort.
The origins of Torta Della Nonna trace back to Tuscany, where it’s commonly served as a dessert following a hearty meal. The custard filling, known as “crema pasticcera,” is infused with lemon zest and vanilla, providing a revitalizing and aromatic contrast to the sweet, nutty topping.
This recipe serves 4-6 people and is perfect for those looking to bring a touch of Italy to their dining table. The following list of ingredients and instructions will guide you through the process of creating this delectable dessert.
Ingredients (Serves 4-6):
- For the Pastry:
- 250g all-purpose flour
- 125g unsalted butter, chilled and diced
- 100g granulated sugar
- 1 egg
- Zest of 1 lemon
- A pinch of salt
- For the Custard Filling:
- 500ml whole milk
- 4 egg yolks
- 100g granulated sugar
- 40g all-purpose flour
- Zest of 1 lemon
- 1 teaspoon vanilla extract
- For the Topping:
- 50g pine nuts
- Powdered sugar for dusting
Cooking Instructions:
- Prepare the Pastry Dough:
- In a large mixing bowl, combine the flour, butter, sugar, lemon zest, and salt. Use your fingertips to rub the butter into the flour until the mixture resembles breadcrumbs.
- Add the egg and mix until the dough comes together. Form the dough into a disc, wrap it in cling film, and refrigerate for at least 30 minutes.
- Make the Custard Filling:
- In a saucepan, heat the milk and lemon zest over medium heat until it just starts to simmer. Remove from heat and let it infuse.
- In a separate bowl, whisk together the egg yolks and sugar until pale and creamy. Add the flour and whisk until smooth.
- Gradually pour the infused milk into the egg mixture, whisking constantly. Return the mixture to the saucepan and cook over low heat, stirring continuously until thickened. Stir in the vanilla extract and let it cool.
- Assemble the Torta:
- Preheat the oven to 180°C (350°F). Roll out the chilled pastry dough on a floured surface to fit a 9-inch tart tin. Line the tin with the dough, trimming any excess.
- Pour the cooled custard filling into the pastry shell. Sprinkle the pine nuts evenly over the top.
- Bake and Finish:
- Bake the torta in the preheated oven for 35-40 minutes, or until the pastry is golden and the pine nuts are toasted.
- Allow the torta to cool completely in the tin before removing. Dust with powdered sugar before serving.
Extra Tips:
For the perfect Torta Della Nonna, verify the custard is thickened sufficiently before pouring it into the pastry shell to prevent a soggy bottom. If the custard seems too runny, cook it a bit longer while stirring continuously.
When rolling out the pastry, work quickly to prevent the butter from melting, which can affect the texture of the crust. If you find the pastry dough too sticky, lightly dust it with flour as you roll it out.
Finally, for an extra burst of flavor, consider adding a pinch of cinnamon to the custard filling. Enjoy your homemade Italian delight!