

Weeknights can feel like a whirlwind, making it hard to whip up a delicious meal.
That’s why make-ahead Italian recipes are a game-changer.
They bring the comforting flavors of a cozy trattoria right to your kitchen.
These dishes can be prepped in advance, saving you time and stress.
Picture coming home to the delightful aroma of classic lasagna or creamy chicken Alfredo.
Classic Lasagna With Rich Meat Sauce
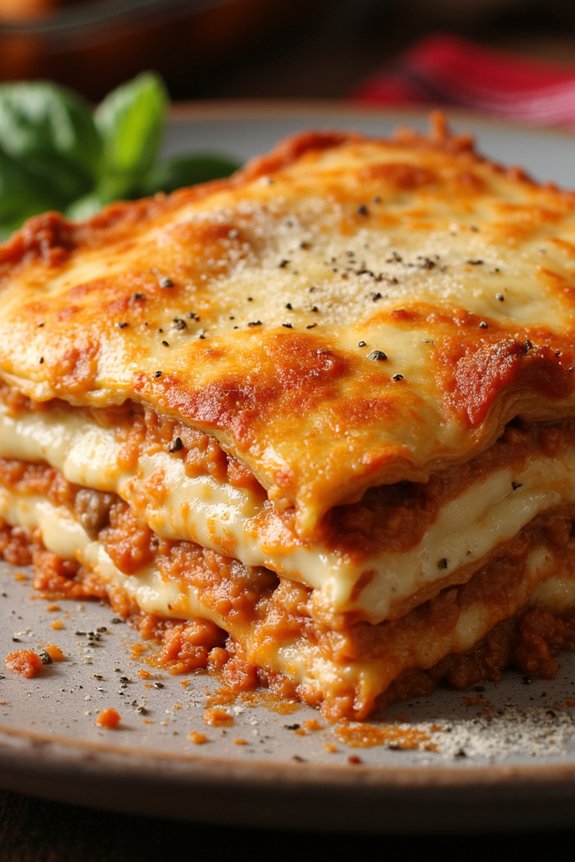
Lasagna is the epitome of Italian comfort food, with its layers of pasta, rich meat sauce, creamy béchamel, and gooey cheese. This classic lasagna is a make-ahead marvel, perfect for those who want to prepare a hearty dish in advance for a family gathering or a cozy weeknight dinner.
The key to this recipe lies in the robust meat sauce, which is simmered to perfection, allowing the flavors to develop deeply and richly. When it’s time to serve, you’ll have a deliciously layered masterpiece that’s bound to impress.
This recipe serves 4-6 people, making it ideal for a small dinner party or a family meal with leftovers for the next day. The lasagna can be assembled the day before and refrigerated, permitting the flavors to meld together beautifully. When you’re ready to enjoy, simply bake it until bubbly and golden. The following recipe provides the ingredients and step-by-step instructions to create a lasagna that’s both classic and unforgettable.
Ingredients:
- 9 lasagna noodles
- 1 pound ground beef
- 1/2 pound Italian sausage, removed from casings
- 1 onion, finely chopped
- 3 cloves garlic, minced
- 1 can (28 ounces) crushed tomatoes
- 2 tablespoons tomato paste
- 1 teaspoon dried oregano
- 1 teaspoon dried basil
- Salt and pepper to taste
- 2 cups ricotta cheese
- 1 egg
- 2 cups shredded mozzarella cheese
- 1 cup grated Parmesan cheese
- 2 cups béchamel sauce (homemade or store-bought)
- 2 tablespoons olive oil
Cooking Instructions:
- Prepare the Meat Sauce:
- Heat the olive oil in a large skillet over medium heat. Add the chopped onion and sauté until translucent, about 5 minutes. Stir in the minced garlic and cook for an additional minute until fragrant.
- Add the ground beef and Italian sausage to the skillet. Cook until browned, breaking up the meat with a wooden spoon. Drain excess fat.
- Stir in the crushed tomatoes, tomato paste, oregano, basil, salt, and pepper. Lower the heat and let the sauce simmer for about 30 minutes, stirring occasionally until it thickens.
- Cook the Lasagna Noodles:
- While the sauce simmers, bring a large pot of salted water to a boil. Cook the lasagna noodles according to package instructions until al dente. Drain and lay them flat on a clean towel to prevent sticking.
- Prepare the Ricotta Mixture:
- In a mixing bowl, combine the ricotta cheese, egg, and a pinch of salt. Mix well until smooth and set aside.
- Assemble the Lasagna:
- Preheat your oven to 375°F (190°C).
- Spread a thin layer of béchamel sauce at the bottom of a 9×13 inch baking dish.
- Place a layer of lasagna noodles over the béchamel. Spread half of the ricotta mixture over the noodles, followed by half of the meat sauce, and a third of the mozzarella cheese.
- Repeat the layers: noodles, remaining ricotta mixture, remaining meat sauce, and another third of mozzarella cheese.
- Top with the final layer of noodles, spread the remaining béchamel sauce over, and sprinkle the remaining mozzarella and Parmesan cheese.
- Bake the Lasagna:
- Cover the dish with aluminum foil and bake in the preheated oven for 25 minutes.
- Remove the foil and bake for an additional 15 minutes, or until the top is bubbly and golden brown.
- Let the lasagna cool for at least 10 minutes before slicing and serving.
Extra Tips:
For the best results, let the lasagna sit for a day in the refrigerator before baking. This resting time allows the flavors to meld together, creating a more cohesive and flavorful dish.
If you’re using fresh lasagna sheets, you can skip boiling them, but remember to add a bit more sauce to guarantee they cook through in the oven. Additionally, feel free to customize the filling with vegetables like spinach or zucchini for added nutrition and texture.
When serving, garnish with fresh basil or parsley for a pop of color and freshness.
Creamy Chicken Alfredo Bake
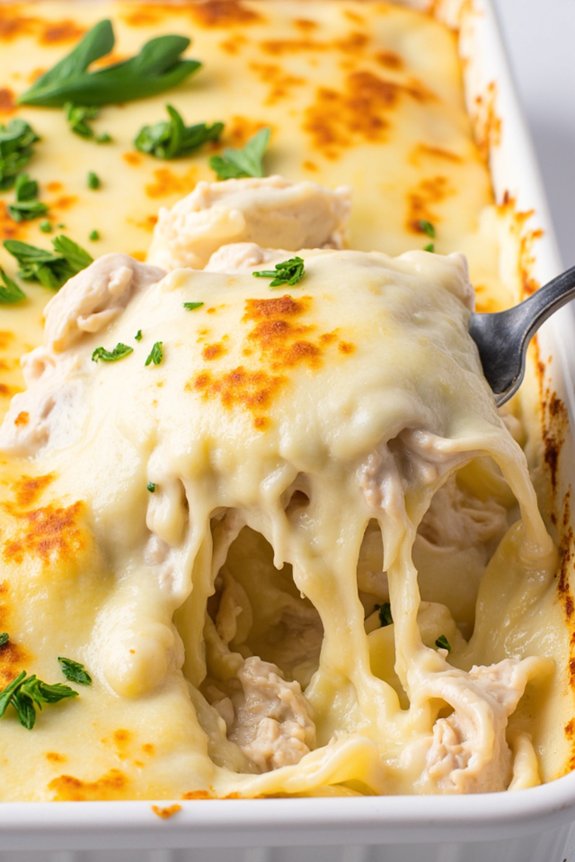
Creamy Chicken Alfredo Bake is a comforting Italian-inspired dish that combines tender chicken, rich Alfredo sauce, and perfectly cooked pasta, all baked to golden perfection.
This make-ahead recipe is perfect for busy weeknights or entertaining guests, as it can be prepared in advance and simply popped into the oven when needed. The creamy texture and savory flavors make it a hit with both kids and adults alike.
To prepare this delicious meal for 4-6 people, you’ll need a few simple ingredients and about an hour of your time. The dish combines the richness of homemade Alfredo sauce with the heartiness of cooked chicken and pasta, topped with gooey melted cheese. It’s a meal that’s sure to satisfy and leave everyone asking for seconds.
Ingredients:
- 2 cups cooked chicken breast, shredded or diced
- 12 ounces fettuccine or penne pasta
- 2 tablespoons unsalted butter
- 2 cloves garlic, minced
- 1 1/2 cups heavy cream
- 1 cup grated Parmesan cheese
- 1 cup shredded mozzarella cheese
- Salt and pepper, to taste
- 1 tablespoon olive oil
- Fresh parsley, chopped (optional, for garnish)
Cooking Instructions:
1. Preheat and Prepare: Preheat your oven to 350°F (175°C). Grease a 9×13 inch baking dish with olive oil or cooking spray to prevent sticking.
2. Cook the Pasta: In a large pot, bring salted water to a boil. Add the pasta and cook according to the package instructions until al dente. Drain and set aside.
3. Make the Alfredo Sauce: In a large skillet over medium heat, melt the butter. Add the minced garlic and sauté for about 1 minute until fragrant.
Pour in the heavy cream, stirring constantly. Gradually add the Parmesan cheese, continuing to stir until the cheese has melted and the sauce is smooth. Season with salt and pepper to taste.
4. Combine Ingredients: In a large mixing bowl, combine the cooked pasta, shredded chicken, and Alfredo sauce. Mix until the pasta and chicken are well coated with the sauce.
5. Assemble the Bake: Transfer the pasta mixture to the prepared baking dish. Sprinkle the shredded mozzarella cheese evenly over the top.
6. Bake: Place the dish in the preheated oven and bake for 20-25 minutes, or until the cheese is melted and bubbly, and the top is slightly golden.
7. Garnish and Serve: Remove from the oven and let it cool for a few minutes. Garnish with chopped fresh parsley if desired, and serve hot.
Extra Tips:
For added flavor, consider adding cooked bacon pieces or sautéed mushrooms to the pasta mixture before baking.
If you prefer a lighter version, substitute half-and-half for the heavy cream and use whole wheat pasta.
To make it ahead, you can prepare the entire dish, cover it tightly with foil, and refrigerate for up to 24 hours before baking. Simply add an additional 10 minutes to the baking time if the dish is being cooked cold from the refrigerator.
Enjoy your Creamy Chicken Alfredo Bake with a side salad or garlic bread for a complete meal.
Savory Eggplant Parmesan Casserole
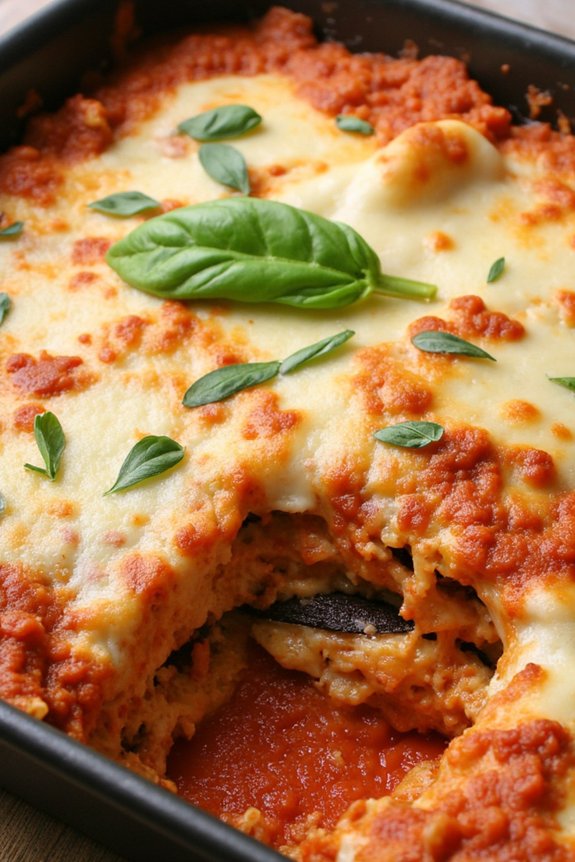
Savory Eggplant Parmesan Casserole is a delicious Italian classic that can be prepared in advance, making it perfect for busy weeknights or for entertaining guests. This dish features layers of tender eggplant slices, rich tomato sauce, and a blend of mozzarella and Parmesan cheeses, all baked to golden perfection. The result is a comforting and hearty casserole that satisfies the taste buds with its savory and cheesy goodness.
Preparing the casserole ahead of time allows the flavors to meld together, enhancing the overall taste. This casserole isn’t only a delight to eat but also a joy to prepare, offering a convenient way to enjoy the flavors of Italy. With its simple ingredients and straightforward steps, this recipe is accessible for both novice and experienced cooks alike.
Whether served as a main course or a side dish, Savory Eggplant Parmesan Casserole is sure to impress family and friends. Gather your ingredients, follow the instructions, and enjoy the delightful aroma that fills your kitchen as the casserole bakes to perfection.
Ingredients for 4-6 servings:
- 2 large eggplants, sliced into 1/4 inch rounds
- Salt
- 3 cups marinara sauce
- 2 cups shredded mozzarella cheese
- 1 cup grated Parmesan cheese
- 1 cup all-purpose flour
- 3 large eggs, beaten
- 2 cups Italian breadcrumbs
- Olive oil for frying
- Fresh basil leaves for garnish
Cooking Instructions:
- Prepare the Eggplant: Begin by placing the eggplant slices on a baking sheet and sprinkle them with salt. Let them sit for about 30 minutes to draw out excess moisture. Rinse the slices with water and pat them dry with a paper towel.
- Bread the Eggplant Slices: Set up a breading station with three shallow dishes. Place flour in the first dish, beaten eggs in the second, and breadcrumbs in the third. Dip each eggplant slice in the flour, then the egg, and finally coat it with breadcrumbs, making certain it’s fully covered.
- Fry the Eggplant: Heat olive oil in a large skillet over medium heat. Fry the eggplant slices in batches until golden brown on both sides, approximately 3-4 minutes per side. Transfer them to a paper towel-lined plate to drain excess oil.
- Assemble the Casserole: Preheat your oven to 375°F (190°C). Spread a thin layer of marinara sauce at the bottom of a 9×13-inch baking dish. Arrange a layer of fried eggplant slices over the sauce. Top with a portion of mozzarella and Parmesan cheese, then a layer of marinara sauce. Repeat the layering process until all ingredients are used, finishing with a layer of cheese on top.
- Bake the Casserole: Cover the baking dish with aluminum foil and bake in the preheated oven for 25 minutes. Remove the foil and bake for an additional 15 minutes, or until the cheese is bubbly and golden brown.
- Garnish and Serve: Let the casserole cool for a few minutes before garnishing with fresh basil leaves. Serve hot as a main dish or alongside pasta for a complete meal.
Extra Tips:
When selecting eggplants, look for ones that are firm and heavy for their size, with smooth, shiny skin. This will guarantee freshness and good flavor.
If you prefer a lighter version, you can bake the breaded eggplant slices instead of frying them. Simply place them on a baking sheet and bake at 400°F (200°C) for about 20 minutes, flipping halfway through.
Additionally, preparing the casserole the day before and reheating it can enhance the flavors even more, making it an excellent make-ahead option.
Zesty Italian Meatballs in Marinara Sauce
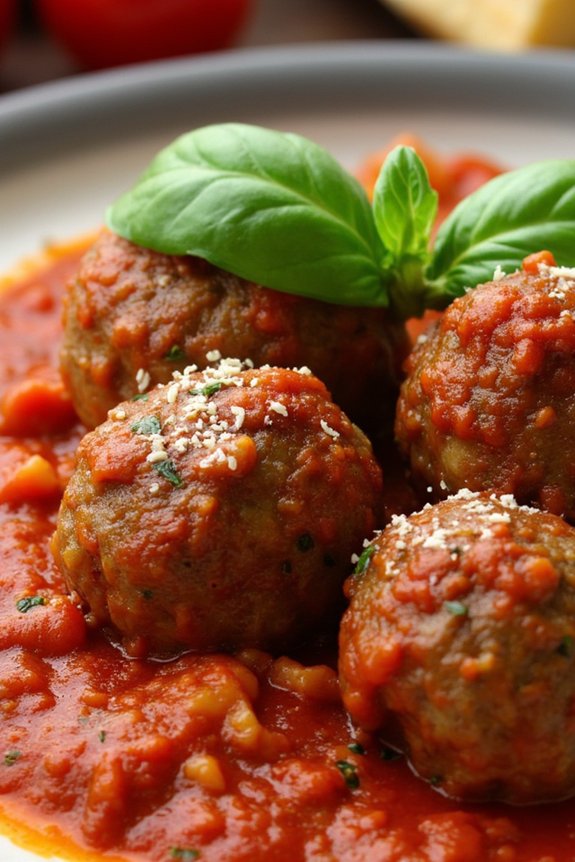
Indulging in a hearty Italian meal doesn’t have to mean spending hours in the kitchen. This Zesty Italian Meatballs in Marinara Sauce recipe is perfect for those who love robust flavors without the fuss. The meatballs are infused with savory herbs and spices, creating an irresistible aroma that will fill your kitchen.
Paired with a rich marinara sauce, this dish can be prepared ahead of time and cooked when you’re ready to serve, making it ideal for busy families and dinner parties alike. Perfect for serving 4-6 people, these meatballs are versatile and can be enjoyed over a bed of spaghetti, nestled in a sub roll, or simply on their own with a side of garlic bread.
The marinara sauce complements the meatballs beautifully, offering a tangy and slightly sweet balance. Whether you’re a seasoned cook or a beginner, this recipe will guide you through creating a delicious Italian meal that everyone will love.
Ingredients:
- 1 pound ground beef
- 1/2 pound ground pork
- 1/2 cup breadcrumbs
- 1/4 cup grated Parmesan cheese
- 1/4 cup milk
- 1 egg
- 2 cloves garlic, minced
- 1 tablespoon Italian seasoning
- 1 teaspoon salt
- 1/2 teaspoon black pepper
- 2 tablespoons olive oil
- 1 onion, finely chopped
- 1 can (28 ounces) crushed tomatoes
- 1 tablespoon tomato paste
- 1 teaspoon sugar
- 1/2 teaspoon red pepper flakes (optional)
- Fresh basil leaves for garnish
Instructions:
- Prepare the Meatballs: In a large bowl, combine ground beef, ground pork, breadcrumbs, Parmesan cheese, milk, egg, minced garlic, Italian seasoning, salt, and black pepper. Mix until all ingredients are well incorporated. Form the mixture into 1-inch meatballs and set aside.
- Cook the Meatballs: In a large skillet, heat the olive oil over medium heat. Add the meatballs in batches, being careful not to overcrowd the pan. Cook until browned on all sides, about 6-8 minutes. Remove the meatballs from the skillet and set them aside on a plate lined with paper towels.
- Make the Marinara Sauce: In the same skillet, add the chopped onion and sauté until translucent, about 5 minutes. Stir in the crushed tomatoes, tomato paste, sugar, and red pepper flakes. Let the sauce simmer for about 10 minutes, allowing the flavors to meld together.
- Combine and Simmer: Return the meatballs to the skillet, nestling them into the marinara sauce. Cover and let them simmer in the sauce for another 15-20 minutes, until the meatballs are cooked through and have absorbed some of the sauce’s flavors.
- Serve: Garnish the dish with fresh basil leaves before serving. Enjoy the meatballs over pasta, in a sandwich, or on their own with a side of your choice.
Extra Tips:
When making meatballs, avoid over-mixing the ingredients, as this can result in tough meatballs. Gently fold the mixture until just combined.
If you prefer a smoother texture to the sauce, you can use an immersion blender to puree the marinara before adding the meatballs. The meatballs and sauce can be made a day in advance and stored in the refrigerator, which might even enhance the flavors. Simply reheat them on the stove or in the oven before serving.
Hearty Minestrone Soup
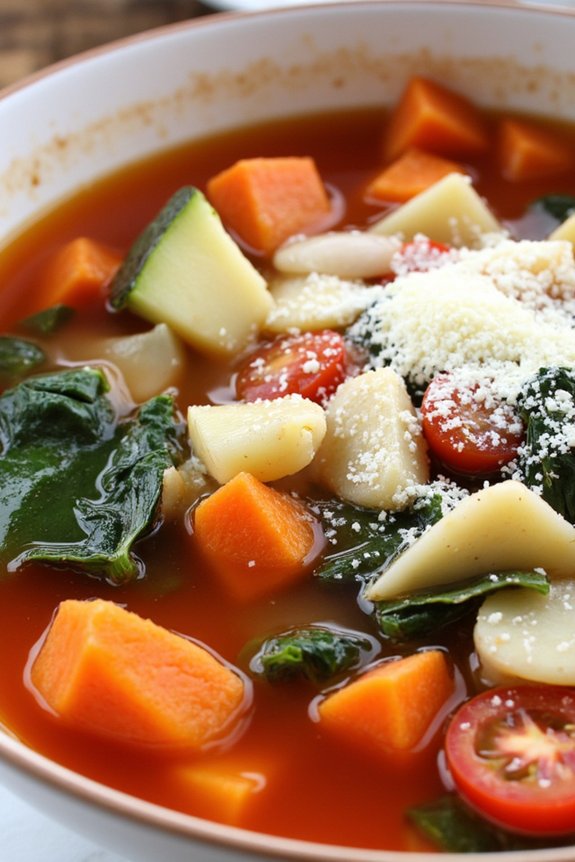
Minestrone soup is a classic Italian dish that perfectly captures the essence of comfort food. This hearty, nutritious soup is brimming with a medley of vegetables, beans, and pasta, all simmered together in a savory broth to create a warming, satisfying meal.
The beauty of minestrone soup lies in its versatility; it can easily adapt to the seasons by incorporating whatever fresh produce is available. It’s an ideal dish to make ahead of time, as the flavors only deepen and improve after a day or two in the refrigerator.
Preparing a batch of Hearty Minestrone Soup provides a delicious and convenient meal option for busy weeknights or leisurely weekend lunches. It’s a one-pot wonder that requires minimal effort but offers maximum flavor. This recipe serves 4-6 people and is perfect for those who enjoy a comforting, nourishing bowl of soup.
Whether you’re serving it as a starter or a main course, this make-ahead recipe is sure to become a staple in your kitchen.
Ingredients for 4-6 servings:
- 2 tablespoons olive oil
- 1 onion, diced
- 2 carrots, diced
- 2 celery stalks, diced
- 3 cloves garlic, minced
- 1 zucchini, diced
- 1 can (14 oz) diced tomatoes
- 1 can (14 oz) cannellini beans, drained and rinsed
- 4 cups vegetable broth
- 1 cup water
- 1 teaspoon dried oregano
- 1 teaspoon dried basil
- Salt and pepper to taste
- 1 cup small pasta (e.g., ditalini or elbow macaroni)
- 2 cups fresh spinach or kale
- Grated Parmesan cheese, for serving
Cooking Instructions:
- Sauté the Aromatics: In a large pot, heat the olive oil over medium heat. Add the diced onion, carrots, and celery. Cook for about 5-7 minutes, stirring occasionally, until the vegetables are softened and the onion is translucent.
- Add Garlic and Zucchini: Stir in the minced garlic and diced zucchini. Cook for an additional 2 minutes, allowing the garlic to become fragrant and the zucchini to slightly soften.
- Incorporate Tomatoes and Beans: Add the canned diced tomatoes (with their juice) and cannellini beans to the pot. Stir to combine with the vegetables.
- Simmer the Soup: Pour in the vegetable broth and water. Stir in the oregano, basil, salt, and pepper. Bring the soup to a boil, then reduce the heat to low. Cover the pot and let it simmer for about 20 minutes to allow the flavors to meld.
- Cook the Pasta: Stir in the pasta and continue to simmer, uncovered, for 10-12 minutes or until the pasta is cooked to al dente.
- Add Greens: Just before serving, stir in the fresh spinach or kale. Allow it to wilt for a few minutes in the hot soup.
- Serve: Ladle the minestrone soup into bowls and garnish with grated Parmesan cheese. Serve hot and enjoy!
Extra Tips:
To enhance the flavors of your Hearty Minestrone Soup, consider preparing it a day in advance; the ingredients will meld beautifully in the refrigerator.
If you prefer a thicker consistency, mash some of the beans before adding them to the pot. Feel free to substitute or add other vegetables based on your preference or seasonal availability.
For a gluten-free version, use gluten-free pasta or skip it entirely and add more beans for substance. Remember to adjust the seasoning to your taste, especially after the soup has had time to sit.
Baked Ziti With Mozzarella and Basil
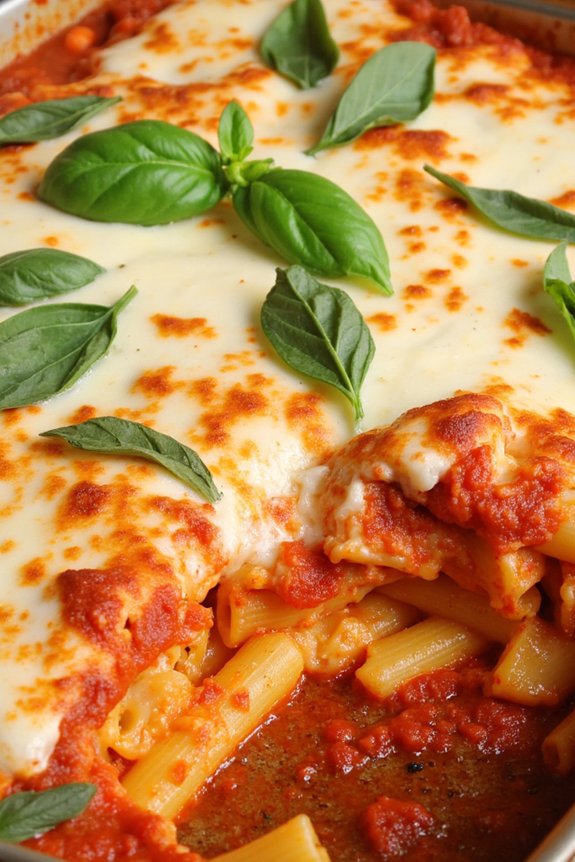
Baked Ziti with Mozzarella and Basil is a classic Italian-American comfort dish that effortlessly brings together simple ingredients for a satisfying and hearty meal. Perfect for family dinners or gatherings, this dish can be prepared in advance and baked just before serving, making it a convenient choice for busy days.
The combination of al dente ziti pasta, rich tomato sauce, creamy mozzarella, and aromatic fresh basil creates a delightful blend of flavors and textures that’s sure to please everyone at the table.
This recipe is designed to serve 4-6 people, making it a great option for a small crowd or a family meal with some leftovers for the next day. The baked ziti can be assembled ahead of time, stored in the refrigerator, and baked when you’re ready to enjoy it. The ingredients list and step-by-step instructions will guide you through the process of creating this delicious dish with ease.
Ingredients:
- 1 pound ziti pasta
- 2 tablespoons olive oil
- 1 onion, finely chopped
- 3 cloves garlic, minced
- 1 pound ground beef or Italian sausage
- 2 cups marinara sauce
- 1 teaspoon dried oregano
- 1/2 teaspoon red pepper flakes (optional)
- Salt and pepper to taste
- 2 cups shredded mozzarella cheese
- 1/2 cup grated Parmesan cheese
- 1/4 cup fresh basil leaves, chopped
Cooking Instructions:
- Preheat the Oven: Preheat your oven to 375°F (190°C). This guarantees that the oven is hot and ready to bake your ziti once it’s assembled.
- Cook the Pasta: Bring a large pot of salted water to a boil. Add the ziti pasta and cook until al dente, according to package instructions. Drain the pasta and set aside.
- Prepare the Sauce: In a large skillet, heat the olive oil over medium heat. Add the chopped onion and cook until translucent, about 5 minutes. Add the minced garlic and cook for another minute. Add the ground beef or Italian sausage, breaking it up with a spoon, and cook until browned.
- Combine Ingredients: Stir in the marinara sauce, dried oregano, red pepper flakes (if using), salt, and pepper. Let the mixture simmer for about 10 minutes to allow the flavors to meld together.
- Assemble the Dish: In a large baking dish, combine the cooked ziti pasta with the sauce mixture. Stir in 1 cup of the shredded mozzarella cheese and half of the grated Parmesan cheese. Mix well to confirm the pasta is evenly coated with the sauce.
- Add Toppings: Spread the remaining mozzarella cheese evenly over the top of the pasta. Sprinkle the remaining Parmesan cheese on top. This creates a delightful cheesy crust when baked.
- Bake: Cover the baking dish with aluminum foil and bake in the preheated oven for 20 minutes. Remove the foil and bake for an additional 10-15 minutes, or until the cheese is bubbly and golden brown.
- Garnish and Serve: Remove from the oven and let the baked ziti cool for a few minutes. Garnish with the chopped fresh basil leaves before serving.
Extra Tips:
To save time, you can prepare the sauce and cook the pasta a day ahead. Store them separately in the refrigerator, and then assemble the dish just before baking.
If you prefer a vegetarian version, simply omit the meat and add your favorite vegetables such as mushrooms, spinach, or zucchini. Additionally, if you find that your mozzarella cheese browns too quickly, you can cover the dish with foil for a longer period during baking.
Enjoy your Baked Ziti with Mozzarella and Basil with a side salad and some crusty bread for a complete meal.
Stuffed Shells With Spinach and Ricotta

Stuffed Shells With Spinach and Ricotta is a classic Italian dish that combines the rich flavors of creamy ricotta cheese, vibrant spinach, and a luscious tomato sauce all enveloped in tender pasta shells.
These stuffed shells are perfect for a family dinner or a potluck gathering, as they can be prepared ahead of time and baked right before serving. With a blend of cheeses and a hint of herbs, this dish offers a comforting and satisfying meal that everyone will love.
The beauty of this recipe lies in its simplicity and the ability to make it in advance. You can prepare the stuffed shells and keep them in the refrigerator for up to two days before baking. This makes it an ideal choice for busy weeknights or when entertaining guests.
Plus, it’s a great way to sneak some greens into your meal, as the spinach blends seamlessly with the ricotta. Serve it with a side salad and some crusty bread, and you have a complete meal that’s sure to impress.
Ingredients (Serves 4-6):
- 1 box (12 oz) jumbo pasta shells
- 1 tablespoon olive oil
- 2 cloves garlic, minced
- 1 bag (10 oz) fresh spinach leaves
- 2 cups ricotta cheese
- 1 egg
- 1 cup grated Parmesan cheese
- 2 cups shredded mozzarella cheese
- 1 teaspoon dried oregano
- 1 teaspoon dried basil
- Salt and pepper to taste
- 3 cups marinara sauce
Cooking Instructions:
- Prepare the Pasta Shells: Cook the jumbo pasta shells according to package instructions until al dente. Drain and rinse them under cold water to stop the cooking process. Set aside.
- Sauté the Spinach: In a large skillet, heat the olive oil over medium heat. Add the minced garlic and sauté for about 1 minute until fragrant. Add the fresh spinach leaves and cook, stirring occasionally, until wilted. Remove from heat and let it cool slightly.
- Make the Ricotta Filling: In a large mixing bowl, combine the ricotta cheese, egg, 1/2 cup of the Parmesan cheese, 1 cup of the mozzarella cheese, oregano, basil, salt, and pepper. Stir in the cooled spinach and mix until well combined.
- Stuff the Shells: Preheat your oven to 375°F (190°C). Spread 1 cup of marinara sauce on the bottom of a 9×13 inch baking dish. Using a spoon, fill each cooked pasta shell with the ricotta-spinach mixture and arrange them in the baking dish.
- Assemble the Dish: Pour the remaining marinara sauce over the stuffed shells. Sprinkle the remaining mozzarella and Parmesan cheese over the top.
- Bake: Cover the baking dish with aluminum foil and bake for 25 minutes. Remove the foil and bake for an additional 10-15 minutes, or until the cheese is bubbly and golden.
- Serve: Let the stuffed shells rest for a few minutes before serving. Garnish with fresh basil or parsley if desired.
Extra Tips:
For a richer flavor, consider adding cooked Italian sausage or ground beef to the ricotta filling. If you prefer a bit of heat, sprinkle some red pepper flakes into the marinara sauce.
When preparing the dish ahead of time, assemble the shells and cover them with plastic wrap or foil before refrigerating. You may need to add a few extra minutes to the baking time if the dish goes straight from the refrigerator to the oven.
Finally, feel free to substitute fresh spinach with frozen spinach—just make sure to thaw and drain it well before using.
Rustic Italian Sausage and Peppers
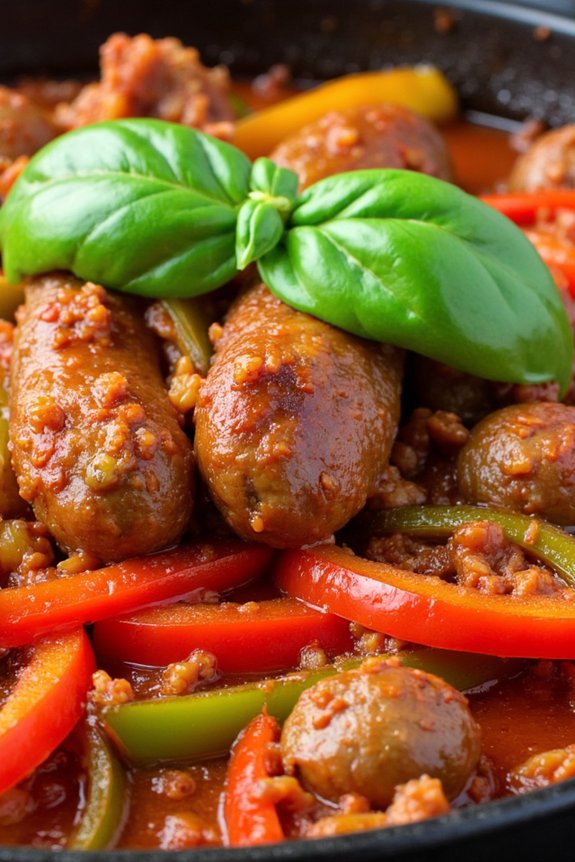
Rustic Italian Sausage and Peppers is a classic Italian dish that’s both hearty and flavorful, making it perfect for any family gathering or simple weeknight dinner. This dish combines the savory taste of Italian sausage with the sweetness of bell peppers and onions, all seasoned with aromatic herbs and spices.
The beauty of this recipe is that it can be made ahead of time, allowing the flavors to meld together for an even richer taste when you’re ready to serve it. This recipe serves 4-6 people and is ideal for those looking to enjoy a comforting meal with minimal effort. The ingredients are easy to find, and the preparation is straightforward, ensuring that even novice cooks can achieve delicious results.
Whether served on its own, over pasta, or alongside crusty bread, Rustic Italian Sausage and Peppers is sure to become a favorite in your household.
Ingredients:
- 6 Italian sausages (mild or spicy)
- 3 tablespoons olive oil
- 2 large red bell peppers, sliced
- 2 large green bell peppers, sliced
- 2 large onions, sliced
- 3 cloves garlic, minced
- 1 teaspoon dried oregano
- 1 teaspoon dried basil
- 1/2 teaspoon red pepper flakes (optional)
- Salt and pepper to taste
- 1/2 cup white wine or chicken broth
- 1 can (14 oz) crushed tomatoes
- Fresh basil leaves for garnish
Instructions:
- Prepare the Sausages: Heat 1 tablespoon of olive oil in a large skillet over medium heat. Add the sausages and cook until browned on all sides, about 8-10 minutes. Remove the sausages from the skillet and set aside.
- Cook the Vegetables: In the same skillet, add the remaining olive oil. Add the sliced onions and cook for 3-4 minutes until they start to soften. Add the bell peppers and continue cooking for another 5 minutes, stirring occasionally.
- Add Garlic and Seasonings: Stir in the minced garlic, oregano, basil, red pepper flakes, salt, and pepper. Cook for 1-2 minutes until the garlic is fragrant.
- Deglaze the Pan: Pour in the white wine (or chicken broth) to deglaze the pan, scraping up any browned bits from the bottom. Let it simmer for 2-3 minutes.
- Combine with Tomatoes and Sausages: Add the crushed tomatoes to the skillet and stir well. Return the sausages to the skillet, nestling them into the sauce and vegetables.
- Simmer: Reduce the heat to low and cover the skillet. Let the dish simmer for 30-40 minutes, stirring occasionally, until the sausages are cooked through and the flavors have melded together.
- Serve and Garnish: Once done, remove from heat and let it cool slightly. Garnish with fresh basil leaves before serving.
Extra Tips:
For an even richer flavor, consider making this dish a day in advance. This allows the sausages to absorb more of the sauce’s flavors.
If you prefer a spicier dish, use hot Italian sausages or increase the amount of red pepper flakes. This dish pairs wonderfully with a side of roasted potatoes or a simple green salad.
If you’re serving it over pasta, reserve some of the pasta cooking water to help bind the sauce to the pasta. Enjoy your Rustic Italian Sausage and Peppers with a glass of your favorite Italian wine for a complete dining experience.
Caprese Salad With Fresh Mozzarella
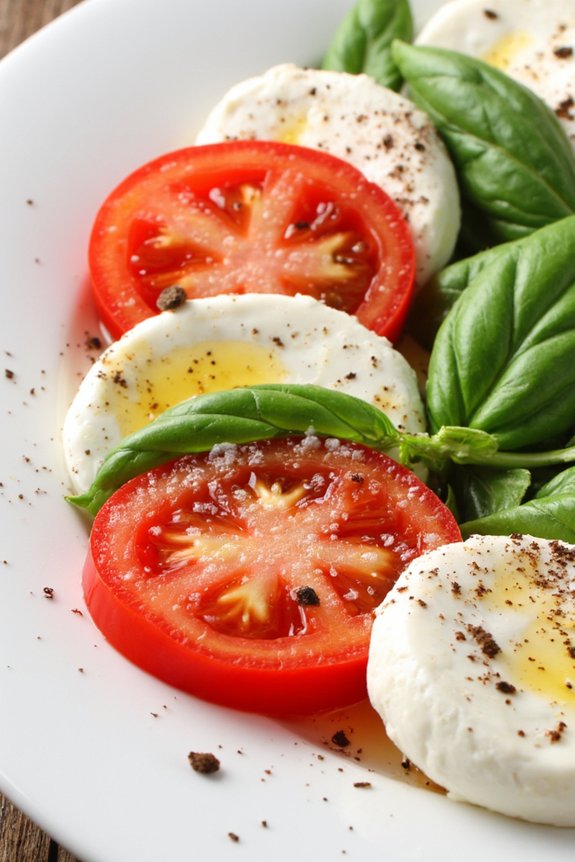
Caprese Salad with Fresh Mozzarella is a classic Italian dish that captures the essence of simple, fresh ingredients. This salad is perfect for a light appetizer or a rejuvenating side dish, and it’s incredibly easy to prepare in advance. The combination of ripe tomatoes, creamy fresh mozzarella, and fragrant basil leaves makes for a delightful and colorful presentation that’s sure to impress your guests.
The key to an authentic Caprese Salad is quality ingredients. Make certain to use the freshest tomatoes and mozzarella you can find, as these will be the stars of your dish. This salad is traditionally seasoned with a drizzle of extra virgin olive oil and a sprinkle of salt and black pepper, allowing the natural flavors to shine. With minimal preparation and maximum flavor, this dish is perfect for serving 4-6 people.
Ingredients:
- 4 large ripe tomatoes
- 1 pound fresh mozzarella cheese
- 1 bunch fresh basil leaves
- 3 tablespoons extra virgin olive oil
- Salt to taste
- Freshly ground black pepper to taste
- Optional: Balsamic glaze for drizzling
Instructions:
- Prepare the Tomatoes: Wash the tomatoes under cold running water and pat them dry with a clean towel. Slice the tomatoes into 1/4-inch thick rounds and set them aside.
- Slice the Mozzarella: Drain any excess liquid from the mozzarella. Using a sharp knife, slice the mozzarella into 1/4-inch thick rounds similar to the tomatoes.
- Assemble the Salad: On a large serving platter, alternate layers of tomato and mozzarella slices. Tuck fresh basil leaves in between the layers. Aim for a visually appealing, overlapping pattern.
- Season the Salad: Drizzle the extra virgin olive oil over the assembled salad. Sprinkle salt and freshly ground black pepper evenly across the top. If desired, drizzle a bit of balsamic glaze for an additional touch of sweetness.
- Chill and Serve: If making ahead, cover the platter with plastic wrap and refrigerate for up to 1 hour to allow the flavors to meld. Serve chilled or at room temperature.
Extra Tips:
When preparing Caprese Salad with Fresh Mozzarella, it’s important to select tomatoes that are ripe yet firm to ascertain they hold their shape when sliced. Likewise, opt for high-quality mozzarella – buffalo mozzarella is a recommended choice for its rich, creamy texture.
If you prefer a more intense flavor, consider using heirloom tomatoes, which offer a unique, sweet taste profile. Remember to add the salt and olive oil just before serving to prevent the tomatoes from releasing too much moisture.
Finally, for a creative twist, try adding a sprinkle of fresh oregano or a hint of lemon zest for added aroma and flavor.
Tuscan Chicken With Sun-Dried Tomatoes
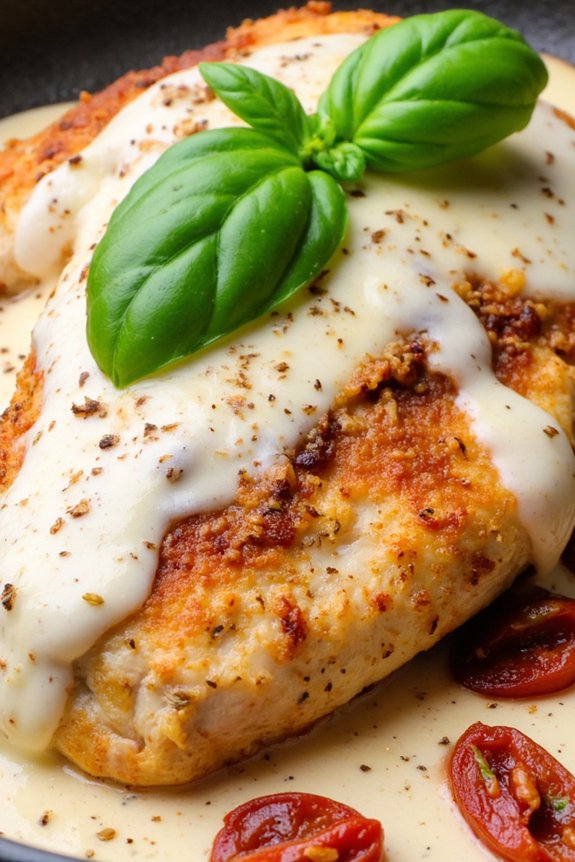
Tuscan Chicken With Sun-Dried Tomatoes is a delightful Italian dish that combines the rustic charm of Tuscany with the rich flavors of sun-dried tomatoes. This recipe is perfect for those who want to enjoy a gourmet meal without spending hours in the kitchen. The succulent chicken breasts are seasoned and cooked to perfection, then smothered in a creamy sauce made with sun-dried tomatoes, garlic, and herbs, offering a taste of the Italian countryside in every bite.
Ideal for a family dinner or a special occasion, this dish can be easily prepared in advance, saving you time and allowing the flavors to meld beautifully.
Preparing Tuscan Chicken With Sun-Dried Tomatoes isn’t only easy but also rewarding, as it brings a touch of Italy to your dining table. This recipe serves 4-6 people, making it perfect for a small gathering or a cozy family meal. The combination of tender chicken, creamy sauce, and the intense flavor of sun-dried tomatoes creates a harmonious dish that’s both comforting and sophisticated.
Whether you’re an experienced cook or a beginner, this make-ahead recipe is sure to impress and satisfy.
Ingredients (serves 4-6):
- 4-6 boneless, skinless chicken breasts
- Salt and pepper, to taste
- 2 tablespoons olive oil
- 1 cup heavy cream
- 1/2 cup chicken broth
- 1/2 cup sun-dried tomatoes, chopped
- 3 cloves garlic, minced
- 1 teaspoon Italian seasoning
- 1/2 cup grated Parmesan cheese
- Fresh basil leaves, for garnish
Instructions:
- Prepare the Chicken: Season the chicken breasts with salt and pepper on both sides. Heat the olive oil in a large skillet over medium-high heat. Add the chicken breasts and cook for 5-7 minutes on each side until golden brown and cooked through. Remove the chicken from the skillet and set aside.
- Make the Sauce: In the same skillet, add the minced garlic and sauté for about 1 minute until fragrant. Pour in the chicken broth and bring it to a simmer, scraping up any browned bits from the bottom of the skillet.
- Add Cream and Tomatoes: Reduce the heat to low, and stir in the heavy cream. Add the sun-dried tomatoes and Italian seasoning, stirring to combine. Let the sauce simmer gently for about 5 minutes until slightly thickened.
- Combine Chicken and Sauce: Return the cooked chicken breasts to the skillet, spooning the sauce over the top. Allow the chicken to simmer in the sauce for an additional 5 minutes, ensuring it’s heated through and well-coated with the sauce.
- Finish the Dish: Sprinkle the grated Parmesan cheese over the chicken and sauce, allowing it to melt into the dish. Garnish with fresh basil leaves before serving.
Extra Tips:
For the best results, choose sun-dried tomatoes packed in oil as they tend to be more flavorful and tender. If you prefer a thicker sauce, you can let it simmer longer or add a bit more Parmesan cheese. This dish pairs beautifully with a side of pasta, rice, or crusty bread to soak up the delicious sauce.
If making ahead, store the chicken and sauce in an airtight container in the refrigerator, reheating gently on the stove before serving to maintain the creamy texture.
Mushroom Risotto With Parmesan
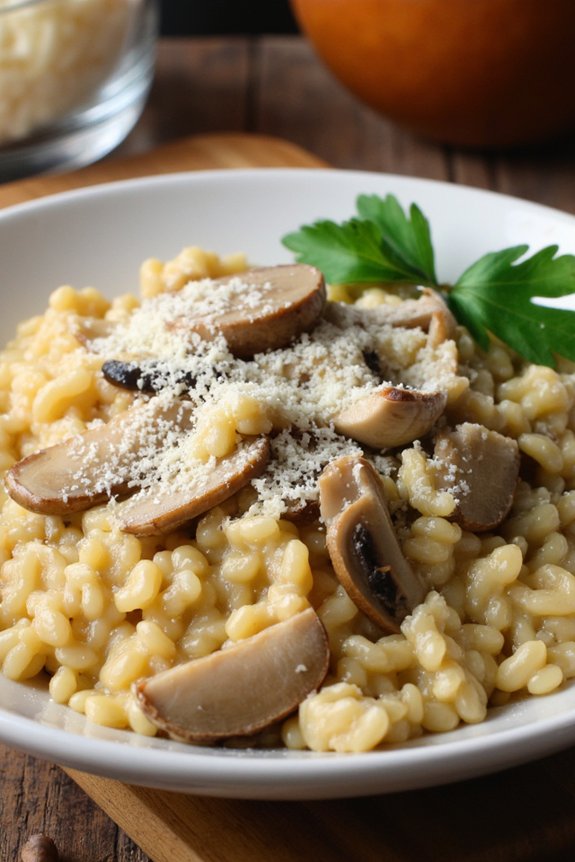
Mushroom Risotto With Parmesan is a classic Italian dish that brings together the earthy flavors of mushrooms with the creamy richness of risotto, elevated by the sharpness of Parmesan cheese. This dish is perfect for those who want to prepare a sophisticated meal without spending too much time in the kitchen, as it can be made ahead of time and reheated just before serving.
The key to a successful risotto is patience and attention to detail, guaranteeing that the rice is perfectly cooked and the flavors are well-balanced. Ideal for a dinner party or a cozy family meal, this recipe serves 4-6 people, making it an excellent choice for entertaining guests.
The process of slowly adding broth to the rice while stirring continuously helps release the starches, creating a creamy consistency that’s characteristic of a good risotto. The addition of mushrooms not only introduces a depth of flavor but also adds a delightful texture to the dish. Finished with a generous amount of Parmesan cheese, this Mushroom Risotto is sure to become a favorite in your culinary repertoire.
Ingredients (serves 4-6):
- 1 ½ cups Arborio rice
- 1 lb mixed mushrooms (such as cremini, shiitake, or porcini), sliced
- 1 small onion, finely chopped
- 3 cloves garlic, minced
- 4 cups vegetable or chicken broth
- 1 cup dry white wine
- 1 cup grated Parmesan cheese
- 2 tablespoons olive oil
- 2 tablespoons unsalted butter
- Salt and pepper to taste
- Fresh parsley, chopped for garnish
Instructions:
- Prepare the broth: In a saucepan, heat the vegetable or chicken broth over low heat. Keep it warm but not boiling, as you’ll need to add it gradually to the rice.
- Sauté the mushrooms: In a large skillet, heat 1 tablespoon of olive oil and 1 tablespoon of butter over medium heat. Add the sliced mushrooms and cook until they’re golden brown and any released moisture has evaporated, about 5-7 minutes. Remove the mushrooms from the skillet and set aside.
- Cook the aromatics: In the same skillet, add the remaining olive oil and butter. Sauté the chopped onion until translucent, about 3 minutes, then add the minced garlic and cook for an additional minute.
- Toast the rice: Add the Arborio rice to the skillet with the onion and garlic. Stir the rice continuously for 2-3 minutes until it’s well-coated with oil and begins to look translucent around the edges.
- Deglaze with wine: Pour in the white wine and stir continuously until it’s mostly absorbed by the rice. This step helps release the starches from the rice, contributing to the creamy texture of the risotto.
- Add the broth: Begin adding the warm broth one ladleful at a time, stirring constantly. Wait until each addition is almost completely absorbed before adding the next. Continue this process until the rice is al dente and the risotto is creamy, approximately 18-20 minutes.
- Finish with mushrooms and cheese: Once the rice is cooked to your liking, stir in the sautéed mushrooms and grated Parmesan cheese. Season with salt and pepper to taste. Stir until the cheese has melted and the risotto is creamy.
- Garnish and serve: Remove the risotto from heat and let it sit for a minute. Garnish with freshly chopped parsley before serving.
Extra Tips: It’s important to use a high-quality Arborio or Carnaroli rice for the best texture in your risotto. Be patient and stir constantly; this guarantees the rice cooks evenly and releases starch for a creamy consistency.
If the risotto thickens too much after making it ahead, simply add a little more broth or water when reheating to loosen it up. Finally, always taste and adjust the seasoning before serving, as the flavors can mellow over time.
Tiramisu With Espresso and Mascarpone

Tiramisu With Espresso and Mascarpone is a classic Italian dessert that perfectly balances the rich flavors of coffee with the creamy texture of mascarpone cheese. This make-ahead recipe allows the flavors to meld together beautifully, resulting in a decadent treat that’s both sophisticated and comforting.
Ideal for gatherings or special occasions, this Tiramisu is sure to impress your guests with its authentic taste and elegant presentation. Whether you’re a seasoned dessert maker or a beginner, this recipe simplifies the process, guaranteeing you achieve a delicious outcome every time.
This version of Tiramisu highlights the bold flavor of espresso, which pairs exceptionally well with the creamy mascarpone and the delicate layers of ladyfinger biscuits. The dessert is assembled in layers, allowing each ingredient to soak into the others, creating a harmonious blend of flavors and textures.
Preparing it in advance not only enhances the taste but also makes it a convenient option for entertaining, as it can be stored in the refrigerator until ready to serve. Follow the recipe below to create a dessert that embodies the true essence of Italian cuisine.
Ingredients (Serving Size: 4-6 people)
- 3 large eggs, separated
- 1 cup granulated sugar
- 8 ounces mascarpone cheese
- 1 cup heavy cream
- 2 cups strong brewed espresso, cooled
- 1 tablespoon coffee liqueur (optional)
- 24-30 ladyfinger biscuits
- Unsweetened cocoa powder for dusting
- Dark chocolate shavings for garnish (optional)
Cooking Instructions
- Prepare the Mascarpone Mixture: In a large mixing bowl, whisk the egg yolks and half of the sugar until the mixture becomes pale and slightly thickened. Gently fold in the mascarpone cheese until well combined and smooth.
- Whip the Cream: In a separate bowl, whip the heavy cream until it holds soft peaks. Carefully fold the whipped cream into the mascarpone mixture, making sure it remains light and airy.
- Beat Egg Whites: In another clean bowl, beat the egg whites with the remaining sugar until stiff peaks form. Gently fold the egg whites into the mascarpone and whipped cream mixture, taking care not to deflate the mixture.
- Prepare Espresso Mixture: Combine the cooled espresso with the coffee liqueur in a shallow dish. Dip each ladyfinger biscuit quickly into the espresso mixture, making sure they’re soaked but not overly saturated.
- Assemble the Tiramisu: In a rectangular or square serving dish, arrange a layer of soaked ladyfingers at the bottom. Spread half of the mascarpone mixture over the ladyfingers, smoothing it out evenly. Repeat with another layer of soaked ladyfingers and the remaining mascarpone mixture.
- Chill the Dessert: Cover the dish with plastic wrap and refrigerate for at least 4 hours, preferably overnight, to allow the flavors to meld and the dessert to set properly.
- Serve: Just before serving, dust the top of the Tiramisu with unsweetened cocoa powder and garnish with dark chocolate shavings if desired. Slice and serve chilled.
Extra Tips
For the best results, use high-quality espresso and mascarpone cheese, as these are the star ingredients of the dish. If you prefer a stronger coffee flavor, you can increase the amount of espresso or add more coffee liqueur.
Always make sure the ladyfingers are only lightly soaked to prevent the dessert from becoming too soggy. Finally, allowing the Tiramisu to chill overnight enhances the flavor and texture, making it a perfect make-ahead dessert option.
Panna Cotta With Berry Compote

Panna Cotta With Berry Compote is a classic Italian dessert that’s as elegant as it’s easy to prepare. Perfect for a dinner party or a family gathering, this make-ahead treat allows you to spend more time with your guests and less time in the kitchen. The creamy panna cotta, with its silky texture, pairs beautifully with the sweet and tangy flavors of the berry compote, creating a delightful balance of flavors that will impress your taste buds.
The beauty of panna cotta lies in its simplicity and versatility. While it might seem like a fancy dessert, the steps involved are straightforward, and the ingredients are easily accessible. The panna cotta itself is rich and creamy, made from a blend of cream, sugar, and vanilla, while the berry compote adds a vibrant, fresh burst of flavor. By preparing this dish in advance, you can focus on the main meal and enjoy the company of your guests, knowing that a delicious dessert awaits them at the end of their culinary journey.
Ingredients for 4-6 servings:
- 2 cups heavy cream
- 1 cup whole milk
- 1/2 cup granulated sugar
- 1 teaspoon vanilla extract
- 2 1/4 teaspoons unflavored gelatin
- 3 tablespoons cold water
- 2 cups mixed berries (such as strawberries, raspberries, and blueberries)
- 1/4 cup granulated sugar (for the berry compote)
- 1 tablespoon lemon juice
Cooking Instructions:
- Prepare the Gelatin: In a small bowl, sprinkle the gelatin over the cold water and let it sit for about 5 minutes. This allows the gelatin to bloom, which will help it dissolve smoothly into the cream mixture.
- Heat the Cream: In a saucepan, combine the heavy cream, whole milk, and 1/2 cup of sugar. Cook over medium heat, stirring occasionally, until the sugar dissolves and the mixture is hot but not boiling. Remove from heat and stir in the vanilla extract.
- Dissolve the Gelatin: Add the bloomed gelatin to the hot cream mixture, stirring until the gelatin is completely dissolved. This step is essential for achieving the perfect texture.
- Pour into Molds: Divide the mixture evenly among 4-6 ramekins or serving glasses. Allow them to cool slightly before covering with plastic wrap and refrigerating for at least 4 hours, or until set.
- Make the Berry Compote: In a saucepan, combine the mixed berries, 1/4 cup sugar, and lemon juice. Cook over medium heat, stirring occasionally, until the berries release their juices and the mixture thickens slightly, about 10 minutes. Remove from heat and let cool completely.
- Serve: Once the panna cotta is set, remove it from the refrigerator. Run a sharp knife around the edge of the ramekin and invert onto a serving plate, or serve directly in the glass. Spoon the berry compote over the top before serving.
Extra Tips:
To guarantee the panna cotta sets correctly, make sure the gelatin is fully dissolved in the cream mixture. If you’d like to experiment with flavors, try infusing the cream with spices like cinnamon or cardamom before straining out the solids.
For a more luxurious texture, you can replace some of the cream with mascarpone cheese. Remember, the panna cotta can be made up to two days in advance, making it a stress-free dessert option. The berry compote can also be customized with seasonal fruits or even a splash of liqueur for added depth of flavor.