

Life can get a little crazy, right? That’s why I’m thrilled to share these clever Italian make-ahead recipes that make busy days so much easier. From a classic lasagna with a twist to creamy pesto gnocchi, these dishes are prepped in advance for your convenience. The comforting aroma of chicken cacciatore stew is perfect for warming up your evenings. Let’s explore these delicious time-savers together!
Classic Lasagna With a Twist
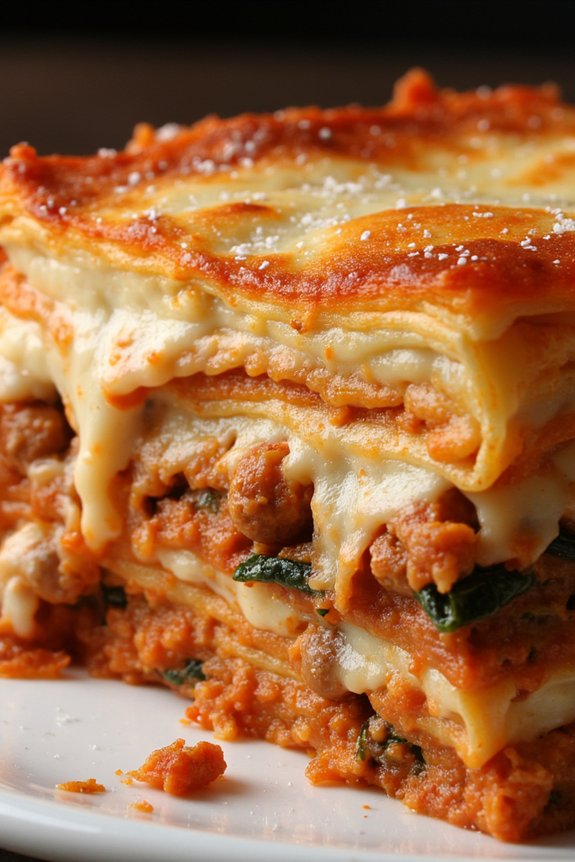
Lasagna is a beloved classic Italian dish that has been a staple in many households around the world. Traditionally made with layers of pasta, rich meat sauce, creamy béchamel, and gooey cheese, this version offers a delightful twist by incorporating some unexpected ingredients to elevate the flavors.
This “Classic Lasagna With a Twist” recipe brings together the comforting and familiar taste of lasagna while introducing a hint of spiciness and freshness with the addition of Italian sausage and fresh spinach. Perfect for gatherings or a cozy family dinner, this make-ahead lasagna is designed to serve 4-6 people.
The beauty of this dish lies in its ability to taste even better the next day, as the flavors meld together gloriously. By preparing it in advance, you’ll not only save time but also guarantee a hearty and delectable meal that everyone will enjoy.
Ingredients (Serves 4-6):
- 9 lasagna noodles
- 1 pound Italian sausage, casings removed
- 1 tablespoon olive oil
- 1 onion, finely chopped
- 3 cloves garlic, minced
- 1 can (28 ounces) crushed tomatoes
- 2 tablespoons tomato paste
- 1 teaspoon dried oregano
- 1 teaspoon dried basil
- 1/2 teaspoon red pepper flakes
- Salt and pepper to taste
- 2 cups fresh spinach, roughly chopped
- 15 ounces ricotta cheese
- 1 egg
- 2 cups shredded mozzarella cheese
- 1/2 cup grated Parmesan cheese
Cooking Instructions:
1. Prepare the Noodles: Bring a large pot of salted water to a boil. Cook the lasagna noodles according to the package instructions until al dente. Drain and lay them flat on a clean kitchen towel to prevent sticking. Set aside.
2. Cook the Sausage: In a large skillet over medium heat, heat the olive oil. Add the Italian sausage and cook until browned, breaking it apart with a wooden spoon. Once cooked through, transfer the sausage to a plate lined with paper towels to drain excess fat.
3. Make the Sauce: In the same skillet, add the chopped onion and garlic. Sauté until the onion is translucent. Stir in the crushed tomatoes, tomato paste, oregano, basil, red pepper flakes, salt, and pepper. Let the sauce simmer for about 15 minutes, stirring occasionally.
Add the fresh spinach and cook until wilted, about 2 minutes.
4. Prepare the Ricotta Mixture: In a medium bowl, combine the ricotta cheese, egg, and a pinch of salt and pepper. Mix until smooth and well combined.
5. Assemble the Lasagna: Preheat your oven to 375°F (190°C). Spread a thin layer of the tomato sauce on the bottom of a 9×13-inch baking dish. Place three noodles over the sauce. Spread half of the ricotta mixture over the noodles, then add half of the cooked sausage and sprinkle with a third of the mozzarella cheese.
Repeat the layers with sauce, noodles, ricotta mixture, sausage, and mozzarella. Finish with a final layer of noodles, remaining sauce, and top with the rest of the mozzarella and Parmesan cheese.
6. Bake: Cover the baking dish with aluminum foil and bake in the preheated oven for 25 minutes. Remove the foil and bake for an additional 15 minutes, or until the cheese is golden and bubbly.
7. Rest and Serve: Allow the lasagna to rest for at least 10 minutes before slicing. This helps the layers set, making it easier to serve.
Extra Tips:
- For an even deeper flavor, prepare the sauce a day in advance and refrigerate it. This allows the spices to infuse into the sauce more thoroughly.
- Feel free to add additional vegetables such as mushrooms or bell peppers for extra nutrition and flavor.
- If you prefer a lighter version, substitute ground turkey or chicken sausage for the Italian sausage.
- To avoid a watery lasagna, guarantee that the spinach is thoroughly drained and patted dry before adding it to the sauce.
Slow-Cooked Bolognese Sauce
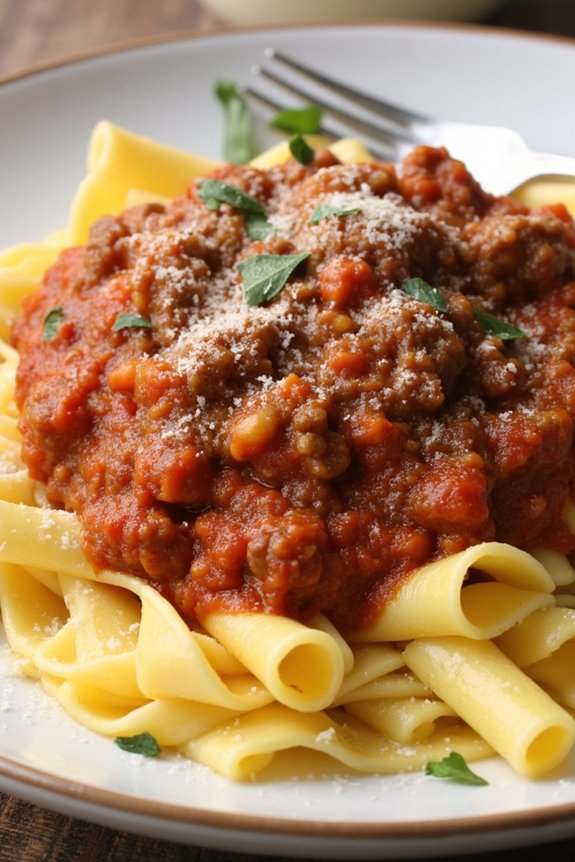
Indulge in the rich flavors of an authentic Italian classic with this Slow-Cooked Bolognese Sauce. This dish is perfect for those who enjoy a hearty, meat-based sauce with a depth of flavor that only comes from hours of slow cooking.
Originating from Bologna in Northern Italy, the Bolognese sauce is traditionally served with tagliatelle pasta, but it also pairs beautifully with other types of pasta or can be used as a filling for lasagna. Preparing this dish in advance not only saves time for busy days, but also allows the flavors to develop further, making it even more delicious when reheated.
The beauty of this recipe lies in its simplicity and the quality of its ingredients. By using a combination of ground beef and pork, along with a mix of aromatic vegetables, herbs, and a splash of wine, you’ll create a sauce that’s savory, aromatic, and deeply satisfying.
The slow cooking process guarantees that all the flavors meld together beautifully, resulting in a sauce that’s perfect for a family dinner or a special occasion. This recipe yields enough sauce to serve 4-6 people.
Ingredients:
- 2 tablespoons olive oil
- 1 large onion, finely chopped
- 2 cloves garlic, minced
- 2 carrots, finely chopped
- 2 celery stalks, finely chopped
- 1 pound ground beef
- 1/2 pound ground pork
- 1 cup whole milk
- 1 cup dry white wine
- 1 can (28 ounces) crushed tomatoes
- 2 tablespoons tomato paste
- 1 teaspoon dried oregano
- 1 teaspoon dried basil
- Salt and freshly ground black pepper, to taste
- 1/4 cup fresh parsley, chopped
- Parmesan cheese, grated (optional)
Cooking Instructions:
- Preparation of Vegetables: Begin by heating the olive oil in a large pot over medium heat. Add the chopped onion, garlic, carrots, and celery. Sauté for about 8-10 minutes, until the vegetables are soft and the onion is translucent.
- Cooking the Meat: Increase the heat slightly and add the ground beef and pork to the pot. Cook, stirring frequently, until the meat is browned and no longer pink, about 10 minutes.
- Incorporating the Milk: Pour in the milk and let it simmer gently, stirring occasionally, until it has mostly evaporated. This step tenderizes the meat and adds richness to the sauce.
- Adding Wine: Add the white wine to the pot and let it reduce by half. This will enhance the depth of flavor and add a subtle acidity to the sauce.
- Simmering the Sauce: Stir in the crushed tomatoes, tomato paste, oregano, basil, salt, and pepper. Bring the mixture to a gentle simmer, then reduce the heat to low. Allow the sauce to cook uncovered for at least 2-3 hours, stirring occasionally. The longer it cooks, the better the flavor will be.
- Final Touches: Taste the sauce and adjust seasoning if necessary. Stir in the fresh parsley just before serving. Serve over your choice of pasta and sprinkle with grated Parmesan cheese if desired.
Extra Tips:
For the best results, use a heavy-bottomed pot which helps distribute heat evenly and reduces the risk of burning. If you have time, prepare the sauce a day in advance and store it in the refrigerator overnight.
This allows the flavors to develop further. When reheating, add a splash of water or beef broth to loosen the sauce if needed. Finally, always taste and adjust the seasoning before serving to guarantee a perfectly balanced sauce. Enjoy your delicious, homemade Slow-Cooked Bolognese Sauce with your favorite pasta!
Spinach and Ricotta Stuffed Shells

Spinach and ricotta stuffed shells are a classic Italian dish that’s perfect for making ahead of time. This comforting meal is an ideal option for busy weeknights or for entertaining guests, as it can be prepared in advance and baked just before serving. The combination of creamy ricotta, nutritious spinach, and savory marinara sauce makes this a wholesome and satisfying dish that will delight both kids and adults alike.
The stuffed pasta shells aren’t only visually appealing but also packed with flavor, making them a favorite in Italian households.
When preparing spinach and ricotta stuffed shells, you’ll find that the process is both straightforward and rewarding. The key is to guarantee that the filling is well-mixed and the pasta shells are cooked just right – al dente, so they hold their shape when filled.
Once assembled, the dish can be refrigerated or even frozen, allowing you to enjoy a homemade Italian meal with minimal effort on the day of serving. Pair it with a fresh salad or some garlic bread, and you have a complete meal that’s sure to impress.
Ingredients for 4-6 servings:
- 20-24 jumbo pasta shells
- 15 oz ricotta cheese
- 1 cup grated Parmesan cheese
- 1 cup shredded mozzarella cheese
- 2 cups fresh spinach, chopped
- 1 large egg
- 2 cups marinara sauce
- 2 cloves garlic, minced
- 1 teaspoon Italian seasoning
- Salt and pepper to taste
- Fresh basil leaves (optional, for garnish)
Cooking Instructions:
- Preheat the Oven: Preheat your oven to 375°F (190°C). This will guarantee it’s ready for baking once the shells are assembled.
- Cook the Pasta Shells: In a large pot of boiling salted water, cook the pasta shells until al dente, according to the package instructions. Drain and set aside to cool slightly.
- Prepare the Filling: In a large mixing bowl, combine the ricotta cheese, chopped spinach, 1/2 cup of the grated Parmesan cheese, the egg, minced garlic, Italian seasoning, salt, and pepper. Mix until well combined.
- Stuff the Shells: Carefully fill each cooked shell with the spinach and ricotta mixture using a spoon, guaranteeing they’re generously filled.
- Assemble the Dish: In a baking dish, spread half of the marinara sauce evenly on the bottom. Arrange the stuffed shells in a single layer over the sauce. Pour the remaining marinara sauce over the shells and sprinkle with the remaining Parmesan cheese and mozzarella cheese.
- Bake: Cover the baking dish with aluminum foil and bake in the preheated oven for 25 minutes. Remove the foil and bake for an additional 10 minutes, or until the cheese is bubbly and golden brown.
- Serve: Allow the dish to cool slightly, then garnish with fresh basil leaves if desired before serving.
Extra Tips: When making spinach and ricotta stuffed shells ahead of time, consider assembling the dish up to the baking step and storing it in the refrigerator for up to 24 hours or in the freezer for up to 2 months. If frozen, let the dish thaw in the refrigerator overnight before baking.
To prevent the shells from sticking together while cooling, drizzle them with a little olive oil after draining. Additionally, feel free to experiment by adding other ingredients to the filling, such as cooked sausage or mushrooms, for a heartier version.
Chicken Cacciatore Stew
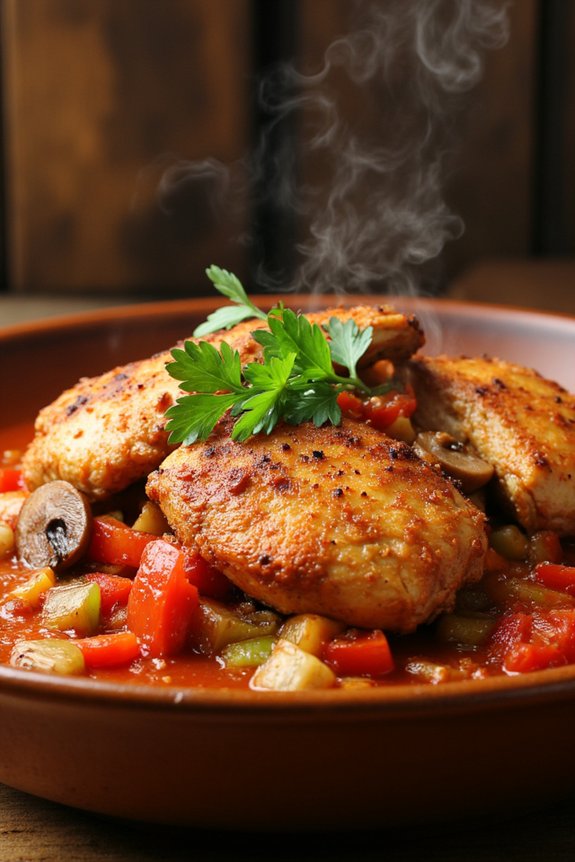
Chicken Cacciatore Stew is a classic Italian dish that captures the essence of rustic, home-cooked meals. Perfectly suited for making ahead of time, this stew allows the robust flavors of the ingredients to meld together, creating a deliciously hearty meal. Traditionally, “cacciatore” means hunter-style, and this dish typically consists of chicken braised in a sauce made from tomatoes, onions, herbs, and wine.
Over time, variations have emerged, including the addition of bell peppers and mushrooms, which add depth and richness to the dish. This Chicken Cacciatore Stew is perfect for a family gathering or a cozy night in, serving 4-6 people. It can be made ahead of time and stored in the fridge, allowing the flavors to deepen before serving.
Pair it with crusty bread or serve it over pasta or polenta for a complete meal. The beauty of this recipe is its flexibility—it can be adapted to suit your taste or the ingredients you have on hand, making it an ideal choice for a satisfying and stress-free meal.
Ingredients for 4-6 servings:
- 4-6 bone-in chicken thighs or drumsticks
- Salt and pepper
- 2 tablespoons olive oil
- 1 large onion, diced
- 2 cloves garlic, minced
- 1 red bell pepper, sliced
- 1 green bell pepper, sliced
- 8 ounces mushrooms, sliced
- 1 teaspoon dried oregano
- 1 teaspoon dried basil
- 1/2 teaspoon dried thyme
- 1/2 cup dry white wine
- 1 can (28 ounces) crushed tomatoes
- 1/2 cup chicken broth
- 2 tablespoons capers (optional)
- 1/4 cup chopped fresh parsley
Cooking Instructions:
- Prepare the Chicken: Season the chicken thighs or drumsticks generously with salt and pepper on both sides. This will help to flavor the meat and create a delicious crust during browning.
- Brown the Chicken: In a large pot or Dutch oven, heat the olive oil over medium-high heat. Add the chicken pieces, skin side down, and sear until golden brown, about 5 minutes per side. Remove the chicken from the pot and set aside.
- Sauté the Vegetables: In the same pot, add the diced onion and sauté for about 3 minutes until translucent. Add the garlic, bell peppers, and mushrooms, and continue to cook for another 5 minutes, stirring occasionally, until the vegetables begin to soften.
- Add Herbs and Wine: Stir in the dried oregano, basil, and thyme, and cook for 1 minute until fragrant. Pour in the white wine, scraping up any browned bits from the bottom of the pot. Let the wine simmer for about 2 minutes to reduce slightly.
- Combine with Tomatoes: Add the crushed tomatoes and chicken broth to the pot, stirring to combine. Bring the mixture to a simmer.
- Return Chicken to Pot: Nestle the browned chicken pieces into the tomato mixture, ensuring they’re mostly submerged. Add the capers if using. Cover the pot with a lid, reduce the heat to low, and let the stew simmer gently for 45-60 minutes, or until the chicken is cooked through and tender.
- Finish and Serve: Once done, taste the stew and adjust seasoning with additional salt and pepper if needed. Stir in the chopped parsley before serving.
Extra Tips:
To enhance the flavor of your Chicken Cacciatore Stew, consider marinating the chicken in the herbs and some olive oil for a few hours or overnight before cooking. This will infuse the meat with extra flavor.
When making ahead, the stew can be stored in the refrigerator for up to 3 days. Reheat it gently on the stove before serving, adding a splash of water or broth if the sauce has thickened too much. For a heartier version, add some olives or even a dash of red pepper flakes for a bit of heat. Enjoy your stew with a side of crusty bread to soak up the delicious sauce.
Tuscan White Bean Soup
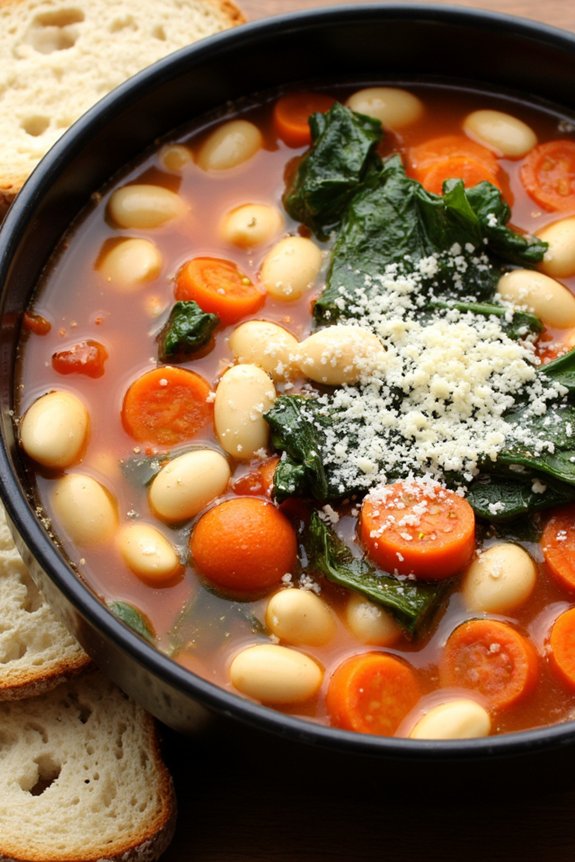
Tuscan White Bean Soup is a comforting and hearty dish that encapsulates the rustic flavors of Italy. Known for its simplicity and rich taste, this soup is perfect for make-ahead meals. Originating from the Tuscany region, this soup typically features cannellini beans, which are creamy and mild, making them ideal for soaking up the flavors of the other ingredients. Its warming nature makes it an excellent choice for a cozy family dinner or a quick and satisfying lunch option.
The beauty of Tuscan White Bean Soup lies in its versatility and depth of flavor, achieved through the harmonious combination of fresh vegetables, aromatic herbs, and a touch of savory broth. This dish isn’t only delicious but also nutritious, rich in protein and fiber, and can easily be adapted to suit various dietary preferences. It’s the perfect example of Italian cuisine’s ability to transform simple ingredients into something extraordinary.
Ingredients for 4-6 servings:
- 2 tablespoons olive oil
- 1 medium onion, chopped
- 2 carrots, diced
- 2 celery stalks, diced
- 4 cloves garlic, minced
- 1 teaspoon dried thyme
- 1 teaspoon dried rosemary
- 1 bay leaf
- 3 cups vegetable or chicken broth
- 2 cans (15 ounces each) cannellini beans, drained and rinsed
- 1 can (14.5 ounces) diced tomatoes, with juice
- Salt and pepper to taste
- 2 cups chopped kale or spinach
- Grated Parmesan cheese, for serving
- Crusty bread, for serving
Cooking Instructions:
- Prepare the Vegetables: Start by heating the olive oil in a large pot over medium heat. Add the chopped onion, diced carrots, and diced celery. Sauté for about 5-7 minutes, or until the vegetables are tender and the onions are translucent.
- Add Aromatics: Stir in the minced garlic, dried thyme, dried rosemary, and the bay leaf. Cook for another 1-2 minutes until the garlic is fragrant, being careful not to let it burn.
- Simmer the Soup: Pour in the vegetable or chicken broth, then add the drained and rinsed cannellini beans and the can of diced tomatoes with its juice. Stir well to combine all the ingredients.
- Season and Cook: Season the soup with salt and pepper to taste. Bring the mixture to a boil, then reduce the heat to low and let it simmer for about 25-30 minutes, allowing the flavors to meld and the soup to thicken slightly.
- Finish with Greens: About 5 minutes before the soup is done, add the chopped kale or spinach. Stir them in and let them wilt into the soup. Taste and adjust seasoning if necessary.
- Serve: Remove the bay leaf before serving. Ladle the soup into bowls, sprinkle with grated Parmesan cheese, and serve with crusty bread on the side.
Extra Tips:
For an even richer flavor, consider adding a Parmesan rind to the soup during the simmering process, removing it before serving. If you prefer a creamier texture, you can partially blend the soup using an immersion blender, but be sure to leave some whole beans for texture.
This soup freezes exceptionally well, making it a great option for meal prep. Simply let it cool completely before transferring it to airtight containers for freezing. When reheating, you may need to add a bit more broth or water to achieve your desired consistency.
Eggplant Parmesan Bake
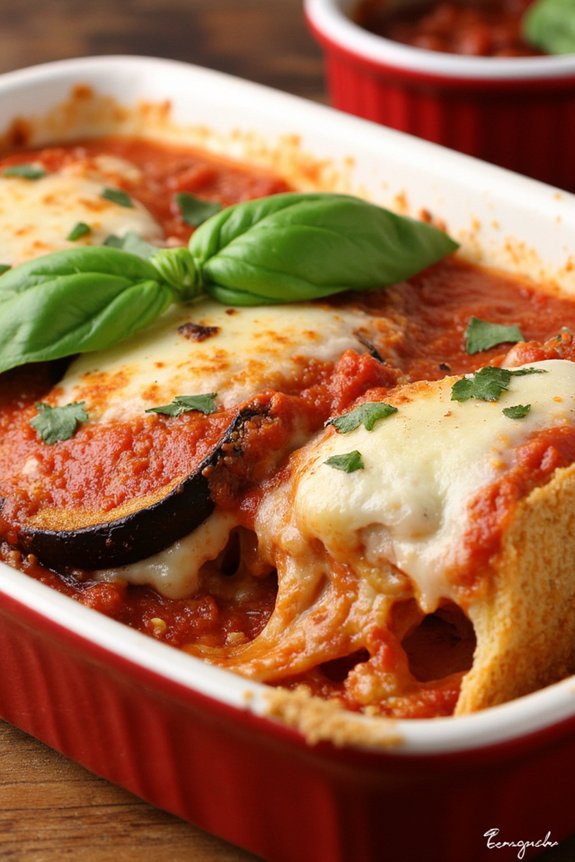
Eggplant Parmesan Bake is a delightful Italian dish that combines layers of tender eggplant slices with rich marinara sauce and a generous topping of melted cheese. This comfort food classic is perfect for preparing in advance, making it ideal for busy weeknights or when entertaining guests.
The eggplant slices are first coated and baked until golden and crispy, then layered with a robust tomato sauce and a blend of cheeses, before being baked to perfection. The result is a warm, hearty meal that bursts with flavors and textures, offering a satisfying dining experience.
Preparing Eggplant Parmesan Bake ahead of time allows the flavors to meld together, enhancing the dish’s taste. It can be assembled in advance and stored in the refrigerator or freezer, ready to be baked when needed. This not only saves time but also guarantees you have a delicious homemade meal at your fingertips.
Whether served as a main course or a side dish, Eggplant Parmesan Bake is sure to please both vegetarians and meat lovers alike.
Ingredients (Serving Size: 4-6 people):
- 2 large eggplants
- Salt
- 2 cups all-purpose flour
- 4 large eggs
- 2 cups breadcrumbs
- 1 cup grated Parmesan cheese
- 4 cups marinara sauce
- 2 cups shredded mozzarella cheese
- Fresh basil leaves (optional)
Cooking Instructions:
- Prepare the Eggplants: Start by slicing the eggplants into 1/4-inch thick rounds. Lay them out in a single layer on a baking sheet and sprinkle with salt to draw out moisture. Let them sit for about 30 minutes, then pat them dry with paper towels.
- Set Up Breading Station: Preheat your oven to 375°F (190°C). Prepare three separate bowls: one with flour, one with beaten eggs, and one with a mixture of breadcrumbs and 1/2 cup of grated Parmesan cheese.
- Bread the Eggplant Slices: Dredge each eggplant slice in flour, then dip it into the beaten eggs, guaranteeing it’s fully coated. Next, press it into the breadcrumb mixture, covering both sides. Place the breaded slices on a baking sheet lined with parchment paper.
- Bake the Eggplant: Bake the eggplant slices in the preheated oven for 20-25 minutes, flipping halfway through, until they’re golden brown and crispy.
- Assemble the Bake: In a 9×13-inch baking dish, spread a thin layer of marinara sauce. Arrange a layer of baked eggplant slices on top. Spoon more marinara sauce over the eggplant, and sprinkle with mozzarella cheese and some of the remaining Parmesan cheese. Repeat the layers until all ingredients are used, ending with a layer of cheese on top.
- Final Baking: Cover the dish with aluminum foil and bake in the oven for 25 minutes. Remove the foil and bake for an additional 15 minutes, or until the cheese is bubbly and slightly golden.
- Garnish and Serve: Allow the dish to cool for a few minutes before serving. Garnish with fresh basil leaves if desired.
Extra Tips:
To prevent your Eggplant Parmesan Bake from being soggy, make sure to properly salt and press the eggplant slices to remove excess moisture. This step is significant for achieving a crispy texture.
Additionally, feel free to customize the marinara sauce with herbs like oregano or thyme for added depth of flavor. If making ahead, the assembled dish can be covered tightly with foil and stored in the refrigerator for up to 2 days or frozen for up to 3 months before baking.
Just remember to thaw it in the refrigerator overnight if frozen, and adjust the baking time accordingly.
Sausage and Peppers Pasta Bake

Sausage and Peppers Pasta Bake is a hearty and delightful dish that combines the robust flavors of Italian sausage with the sweetness of bell peppers, all enveloped in a comforting pasta bake. This dish is perfect for those busy days when you want a delicious homemade meal, but also want to prepare it ahead of time. The beauty of this recipe is that you can assemble it in advance and simply pop it in the oven when you’re ready to eat, making it ideal for family dinners or when you’re entertaining guests.
The combination of spicy Italian sausage, vibrant bell peppers, and gooey melted cheese creates a symphony of flavors that’s sure to please everyone at the table. The pasta, cooked to al dente perfection, absorbs the savory sauce, making every bite a burst of Italian goodness. Whether you’re a seasoned cook or a beginner in the kitchen, this Sausage and Peppers Pasta Bake is straightforward to prepare and is a guaranteed crowd-pleaser.
Ingredients (Serves 4-6):
- 1 pound Italian sausage (mild or spicy, according to preference)
- 2 tablespoons olive oil
- 1 large onion, thinly sliced
- 1 red bell pepper, sliced
- 1 yellow bell pepper, sliced
- 3 cloves garlic, minced
- 1 teaspoon dried oregano
- 1 teaspoon dried basil
- 1/2 teaspoon red pepper flakes (optional)
- 1 can (28 ounces) crushed tomatoes
- 12 ounces pasta (penne or rigatoni recommended)
- 2 cups shredded mozzarella cheese
- 1/2 cup grated Parmesan cheese
- Salt and pepper to taste
- Fresh basil for garnish (optional)
Cooking Instructions:
- Preheat and Prepare: Preheat your oven to 375°F (190°C). Grease a large baking dish with a little olive oil to prevent sticking.
- Cook the Sausage: In a large skillet over medium heat, add 1 tablespoon of olive oil. Add the sausage, breaking it up with a spoon, and cook until browned. Remove the sausage from the skillet and set it aside.
- Sauté the Vegetables: In the same skillet, add the remaining olive oil. Add the onions, red bell pepper, and yellow bell pepper. Sauté until the vegetables are soft, about 5-7 minutes. Add the minced garlic and cook for another minute.
- Make the Sauce: Stir in the crushed tomatoes, oregano, basil, red pepper flakes, salt, and pepper. Return the cooked sausage to the skillet, mix well, and let the mixture simmer for about 10 minutes to allow the flavors to meld.
- Cook the Pasta: While the sauce is simmering, cook the pasta in a large pot of boiling salted water until just al dente. Drain the pasta and add it to the sausage and pepper mixture, stirring until everything is well combined.
- Assemble the Bake: Pour the pasta mixture into the prepared baking dish. Sprinkle the top with mozzarella and Parmesan cheeses.
- Bake: Place the dish in the preheated oven and bake for 20-25 minutes, or until the cheese is melted and bubbly. If you want a golden crust, switch to broil for the last 2-3 minutes, watching carefully to prevent burning.
- Serve: Remove from the oven and let it cool for a few minutes. Garnish with fresh basil if desired and serve hot.
Extra Tips: For a richer flavor, consider adding a splash of red wine to the sauce while it simmers. If you prefer more heat, increase the amount of red pepper flakes or use a spicy sausage. This dish can be made up to a day in advance; simply assemble, cover, and store in the refrigerator until ready to bake. Feel free to experiment with different types of cheese or add other vegetables like mushrooms or zucchini for variety.
Mushroom Risotto Casserole

Mushroom Risotto Casserole combines the classic flavors of creamy risotto with the ease of a make-ahead casserole dish. Ideal for gatherings or a cozy family dinner, this recipe captures the earthy richness of mushrooms, the creaminess of Arborio rice, and a touch of parmesan cheese for a savory finish.
The beauty of this dish lies in its ability to be prepared in advance, allowing the flavors to meld together and making it a stress-free option for entertaining. This recipe serves 4-6 people and is perfect for those who want to enjoy a sophisticated Italian dish without spending hours in the kitchen.
By preparing the risotto ahead of time and baking it just before serving, you can focus on other aspects of your meal or simply relax with your guests. The casserole can be served as a main course or as a side dish, offering versatility for any occasion.
Ingredients:
- 1 1/2 cups Arborio rice
- 2 tablespoons olive oil
- 1 onion, finely chopped
- 2 garlic cloves, minced
- 8 ounces cremini mushrooms, sliced
- 1/2 cup white wine
- 4 cups chicken or vegetable broth
- 1/2 cup freshly grated parmesan cheese
- 2 tablespoons unsalted butter
- Salt and pepper to taste
- 1 tablespoon chopped fresh parsley (optional)
- 1/2 cup grated mozzarella cheese
Instructions:
- Prepare the Mushrooms and Aromatics: Heat the olive oil in a large skillet over medium heat. Add the chopped onion and sauté until translucent, about 5 minutes. Add the minced garlic and sliced mushrooms, cooking until the mushrooms are soft and have released their moisture, approximately 8 minutes.
- Cook the Rice: Stir in the Arborio rice and cook for 2 minutes, allowing the grains to be coated in the oil and slightly toasted. Pour in the white wine and cook until it’s absorbed by the rice.
- Add the Broth: Gradually add the chicken or vegetable broth, one cup at a time, stirring frequently until each addition is absorbed before adding the next. This process should take about 20 minutes and will result in a creamy consistency.
- Mix in Cheese and Season: Once the rice is cooked and creamy, stir in the parmesan cheese and butter. Season with salt and pepper to taste. Remove from heat and let the risotto cool slightly.
- Assemble the Casserole: Preheat your oven to 350°F (175°C). Transfer the risotto to a greased baking dish. Sprinkle the mozzarella cheese evenly over the top.
- Bake: Cover the baking dish with foil and bake in the preheated oven for 15 minutes. Remove the foil and bake for an additional 10 minutes, or until the cheese is melted and golden brown.
- Garnish and Serve: Remove from the oven and let it cool for a few minutes before serving. Garnish with chopped fresh parsley if desired.
Extra Tips:
To enhance the flavor of the risotto, consider using a combination of different mushrooms, such as shiitake or porcini, in addition to cremini. For additional creaminess, you can stir in a splash of cream along with the parmesan cheese.
This casserole can be made a day ahead and refrigerated; simply reheat it in the oven before serving. If you prefer a vegetarian version, make sure to use vegetable broth instead of chicken broth.
Marinated Antipasto Salad
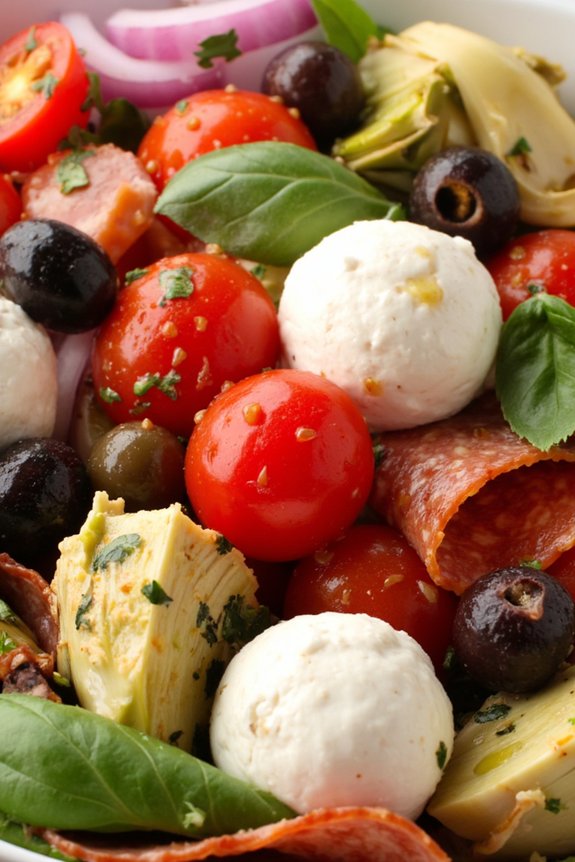
Marinated Antipasto Salad is a delightful Italian make-ahead recipe bursting with vibrant colors and flavors. This salad is perfect for gatherings, parties, or as a rejuvenating appetizer to start any meal. The combination of marinated vegetables, cheese, and meats makes it a versatile dish that can be customized according to your preference.
The beauty of this dish lies in its ability to be prepared in advance, allowing the flavors to meld together beautifully, resulting in a more robust taste. To guarantee the salad is bursting with flavor, a marinade of olive oil, vinegar, and a blend of Italian herbs is used. This marinade not only enhances the taste of the vegetables but also tenderizes them slightly.
The mixture of crunchy vegetables, creamy cheese, and hearty meat is a wonderful play of textures and flavors, making every bite an adventure. This recipe serves 4-6 people, making it ideal for family dinners or small gatherings.
Ingredients:
- 1 cup cherry tomatoes, halved
- 1 cup marinated artichoke hearts, drained and quartered
- 1 cup roasted red peppers, sliced
- 1 cup mozzarella balls
- 1/2 cup black olives, pitted
- 1/2 cup green olives, pitted
- 1/2 cup sliced salami or pepperoni
- 1/4 cup red onion, thinly sliced
- 1/4 cup fresh basil leaves
- 1/4 cup fresh parsley, chopped
- 1/3 cup olive oil
- 3 tablespoons red wine vinegar
- 1 teaspoon dried oregano
- 1/2 teaspoon garlic powder
- Salt and pepper to taste
Instructions:
- Prepare the Vegetables and Ingredients: Start by washing and preparing all the vegetables. Halve the cherry tomatoes, drain and quarter the marinated artichoke hearts, slice the roasted red peppers, and thinly slice the red onion.
- Combine the Main Ingredients: In a large mixing bowl, combine the cherry tomatoes, artichoke hearts, roasted red peppers, mozzarella balls, black olives, green olives, sliced salami or pepperoni, red onion, fresh basil, and parsley. Gently toss these ingredients to mix them thoroughly.
- Make the Marinade: In a small bowl, whisk together the olive oil, red wine vinegar, dried oregano, garlic powder, salt, and pepper. Assure the mixture is well combined and the herbs are evenly distributed.
- Marinate the Salad: Pour the marinade over the mixed salad ingredients. Use a large spoon or your hands to gently toss everything together, ensuring each piece is well coated with the marinade.
- Chill and Serve: Cover the bowl with plastic wrap or a lid and refrigerate for at least 2 hours, allowing the flavors to meld. For best results, let the salad marinate overnight. Before serving, give it a gentle toss again to redistribute the marinade.
Extra Tips:
For an extra kick, consider adding a pinch of red pepper flakes to the marinade. You can also experiment with different types of cheese or cured meats to suit your taste preferences.
If you have extra marinade left, use it as a salad dressing or a dipping sauce for fresh bread. Remember, the longer the salad marinates, the more intense the flavors will become, so adjust marinating time based on your taste preference.
Herb-Crusted Pork Tenderloin

Herb-Crusted Pork Tenderloin is an Italian-inspired dish that’s both elegant and easy to prepare, making it perfect for any special occasion or dinner party. This dish features a succulent pork tenderloin coated with a flavorful crust of fresh herbs, garlic, and Parmesan cheese, giving it a rich and aromatic taste. The herb crust not only adds flavor but also helps to keep the meat moist and tender during the cooking process.
This recipe is ideal for make-ahead preparation, allowing you to spend more time with your guests and less time in the kitchen. The key to a successful Herb-Crusted Pork Tenderloin is selecting the right blend of herbs and guaranteeing the tenderloin is cooked to perfection. A combination of rosemary, thyme, and parsley complements the natural flavors of the pork, while a hint of garlic and Parmesan cheese adds depth and richness.
This dish can be prepared in advance, with the tenderloin marinating in the herb mixture for several hours or overnight, which enhances the flavors and makes the cooking process quick and hassle-free. Serve with a side of roasted vegetables or a light salad for a complete and satisfying meal.
Ingredients (Serves 4-6):
- 2 pork tenderloins (about 1 pound each)
- 1/4 cup fresh rosemary, finely chopped
- 1/4 cup fresh thyme, finely chopped
- 1/4 cup fresh parsley, finely chopped
- 4 cloves garlic, minced
- 1/2 cup grated Parmesan cheese
- 2 tablespoons olive oil
- Salt and pepper to taste
Cooking Instructions:
- Prepare the Herb Mixture: In a medium-sized bowl, combine the chopped rosemary, thyme, parsley, minced garlic, and grated Parmesan cheese. Mix well to confirm the herbs and cheese are evenly distributed.
- Season the Pork Tenderloins: Pat the pork tenderloins dry with paper towels and season them generously with salt and pepper on all sides.
- Coat the Tenderloins: Rub the olive oil over the pork tenderloins, making sure they’re completely coated. This will help the herb mixture adhere to the meat. Then, press the herb mixture onto the tenderloins, covering them evenly to form a crust.
- Marinate: Place the herb-crusted pork tenderloins in a shallow dish, cover with plastic wrap, and refrigerate for at least 2 hours, or overnight for more intense flavor.
- Preheat the Oven: When ready to cook, preheat your oven to 375°F (190°C).
- Sear the Tenderloins: Heat a large oven-safe skillet over medium-high heat. Add a little olive oil to the pan and sear the pork tenderloins on all sides until they’re golden brown, about 3-4 minutes per side.
- Bake the Tenderloins: Transfer the skillet to the preheated oven. Bake the tenderloins for 15-20 minutes, or until the internal temperature reaches 145°F (63°C) for medium-rare or 160°F (71°C) for medium, using a meat thermometer.
- Rest and Serve: Remove the pork tenderloins from the oven and let them rest for 5-10 minutes before slicing. This allows the juices to redistribute within the meat, keeping it moist and tender. Slice the tenderloins into medallions and serve with your choice of sides.
Extra Tips:
When preparing the Herb-Crusted Pork Tenderloin, it’s important to let the pork marinate for a sufficient amount of time to allow the flavors to penetrate the meat fully. If you’re short on time, marinating for at least 2 hours will still provide good results.
Make sure not to overcook the pork; using a meat thermometer is the best way to confirm it reaches the desired doneness without becoming dry. If you don’t have fresh herbs, dried herbs can be used in smaller quantities, but fresh herbs will yield the best flavor.
Finally, resting the meat after cooking is essential for maintaining its juiciness, so resist the urge to slice it immediately.
Lemon Ricotta Cake

Lemon Ricotta Cake is a delightful Italian dessert that embodies the bright and tangy flavors of lemon combined with the smooth and creamy texture of ricotta cheese. This make-ahead treat is perfect for those who want to prepare a sweet dish in advance for a special occasion or a simple family gathering.
Its moist and dense cake texture, paired with a hint of citrus, makes it a rejuvenating finish to any meal. As the cake rests, the flavors meld together, making it even more delicious the next day.
This cake isn’t only easy to prepare but also a crowd-pleaser that can be served on its own or with a dollop of whipped cream or a sprinkle of powdered sugar. The key to achieving the perfect Lemon Ricotta Cake is to balance the rich ricotta and the zestiness of the lemon. By following this recipe, you’ll create a cake that’s both indulgent and light, a true reflection of the versatility of Italian desserts.
Ingredients (Serves 4-6):
- 1 1/2 cups all-purpose flour
- 1 cup granulated sugar
- 1/2 cup unsalted butter, softened
- 3 large eggs
- 1 cup ricotta cheese
- Zest of 2 lemons
- Juice of 1 lemon
- 1 teaspoon vanilla extract
- 1 tablespoon baking powder
- 1/2 teaspoon salt
- Powdered sugar, for dusting (optional)
Cooking Instructions:
- Preheat the Oven: Begin by preheating your oven to 350°F (175°C). This guarantees that the oven is hot enough to bake the cake evenly once the batter is ready.
- Prepare the Baking Pan: Grease a 9-inch round cake pan with butter or line it with parchment paper. This step prevents the cake from sticking to the pan and makes it easier to remove after baking.
- Mix Dry Ingredients: In a medium bowl, whisk together the all-purpose flour, baking powder, and salt. Set this mixture aside as it will be added to the wet ingredients later.
- Cream Butter and Sugar: In a large mixing bowl, beat the softened butter and granulated sugar together using an electric mixer on medium speed until the mixture is light and fluffy. This should take about 3-4 minutes.
- Add Eggs and Ricotta: Gradually add the eggs, one at a time, beating well after each addition. Then, mix in the ricotta cheese, lemon zest, lemon juice, and vanilla extract until well combined.
- Combine Wet and Dry Ingredients: Slowly add the dry ingredient mixture to the wet ingredients, mixing on low speed until just combined. Be careful not to overmix, as this can make the cake dense.
- Pour and Bake: Pour the batter into the prepared cake pan, spreading it evenly with a spatula. Bake in the preheated oven for 45-50 minutes, or until a toothpick inserted into the center of the cake comes out clean.
- Cool and Serve: Allow the cake to cool in the pan for about 10 minutes before transferring it to a wire rack to cool completely. Once cooled, dust with powdered sugar if desired, and serve.
Extra Tips:
To promote the best flavor and texture, use fresh lemons for both the zest and the juice. The freshness of the lemons can greatly enhance the citrus aroma and taste of the cake.
When zesting the lemons, make sure to avoid the white pith as it can add a bitter taste. Additionally, if you prefer a more intense lemon flavor, you can add an extra teaspoon of lemon zest.
This cake can be stored in an airtight container at room temperature for up to three days, making it a convenient dessert to prepare in advance.
Creamy Pesto Gnocchi
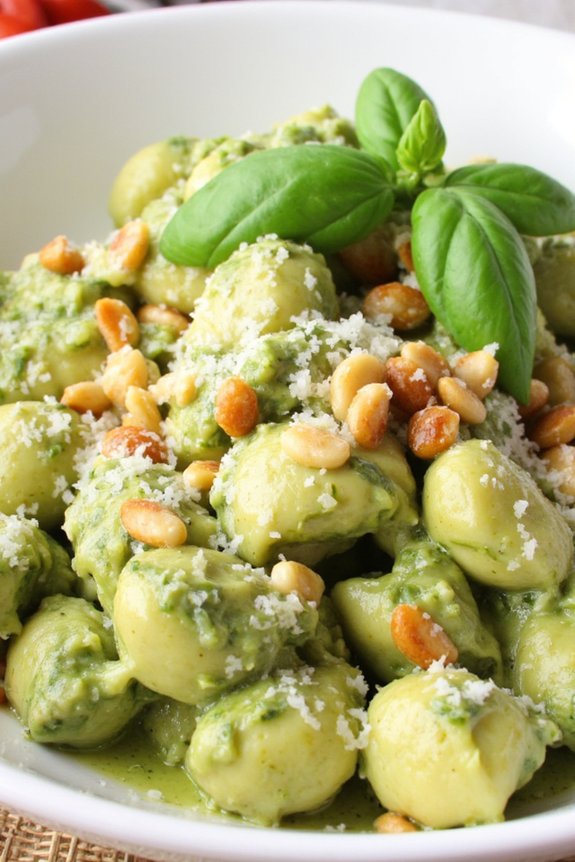
Creamy Pesto Gnocchi is a delightful Italian dish that combines the rich flavors of pesto with soft, pillowy gnocchi enveloped in a luscious cream sauce. This dish is perfect for a cozy dinner or a family gathering, as it’s both comforting and indulgent.
The beauty of this recipe is that it can be prepared ahead of time, making it an ideal choice for those who love to plan and prep meals in advance. With its vibrant green hue and aromatic basil fragrance, this dish is sure to impress your guests and transport them straight to the heart of Italy.
Making Creamy Pesto Gnocchi involves a seamless blend of flavors and textures. The gnocchi, made from potato, perfectly absorbs the creamy pesto sauce, creating a harmonious balance of taste and mouthfeel.
This dish is best served with a sprinkle of freshly grated Parmesan cheese and a few toasted pine nuts for added crunch. The following recipe serves 4-6 people, making it perfect for a small dinner party or a family meal. Gather your ingredients and get ready to commence on a culinary journey to Italy!
Ingredients:
- 1 pound potato gnocchi
- 1 cup pesto sauce
- 1 cup heavy cream
- 1/4 cup grated Parmesan cheese
- 2 tablespoons olive oil
- 1/4 cup pine nuts
- Salt and pepper to taste
- Fresh basil leaves for garnish
Cooking Instructions:
- Prepare the Gnocchi: Begin by bringing a large pot of salted water to a boil. Add the potato gnocchi and cook according to the package instructions, usually about 2-3 minutes, or until the gnocchi float to the top. Once cooked, drain the gnocchi and set aside.
- Toast the Pine Nuts: In a small skillet over medium heat, add the pine nuts and toast them until they’re golden brown, stirring frequently to prevent burning. This should take about 3-4 minutes. Once toasted, remove them from the skillet and set aside.
- Make the Creamy Pesto Sauce: In a large skillet, heat the olive oil over medium heat. Add the pesto sauce and stir gently. Gradually pour in the heavy cream, stirring continuously until the mixture is smooth and well combined. Allow the sauce to simmer for about 2-3 minutes, or until it thickens slightly.
- Combine Gnocchi and Sauce: Add the cooked gnocchi to the skillet with the creamy pesto sauce. Gently toss the gnocchi in the sauce until they’re well coated. Season with salt and pepper to taste.
- Serve: Transfer the Creamy Pesto Gnocchi to serving plates. Sprinkle each serving with grated Parmesan cheese and the toasted pine nuts. Garnish with fresh basil leaves for an added touch of freshness.
Extra Tips: When cooking gnocchi, be sure to use a large pot of salted boiling water to guarantee they don’t stick together. For the pesto sauce, homemade pesto can elevate the flavors considerably, but store-bought pesto works well for convenience.
If you’re making the dish ahead of time, you can prepare the sauce and gnocchi separately, and then combine them just before serving to maintain the creamy texture. Additionally, feel free to customize the dish with sautéed vegetables or grilled chicken for extra protein and nutrients.
Traditional Tiramisu Dessert

Tiramisu is a classic Italian dessert that has captured the hearts and taste buds of people around the world. Known for its creamy layers and rich coffee flavor, this delightful treat is surprisingly easy to make ahead of time, which makes it perfect for entertaining. The combination of coffee-soaked ladyfingers, velvety mascarpone cheese, and a dusting of cocoa powder creates a harmonious balance of flavors and textures.
The beauty of Tiramisu is that it actually tastes better after it has had time to sit, allowing the flavors to meld and intensify. This traditional Tiramisu recipe serves 4-6 people and can be prepared a day in advance, making it an ideal dessert for dinner parties or family gatherings. By preparing it ahead of time, you can focus on other aspects of your meal while guaranteeing you have a show-stopping dessert to impress your guests.
The following recipe will guide you through the process of creating this decadent Italian classic, step by step.
Ingredients:
- 3 large eggs
- 1 cup granulated sugar
- 1 cup mascarpone cheese
- 1 cup heavy whipping cream
- 1 cup brewed espresso or strong coffee, cooled
- 1/4 cup coffee liqueur (optional)
- 24-30 ladyfinger cookies (savoiardi)
- Unsweetened cocoa powder for dusting
- Dark chocolate shavings (optional)
Cooking Instructions:
- Prepare the Egg Mixture: Separate the egg yolks from the whites. In a large bowl, whisk together the egg yolks and sugar until the mixture is pale and creamy. This will take about 5 minutes using an electric mixer.
- Add Mascarpone Cheese: Gently fold the mascarpone cheese into the egg yolk mixture, ensuring it’s well combined and smooth.
- Whip the Cream: In a separate bowl, whip the heavy cream until stiff peaks form. Carefully fold the whipped cream into the mascarpone mixture until no streaks remain.
- Prepare the Coffee Mixture: In a shallow dish, combine the cooled espresso or coffee with the coffee liqueur. This will be used to soak the ladyfingers.
- Layer the Tiramisu: Quickly dip each ladyfinger into the coffee mixture, making sure not to soak them for too long. Arrange a layer of soaked ladyfingers in the bottom of a 9×9-inch dish.
- Add the Cream Layer: Spread half of the mascarpone mixture over the ladyfingers, smoothing it into an even layer.
- Repeat Layers: Add another layer of coffee-soaked ladyfingers on top of the mascarpone mixture. Spread the remaining mascarpone mixture over the second layer of ladyfingers.
- Chill and Set: Cover the dish with plastic wrap and refrigerate for at least 4 hours, or overnight, to allow the flavors to meld and the dessert to set properly.
- Finish with Cocoa Powder: Just before serving, dust the top of the Tiramisu with a generous layer of unsweetened cocoa powder. Optionally, add dark chocolate shavings for extra decadence.
Extra Tips:
To guarantee the best texture, it’s important not to over-soak the ladyfingers, as they should maintain some structure even after absorbing the coffee mixture. Using high-quality espresso and mascarpone cheese will enhance the overall flavor of the dessert.
If you don’t have coffee liqueur, it can be omitted or replaced with a similar liqueur like amaretto. Remember that Tiramisu is best when allowed to sit overnight, so plan accordingly to give it ample time to develop its rich flavors.