

There’s something truly enchanting about Italian appetizers. They effortlessly charm with their fresh ingredients and bold flavors. From the juicy burst of tomatoes on Bruschetta Al Pomodoro to the savory delight of Stuffed Mushrooms with Italian Sausage, each dish has a unique story to tell. These timeless recipes can transform any gathering into a memorable feast. Let’s explore these classic favorites together.
Bruschetta Al Pomodoro

Bruschetta Al Pomodoro is a classic Italian appetizer that embodies the essence of simplicity and freshness found in Mediterranean cuisine. Originating from central Italy, this dish is a delightful combination of ripe tomatoes, fragrant basil, and garlic piled atop slices of crusty bread. It’s an excellent way to showcase the flavors of high-quality ingredients, making it a staple in Italian homes, especially during the summer months when tomatoes are at their peak.
Whether you’re hosting a dinner party or looking for a light starter, Bruschetta Al Pomodoro is sure to impress with its vibrant colors and fresh taste. This appetizer isn’t only delicious but also incredibly easy to prepare, requiring minimal cooking.
The key to a perfect Bruschetta Al Pomodoro lies in using the freshest ingredients possible. Opt for vine-ripened tomatoes, fresh basil, and a good quality extra virgin olive oil for the best results. The bread, typically a rustic Italian loaf, is toasted to a golden brown, providing a satisfying crunch that complements the juicy tomato topping. Perfect for serving 4-6 people, this dish will bring a taste of Italy right to your table.
Ingredients (Serves 4-6):
- 6 ripe tomatoes, diced
- 2 cloves of garlic, minced
- 1 bunch of fresh basil leaves, chopped
- 3 tablespoons of extra virgin olive oil
- 1 tablespoon of balsamic vinegar (optional)
- Salt and pepper to taste
- 1 baguette or rustic Italian bread
- Additional olive oil for brushing bread
Cooking Instructions:
- Prepare the Tomato Mixture: In a medium-sized bowl, combine the diced tomatoes, minced garlic, and chopped basil. Add the extra virgin olive oil and balsamic vinegar, if using. Season with salt and pepper to taste. Mix everything together gently to guarantee the tomatoes are well coated. Let the mixture sit for about 10-15 minutes to allow the flavors to meld.
- Prepare the Bread: Preheat your oven to 400°F (200°C). Slice the baguette or rustic Italian bread into 1/2-inch thick slices. Arrange the slices on a baking sheet. Brush each slice lightly with olive oil on both sides.
- Toast the Bread: Place the bread slices in the preheated oven and toast for about 5-7 minutes, or until they’re golden brown and crispy. Keep an eye on them to prevent burning.
- Assemble the Bruschetta: Once the bread is toasted, remove from the oven and allow to cool slightly. Spoon the tomato mixture generously over each slice of bread. For a more intense flavor, you can rub a cut clove of garlic over the surface of the warm toasted bread before adding the tomato mixture.
- Serve: Arrange the Bruschetta Al Pomodoro on a serving platter. Serve immediately, while the bread is still warm and crispy.
Extra Tips:
For the best results, use tomatoes that are ripe and at room temperature, as they’ll have the most flavor. If you want to add a bit more zest, consider adding a pinch of red pepper flakes to the tomato mixture.
Additionally, if possible, prepare the tomato topping a few hours in advance and let it sit at room temperature; this allows the flavors to deepen. When choosing your bread, a rustic, country-style bread works best as it holds up well to the juicy tomato mixture.
Enjoy your Bruschetta Al Pomodoro with a glass of chilled white wine for a truly authentic Italian experience.
Caprese Salad Skewers
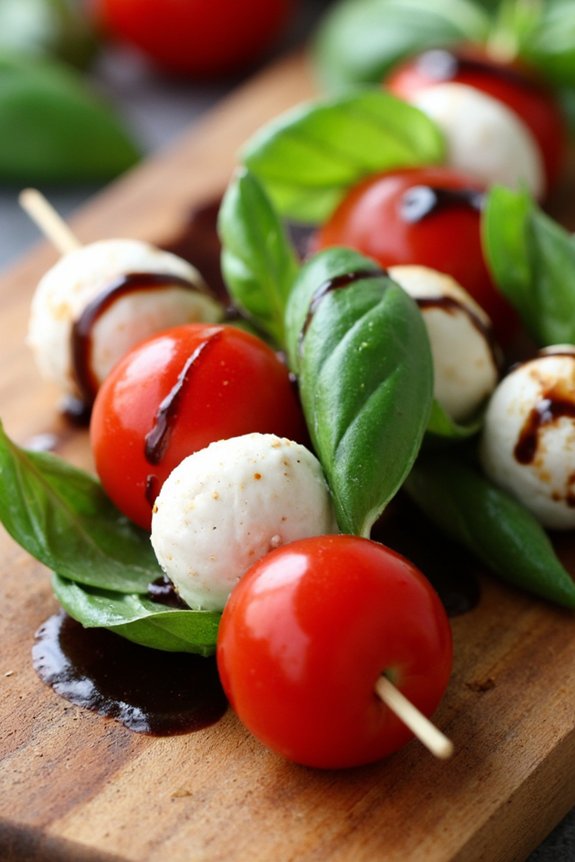
Caprese Salad Skewers are a delightful twist on the classic Italian Caprese salad, offering a convenient and visually appealing way to enjoy this beloved appetizer. This dish combines the fresh flavors of ripe tomatoes, creamy mozzarella, and aromatic basil leaves, all drizzled with a touch of balsamic glaze. Perfect for parties, picnics, or as a starter to a larger meal, these skewers highlight the best of Italian simplicity and elegance.
The skewers make it easy for guests to grab and enjoy, without the need for utensils, making them an ideal choice for entertaining.
The beauty of Caprese Salad Skewers lies in their simplicity and the quality of the ingredients used. Selecting fresh and vibrant produce is key to ensuring the flavors shine through. The tomatoes should be juicy and ripe, the mozzarella fresh and creamy, and the basil leaves fragrant.
The balsamic glaze adds a sweet and tangy touch, perfectly complementing the other ingredients. These skewers aren’t only delicious but also visually stunning, with their vibrant red, white, and green colors echoing the Italian flag.
Ingredients (Serving Size: 4-6 people):
- 20 cherry tomatoes
- 20 small fresh mozzarella balls (bocconcini)
- 20 fresh basil leaves
- Salt, to taste
- Freshly ground black pepper, to taste
- 2 tablespoons olive oil
- Balsamic glaze, for drizzling
- 20 wooden skewers or toothpicks
Instructions:
- Prepare the Ingredients: Start by washing the cherry tomatoes and basil leaves thoroughly under cold running water. Pat them dry with a clean kitchen towel or paper towel to remove excess moisture. Drain the mozzarella balls and place them in a bowl.
- Assemble the Skewers: Take a wooden skewer or toothpick and begin by threading one cherry tomato onto it. Follow this with a basil leaf, folded in half if necessary to fit onto the skewer. Next, add a mozzarella ball. Repeat this pattern until all ingredients are used, aiming for about 4-5 pieces per skewer.
- Season the Skewers: Once the skewers are assembled, lay them out on a serving platter. Lightly sprinkle them with salt and freshly ground black pepper to taste. Drizzle olive oil evenly over the skewers to enhance the flavors.
- Add the Finishing Touches: Just before serving, drizzle a small amount of balsamic glaze over each skewer. This adds a sweet and tangy flavor that complements the freshness of the tomatoes and basil.
- Serve Immediately: Caprese Salad Skewers are best enjoyed fresh, so serve them immediately after preparation for the best taste and texture.
Extra Tips:
When selecting your ingredients, opt for the highest quality available, as the simplicity of this dish relies heavily on the freshness and taste of each component. If possible, use heirloom cherry tomatoes for an extra burst of flavor.
For a more personalized touch, try experimenting with different types of mozzarella, such as buffalo mozzarella, for a richer taste. If you have time, consider making your own balsamic glaze by reducing balsamic vinegar over low heat until it’s thick and syrupy. This allows you to control the sweetness to your preference.
Stuffed Mushrooms With Italian Sausage

Stuffed Mushrooms With Italian Sausage is a delicious and savory appetizer that brings the rich flavors of Italy right to your table. This classic dish combines the earthy taste of mushrooms with the spicy and aromatic flavors of Italian sausage, making it an irresistible starter for any meal.
Whether you’re hosting a dinner party or simply looking for a delightful snack, these stuffed mushrooms will certainly impress your guests and satisfy your cravings.
The preparation of this dish is straightforward and rewarding, perfect for both beginners and experienced cooks. The mushrooms are hollowed out and filled with a mouthwatering mixture of Italian sausage, herbs, and cheese, then baked to perfection.
The result is a harmonious blend of textures and flavors that are certain to please. Serve these stuffed mushrooms as an appetizer or side dish, and watch them disappear off the plate!
Ingredients (Serves 4-6):
- 24 large white or cremini mushrooms
- 1 pound Italian sausage, casings removed
- 1 small onion, finely chopped
- 2 cloves garlic, minced
- 1/2 cup breadcrumbs
- 1/2 cup grated Parmesan cheese
- 1/4 cup fresh parsley, chopped
- 1 tablespoon olive oil
- Salt and pepper to taste
- 1 cup shredded mozzarella cheese
Cooking Instructions:
- Preheat and Prepare Mushrooms: Preheat your oven to 375°F (190°C). Clean the mushrooms with a damp paper towel and remove the stems. Set the mushroom caps aside and finely chop the stems.
- Cook Sausage Mixture: In a large skillet over medium heat, add olive oil and chopped mushroom stems. Cook for 2-3 minutes until softened. Add the chopped onion and garlic, cooking until the onion is translucent. Add the Italian sausage, breaking it up with a spoon, and cook until browned and fully cooked, about 5-7 minutes.
- Combine Filling Ingredients: Remove the skillet from heat and transfer the sausage mixture to a mixing bowl. Stir in the breadcrumbs, Parmesan cheese, and parsley. Season with salt and pepper to taste, and mix until well combined.
- Stuff the Mushrooms: Using a spoon, generously fill each mushroom cap with the sausage mixture, pressing lightly to guarantee the filling stays in place. Arrange the stuffed mushrooms on a baking sheet.
- Bake the Mushrooms: Sprinkle the shredded mozzarella cheese evenly over the stuffed mushrooms. Bake in the preheated oven for 20-25 minutes, or until the mushrooms are tender and the cheese is melted and bubbly.
- Serve: Remove from the oven and let them cool slightly before serving. Garnish with additional parsley if desired.
Extra Tips:
When selecting mushrooms, choose those that are firm and fresh, avoiding any with blemishes or soft spots. For added flavor, you can experiment with different types of cheese, such as fontina or gouda, in place of mozzarella.
Additionally, if you prefer a spicier kick, opt for hot Italian sausage or add a pinch of red pepper flakes to the filling mixture. These stuffed mushrooms can also be prepared in advance and refrigerated until ready to bake, making them a convenient option for entertaining.
Prosciutto-Wrapped Melon
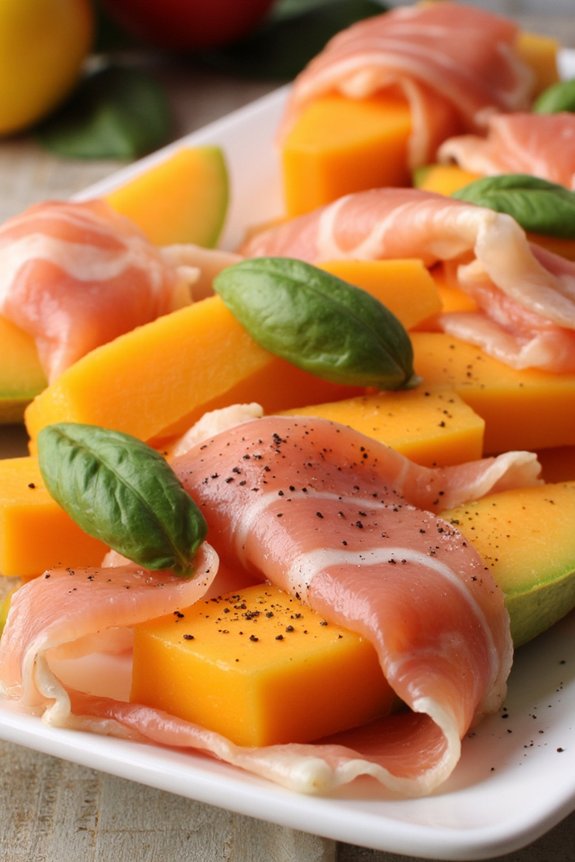
The origins of prosciutto-wrapped melon can be traced back to Italy, where the combination of fruit and cured meats has been a beloved tradition for centuries. This dish isn’t only delicious but also incredibly easy to prepare, requiring minimal ingredients and effort. It’s a great option for those who want to serve something sophisticated without spending too much time in the kitchen.
The key to success with this recipe is selecting high-quality ingredients, especially ripe, flavorful melon and authentic Italian prosciutto.
Ingredients (Serves 4-6):
- 1 ripe cantaloupe or honeydew melon
- 12-18 thin slices of prosciutto
- Freshly ground black pepper
- Fresh basil leaves (optional)
Instructions:
- Prepare the Melon: Start by washing the melon thoroughly under running water. Cut the melon in half and remove the seeds with a spoon. Slice the melon into 12-18 wedges, depending on how many slices of prosciutto you have. Carefully remove the rind from each wedge.
- Wrap the Melon: Take one slice of prosciutto and wrap it around the center of each melon wedge. Confirm the prosciutto is wrapped tightly enough to stay in place but not so tight as to tear.
- Arrange on a Platter: Once all melon wedges are wrapped, arrange them neatly on a serving platter. Make sure to leave a little space between each piece for easy serving.
- Season and Garnish: Lightly season the prosciutto-wrapped melon with freshly ground black pepper to taste. If desired, add fresh basil leaves for a touch of color and an additional layer of flavor.
- Serve Immediately: For the best taste, serve the prosciutto-wrapped melon immediately. This dish is best enjoyed fresh, as the melon can lose its juiciness if it sits too long.
Extra Tips:
When selecting a melon, choose one that feels heavy for its size and has a sweet, fragrant aroma. This is usually an indicator of ripeness and flavor.
If you want to add a bit of variety, consider using both cantaloupe and honeydew for a colorful presentation. Additionally, if you’re preparing this dish ahead of time, wrap the melon and store it in the refrigerator, but wait to add the black pepper and basil until just before serving to keep the flavors fresh and vibrant.
Arancini Di Riso

Arancini Di Riso, also known as Sicilian rice balls, are a classic Italian appetizer that are crispy on the outside and creamy on the inside. These delightful bites are traditionally filled with a savory meat sauce, peas, and mozzarella, all encased in a perfectly cooked risotto. Originating from Sicily, arancini are a staple in Italian cuisine, often enjoyed as a snack or starter at gatherings. The name “arancini” is derived from the Italian word for orange, which these rice balls resemble once fried to a golden hue.
Making Arancini Di Riso is a labor of love, but the end result is well worth the effort. This recipe guides you through creating a batch that serves 4-6 people, perfect for a family dinner or a small party. The process involves making a flavorful risotto, preparing a rich filling, and then carefully shaping, breading, and frying the rice balls to perfection. With the right techniques and a bit of patience, you’ll be able to enjoy these delicious bites right at home.
Ingredients for 4-6 servings:
- 2 cups arborio rice
- 4 cups chicken or vegetable broth
- 1/2 cup grated Parmesan cheese
- 1/2 cup white wine
- 2 tablespoons olive oil
- 1 onion, finely chopped
- 2 cloves garlic, minced
- 1 cup frozen peas
- 1 cup ground beef or pork
- 1/2 cup tomato paste
- 1/4 cup fresh basil, chopped
- Salt and pepper, to taste
- 4 ounces mozzarella cheese, cut into small cubes
- 2 cups all-purpose flour
- 3 large eggs, beaten
- 2 cups breadcrumbs
- Vegetable oil, for frying
Cooking Instructions:
- Prepare the Risotto: In a large saucepan, heat the olive oil over medium heat. Add the chopped onion and minced garlic, sautéing until translucent. Stir in the arborio rice, allowing it to toast slightly. Pour in the white wine, stirring until absorbed. Gradually add the broth, one ladle at a time, stirring constantly and allowing each addition to be absorbed before adding more. This process should take about 20 minutes. Once the rice is al dente, stir in the Parmesan cheese and season with salt and pepper. Spread the risotto on a baking sheet to cool.
- Cook the Filling: In a skillet, cook the ground meat over medium heat until browned. Add the tomato paste, peas, and fresh basil, cooking until the peas are tender. Season with salt and pepper. Allow the filling to cool before using.
- Shape the Arancini: Take a small handful of cooled risotto and flatten it in your palm. Place a spoonful of the meat filling and a cube of mozzarella in the center. Enclose the filling by shaping the rice around it, forming a ball. Repeat until all ingredients are used.
- Coat the Arancini: Set up a breading station with three bowls: one with flour, one with beaten eggs, and one with breadcrumbs. Roll each rice ball in the flour, dip it in the egg, and then coat it with breadcrumbs. Confirm each arancini is evenly coated.
- Fry the Arancini: In a deep frying pan or pot, heat vegetable oil to 350°F (175°C). Carefully lower the arancini into the hot oil, frying in batches until they’re golden brown and crispy, about 3-4 minutes. Drain on paper towels.
Extra Tips:
To guarantee success with your Arancini Di Riso, make sure the risotto and filling are completely cooled before shaping. This helps the rice balls hold together better during frying. If the mixture seems too sticky, wet your hands slightly to prevent it from sticking to your skin.
Additionally, maintain a consistent oil temperature to achieve even browning and a crunchy exterior. If you prefer a vegetarian version, simply omit the meat and add extra peas or a different vegetable to the filling. Enjoy your homemade Sicilian rice balls with a side of marinara sauce for dipping!
Marinated Olives and Artichokes
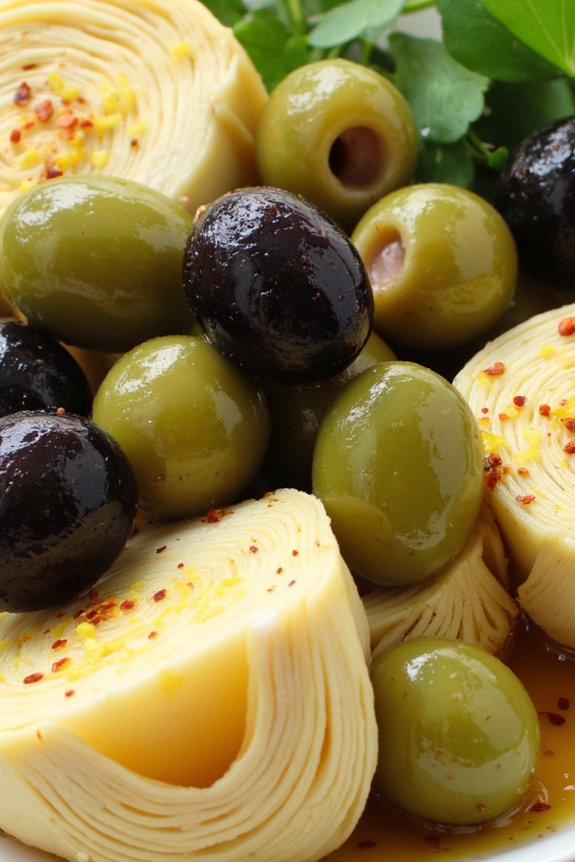
Marinated olives and artichokes are a classic Italian appetizer that perfectly balances tangy and savory flavors, making them a delightful start to any meal. This dish boasts a combination of textures and tastes, from the tender artichoke hearts to the firm, briny olives, all enhanced by a fragrant marinade.
It’s an ideal appetizer for entertaining, as it can be prepared ahead of time and stored in the refrigerator, allowing the flavors to meld beautifully. Enjoy this dish with a crusty loaf of Italian bread or as part of an antipasto platter to impress your guests with the vibrant flavors of Italy.
This recipe serves 4-6 people and offers a delightful medley of marinated goodness. Traditionally, a blend of green and black olives is used, but feel free to experiment with your favorite varieties. The artichokes, whether fresh or canned, absorb the marinade’s zest, complementing the olives perfectly.
The addition of herbs and spices elevates the dish, transforming simple ingredients into a gourmet experience.
Ingredients:
- 1 cup green olives, pitted
- 1 cup black olives, pitted
- 1 cup canned artichoke hearts, drained and quartered
- 1/4 cup extra-virgin olive oil
- 2 tablespoons red wine vinegar
- 3 cloves garlic, minced
- 1 teaspoon lemon zest
- 1 tablespoon fresh parsley, chopped
- 1 teaspoon dried oregano
- 1/2 teaspoon crushed red pepper flakes
- Salt and black pepper, to taste
Instructions:
- Prepare the Marinade: In a medium-sized mixing bowl, combine the extra-virgin olive oil, red wine vinegar, minced garlic, lemon zest, chopped parsley, dried oregano, crushed red pepper flakes, salt, and black pepper. Whisk until the mixture is well combined.
- Combine the Ingredients: Add the green olives, black olives, and artichoke hearts to the bowl with the marinade. Stir gently to guarantee all the ingredients are well coated with the marinade.
- Marinate the Mixture: Cover the bowl with plastic wrap or transfer the mixture to an airtight container. Place it in the refrigerator for at least 2 hours, or overnight if possible, to allow the flavors to develop.
- Serve the Dish: Before serving, remove the marinated olives and artichokes from the refrigerator and allow them to come to room temperature. Stir the mixture to redistribute the marinade and transfer it to a serving dish. Garnish with additional chopped parsley if desired.
Extra Tips:
When selecting olives, opt for high-quality varieties for the best flavor. Kalamata or Castelvetrano olives work exceptionally well in this recipe.
If using fresh artichokes, make sure to properly clean and cook them before adding to the marinade. Adjust the seasoning to your taste, and don’t hesitate to add more crushed red pepper flakes if you prefer a spicier kick.
This appetizer can be prepared a day in advance, making it a convenient choice for entertaining.
Mozzarella En Carrozza

Mozzarella En Carrozza is a classic Italian appetizer that’s both delicious and indulgent. The name translates to “Mozzarella in a Carriage,” hinting at the bread that serves as a vehicle for the gooey mozzarella cheese inside. This dish is fundamentally a fried sandwich that takes simple ingredients and elevates them into a crispy, cheesy delight. It’s a perfect starter for any Italian-themed dinner or a comforting snack enjoyed with friends and family.
This dish originated in Southern Italy, where it was traditionally made to use up leftover bread and mozzarella. It’s a reflection of the Italian ability to take humble ingredients and create something extraordinary. The key to a successful Mozzarella En Carrozza lies in the balance of textures: a crunchy, golden-brown exterior with a soft, melty interior. Whether you’re a seasoned cook or a beginner, this recipe is easy to follow and promises to deliver a satisfyingly savory experience.
Ingredients (Serves 4-6)
- 12 slices of white bread
- 8 ounces of fresh mozzarella cheese, sliced
- 3 large eggs
- 1 cup of whole milk
- Salt and pepper, to taste
- 1 cup of all-purpose flour
- Vegetable oil, for frying
- Optional: marinara sauce, for serving
Cooking Instructions
- Prepare the Bread and Cheese: Start by laying out six slices of bread. Place slices of mozzarella cheese evenly over the bread, making sure you leave a small border around the edges to prevent the cheese from leaking out during cooking. Top with the remaining slices of bread to form a sandwich.
- Prepare the Batter: In a shallow bowl, whisk together the eggs and milk until well combined. Season this mixture with a pinch of salt and pepper. Place the flour in a separate shallow dish.
- Coat the Sandwiches: Carefully dredge each sandwich in the flour, making sure all sides are evenly coated. Then, dip the floured sandwich into the egg mixture, again ensuring all sides are coated but allowing any excess to drip off.
- Heat the Oil: In a large skillet, heat about half an inch of vegetable oil over medium-high heat. To test if the oil is hot enough, drop a small piece of bread into the oil; it should sizzle immediately.
- Fry the Sandwiches: Place the sandwiches in the hot oil, frying them for about 2-3 minutes on each side, or until they’re golden brown and crispy. Be careful not to overcrowd the pan; you may need to do this in batches.
- Drain and Serve: Once fried, remove the sandwiches from the oil and place them on a paper towel-lined plate to drain any excess oil. Serve hot, with a side of marinara sauce for dipping if desired.
Extra Tips
For the best results, use day-old bread as it tends to hold up better during frying. Make sure the cheese isn’t sliced too thickly, as it mightn’t melt properly. If you find the mozzarella leaking out while frying, slightly reduce the heat to ensure even cooking.
Feel free to add a layer of thinly sliced prosciutto or a sprinkle of herbs for an extra flavor boost. Enjoy this delightful appetizer warm for the ultimate crunchy and cheesy experience.
Frittata Di Cipolle

Frittata Di Cipolle, a classic Italian appetizer, is a delightful dish that combines the simplicity of eggs with the rich flavor of caramelized onions. This traditional recipe is perfect for serving at a dinner party or as a light meal on its own. The frittata is known for its fluffy texture and savory taste, making it a beloved dish in Italian cuisine. With just a few ingredients, this dish can be whipped up in no time, bringing a taste of Italy to your table.
The key to a perfect Frittata Di Cipolle is the slow caramelization of onions, which adds a depth of flavor and sweetness to the dish. The eggs are then whisked and poured over the onions, allowing them to cook gently on the stove before finishing in the oven. This method guarantees a creamy interior and a slightly crispy exterior, creating a balanced texture that complements the flavorful onions.
Whether served warm or at room temperature, this frittata is sure to impress your guests.
Ingredients for 4-6 servings:
- 6 large eggs
- 3 medium-sized onions, thinly sliced
- 2 tablespoons olive oil
- Salt and pepper to taste
- 1/4 cup grated Parmesan cheese
- Fresh parsley for garnish (optional)
Cooking Instructions:
- Prepare the onions: Heat the olive oil in a large, oven-safe, non-stick skillet over medium heat. Add the sliced onions and a pinch of salt. Cook, stirring occasionally, until the onions are soft and golden brown, approximately 20-25 minutes. This slow cooking will caramelize the onions, enhancing their sweetness.
- Preheat the oven: While the onions are cooking, preheat your oven to 375°F (190°C).
- Whisk the eggs: In a large bowl, whisk together the eggs, Parmesan cheese, salt, and pepper until well combined. The Parmesan will add a subtle nutty flavor to the eggs.
- Combine eggs and onions: Once the onions are caramelized, reduce the heat to low. Pour the egg mixture over the onions in the skillet, gently stirring to distribute the onions evenly throughout the eggs.
- Cook the frittata on the stove: Cook the mixture on the stove over low heat until the edges begin to set, about 5-7 minutes. Avoid stirring during this step to allow the frittata to form properly.
- Finish in the oven: Transfer the skillet to the preheated oven and bake for 10-12 minutes, or until the frittata is fully set and lightly golden on top.
- Garnish and serve: Remove the frittata from the oven and allow it to cool slightly before slicing. Garnish with fresh parsley if desired and serve warm or at room temperature.
Extra Tips:
For a fluffier frittata, consider adding a splash of milk or cream to the egg mixture before whisking. If you don’t have an oven-safe skillet, you can cook the frittata entirely on the stovetop by covering the skillet with a lid to trap heat and help the top set.
Additionally, you can experiment by adding other ingredients like spinach, mushrooms, or bell peppers to customize your frittata to your liking. Remember, the key to a perfect frittata is patience with the onions and allowing the eggs to cook slowly for the best texture and flavor.
Grilled Eggplant Rollatini

Grilled Eggplant Rollatini is a classic Italian appetizer that combines the smoky, earthy flavor of grilled eggplant with the creamy richness of ricotta cheese. This dish isn’t only visually appealing but also packs a delightful burst of flavors and textures. It’s perfect for a dinner party or a casual family meal, showcasing the simplicity and elegance of Italian cuisine.
The rollatini consists of thin slices of eggplant that are grilled to perfection, then rolled around a delicious filling of ricotta, parmesan, and fresh herbs, and finally baked in a flavorful tomato sauce.
Preparing Grilled Eggplant Rollatini is a straightforward process that results in a rewarding and satisfying appetizer. It starts with selecting fresh, firm eggplants, which are sliced thinly and grilled to bring out their natural sweetness.
The ricotta filling, flavored with parmesan, garlic, and fresh basil, is carefully wrapped in each eggplant slice before being nestled in a bed of tangy tomato sauce. The rollatini are then baked until bubbly and golden, ready to be served and savored by 4-6 people.
Ingredients for Grilled Eggplant Rollatini (serves 4-6):
- 2 medium eggplants
- 1 cup ricotta cheese
- 1/2 cup grated parmesan cheese
- 1 egg
- 1/4 cup fresh basil leaves, chopped
- 2 cloves garlic, minced
- 2 cups marinara sauce
- 1/2 teaspoon salt
- 1/4 teaspoon black pepper
- Olive oil for grilling
- Fresh parsley, for garnish (optional)
- Crushed red pepper flakes (optional)
Cooking Instructions:
- Prepare the Eggplant: Start by slicing the eggplants lengthwise into 1/4-inch thick slices. Lay the slices on a baking sheet and sprinkle them with salt to draw out excess moisture. Let them sit for about 15 minutes, then blot with a paper towel to remove moisture and salt.
- Grill the Eggplant: Preheat a grill or grill pan over medium-high heat. Brush both sides of the eggplant slices lightly with olive oil. Grill the slices for about 3-4 minutes on each side, or until they’re tender and have nice grill marks. Remove from heat and let them cool slightly.
- Prepare the Filling: In a mixing bowl, combine the ricotta cheese, parmesan cheese, egg, chopped basil, minced garlic, salt, and black pepper. Mix until well combined and smooth.
- Assemble the Rollatini: Preheat your oven to 375°F (190°C). Spread a thin layer of marinara sauce on the bottom of a baking dish. Place a spoonful of the ricotta mixture at the wider end of each grilled eggplant slice, then roll it up tightly. Arrange the rollatini seam side down in the prepared baking dish.
- Bake the Rollatini: Pour the remaining marinara sauce over the top of the eggplant rollatini. Cover the dish with aluminum foil and bake in the preheated oven for 25 minutes. Remove the foil and bake for an additional 10 minutes, or until the top is bubbly and slightly golden.
- Serve: Allow the rollatini to cool slightly before serving. Garnish with fresh parsley and a sprinkle of crushed red pepper flakes if desired.
Extra Tips:
When selecting eggplants, choose those that are firm and heavy for their size with smooth, shiny skin. This guarantees they’re fresh and have fewer seeds, which can sometimes lend a bitter taste.
If you prefer a spicier kick, adding a bit of crushed red pepper to the ricotta filling can enhance the flavor. Additionally, you can prepare the rollatini a day ahead and refrigerate them until ready to bake, making this a convenient dish for entertaining.
Baked Zucchini Flowers

Baked Zucchini Flowers, or “Fiori di Zucca al Forno,” is a delightful classic Italian appetizer that captures the essence of Italian cuisine with its simplicity and flavorful ingredients. This dish features the delicate and beautiful zucchini flowers, which are usually in season during the spring and summer months.
These edible blossoms are stuffed with a creamy ricotta filling, then baked to perfection, offering a wonderful combination of textures and flavors. The crispiness of the lightly baked flower and the creamy, cheesy interior make it an exquisite appetizer that’s bound to impress guests.
Preparing Baked Zucchini Flowers is a rewarding culinary experience that highlights the harmonious blend of fresh ingredients. The key to this recipe is to use fresh, high-quality zucchini flowers and a rich ricotta cheese. This dish isn’t only aesthetically pleasing but also incredibly delicious, making it a perfect choice for a dinner party or a special family meal.
With just a few steps, you can create an elegant appetizer that celebrates the flavors of Italy.
Ingredients (Serves 4-6):
- 12 fresh zucchini flowers
- 250 grams ricotta cheese
- 50 grams grated Parmesan cheese
- 1 egg
- Salt and pepper to taste
- A pinch of nutmeg
- 2 tablespoons olive oil
- 1 tablespoon fresh basil, finely chopped
- 1 tablespoon fresh parsley, finely chopped
- Zest of 1 lemon
Cooking Instructions:
1. Preheat the Oven: Start by preheating your oven to 180°C (350°F). This guarantees the oven is at the right temperature when you’re ready to bake the zucchini flowers.
2. Prepare the Filling: In a medium-sized bowl, combine the ricotta cheese, grated Parmesan, egg, salt, pepper, and a pinch of nutmeg. Mix well until all ingredients are fully incorporated.
Add the chopped basil, parsley, and lemon zest, and stir until evenly distributed throughout the mixture.
3. Prepare the Zucchini Flowers: Carefully open each zucchini flower and remove the stamen from inside without tearing the petals. This is best done with gentle hands, as the flowers are quite delicate.
4. Stuff the Flowers: Using a small spoon or a piping bag, fill each flower with about a tablespoon of the ricotta mixture. Gently twist the petals together to close the flower around the filling.
5. Arrange in Baking Dish: Lightly oil a baking dish with half of the olive oil. Place the stuffed zucchini flowers neatly in the dish, ensuring they fit snugly without overlapping.
6. Drizzle and Bake: Drizzle the remaining olive oil over the flowers. Place the dish in the preheated oven and bake for 15-20 minutes, or until the flowers are lightly golden and the filling is hot.
7. Serve: Once baked, remove from the oven and let them cool slightly before serving. These are best enjoyed warm.
Extra Tips:
When selecting zucchini flowers, look for ones that are bright, firm, and free of blemishes. They should be used as soon as possible after purchasing for the best flavor and texture.
If you find that the flowers are slightly wilted, you can revive them by placing them in cold water for a few minutes. Additionally, to make the filling even creamier, you can substitute half of the ricotta with mascarpone cheese.
For added flavor, consider incorporating a small amount of minced garlic into the filling mixture.
Garlic and Herb Crostini

Garlic and Herb Crostini is a timeless Italian appetizer that perfectly blends the rustic flavors of fresh herbs and the robust taste of garlic with the crispiness of toasted bread. This dish is an excellent starter for any meal, and it also pairs beautifully with a variety of toppings such as tomatoes, cheeses, or olives.
The simplicity of its ingredients allows the natural flavors to shine, making it a favorite for those who appreciate the elegance of Italian cuisine.
The key to making perfect Garlic and Herb Crostini is choosing quality ingredients. Fresh herbs like basil, thyme, and parsley add vibrant flavors, while the aroma of freshly minced garlic elevates the dish to a new level. The bread, preferably a day-old baguette, should be lightly toasted to achieve that satisfying crunch.
These crostini can be served warm or at room temperature, making them a versatile addition to any gathering or dinner spread.
Ingredients for 4-6 servings:
- 1 French baguette, sliced into 1/2-inch thick slices
- 4 cloves of garlic, minced
- 1/4 cup of olive oil
- 1 tablespoon of fresh basil, finely chopped
- 1 tablespoon of fresh parsley, finely chopped
- 1 teaspoon of fresh thyme leaves
- Salt and pepper to taste
Cooking Instructions:
- Preheat the Oven: Start by preheating your oven to 375°F (190°C) to confirm it’s hot enough to toast the bread slices evenly.
- Prepare the Bread: Slice the baguette into 1/2-inch thick slices. Place the slices in a single layer on a baking sheet.
- Mix the Herb Oil: In a small bowl, combine the olive oil, minced garlic, basil, parsley, thyme, salt, and pepper. Stir well to confirm the garlic and herbs are evenly distributed in the oil.
- Brush the Bread: Using a pastry brush, generously brush each slice of bread with the garlic and herb oil mixture. Make sure each slice is well-coated to absorb the flavors.
- Toast the Bread: Place the baking sheet in the preheated oven and bake for about 8-10 minutes or until the edges of the bread are golden brown and crispy.
- Serve the Crostini: Once toasted, remove the crostini from the oven and let them cool slightly. Serve warm or at room temperature as a delicious appetizer or side.
Extra Tips:
For the best results, use a good quality olive oil as it greatly impacts the flavor of the crostini. If you prefer a stronger garlic flavor, you can rub a halved garlic clove directly onto the warm toasted bread before serving.
Additionally, these crostini can be topped with a variety of additional ingredients such as roasted peppers, sun-dried tomatoes, or a sprinkle of Parmesan cheese to add more complexity to your appetizer.
Antipasto Platter
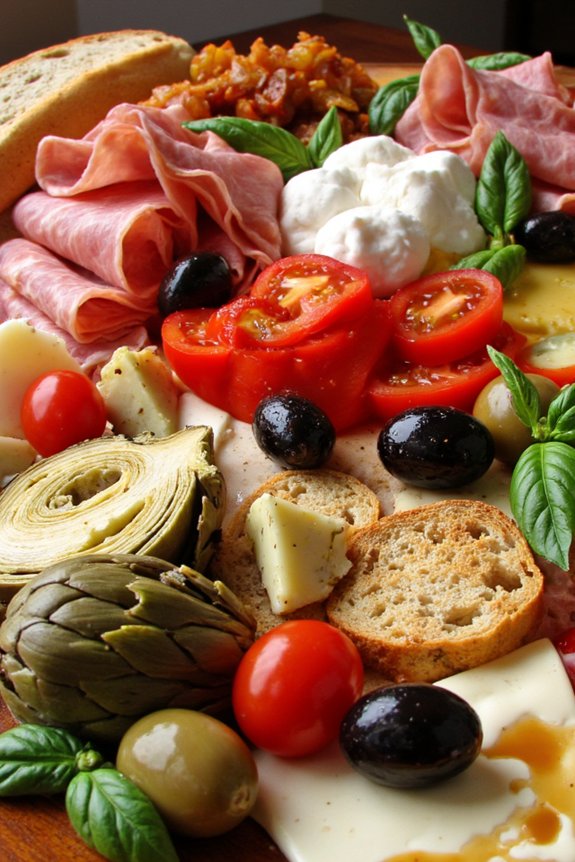
An antipasto platter is a classic Italian appetizer that brings together a variety of flavors and textures, offering your guests a taste of Italy before the main course. Traditionally, an antipasto platter includes a selection of cured meats, cheeses, olives, pickled vegetables, and sometimes seafood, all artfully arranged on a large platter.
The beauty of an antipasto platter lies in its versatility and the ability to customize it to suit your preferences or the theme of your meal. Preparing an antipasto platter isn’t only about the ingredients but also about the presentation. The key is to choose high-quality ingredients that complement each other and to arrange them in an inviting and aesthetically pleasing manner.
This dish is perfect for a casual gathering or a formal dinner party, as it allows guests to sample a variety of flavors and create their own perfect bite.
Ingredients (serving size: 4-6 people):
- 150g prosciutto
- 150g salami
- 150g mortadella
- 200g mozzarella balls
- 200g provolone cheese, sliced
- 150g marinated artichoke hearts
- 150g roasted red peppers
- 100g mixed olives (green and black)
- 100g cherry tomatoes
- 1 small bunch of fresh basil
- 1 baguette or Italian bread, sliced
- Olive oil for drizzling
- Balsamic glaze for drizzling (optional)
Instructions:
- Prepare the Meats and Cheeses: Begin by slicing the salami, mortadella, and provolone cheese into thin pieces. Arrange these along with the prosciutto and mozzarella balls on a large serving platter, guaranteeing some overlap for an appealing presentation.
- Add the Vegetables: Drain any excess oil from the marinated artichoke hearts and roasted red peppers. Place these on the platter, making sure they’re spread out to create balance. Add the mixed olives and arrange them in small piles around the meats and cheeses.
- Incorporate Fresh Elements: Wash the cherry tomatoes and slice them in half. Add them to the platter for a burst of color and freshness. Tear fresh basil leaves and scatter them over the platter, adding an aromatic touch.
- Bread and Finishing Touches: Slice the baguette or Italian bread and arrange the slices around the edges of the platter or in a separate basket. Drizzle olive oil over the bread and, if desired, lightly drizzle balsamic glaze over the platter for a touch of sweetness.
Extra Tips:
When selecting ingredients for your antipasto platter, try to incorporate a variety of textures and flavors, such as creamy, tangy, salty, and sweet, to keep things interesting.
Feel free to substitute or add ingredients based on what’s in season or what you have on hand. For a more robust flavor, consider adding marinated mushrooms or sun-dried tomatoes.
Always use fresh and high-quality ingredients for the best taste and presentation. Finally, if preparing in advance, keep the platter refrigerated and add the bread just before serving to guarantee it remains fresh and crisp.