

Looking to make dinner time a joyful experience with your little ones? Let’s explore 12 delightful Italian recipes that are both simple to prepare and perfect for involving your kids. From crafting mini margherita pizzas to assembling colorful caprese salads, these dishes offer vibrant flavors and playful culinary adventures. Ready to turn your kitchen into a fun and creative space? Let’s get started!
Mini Margherita Pizzas
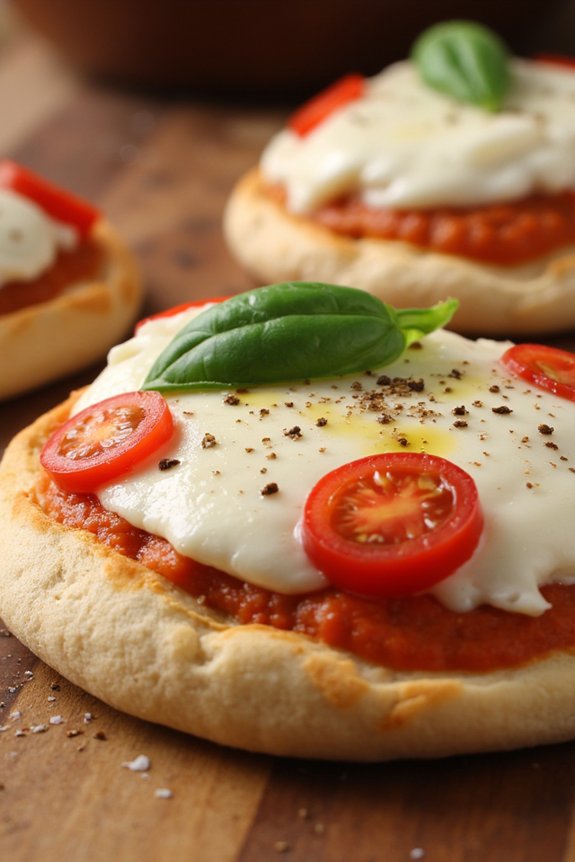
Mini Margherita Pizzas are a delightful and easy way to introduce kids to the classic flavors of Italy. This recipe is perfect for little hands to participate in the kitchen, from spreading the sauce to sprinkling the cheese. The bite-sized pizzas aren’t only fun to make but also offer a healthy twist with fresh ingredients like tomatoes and basil. It’s a great meal for a family lunch or a cozy dinner, offering a taste of Italy that kids will love.
These Mini Margherita Pizzas are made using simple ingredients that are likely already in your pantry or easy to find in any grocery store. The vibrant colors from the tomatoes and basil make the pizzas visually appealing, while the melty mozzarella cheese adds a creamy texture. The recipe yields enough to serve 4-6 people, making it ideal for a family meal or a small gathering. It’s a dish that can be customized by adding other toppings if desired, but the traditional Margherita style is sure to be a hit with its straightforward yet delicious combination.
Ingredients (Serves 4-6):
- 6 English muffins, halved
- 1 cup tomato sauce
- 2 cups shredded mozzarella cheese
- 1 cup cherry tomatoes, sliced
- Fresh basil leaves
- Olive oil
- Salt and pepper to taste
Cooking Instructions:
- Preheat the Oven: Start by preheating your oven to 400°F (200°C). This guarantees that the pizzas will cook evenly and the cheese will melt perfectly.
- Prepare the Muffins: Place the English muffin halves on a baking sheet, cut side up. This will be the base for your mini pizzas.
- Spread the Sauce: Using a spoon, spread a thin layer of tomato sauce over each muffin half. Make sure to leave a small border around the edges to prevent the sauce from spilling over.
- Add the Cheese: Sprinkle a generous amount of shredded mozzarella cheese over the sauce on each muffin. Be sure to cover the sauce completely for a cheesy finish.
- Top with Tomatoes: Arrange the sliced cherry tomatoes on top of the cheese. You can use as many or as few as you like, depending on personal preference.
- Bake the Pizzas: Place the baking sheet in the preheated oven and bake for about 10-12 minutes, or until the cheese is melted and bubbly, and the edges of the muffins are golden brown.
- Finish with Basil and Seasoning: Once out of the oven, top each mini pizza with fresh basil leaves. Drizzle a little olive oil over the top and season with salt and pepper to taste.
- Serve: Allow the pizzas to cool for a minute or two before serving. Enjoy them warm for the best taste.
Extra Tips: For a crispy base, you can lightly toast the English muffin halves before adding the toppings. If your kids are adventurous eaters, consider adding a sprinkle of oregano or a pinch of red pepper flakes for extra flavor.
When selecting tomatoes, go for the freshest ones you can find for the best taste. Finally, if you’re making these pizzas for a party, consider setting up a mini pizza station where kids can customize their own toppings for added fun!
Cheesy Garlic Breadsticks
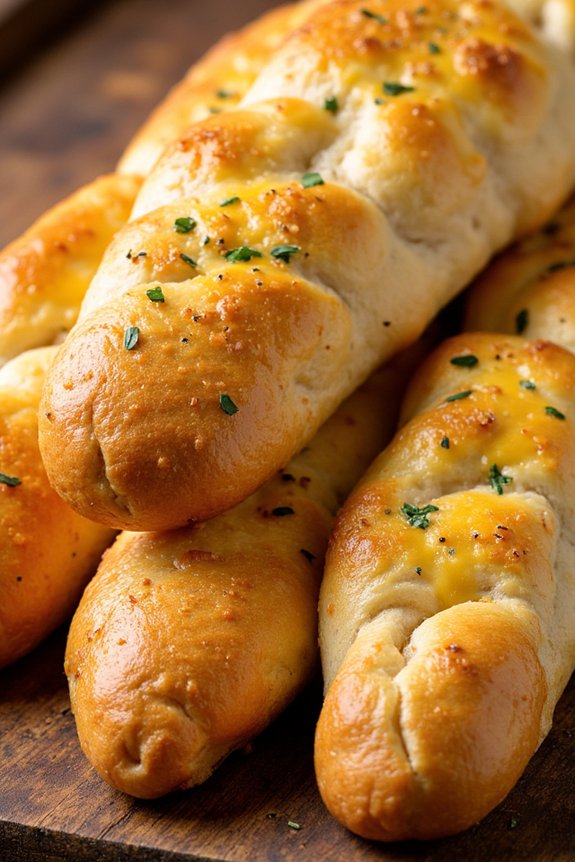
Cheesy Garlic Breadsticks are a fun and delicious addition to any meal, and they’re especially perfect for kids! These breadsticks are easy to make and packed with flavors that kids love. The combination of melty cheese, buttery garlic, and soft bread will have your little ones reaching for seconds.
Plus, these breadsticks are great for dipping in marinara sauce or enjoying on their own as a tasty snack. This recipe is designed to be simple enough for kids to help with, making it a great family activity. Involving children in cooking can be a wonderful way to teach them about different ingredients and cooking techniques, all while spending quality time together.
So, gather your ingredients, roll up your sleeves, and get ready to make some mouth-watering Cheesy Garlic Breadsticks!
Ingredients (Serves 4-6):
- 1 pound pizza dough (store-bought or homemade)
- 2 tablespoons unsalted butter, melted
- 2 cloves garlic, minced
- 1 cup shredded mozzarella cheese
- 1/4 cup grated Parmesan cheese
- 1 teaspoon dried Italian seasoning
- 1/2 teaspoon salt
- 1 tablespoon fresh parsley, chopped (optional)
Cooking Instructions:
- Preheat the Oven: Start by preheating your oven to 400°F (200°C). Line a baking sheet with parchment paper or lightly grease it to prevent sticking.
- Prepare the Dough: On a floured surface, roll out the pizza dough into a rectangle, roughly 10×15 inches in size. If the dough is too sticky, sprinkle a little more flour to make it easier to handle.
- Make the Garlic Butter: In a small bowl, mix the melted butter, minced garlic, and Italian seasoning. Use a pastry brush to spread this garlic butter evenly over the rolled-out dough.
- Add the Cheese: Sprinkle the shredded mozzarella and grated Parmesan cheese evenly over the garlic butter-covered dough. Make sure the cheese is distributed to the edges for maximum cheesy goodness.
- Cut into Strips: Using a pizza cutter or a sharp knife, slice the dough into strips approximately 1 inch wide. Depending on your preference, you can make them as long or as short as you like.
- Bake the Breadsticks: Transfer the strips onto the prepared baking sheet, leaving a little space between each one. Bake in the preheated oven for 12-15 minutes or until the edges are golden brown and the cheese is bubbling.
- Serve: Once baked, remove the breadsticks from the oven and let them cool for a few minutes. Optionally, sprinkle chopped fresh parsley over the top for a pop of color and freshness.
Extra Tips:
For an extra crispy crust, you can bake the breadsticks directly on a pizza stone if you have one. Be sure not to over-bake, as this can cause the cheese to burn and the bread to dry out.
If you’re working with young children, let them help with spreading the garlic butter or sprinkling the cheese to make the experience more engaging. Finally, for a fun twist, try adding different cheese blends or incorporating a touch of red pepper flakes for a mild kick.
Enjoy your Cheesy Garlic Breadsticks with your favorite dipping sauce!
Kid-Friendly Caprese Salad
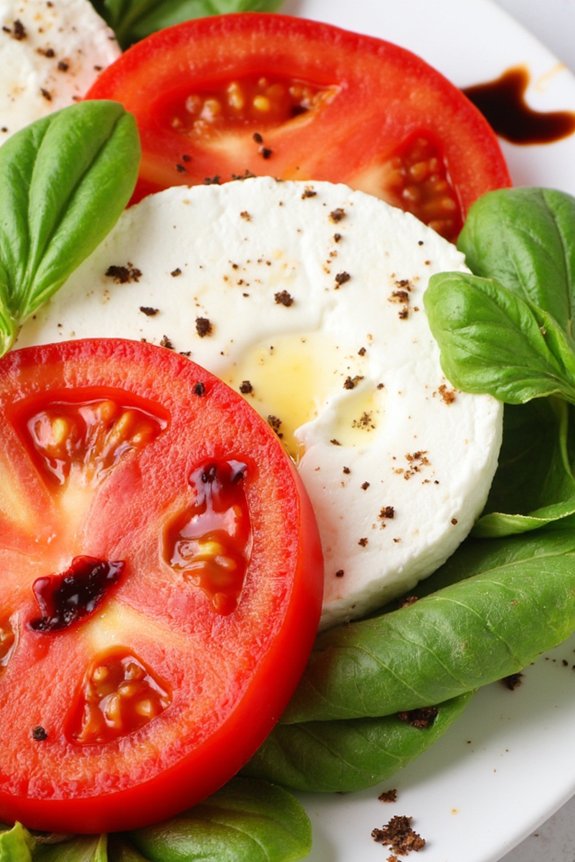
The Kid-Friendly Caprese Salad is a delightful and colorful dish that’s perfect for introducing young ones to the fresh flavors of Italian cuisine. This simple salad combines juicy tomatoes, creamy mozzarella, and aromatic basil leaves, making it a feast for the eyes and the taste buds. Perfect for a light lunch or a rejuvenating side dish at dinner, the Caprese salad isn’t only delicious but also a great way to get kids interested in cooking and eating healthy.
Preparing this dish is a fun and easy activity that kids can participate in, offering them a chance to practice their culinary skills while learning about the importance of fresh ingredients. The Kid-Friendly Caprese Salad can be made in just a few simple steps, and it’s sure to be a hit with the whole family. With a serving size of 4-6 people, this salad is perfect for sharing and enjoying together.
Ingredients:
- 4 large ripe tomatoes
- 1 pound fresh mozzarella cheese
- 1 bunch fresh basil leaves
- 3 tablespoons extra-virgin olive oil
- 1 tablespoon balsamic vinegar
- Salt to taste
- Freshly ground black pepper to taste
Instructions:
- Prepare the Ingredients: Begin by thoroughly washing the tomatoes and basil leaves under cold running water. Pat them dry with a clean kitchen towel. Slice the tomatoes into approximately 1/4-inch thick rounds. Next, slice the mozzarella cheese into similar-sized rounds.
- Assemble the Salad: On a large serving platter, start layering the slices of tomato and mozzarella cheese. Place a slice of tomato, followed by a slice of mozzarella, and top with a basil leaf. Repeat this pattern until all the ingredients are used up. Make sure the slices slightly overlap for an attractive presentation.
- Dress the Salad: Drizzle the extra-virgin olive oil evenly over the assembled salad. Follow up with a drizzle of balsamic vinegar. This step adds a rich and tangy flavor that complements the creamy mozzarella and sweet tomatoes.
- Season the Salad: Sprinkle salt and freshly ground black pepper over the salad to taste. This will enhance the natural flavors of the ingredients and bring the dish together.
- Serve and Enjoy: Allow the salad to sit for a few minutes before serving to let the flavors meld together. This salad can be served chilled or at room temperature, making it versatile and easy to prepare ahead of time.
Extra Tips: When selecting tomatoes for your Caprese salad, opt for vine-ripened or heirloom varieties for the best flavor. Fresh mozzarella is key, so try to find the highest quality available. If using balsamic glaze instead of vinegar, use sparingly as it has a more concentrated sweetness.
Engaging kids by letting them help with the layering process adds a fun and interactive element to making this dish, ensuring they enjoy the experience from preparation to the last bite.
Simple Spaghetti Carbonara
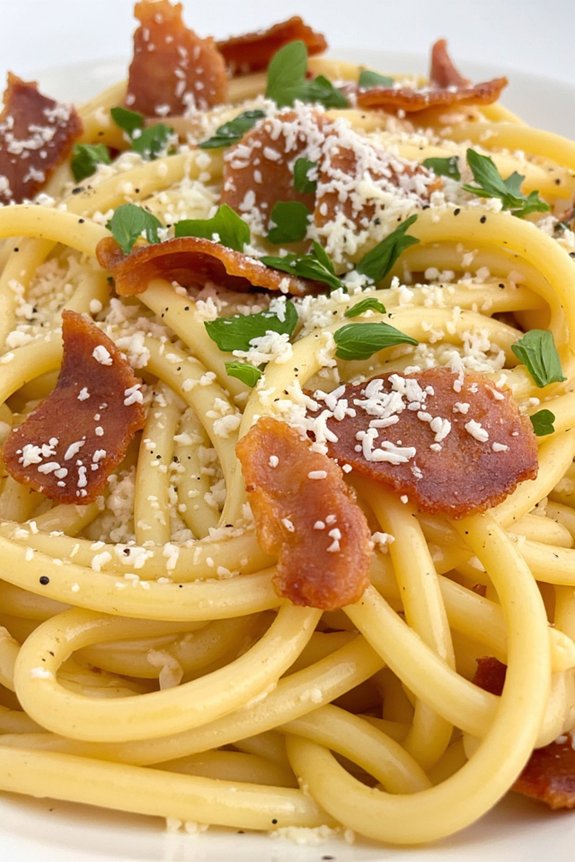
Spaghetti Carbonara is a classic Italian dish that’s perfect for kids to help make and enjoy. This creamy, cheesy pasta dish isn’t only delicious but also straightforward to prepare, making it a great introduction to Italian cooking for young chefs. With just a few ingredients, you can whip up this meal in no time, and the whole family will love the rich flavors that come from the combination of eggs, cheese, and pancetta.
This Simple Spaghetti Carbonara recipe is tailored for serving 4-6 people, allowing everyone to have a generous portion. The key to achieving the perfect Carbonara is to time everything well and guarantee the eggs are cooked just right to create a creamy sauce without scrambling. Follow the steps below for a delightful meal that brings a taste of Italy to your kitchen.
Ingredients (Serves 4-6):
- 400g spaghetti
- 150g pancetta, diced
- 4 large eggs
- 100g grated Parmesan cheese
- 2 cloves garlic, minced
- Salt, to taste
- Black pepper, freshly ground
- Fresh parsley, chopped (optional, for garnish)
Cooking Instructions:
- Cook the Spaghetti: Begin by bringing a large pot of salted water to a boil. Add the spaghetti and cook according to the package instructions until it’s al dente. Reserve about a cup of the pasta water, then drain the spaghetti.
- Prepare the Sauce: While the spaghetti is cooking, crack the eggs into a mixing bowl and beat them together with the grated Parmesan cheese. Add a pinch of salt and a generous amount of freshly ground black pepper. Mix until well combined and set aside.
- Cook the Pancetta: In a large pan over medium heat, add the diced pancetta and cook until it’s crispy. This should take about 5-7 minutes. Add the minced garlic to the pan and sauté for another minute until fragrant.
- Combine Ingredients: Once the spaghetti is cooked and drained, add it to the pan with the pancetta. Turn off the heat and quickly pour in the egg and cheese mixture, stirring constantly. The residual heat of the pasta will cook the eggs gently, creating a creamy sauce. If the sauce seems too thick, add a little reserved pasta water to reach your desired consistency.
- Serve: Divide the spaghetti carbonara among plates. Sprinkle each serving with extra Parmesan cheese, a little more black pepper, and fresh parsley if using. Serve immediately while it’s hot.
Extra Tips:
To guarantee a perfectly creamy sauce, make sure to turn off the heat before adding the egg mixture to the pasta. The residual heat will cook the eggs gently without scrambling them. If you’re concerned about raw eggs, ensure that the pasta is very hot before mixing in the eggs, which will help cook them through.
Remember that the key to a good Carbonara is timing, so have all your ingredients prepped and ready before you start cooking. Enjoy your Italian feast!
Easy Pesto Pasta

Pesto pasta is a delightful Italian dish that isn’t only easy to prepare but also incredibly satisfying for kids and adults alike. This recipe combines the comforting flavors of pasta with the fresh and vibrant taste of homemade pesto sauce. Perfect as a quick lunch or dinner option, this dish will have your kids asking for more and may even inspire them to get involved in the kitchen. The rich, nutty flavors of the pesto sauce pair beautifully with the pasta, creating a meal that’s both nutritious and delicious.
This recipe for Easy Pesto Pasta is designed to serve 4-6 people, making it ideal for family meals. The preparation and cooking time are minimal, allowing you to have a delicious meal on the table in no time. Whether you’re an experienced cook or just getting started, this recipe is straightforward and requires basic ingredients that are readily available. With a few simple steps, you can create a dish that brings the authentic taste of Italy right to your dining table.
Ingredients:
- 1 pound (450g) pasta of your choice (such as spaghetti, penne, or fusilli)
- 2 cups fresh basil leaves
- 1/2 cup grated Parmesan cheese
- 1/2 cup pine nuts
- 2 cloves garlic, minced
- 1/2 cup olive oil
- Salt and pepper to taste
- Optional: Cherry tomatoes, halved
Cooking Instructions:
- Cook the Pasta: Bring a large pot of salted water to a boil. Add the pasta and cook according to the package instructions until al dente. Once cooked, drain the pasta and set it aside, reserving about 1/2 cup of the pasta cooking water.
- Prepare the Pesto Sauce: In a food processor, combine the basil leaves, grated Parmesan cheese, pine nuts, and minced garlic. Pulse the ingredients a few times until they’re coarsely chopped.
- Blend the Sauce: With the food processor running, slowly drizzle in the olive oil. Continue blending until the mixture is smooth and creamy. Add salt and pepper to taste. If the sauce is too thick, you can add a little of the reserved pasta cooking water to reach your desired consistency.
- Mix Pasta and Pesto: In a large bowl, combine the cooked pasta with the pesto sauce. Toss well to guarantee the pasta is evenly coated with the sauce. If using, add halved cherry tomatoes for a burst of freshness and color.
- Serve: Transfer the pesto pasta to a serving dish. Sprinkle with additional Parmesan cheese if desired. Serve warm and enjoy!
Extra Tips:
For an even more flavorful dish, consider toasting the pine nuts lightly in a dry skillet over medium heat before adding them to the food processor. This will enhance their nutty flavor.
If you don’t have pine nuts on hand, walnuts or almonds can be used as substitutes. Additionally, you can adjust the amount of garlic according to your taste preference.
For a creamier texture, you can stir in a spoonful of ricotta cheese into the pesto sauce before mixing with the pasta. Remember, the key to a great pesto is using fresh basil and a good quality olive oil. Enjoy your homemade Easy Pesto Pasta!
Delicious Meatball Sliders
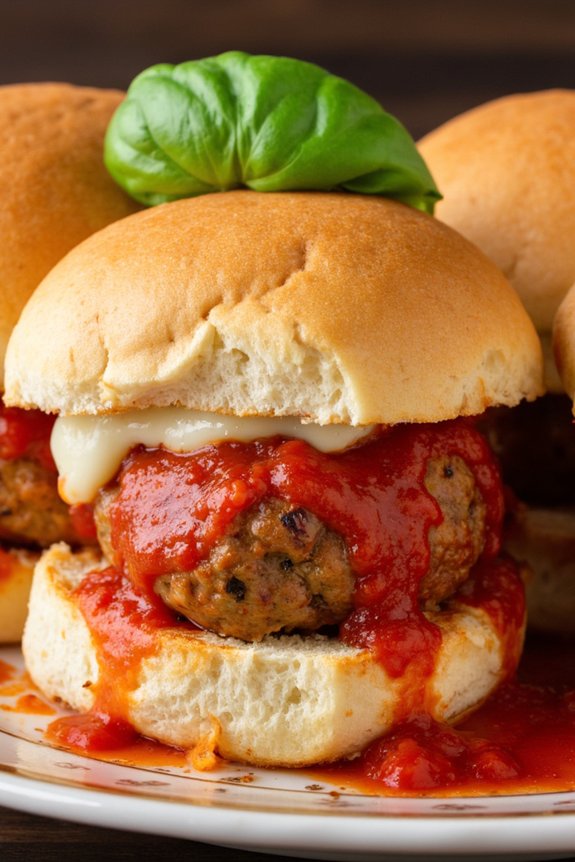
Delicious Meatball Sliders are a fun and tasty Italian-inspired dish that kids will love to both make and eat. These sliders are perfect for a family dinner, a party, or any casual gathering. The juicy meatballs, flavored with Italian seasoning, are nestled in soft slider buns and topped with marinara sauce and melted cheese to create a mouthwatering experience.
This recipe isn’t only easy to follow but also encourages kids to get involved in the kitchen, helping them build confidence and learn essential cooking skills.
Creating these sliders involves making homemade meatballs, which are then baked to perfection. The meatballs are then placed in slider buns, topped with a generous spoonful of marinara sauce, and finished with a sprinkle of mozzarella cheese before being baked until the cheese is bubbly and golden.
The combination of flavors and textures in these sliders makes them an irresistible treat that both kids and adults will enjoy. Plus, they’re convenient to hold and eat, making them a great option for picnics or lunchboxes.
Ingredients (serves 4-6):
- 1 pound ground beef
- 1/2 cup breadcrumbs
- 1/4 cup grated Parmesan cheese
- 1 large egg
- 2 cloves garlic, minced
- 1 teaspoon Italian seasoning
- Salt and pepper to taste
- 1 cup marinara sauce
- 1 cup shredded mozzarella cheese
- 12 slider buns
- Fresh basil for garnish (optional)
Cooking Instructions:
- Preheat the Oven: Preheat your oven to 375°F (190°C). This guarantees the oven is hot enough to properly cook the meatballs.
- Prepare the Meatball Mixture: In a large mixing bowl, combine the ground beef, breadcrumbs, Parmesan cheese, egg, minced garlic, Italian seasoning, salt, and pepper. Mix everything together until well combined. Be careful not to overmix, as this can make the meatballs tough.
- Shape the Meatballs: Using your hands or a small ice cream scoop, shape the meatball mixture into 12 equal-sized balls. Place them on a baking sheet lined with parchment paper, ensuring they’re evenly spaced apart.
- Bake the Meatballs: Place the baking sheet in the preheated oven and bake for about 20 minutes, or until the meatballs are cooked through and have a nice golden color.
- Assemble the Sliders: Once the meatballs are cooked, remove them from the oven and reduce the oven temperature to 350°F (175°C). Open the slider buns and place them on a separate baking sheet. Place one meatball on each bottom bun, then top each meatball with a tablespoon of marinara sauce and a sprinkle of mozzarella cheese.
- Bake the Sliders: Return the assembled sliders to the oven and bake for an additional 5-7 minutes, or until the cheese is melted and bubbly.
- Serve: Remove the sliders from the oven and, if desired, garnish with fresh basil. Serve warm and enjoy!
Extra Tips:
For added flavor, consider using a mixture of ground beef and pork for the meatballs. If you want to sneak in some vegetables, finely grated zucchini or carrots can be mixed into the meatball mixture without affecting the taste.
Be sure to let the meatballs rest a few minutes before assembling the sliders, as this helps retain their juices and improves the overall texture. Finally, if you prefer a crispy bun, lightly toast the slider buns before assembling the sliders.
Homemade Cheese Ravioli
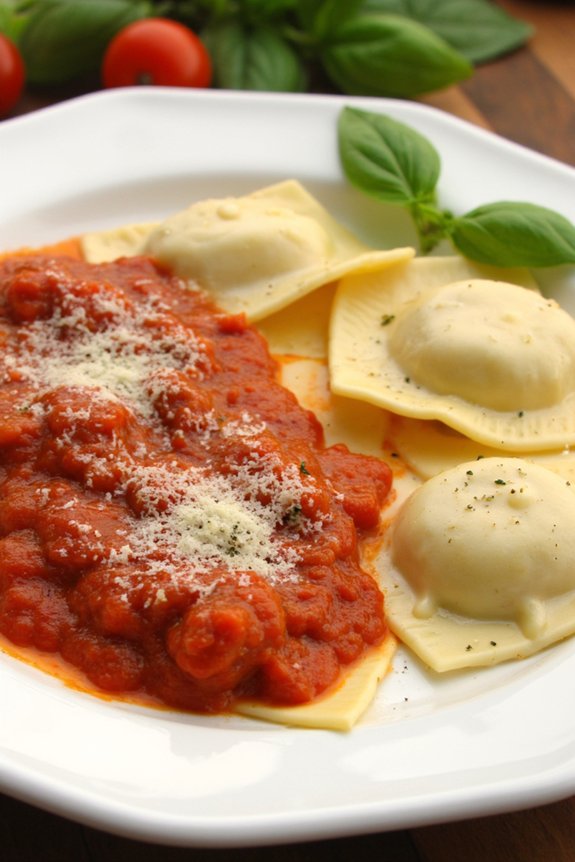
Making Homemade Cheese Ravioli is a fun and rewarding activity that can engage kids in cooking while introducing them to the delightful flavors of Italian cuisine. This dish combines the art of pasta-making with a rich and creamy cheese filling, resulting in a delicious meal that’s perfect for a family dinner or a special occasion. Kids will enjoy the hands-on experience of rolling out the dough and filling each ravioli, making it an ideal recipe for a weekend cooking project.
The beauty of Homemade Cheese Ravioli lies in its simplicity and adaptability. You can tailor the filling to your liking, adding herbs or different types of cheese to suit your family’s taste. This recipe provides a foundation for creativity in the kitchen, encouraging young chefs to experiment with flavors while mastering a classic Italian dish. Gather your ingredients, roll up your sleeves, and get ready to create a memorable meal that everyone will love.
Ingredients (Serves 4-6):
- 2 cups all-purpose flour
- 3 large eggs
- 1 tablespoon olive oil
- 1/2 teaspoon salt
- 1 cup ricotta cheese
- 1/2 cup grated Parmesan cheese
- 1 cup shredded mozzarella cheese
- 1 teaspoon dried basil
- 1 teaspoon dried oregano
- Salt and pepper to taste
- 4 cups tomato sauce (for serving)
Cooking Instructions:
- Prepare the Dough: In a large mixing bowl, combine the all-purpose flour and salt. Make a well in the center and add the eggs and olive oil. Use a fork to whisk the eggs and gradually incorporate the flour until the dough starts to come together.
- Knead the Dough: Transfer the dough onto a floured surface. Knead it for about 8-10 minutes until it’s smooth and elastic. Wrap the dough in plastic wrap and let it rest for at least 30 minutes at room temperature.
- Make the Cheese Filling: In a medium bowl, combine ricotta cheese, Parmesan cheese, mozzarella cheese, dried basil, dried oregano, salt, and pepper. Mix until smooth and well-blended.
- Roll Out the Dough: Divide the rested dough into four equal pieces. Roll out each piece on a floured surface into thin sheets, about 1/8 inch thick.
- Assemble the Ravioli: Place small spoonfuls of the cheese filling onto one sheet of dough, about 1-2 inches apart. Brush a little water around the edges of each filling mound. Lay another sheet of dough over the top and press around the filling to seal. Use a ravioli cutter or a knife to cut into individual ravioli pieces.
- Cook the Ravioli: Bring a large pot of salted water to a boil. Carefully add the ravioli and cook for 3-4 minutes, or until they float to the top and are tender. Use a slotted spoon to remove them from the water.
- Serve with Sauce: Heat the tomato sauce in a separate pot. Serve the ravioli hot, topped with warm tomato sauce and a sprinkle of extra Parmesan cheese if desired.
Extra Tips:
When making ravioli, ascertain that the dough is rolled out as thin as possible without tearing; this will ensure a delicate texture. If you find the dough difficult to work with, let it rest a little longer to relax the gluten.
Additionally, it’s important to seal the edges of the ravioli well to prevent the filling from leaking during cooking. For a variation, try adding chopped spinach or nutmeg to the cheese filling for extra flavor.
Mini Lasagna Cups
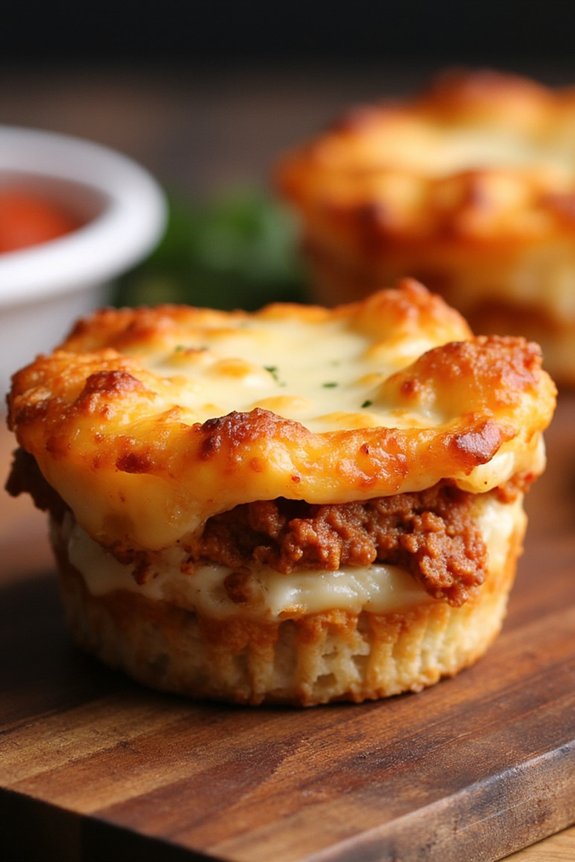
Lasagna is a beloved Italian dish, known for its layers of pasta, rich meat sauce, creamy cheese, and flavorful herbs. However, traditional lasagna can be a bit challenging for little ones to help with in the kitchen. That’s why Mini Lasagna Cups are the perfect solution! This fun and easy recipe allows kids to get hands-on, layering their own individual servings that bake up quickly in a muffin tin. Not only are these lasagna cups adorable, but they also pack all the classic flavors of a traditional lasagna into a bite-sized treat.
These Mini Lasagna Cups are perfect for dinner parties, family meals, or simply a fun cooking activity with kids. They encourage creativity and can be customized to cater to different tastes. Whether you’re a seasoned chef or new to cooking, this recipe is straightforward and enjoyable. Plus, it’s a great way to introduce children to cooking Italian cuisine, helping them develop skills in measuring, layering, and understanding different ingredients.
Ingredients (serves 4-6 people):
- 12 wonton wrappers
- 1 cup marinara sauce
- 1/2 pound ground beef or Italian sausage
- 1 cup ricotta cheese
- 1 cup shredded mozzarella cheese
- 1/4 cup grated Parmesan cheese
- 1 teaspoon Italian seasoning
- Salt and pepper to taste
- Cooking spray or a little olive oil
Cooking Instructions:
- Preheat the Oven: Preheat your oven to 375°F (190°C) to guarantee it’s ready for baking once you have prepared your lasagna cups.
- Cook the Meat: In a skillet over medium heat, cook the ground beef or Italian sausage until browned and fully cooked. Season with salt, pepper, and Italian seasoning. Drain any excess fat from the skillet and set the cooked meat aside.
- Prepare the Muffin Tin: Lightly spray a 12-cup muffin tin with cooking spray or brush with a little olive oil to prevent the lasagna cups from sticking.
- Assemble the Cups: Place a wonton wrapper in each muffin cup, pressing gently to fit. Spoon a little marinara sauce into each cup, followed by a layer of the cooked meat.
- Add Cheese Layers: Top the meat with a dollop of ricotta cheese, then sprinkle with a layer of mozzarella and a bit of Parmesan. Add another wonton wrapper on top and repeat the layering process: sauce, meat, ricotta, mozzarella, and Parmesan.
- Bake: Once all the cups are assembled, place the muffin tin in the preheated oven. Bake for about 15-20 minutes, or until the cheese is bubbly and golden brown.
- Cool and Serve: Allow the lasagna cups to cool for a few minutes before removing them from the tin. Serve warm and enjoy!
Extra Tips:
When baking Mini Lasagna Cups, make sure not to overfill the muffin cups, as the ingredients can expand slightly during cooking. You can also experiment with additional ingredients like spinach or mushrooms for added flavor and nutrition. If you prefer a vegetarian version, simply omit the meat and add more vegetables.
These lasagna cups store well in the refrigerator for a day or two, making them a great make-ahead option for busy nights.
Quick Tomato Bruschetta
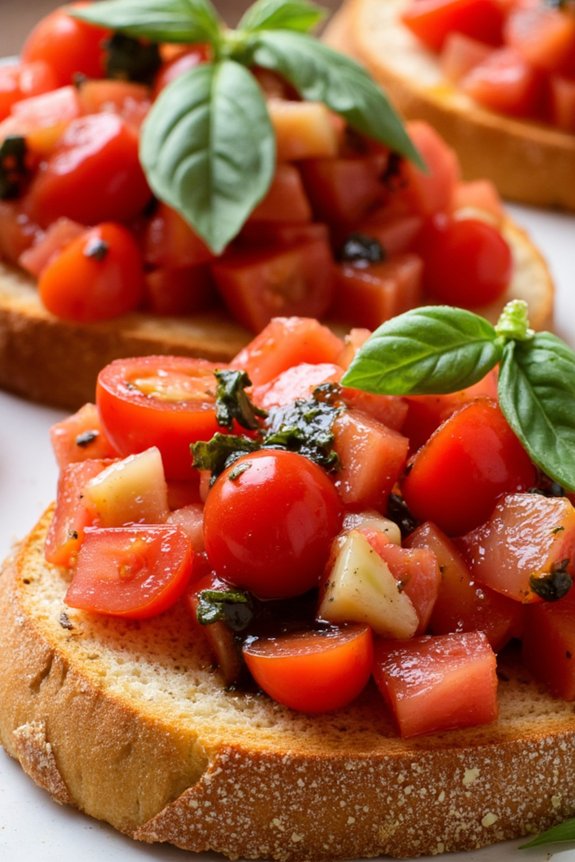
Tomato Bruschetta is a classic Italian appetizer that isn’t only easy to make but also a delightful treat for kids. This dish combines fresh, juicy tomatoes with aromatic basil and a hint of garlic on crispy slices of bread. It’s a great introduction to Italian flavors for young taste buds and a fun way to get kids involved in the kitchen.
Perfect for a quick snack, a light lunch, or a party appetizer, Quick Tomato Bruschetta is sure to please everyone in the family. The simplicity of this recipe allows children to enjoy the process of preparing their own food while learning about fresh ingredients. This dish can be prepared in under 20 minutes, making it an ideal choice for busy weekdays or a spontaneous cooking session.
Not only will kids love eating it, but they’ll also enjoy the hands-on experience of chopping, mixing, and assembling these delicious little bites.
Ingredients (serving size: 4-6 people):
- 1 French baguette
- 4 ripe tomatoes
- 2 cloves of garlic
- 1/4 cup fresh basil leaves
- 3 tablespoons olive oil
- Salt and pepper to taste
- Optional: Balsamic glaze for drizzling
Cooking Instructions:
- Prepare the Bread: Preheat your oven to 400°F (200°C). Slice the French baguette into 1/2-inch thick slices. Arrange the slices on a baking sheet and brush both sides lightly with olive oil.
- Toast the Bread: Place the baking sheet in the preheated oven and toast the bread slices for about 5-7 minutes, or until they’re golden brown and crispy. Remove from the oven and let them cool slightly.
- Prepare the Topping: While the bread is toasting, wash the tomatoes and dice them into small pieces. Place the diced tomatoes into a bowl. Mince the garlic cloves and add them to the tomatoes.
- Season and Mix: Add the remaining olive oil, salt, and pepper to the tomato mixture. Tear the basil leaves into smaller pieces and mix them into the tomato mixture. Stir everything together until well combined.
- Assemble the Bruschetta: Once the bread slices are toasted and slightly cooled, spoon the tomato mixture onto each slice. If using, drizzle a small amount of balsamic glaze over the top for added flavor.
- Serve: Arrange the bruschetta on a serving platter and serve immediately. Encourage the kids to help with serving or even creating their own custom toppings.
Extra Tips:
For the best flavor, use ripe, in-season tomatoes. If you have the chance, let the tomato mixture sit for a few minutes before topping the bread to allow the flavors to meld together. This will enhance the taste of your bruschetta.
Additionally, feel free to get creative with toppings — adding a sprinkle of grated Parmesan cheese or a few olives can add an extra layer of flavor. Remember, the key to a great bruschetta is fresh ingredients and a fun, hands-on approach in the kitchen!
Fun Fettuccine Alfredo
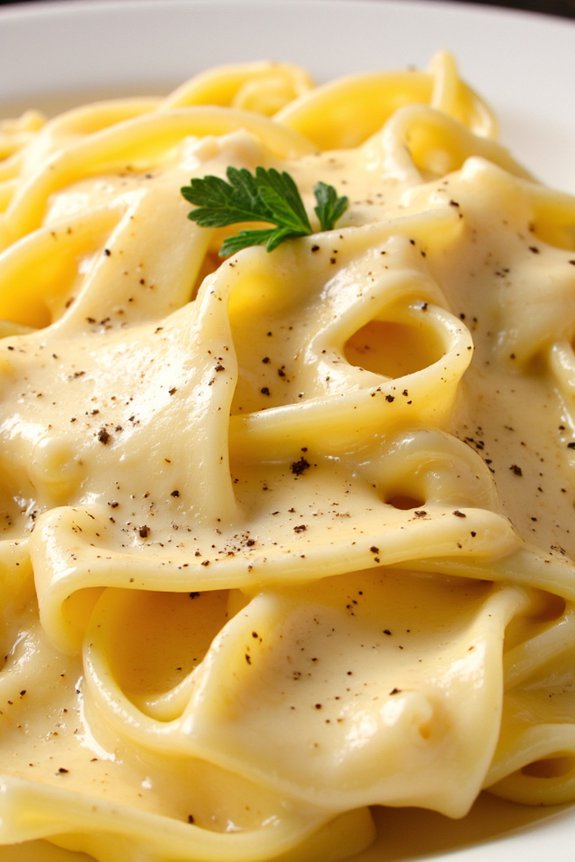
Fettuccine Alfredo is a classic Italian dish that’s both creamy and delightful, making it a perfect choice for kids who are learning to cook. This easy recipe will guide them through creating a delicious homemade meal that the whole family can enjoy. The creamy sauce, made with simple ingredients like butter, cream, and Parmesan cheese, comes together quickly and pairs perfectly with tender fettuccine noodles.
Encouraging kids to participate in the kitchen can be both fun and educational, allowing them to develop cooking skills and confidence. The beauty of Fettuccine Alfredo lies in its simplicity and rich flavors. With just a few ingredients, kids can create a restaurant-quality dish right at home.
This recipe is designed to be straightforward and engaging, providing an excellent opportunity for young chefs to get hands-on experience with cooking. Whether it’s for a family dinner or a special occasion, Fun Fettuccine Alfredo is sure to be a hit with its creamy texture and cheesy goodness.
Ingredients (serving size: 4-6 people):
- 1 pound fettuccine pasta
- 1 cup heavy cream
- 1/2 cup unsalted butter
- 1 1/2 cups grated Parmesan cheese
- Salt to taste
- Freshly ground black pepper to taste
- Optional: chopped parsley for garnish
Cooking Instructions:
- Boil the Pasta: Fill a large pot with water and add a pinch of salt. Bring the water to a boil over high heat. Once boiling, add the fettuccine pasta and cook according to package instructions until al dente, usually about 8-10 minutes. Drain the pasta, reserving about 1 cup of pasta water, and set aside.
- Prepare the Sauce: In a large, deep skillet or saucepan, melt the butter over medium heat. Once melted, pour in the heavy cream and stir gently to combine. Allow the mixture to heat through, taking care not to let it boil.
- Add the Cheese: Gradually add the grated Parmesan cheese to the cream mixture, stirring continuously until the cheese has melted and the sauce is smooth and creamy. If the sauce is too thick, add a bit of the reserved pasta water to achieve the desired consistency.
- Combine Pasta and Sauce: Add the cooked fettuccine to the skillet with the Alfredo sauce. Toss the pasta gently to guarantee every strand is coated with the creamy sauce. Season with salt and freshly ground black pepper to taste.
- Serve: Once the pasta is thoroughly mixed with the sauce, remove the skillet from the heat. Serve the Fettuccine Alfredo hot, garnished with chopped parsley if desired.
Extra Tips:
For a richer flavor, consider using freshly grated Parmesan cheese instead of pre-grated varieties, as it melts more smoothly into the sauce. To prevent the sauce from separating, avoid overheating the cream and butter mixture.
If the sauce becomes too thick, adding a little pasta water can help achieve the perfect consistency. Finally, encourage kids to taste the dish at the end and adjust the seasoning according to their preference – it’s a great way to teach them about balancing flavors.
Tasty Italian Sausage Skewers

Tasty Italian Sausage Skewers are perfect for a fun and delicious meal that kids will love to help make and eat. This recipe takes traditional Italian flavors and presents them in a playful way that makes mealtime exciting. The combination of juicy Italian sausage, colorful bell peppers, and tangy cherry tomatoes creates a vibrant dish full of flavors and textures that will appeal to the whole family.
It’s a great way to introduce children to cooking, as they can easily help assemble the skewers before you handle the grilling. The preparation of these skewers is straightforward, making it a fantastic choice for a quick weeknight dinner or a weekend barbecue. The skewers can be grilled to bring out a smoky flavor that pairs perfectly with the sausage and vegetables.
Additionally, this dish is highly versatile, allowing you to customize the skewers with your favorite vegetables or even add some cheese for an extra twist. Serve them with a side of marinara sauce for dipping or over a bed of pasta for a complete Italian-inspired meal.
Ingredients (Serves 4-6):
- 1 pound Italian sausage links
- 2 large bell peppers (red, yellow, or green)
- 1 pint cherry tomatoes
- 1 large red onion
- 2 tablespoons olive oil
- 1 teaspoon Italian seasoning
- Salt and pepper to taste
- Wooden or metal skewers
Cooking Instructions:
- Prepare the Ingredients: Begin by soaking the wooden skewers in water for at least 30 minutes to prevent them from burning on the grill. While the skewers soak, slice the Italian sausage into 1-inch thick pieces. Cut the bell peppers and red onion into bite-sized chunks, and wash the cherry tomatoes thoroughly.
- Assemble the Skewers: Once all the ingredients are prepped, start assembling the skewers. Alternate the sausage pieces, bell pepper chunks, cherry tomatoes, and onion pieces on each skewer until all the ingredients are used up. Aim for a colorful and even distribution of ingredients on each skewer.
- Season the Skewers: In a small bowl, mix the olive oil, Italian seasoning, salt, and pepper. Brush this mixture generously over the skewers, making sure each piece of sausage and vegetable is well-coated for maximum flavor.
- Grill the Skewers: Preheat your grill to medium-high heat. Once hot, place the skewers on the grill and cook for about 10-15 minutes, turning occasionally. Grill until the sausage is fully cooked and the vegetables are tender and slightly charred.
- Serve and Enjoy: Remove the skewers from the grill and let them cool slightly before serving. They can be enjoyed as is, or served with a side of marinara sauce or over pasta for a more substantial meal.
Extra Tips: When using wooden skewers, soaking them prevents burning and makes handling easier. If you prefer, metal skewers are a reusable alternative. Feel free to experiment with additional vegetables like zucchini or mushrooms for more variety.
If you want extra flavor, consider marinating the sausage and vegetables in the olive oil mixture for an hour before assembling the skewers. Finally, confirm the grill is preheated adequately to avoid sticking and achieve a nice char on the ingredients.
Sweet Ricotta Cannoli

Sweet Ricotta Cannoli is a delightful Italian dessert that kids and adults alike will enjoy. This recipe is perfect for introducing children to the joys of Italian cuisine, as it offers a fun and safe cooking experience. Cannoli are traditional Sicilian pastries consisting of tube-shaped shells filled with a creamy ricotta filling. With their crispy exterior and sweet, creamy interior, these cannoli are a treat that will satisfy any sweet tooth.
This recipe for Sweet Ricotta Cannoli is ideal for serving 4-6 people, making it perfect for family gatherings or simply as a scrumptious after-dinner dessert. The process involves preparing the pastry shells and creating a luscious ricotta filling, which is then piped into the shells. While the idea of making cannoli from scratch may seem intimidating, this simplified version is designed to be kid-friendly and easy to follow, bringing a taste of Italy straight to your home kitchen.
Ingredients for Sweet Ricotta Cannoli (Serving Size: 4-6 people):
- 12 store-bought cannoli shells
- 2 cups ricotta cheese
- 1/2 cup powdered sugar
- 1 teaspoon vanilla extract
- 1/2 cup mini chocolate chips
- 1 teaspoon orange zest
- 1/4 cup chopped pistachios (optional)
- Powdered sugar for dusting
Cooking Instructions:
- Prepare the Ricotta Filling: Begin by placing the ricotta cheese in a fine mesh strainer or cheesecloth over a bowl, and let it drain for about 30 minutes to remove excess moisture. This step is essential to guarantee the filling isn’t too runny.
- Mix the Filling Ingredients: In a medium mixing bowl, combine the drained ricotta cheese, powdered sugar, and vanilla extract. Mix until smooth and creamy. Gently fold in the mini chocolate chips and orange zest until evenly distributed throughout the mixture.
- Fill the Cannoli Shells: Using a pastry bag or a plastic bag with a corner snipped off, pipe the ricotta filling into each end of the cannoli shells until they’re completely filled. Be careful not to overfill, as this can cause the shells to crack.
- Garnish the Cannoli (Optional): If desired, dip each end of the filled cannoli in chopped pistachios for added flavor and texture. This step is optional and can be omitted if preferred.
- Chill and Serve: Place the filled cannoli in the refrigerator for at least 30 minutes to allow the flavors to meld and the filling to set. Before serving, dust the cannoli with powdered sugar for a touch of sweetness and presentation.
Extra Tips:
To guarantee the cannoli shells remain crisp, fill them with the ricotta mixture just before serving. If prepared too far in advance, the shells may become soggy.
Additionally, for a more personalized touch, consider experimenting with different fillings by adding nuts, dried fruits, or other flavor extracts. When working with kids, encourage them to get creative with the garnishes, allowing them to decorate their cannoli with colorful sprinkles or candies for a fun twist.