

When life hands you lemons, why not whip up some delightful Italian lemon recipes to brighten your table?
Think Lemon Ricotta Pasta twirled around your fork, or a creamy Limoncello Tiramisu to savor.
How about a refreshing scoop of Italian Lemon Sorbet for a taste of sunny Italy?
These recipes are all about zest and vibrancy.
Ready to explore these flavors?
Lemon Ricotta Pasta

Lemon Ricotta Pasta is a flavorful and creamy dish that combines the tangy freshness of lemons with the smooth, rich texture of ricotta cheese. This Italian classic is perfect for a quick weeknight dinner or a leisurely weekend meal. The vibrant lemon zest and juice bring a bright contrast to the soft, warm pasta, while the ricotta provides a luscious creaminess that perfectly coats each strand.
This dish isn’t only delicious but also incredibly easy to prepare, making it a favorite for both novice and experienced cooks. With its simple yet elegant flavors, Lemon Ricotta Pasta is a versatile dish that can be enjoyed as is or enhanced with additional ingredients like fresh herbs, vegetables, or grilled chicken.
The beauty of this recipe lies in its simplicity, allowing the quality of the ingredients to shine through. It’s a delightful, satisfying meal that’s sure to impress your family and friends, while also being manageable enough to whip up on a busy evening.
Ingredients (for 4-6 servings):
- 1 pound (450g) of spaghetti or your choice of pasta
- 1 cup (250g) of ricotta cheese
- Zest of 2 lemons
- Juice of 2 lemons
- 1/4 cup (60ml) of olive oil
- 1/2 cup (50g) of grated Parmesan cheese
- Salt and pepper, to taste
- Fresh basil or parsley for garnish (optional)
- 2 cloves garlic, minced
- Red pepper flakes, to taste (optional)
Cooking Instructions:
- Cook the Pasta: Bring a large pot of salted water to a boil. Add the pasta and cook according to the package instructions until al dente. Reserve 1 cup of the pasta water and drain the rest.
- Prepare the Ricotta Mixture: In a large mixing bowl, combine the ricotta cheese, lemon zest, lemon juice, olive oil, minced garlic, grated Parmesan cheese, salt, and pepper. Mix until smooth and well combined.
- Combine Pasta and Sauce: Add the hot, drained pasta to the bowl with the ricotta mixture. Toss to coat the pasta thoroughly. If the sauce is too thick, gradually add the reserved pasta water until you reach the desired consistency.
- Adjust Seasoning: Taste the pasta and adjust the seasoning with additional salt, pepper, or lemon juice as needed. If you prefer a bit of heat, add a pinch of red pepper flakes.
- Serve: Transfer the pasta to serving plates or a large serving dish. Garnish with fresh basil or parsley, if desired, and a bit more grated Parmesan cheese. Serve immediately.
Extra Tips:
To enhance the flavor of your Lemon Ricotta Pasta, consider toasting the garlic lightly in olive oil before adding it to the ricotta mixture. This will give the dish a subtle, nutty flavor.
Additionally, always use fresh lemons for the zest and juice to guarantee the brightest, most vibrant flavor. If you’re adding vegetables like spinach or peas, blanch them briefly in the pasta water before tossing them with the pasta.
This dish can also be made more indulgent by adding a handful of toasted pine nuts or a drizzle of truffle oil just before serving. Enjoy your delicious, homemade Italian Lemon Ricotta Pasta!
Limoncello Tiramisu

Limoncello Tiramisu is a delightful twist on the classic Italian dessert, offering a revitalizing and zesty flavor that’s perfect for summer gatherings or any occasion where you want to impress your guests. The traditional coffee-soaked ladyfingers are swapped out for a lemon-infused syrup, creating a lighter, citrusy experience. The creamy mascarpone mixture is delicately layered with the ladyfingers, resulting in a dessert that’s both rich and revitalizing.
This version of tiramisu captures the essence of Italy, combining the beloved taste of limoncello with a creamy, indulgent treat that leaves a lasting impression. This recipe serves 4-6 people, making it an ideal size for a small dinner party or family gathering. The key to a successful Limoncello Tiramisu lies in the balance of flavors; the bright lemon should complement the creamy mascarpone without overpowering it, and the texture should be light yet satisfying.
By following this recipe, you can create a dessert that not only looks beautiful but also delivers a burst of lemony goodness in every bite. Whether you’re a seasoned chef or a home cook, this Limoncello Tiramisu will become a favorite in your dessert repertoire.
Ingredients:
- 1 cup limoncello
- 1 cup water
- Zest of 2 lemons
- 1/2 cup sugar
- 3 large eggs, separated
- 8 oz mascarpone cheese
- 1 cup heavy cream
- 1 teaspoon vanilla extract
- 24 ladyfinger cookies
- Powdered sugar for dusting
- Lemon slices and mint leaves for garnish (optional)
Instructions:
- Prepare the Lemon Syrup: In a small saucepan, combine the limoncello, water, lemon zest, and sugar. Heat over medium heat, stirring until the sugar dissolves completely. Allow the mixture to cool to room temperature. This syrup will be used to soak the ladyfingers, giving them a lovely lemon flavor.
- Whip the Egg Yolks and Mascarpone: In a mixing bowl, beat the egg yolks with 1/4 cup of the cooled lemon syrup until thick and pale. Add the mascarpone cheese and continue to beat until smooth and creamy. Set aside while you prepare the egg whites and cream.
- Beat the Egg Whites and Cream: In a separate bowl, beat the egg whites until stiff peaks form. In another bowl, whip the heavy cream with the vanilla extract until soft peaks form. Gently fold the whipped egg whites and cream into the mascarpone mixture, creating a light and fluffy filling.
- Assemble the Tiramisu: Quickly dip each ladyfinger into the remaining lemon syrup, ensuring they’re well-soaked but not soggy. Place a layer of soaked ladyfingers in the bottom of a serving dish. Spread half of the mascarpone mixture over the ladyfingers. Repeat the layers with the remaining ladyfingers and mascarpone mixture, finishing with a layer of mascarpone on top.
- Chill and Serve: Cover the dish with plastic wrap and refrigerate for at least 4 hours, or overnight if possible. Before serving, dust the top with powdered sugar and garnish with lemon slices and mint leaves if desired.
Extra Tips:
To guarantee the best texture, it’s important not to over-soak the ladyfingers in the lemon syrup, as they can become too soft and lose their shape. For a more intense lemon flavor, consider adding a few drops of lemon extract to the mascarpone mixture.
If you prefer a non-alcoholic version, you can substitute the limoncello with a mixture of lemon juice and additional sugar. Additionally, make sure to use fresh, high-quality mascarpone cheese for the creamiest texture. Enjoy your Limoncello Tiramisu chilled, and savor the revitalizing blend of lemon and cream in every bite.
Lemon Chicken Piccata

Lemon Chicken Piccata is a classic Italian dish that perfectly balances the tangy and zesty flavor of lemons with tender, juicy chicken breasts. This dish is renowned for its simplicity and elegance, making it a favorite for both weeknight dinners and special occasions. The combination of lemon, capers, and white wine creates a delightful sauce that complements the chicken beautifully, while the light dusting of flour gives the chicken a delicate crust that soaks up all the delicious flavors.
To prepare Lemon Chicken Piccata, you’ll start by flattening the chicken breasts to guarantee they cook evenly. The chicken is then lightly coated in flour and pan-fried until golden brown. The sauce, made from fresh lemon juice, white wine, and briny capers, is simmered to perfection before being poured over the chicken. This dish pairs wonderfully with a side of pasta or a fresh green salad, making it a versatile option for any meal.
Ingredients (serving size: 4-6 people)
- 4 boneless, skinless chicken breasts
- Salt and pepper to taste
- 1/2 cup all-purpose flour
- 4 tablespoons unsalted butter
- 2 tablespoons olive oil
- 1/2 cup dry white wine
- 1 cup chicken broth
- 1/4 cup fresh lemon juice
- 1/4 cup capers, drained
- 1/4 cup fresh parsley, chopped
- Lemon slices for garnish (optional)
Cooking Instructions
- Prepare the Chicken: Begin by placing each chicken breast between two sheets of plastic wrap or parchment paper. Use a meat mallet or rolling pin to pound the chicken to an even thickness of about 1/2 inch. Season the chicken breasts with salt and pepper on both sides.
- Coat the Chicken: Place the flour in a shallow dish. Dredge each chicken breast in the flour, shaking off any excess.
- Cook the Chicken: In a large skillet, heat 2 tablespoons of butter and 2 tablespoons of olive oil over medium-high heat. Once the butter has melted and the oil is hot, add the chicken breasts. Cook for about 3-4 minutes on each side, or until golden brown and cooked through. Remove the chicken from the skillet and set aside on a plate.
- Make the Sauce: In the same skillet, reduce the heat to medium and add the white wine. Use a wooden spoon to scrape up any browned bits from the bottom of the pan, allowing the wine to reduce slightly for about 2 minutes. Add the chicken broth, lemon juice, and capers to the skillet. Bring the mixture to a simmer and let it cook for about 5 minutes, or until the sauce has reduced by half.
- Finish the Dish: Return the chicken breasts to the skillet, spooning the sauce over them. Allow the chicken to warm through for an additional 2 minutes. Add the remaining butter to the sauce and stir until melted and incorporated. Sprinkle the chopped parsley over the dish.
- Serve: Transfer the chicken to a serving platter and pour the sauce over the top. Garnish with lemon slices if desired. Serve immediately with your choice of side.
Extra Tips
For the best results, use fresh lemon juice rather than bottled, as it provides a brighter and more authentic flavor to the dish. If you don’t have white wine on hand, you can substitute it with additional chicken broth, though the wine adds a depth of flavor that’s hard to match.
When pounding the chicken, aim for an even thickness to guarantee uniform cooking. Finally, make sure not to overcrowd the pan when cooking the chicken, as this can cause steaming rather than browning, affecting the texture and flavor. Enjoy your Lemon Chicken Piccata with a crisp white wine or a light Italian red for the perfect pairing.
Lemon Risotto With Asparagus
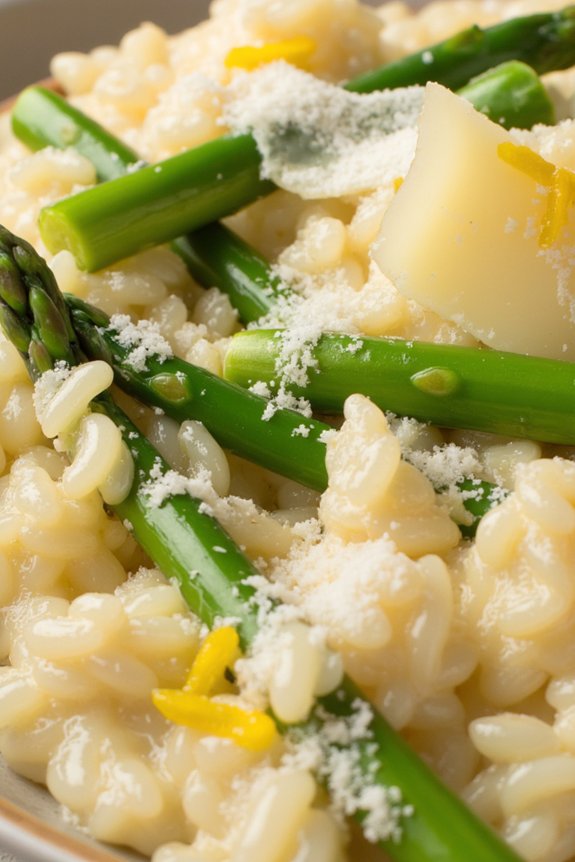
Lemon Risotto with Asparagus is a delightful Italian dish that perfectly balances the creamy texture of risotto with the invigorating zest of lemon, complemented by the tender crunch of asparagus. This dish isn’t only visually appealing but also bursts with flavors that make it a wonderful choice for a sophisticated dinner or a cozy family meal.
The risotto is cooked slowly to achieve a creamy consistency, allowing the rice to absorb the rich flavors of vegetable broth and lemon, while the asparagus adds a fresh, earthy note. Cooking Lemon Risotto with Asparagus is a rewarding experience, offering a taste of Italy’s culinary elegance right in your kitchen.
The key to a perfect risotto is patience and continuous stirring, which helps release the rice’s natural starches, resulting in a creamy dish without needing any cream. The addition of lemon zest and juice at the end brightens the flavors, making it a perfect spring or summer dish that can be enjoyed year-round.
Whether you’re a novice or an experienced cook, this recipe will guide you to create a delicious meal for family and friends.
Ingredients (For 4-6 people):
- 1 ½ cups Arborio rice
- 1 bunch of asparagus, trimmed and cut into 1-inch pieces
- 1 medium onion, finely chopped
- 2 cloves garlic, minced
- 4 cups vegetable broth
- 1 cup dry white wine
- 2 tablespoons olive oil
- 1 tablespoon butter
- Zest of 1 lemon
- Juice of 1 lemon
- ½ cup grated Parmesan cheese
- Salt and pepper to taste
- Fresh parsley, chopped for garnish (optional)
Instructions:
- Prepare the Asparagus: In a large pot of boiling salted water, blanch the asparagus for 2-3 minutes until just tender. Drain and immediately plunge into ice water to stop cooking. Drain again and set aside.
- Prepare the Broth: In a separate saucepan, bring the vegetable broth to a simmer over low heat. Keep it warm throughout the cooking process.
- Sauté the Aromatics: In a large skillet or saucepan, heat the olive oil over medium heat. Add the chopped onion and sauté for about 3-4 minutes until translucent. Stir in the garlic and cook for another minute until fragrant.
- Toast the Rice: Add the Arborio rice to the skillet and stir well to coat the rice with the oil, cooking for about 2 minutes until the rice is slightly translucent around the edges.
- Deglaze with Wine: Pour in the white wine and cook, stirring constantly, until the wine is fully absorbed by the rice.
- Cook the Risotto: Begin adding the warm vegetable broth, one ladle at a time, to the rice. Stir continuously and wait for each addition to be absorbed before adding the next. This process will take about 18-20 minutes, or until the rice is creamy and just tender.
- Incorporate Asparagus and Season: When the rice is almost done, stir in the blanched asparagus, lemon zest, and lemon juice. Season with salt and pepper to taste.
- Finish with Butter and Cheese: Remove the skillet from the heat and stir in the butter and Parmesan cheese until melted and creamy. Adjust seasoning if necessary.
- Serve: Spoon the risotto into bowls, garnishing with freshly chopped parsley if desired. Serve immediately.
Extra Tips:
For a richer flavor, you can substitute half of the vegetable broth with chicken broth if preferred. Always use fresh lemon juice and zest for the best flavor impact.
If the risotto becomes too thick while resting, stir in a little more warm broth to loosen it before serving. Remember that continuous stirring is key to achieving the perfect creamy texture, and using a good quality Parmesan cheese will enhance the overall flavor of the dish.
Enjoy your Lemon Risotto with Asparagus with a glass of the same white wine used in cooking, for a harmonious dining experience.
Italian Lemon Sorbet

Italian Lemon Sorbet, or “Sorbetto al Limone,” is a revitalizing and zesty dessert that perfectly captures the essence of Italian summer. This delicacy is renowned for its light and tangy flavor, making it an ideal palate cleanser or a delightful treat on a hot day. The beauty of this recipe lies in its simplicity, utilizing fresh lemons to deliver a burst of citrus that’s both invigorating and satisfying.
The sorbet is smooth and creamy, with just the right amount of sweetness to balance the tartness of the lemons. Making Italian Lemon Sorbet at home is a straightforward process, requiring only a few ingredients. This recipe serves 4-6 people, making it perfect for a family gathering or a small dinner party. With the right technique and a little patience, you can create a sorbet that rivals those found in the finest Italian gelaterias.
Let’s explore the ingredients and the method to create this delightful dessert.
Ingredients (Serves 4-6):
- 1 cup freshly squeezed lemon juice (about 4-5 lemons)
- 1 cup granulated sugar
- 1 cup water
- 1 tablespoon lemon zest
- Optional: Fresh mint leaves for garnish
Cooking Instructions:
- Prepare the Simple Syrup: In a small saucepan, combine the water and sugar. Heat over medium heat, stirring occasionally, until the sugar has completely dissolved. This should take about 5 minutes. Once dissolved, remove the saucepan from the heat and allow the syrup to cool to room temperature.
- Juice the Lemons: While the syrup is cooling, juice the lemons until you have 1 cup of fresh lemon juice. Be sure to strain the juice to remove any seeds or pulp for a smooth sorbet.
- Combine Ingredients: In a large mixing bowl, combine the cooled simple syrup, lemon juice, and lemon zest. Stir the mixture well until all ingredients are fully incorporated.
- Chill the Mixture: Cover the bowl with plastic wrap and place it in the refrigerator for at least 2 hours. This guarantees the mixture is thoroughly chilled before churning.
- Churn the Sorbet: Once chilled, pour the lemon mixture into an ice cream maker. Churn according to the manufacturer’s instructions until the mixture reaches a thick, slushy consistency. This typically takes 20-25 minutes.
- Freeze the Sorbet: Transfer the sorbet into an airtight container and freeze for at least 2 hours, or until firm. This step allows the sorbet to set properly and enhances its texture.
- Serve: Scoop the sorbet into bowls or glasses. Garnish with fresh mint leaves if desired and serve immediately for the best texture and flavor.
Extra Tips:
To enhance the flavor of your Italian Lemon Sorbet, consider using Meyer lemons, which offer a sweeter and more fragrant taste compared to regular lemons. If you prefer a less tart sorbet, you can adjust the sugar quantity to your liking.
Additionally, if you don’t have an ice cream maker, you can still make this sorbet by placing the mixture in a shallow container, freezing it, and stirring every 30 minutes until it reaches a smooth consistency. This will take a bit longer but still yields a delicious result.
Enjoy the vibrant taste of Italy in every spoonful!
Lemon Basil Pesto

Lemon Basil Pesto is a bright and vibrant twist on the classic pesto sauce, incorporating the zesty flavor of fresh lemons to enhance the natural sweetness of basil. This delightful recipe is perfect for pasta, as a spread on sandwiches, or even as a marinade for grilled meats and seafood.
The invigorating aroma of lemon zest combined with fresh basil and garlic creates an irresistible sauce that will tantalize your taste buds. Perfect for a summer meal or whenever you crave a taste of sunshine, Lemon Basil Pesto is sure to become a favorite in your kitchen.
This recipe is designed to serve 4-6 people, making it ideal for family dinners or small gatherings. The key to a successful Lemon Basil Pesto is using fresh, high-quality ingredients that allow each flavor to shine. The process is simple and quick, requiring minimal equipment and effort. With just a few steps, you’ll have a delicious homemade pesto that will elevate any dish it accompanies.
Ingredients (serving size: 4-6 people):
- 2 cups fresh basil leaves, packed
- 1/2 cup freshly grated Parmesan cheese
- 1/2 cup extra virgin olive oil
- 1/3 cup pine nuts
- 3 cloves garlic
- Zest and juice of 1 lemon
- Salt and pepper to taste
Cooking Instructions:
- Prepare the Ingredients: Begin by washing and thoroughly drying the fresh basil leaves to prevent excess water from diluting the pesto’s flavor. Peel the garlic cloves, and zest and juice the lemon, setting these ingredients aside.
- Toast the Pine Nuts: In a small skillet over medium heat, toast the pine nuts, stirring frequently until they’re golden brown and fragrant, about 3-5 minutes. Be careful not to burn them. Remove from the heat and let them cool.
- Blend the Ingredients: In a food processor, combine the basil leaves, toasted pine nuts, garlic cloves, lemon zest, and Parmesan cheese. Pulse several times until the mixture is well combined and roughly chopped.
- Add Lemon Juice and Olive Oil: With the food processor running, slowly drizzle in the lemon juice and olive oil. Continue processing until the mixture is smooth and creamy. Scrape down the sides as needed to guarantee even blending.
- Season to Taste: Taste the pesto and add salt and pepper as desired. Blend again briefly to incorporate the seasoning.
- Serve or Store: Transfer the pesto to a serving bowl or store it in an airtight container in the refrigerator for up to a week. If storing, cover the top of the pesto with a thin layer of olive oil to prevent browning.
Extra Tips:
For a nuttier flavor, you can substitute walnuts or almonds for the pine nuts. If you prefer a cheesier pesto, increase the Parmesan cheese to 3/4 cup.
For the best results, use freshly squeezed lemon juice rather than bottled, as it provides a fresher taste. When storing pesto, always make sure it’s covered with a thin layer of olive oil to maintain its vibrant green color and prevent oxidation.
If you find your pesto too thick, gradually add more olive oil until you reach your desired consistency.
Lemon and Olive Oil Cake

Lemon and olive oil cake is a delightful Italian dessert that combines the bright, invigorating flavor of lemons with the rich, fruity notes of high-quality olive oil. This cake isn’t only delicious but also incredibly moist, making it a perfect treat for any occasion.
The balance of sweet and tangy flavors guarantees that each bite is a burst of freshness, while the olive oil adds a unique depth, making it a sophisticated yet simple dessert that pairs wonderfully with a cup of tea or coffee.
Ideal for serving 4-6 people, this recipe calls for basic ingredients that you likely have in your pantry, along with a few fresh items. The use of lemon zest and juice captures the essence of the fruit, while the olive oil guarantees a tender crumb.
This cake is easy to prepare, making it a go-to recipe for both novice and experienced bakers alike. Whether you’re hosting a dinner party or enjoying an afternoon snack, this lemon and olive oil cake is sure to impress.
Ingredients:
- 1 cup all-purpose flour
- 1/2 cup almond flour
- 1 cup granulated sugar
- 1/2 teaspoon baking powder
- 1/4 teaspoon baking soda
- 1/4 teaspoon salt
- 1/2 cup extra virgin olive oil
- 2 large eggs
- 1/2 cup plain Greek yogurt
- Zest of 2 lemons
- 1/4 cup fresh lemon juice
- 1 teaspoon vanilla extract
- Powdered sugar for dusting (optional)
Instructions:
- Preheat and Prepare: Preheat your oven to 350°F (175°C). Grease a 9-inch round cake pan with olive oil or line it with parchment paper to prevent sticking.
- Mix Dry Ingredients: In a medium bowl, whisk together the all-purpose flour, almond flour, sugar, baking powder, baking soda, and salt. This guarantees all dry ingredients are evenly distributed.
- Combine Wet Ingredients: In a separate large bowl, whisk together the olive oil, eggs, and Greek yogurt until smooth. Add the lemon zest, lemon juice, and vanilla extract, mixing until combined.
- Blend Together: Gradually add the dry ingredients to the wet ingredients, stirring gently with a spatula until just combined. Be careful not to overmix, as this can make the cake dense.
- Bake the Cake: Pour the batter into the prepared cake pan. Tap the pan gently on the counter to remove any air bubbles. Bake in the preheated oven for 30-35 minutes, or until a toothpick inserted into the center comes out clean.
- Cool and Serve: Allow the cake to cool in the pan for about 10 minutes, then transfer it to a wire rack to cool completely. Once cooled, dust with powdered sugar if desired before slicing and serving.
Extra Tips:
For the best results, use fresh lemons to guarantee a vibrant citrus flavor. If you prefer a more pronounced lemon taste, you can add an extra tablespoon of lemon juice or some lemon extract.
The quality of the olive oil can notably affect the taste of the cake, so opt for a fruity, high-quality extra virgin olive oil. For a decorative touch, consider garnishing with thin lemon slices or fresh mint leaves.
This cake can be stored in an airtight container at room temperature for up to three days, or refrigerated for longer freshness.
Lemon Arugula Salad
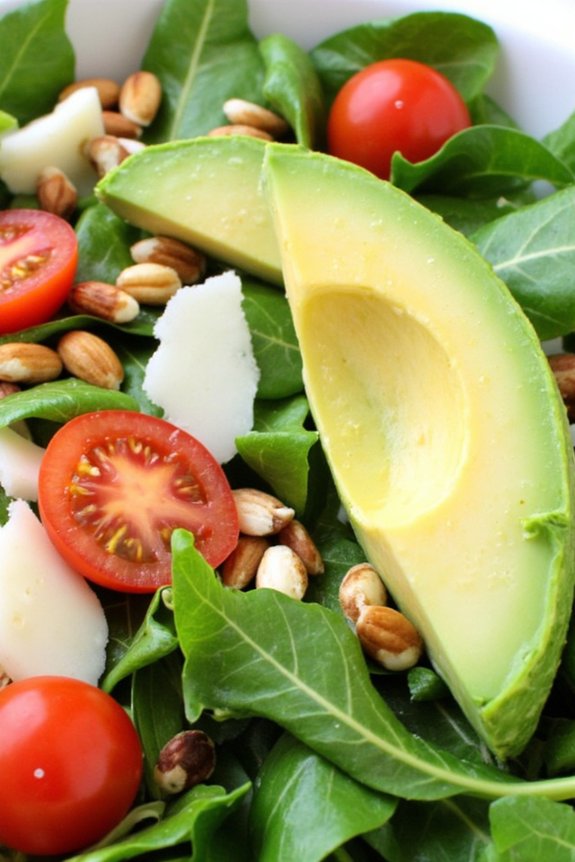
Lemon Arugula Salad is a fresh and vibrant dish that captures the essence of Italian cuisine with its simple yet flavorful ingredients. The peppery taste of arugula is balanced by a zesty lemon dressing, enhancing the freshness of ripe cherry tomatoes and creamy avocado slices. This salad is perfect as a light entrée or a side dish, and it’s particularly delightful during the warm months when you crave something invigorating and easy to prepare.
One of the key highlights of this salad is the use of high-quality ingredients that truly make a difference in its taste. The lemon dressing is light but packs a punch, bringing together the flavors of the salad in a harmonious way. The addition of shaved Parmesan adds a subtle richness, while toasted pine nuts give a delicious crunch and nuttiness.
This Lemon Arugula Salad isn’t only a feast for the palate but also a visual delight with its vibrant colors and textures.
Ingredients (serves 4-6 people):
- 5 cups fresh arugula
- 1 cup cherry tomatoes, halved
- 1 avocado, sliced
- 1/4 cup shaved Parmesan cheese
- 1/4 cup pine nuts, toasted
- 1 lemon, juiced
- 1/4 cup extra virgin olive oil
- Salt and pepper to taste
Cooking Instructions:
- Prepare the Ingredients: Begin by washing the arugula thoroughly under cold water and pat it dry with a kitchen towel. Slice the cherry tomatoes in half and set aside. Cut the avocado in half, remove the pit, slice it into thin pieces, and carefully scoop them out with a spoon.
- Toast the Pine Nuts: In a small, dry skillet over medium-low heat, toast the pine nuts, stirring frequently until they’re golden brown and fragrant. This should take about 3-4 minutes. Be careful not to burn them. Remove from heat and let them cool.
- Make the Dressing: In a small bowl, whisk together the freshly squeezed lemon juice and extra virgin olive oil. Season the dressing with salt and pepper to your taste. Confirm the dressing is well emulsified.
- Assemble the Salad: In a large salad bowl, combine the arugula, cherry tomatoes, and avocado slices. Drizzle the lemon dressing over the salad and toss gently to coat all the ingredients evenly.
- Finish and Serve: Top the salad with shaved Parmesan cheese and the toasted pine nuts. Serve immediately to enjoy the freshness and the mix of flavors and textures.
Extra Tips:
For an added depth of flavor, you can include a touch of lemon zest in the dressing for more citrusy notes. If you prefer, substitute the Parmesan with another hard cheese like Pecorino Romano for a different taste profile.
Remember to toast the pine nuts only until they’re lightly golden, as they can burn quickly. This salad is best served fresh and immediately after assembling to maintain its crispness and vibrant flavors.
Lemon and Herb Grilled Fish

This recipe serves 4-6 people, making it an excellent choice for a small gathering or a family dinner. The key to this dish is to use fresh ingredients, especially when it comes to the herbs and fish of your choice. The marinade is a harmonious blend of lemon, garlic, and herbs, which infuses the fish with a tangy and savory taste.
Pair this dish with a simple salad or a side of roasted vegetables for a complete meal that everyone will enjoy.
Ingredients:
- 4-6 fish fillets (such as sea bass, snapper, or tilapia)
- 2 lemons (juice and zest)
- 4 cloves of garlic, minced
- 1/4 cup fresh parsley, chopped
- 1/4 cup fresh basil, chopped
- 2 tablespoons olive oil
- Salt and pepper, to taste
- Lemon wedges, for serving
Cooking Instructions:
- Prepare the Marinade: In a small bowl, combine the lemon juice, lemon zest, minced garlic, chopped parsley, and basil. Add the olive oil and mix well until all ingredients are combined. Season the marinade with salt and pepper to taste.
- Marinate the Fish: Place the fish fillets in a shallow dish or a resealable plastic bag. Pour the marinade over the fish, guaranteeing each piece is well coated. Cover the dish with plastic wrap or seal the bag, and let the fish marinate in the refrigerator for at least 30 minutes, allowing the flavors to penetrate the fish.
- Preheat the Grill: Preheat your grill to medium-high heat. If using a charcoal grill, guarantee the coals are evenly distributed for consistent cooking. Lightly oil the grill grates to prevent the fish from sticking.
- Grill the Fish: Remove the fish from the marinade and place it directly onto the preheated grill. Cook each side for about 4-5 minutes, or until the fish is opaque and flakes easily with a fork. Be careful not to overcook the fish, as it can become dry.
- Serve: Once cooked, transfer the fish to a serving platter and garnish with fresh lemon wedges. Serve immediately alongside your choice of sides.
Extra Tips: For the best results, choose fresh, high-quality fish from a trusted source. If you don’t have a grill, you can use a grill pan on the stove for similar results.
Always keep a close eye on the fish while grilling, as the cooking times can vary depending on the thickness of the fillets. To add an extra layer of flavor, consider adding a splash of white wine to the marinade.
Lemon and Ricotta Pancakes

Start your morning with a burst of citrus and creaminess by indulging in Lemon and Ricotta Pancakes. This delightful Italian-inspired dish combines the vibrant flavor of fresh lemons with the rich, creamy texture of ricotta cheese, creating a breakfast treat that’s both invigorating and satisfying.
Perfectly fluffy and light, these pancakes are ideal for a weekend brunch or a special family breakfast. The tangy lemon zest and juice elevate the flavors, making each bite a perfect balance of sweet and tart.
The addition of ricotta cheese not only adds a luscious texture but also boosts the protein content, making these pancakes a nourishing option. The recipe is simple and comes together quickly, making it manageable even on a busy morning.
Serve them with a drizzle of maple syrup, a dollop of whipped cream, or simply dust them with powdered sugar for a delightful finish. Whether you’re serving a crowd or just a few, these Lemon and Ricotta Pancakes will surely impress and become a new breakfast favorite.
Ingredients for 4-6 servings:
- 1 cup ricotta cheese
- 1 cup all-purpose flour
- 1 tablespoon baking powder
- 1/4 teaspoon salt
- 3 tablespoons granulated sugar
- 2 large eggs
- 1 cup milk
- 1 teaspoon vanilla extract
- Zest of 2 lemons
- Juice of 1 lemon
- Butter or oil for cooking
Cooking Instructions:
- Prepare the Batter: In a large mixing bowl, combine the ricotta cheese, flour, baking powder, salt, and sugar. Stir until well mixed. In a separate bowl, whisk together the eggs, milk, vanilla extract, lemon zest, and lemon juice until smooth. Gradually add the wet ingredients to the dry ingredients, stirring gently until just combined. Be careful not to overmix as this can make the pancakes dense.
- Preheat the Pan: Heat a non-stick skillet or griddle over medium heat. Lightly grease the surface with a small amount of butter or oil to prevent sticking and enhance flavor.
- Cook the Pancakes: Pour about 1/4 cup of batter onto the hot skillet for each pancake. Cook until bubbles form on the surface and the edges begin to look set, about 2-3 minutes. Flip the pancakes carefully with a spatula and cook for an additional 2-3 minutes, or until golden brown and cooked through. Adjust the heat as necessary to avoid burning.
- Keep Warm: As the pancakes are done, transfer them to a warm oven or cover them with a clean towel to keep them warm while you finish making the rest.
- Serve: Once all the pancakes are cooked, serve them immediately with your choice of toppings such as maple syrup, fresh berries, whipped cream, or a sprinkle of powdered sugar.
Extra Tips:
For the best results, always use fresh lemons for zest and juice; it makes a significant difference in flavor. If you prefer a thicker batter, reduce the milk slightly. Conversely, if a thinner batter is desired, add a little more milk.
Confirm the skillet is properly heated before adding the batter to achieve the perfect golden crust. Finally, if serving a larger crowd, keep cooked pancakes warm in a low oven (around 200°F/95°C) until ready to serve. This guarantees everyone enjoys hot pancakes together.
Lemon Roasted Vegetables

Lemon Roasted Vegetables is a delightful Italian-inspired dish that brings together the zesty flavor of lemons with the rich, earthy taste of assorted vegetables. This recipe is perfect for those who seek a healthy and flavorful side dish, or even a light main course. The combination of roasted vegetables and lemon makes for a revitalizing and satisfying meal.
It’s a versatile dish that can accompany a variety of proteins or stand alone as a vegetarian option. Whether you’re hosting a dinner party or simply preparing a weeknight meal, Lemon Roasted Vegetables will brighten your table with its vibrant colors and enticing aromas.
This recipe is designed to serve 4-6 people, making it ideal for family gatherings or meal prep for the week. The selection of vegetables can be tailored to what’s in season or your personal preferences, but the key to this dish is the harmonious blend of lemon juice and zest, which elevates the natural sweetness of the roasted vegetables.
The roasting process caramelizes the vegetables, enhancing their flavors and creating a slightly crispy exterior with a tender interior. This combination of textures and flavors makes Lemon Roasted Vegetables a crowd-pleaser that will have everyone asking for seconds.
Ingredients (for 4-6 servings):
- 2 large carrots
- 2 medium zucchinis
- 1 red bell pepper
- 1 yellow bell pepper
- 1 red onion
- 200g cherry tomatoes
- 3 cloves garlic
- 1 lemon (zest and juice)
- 3 tablespoons olive oil
- 1 teaspoon dried oregano
- 1 teaspoon dried thyme
- Salt and pepper to taste
Cooking Instructions:
- Preheat the Oven: Start by preheating your oven to 200°C (400°F). This temperature is perfect for roasting vegetables, allowing them to caramelize nicely without burning.
- Prepare the Vegetables: Wash all the vegetables thoroughly. Peel the carrots and cut them into sticks. Slice the zucchinis into half-moons. Cut the bell peppers into strips and the red onion into wedges. Halve the cherry tomatoes. Mince the garlic cloves.
- Prepare the Lemon Mixture: In a small bowl, combine the olive oil, lemon juice, lemon zest, minced garlic, dried oregano, and dried thyme. Mix well to create a flavorful marinade.
- Combine and Season: Place all the prepared vegetables in a large mixing bowl. Pour the lemon mixture over the vegetables, making sure they’re well coated. Season generously with salt and pepper, and toss everything together until the vegetables are evenly coated.
- Roast the Vegetables: Spread the coated vegetables evenly on a large baking sheet lined with parchment paper. Make sure they’re in a single layer to promote even roasting. Place the baking sheet in the preheated oven and roast for 25-30 minutes, stirring halfway through, until the vegetables are tender and lightly browned.
- Serve: Once roasted, remove the vegetables from the oven and transfer them to a serving platter. Garnish with fresh lemon slices or additional zest if desired, and serve warm.
Extra Tips:
For best results, try to cut the vegetables into uniform sizes to guarantee even cooking. You can also experiment with other vegetables such as asparagus, broccoli, or sweet potatoes, depending on what you have on hand.
If you prefer a bit of heat, consider adding a pinch of red pepper flakes to the lemon mixture. Remember that the key to perfect roasted vegetables isn’t overcrowding the baking sheet; if necessary, use two sheets to allow ample space for each piece to roast properly.
Lemon and Thyme Focaccia

Lemon and Thyme Focaccia is a delightful Italian bread that combines the tangy zest of lemons with the aromatic flavor of fresh thyme. This focaccia is perfect as a standalone snack or as an accompaniment to a meal. The citrusy notes of lemon pair beautifully with the earthy thyme, creating a unique and flavorful bread. This recipe will guide you through the process of making this delicious focaccia at home, resulting in a golden-brown crust with a tender, airy interior.
Focaccia is a versatile bread, and this version is especially appealing due to its invigorating lemony aroma and herbaceous touch. It’s an excellent choice for entertaining guests or simply enjoying with a glass of wine. The preparation process involves creating a basic dough, which is then enriched with the vibrant flavors of lemon zest and fresh thyme. Follow the steps below to create your own Lemon and Thyme Focaccia, perfect for serving 4-6 people.
Ingredients (serving size: 4-6 people):
- 500g all-purpose flour
- 1 packet (7g) active dry yeast
- 1 tablespoon sugar
- 1 teaspoon salt
- 300ml warm water
- 60ml extra virgin olive oil, plus extra for drizzling
- Zest of 2 lemons
- 2 tablespoons fresh thyme leaves
- Coarse sea salt, for sprinkling
Instructions:
- Activate the Yeast: In a small bowl, combine the warm water, sugar, and active dry yeast. Stir gently and let it sit for about 5-10 minutes, or until the mixture becomes frothy. This indicates that the yeast is active.
- Mix the Dough: In a large mixing bowl, combine the flour and salt. Make a well in the center and pour in the yeast mixture and 3 tablespoons of olive oil. Mix until a rough dough forms.
- Knead the Dough: Transfer the dough to a floured surface and knead for about 10 minutes until it becomes smooth and elastic. If the dough is sticky, sprinkle a little more flour as needed.
- First Rise: Place the kneaded dough in a lightly oiled bowl, cover with a damp cloth, and let it rise in a warm place for about 1-2 hours, or until it has doubled in size.
- Prepare the Pan: Generously oil a baking pan or a rimmed baking sheet with olive oil. Preheat your oven to 220°C (428°F).
- Shape the Focaccia: Once the dough has risen, punch it down to release the air. Transfer it to the prepared pan and gently stretch it out to fit the pan. Use your fingers to dimple the surface of the dough.
- Add Flavor: Drizzle the top with olive oil, then evenly sprinkle the lemon zest and thyme leaves over the dough. Press them gently into the surface. Finish by sprinkling coarse sea salt on top.
- Second Rise: Cover the pan loosely with a damp cloth and let the dough rise for another 20-30 minutes.
- Bake: Place the focaccia in the preheated oven and bake for 25-30 minutes, or until the top is golden brown and the bread sounds hollow when tapped.
- Cool and Serve: Remove the focaccia from the oven and let it cool slightly before slicing. Serve warm or at room temperature.
Extra Tips:
For the best results, make sure your yeast is fresh and not expired, as this will affect the rise of your dough. If you prefer a more pronounced lemon flavor, feel free to add a bit more lemon zest.
You can also experiment by adding other herbs like rosemary or oregano for additional flavor complexity. If you have leftovers, store the focaccia in an airtight container and reheat it in the oven to restore its crispness.
Enjoy your homemade Lemon and Thyme Focaccia with a drizzle of olive oil or a side of balsamic vinegar for dipping.
Lemon Gelato

Indulge in the invigorating and tangy flavors of Italy with homemade Lemon Gelato. This creamy and delightful dessert is the perfect way to cool down on a warm day. The combination of fresh lemon juice and zest provides a vibrant citrus flavor that pairs beautifully with the smooth texture of the gelato.
Whether you’re serving it after a hearty Italian meal or as a treat on its own, Lemon Gelato is sure to impress with its balance of sweetness and tartness.
Making Lemon Gelato at home is a rewarding experience that allows you to control the ingredients and level of sweetness. With just a few simple ingredients, you’ll be able to whip up a batch that captures the essence of an Italian summer.
Best of all, this recipe doesn’t require an ice cream maker, making it accessible for everyone to create a taste of Italy in their own kitchen.
Ingredients for 4-6 servings:
- 1 cup whole milk
- 1 cup heavy cream
- 3/4 cup granulated sugar
- 1/2 cup fresh lemon juice (about 3-4 lemons)
- Zest of 2 lemons
- 4 egg yolks
- A pinch of salt
Cooking Instructions:
1. Prepare the Lemon Mixture:
In a small saucepan, combine the whole milk and heavy cream. Place over medium heat and bring to a gentle simmer, stirring occasionally to prevent scorching. Once simmering, remove from heat and set aside.
2. Whisk the Egg Yolks and Sugar:
In a medium bowl, whisk together the egg yolks, granulated sugar, and a pinch of salt until the mixture becomes pale and thick. This usually takes about 2-3 minutes of vigorous whisking.
3. Temper the Egg Yolks:
Gradually add the hot milk and cream mixture into the egg yolk mixture, whisking continuously to prevent the eggs from curdling. Once combined, return this mixture to the saucepan.
4. Cook the Custard:
Place the saucepan back on the stove over low heat. Stir constantly with a wooden spoon until the mixture thickens enough to coat the back of the spoon, about 5-7 minutes. Don’t let it boil.
5. Add Lemon Flavor:
Remove the thickened custard from heat and stir in the fresh lemon juice and lemon zest. Mix well to incorporate the citrus flavor throughout the custard.
6. Chill the Mixture:
Pour the mixture through a fine-mesh sieve into a clean bowl to remove any cooked egg bits and zest. Cover the bowl with plastic wrap, pressing it directly onto the surface of the custard to prevent a skin from forming. Refrigerate for at least 4 hours or until completely chilled.
7. Freeze and Serve:
Once chilled, transfer the mixture to a freezer-safe container. Freeze for at least 4 hours, stirring every 30 minutes for the first 2 hours to maintain a smooth texture. Serve scoops of Lemon Gelato garnished with additional lemon zest if desired.
Extra Tips:
For the best results, always use fresh lemons to extract the juice and zest, as they provide the most vibrant flavor. If you prefer a more intense lemon flavor, you can increase the amount of zest in the recipe.
Additionally, if you own an ice cream maker, you can use it instead of the manual freezing process for an even creamier texture. Remember to allow the gelato to soften slightly at room temperature before serving for the best consistency.