

When it comes to hosting a gathering, there’s nothing quite like the joy of putting together a vibrant antipasto spread. The rich flavors and textures are sure to impress your guests. Think fresh Caprese skewers, marinated artichoke hearts, and the irresistible taste of prosciutto-wrapped melon. Each dish adds its own Italian flair to your table. Ready to explore these bold flavors and create a memorable experience?
Classic Caprese Skewers
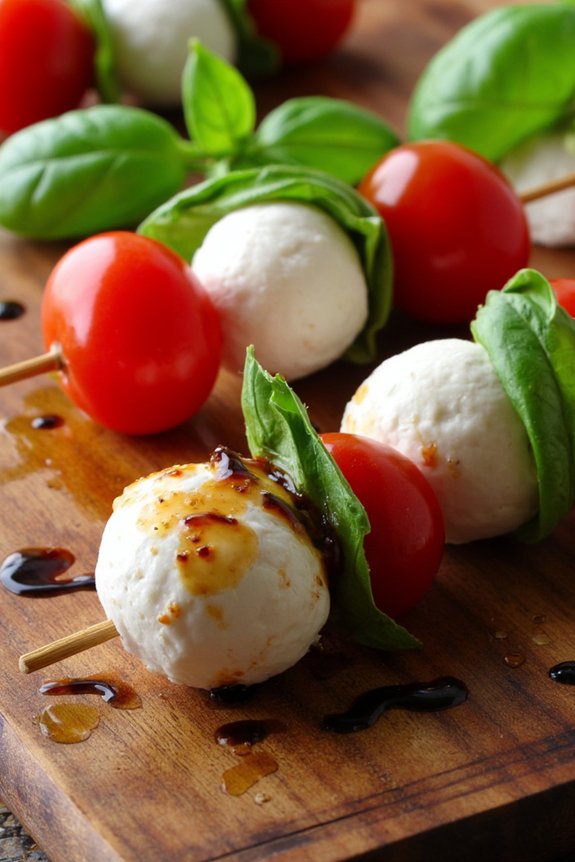
Feast your senses on the vibrant flavors of Italy with Classic Caprese Skewers, a simple yet elegant antipasto that’s bound to delight your guests. This dish beautifully showcases the harmonious combination of fresh mozzarella, ripe tomatoes, and fragrant basil leaves, all drizzled with a balsamic glaze that adds the perfect touch of sweetness and tanginess.
Ideal for summer gatherings or as a quick appetizer, these skewers offer an enticing blend of colors and flavors that are both invigorating and satisfying. Whether you’re hosting a sophisticated dinner party or enjoying a casual meal with family, Caprese Skewers are a versatile choice that can be prepared in advance and served at room temperature.
The key to creating the perfect Caprese Skewers lies in selecting the freshest ingredients and assembling them with care to guarantee that each bite is a delightful burst of flavor. With just a few simple steps, you can create an impressive appetizer that embodies the essence of Italian cuisine.
Ingredients for 4-6 servings:
- 20 cherry tomatoes
- 20 small fresh mozzarella balls (bocconcini)
- 20 fresh basil leaves
- 2 tablespoons extra virgin olive oil
- Salt and freshly ground black pepper, to taste
- Balsamic glaze, for drizzling
- 20 wooden or bamboo skewers
Cooking Instructions:
- Prepare the ingredients: Start by washing the cherry tomatoes and basil leaves thoroughly. Pat them dry gently with a clean kitchen towel or paper towels. Drain the mozzarella balls and set them aside.
- Assemble the skewers: Take a wooden skewer and carefully thread a cherry tomato onto it, followed by a fresh basil leaf. Next, add a mozzarella ball. Repeat this pattern until each skewer has approximately three sets of tomato, basil, and mozzarella. Continue assembling until all ingredients are used.
- Season the skewers: Once all the skewers are assembled, place them on a serving platter. Drizzle each skewer lightly with extra virgin olive oil. Season with a pinch of salt and freshly ground black pepper to enhance the flavors.
- Add the finishing touch: Just before serving, drizzle a generous amount of balsamic glaze over the skewers. This will add a glossy finish and a delightful tangy sweetness that complements the fresh ingredients perfectly.
- Serve and enjoy: Arrange the skewers neatly on a platter and serve them as an appetizer. They can be enjoyed at room temperature, making them an ideal make-ahead dish for your event.
Extra Tips:
For the best results, choose the freshest mozzarella you can find, preferably buffalo mozzarella for an authentic touch. If available, heirloom cherry tomatoes can add a variety of colors and flavors to your skewers.
Be sure not to over-soak the skewers if you plan to grill them slightly for added flavor. Finally, if making the skewers in advance, store them in the refrigerator and drizzle the balsamic glaze just before serving to maintain the skewers’ crispness and freshness.
Marinated Artichoke Hearts
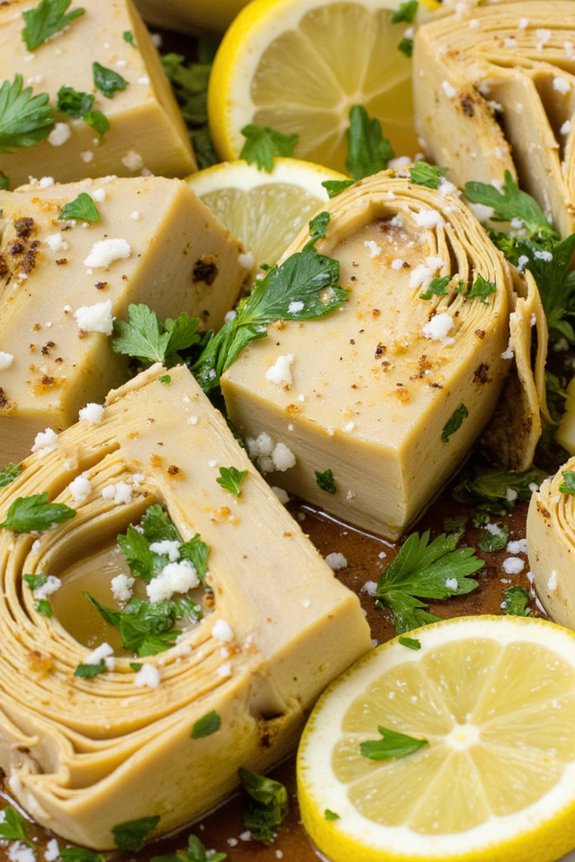
Marinated artichoke hearts are a classic Italian antipasto that offers a burst of flavor in every bite. This dish is perfect for serving as an appetizer at gatherings or as a delightful addition to a charcuterie board. Made with tender artichoke hearts, aromatic herbs, and a tangy marinade, this recipe is simple yet incredibly flavorful.
The marinated artichokes can also be used as a topping for salads, pizzas, or pasta dishes, making them a versatile component in various meals. The key to a perfect marinated artichoke heart dish is to allow the flavors to meld together over time. By preparing them a day in advance and letting them marinate overnight, you guarantee that the artichokes absorb the full depth of flavors from the marinade.
This recipe will guide you through making enough marinated artichoke hearts to serve 4-6 people, perfect for a small gathering or family meal.
Ingredients (Serves 4-6):
- 2 cans (14 ounces each) of artichoke hearts, drained and quartered
- 1/2 cup extra virgin olive oil
- 1/4 cup white wine vinegar
- 2 cloves garlic, minced
- 1 teaspoon dried oregano
- 1/2 teaspoon dried thyme
- 1/2 teaspoon dried basil
- Salt and pepper to taste
- 1/4 cup chopped fresh parsley
- 1/4 cup grated Parmesan cheese
- 1 lemon, sliced
Cooking Instructions:
- Prepare the Artichokes: Begin by draining the canned artichoke hearts thoroughly. Once drained, cut them into quarters if they aren’t already. Place them in a medium-sized mixing bowl.
- Make the Marinade: In a separate bowl, combine the extra virgin olive oil and white wine vinegar. Add the minced garlic, dried oregano, thyme, and basil. Season the mixture with salt and pepper to taste. Whisk together until the ingredients are well blended.
- Combine Ingredients: Pour the marinade over the artichoke hearts in the mixing bowl. Toss the artichokes gently to guarantee they’re evenly coated with the marinade.
- Add Fresh Herbs and Cheese: Sprinkle the chopped fresh parsley and grated Parmesan cheese over the marinated artichokes. Toss again to distribute these ingredients throughout the dish.
- Marinate: Cover the bowl with plastic wrap or transfer the mixture to an airtight container. Place in the refrigerator and let marinate for at least 2 hours, but preferably overnight, to allow the flavors to meld.
- Serve: Before serving, give the marinated artichoke hearts a gentle stir. Arrange them on a serving platter or dish and garnish with lemon slices for an added touch of freshness.
Extra Tips:
For the best flavor, use high-quality olive oil and freshly grated Parmesan cheese. If you prefer a bit of heat, consider adding a pinch of red pepper flakes to the marinade.
Additionally, if you have access to fresh herbs, they can be used in place of dried ones for a more vibrant flavor. Remember that marinated artichokes can be stored in the refrigerator for up to a week, making them a convenient make-ahead option for parties or quick meals.
Prosciutto-Wrapped Melon
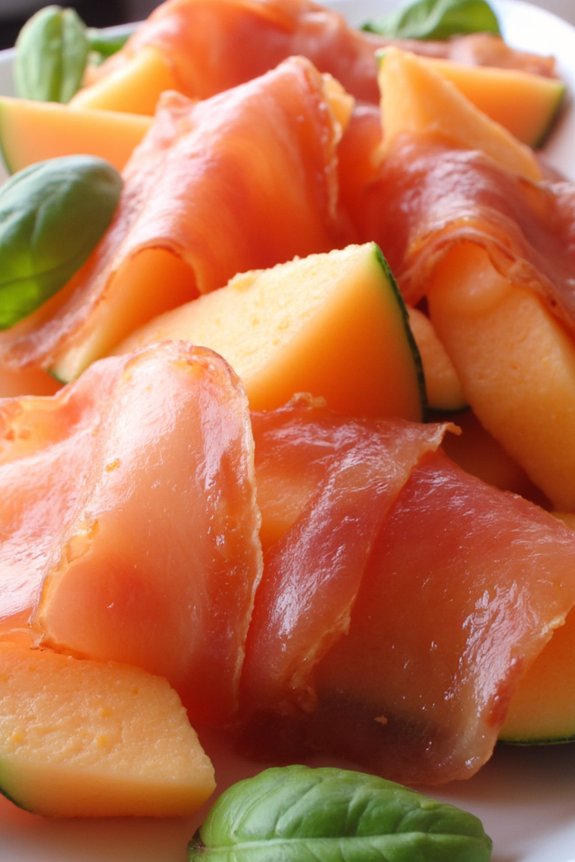
This dish isn’t only visually appealing but also incredibly easy to prepare, making it great for entertaining guests without spending hours in the kitchen. The key to a perfect Prosciutto-Wrapped Melon is selecting a ripe, juicy melon and a high-quality prosciutto. The contrast between the sweet, juicy melon and the thin, delicate slices of prosciutto creates a harmonious balance that’s both invigorating and satisfying.
Ingredients for 4-6 servings:
- 1 ripe cantaloupe or honeydew melon
- 12 thin slices of prosciutto
- Freshly ground black pepper (optional)
- Fresh basil leaves (optional, for garnish)
Cooking Instructions:
- Prepare the Melon: Start by washing the melon thoroughly. Cut the melon in half and remove the seeds with a spoon. Carefully slice the melon into wedges or cubes, depending on your preference. For wedges, aim for 12 even pieces to match the number of prosciutto slices.
- Wrap the Melon: Take a slice of prosciutto and gently wrap it around each piece of melon. Confirm that the prosciutto is snug but not too tight, as you want to maintain the shape of the melon.
- Plate the Antipasto: Arrange the prosciutto-wrapped melon pieces on a serving platter. If desired, add a light sprinkle of freshly ground black pepper over the top for an added hint of spice.
- Garnish and Serve: To enhance the presentation, consider garnishing with fresh basil leaves. This not only adds a pop of color but also complements the flavors of the dish. Serve immediately to enjoy the melon at its freshest.
Extra Tips:
When choosing a melon, confirm it’s ripe by pressing gently on the surface – it should yield slightly under pressure and emit a sweet fragrance. The prosciutto should be thinly sliced so it wraps easily around the melon without tearing.
If preparing in advance, store the wrapped melon in the refrigerator and serve chilled for an invigorating bite. Remember, this dish shines with minimal ingredients, so opt for the best quality available to elevate the taste effortlessly.
Olive Tapenade Crostini
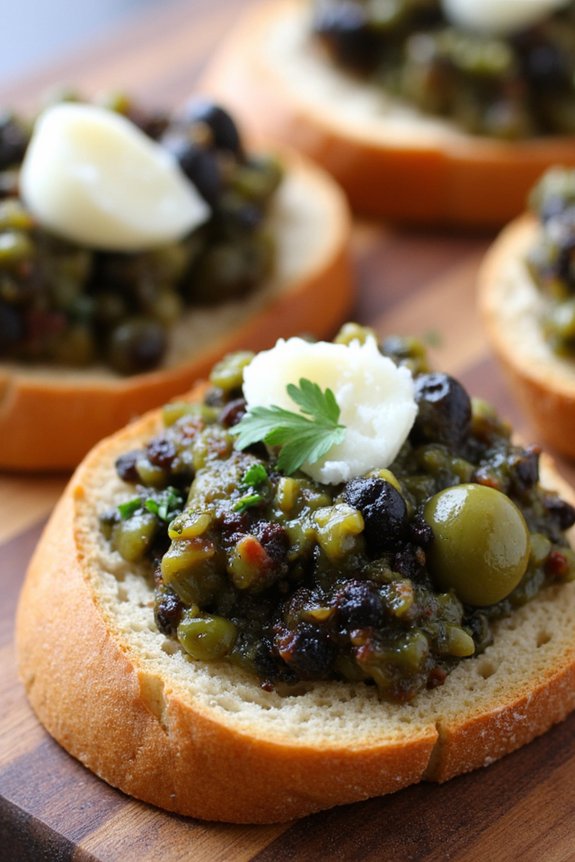
Olive Tapenade Crostini is a delightful Italian appetizer that captures the essence of Mediterranean flavors. This dish features a rich and savory olive tapenade spread over crispy crostini, making it a perfect starter for any meal or a delightful treat for a party. The combination of briny olives, capers, and anchovies provides a robust flavor profile that’s complemented by aromatic herbs and fresh garlic.
The crostini serve as the perfect vehicle for this flavorful spread, offering a crunchy contrast to the creamy tapenade.
Preparing Olive Tapenade Crostini is simple and requires minimal cooking time, making it an ideal choice for those who want to create a sophisticated dish without spending hours in the kitchen. The key is in balancing the flavors to guarantee that the tapenade is neither too salty nor too mild.
With this recipe, you’ll be able to serve a delicious appetizer that will impress your guests and leave them craving more.
Ingredients for 4-6 servings:
- 1 baguette, sliced into 1/2-inch rounds
- 1 cup pitted black olives
- 1/2 cup pitted green olives
- 2 tablespoons capers, drained
- 2 anchovy fillets
- 2 cloves garlic, minced
- 2 tablespoons fresh lemon juice
- 1/4 cup extra-virgin olive oil
- 1 tablespoon fresh parsley, chopped
- Salt and pepper to taste
- Optional: grated Parmesan cheese for garnish
Cooking Instructions:
- Preheat the Oven: Preheat your oven to 375°F (190°C). Line a baking sheet with parchment paper to prevent sticking.
- Prepare the Crostini: Arrange the baguette slices in a single layer on the prepared baking sheet. Lightly brush each slice with olive oil. Bake in the preheated oven for 8-10 minutes, or until the slices are golden brown and crispy. Remove from the oven and let them cool slightly.
- Make the Tapenade: In a food processor, combine the black olives, green olives, capers, anchovies, and minced garlic. Pulse the mixture until it’s finely chopped but not completely smooth. You want a slightly chunky texture.
- Add Seasonings: Transfer the olive mixture to a bowl. Stir in the lemon juice, extra-virgin olive oil, and fresh parsley. Mix well until all ingredients are combined. Season with salt and pepper to taste.
- Assemble the Crostini: Spread a generous amount of olive tapenade on each crostini. For extra flavor, you can sprinkle a little grated Parmesan cheese on top if desired.
- Serve: Arrange the Olive Tapenade Crostini on a serving platter. Serve immediately while the crostini are still slightly warm for the best flavor and texture.
Extra Tips:
When preparing Olive Tapenade Crostini, it’s important to use high-quality olives and extra-virgin olive oil, as these ingredients greatly impact the dish’s flavor.
If you prefer a milder tapenade, you can reduce the number of anchovy fillets or use mild green olives. The tapenade can be made a day in advance and stored in the refrigerator, which can enhance the flavors. Just make sure to bring it to room temperature before serving.
Finally, feel free to experiment with different herbs like basil or thyme to add a unique twist to the classic recipe.
Roasted Red Pepper Bruschetta
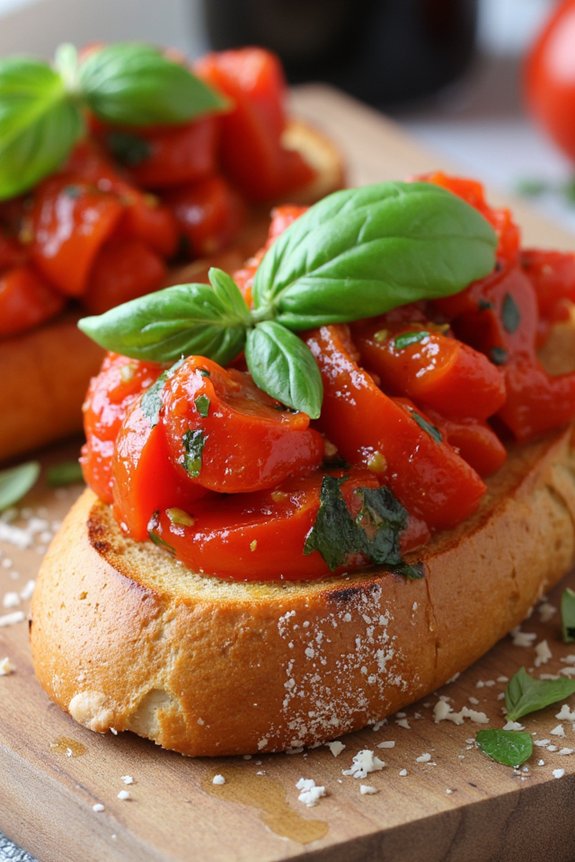
Roasted Red Pepper Bruschetta is a delightful Italian antipasto that combines the smoky sweetness of roasted red peppers with the crisp texture of toasted bread. This dish is perfect for a gathering, offering vibrant colors and flavors that are certain to impress your guests. The process of making Roasted Red Pepper Bruschetta is straightforward, allowing even novice chefs to create a dish that boasts both elegance and simplicity.
The star ingredient, roasted red peppers, are enhanced with a touch of garlic, fresh basil, and a hint of balsamic vinegar, bringing out their natural sweetness. Served on slices of crusty bread, this bruschetta is an ideal appetizer for 4-6 people. Whether you’re hosting a dinner party or simply enjoying a quiet evening at home, this recipe promises to deliver a taste of Italy right to your table.
Ingredients (for 4-6 people):
- 4 large red bell peppers
- 1 baguette or rustic Italian bread
- 2 cloves garlic
- 1/4 cup extra virgin olive oil
- 1 tablespoon balsamic vinegar
- 1/4 cup fresh basil leaves, chopped
- Salt and pepper to taste
- Optional: grated Parmesan cheese for garnish
Instructions:
- Roast the Peppers: Preheat your oven to 450°F (230°C). Place the red bell peppers on a baking sheet and roast them in the oven for about 25-30 minutes, turning occasionally, until the skins are charred and blistered.
- Steam and Peel the Peppers: Remove the peppers from the oven and place them in a bowl. Cover the bowl with plastic wrap or a lid, allowing them to steam for about 10 minutes. This will make the skins easier to remove. Once cooled, peel off the skins, remove the seeds, and slice the peppers into thin strips.
- Prepare the Bread: While the peppers are cooling, slice the baguette into 1/2-inch thick slices. Arrange the slices on a baking sheet and brush each side lightly with olive oil. Toast them in the oven for about 5 minutes, or until they’re golden and crisp.
- Garlic and Oil: Peel the garlic cloves and cut them in half. Rub the cut side of the garlic on each toasted bread slice to impart a subtle garlic flavor.
- Mix the Topping: In a mixing bowl, combine the sliced roasted red peppers, remaining olive oil, balsamic vinegar, chopped basil, salt, and pepper. Toss gently to guarantee the peppers are well coated.
- Assemble the Bruschetta: Spoon the red pepper mixture onto each slice of toasted bread. If desired, sprinkle some grated Parmesan cheese over the top for added flavor.
Extra Tips: For an extra layer of flavor, consider adding a touch of crushed red pepper flakes to the red pepper mixture for a bit of heat. Additionally, if you prefer a smokier taste, you can char the peppers over an open flame on your stovetop instead of roasting them in the oven.
When selecting your bread, aim for a dense, crusty loaf that will hold up well under the weight of the topping. Finally, make the topping ahead of time and refrigerate it for a couple of hours; this allows the flavors to meld beautifully.
Antipasto Salad With Italian Dressing
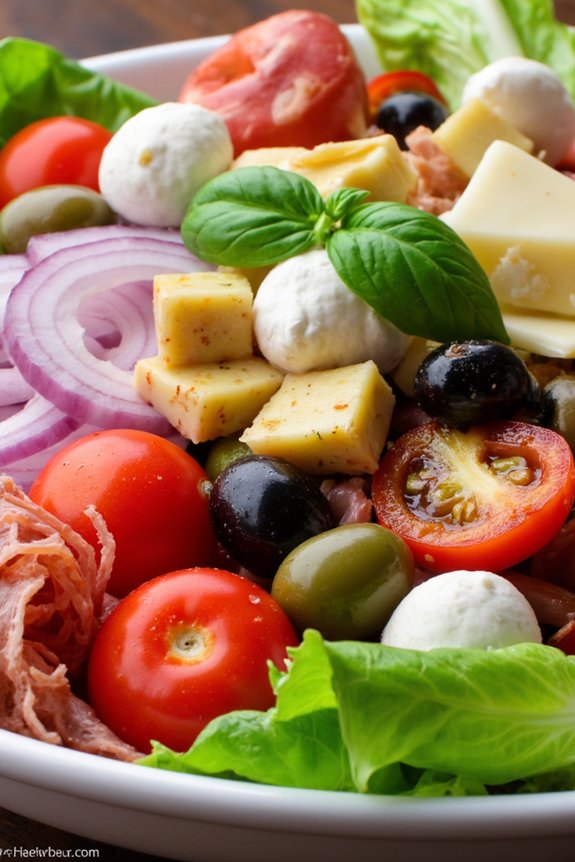
Antipasto Salad With Italian Dressing is a delightful and vibrant dish that brings together the best of Italian flavors in one bowl. This salad is a quintessential part of Italian cuisine, often served as a starter to stimulate the appetite. It combines fresh vegetables, cured meats, cheeses, and olives, all brought together with a zesty Italian dressing.
It’s a perfect dish for entertaining or as a light meal on its own, offering a balance of textures and flavors that will surely please any palate. The key to a great Antipasto Salad is the quality of the ingredients. Fresh, crisp vegetables such as romaine lettuce and cherry tomatoes provide a revitalizing crunch, while the use of cured meats like salami and prosciutto adds a savory depth.
Cheeses such as mozzarella or provolone contribute a creamy richness, and the olives introduce a briny note that complements the other ingredients. The Italian dressing, made from a mix of olive oil, vinegar, and Italian herbs, ties everything together, enhancing the flavors without overwhelming them. This recipe serves 4-6 people, making it perfect for sharing with friends and family.
Ingredients:
- 1 head of romaine lettuce, chopped
- 1 cup cherry tomatoes, halved
- 1/2 cup sliced red onion
- 1/2 cup black olives, pitted
- 1/2 cup green olives, pitted
- 1/2 cup artichoke hearts, quartered
- 1/2 cup roasted red bell peppers, sliced
- 1/4 pound salami, thinly sliced
- 1/4 pound prosciutto, thinly sliced
- 1/2 cup mozzarella balls, halved
- 1/2 cup provolone cheese, cubed
- 1/2 cup Italian dressing
- Fresh basil leaves for garnish
Instructions:
- Prepare the Vegetables: Begin by washing the romaine lettuce thoroughly under cold water. After rinsing, pat it dry with a clean kitchen towel or use a salad spinner to remove excess water. Chop the lettuce into bite-sized pieces and place it in a large salad bowl.
- Add the Fresh Ingredients: Halve the cherry tomatoes and slice the red onion thinly. Add them to the salad bowl along with the black and green olives, artichoke hearts, and roasted red bell pepper strips. These ingredients provide a mix of colors and flavors, making the salad vibrant and tasty.
- Incorporate the Proteins and Cheeses: Arrange the thinly sliced salami and prosciutto over the vegetable mixture. Add the halved mozzarella balls and cubed provolone cheese. These elements add richness and texture to the salad.
- Dress the Salad: Pour the Italian dressing over the salad. Use salad tongs or clean hands to gently toss the salad, ensuring the dressing coats all the ingredients evenly.
- Garnish and Serve: Finally, garnish the salad with fresh basil leaves for an aromatic finish. Serve immediately to enjoy the crispness of the ingredients.
Extra Tips:
To enhance the flavors of your Antipasto Salad, allow the salad to sit for a few minutes after tossing with the dressing. This resting time helps the flavors meld together.
If you prefer a homemade touch, consider making your own Italian dressing using olive oil, red wine vinegar, garlic, and a blend of Italian herbs like oregano and basil. Additionally, you can customize the salad by adding other ingredients like pepperoncini, capers, or even marinated mushrooms for added complexity.
Remember to adjust the seasoning to taste, especially if the cured meats and cheeses are particularly salty. Enjoy the salad fresh for the best experience!
Stuffed Cherry Peppers
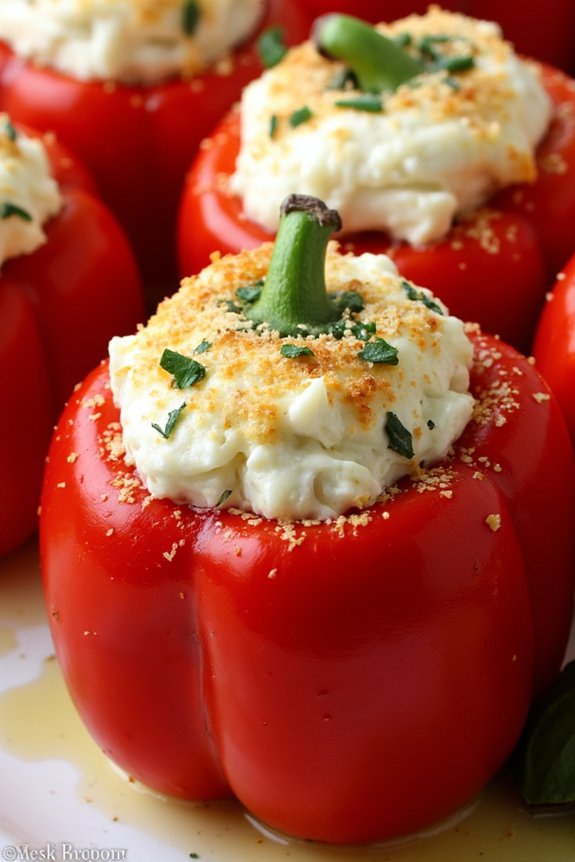
Stuffed Cherry Peppers are a delightful addition to any antipasto platter, offering a burst of flavor that combines the richness of cheese with the subtle heat of cherry peppers.
These bite-sized appetizers are perfect for entertaining, as they’re both visually appealing and deliciously satisfying. The sweetness of the cherry peppers complements the creamy filling, providing a harmonious blend of textures and flavors.
Whether you’re hosting a dinner party or simply enjoying an Italian-themed night, Stuffed Cherry Peppers are sure to impress your guests and leave them craving more.
This recipe for Stuffed Cherry Peppers is designed to serve 4-6 people, making it an ideal choice for small gatherings. The preparation involves hollowing out the cherry peppers and filling them with a savory mixture of cheeses and herbs.
The filling is then topped with a drizzle of olive oil and baked to perfection, allowing the flavors to meld and the cheese to melt beautifully. Simple yet elegant, these stuffed peppers are a reflection of the delicious simplicity of Italian cuisine.
Ingredients (Serves 4-6):
- 20-24 cherry peppers
- 1 cup ricotta cheese
- 1/2 cup grated Parmesan cheese
- 1/2 cup shredded mozzarella cheese
- 1/4 cup chopped fresh basil
- 2 cloves garlic, minced
- 1 tablespoon olive oil
- Salt and pepper, to taste
- Olive oil, for drizzling
Cooking Instructions:
- Prepare the Cherry Peppers: Begin by washing the cherry peppers thoroughly. Carefully cut off the tops and remove the seeds and membranes using a small spoon or a paring knife, being cautious not to tear the peppers. Set the hollowed peppers aside.
- Make the Cheese Filling: In a medium-sized mixing bowl, combine the ricotta cheese, Parmesan cheese, and mozzarella cheese. Add the chopped basil, minced garlic, olive oil, salt, and pepper. Mix until all ingredients are well incorporated and the mixture is smooth.
- Stuff the Peppers: Using a small spoon or a piping bag, fill each hollowed cherry pepper with the cheese mixture. Press the filling firmly into the peppers to guarantee they’re fully stuffed.
- Bake the Peppers: Preheat your oven to 375°F (190°C). Arrange the stuffed peppers on a baking sheet lined with parchment paper. Drizzle a little olive oil over the tops of the stuffed peppers to enhance flavor and help with browning.
- Cook to Perfection: Place the baking sheet in the preheated oven and bake for 15-20 minutes, or until the peppers are tender and the cheese filling is bubbly and golden brown. Remove from the oven and let them cool slightly before serving.
Extra Tips:
For an extra layer of flavor, consider adding a pinch of red pepper flakes to the cheese filling for those who prefer a spicier kick.
If you want to prepare these in advance, you can stuff the peppers and refrigerate them for up to a day before baking. Just be sure to bring them to room temperature before placing them in the oven.
Additionally, if fresh basil isn’t available, dried Italian herbs can be substituted, though fresh herbs will provide the best flavor.
Experiment with different cheeses according to your taste preference, and feel free to add chopped nuts for a crunchy texture.
Grilled Eggplant Rollatini
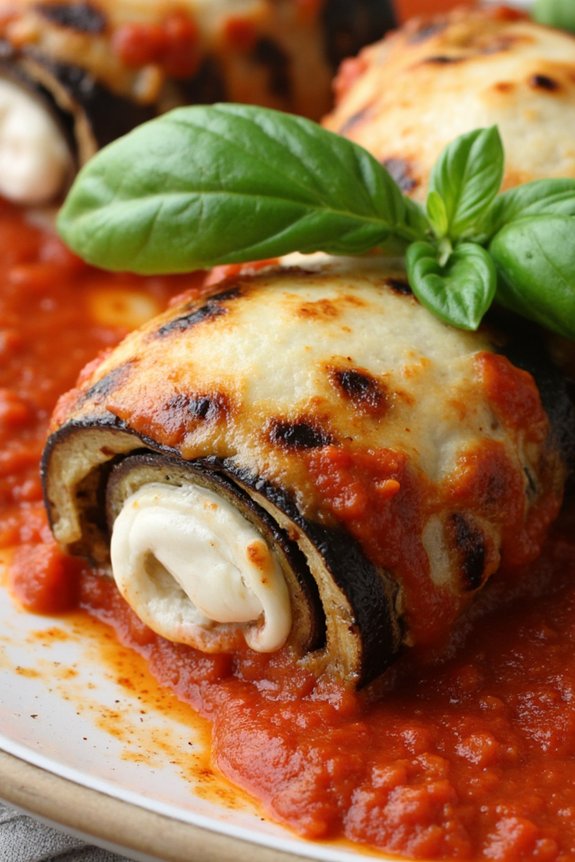
Grilled Eggplant Rollatini is a delightful Italian antipasto that combines the rich flavors of grilled eggplant with the creamy texture of ricotta cheese. This dish is perfect for a light appetizer or a main course for those who appreciate the delicate balance of savory and creamy flavors. The eggplant slices are grilled to perfection, providing a slightly smoky taste that pairs beautifully with the fresh basil, tangy marinara sauce, and gooey mozzarella cheese.
This recipe is great for gatherings and can easily be prepared ahead of time, making it a convenient yet impressive dish to serve to guests. The rollatini can be assembled and refrigerated until it’s time to bake, allowing the flavors to meld together wonderfully. It’s a versatile dish that can be adapted to suit various dietary needs and preferences, ensuring that everyone at the table will be delighted by its taste and presentation.
Ingredients (Serves 4-6):
- 2 large eggplants
- Olive oil, for brushing
- Salt and pepper to taste
- 1 1/2 cups ricotta cheese
- 1/2 cup grated Parmesan cheese
- 1 egg
- 1/4 cup chopped fresh basil leaves
- 2 cups marinara sauce
- 1 cup shredded mozzarella cheese
Cooking Instructions:
- Prepare the Eggplant: Slice the eggplants lengthwise into 1/4-inch thick slices. Lay the slices on a paper towel and sprinkle with salt. Let them sit for about 15-20 minutes to draw out moisture. Rinse and pat them dry with a clean towel.
- Grill the Eggplant: Preheat your grill or grill pan over medium-high heat. Lightly brush both sides of the eggplant slices with olive oil and season with salt and pepper. Grill the slices for about 3-4 minutes on each side, until they’re tender and have grill marks. Remove from the grill and set aside to cool slightly.
- Prepare the Filling: In a medium bowl, mix together the ricotta cheese, Parmesan cheese, egg, and chopped basil until well combined. Season with salt and pepper to taste.
- Assemble the Rollatini: Preheat your oven to 375°F (190°C). Spread a thin layer of marinara sauce at the bottom of a baking dish. Take a grilled eggplant slice and place about a tablespoon of the ricotta mixture at one end. Roll the slice up and place it seam-side down in the baking dish. Repeat with the remaining eggplant slices.
- Add Sauce and Cheese: Once all the rollatini are assembled in the dish, pour the remaining marinara sauce over the top. Sprinkle the shredded mozzarella cheese evenly over the rollatini.
- Bake: Cover the baking dish with foil and bake in the preheated oven for 20 minutes. Remove the foil and bake for an additional 10 minutes, or until the cheese is bubbly and golden brown.
- Serve: Let the dish cool for a few minutes before serving. Garnish with additional fresh basil leaves, if desired.
Extra Tips:
When preparing Grilled Eggplant Rollatini, it’s important not to skip the step of salting and draining the eggplant slices. This process helps remove excess moisture and reduces any bitterness, resulting in a better texture and flavor.
Additionally, feel free to experiment with the filling by adding ingredients like spinach or sun-dried tomatoes for added flavor and texture. If you prefer a lighter version, you can substitute part-skim ricotta and mozzarella cheeses.
Focaccia With Rosemary and Sea Salt

Focaccia with Rosemary and Sea Salt is a classic Italian bread that’s perfect as an antipasto or a side dish. Known for its soft, airy texture and distinctive topping of fragrant rosemary and crunchy sea salt, this focaccia is a delightful addition to any meal.
Whether you’re serving it with a selection of cured meats and cheeses or simply enjoying it on its own with a drizzle of olive oil, this focaccia is sure to impress your guests with its rustic charm and rich flavors.
Making focaccia at home is a rewarding endeavor that allows you to create a bread that’s both comforting and flavorful. This recipe is designed to serve 4-6 people, making it ideal for a family dinner or a small gathering.
The process involves creating a simple dough that’s left to rise, then topped with fresh rosemary and coarse sea salt before baking to golden perfection. Follow this recipe to experience the authentic taste of homemade focaccia, a staple of Italian cuisine.
Ingredients (Serves 4-6):
- 500g all-purpose flour
- 325ml warm water
- 7g active dry yeast
- 1 tablespoon sugar
- 1 teaspoon salt
- 4 tablespoons olive oil, divided
- 2 tablespoons fresh rosemary, chopped
- 1 tablespoon coarse sea salt
Cooking Instructions:
- Prepare the Yeast Mixture: In a small bowl, mix the warm water, sugar, and active dry yeast. Stir gently and let it sit for about 5-10 minutes until it becomes frothy. This indicates that the yeast is activated.
- Make the Dough: In a large mixing bowl, combine the flour and salt. Create a well in the center and pour in the yeast mixture along with 2 tablespoons of olive oil. Mix together until a dough forms.
- Knead the Dough: Transfer the dough onto a lightly floured surface and knead for about 10 minutes until it becomes smooth and elastic. If the dough is too sticky, add a little more flour as needed.
- First Rise: Place the kneaded dough in a lightly oiled bowl, cover it with a damp cloth or plastic wrap, and let it rise in a warm, draft-free place for about 1 to 1.5 hours, or until it has doubled in size.
- Shape the Focaccia: Once risen, punch down the dough to release the air. Transfer it to a baking sheet lined with parchment paper. Stretch and flatten the dough into a rectangular shape, about 1.5 cm thick.
- Second Rise: Cover the dough again and let it rise for another 30 minutes.
- Preheat the Oven: While the dough is undergoing the second rise, preheat your oven to 220°C (428°F).
- Prepare the Topping: After the second rise, use your fingers to make dimples all over the surface of the dough. Drizzle the remaining olive oil over the top, then sprinkle with the chopped rosemary and coarse sea salt.
- Bake the Focaccia: Place the focaccia in the preheated oven and bake for 20-25 minutes, or until the top is golden brown and the bread sounds hollow when tapped on the bottom.
- Cool and Serve: Remove from the oven and let the focaccia cool on a wire rack for a few minutes before slicing and serving.
Extra Tips: For an extra moist and flavorful focaccia, you can brush additional olive oil on top immediately after it comes out of the oven.
If you prefer a more intense rosemary flavor, infuse the olive oil with rosemary by heating them together gently before using it as a topping. Additionally, you can add other toppings like sliced olives or cherry tomatoes for a variation on the classic recipe.
Enjoy your homemade focaccia warm or at room temperature, and consider serving it with a balsamic vinegar and olive oil dip for an authentic Italian experience.
Italian Cheese Platter With Honey and Nuts
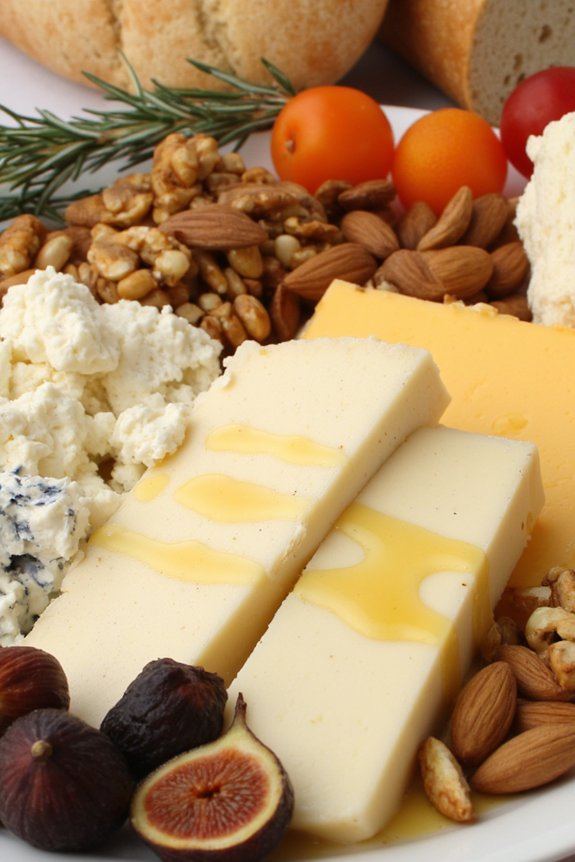
An Italian cheese platter with honey and nuts is a delightful and elegant way to start any Italian meal. This antipasto dish showcases a variety of textures and flavors that perfectly complement each other. The combination of creamy and hard cheeses, the sweetness of honey, and the crunch of nuts creates a harmonious balance that’s both satisfying and visually appealing.
This platter isn’t only a treat for the taste buds but also a feast for the eyes, making it a perfect choice for entertaining guests or enjoying a special family gathering.
Creating the perfect cheese platter involves selecting a variety of Italian cheeses, each with its distinct flavor and character. The addition of honey and nuts enhances the natural richness of the cheeses, offering a sweet and nutty contrast.
When arranging the platter, consider including a mix of soft, semi-soft, and hard cheeses to cater to different palates. Pairing these elements with a selection of Italian breads or crackers will complete the experience, allowing everyone to savor the essence of Italy with every bite.
Ingredients (Serves 4-6):
- 150g Gorgonzola cheese
- 150g Parmigiano-Reggiano cheese
- 150g Taleggio cheese
- 150g Pecorino Romano cheese
- 100g assorted nuts (such as walnuts, almonds, and hazelnuts)
- 100g dried figs or apricots
- 4 tbsp honey
- Fresh rosemary sprigs (for garnish)
- Mixed Italian bread or crackers
Instructions:
- Select and Prepare Cheeses: Choose a variety of Italian cheeses such as Gorgonzola, Parmigiano-Reggiano, Taleggio, and Pecorino Romano. Cut the cheeses into small, bite-sized pieces or wedges. Arrange them on a large platter, spacing them out to allow for easy serving.
- Add Nuts: Lightly toast the assorted nuts in a dry skillet over medium heat for about 5 minutes, stirring occasionally until they’re golden and fragrant. Once cooled, scatter them around the cheeses on the platter.
- Include Dried Fruits: Add dried figs or apricots to the platter. These will provide a sweet contrast to the savory cheeses and nuts.
- Drizzle with Honey: Just before serving, drizzle honey over the cheeses. You can also serve the honey in a small bowl with a spoon, allowing guests to add more if desired.
- Garnish and Serve: Garnish the platter with fresh rosemary sprigs for a touch of color and aroma. Serve the cheese platter with a selection of Italian breads or crackers on the side, allowing guests to pair them with the cheeses.
Extra Tips:
When selecting cheeses, look for ones that are aged and have a good aroma, ensuring they’re of high quality. You can also include a variety of textures by choosing some creamy cheeses like Taleggio alongside firmer options like Parmigiano-Reggiano.
For the nuts, consider lightly salting them to enhance their flavor, and if you want more variety, you can include different dried fruits like cranberries or dates. Always serve the platter at room temperature, as this allows the flavors of the cheeses to be fully appreciated.
Enjoy your Italian cheese platter with a glass of Italian wine for the full experience.
Garlic and Herb Marinated Olives
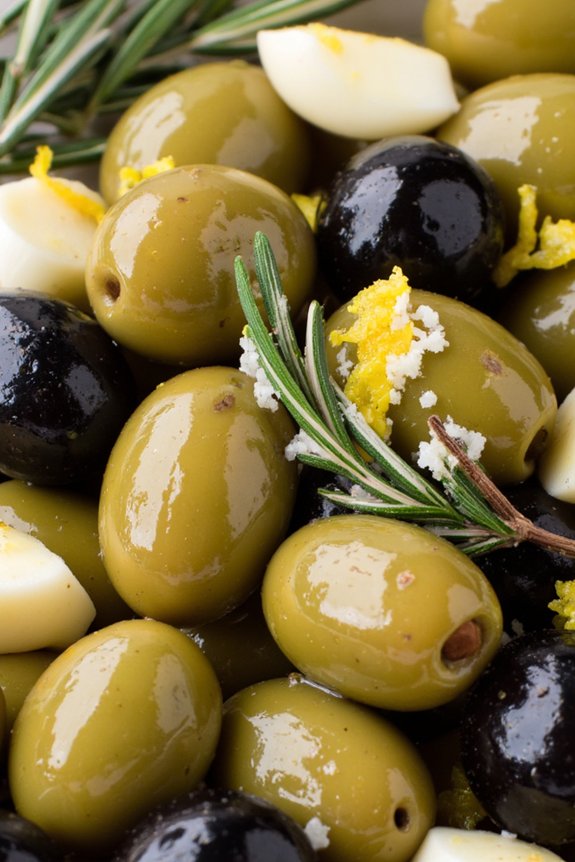
Garlic and Herb Marinated Olives is a delightful and versatile Italian antipasto that’s sure to captivate the taste buds of your guests. This dish brings together the subtle, earthy flavors of assorted olives with the robust aroma of garlic and a medley of fresh herbs. Whether served as an appetizer at a festive gathering or as a simple snack, these marinated olives are a perfect way to introduce the flavors of Italy to your table.
The secret to this dish lies in the marination process, which allows the olives to absorb the rich, aromatic flavors of the garlic and herbs. By letting the olives rest in this flavorful bath for several hours or overnight, you’ll achieve a depth of flavor that’s both complex and satisfying. This recipe serves 4-6 people and is a hassle-free addition to any meal, whether you’re hosting an intimate dinner or a grand feast.
Ingredients:
- 2 cups mixed olives (green and black, pitted or unpitted)
- 4 cloves garlic, thinly sliced
- 1 teaspoon crushed red pepper flakes
- 1 teaspoon dried oregano
- 1 teaspoon dried thyme
- 1 teaspoon dried rosemary
- 1 lemon, zested and juiced
- 1/4 cup extra-virgin olive oil
- Freshly cracked black pepper, to taste
- Salt, to taste
Cooking Instructions:
- Prepare the Olives: Begin by draining and rinsing the mixed olives under cold water if they’re stored in brine. Pat them dry with a kitchen towel to remove excess moisture.
- Combine the Ingredients: In a large mixing bowl, combine the dried oregano, thyme, rosemary, and crushed red pepper flakes. Add the thinly sliced garlic and lemon zest to the herb mixture.
- Marinate the Olives: Add the prepared olives to the bowl of herbs and garlic. Drizzle the extra-virgin olive oil over the olives and add the lemon juice. Toss everything together gently until the olives are evenly coated with the marinade.
- Add Seasonings: Season the olives with freshly cracked black pepper and a pinch of salt. Be cautious with the salt, as olives can already be quite salty. Mix well to guarantee an even distribution of flavors.
- Let the Flavors Meld: Transfer the marinated olives to a glass or ceramic container with a lid. Allow the olives to marinate at room temperature for at least 2 hours, or up to 24 hours in the refrigerator, to let the flavors meld together. If refrigerated, bring to room temperature before serving.
- Serve: Once marinated, serve the olives in a small bowl as part of an antipasto platter or as a standalone appetizer. Garnish with additional lemon zest or fresh herbs if desired.
Extra Tips:
When selecting olives, opt for a mix of varieties to create a more interesting flavor profile. Kalamata, Castelvetrano, and Manzanilla are excellent choices.
If you prefer a stronger garlic flavor, gently crush the garlic cloves before slicing to release more of their natural oils. For a more intense flavor, consider adding a splash of red wine vinegar or a few anchovy fillets to the marinade.
Remember to adjust the seasoning to taste, as the saltiness of olives can vary. Enjoy these marinated olives with crusty bread or alongside a selection of Italian cold cuts and cheeses for a complete antipasto experience.
Balsamic Glazed Antipasto Board
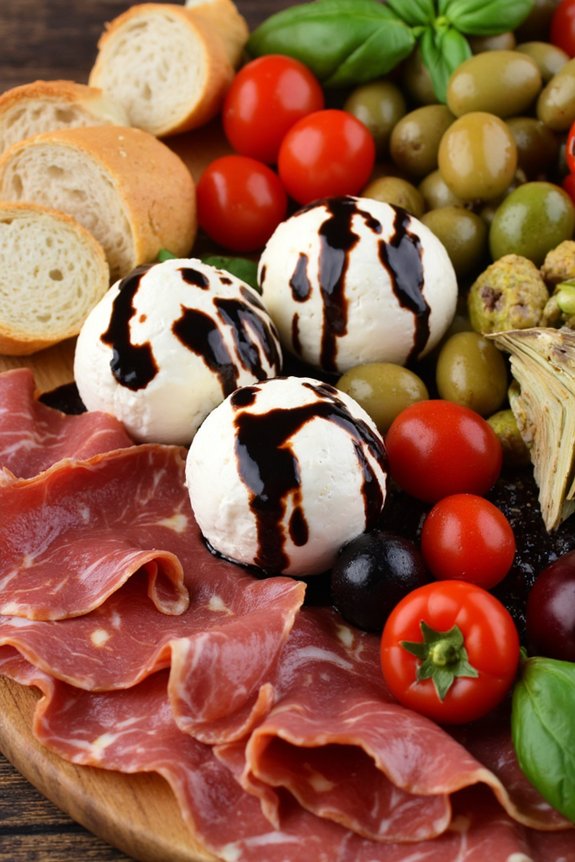
The Balsamic Glazed Antipasto Board is a delightful combination of flavors and textures that encapsulates the essence of Italian cuisine. This dish is perfect for entertaining, offering a visually stunning and appetizing spread that promotes sharing and conversation. The use of a balsamic glaze adds a sweet and tangy dimension, perfectly complementing the rich and savory components of the antipasto board.
Ideal for gatherings, this dish brings together an array of meats, cheeses, and vegetables that are enhanced with the subtle acidity and sweetness of the balsamic glaze.
Crafting a Balsamic Glazed Antipasto Board for 4-6 people requires an assortment of high-quality ingredients. Selecting the freshest vegetables, premium deli meats, and artisanal cheeses will guarantee a memorable culinary experience. The balsamic glaze ties everything together, adding a sophisticated touch that elevates the traditional antipasto board to a new level of gourmet delight.
By arranging the ingredients in an aesthetically pleasing manner, you’ll create not just a dish, but a centerpiece for your gathering.
Ingredients for 4-6 people:
- 8 ounces of prosciutto
- 8 ounces of salami
- 8 ounces of mozzarella balls
- 8 ounces of marinated artichoke hearts
- 1 cup of cherry tomatoes, halved
- 1 cup of mixed olives
- 1 cup of roasted red peppers
- 1/2 cup of balsamic glaze
- 1 baguette, sliced
- Fresh basil leaves for garnish
Cooking Instructions:
- Prepare the Ingredients: Begin by gathering all the ingredients. Slice the baguette into thin rounds and set aside. Halve the cherry tomatoes and drain the marinated artichoke hearts and roasted red peppers.
- Arrange the Board: On a large serving platter or board, begin arranging the ingredients. Place the meats (prosciutto and salami) in separate sections, allowing them to slightly overlap for visual appeal.
- Add the Cheeses and Vegetables: Position the mozzarella balls next to the meats, followed by the marinated artichoke hearts, cherry tomatoes, mixed olives, and roasted red peppers. Confirm the ingredients are distributed evenly across the board.
- Drizzle with Balsamic Glaze: Using a spoon or a squeeze bottle, drizzle the balsamic glaze over the mozzarella, cherry tomatoes, and roasted red peppers. Be generous, as the glaze is the star of the dish.
- Finish with Bread and Garnish: Arrange the sliced baguette around the edges of the board. Garnish with fresh basil leaves for added color and aroma.
- Serve and Enjoy: Allow your guests to help themselves, encouraging them to mix and match the various flavors. The combination of tangy, sweet, and savory will delight their taste buds.
Extra Tips:
When assembling your Balsamic Glazed Antipasto Board, consider the balance of flavors and textures. Use a variety of olives to add depth, and feel free to include additional cheeses such as aged Parmesan or creamy Brie for variety.
If you’re preparing the board ahead of time, keep the bread separate until just before serving to guarantee it remains crisp. Additionally, you can make your own balsamic glaze by simmering balsamic vinegar with a touch of honey until it reduces to a syrupy consistency. This homemade touch can further enhance the authenticity and flavor of your antipasto board.
Sun-Dried Tomato and Basil Pesto Dip
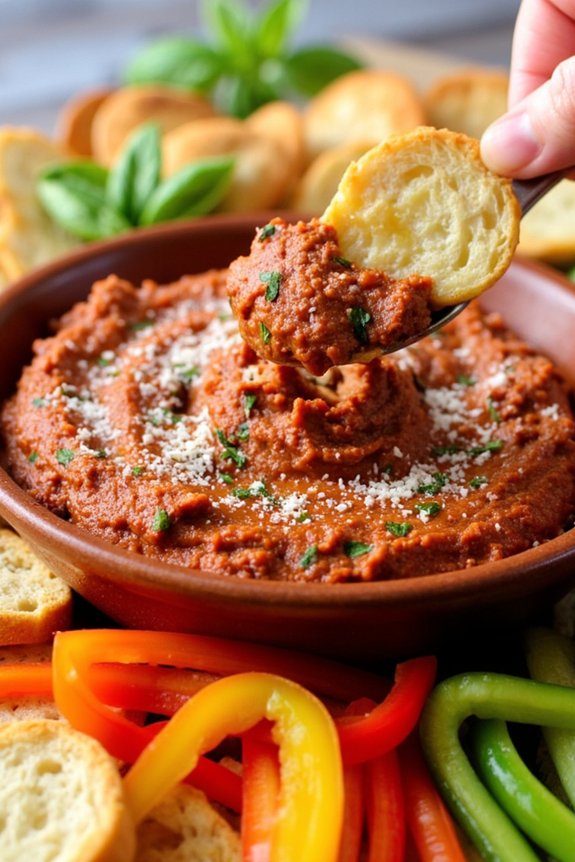
Sun-Dried Tomato and Basil Pesto Dip is a vibrant and flavorful Italian antipasto that can be the perfect addition to any gathering or a simple snack. This creamy dip combines the rich, tangy flavor of sun-dried tomatoes with the fresh and aromatic essence of basil pesto. The combination of these ingredients creates a colorful and appetizing dish that’s sure to impress your guests.
Whether served with crispy breadsticks, crunchy vegetables, or as a spread on toasted crostini, this dip is versatile and can be easily incorporated into any meal or enjoyed on its own.
The beauty of this recipe lies in its simplicity and the freshness of its ingredients. With just a few steps and minimal preparation time, you can have a delightful dip ready to serve. This Sun-Dried Tomato and Basil Pesto Dip isn’t only delicious but also packed with nutrients, making it a guilt-free indulgence.
Perfect for a serving size of 4-6 people, this recipe is ideal for small gatherings or family dinners. Let’s explore the ingredients and steps needed to create this delicious dip.
Ingredients for 4-6 servings:
- 1 cup sun-dried tomatoes in oil, drained
- 1/2 cup fresh basil leaves
- 1/4 cup pine nuts
- 1/2 cup grated Parmesan cheese
- 2 cloves garlic
- 1/2 cup extra-virgin olive oil
- 1/4 teaspoon salt
- 1/4 teaspoon black pepper
- 1/2 cup ricotta cheese
- Juice of 1 lemon
Cooking Instructions:
- Prepare the Ingredients: Begin by draining the sun-dried tomatoes if they’re packed in oil. Pat them dry with a paper towel to remove any excess oil. Rinse the fresh basil leaves under cold water and pat them dry as well.
- Blend the Pesto Base: In a food processor, combine the sun-dried tomatoes, basil leaves, pine nuts, Parmesan cheese, and garlic cloves. Pulse the mixture until it becomes a coarse paste. This will form the base of your dip, incorporating all the bold flavors.
- Add the Olive Oil: With the food processor running on low speed, slowly drizzle in the extra-virgin olive oil. Continue to blend until the mixture is smooth and emulsified. The olive oil will give the dip a rich and creamy texture.
- Season the Dip: Add the salt, black pepper, and lemon juice to the mixture in the food processor. Pulse a few more times to guarantee the seasonings are well distributed. Taste the dip and adjust the seasoning if necessary.
- Incorporate the Ricotta Cheese: Transfer the pesto mixture to a mixing bowl and gently fold in the ricotta cheese until fully combined. This step adds a creamy and mild flavor to the dip, balancing the intense taste of the sun-dried tomatoes and basil.
- Serve and Enjoy: Transfer the Sun-Dried Tomato and Basil Pesto Dip to a serving bowl. Garnish with a few fresh basil leaves or a sprinkle of Parmesan cheese for an extra touch. Serve with your choice of breadsticks, crostini, or fresh vegetables.
Extra Tips:
For the best results, use high-quality sun-dried tomatoes and fresh basil as they greatly influence the flavor of the dip. If you prefer a spicier version, consider adding a pinch of red pepper flakes during the blending process.
The dip can be made a day in advance and stored in the refrigerator, allowing the flavors to meld together beautifully. Before serving, bring the dip to room temperature for the best texture and taste.
Smoked Salmon and Cream Cheese Bites

Smoked Salmon and Cream Cheese Bites are a delightful appetizer that perfectly embodies the essence of Italian antipasto. This dish combines the rich flavors of smoked salmon with the creamy texture of cream cheese, all perched atop a crisp cracker or slice of cucumber. It’s a sophisticated yet simple option that’s certain to impress your guests.
Whether you’re hosting a casual get-together or a formal dinner party, these bites are a versatile and elegant choice that can be prepared quickly without sacrificing on taste.
The harmonious blend of flavors in Smoked Salmon and Cream Cheese Bites provides a burst of freshness with every bite. The salty, smoky notes of the salmon are complemented by the smooth, tangy cream cheese, while the dill and capers add an aromatic and slightly briny finish.
The base of the cracker or cucumber slice provides a satisfying crunch, making this dish not only flavorful but also texturally appealing. Perfect for serving 4-6 people, this recipe is both easy to prepare and a guaranteed crowd-pleaser.
Ingredients (Serves 4-6)
- 8 ounces of smoked salmon
- 8 ounces of cream cheese, softened
- 1 tablespoon of fresh dill, finely chopped
- 1 tablespoon of capers, rinsed and drained
- 1 lemon, cut into wedges
- 16-20 crackers or cucumber slices
- Freshly ground black pepper, to taste
Cooking Instructions
- Prepare the Cream Cheese Mixture: In a medium-sized bowl, combine the softened cream cheese and finely chopped dill. Mix thoroughly until the dill is evenly distributed throughout the cream cheese.
- Assemble the Bites: Lay out the crackers or cucumber slices on a serving platter. Using a butter knife or a small spoon, spread a generous dollop of the dill-infused cream cheese onto each base.
- Add the Smoked Salmon: Tear the smoked salmon into small pieces that will fit comfortably on top of the cream cheese layer. Place a piece of smoked salmon onto each prepared cracker or cucumber slice.
- Garnish and Serve: Top each bite with a caper and a light sprinkle of freshly ground black pepper. Arrange the lemon wedges around the platter for guests to squeeze over the bites, if desired, to add a hint of acidity.
Extra Tips
For the best results, allow the cream cheese to reach room temperature before mixing it with the dill, as this will make it easier to combine and spread.
If you prefer a bit more zest, consider adding a dash of lemon juice directly to the cream cheese mixture. Additionally, feel free to experiment with different bases, such as crostini or slices of baguette, to match your taste and presentation preference.
Finally, always select high-quality smoked salmon to guarantee a fresh and flavorful outcome.