

There’s something truly magical about the aroma of freshly baked Italian bread filling the kitchen. My first attempt at baking ciabatta was full of anticipation and excitement. Each recipe, from savory olive and rosemary bread to sweet pane di noci, carries its own special story. Are you ready to discover which ones will become your favorites? Let’s explore these delightful breads together.
Classic Ciabatta

Ciabatta, a classic Italian bread known for its crisp crust and airy, chewy interior, is a staple in Italian cuisine. It’s perfect for sandwiches or enjoying with some olive oil and balsamic vinegar. The name “ciabatta” means slipper in Italian, referring to its somewhat flat and elongated shape.
To make the perfect ciabatta, the key is in the dough’s hydration, which gives it its characteristic open crumb structure. This recipe will guide you through the process of creating an authentic ciabatta loaf at home.
The process begins by making a pre-ferment or “biga,” which is a starter that ferments overnight to develop the bread’s flavor and texture. This pre-ferment is then mixed with additional flour, water, salt, and yeast to create a wet, sticky dough. The dough is then allowed to rise and develop its gluten structure through a series of stretch and folds, rather than traditional kneading.
The final result is a beautifully rustic loaf with a chewy crust and a light, airy crumb inside. This recipe serves 4-6 people, perfect for a family meal or gathering.
Ingredients (Serves 4-6):
- 1 3/4 cups all-purpose flour
- 1 1/2 cups bread flour
- 1 1/2 cups water, room temperature
- 1/2 teaspoon active dry yeast
- 1 1/2 teaspoons salt
- 1 tablespoon olive oil
Instructions:
- Prepare the Biga:
- In a large bowl, combine 1 cup of all-purpose flour, 1/2 cup of water, and 1/4 teaspoon of active dry yeast. Mix until smooth.
- Cover the bowl with plastic wrap and let it sit at room temperature for 12-16 hours, or overnight, until bubbly and doubled in size.
- Make the Dough:
- In another large bowl, mix the remaining flour, water, and yeast with the biga. Stir until it forms a sticky dough.
- Add the salt and olive oil to the dough and mix thoroughly.
- First Rise:
- Cover the bowl with plastic wrap and let it rise at room temperature for about 1 hour.
- Every 30 minutes, perform a series of stretch and folds: gently lift and fold the dough over itself in the bowl from each side.
- Shape the Loaves:
- Once the dough has risen and is airy, turn it out onto a well-floured surface.
- Divide the dough into two equal pieces. Gently shape each piece into a rectangle, being careful not to deflate the dough.
- Transfer the shaped loaves onto a parchment-lined baking sheet, seam side down.
- Final Proof:
- Cover the loaves with a damp kitchen towel and let them rise for another 45 minutes to 1 hour.
- Bake:
- Preheat your oven to 450°F (230°C). Place a baking stone or an upside-down baking sheet in the oven to preheat.
- Slide the parchment with the loaves onto the hot stone or baking sheet. Bake for 20-25 minutes, or until the crust is golden brown and the loaves sound hollow when tapped on the bottom.
- Let the bread cool on a wire rack before slicing.
Extra Tips:
When making ciabatta, it’s important to maintain a high level of hydration in your dough for the characteristic open crumb.
Don’t be tempted to add extra flour even if the dough seems sticky; trust the process and use a dough scraper if necessary. The stretch and fold technique helps develop gluten without overworking the dough.
Additionally, for the best crust, bake the bread on a preheated stone or upside-down baking sheet and consider adding steam to your oven by placing a pan of hot water on the bottom rack.
Enjoy your homemade ciabatta fresh, or freeze it for later use.
Traditional Focaccia Genovese
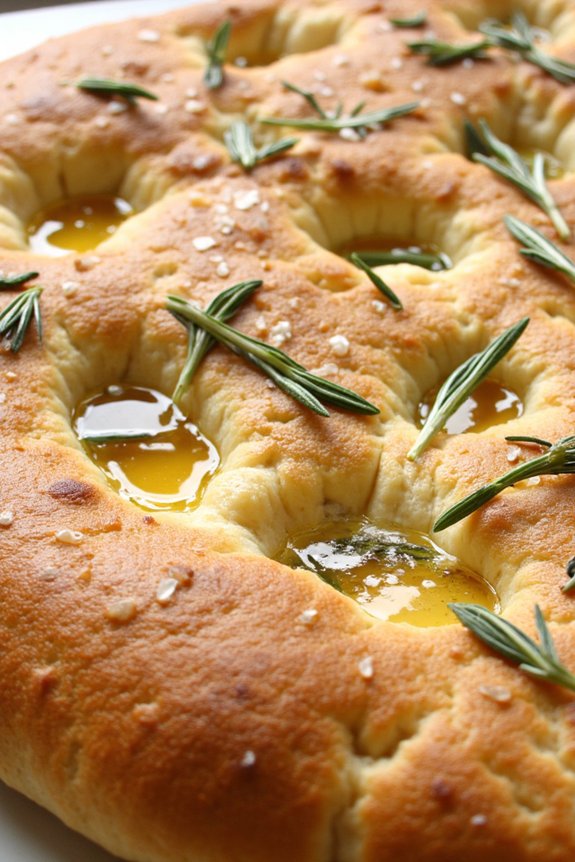
Traditional Focaccia Genovese is a classic Italian bread that originated from the Liguria region. Known for its distinctively soft and airy texture, the bread is topped with a generous drizzle of olive oil, a sprinkling of coarse sea salt, and sometimes a scattering of fresh rosemary. This bread makes for a perfect accompaniment to soups, salads, or can be enjoyed on its own as a simple yet satisfying snack.
The hallmark of Focaccia Genovese is its deep dimples, which are made by pressing fingertips into the dough, allowing the olive oil to pool and infuse the bread with rich flavor.
This traditional recipe serves 4-6 people and requires a bit of patience as it involves several stages of rising to develop its characteristic texture and flavor. The ingredients are simple, but the key to achieving an authentic Focaccia Genovese lies in the quality of the olive oil and the right technique when handling the dough. The process may take a few hours, mostly waiting for the dough to rise, but the end result is definitely worth the effort.
Ingredients:
- 500g all-purpose flour
- 350ml lukewarm water
- 15g fresh yeast or 7g active dry yeast
- 2 tsp sugar
- 2 tsp fine sea salt
- 100ml extra virgin olive oil, plus extra for drizzling
- Coarse sea salt for topping
- Fresh rosemary (optional)
Instructions:
- Prepare the Dough: In a large mixing bowl, dissolve the yeast and sugar in lukewarm water. Let it sit for about 5 minutes until it becomes frothy, indicating that the yeast is active.
- Mix Ingredients: Add the flour and fine sea salt to the yeast mixture. Mix until a shaggy dough forms, then add about 60ml of the olive oil. Continue mixing until the dough begins to come together.
- Knead the Dough: Transfer the dough onto a floured surface and knead for about 10 minutes until it becomes smooth and elastic. If using a stand mixer, knead with a dough hook on medium speed for about 7 minutes.
- First Rise: Place the dough in a lightly oiled bowl, cover with a damp cloth or plastic wrap, and let it rise in a warm place for about 1-1.5 hours, or until doubled in size.
- Prepare the Baking Pan: Generously oil a rectangular baking pan (about 30×40 cm). Once the dough has risen, gently transfer it to the pan and stretch it to fit. Be careful not to deflate it too much.
- Second Rise: Cover the dough in the pan and let it rise again for about 30-40 minutes, or until it puffs up slightly.
- Create Dimples: Preheat the oven to 220°C (428°F). Using your fingertips, press down on the dough to create deep dimples all over the surface.
- Add Toppings: Drizzle the remaining olive oil over the dough, ensuring it pools in the dimples. Sprinkle coarse sea salt and fresh rosemary, if using.
- Bake the Focaccia: Place the pan in the preheated oven and bake for 20-25 minutes, or until the focaccia is golden brown and crispy on top.
- Cool and Serve: Remove from the oven and let it cool slightly in the pan before transferring to a wire rack. Slice and serve warm or at room temperature.
Extra Tips:
For the best Focaccia Genovese, use high-quality extra virgin olive oil, as it greatly influences the flavor of the bread. If fresh yeast isn’t available, dry yeast can be used, but remember to adjust the quantity as specified.
Be gentle when handling the dough after the first rise to retain the air pockets that contribute to the bread’s airy texture. If you prefer a more rustic look, dust the surface lightly with flour before baking.
Ultimately, if you want a more herbaceous flavor, feel free to add other herbs such as thyme or oregano along with rosemary.
Rustic Pane Toscano

Rustic Pane Toscano is a traditional Tuscan bread known for its unique flavor and texture, which is achieved by using a salt-free dough. This bread has a slightly dense and chewy crumb with a crispy, golden crust, making it an excellent companion to a variety of dishes or simply enjoyed on its own. The absence of salt in the dough allows the natural flavors of the wheat to shine through, making it a perfect complement to the flavorful Tuscan cuisine.
This recipe for Rustic Pane Toscano is designed to serve 4-6 people, providing enough slices to accompany a family meal or to be savored over a couple of days. The process involves creating a simple starter, known as a biga, which is left to ferment overnight. This step is vital, as it develops the complex flavors and improves the texture of the bread. With a bit of patience, you’ll be rewarded with an authentic Italian bread that transports you to the heart of Tuscany.
Ingredients (Serves 4-6):
- 500g all-purpose flour
- 350ml water
- 1 tsp active dry yeast
- Extra flour for dusting
Instructions:
- Prepare the Biga: Begin by making the biga the night before you plan to bake. In a large mixing bowl, combine 200g of the all-purpose flour with 150ml of water and 1/2 teaspoon of the yeast. Mix until a sticky dough forms. Cover the bowl with a damp cloth or plastic wrap and let it sit at room temperature overnight, or for at least 12 hours.
- Make the Dough: The next day, in a large bowl, combine the remaining 300g of flour and 200ml of water. Add the rest of the dry yeast and the biga from the previous day. Mix everything together until a shaggy dough forms.
- Knead the Dough: Transfer the dough onto a lightly floured surface and knead it for about 10 minutes, or until it becomes smooth and elastic. This step develops the gluten structure, which is essential for achieving the bread’s chewy texture.
- First Rise: Place the kneaded dough back into a lightly oiled bowl and cover it with a damp cloth. Allow it to rise at room temperature for about 2 hours, or until it has doubled in size.
- Shape the Loaf: Once the dough has risen, turn it out onto a floured surface. Gently deflate the dough and shape it into a round loaf. Place it on a baking sheet lined with parchment paper.
- Second Rise: Cover the shaped loaf with a damp cloth and let it rise again for about 1 hour, or until it has visibly expanded.
- Preheat the Oven: Preheat your oven to 220°C (430°F) during the last 20 minutes of the second rise.
- Bake the Bread: Before baking, sprinkle some flour on top of the loaf and, using a sharp knife, score a cross or a few slashes on the top to allow the bread to expand while baking. Place the loaf in the preheated oven and bake for about 30-35 minutes, or until the crust is golden brown and the bread sounds hollow when tapped on the bottom.
- Cool and Serve: Remove the bread from the oven and let it cool on a wire rack for at least 30 minutes before slicing. This cooling step is vital as it allows the interior to set properly.
Extra Tips: To achieve the perfect crust, place a small pan of water at the bottom of the oven when preheating. The steam will help create a crispy crust. Additionally, make sure your biga ferments in a warm, draft-free area to encourage active yeast development. If you prefer a more pronounced yeasty flavor, consider extending the fermentation time of the biga to up to 24 hours.
Savory Olive and Rosemary Bread
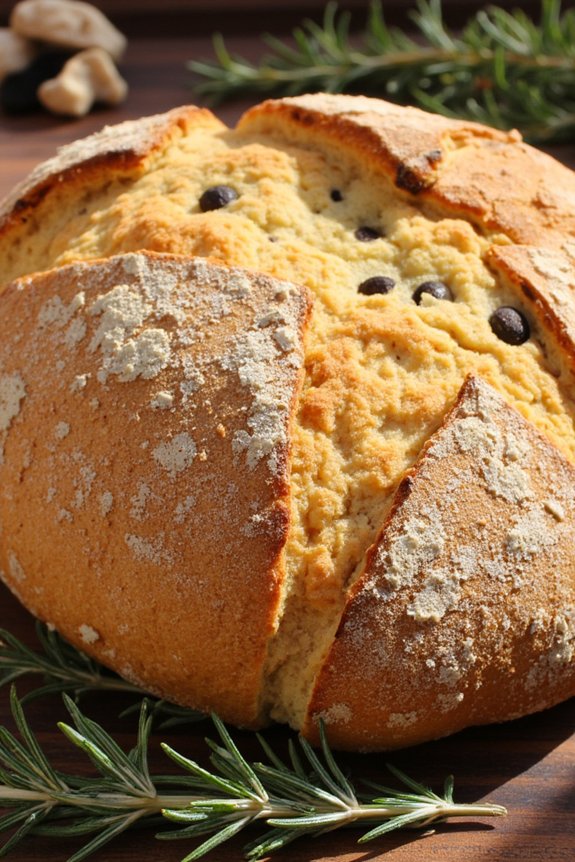
Savory Olive and Rosemary Bread is a delightful Italian bread that combines the robust flavors of olives and the aromatic hints of rosemary to create a loaf that’s perfect for any occasion. Known for its rich taste and slightly chewy texture, this bread is a fantastic accompaniment to soups, salads, or simply on its own with a touch of olive oil.
The combination of olives and rosemary not only adds depth and character to the bread but also brings a touch of Mediterranean flair to your table. Whether you’re an experienced baker or a novice in the kitchen, this recipe will guide you through creating a delicious and satisfying loaf that will impress your family and friends.
The preparation of Savory Olive and Rosemary Bread involves a few simple steps that guarantee a flavorful and aromatic end product. The use of fresh ingredients, such as chopped olives and rosemary, is key to achieving the authentic taste that sets this bread apart.
The dough is allowed to rise sufficiently, guaranteeing a light and airy texture, while the baking process locks in the flavors and gives the bread its beautiful crust. This bread recipe serves 4-6 people, making it ideal for a family meal or a small gathering.
Ingredients:
- 3 1/2 cups all-purpose flour
- 1 cup warm water (about 110°F)
- 1 packet (2 1/4 teaspoons) active dry yeast
- 1/4 cup olive oil
- 1 teaspoon salt
- 1/2 cup pitted and chopped black olives
- 1 tablespoon chopped fresh rosemary
- 1 teaspoon sugar
Cooking Instructions:
- Prepare the Yeast Mixture: In a small bowl, combine the warm water, sugar, and active dry yeast. Stir gently and let it sit for about 5-10 minutes until it becomes frothy. This step activates the yeast and is essential for the dough to rise properly.
- Mix the Dry Ingredients: In a large mixing bowl, whisk together the all-purpose flour and salt. This evenly distributes the salt and avoids any clumps in the flour.
- Combine Wet Ingredients: Make a well in the center of the flour mixture and pour in the yeast mixture along with the olive oil. Mix until the dough begins to come together, then add the chopped olives and rosemary.
- Knead the Dough: Transfer the dough onto a lightly floured surface. Knead it for about 8-10 minutes until it becomes smooth and elastic. Proper kneading develops the gluten, which gives the bread its structure.
- First Rise: Place the dough in a lightly oiled bowl, turning it once to coat with oil. Cover with a clean kitchen towel and let it rise in a warm place for about 1-1.5 hours, or until it has doubled in size.
- Shape the Dough: Once risen, punch down the dough to release the air. Shape it into a loaf by folding it and tucking the ends underneath. Place the loaf on a baking sheet lined with parchment paper.
- Second Rise: Cover the shaped loaf with the kitchen towel again and let it rise for another 30-45 minutes until it has expanded noticeably.
- Preheat the Oven: While the loaf is undergoing its second rise, preheat your oven to 400°F (200°C). This guarantees the oven is hot enough to create a good crust.
- Bake the Bread: Once risen, place the loaf in the preheated oven and bake for 25-30 minutes or until the bread is golden brown and sounds hollow when tapped on the bottom.
- Cool the Bread: Remove the baked loaf from the oven and let it cool on a wire rack. Cooling allows the interior to set and makes slicing easier.
Extra Tips:
For the best results, use fresh ingredients where possible. Fresh rosemary has a more potent aroma than dried, greatly enhancing the bread’s flavor.
If you prefer a softer crust, you can place a small dish of water in the oven while baking to create steam. This method helps keep the crust from becoming too hard. Additionally, verify your yeast is fresh and active, as old or inactive yeast can prevent the dough from rising properly.
Enjoy your Savory Olive and Rosemary Bread as soon as it cools for the best taste and texture!
Soft and Chewy Pane Siciliano
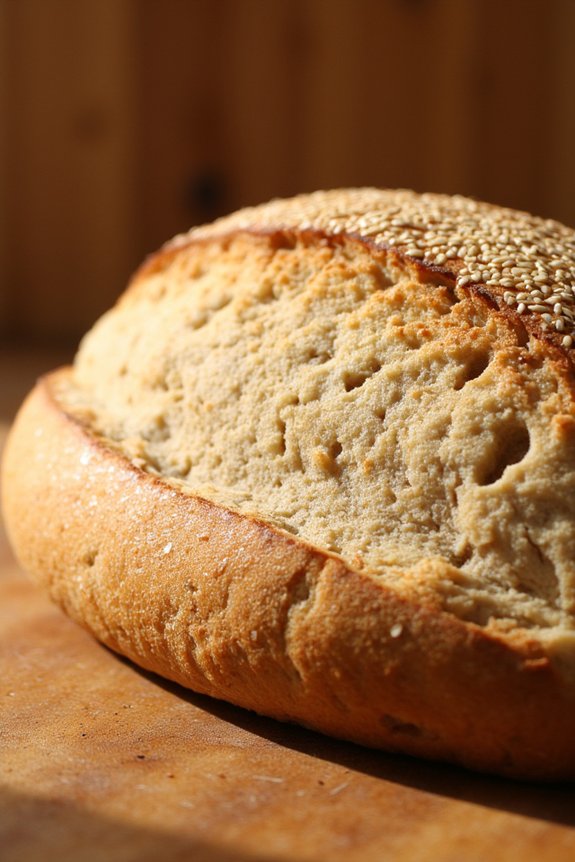
Soft and Chewy Pane Siciliano is a delightful Italian bread known for its distinct flavor and texture. With a slightly crispy crust and a soft, chewy interior, this bread is perfect for any meal or occasion. The Pane Siciliano uses semolina flour, which gives it its characteristic golden color and nutty taste. This traditional Sicilian bread often features sesame seeds on top, adding a pleasant crunch and additional flavor.
Making Pane Siciliano at home is a rewarding experience that fills your kitchen with the aroma of freshly baked bread. Although it requires some time for rising and proofing, the steps are simple and the results are well worth the effort. This recipe yields a loaf that serves 4-6 people, making it ideal for a family meal or a small gathering.
Ingredients:
- 4 cups all-purpose flour
- 1 cup semolina flour
- 1 1/2 teaspoons salt
- 2 teaspoons sugar
- 2 teaspoons active dry yeast
- 2 cups warm water (about 110°F)
- 2 tablespoons olive oil
- 1/4 cup sesame seeds
Instructions:
- Prepare the Yeast: In a small bowl, combine the warm water, sugar, and yeast. Stir gently and let it sit for about 5-10 minutes until it becomes frothy. This indicates that the yeast is active.
- Mix the Dry Ingredients: In a large mixing bowl, combine the all-purpose flour, semolina flour, and salt. Mix well to guarantee the salt is evenly distributed.
- Combine Ingredients: Make a well in the center of the dry ingredients and add the yeast mixture and olive oil. Mix until a shaggy dough forms.
- Knead the Dough: Transfer the dough onto a floured surface. Knead the dough for about 10 minutes until it becomes smooth and elastic. If the dough is sticky, sprinkle a little more flour as needed.
- First Rise: Place the dough in a lightly oiled bowl, turning it to coat all sides with oil. Cover with a damp cloth or plastic wrap. Let it rise in a warm, draft-free area for about 1.5 to 2 hours, or until it doubles in size.
- Shape the Loaf: Punch down the dough to release any air. Transfer it back to the floured surface and shape it into a loaf or oval shape. Transfer it to a baking sheet lined with parchment paper.
- Second Rise: Cover the shaped loaf with a damp cloth and let it rise again for about 1 hour until it has doubled in size.
- Preheat and Prepare: Preheat your oven to 425°F (220°C). Just before baking, lightly brush the top of the loaf with water and sprinkle generously with sesame seeds.
- Bake the Bread: Place the loaf in the preheated oven and bake for about 25-30 minutes, or until the crust is golden brown and the bread sounds hollow when tapped on the bottom.
- Cool the Bread: Remove the loaf from the oven and let it cool on a wire rack for at least 30 minutes before slicing. This helps the crumb set properly.
Extra Tips: To guarantee the best rise, make sure your water is warm but not hot, as too much heat can kill the yeast. If you find that your dough isn’t rising adequately, consider placing it in an oven with the light on or near a warm stove to create a slightly warmer environment.
Additionally, using a pizza stone or baking steel can help achieve a crispier crust by providing consistent heat. Enjoy your Pane Siciliano as a side with soups, stews, or simply with a drizzle of olive oil and balsamic vinegar.
Fluffy Pane Di Altamura

Fluffy Pane Di Altamura is a classic Italian bread that hails from the Altamura region in Puglia. Known for its crusty exterior and soft, airy interior, this bread is made using durum wheat semolina, which gives it a distinctive golden color and unique flavor.
Traditionally baked in wood-fired ovens, Pane Di Altamura has a rich history and is even recognized by the European Union with a DOP (Protected Designation of Origin) status. Making this bread at home requires patience and respect for the art of bread-making, as it involves a slow fermentation process that develops its deep, complex flavors.
The key to achieving a Fluffy Pane Di Altamura lies in the use of high-quality ingredients and attention to detail during each step of the process. The dough is naturally leavened with a starter, which acts as a natural yeast, contributing to the bread’s unique texture and taste.
While the traditional method can take up to 24 hours, this recipe provides a slightly faster approach without sacrificing quality. Whether enjoyed fresh out of the oven or toasted the next day, Pane Di Altamura is sure to be a delightful addition to any meal.
Ingredients (for 4-6 people):
- 1 cup (250g) of durum wheat semolina flour
- 2 ½ cups (310g) of all-purpose flour
- 1 ½ teaspoons of salt
- 1 ½ cups (360ml) of lukewarm water
- ½ cup (120g) of sourdough starter (active and bubbly)
- 1 tablespoon of olive oil
Cooking Instructions:
- Prepare the Starter: If you don’t have a ready sourdough starter, begin by feeding your starter the night before you plan to bake. Combine equal parts all-purpose flour and water with a spoonful of existing starter, mix well, and leave it covered at room temperature overnight.
- Mix the Dough: In a large bowl, mix the durum wheat semolina flour, all-purpose flour, and salt. Create a well in the center and add the sourdough starter and lukewarm water. Stir until a shaggy dough forms. Allow the mixture to rest for 20 minutes to hydrate the flour.
- Knead the Dough: Transfer the dough onto a floured surface. Knead by hand for about 10-15 minutes until the dough becomes smooth and elastic. Add a tablespoon of olive oil and continue kneading for another 2 minutes to incorporate the oil.
- First Rise: Place the dough in a lightly oiled bowl, cover it with a damp cloth, and let it rise in a warm place for about 3-4 hours, or until it has doubled in size.
- Shape the Dough: Once risen, gently deflate the dough and shape it into a round loaf. Place it on a parchment-lined baking sheet and cover it again with a damp cloth. Let it rise for another 1-2 hours.
- Preheat the Oven: Preheat your oven to 450°F (230°C) about 30 minutes before baking. Place a baking stone or an upside-down baking sheet in the oven to heat.
- Bake the Bread: Score the top of the loaf with a sharp knife. Carefully transfer the parchment with the loaf onto the hot baking stone or sheet. Bake for 30-35 minutes until the bread is golden brown and sounds hollow when tapped on the bottom.
- Cool the Bread: Remove the bread from the oven and let it cool on a wire rack for at least 1 hour before slicing.
Extra Tips:
When making Pane Di Altamura, the quality of the flour is essential as it affects the texture and flavor of the bread. Confirm your sourdough starter is active and bubbly for the best results.
Adjust the hydration level by adding a little more water if the dough feels too stiff, as semolina can absorb more water than regular flour. Be patient during the rising phases; good things take time, and the flavors develop considerably during fermentation.
Enjoy your Pane Di Altamura simply with olive oil or as a base for hearty sandwiches.
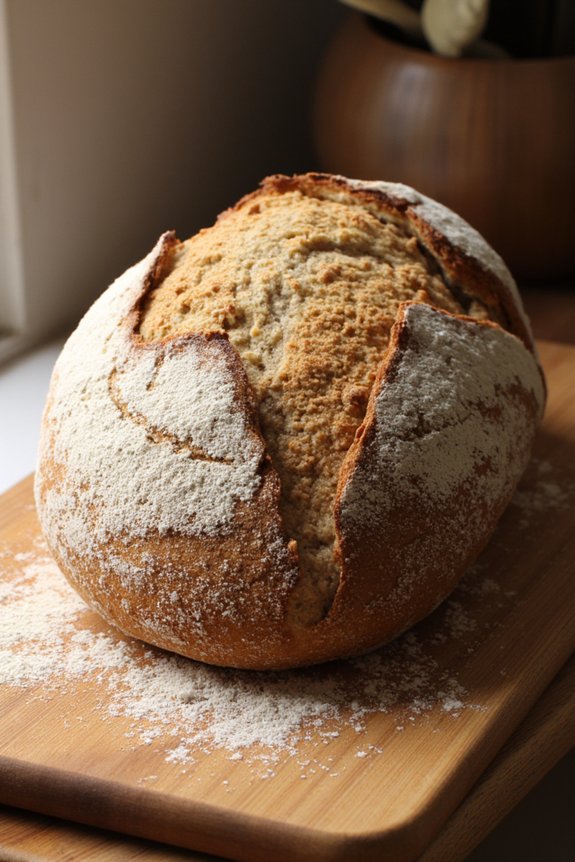
Hearty Pane Casareccio

Pane Casareccio is a traditional Italian country bread known for its rustic charm and hearty flavor. This artisanal loaf is famous for its crisp crust and tender crumb, making it the perfect companion to a wide array of dishes or simply enjoyed with a drizzle of olive oil. The beauty of Pane Casareccio lies in its simplicity, using just a few ingredients to create a satisfying and aromatic loaf that embodies the essence of Italian home baking.
Creating this bread requires patience and a bit of skill, but the reward is a delicious loaf that captures the warmth of the Italian countryside. This recipe is designed to serve 4-6 people, offering generous slices that are ideal for sharing. With the use of a pre-ferment, the bread develops an enhanced depth of flavor and a delightful texture that makes every bite memorable.
Ingredients for 4-6 Servings:
- 500g all-purpose flour
- 325ml lukewarm water
- 10g salt
- 7g active dry yeast
- 1 tablespoon olive oil
- 10g sugar
Cooking Instructions:
- Prepare the Pre-ferment (Biga): In a small bowl, combine 100g of the flour, 100ml of the water, and a pinch of the yeast. Mix until well combined, cover with plastic wrap, and let it rest at room temperature for about 12-16 hours. This step enhances the flavor and texture of the bread.
- Mix the Dough: In a large mixing bowl, combine the remaining flour, yeast, and sugar. Add the pre-ferment, the rest of the water, and olive oil. Mix until a shaggy dough forms. Add salt and continue mixing until the dough begins to come together.
- Knead the Dough: Transfer the dough to a lightly floured surface and knead for about 10 minutes, or until it becomes smooth and elastic. The dough should be slightly sticky but manageable.
- First Rise: Place the dough in a lightly oiled bowl, cover with a damp cloth, and let it rise in a warm, draft-free place for about 1-2 hours, or until it has doubled in size.
- Shape the Loaf: Punch down the dough to release any air bubbles. Shape it into a round loaf by folding the edges into the center, then flip it over and gently tuck the edges underneath to form a smooth surface.
- Second Rise: Place the shaped loaf on a baking sheet lined with parchment paper. Cover it with a damp cloth and let it rise again for about 1 hour, or until doubled in size.
- Preheat the Oven: About 30 minutes before baking, preheat your oven to 220°C (430°F). Place a shallow pan of water at the bottom of the oven to create steam, which helps develop a crisp crust.
- Score and Bake: Just before baking, lightly dust the top of the loaf with flour and use a sharp knife to make a few slashes on the surface. Bake for 30-35 minutes, or until the bread is golden brown and sounds hollow when tapped on the bottom.
Extra Tips:
For best results, use high-quality ingredients and verify your water is lukewarm to help activate the yeast. If your environment is cooler, the dough may take longer to rise; be patient and allow it to fully double in size for peak texture.
If you have a baking stone, use it for baking to improve the crust quality. Always allow the bread to cool completely on a wire rack before slicing to ensure the crumb sets properly. Enjoy your Pane Casareccio fresh, or store it in an airtight container at room temperature for up to three days.
Irresistible Grissini Breadsticks

Irresistible Grissini Breadsticks are a delightful addition to any meal, offering a crispy texture and savory flavor that makes them hard to resist. These Italian breadsticks, known for their long, thin shape, are perfect for snacking or serving as an appetizer alongside dips, soups, or salads.
With a few simple ingredients and a bit of patience, you can create homemade grissini that are far superior to any store-bought variety. Making grissini is a straightforward process that involves preparing a simple dough, allowing it to rise, and then shaping and baking the breadsticks to golden perfection.
The key to achieving authentic grissini lies in rolling the dough as thin as possible and baking it until it’s crisp. Whether you enjoy them plain or sprinkled with your favorite herbs and spices, these breadsticks are sure to become a staple in your recipe collection.
Ingredients for 4-6 people:
- 3 cups all-purpose flour
- 1 cup warm water (about 110°F/45°C)
- 2 teaspoons active dry yeast
- 1 teaspoon sugar
- 2 teaspoons salt
- 1/4 cup olive oil
- Additional olive oil for brushing
- Optional: sesame seeds, poppy seeds, or grated Parmesan cheese for topping
Cooking Instructions:
- Prepare the Yeast Mixture: In a small bowl, combine the warm water, sugar, and active dry yeast. Stir gently to dissolve the yeast and let it sit for about 5–10 minutes, or until the mixture is frothy and bubbly. This indicates that the yeast is active and ready to use.
- Make the Dough: In a large mixing bowl, combine the flour and salt. Create a well in the center and pour in the yeast mixture and olive oil. Mix the ingredients together using a wooden spoon or your hands until a dough begins to form.
- Knead the Dough: Transfer the dough onto a lightly floured surface and knead it for about 8–10 minutes, or until it becomes smooth and elastic. If the dough is too sticky, add a little more flour as needed.
- First Rise: Place the kneaded dough in a lightly oiled bowl, cover with a damp cloth or plastic wrap, and let it rise in a warm, draft-free area for about 1 hour, or until it doubles in size.
- Shape the Grissini: Preheat your oven to 400°F (200°C). Punch down the risen dough to release the air, then divide it into small portions. Roll each portion into a long, thin stick, about 1/4 inch in diameter. The thinner you roll them, the crispier they’ll be.
- Second Rise: Place the grissini on a baking sheet lined with parchment paper, leaving space between each stick. Cover them loosely with a cloth and let them rise for another 15–20 minutes.
- Bake the Grissini: Brush the grissini with olive oil and sprinkle with your choice of toppings, such as sesame seeds, poppy seeds, or Parmesan cheese. Bake in the preheated oven for 15–20 minutes, or until they’re golden brown and crisp.
- Cool and Serve: Remove the grissini from the oven and let them cool on a wire rack. Once cooled, serve them as a snack or appetizer.
Extra Tips:
To guarantee your grissini breadsticks come out perfectly crispy, be sure to roll them as evenly as possible to prevent uneven baking.
Experiment with different toppings to customize the flavor to your liking, and consider adding herbs like rosemary or thyme to the dough for an aromatic twist. For a more rustic look, you can twist the dough before baking to create a fun, spiral shape.
Finally, store any leftover grissini in an airtight container to keep them fresh and crunchy for several days.
Delicious Pane Pugliese

Delicious Pane Pugliese is a traditional Italian bread originating from the Puglia region. Known for its rustic appearance and chewy texture, this bread boasts a rich flavor with a slightly crisp crust. It’s the perfect accompaniment to any meal, or it can be enjoyed on its own, drizzled with olive oil or topped with fresh tomatoes and basil. The secret to its delightful taste lies in the long fermentation process, which develops the bread’s flavor and texture.
This bread is made using a starter, which is a mixture of flour, water, and yeast allowed to ferment overnight. This gives the Pane Pugliese its characteristic flavor and open crumb. Although it requires some time and patience, the steps are straightforward, and the end result is incredibly rewarding. With this recipe, you can bring a taste of Italy to your own kitchen and impress your family or guests with your baking skills.
Ingredients for 4-6 servings:
- 3 cups all-purpose flour
- 1 1/2 cups water (room temperature)
- 1 teaspoon active dry yeast
- 2 teaspoons salt
- Extra flour for dusting
Cooking Instructions:
- Prepare the Starter: In a medium bowl, combine 1 cup of flour, 1/2 cup of water, and yeast. Mix until well combined, cover with plastic wrap, and let it sit at room temperature for 12-16 hours. The starter should be bubbly and have a pleasant sour aroma when ready.
- Mix the Dough: In a large bowl, combine the remaining 2 cups of flour and 1 teaspoon of salt. Add the starter and 1 cup of water. Mix with a wooden spoon or your hands until a sticky dough forms. The dough should be wet and sticky but should start pulling away from the sides of the bowl.
- Knead the Dough: On a lightly floured surface, knead the dough for about 10 minutes until it becomes smooth and elastic. You may need to add a little more flour if the dough is too sticky, but be careful not to add too much.
- First Rise: Place the dough in a lightly oiled bowl, cover with a damp cloth, and let it rise at room temperature for about 1 ½ to 2 hours or until it doubles in size.
- Shape the Loaf: Gently punch down the dough to release any air bubbles. Turn it out onto a floured surface and shape it into a round or oval loaf. Place it on a floured baking sheet or parchment paper.
- Second Rise: Cover the loaf with a clean cloth and let it rest for about 45 minutes to 1 hour, until it has increased in size by about half.
- Preheat the Oven: Preheat your oven to 450°F (230°C) with a baking stone or an inverted baking tray on the middle rack. Place an empty baking dish on the bottom rack.
- Bake the Bread: Carefully transfer the loaf to the hot baking stone or tray. Pour a cup of hot water into the empty baking dish to create steam. Bake for 30-35 minutes or until the bread is golden brown and sounds hollow when tapped on the bottom.
- Cool the Bread: Remove the bread from the oven and let it cool on a wire rack for at least 30 minutes before slicing.
Extra Tips:
For the best results, use a kitchen scale to measure the flour and water for more accuracy. The dough should be quite wet and sticky, which is essential for the open crumb texture of Pane Pugliese. If you prefer a more pronounced sourdough flavor, allow the starter to ferment for the full 16 hours.
Additionally, using a baking stone or an inverted baking tray helps in achieving a better crust by providing an evenly distributed heat. Patience is key with this recipe, but the delicious aroma and taste of homemade Pane Pugliese are worth the wait!
Sourdough Pane Di Matera

Pane Di Matera is a traditional Italian bread hailing from the beautiful region of Basilicata, specifically the town of Matera. Known for its unique flavor and thick crust, this sourdough bread has been a staple in Italian cuisine for centuries. The bread is characterized by its dense crumb and long shelf life, making it perfect for a variety of uses from sandwiches to a simple accompaniment with olive oil and balsamic vinegar.
Creating Sourdough Pane Di Matera requires a bit of patience, as it involves a sourdough starter that needs to be prepared in advance. However, the time invested is well worth it as this bread boasts a rich flavor profile that’s both tangy and subtly sweet. We’ll guide you through the steps to make a loaf that serves 4-6 people, guaranteeing you get the authentic taste of Matera in your own kitchen.
Ingredients (Serving Size: 4-6 people):
- 500g all-purpose or bread flour
- 300g water
- 150g active sourdough starter
- 10g salt
- Extra flour for dusting
Cooking Instructions:
- Prepare the Sourdough Starter: If you don’t have an active sourdough starter, you’ll need to create one at least a week in advance. To make a starter, mix equal parts of flour and water and let it ferment at room temperature, feeding it with fresh flour and water daily.
- Mix the Dough: In a large mixing bowl, combine the flour and water. Stir until no dry flour remains. Let this mixture rest for 30 minutes to allow the flour to fully hydrate.
- Incorporate the Starter and Salt: Add the active sourdough starter and salt to the hydrated flour mixture. Mix thoroughly until all ingredients are combined. This can be done by hand or with a stand mixer using a dough hook.
- Knead the Dough: Knead the dough on a lightly floured surface for about 10-15 minutes until it becomes smooth and elastic. Alternatively, use a stand mixer with a dough hook for about 8 minutes on medium speed.
- First Rise (Bulk Fermentation): Place the dough in a lightly oiled bowl, cover it with a damp cloth or plastic wrap, and let it rise at room temperature for 4-6 hours, or until it has doubled in size.
- Shape the Dough: Once risen, turn the dough out onto a lightly floured surface. Shape it into a round or oval loaf by folding the edges into the center, then flip it seam-side down.
- Second Rise (Proofing): Place the shaped loaf onto a parchment-lined baking sheet or into a proofing basket. Cover it with a damp cloth and let it proof for 2-3 hours until it has expanded noticeably, but not doubled.
- Preheat the Oven: Preheat your oven to 230°C (450°F) about 30 minutes before baking. If using a baking stone, place it in the oven to heat up as well.
- Score the Bread: Just before baking, use a sharp knife or bread lame to score the top of the loaf with a slash that’s about 1/2 inch deep. This will allow steam to escape and give the bread a beautiful shape.
- Bake the Bread: Place the loaf in the oven (on the baking stone if using) and bake for 25-30 minutes, or until the crust is golden brown and the bread sounds hollow when tapped on the bottom.
- Cool the Bread: Remove the bread from the oven and let it cool on a wire rack for at least an hour before slicing. This cooling time allows the crumb to set properly.
Extra Tips:
For the best results, use a kitchen scale to weigh your ingredients. This guarantees precision, especially when working with sourdough, where hydration levels are vital.
If you’re new to sourdough, be patient with the process and allow the dough to ferment properly; this is where the flavor develops.
Adjust proofing times based on the temperature of your kitchen—a warmer environment will speed up fermentation, while a cooler one will slow it down.
Finally, resist the urge to cut into the bread immediately after baking, as it needs time to finish cooking internally after it’s removed from the oven.
Sweet and Nutty Pane Di Noci

Sweet and Nutty Pane Di Noci is a delightful Italian bread that combines the rich flavors of walnuts with a touch of sweetness, making it a perfect accompaniment to both savory meals and as a standalone snack.
This bread boasts a warm, nutty aroma and a tender crumb, with crunchy walnut pieces adding texture and flavor. Perfect for an afternoon tea or a breakfast spread, Pane Di Noci pairs beautifully with cheeses, spreads, or simply a pat of butter.
The process of making this bread is both rewarding and straightforward. The natural oils from the walnuts enrich the dough, while honey adds a subtle sweetness that complements the nuts. As it bakes, the loaf becomes golden brown with a crusty exterior, while the inside remains soft and inviting.
This recipe is designed to serve 4-6 people, offering enough delicious slices to share or enjoy over a couple of days.
Ingredients (serving size: 4-6 people):
- 3 1/2 cups all-purpose flour
- 1 1/2 cups walnuts, roughly chopped
- 2 teaspoons salt
- 2 teaspoons sugar
- 1 packet (2 1/4 teaspoons) active dry yeast
- 1 1/4 cups warm water (about 110°F)
- 3 tablespoons honey
- 3 tablespoons olive oil
Cooking Instructions:
- Prepare the Yeast: In a small bowl, dissolve the sugar in 1/4 cup of the warm water. Sprinkle the yeast over the top and let it sit for about 5-10 minutes, until foamy. This indicates that the yeast is active.
- Mix the Dough: In a large mixing bowl, combine the flour and salt. Create a well in the center and add the foamy yeast mixture, the remaining warm water, honey, and olive oil. Stir with a wooden spoon until a rough dough forms.
- Knead the Dough: Transfer the dough onto a floured surface and knead for about 8-10 minutes, incorporating the chopped walnuts gradually. The dough should become smooth and elastic.
- First Rise: Place the dough in a lightly oiled bowl, cover it with a damp cloth, and let it rise in a warm place for about 1-2 hours, or until doubled in size.
- Shape the Loaf: Punch down the risen dough to release air. Shape it into a loaf by flattening it slightly and folding the edges into the center. Turn it seam-side down on a parchment-lined baking sheet.
- Second Rise: Cover the shaped loaf with a towel and let it rise for another 30-45 minutes, until it puffs up.
- Preheat the Oven: While the loaf is rising, preheat your oven to 400°F (200°C).
- Bake the Bread: Once the loaf has risen, make a few slashes on the top with a sharp knife. Place the baking sheet in the preheated oven and bake for 25-30 minutes, until the bread is golden brown and sounds hollow when tapped on the bottom.
- Cool: Remove the bread from the oven and let it cool on a wire rack before slicing.
Extra Tips:
For a deeper flavor, toast the walnuts lightly in a dry pan before adding them to the dough. If you prefer a softer crust, you can brush the loaf with some olive oil or melted butter immediately after baking.
This bread can also be customized by adding dried fruits like raisins or figs for additional sweetness. Remember, the key to a great Pane Di Noci is patience during the rising process, as this develops the bread’s flavor and texture.
Delightful Pane Integrale
Pane Integrale, or whole wheat bread, is a classic Italian staple known for its dense texture and rich, nutty flavor. It’s a nutritious alternative to white bread, providing more fiber, vitamins, and minerals.
Originating from the Italian countryside, Pane Integrale is often enjoyed with a drizzle of olive oil or a hearty soup. The recipe for this delightful bread involves simple ingredients and straightforward techniques, making it accessible even to beginner bakers.
The process of making Pane Integrale involves the use of whole wheat flour, which gives the bread its characteristic flavor and texture. It’s essential to use high-quality ingredients, including fresh yeast and extra virgin olive oil, to achieve the best results.
This recipe serves 4-6 people and requires some patience for proofing and rising, but the end result is a wholesome, homemade loaf that’s well worth the effort.
Ingredients:
- 500g whole wheat flour
- 10g salt
- 300ml lukewarm water
- 15g fresh yeast or 7g dry yeast
- 30ml extra virgin olive oil
- 1 tablespoon honey
Cooking Instructions:
- Prepare the Yeast Mixture: In a small bowl, dissolve the fresh yeast or dry yeast in the lukewarm water, adding the honey to help activate the yeast. Let this mixture sit for about 5-10 minutes until it becomes frothy.
- Mix the Dough: In a large mixing bowl, combine the whole wheat flour and salt. Make a well in the center and pour in the yeast mixture and olive oil. Stir with a wooden spoon until the dough begins to come together.
- Knead the Dough: Transfer the dough onto a lightly floured surface. Knead it for about 10 minutes until it’s smooth and elastic. This step is essential for developing the gluten structure necessary for a good rise.
- First Rise: Place the dough in a lightly oiled bowl, cover it with a damp cloth, and let it rise in a warm place for about 1.5 to 2 hours or until it has doubled in size.
- Shape the Dough: Once the dough has risen, punch it down to release the gas. Shape it into a round loaf or place it into a greased loaf pan, depending on your preference.
- Second Rise: Cover the shaped dough with a cloth and let it rise again for about 30-45 minutes.
- Preheat the Oven: While the dough is undergoing its second rise, preheat your oven to 220°C (430°F).
- Bake the Bread: Once the dough has risen, place it in the preheated oven. Bake for 25-30 minutes or until the bread is golden brown and sounds hollow when tapped on the bottom.
- Cool the Bread: Remove the bread from the oven and let it cool on a wire rack before slicing.
Extra Tips:
For the best results, make sure that all your ingredients are at room temperature before starting the recipe. If you prefer a crustier loaf, place a small pan of water at the bottom of the oven while baking to create steam.
Additionally, experimenting with add-ins like seeds or nuts can provide extra texture and flavor to your Pane Integrale. Remember not to rush the rising process, as this is key to achieving the perfect texture and flavor.
Golden Cornmeal Polenta Bread
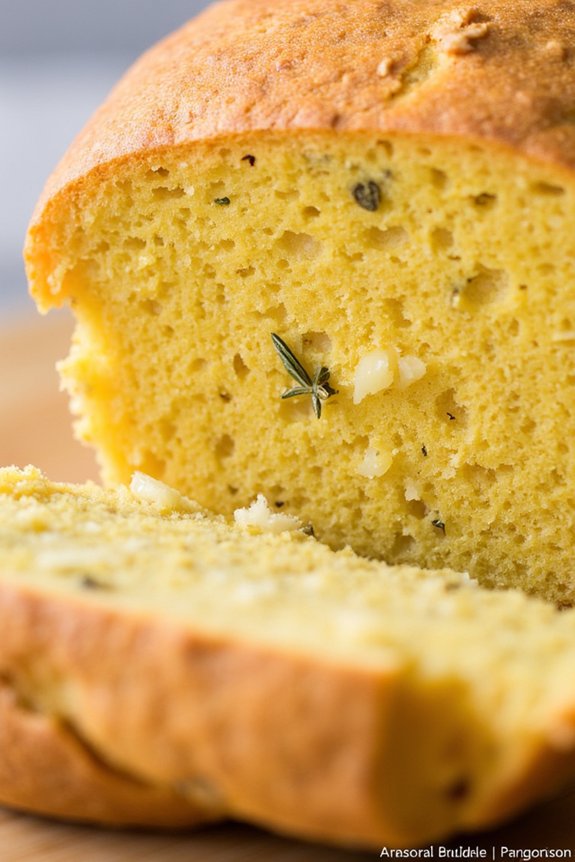
Golden Cornmeal Polenta Bread is a delightful fusion of traditional Italian flavors and comforting textures. This bread brings together the earthy richness of cornmeal with the delicate nuances of a classic polenta, resulting in a hearty loaf that’s perfect for any meal. The bread’s golden hue and crisp crust make it as visually appealing as it’s delicious, while the tender, crumbly interior provides the perfect accompaniment to soups, stews, or as a standalone snack.
Baking this bread is an exercise in appreciating the simple yet profound combination of high-quality ingredients and time-honored techniques.
This recipe for Golden Cornmeal Polenta Bread is designed to serve 4-6 people, making it ideal for a family meal or a small gathering. It’s a versatile dish that can be enjoyed warm from the oven or toasted with a drizzle of olive oil and a sprinkle of sea salt. With minimal ingredients and a straightforward method, this bread is accessible even to novice bakers, while still offering a satisfying challenge for those more experienced in the kitchen.
The result is a bread that embodies the rustic charm and culinary excellence of Italian baking.
Ingredients for 4-6 servings:
- 1 cup cornmeal
- 1 cup all-purpose flour
- 1 teaspoon salt
- 1 teaspoon sugar
- 1 tablespoon baking powder
- 1 1/2 cups water
- 2 tablespoons olive oil, plus extra for greasing
- 1/2 cup grated Parmesan cheese
- 1 teaspoon dried rosemary or Italian herbs (optional)
Cooking Instructions:
- Preheat and Prepare: Preheat your oven to 400°F (200°C). Grease a 9-inch round cake pan or a loaf pan with olive oil, guaranteeing the surface is evenly covered to prevent sticking.
- Mix Dry Ingredients: In a large mixing bowl, whisk together the cornmeal, all-purpose flour, salt, sugar, and baking powder. Verify that the ingredients are well combined for an even texture in the bread.
- Combine Wet Ingredients: In a separate bowl or large measuring cup, mix the water and 2 tablespoons of olive oil. Slowly add the wet ingredients to the dry ingredients, stirring continuously until a smooth batter forms.
- Incorporate Cheese and Herbs: Fold in the grated Parmesan cheese and, if using, the dried rosemary or Italian herbs. This step infuses the bread with a savory, aromatic flavor.
- Pour and Bake: Pour the batter into the prepared pan, smoothing the top with a spatula. Place the pan in the preheated oven and bake for 25-30 minutes, or until the top is golden brown and a toothpick inserted into the center comes out clean.
- Cool and Serve: Once baked, remove the bread from the oven and allow it to cool in the pan for about 10 minutes. Transfer it to a wire rack to cool completely before slicing and serving.
Extra Tips:
For a more robust flavor, consider adding a handful of sun-dried tomatoes or chopped olives to the batter. These ingredients complement the savory notes of the Parmesan cheese and rosemary, creating a more complex taste profile.
If you want a softer crust, cover the bread with a clean kitchen towel as it cools. To store leftovers, wrap the bread tightly in plastic wrap or aluminum foil and store at room temperature for up to 3 days. Reheat slices in the oven or toaster for a freshly baked experience.
Flavored Pane Al Pomodoro

Flavored Pane Al Pomodoro, or tomato bread, is a delightful Italian bread infused with the rich flavors of fresh tomatoes, herbs, and a hint of garlic. This bread is an excellent addition to any meal, whether you’re serving it as an appetizer, alongside a hearty soup, or as a part of a traditional Italian spread.
The addition of tomatoes not only adds a beautiful color to the bread but also imparts a subtle sweetness and a moist texture that makes it irresistible.
This recipe for Flavored Pane Al Pomodoro is designed to serve 4-6 people and captures the essence of Italian cuisine by using simple, fresh ingredients. The process involves creating a dough enriched with tomato purée and a blend of aromatic herbs, which is then baked to perfection.
Whether you’re a seasoned bread maker or a novice, this recipe will guide you through each step to guarantee your homemade bread is a success.
Ingredients:
- 500g bread flour
- 10g salt
- 7g instant yeast
- 300ml warm water
- 100ml tomato purée
- 2 tablespoons olive oil
- 1 teaspoon sugar
- 2 cloves garlic, minced
- 1 tablespoon dried oregano
- 1 tablespoon dried basil
- 1 teaspoon black pepper
- 50g sun-dried tomatoes, chopped
Cooking Instructions:
1. Mix the Dry Ingredients:
In a large mixing bowl, combine the bread flour, salt, and yeast. Stir them together until evenly distributed. This forms the base for your dough.
2. Prepare the Wet Ingredients:
In a separate bowl, mix the warm water, tomato purée, olive oil, sugar, and minced garlic. Stir until the sugar dissolves and the mixture is well combined.
3. Combine Ingredients:
Create a well in the center of the dry ingredients and pour in the wet mixture. Add the dried oregano, basil, black pepper, and chopped sun-dried tomatoes.
4. Knead the Dough:
Mix the ingredients together until a dough forms. Turn the dough out onto a floured surface and knead for about 10 minutes until smooth and elastic.
5. First Rise:
Place the dough in a lightly oiled bowl, cover with a damp cloth, and let it rise in a warm area for about 1-2 hours, or until doubled in size.
6. Shape the Dough:
Once risen, punch down the dough to release air. Shape it into a loaf or your desired form and place it on a baking sheet lined with parchment paper.
7. Second Rise:
Cover the dough again and let it rise for another 30-45 minutes.
8. Preheat and Bake:
Preheat your oven to 220°C (430°F). Once preheated, bake the bread for 25-30 minutes, or until it has a golden crust and sounds hollow when tapped on the bottom.
9. Cool and Serve:
Remove the bread from the oven and let it cool on a wire rack before slicing. Serve warm or at room temperature.
Extra Tips:
For a richer flavor, consider adding fresh basil leaves or a sprinkle of parmesan cheese on top before baking. If you prefer a more intense tomato flavor, use concentrated tomato paste instead of purée.
Make sure the water is warm but not hot to activate the yeast properly. If you don’t have sun-dried tomatoes, fresh cherry tomatoes can be used, but make sure they’re patted dry to avoid excess moisture.
Enjoy your Flavored Pane Al Pomodoro with a drizzle of olive oil or a balsamic reduction for an extra touch of Italian flair.