

When it comes to planning my midday meals, I can’t help but be drawn to the simplicity and flavor of Italian cuisine. A Caprese salad or a classic Italian panini always seems to hit the spot. Think creamy mozzarella paired with ripe tomatoes or savory prosciutto with peppery arugula. It’s all about fresh ingredients and bold flavors that make lunchtime feel special. Looking for more delicious options? Let’s explore further.
Caprese Salad With Fresh Mozzarella
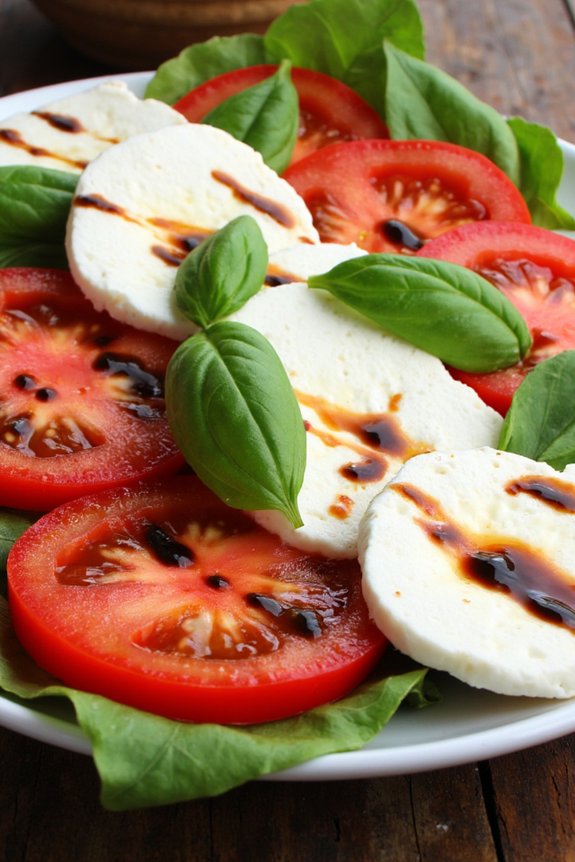
Caprese Salad With Fresh Mozzarella is a classic Italian dish that perfectly captures the essence of fresh ingredients. This simple yet elegant salad is a celebration of fresh mozzarella, ripe tomatoes, and fragrant basil leaves, drizzled with olive oil and balsamic glaze. It’s a dish that’s as delightful to look at as it’s to eat, offering a revitalizing taste that’s perfect for a light lunch or as a starter for a more elaborate meal.
The vibrant colors and fresh flavors make it a staple in Italian cuisine, and it’s incredibly easy to prepare. Ideal for warm summer days, Caprese Salad is both revitalizing and satisfying. The key to a great Caprese Salad lies in the quality of its ingredients. Fresh mozzarella should be soft and creamy, tomatoes should be ripe and juicy, and the basil should be aromatic.
This salad is traditionally seasoned with a sprinkle of salt and pepper to enhance the natural flavors of the ingredients. Perfect for serving 4-6 people, this recipe is a delightful addition to any Italian lunch spread.
Ingredients:
- 4 large ripe tomatoes
- 16 ounces fresh mozzarella cheese
- 1 bunch fresh basil leaves
- 3 tablespoons extra virgin olive oil
- 2 tablespoons balsamic glaze
- Salt and pepper to taste
Cooking Instructions:
- Prepare the Ingredients: Begin by washing the tomatoes and basil leaves under cold water. Pat them dry with a clean kitchen towel. Slice the tomatoes into thick rounds, about 1/4 inch thick. Slice the fresh mozzarella into similar-sized rounds.
- Assemble the Salad: On a large serving platter or individual plates, arrange the tomato and mozzarella slices alternately, slightly overlapping them. Tuck fresh basil leaves between the slices, ensuring each piece of cheese and tomato has a basil leaf.
- Season the Salad: Drizzle the extra virgin olive oil evenly over the arranged salad. Season generously with salt and freshly ground black pepper to taste.
- Add the Balsamic Glaze: Finish by drizzling balsamic glaze over the top of the salad. If you prefer, you can serve the glaze on the side for guests to add to their liking.
- Serve Immediately: Caprese Salad is best enjoyed fresh. Serve immediately as a light lunch or as an appetizer.
Extra Tips:
When making Caprese Salad, opt for the highest quality ingredients you can find. Use heirloom tomatoes for a variety of colors and flavors if available. Fresh mozzarella packed in water is preferred for its creaminess.
If you can, make your own balsamic glaze by reducing balsamic vinegar over low heat until it thickens. This will give you a rich, flavorful glaze without any added sugars. Finally, serve the salad at room temperature to fully enjoy the flavors.
Classic Italian Panini With Prosciutto and Arugula

Classic Italian Panini With Prosciutto and Arugula is a perfect lunch option that combines the rich, salty flavor of prosciutto with the peppery bite of fresh arugula. This traditional Italian sandwich is made using a crusty ciabatta bread that’s lightly toasted to achieve the perfect crunch. The combination of creamy cheese, ripe tomatoes, and a hint of balsamic glaze adds layers of flavor that make this panini truly irresistible.
Whether you’re planning a casual lunch at home or impressing guests, this panini is sure to be a hit. The beauty of this panini lies in its simplicity and the quality of its ingredients. Choosing the best prosciutto and arugula you can find will elevate the flavors and authenticity of the dish.
The balance of textures—from the crisp bread to the soft cheese and the tender prosciutto—ensures every bite is a delightful experience. This recipe is designed to feed 4-6 people, making it ideal for family meals or gatherings with friends. The following list of ingredients and step-by-step instructions will guide you through creating this classic Italian sandwich.
Ingredients (Serves 4-6):
- 1 loaf of ciabatta bread
- 12 slices of prosciutto
- 1 cup of fresh arugula
- 8 slices of fresh mozzarella cheese
- 2 large ripe tomatoes, sliced
- 2 tablespoons of extra virgin olive oil
- 1 tablespoon of balsamic glaze
- Salt and pepper to taste
Cooking Instructions:
- Prepare the Bread: Start by slicing the ciabatta loaf horizontally to create a top and bottom half. Brush the inside of each half with extra virgin olive oil. This will prevent the bread from becoming soggy and add a nice flavor when toasted.
- Assemble the Panini: On the bottom half of the bread, layer the mozzarella slices evenly, followed by the tomato slices. Season the tomatoes with a pinch of salt and pepper to enhance their flavor.
- Add Prosciutto and Arugula: Lay the prosciutto slices over the tomatoes, ensuring they’re evenly distributed. Top with fresh arugula leaves, adding a peppery contrast to the other ingredients.
- Drizzle with Balsamic Glaze: Lightly drizzle the balsamic glaze over the arugula. This will add a sweet and tangy element that complements the savory flavors of the sandwich.
- Toast the Panini: Place the top half of the ciabatta loaf over the assembled ingredients. Heat a panini press or grill pan over medium heat and place the sandwich inside. Toast for about 5-7 minutes or until the bread is golden brown and the cheese has melted.
- Serve: Remove the panini from the press or pan, and let it cool slightly before cutting it into individual servings. Serve warm for the best flavor and texture.
Extra Tips: For the best results, use a high-quality ciabatta bread with a good crust. If you don’t have a panini press, a heavy skillet or cast-iron pan can be used to press the sandwich while grilling. Simply place another heavy pan on top for weight.
Additionally, experiment with adding other Italian ingredients like roasted red peppers or sun-dried tomatoes for variation. The key is in the freshness of the ingredients, which will truly make this panini stand out. Enjoy your Classic Italian Panini With Prosciutto and Arugula with a side of Italian salad or a bowl of soup for a complete meal.
Creamy Tomato Basil Soup

Creamy Tomato Basil Soup is a delightful addition to any Italian lunch, offering a rich blend of flavors that are both comforting and satisfying. This classic soup is perfect for cooler days, with its warm and creamy texture providing a cozy experience. The combination of ripe tomatoes, fresh basil, and a touch of cream creates a harmonious balance that’s both invigorating and indulgent.
Whether you’re serving it as a starter or a main dish, this soup is sure to impress your family and friends.
Preparing this soup doesn’t require a lot of time or complicated techniques, making it an excellent option for both novice and experienced cooks. The key to a delicious Creamy Tomato Basil Soup lies in using fresh, high-quality ingredients which enhance the flavors and bring the dish to life. This recipe serves 4-6 people, making it a perfect choice for a family meal or a small gathering.
Ingredients:
- 2 tablespoons olive oil
- 1 medium onion, chopped
- 3 cloves garlic, minced
- 2 cans (28 ounces each) whole peeled tomatoes
- 1 cup vegetable broth
- 1 cup heavy cream
- 1 teaspoon sugar
- Salt and black pepper to taste
- 1/4 cup fresh basil leaves, chopped
- Parmesan cheese, grated (optional, for garnish)
- Fresh basil leaves (optional, for garnish)
Instructions:
- Sauté the Vegetables: Heat the olive oil in a large pot over medium heat. Add the chopped onion and garlic, and sauté until the onion becomes translucent and fragrant, about 5 minutes.
- Add Tomatoes and Broth: Pour in the whole peeled tomatoes with their juice and the vegetable broth. Use a wooden spoon to break up the tomatoes into smaller pieces as they cook.
- Simmer the Soup: Bring the mixture to a boil, then reduce the heat to low and let it simmer uncovered for about 20 minutes. This allows the flavors to meld together and the soup to thicken slightly.
- Blend the Soup: Remove the pot from the heat. Use an immersion blender to puree the soup until it’s smooth and creamy. If you don’t have an immersion blender, carefully transfer the soup in batches to a regular blender and blend until smooth. Return the soup to the pot.
- Add Cream and Season: Stir in the heavy cream and sugar. Season the soup with salt and black pepper to taste. Add the chopped basil leaves and let the soup simmer for an additional 5 minutes to allow the flavors to combine.
- Serve: Ladle the soup into bowls and garnish with grated Parmesan cheese and fresh basil leaves, if desired. Serve warm.
Extra Tips:
For an even richer flavor, consider roasting the tomatoes in the oven with a drizzle of olive oil before adding them to the soup. This will enhance their natural sweetness and add a depth of flavor.
If you prefer a thicker soup, reduce the amount of broth or let the soup simmer longer until it reaches your desired consistency. Additionally, you can add a pinch of red pepper flakes if you like a hint of spice.
Finally, this soup pairs beautifully with a slice of crusty Italian bread for dipping. Enjoy!
Simple Spaghetti Aglio E Olio

Simple Spaghetti Aglio E Olio is a classic Italian dish that embodies the beauty of simplicity. Originating from Naples, this dish features just a few key ingredients that combine to create a delightful and flavorful meal. The essence of this recipe lies in the harmonious blend of garlic and olive oil, which coats the spaghetti perfectly, making it a favorite for many.
Its straightforward preparation process and the use of readily available ingredients make it an ideal option for a quick lunch or dinner. This recipe is perfect for serving 4-6 people and can be easily adjusted if you’re cooking for a smaller or larger group. The combination of al dente pasta, aromatic garlic, and a hint of red pepper flakes creates a dish that’s both comforting and invigorating.
Whether you’re a seasoned chef or a novice in the kitchen, Spaghetti Aglio E Olio will quickly become a staple dish in your culinary repertoire.
Ingredients (serving size: 4-6 people):
- 500g spaghetti
- 6 cloves garlic, thinly sliced
- 1/2 cup extra virgin olive oil
- 1 teaspoon red pepper flakes (adjust to taste)
- Salt, to taste
- 1/2 cup fresh parsley, chopped
- 1/2 cup grated Parmesan cheese (optional)
- Lemon wedges, for serving (optional)
Cooking Instructions:
- Boil the Pasta: Fill a large pot with water and bring it to a boil. Add a generous amount of salt to the boiling water. Add the spaghetti and cook until al dente, following the package instructions. Reserve about 1 cup of pasta water, then drain the spaghetti.
- Prepare the Garlic and Oil: While the pasta is cooking, heat the olive oil in a large skillet over medium heat. Add the sliced garlic and sauté until it turns golden brown. Be careful not to burn the garlic as it can become bitter.
- Add Red Pepper Flakes: Once the garlic is golden, lower the heat and add the red pepper flakes, stirring them into the oil for about 30 seconds to release their flavor.
- Combine Pasta and Sauce: Add the cooked spaghetti into the skillet with the garlic and oil mixture. Toss the spaghetti to coat it thoroughly with the oil and garlic. If the pasta seems dry, gradually add the reserved pasta water, a little at a time, until you achieve the desired consistency.
- Season and Garnish: Season the pasta with salt to taste. Add the chopped parsley and toss everything together. If desired, sprinkle grated Parmesan cheese over the top before serving.
- Serve: Transfer the spaghetti to serving plates. For an added touch of freshness, serve with lemon wedges on the side.
Extra Tips: When making Spaghetti Aglio E Olio, the quality of the olive oil plays a significant role in the flavor of the dish. Use a good quality extra virgin olive oil for the best results.
Additionally, be mindful of the garlic; it should be lightly golden, not dark brown, to avoid a bitter taste. If you prefer a more robust garlic flavor, you can adjust the amount to suit your preference. Finally, always reserve some pasta water before draining the spaghetti, as it helps to create a silky sauce that clings to the pasta beautifully.
Tuscan White Bean Salad

Tuscan White Bean Salad is a delightful and invigorating dish that captures the essence of Italian cuisine. This salad combines the earthy flavors of cannellini beans with the vibrant tastes of fresh vegetables and herbs, making it a perfect choice for a light lunch or as a side dish.
The simplicity of its ingredients allows the natural flavors to shine, making it a staple in Tuscan cooking. Served at room temperature or slightly chilled, this salad isn’t only easy to prepare but also packs a nutritious punch, filled with protein and fiber from the beans, and vitamins from the vegetables.
This salad is traditionally made with high-quality olive oil, which enhances its flavor profile, giving it a rich and authentic taste. The addition of fresh herbs such as parsley and basil adds a fragrant aroma, while a splash of lemon juice brings a zesty brightness to the mix. Ideal for serving 4-6 people, this dish is perfect for a lunch gathering or a potluck, offering a taste of Italy that’s both simple and sophisticated.
Ingredients (Serves 4-6):
- 2 cans (15 oz each) of cannellini beans, drained and rinsed
- 1 small red onion, finely chopped
- 1 red bell pepper, diced
- 1 cucumber, diced
- 2 cups cherry tomatoes, halved
- 1/4 cup fresh parsley, chopped
- 1/4 cup fresh basil leaves, chopped
- 1/4 cup extra-virgin olive oil
- 2 tablespoons lemon juice
- Salt and pepper to taste
Cooking Instructions:
- Prepare the Beans: Start by draining and rinsing the canned cannellini beans under cold water. This step is essential to remove any excess salt or canning liquid that might affect the taste of your salad. Once rinsed, place the beans in a large mixing bowl.
- Chop the Vegetables: Finely chop the red onion and dice the red bell pepper and cucumber. Halve the cherry tomatoes. Add all these vegetables to the bowl with the beans. The variety of colors from the vegetables won’t only make your salad visually appealing but will also contribute to a range of flavors and textures.
- Add Fresh Herbs: Chop the parsley and basil leaves and add them to the salad bowl. These herbs will infuse the salad with a fresh aroma and enhance the overall flavor.
- Dress the Salad: In a small bowl or a jar, combine the extra-virgin olive oil and lemon juice. Whisk or shake well to emulsify the dressing. Pour the dressing over the salad ingredients in the bowl.
- Season and Mix: Season the salad with salt and pepper according to your taste. Gently toss all ingredients together until well combined, making sure the dressing coats all components evenly.
- Let it Rest: Allow the salad to sit for at least 10-15 minutes before serving. This resting time lets the flavors meld together and enhances the overall taste.
Extra Tips:
When preparing the Tuscan White Bean Salad, consider using freshly squeezed lemon juice for the best flavor and avoid pre-sliced vegetables to guarantee maximum freshness.
If you have time, let the salad marinate in the refrigerator for an hour before serving; this will allow the flavors to develop even more. Additionally, if you prefer a more robust flavor, consider adding a clove of minced garlic to the dressing.
This salad is versatile and can be customized with other ingredients such as olives or feta cheese for added richness. Enjoy your Tuscan culinary creation!
Margherita Pizza on Flatbread

Margherita Pizza on Flatbread is a delightful twist to the classic Italian Margherita pizza, offering a quicker and easier way to enjoy this beloved dish. Perfect for a casual lunch or a quick dinner, this recipe uses flatbread as a base, which saves time without compromising on flavor. The combination of fresh ingredients like ripe tomatoes, creamy mozzarella, and fragrant basil leaves creates a simple yet satisfying meal that captures the essence of Italian cuisine.
This recipe is ideal for serving 4-6 people and provides a great introduction to homemade pizza for those who may find traditional pizza-making intimidating. By using flatbread, you eliminate the need for dough-making and lengthy rising times, turning this into an approachable and speedy option for any day of the week. The vibrant colors and fresh flavors make it not only a delicious meal but also a visually appealing one.
Ingredients for 4-6 servings:
- 4-6 pieces of flatbread (store-bought or homemade)
- 1 cup of tomato sauce (preferably homemade or high-quality store-bought)
- 2 cups of fresh mozzarella cheese, sliced
- 2-3 ripe tomatoes, thinly sliced
- A handful of fresh basil leaves
- 2 tablespoons of olive oil
- Salt and pepper to taste
- Optional: Balsamic glaze for drizzling
Cooking Instructions:
- Preheat the Oven: Start by preheating your oven to 400°F (200°C). This guarantees that the flatbread will cook evenly and the cheese will melt perfectly.
- Prepare the Flatbread: Lay out the flatbreads on a large baking sheet lined with parchment paper. This helps prevent sticking and makes for an easy cleanup.
- Spread the Sauce: Using a spoon, evenly spread the tomato sauce over each flatbread, leaving a small border around the edges to mimic a pizza crust.
- Layer the Toppings: Place slices of fresh mozzarella cheese evenly across the flatbread, followed by the sliced tomatoes. Arrange them in a visually appealing manner for a beautiful presentation.
- Add Seasoning: Drizzle olive oil over the top and sprinkle with salt and pepper to enhance the flavors of the fresh ingredients.
- Bake the Pizza: Place the baking sheet in the preheated oven and bake for about 10-15 minutes, or until the cheese is melted and bubbly, and the edges of the flatbread are golden brown.
- Garnish with Basil: Once baked, remove the flatbread pizzas from the oven and immediately scatter fresh basil leaves over the top. The residual heat will help release the basil’s aroma.
- Serve and Enjoy: Let the pizzas cool for a few minutes before slicing and serving. For an extra flavor boost, drizzle with balsamic glaze if desired.
Extra Tips:
For the best results, use the freshest ingredients possible. Fresh mozzarella and ripe tomatoes make all the difference in achieving authentic Italian flavors.
If you prefer a crispier crust, try pre-baking the flatbread for a few minutes before adding the toppings. Additionally, experiment with different types of flatbreads to suit your taste, such as whole grain or gluten-free options.
Finally, if you have a pizza stone, using it can help achieve a more traditional pizza texture by evenly distributing heat.
Pesto Pasta Salad With Cherry Tomatoes
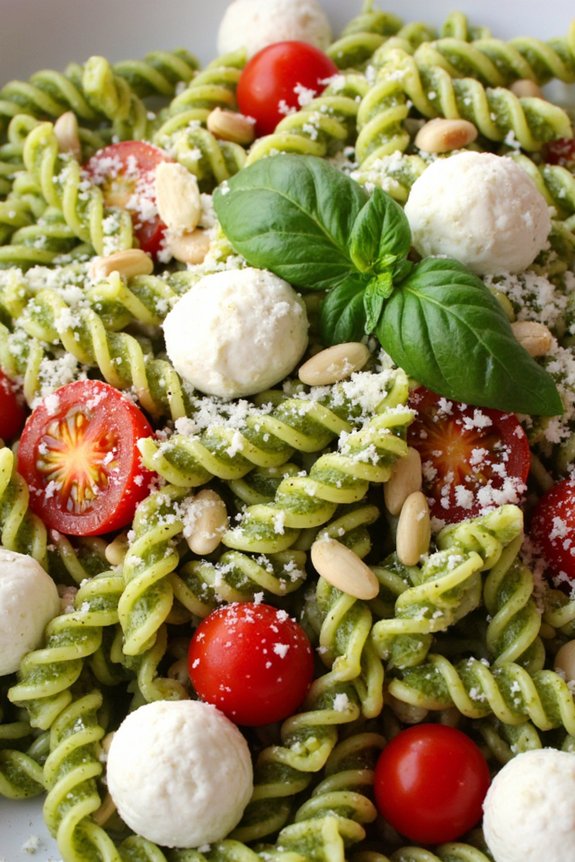
Pesto Pasta Salad With Cherry Tomatoes is a delightful Italian dish that combines the fresh, vibrant flavors of pesto with the juicy sweetness of cherry tomatoes. This salad is perfect for a summer lunch or as a side dish for any meal. The combination of pasta with pesto sauce and fresh vegetables makes it both satisfying and invigorating. It’s easy to prepare and can be made ahead of time, making it a convenient option for busy days or when you have guests.
This dish isn’t only delicious but also versatile. You can add your favorite ingredients to customize it to your liking. Whether you prefer a more traditional approach or want to add a few twists, Pesto Pasta Salad With Cherry Tomatoes offers a great base. The key is to use fresh ingredients, especially when it comes to the pesto. If possible, make your own pesto from scratch using fresh basil, pine nuts, Parmesan cheese, garlic, and good quality olive oil for the best flavor.
Ingredients (serving size: 4-6 people):
- 400 grams of pasta (fusilli or penne works well)
- 1 cup of fresh basil pesto
- 250 grams of cherry tomatoes, halved
- 100 grams of mozzarella balls, halved
- 1/4 cup of pine nuts, lightly toasted
- 1/4 cup of Parmesan cheese, grated
- Salt and pepper to taste
- Fresh basil leaves for garnish
- 2 tablespoons of extra virgin olive oil
Instructions:
- Cook the Pasta: Begin by bringing a large pot of salted water to a boil. Add the pasta and cook it according to the package instructions until it’s al dente. Once cooked, drain the pasta and rinse it under cold water to stop the cooking process. This also helps in keeping the pasta firm and prevents it from sticking together.
- Prepare the Ingredients: While the pasta is cooking, halve the cherry tomatoes and mozzarella balls. Toast the pine nuts lightly in a dry skillet over medium heat until they’re golden brown, which should take about 3-4 minutes. Be sure to stir them frequently to avoid burning.
- Combine the Ingredients: In a large mixing bowl, combine the cooked pasta, cherry tomatoes, mozzarella balls, and pesto. Stir gently to make sure that the pesto evenly coats the pasta and other ingredients.
- Add Finishing Touches: Add the toasted pine nuts and grated Parmesan cheese to the bowl. Season with salt and pepper according to your taste. Drizzle the extra virgin olive oil over the salad and toss everything gently to combine.
- Serve and Garnish: Transfer the pasta salad to a serving platter or individual plates. Garnish with fresh basil leaves for an added touch of flavor and visual appeal. Serve immediately or chill in the refrigerator for at least 30 minutes if you prefer a cold salad.
Extra Tips:
When making Pesto Pasta Salad With Cherry Tomatoes, the quality of the pesto can make a significant difference. If making your own pesto, use fresh, high-quality ingredients for the best flavor.
Additionally, feel free to experiment with different types of pasta or add other ingredients like arugula, grilled chicken, or roasted vegetables to make the dish more substantial. Keep in mind that pasta salad tends to absorb the dressing as it sits, so if you’re preparing it in advance, you might need to add a little more olive oil or pesto before serving to rejuvenate the flavors.
Italian Tuna Salad With Cannellini Beans
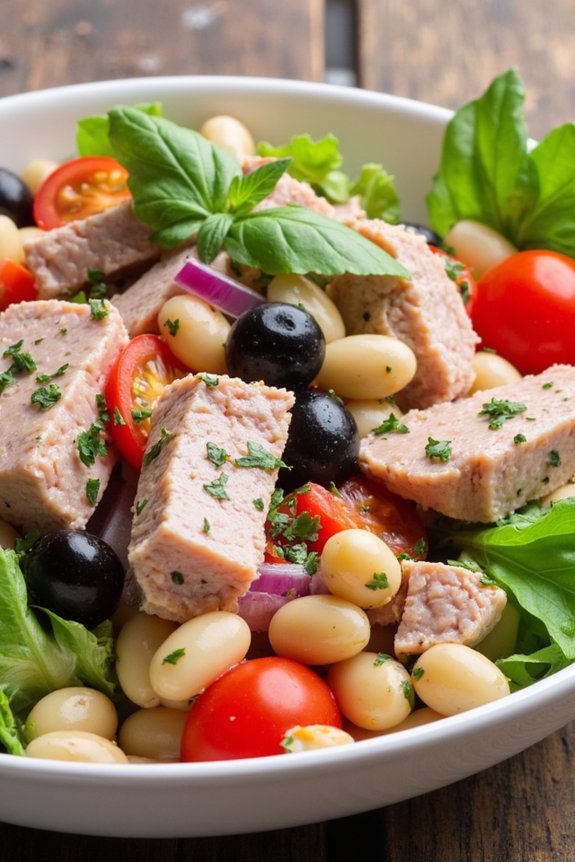
Italian Tuna Salad With Cannellini Beans is a rejuvenating and nutritious dish that perfectly combines the flavors of the Mediterranean. This salad isn’t only quick and easy to prepare but also packed with protein and fiber, making it an ideal option for a light lunch or a side dish. The creamy cannellini beans, paired with the rich and flavorful tuna, create a satisfying meal that’s both wholesome and delicious.
The addition of fresh herbs and a zesty dressing enhances the flavors, while the colorful vegetables add a delightful crunch. This Italian-inspired salad can be prepared in advance, making it a convenient choice for busy days. It can be served chilled or at room temperature, allowing the flavors to meld together beautifully.
Perfect for a family meal or a gathering with friends, this salad is sure to impress with its vibrant appearance and delightful taste. Enjoy it with a crusty piece of Italian bread for a complete and satisfying meal.
Ingredients for 4-6 servings:
- 2 cans (5 ounces each) of tuna in olive oil, drained
- 2 cans (15 ounces each) of cannellini beans, drained and rinsed
- 1 small red onion, finely chopped
- 1 cup cherry tomatoes, halved
- 1/4 cup fresh parsley, chopped
- 1/4 cup fresh basil, chopped
- 1/4 cup extra virgin olive oil
- 2 tablespoons red wine vinegar
- 1 tablespoon lemon juice
- Salt and pepper to taste
- Optional: 1/4 cup black olives, sliced
Cooking Instructions:
- Prepare the Ingredients: Start by draining the tuna and cannellini beans. Rinse the beans under cold water to remove any excess salt or canning liquid. Chop the red onion finely and halve the cherry tomatoes. If using, slice the black olives.
- Mix the Salad Base: In a large mixing bowl, combine the drained tuna, cannellini beans, chopped red onion, cherry tomatoes, parsley, basil, and black olives (if using). Gently toss the ingredients together to evenly distribute.
- Make the Dressing: In a small bowl, whisk together the extra virgin olive oil, red wine vinegar, and lemon juice. Season the dressing with salt and pepper to taste.
- Combine and Toss: Pour the dressing over the tuna and bean mixture. Use a large spoon to gently toss the salad, ensuring that all the ingredients are well-coated with the dressing.
- Chill and Serve: Cover the bowl with plastic wrap and refrigerate for at least 30 minutes to allow the flavors to meld. Serve the salad chilled or at room temperature.
Extra Tips:
To enhance the flavor of this Italian Tuna Salad With Cannellini Beans, consider adding a pinch of red pepper flakes for a touch of heat. If you prefer a creamier texture, you can mash a portion of the cannellini beans before mixing them into the salad.
This dish pairs wonderfully with a slice of crusty Italian bread or a fresh green salad on the side. For added freshness, garnish with a few extra basil leaves just before serving. Enjoy experimenting with the ingredients to suit your personal taste preferences!
Eggplant Parmesan Sandwich
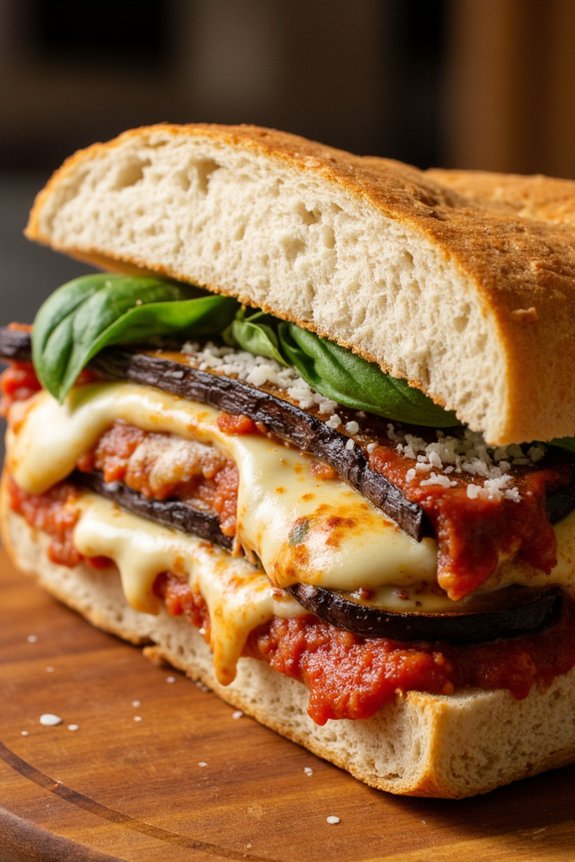
Eggplant Parmesan Sandwich is a delightful Italian lunch recipe that combines the rich flavors of eggplant, marinara sauce, and melted cheese, all nestled between slices of crusty bread. This dish is perfect for a hearty lunch or a light dinner and is certain to satisfy your cravings for something comforting yet elegant.
The eggplant slices are breaded and fried to a golden brown, then layered with marinara sauce and cheese, providing a delicious contrast of textures and flavors. This recipe serves 4-6 people, making it ideal for family meals or small gatherings.
The key to a perfect Eggplant Parmesan Sandwich is balancing the crispy, savory eggplant with the tangy marinara sauce and gooey cheese. Using fresh ingredients will elevate the flavors, and choosing the right bread will guarantee your sandwiches hold together nicely while you enjoy every bite.
Ingredients:
- 2 medium eggplants, sliced into 1/2-inch rounds
- Salt
- 2 cups all-purpose flour
- 4 large eggs, beaten
- 2 cups breadcrumbs
- Olive oil, for frying
- 2 cups marinara sauce
- 2 cups shredded mozzarella cheese
- 1 cup grated Parmesan cheese
- 1/2 cup fresh basil leaves
- 8 slices of ciabatta or Italian bread
- Butter, for toasting
Instructions:
- Prepare the Eggplant: Start by placing the eggplant slices on a baking sheet and sprinkle them with salt. Let them sit for about 30 minutes to draw out excess moisture and bitterness. Rinse the slices and pat dry with paper towels.
- Bread the Eggplant: Set up a breading station with three shallow dishes: one with flour, one with beaten eggs, and one with breadcrumbs. Dredge each eggplant slice first in flour, then dip in egg, and finally coat with breadcrumbs. Confirm each slice is evenly coated.
- Fry the Eggplant: In a large skillet, heat olive oil over medium heat. Fry the breaded eggplant slices in batches for about 3-4 minutes on each side, or until golden brown and crispy. Transfer the cooked slices to a paper towel-lined plate to drain excess oil.
- Assemble the Sandwiches: Preheat your oven to 375°F (190°C). On a baking sheet, lay out the bread slices and lightly butter each one. Toast them in the oven for about 5 minutes, or until lightly golden. Remove from the oven and start assembling the sandwiches: place a layer of fried eggplant on half of the bread slices, spoon marinara sauce over the eggplant, sprinkle mozzarella and Parmesan cheeses, and add fresh basil leaves.
- Finish the Sandwiches: Top each with another slice of bread. Place the assembled sandwiches back in the oven and bake for about 10 minutes, or until the cheese is melted and bubbly.
- Serve: Once baked, remove from the oven and let the sandwiches cool for a minute before cutting and serving. Enjoy the Eggplant Parmesan Sandwiches warm.
Extra Tips: For best results, choose firm eggplants that are smooth and shiny. If you prefer a healthier version, you can bake the eggplant slices instead of frying them.
Simply place them on a baking sheet lined with parchment paper, drizzle with olive oil, and bake at 400°F (200°C) for about 20 minutes, flipping halfway through. Additionally, homemade marinara sauce can enhance the flavor profile if you have time to prepare it.
Finally, to prevent soggy sandwiches, serve them immediately after baking, or keep them warm in the oven until ready to serve.
Balsamic Grilled Vegetable Wrap
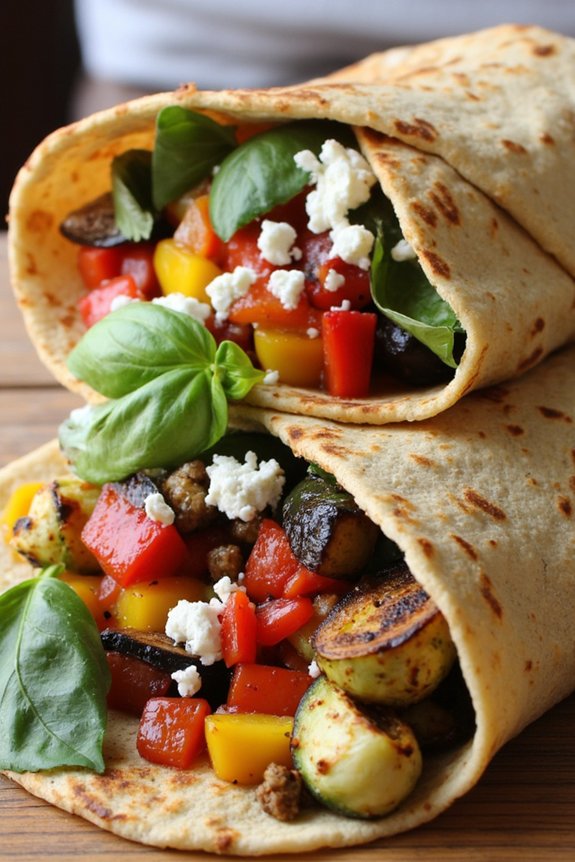
The Balsamic Grilled Vegetable Wrap is a delightful and healthy option for an Italian lunch. This dish combines the smoky flavor of grilled vegetables with the tangy sweetness of balsamic vinegar, all wrapped up in a soft tortilla.
It’s perfect for a light meal that’s both satisfying and packed with nutrients. Whether you’re planning a picnic, a casual lunch, or simply craving a fresh and vibrant meal, these wraps are bound to please.
Grilled vegetables are the star of this dish, offering a burst of flavors and textures. The recipe includes a variety of colorful vegetables such as bell peppers, zucchini, and eggplant, marinated in a rich balsamic dressing.
Once grilled to perfection, they’re wrapped in a tortilla with a sprinkle of fresh herbs and crumbled feta cheese, adding a creamy contrast to the vegetables. This recipe makes enough for 4-6 people, making it perfect for a family meal or a gathering with friends.
Ingredients for 4-6 people:
- 2 red bell peppers
- 2 yellow bell peppers
- 2 zucchini
- 1 eggplant
- 1 red onion
- 1/4 cup olive oil
- 1/4 cup balsamic vinegar
- 2 cloves garlic, minced
- Salt and pepper to taste
- 6 large tortillas or wraps
- 1 cup crumbled feta cheese
- Fresh basil leaves
- Fresh parsley, chopped
Cooking Instructions:
1. Prepare the Vegetables: Wash and slice the bell peppers, zucchini, eggplant, and red onion into even strips or rounds, about 1/4-inch thick. This guarantees they cook evenly on the grill.
2. Make the Marinade: In a large bowl, whisk together the olive oil, balsamic vinegar, minced garlic, salt, and pepper. Add the sliced vegetables and toss to coat them thoroughly in the marinade.
Allow them to sit for at least 15 minutes to absorb the flavors.
3. Preheat the Grill: While the vegetables are marinating, preheat your grill to medium-high heat. If using a grill pan, preheat it on the stove over medium-high heat.
4. Grill the Vegetables: Place the marinated vegetable slices on the grill or grill pan in a single layer. Cook for about 3-4 minutes per side or until they’ve beautiful grill marks and are tender.
Remove from the grill and set aside.
5. Assemble the Wraps: Lay each tortilla flat and place a portion of grilled vegetables in the center. Sprinkle with crumbled feta cheese and a few fresh basil leaves.
Fold the sides of the tortilla over the filling, then roll it up tightly from the bottom.
6. Serve: Cut each wrap in half diagonally and Serve warm or at room temperature. Garnish with chopped parsley if desired.
Extra Tips:
When grilling the vegetables, make sure not to overcrowd the grill or pan, as this can cause them to steam rather than grill, affecting the texture and flavor.
If you’re short on time, the vegetables can be grilled ahead of time and stored in the refrigerator for up to 2 days. Just reheat them slightly before assembling the wraps.
Additionally, feel free to customize the wraps with your favorite vegetables or add a spread of hummus or pesto for extra flavor.
Mushroom Risotto With Parmesan
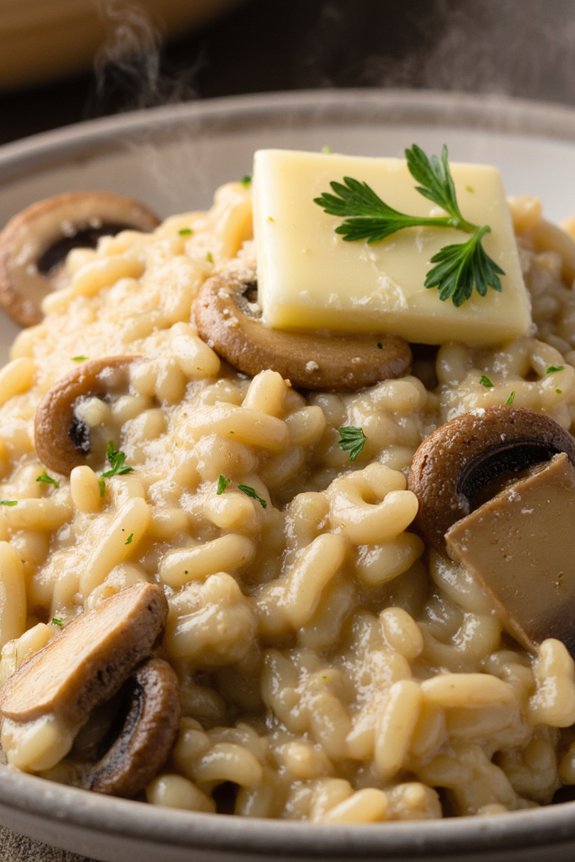
Mushroom Risotto with Parmesan is a classic Italian dish that combines creamy Arborio rice with the earthy flavor of mushrooms and the rich taste of Parmesan cheese. This dish is perfect for a comforting lunch and showcases the simplicity and elegance of Italian cuisine. The key to a great risotto is patience and the gradual addition of broth, allowing the rice to release its starches and create a velvety texture.
This Mushroom Risotto is a crowd-pleaser, ideal for serving 4-6 people. The umami notes of the mushrooms pair beautifully with the nutty, salty essence of Parmesan, while the rice acts as a perfect canvas for these flavors. Whether you’re cooking for family or entertaining guests, this dish will surely impress and satisfy.
Ingredients:
- 2 tablespoons olive oil
- 1 onion, finely chopped
- 2 cloves garlic, minced
- 1 pound mushrooms, sliced
- 1 ½ cups Arborio rice
- ½ cup dry white wine
- 6 cups chicken or vegetable broth, kept warm
- 1 cup grated Parmesan cheese
- 2 tablespoons unsalted butter
- Salt and pepper to taste
- 2 tablespoons chopped fresh parsley (optional)
Instructions:
- Prepare the Ingredients: Begin by heating the olive oil in a large pan over medium heat. Add the finely chopped onion and cook until translucent, about 3-4 minutes. Stir in the minced garlic and cook for another 1 minute, making sure the garlic doesn’t burn.
- Cook the Mushrooms: Add the sliced mushrooms to the pan and sauté until they’re browned and any liquid has evaporated, approximately 5-7 minutes.
- Toast the Rice: Stir in the Arborio rice and cook for 2-3 minutes, allowing it to toast slightly. This step helps to enhance the nutty flavor of the rice.
- Deglaze with Wine: Pour in the dry white wine and stir continuously until the wine has been absorbed by the rice.
- Add the Broth Gradually: Begin adding the warm broth, one ladle at a time, stirring constantly. Wait until each addition is absorbed before adding the next ladle. This process will take about 18-20 minutes, and you should use most of the broth. The rice should be creamy and slightly al dente.
- Finish with Parmesan and Butter: Once the rice is cooked to your liking, remove the pan from the heat. Stir in the grated Parmesan cheese and unsalted butter until well combined. Season with salt and pepper to taste.
- Garnish and Serve: If desired, garnish the risotto with chopped fresh parsley before serving. Enjoy your Mushroom Risotto with Parmesan while hot.
Extra Tips: For the best results, use fresh, high-quality ingredients, especially the Parmesan cheese, as it greatly impacts the flavor. Keep the broth warm throughout the cooking process to maintain even cooking of the rice. If you prefer a vegetarian version, use vegetable broth instead of chicken broth. Remember, risotto is all about texture; it should be creamy but not soupy, with the rice grains retaining a slight bite.